1
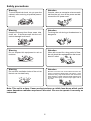
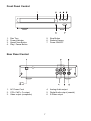
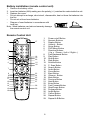
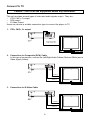
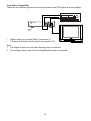
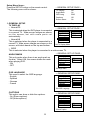
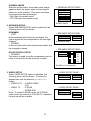
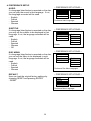
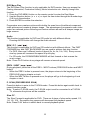
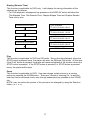
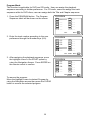
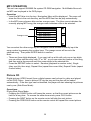
Progressive Scan DVD Player
DHM-0100
Operation Manual
20050228
WARNING
To prevent fire or shock hazard, do not expose this appliance to rain or moisture.
The apparatus should not be exposed to dripping or splashing and that no objects filled with liquids, such
as vases, shall be placed on the apparatus.
The ventillation should not be impeded by covering the ventilation openings with items, such as
newspapers, table-cloths, curtains, etc.
No naked flame sources, such as lighted candles, should be placed on the apparatus.
CAUTION
TO PREVENT ELECTRIC SHOCK, DO NOT USE THIS (POLARIZED) PLUG WITH ANY EXTENSION
CORD, RECEPTACLE OR OTHER OUTLET UNLESS THE PLUG CAN BE FULLY INSERTED
WITHOUT EXPOSING ANY PARTS OF THE BLADES.
RISK OF ELECTRIC SHOCK
DO NOT OPEN
The lighting flash with arrowhead
symbol, within an equilateral triangle, is intended to alert the user to
the presence of uninsulated "dangerous voltage" within the
product's enclosure that may be of
sufficient magnitude to constitute
a risk of electric shock to persons.
WARNING: TO REDUCE THE
RISK OF ELECTRIC SHOCK,
DO NOT REMOVE COVER
(OR BACK). NO USERS E R V I C E A B L E PA R T S
INSIDE, REFER SERVICING
TO QUALIFIED SERVICE
PERSONNEL.
The exclamation point within
an equilateral triangle is intended to alert the user to
presence of important operating and maintenance
(servicing) instructions in the
literature accompanying the
appliance.
IMPORTANT
Since CD circuitry may cause interference with other radio tuners nearby, switch this player off
when not in use or move it away from an affected radio tuner.
This device complies with Part 15 of the FCC Rules. Operation is subject to the following two
conditions: (1) This device may cause harmful interference, and (2) this device must accept any
interference received, including interference that may cause undesirable operation.
Warning: Changes or modifications to this unit not expressly approved by the party responsible
for compliance could void the user's authority to operate the equipment.
NOTE: This equipment has been tested and found to comply with the limits for a Class B digital
device, pursuant to Part 15 of the FCC Rules. These limits are designed to provide reasonable
protection against harmful interference in a residential installation. This equipment generates
uses and can radiate radio frequency energy and, if not installed and used in accordance with
these instructions, may cause harmful interference to radio communications. There is no
guarantee that interference will not occur in a particular installation. If this equipment does
cause harmful interference to radio or television reception, which can be determined by turning
the equipment off and on, the user is encouraged to try to correct the interference by one or
more of the following measures:
• Increase the separation between the equipment and player.
• Connect the equipment into an outlet on a circuit different from that
to which the player is connected.
• Consult the dealer or an experienced radio / TV technician for help.
SAFETY CERTIFICATION
This CD player is made and tested to meet safety standards of the FCC, requirements and
compliance with safety performance of the U.S. Department of Health and Human Services,
and also with FDA Radiation Performance Standards 21 CFR Subchapter J.
2
SAFETY INSTRUCTIONS - Read before operating equipment
This product was designed and manufactured to meet strict quality and safety standards. There are,
however, some installation and operation precautions which you should be particularly aware of.
1. Read Instructions — All the safety and operating instructions should be read before the
appliance is operated.
2. Retain Instructions — The safety and operating instructions should be retained for future
reference.
3. Heed Warnings — All warnings on the appliance and in the operating instructions should
be adhered to.
4. Follow Instructions — All operating and use instructions should be followed.
5. Water and Moisture — The appliance should not be used near water – for example, near a
bathtub, washbowl, kitchen sink, laundry tub, in a wet basement, or near a swimming pool,
etc.
6. Carts and Stands — The appliance should be used only with a cart or stand that is recommended by the manufacturer.
6A.
An appliance and cart combination should be moved with care. Quick stops, excessive force, and uneven surfaces may cause the appliance and cart combination
to overturn.
7. Wall or Ceiling Mounting — The appliance should be mounted to a wall or ceiling only as
recommended by the manufacturer.
8. Ventilation — The appliance should be situated so that its location or position does not
interfere with its proper ventilation. For example, the appliance should not be situated on a
bed, sofa, rug, or similar surface that may block the ventilation openings; or, placed in builtin installation, such as a book case or cabinet that may impede the flow of air through the
ventilation openings.
9. Heat — The appliance should be situated away from heat sources such as radiators, heat
registers, stoves, or other appliances (including amplifiers) that produce heat.
10. Power Sources — The appliance should be connected to a power supply only of the type
described in the operating instructions or as marked on the appliance.
11. Grounding or Polarization — The precautions that should be taken so that the grounding
or polarization means of an appliance is not defeated.
CAUTION: To prevent electric shock, match the wide blade of this plug
to the widle slot, fully insert. Do not use this (polarized) plug with an
extension cord, receptable or other outlet unless the blades can be fully
inserted to prevent blade exposure.
12. Power-Cord Protection — Power-supply cords should be routed so that they are not likely
to be walked on or pinched by items placed upon or against them, paying particular attention to cords at plugs, convenience receptacles, and the point where they exit from the
appliance.
13. Cleaning — The appliance should be cleaned only as recommended by the manufacturer.
14. Power Lines — An outdoor antenna should be located away from power lines.
15. Nonuse Periods — The power cord of the appliance should be unplugged from the outlet
when left unused for a long period of time.
16. Object and Liquid Entry — Care should be taken so that objects do not fall and liquids are
not spilled into the enclosure through openings.
17. Damage Requiring Service — the appliance should be serviced by qualified service personnel when:
A. The power-supply cord or the plug has been damaged; or
B. Objects have fallen, or liquid has spilled into the appliance; or
C. The appliance has been exposed to rain; or
D. The appliance does not appear to operate normally or exhibits a marked change in performance; or
E. The appliance has been dropped, or the enclosure damaged.
18. Servicing — The user should not attempt to service the appliance beyond that described in
the operating instructions. All other servicing should be referred to qualified service personnel.
3
Getting Started
Before attempting to connect, operate or adjust this product, please read these instructions completely and keep this manual for future reference.
Dear customers :
May we take this opportunity to thank you for purchasing this DVD Player.
We strongly recommend that you carefully study the operating instructions before operating the unit.
Main Features
• Front loading DVD / MP3 / CD player.
• Built-in Dolby Digital.
Standards
Video : NTSC
Audio : PCM (48 or 96 kHz), 2 Channel MPEG layer 2, Dolby AC-3 & dts line out
Features of audio specifications
–
–
–
DOLBY Digital 2 ch decoding output.
DTS for Digital (Coaxial) output
Linear PCM output.
Consumers should note that not all high definition television sets are fully compatible with this product and may cause artifacts to be displayed in the picture.
In case of 525 or 625 progressive scan picture problems, it is recommended that
the user switch the connection to the “STANDARD DEFINITION” output. If there
are questions regarding our TV set compatibility with this model 525p and 625p
DVD player, please contact our customer service center.
This product incorporates copyright protection technology that is protected by
method claims of certain U.S. patents and other intellectual property rights
owners. Use of this copyright protection technology must be authorized by
Marcrovision Corporation, and is intended for home and other limited viewing
uses only unless otherwise authorized by Macrovision Corporation. Reverse
engineering or disassembly is prohibited.
Manufactured under license from Dolby Laboratories. “Dolby”, “Pro Logic” and
the double-D symbol are trademarks of Dolby Laboratories. Confidential unpublished works. ©1992-1997 Dolby Laboratories, Inc. All rights reserved.
4
Getting Started
Disc types
Audio &
Video
MP3
Disc size 12cm
single side, single layer / single side, double layer
PAL and NTSC DVD disc
Playback time 135min / 240min max.
Audio
Disc size 12cm / 8cm
CD disc
Playback time 74min/20min max.
Audio
MP3 format disc
* Player is CD-R, CD-RW compatible.
Note: Not all CD-R, CD-RW Discs are compatible with this player.
Region Management Information
This DVD Player is designed and manufactured to respond to the Region Management
Information that is recorded on a DVD disc. If the Region number described on the DVD
disc does not correspond to the Region number of this DVD Player, this DVD player cannot play that disc.
This Region number of this DVD player is
.
Disc manintenace
– Before playback, wipe the disc from the center hole toward the outer edge with a clean
cloth.
– Never use benzine, thinner, cleaning fluid, static electricity prevention liquids or any
other solvent.
Note : Dirty discs may cause bad picture.
Correct
Incorrect
From the center to the edge
5
Safety precautions
Warning
Attention
To avoid electrical shock, do not open the
cabinet, refer servicing to qualified personnel only.
If smoke, odour or excessive noise are emitted from the unit, turn off the power and disconnect the AC power cord.
Warning
Attention
Keep the unit away from flower vases, tubs,
sinks, etc. If liquids are spilt into the unit,
serious damage could occur.
Touching the unit during a thunderstorm is
dangerous.
Warning
Attention
Do not expose this equipment to rain or
moisture.
When left unused for a long period of time,
the unit should be unplugged from the household AC outlet.
Warning
Attention
Do not block ventilation holes of the unit so
that air can circulate freely,
Be sure to turn the unit off and disconnect the AC
power cord before cleaning the unit surface. If the
surface is dirty, wipe clean with a cloth which has
been dipped in a weak soap and water solution and
wrung out thoroughly, and then wipe again with a
dry cloth.
Note: This unit is a class 1 laser product and uses a visible laser beam which could
cause hazardous radiation exposure if directed. Be sure to operate it correctly as
instructed.
6
Front Panel Control
1.
2.
3.
4.
5. Stop Button
6. Remote Sensor
7. Power ON/OFF
Disc Tray
Power Indicator
Open/Close Button
Play / Pause Button
Rear Panel Control
1. AC Power Cord
2. Y/Pb. Cb/Pr. Cr output
3. Video output (composite)
4. Analog Audio output
5. Digital Audio output (coaxial)
6. S-Video output
7
Battery installation (remote control unit)
1.
2.
3.
–
Remove the battery cover.
Insert two batteries (AAA) making sure the polarity (+/-) matches the marks inside the unit.
Replace the cover.
Do not attempt to recharge, short-circuit, disassemble, heat or throw the batteries into
the fire.
– Do not mix old and new batteries
– Dispose of used batteries in accordance with
local law.
Note : Weak batteries can leak and severely damage
the remote control unit.
Remote Control Unit
1
17
2
3
4
5
6
18
19
20
21
22
7
8
9
10
11
12
23
24
25
26
27
13
14
28
15
16
29
1.
2.
3.
4.
5.
6.
7.
8.
9.
10.
11.
12.
13.
14.
15.
16.
17.
18.
19.
20.
21.
22.
23.
24.
25.
26.
27.
28.
29.
8
Power on/off Button
Numeric Buttons
Display Button
Volume – Button
Setup Button
DVD Menu Button
Direction Buttons
( Up / Down/ Left/ Right)
Fast Backward Button
Play Button
Stop Button
Slow Button
Subtitle Button
P. Scan Button
Search Button
Audio Button
Zoom Button
Eject Button
Volume + Button
Mute Button
Previous Button
Next Button
Enter Button
Fast Forward Button
Step/Pause Button
Program Button
Angle Button
Cancel Button
Repeat Button
Repeat A-B Button
Connect To TV
Caution : Turn off all the equipment before any installation.
This unit provides several types of video and audio signals output. They are :
• Y/Pb, Cb/Pr, Cr output
• RCA output
• S-Video Output
Users can choose a suitable connection type to connect the player to TV.
1. Y/Pb, Cb/Pr, Cr output
Component Video
(Y/Pb, Cb/Pr, Cr)
2. Connection via Composite (RCA) Cable
In this type of connection, connect the Left/Right Audio Cables (Red and White) and a
Video signal (Yellow).
Video in
Audio in R
Audio in L
3. Connection via S-Video Cable
S-Video in
Audio in R
Audio in L
9
Connection to Amplifier
There are two different types of connections between the DVD player and an amplifier.
2
3
1
Video output
•
•
Digital output via Coaxial Cable (Connection 1).
2 channels (left/right) Audio Output (connection 2-3)
Note:
1. The Digital output turns off when Analog output is selected.
2. The Analog output turns off when Digital/Optical output is selected.
10
Operation
TV Selection
Turn on the TV, the DVD player and the Audio Amplifer System (if any).
1. Press the “TV/VIDEO” button on the TV.
2. Select the Video Mode (TV).
Note: If there are more than 1 AV channel for the TV, select the channel you have
connected to the DVD player.
3. Select the Correct Audio Input on the AV Amplifier (if any)
Play Discs
) on the front panel and load the Disc on the
1. Press the OPEN/CLOSE button (
tray. The label side should be facing upwards. For a Double-sided DVD Disc, put
the disc with label A/1 up.
2. Press the OPEN/CLOSE button (
) again to close the tray and the disc will be
loaded.
3. The Disc will be played automatically.
• If it is a DVD disc, it will show the Menu/Title Page on the screen.
• If it is a CD, it will play the first track directly.
4. Press the STOP button ( ) if you want to stop the Disc playback. You can resume
playback by pressing the PLAY button and it will start at the location where you have
pressed stop (Resume Play).
5. Press the STOP button twice to have the Disc stop completely.
Pause /Play
This function is applicable for DVD and CD audio.
• For DVD, the picture will freeze.
• For CD audio, the sound will be muted.
1. Press the PAUSE button ( ) to pause play.
2. Press the PLAY button again to resume Play.
DVD Setup Mode
• Setup Mode provides the menu for the configuration of TV DISPLAY Mode, OSD
LANGUAGE Mode and AUDIO Mode etc.
• Item selection in the SETUP menu is done by using the Direction buttons and the
ENTER button.
• To exit the SETUP menu, press the SETUP button again.
Note: To setup the TV display mode, the player must be stopped.
11
Setup Menu Items :
Press the SETUP button on the remote control.
The following menu will be shown:
-- GENERAL SETUP PAGE -TV Display
Angle Mark
OSD Lang
Captions
Screen Saver
LB
On
ENG
Off
On
1. GENERAL SETUP
Go To General Setup Page
TV DISPLAY
• Normal/PS
-- GENERAL SETUP PAGE -This is selected when the DVD player is connected
TV Display
NORMAL/PS
to a normal TV. Wide-screen images are shown
Angle Mark
NORMAL/LB
on the screen, but with some parts cut
OSD
Lang
WIDE
automatically.
Captions
• Normal/LB
Screen Saver
This is selected when the player is connected to a
normal TV. Wide screen images are shown on the
Set TV Display Mode
screen, with black bands on the top and bottom.
• WIDE
This is selected when the player is connected to a wide-screen TV.
ANGLE MARK
This only works when there is an angle mark on
the disc. Select ON, the screen shows the mark
when playing DVD.
- ON
- OFF
-- GENERAL SET UP PAGE -TV Display
Angle Mark
OSD Lang
Captions
Screen Saver
ON
OFF
Set Angle Mark
OSD LANGUAGE
This used to select the OSD language.
- English
- Spanish
- German
- French
-- GENERAL SETUP PAGE -TV Display
Angle Mark
OSD Lang
Captions
Screen Saver
English
French
German
Spanish
Set OSD Language
CAPTIONS
This option can show or hide the captions.
- On (Show captions)
- Off (Hide captions)
-- GENERAL SETUP PAGE -TV Display
Angle Mark
OSD Lang
CAPTIONS
Screen Saver
Closed Caption
12
ON
OFF
SCREEN SAVER
Start the screen saver, the screen saver image
appears when the player stops or the image is
frozen for a few minutes. This saver can keep
the screen from being damaged.
- ON (Start the screen saver)
- OFF (Remove the screen saver)
-- GENERAL SETUP PAGE -TV Display
Angle Mark
OSD Lang
Captions
Screen Saver
ON
OFF
2. SPEAKER SETUP
When SPEAKER SETUP option is selected, the
following menu will be shown.
DOWNMIX
• LT/RT
Discs recorded multi channel soundtrack, the
output signal will be incorporated to left and right
channel.
• STEREO
A disc recorded with multi-channel soundtrack will
be changed to stereo.
DOLBY DIGITAL SETUP
• DYNAMIC
This option is used to set the compression ratio in
order to control the sound (volume) contrast.
SCREEN SAVER
-- SPEAKER SETUP PAGE -Downmix
Dynamic
LT/RT
Stereo
Set Downmix Mode
-- SPEAKER SETUP PAGE -Downmix
Dynamic FULL
3/4
1/2
1/4
0FF
Set DRC to 1/2 Conpression
3. VIDEO SETUP
When VIDEO SETUP option is selected, the
following menu will be shown. To select the
desired item use the direction ( /// )
button.
• VIDEO OUT : CVBS/S-VIDEO
YUV
• VIDEO TV : P-SCAN
INTERLACE
Note : To select P-SCAN mode, the P-SCAN
output must be connect to P-SCAN TV, otherwise
the picture will be unstable.
13
-- VIDEO SETUP PAGE -Video Out
TV Mode
CVBS/S-VIDEO
YUV
-- VIDEO SETUP PAGE -Video Out
TV Mode
P-SCAN
Interlace
4. PREFERENCE SETUP
AUDIO
If a language listed below is recorded on the disc,
you can play the sound in that language. If not,
the language recorded will be used.
- English
- French
- Spanish
- German
SUBTITLE
If a language listed below is recorded on the disc,
you may set the subtitle to be displayed in that
language. If not, the language recorded will be
used.
- English
- French
- Spanish
- German
- Off
DISC MENU
If a language listed below is recorded on the disc,
you can set the Menu to be displayed in such
language. If not, the language recorded will be
used.
- English
- French
- Spanish
- German
DEFAULT
User can load the original factory settings by
choosing RESET and pressing ENTER.
- RESET
-- PREFERENCE SET UP PAGE -Audio
Subtitle
Disc Menu
Default
English
French
Spanish
German
Preference Audio Languages
-- PREFERENCE SET UP PAGE -Audio
Subtitle
Disc Menu
Default
English
French
Spanish
German
Off
Subtitle
-- PREFERENCE SET UP PAGE -Audio
Subtitle
Disc Menu
Default
English
French
Spanish
German
Preference Disc Menu Languages
-- PREFERENCE SET UP PAGE -Audio
Subtitle
Disc Menu
Default
Reset
Preference Menu Languages
14
DVD Menu Play
The DVD Menu Play function is only applicable for DVD movies. User can access the
Casting information, Production History, Movie Introduction etc. directly through this
function.
1. Press the DVD MENU button on the remote control to enter the Root Menu.
2. Use the Direction button () or input the item index through the Number keys
(0-9) to do the selection.
3. Press ENTER to confirm the selection.
Progressive scan creates a picture with double the scan lines of traditional component
video pictures and creates a sharper image. The advantages of progressive scan video
output are reduced picture flickering and motion artifacts as well as a sharper image on
large screens.
Audio
This funciton is applicable for DVD and CD audio but with different effects.
- Pressing AUDIO button will change the Audio channel.
REW / F.F. (
/
)
This function is applicable for DVD and CD audio but with different effects. The FAST
FORWARD key and FAST BACKWARD key are used to achieve fast play function.
- For DVD, there are 5 different levels of speed (2x, 4x, 8x, 16x, 32x). Every successive key press will increment the speed of quick play.
- For CD audio, the FORWARD/BACKWARD will fast forward or fast reverse the
music output.
Note : Press PLAY button at any stage will resume at normal speed.
PREV. / NEXT (
/
)
During playback, press one of the PREV. / NEXT buttons (PREVIOUS button and NEXT
button)
- When the PREV. button is pressed once, the player returns to the beginning of the
PREVIOUS playing chapter or track.
- When the NEXT button is pressed once, the player will go to the beginning of next
chapter or track.
P. SCAN (PROGRESSIVE SCAN)
Press this button to enter to the P-SCAN mode. Press this button again switch back to
normal interlace mode.
Note : To select P-SCAN mode, the P-SCAN output must be connected to a P-SCAN
TV, otherwise the picture will be unstable.
Slow F.F.
The Slow Forward is applicable for DVD. There are 4 steps of slow motion speed, 1/2,
1/4, 1/8, 1/16. Successive key presses will decrement the playback speed.
Note: Press PLAY button to switch back to normal playback speed.
15
Repeat Mode
This function is applicable for DVD and CD audio but with different effects.
- For DVD disc playback, user can choose to repeat the current chapter, current title
or disc. Subsequent key press of the REPEAT key can change between these three
options.
- For CD, user can choose to repeat the current track or the whole disc (Repeat All).
Subsequent key press of the REPEAT key can change between these two options.
A–B
This function is applicable for DVD and CD audio. User can specify the repeating
interval by marking the starting point and the end point.
1. Press the A-B button to mark the starting point (Playback will continue).
2. Press the A-B button to mark the end point (The marked part will be repeated
automatically.)
Note : Press the A-B button during repetition will disable the Repeat mode.
Subtitle
This function is only applicable for DVD disc. It can change the subtitle language shown
on the screen.
Note : The number of subtitles available depends on the DVD disc.
Angle
Some discs may have multiple viewing angle playback. The ANGLE button is to select
the viewing angle shown on the screen.
Note : The number of playback angles depends on the disc. Not all discs have this
feature.
Search
This function is applicable for DVD and CD audio. Through this function, the user can
access a specific location or a specific track by key in the target time or the track
number.
1. Press the SEARCH button to enter the Search Mode.
2. Input the target time through the Number keys (0-9) and the player will jump to the
target location immediately.
16
Display (Remain Time)
This function is applicable for DVD only. It will display the timing information of the
playback on the screen.
- For DVD playback, subsequent key presses on the DISPLAY button will show the
Title Elapsed Time, Title Remain Time, Chapter Elapse Time and Chapter Remain
Time one by one.
Press the DISPLAY Button
TITLE ELAPSED
TT 01/04 CH 01/02 0:02:13
Press the DISPLAY Button
TITLE REMAIN
TT 01/04 CH 01/02 1:33:30
Press the DISPLAY Button
CHAPTER ELAPSED
TT 01/04 CH 01/02 0:02:15
Press the DISPLAY Button
CHAPTER REMAIN
TT 01/04 CH 01/02 0:02:18
Press the DISPLAY Button
DISPLAY OFF
Play
This function is applicable for DVD and CD audio. During the disc playback, when the
STOP button is pressed once, the player will enter the Resume Play mode. At this time,
if the PLAY button is pressed, the player will resume playback at the location where the
STOP button is pressed. If the STOP button is pressed (i.e. STOP button is pressed
twice), the player will be stop.
Zoom
This function is applicable for DVD. User can enlarge a static picture or a moving
picture by pressing the ZOOM button. There are 3 levels of zooming (2x, 3x and 4x)
and they can be achieved one by one through subsequent key presses on the ZOOM
key.
NOTE: user can select the portion of the picture to be enlarged by using the Direction
button ().
17
Program Mode
This function is applicable for DVD and CD audio. User can assign the playback
sequence according to his/her preference. For CD audio, users can assign the track
sequence while for DVD discs, user can assign both the Title and Chapter sequence.
1. Press the PROGRAM button. The Program
Sequence tabel will be shown on the screen.
PROGRAM
01
02
03
04
05
__
__
__
__
__
06
07
08
09
10
__
__
__
__
__
EXIT START NEXT
2. Enter the track number according to the user
preference through the Number keys (0-9).
PROGRAM
01
02
03
04
05
05
03
08
__
__
06
07
08
09
10
__
__
__
__
__
EXIT START NEXT
3. After assigning the playback sequence, move
the highlight cursor to the START opiton by
using the Navigation Arrows. Press ENTER on
the remote control to confirm.
18
I
PROGRAM
01
02
03
04
05
05
03
08
__
__
06
07
08
09
10
__
__
__
__
__
EXIT START NEXT
To remove the program:
Move the highlight cursor to desired Program by
using the Navigation arrows then press the CLEAR
button to remove the selected program.
I
I
MP3 OPERATION
This unit can support ISO9660 file system CD-ROM navigation. Multi-Media files such
as MP3 can be played in the DVD player.
Operation
• Insert the MP3 disc into the tray. Navigation Menu will be displayed. The menu will
show the files in the root directory, and the MP3 files then be play automatically.
• In the MP3 menu shows a blue and an orange cursor. The blue cursor indicates the
currently playing MP3 song, the orange cursor indicates a title to be selected.
Blue cursor
Orange cursor
MP3
MP3
MP3
MP3
MP3
MP3
SONG 001
SONG 002
SONG 003
SONG 004
SONG 005
SONG 006
You can select the other songs by the nevigation arrow buttons or directly input the
song number by pressing the number keys. The orange cursor will move to the
selected song. Then press ENTER button to confirm.
Note :
• There are three digits displayed. If you want call up a title with only one or two digits,
you can either start the entry with “0” or “00”, or you can enter the number of the song
and then wait a few seconds until the cursor skips to the selected title.
• Press the REPEAT button to select : Random (playback in random order), Single
(play one title, then stop), Repeat One (repeat the current title), Repeat Folder (repeat
current folder).
Picture CD
Digital pictures (JPEG format) from a digital camera can be burnt to a disc and played
on this DVD Player. Insert a picture CD into the tray and the disc will be loaded
automatically. If the disc type can be identified, the player will start showing the pictures
one by one (Side Show Mode).
Operations:
During Slide Show Mode:
• Pressing the PAUSE button will freeze the screen, so that the current picture can be
held for a long time. To resume the slide show mode, press PLAY button.
• Pressing the NEXT button on the remote control will skip the next picture.
• Pressing the PREVIOUS button on the remote control will repeat the current picture.
19
TROUBLE SHOOTING
Check the following guide for the possible cause of a problem before contacting service.
Symptom
No Power
Correction
Cause
• The power cord is disconnected. • Plug the power cord into the wall
outlet and unit securely.
• Insert a disc. (Check that the DVD or auThe power is on, but DVD • No disc is inserted.
dio CD indicator in the DVD display is lit.)
player does not work
• The TV is not set to receive DVD • Select the appropriate video input mode
No Picture
on the TV so the picture from the DVD
signal output.
player appears on the TV screen.
• The video cable is not connected • Connect the video cable into the
jacks securely.
securely.
• The connected TV power is turned off. • Turn on the TV.
• The equipment connected with the • Select the correct input mode of the
No Sound
audio receiver so you can listen to the
audio cable is not set to receive
sound from the DVD player.
DVD signal output.
• The audio cable is not connected • Connect the audio cable into the
jacks securely.
securely.
• The power of the equipment connected • Turn on the equipment connected with
the audio cable.
with the audio cable is turned off.
• The Digital Audio Output is set to • Set the Digital audio Output to the correct
position, then turn on the DVD player
the wrong position.
again by pressing the POWER button.
• Clean the disc.
The playback picture is poor • The disc is dirty.
• Insert a disc
The DVD player does • No disc is inserted.
• Insert a playable disc. (Check the disc
• An unplayable disc is inserted.
not start playbac
type, color system and Regional code.)
• The disc is placed upside down. • Place the disc with the playback side down.
• The disc is not placed with the • Place the disc on the disc tray correctly inside the guide.
guide.
• Clean the disc.
• The disc is dirty.
• Press the SET UP button to turn off
• A menu is on the TV screen.
the menu screen.
The Remote Control • The remote control is not pointed at • Point the remote control at the remote
does not work properly
sensor of the DVD player.
the remote sensor of the DVD player.
• The remote control is too far from • Operate the remote control within
about 23ft (7m).
the DVD player.
• There is an obstacle in the path of the • Remove the obstacle.
remote control and the DVD player.
• The batteries in the remote con- • Replace the batteries with new ones.
trol are exhausted.
20
SPECIFICATION
GENERAL
Power source
Power consumption
Mass
External dimensions (WxHxD)
Operating conditions
Operation status
Operating humidity
AC 120V~ 60Hz
10W
2 Kg
263 x 225 x 55 mm
Temperature: 5°C to 35°C
Horizontal
5% to 90%
CD/DVD
Laser
Signal system
Frequency response (audio)
Signal to noise ratio (audio)
Dynamic range (audio)
Harmonic distortion (audio)
Semiconductor laser, wavelength 650nm
NTSC
4Hz to 20 KHz
More than 90dB (1KHz, NOP, 20KHz LPF/A-Filter)
More than 95dB
0.2% (1KHz)
VIDEO
Video output
S-Video output
Component video (Y, Pb/Cb, Pr/Cr)
1.0V (p-p), 75 ohm, negative sync., RCA jack
(Y) 1.0V (p-p), negative sync., Mini DIN 4-pin x 1
(C) 0.3V (p-p), 75 ohm
(Y) 0.7V (p-p), negative sync. RCA jack
(Pb/Cb) 0.7V (p-p), 75 ohm
(Pr/Cr) 0.7V (p-p), 75 ohm
* Design and specification are subject to change without notice.
21
For service, support and warranty information, visit www.polaroidelectronics.com or in
the US call 1-866-289-5168, in Canada call 1-866-301-7922 and in Mexico call 01-800400-2443.
“Polaroid” is a registered trademark of Polaroid Corporation of Waltham, MA USA and
licensed for use on the DHM-0100 to Petters Consumer Brands, LLC.
22