1
EPSON PowerLite 7700p Projector
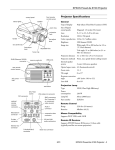
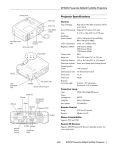
Projector Specifications
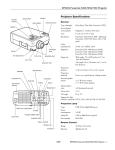
control panel
status lights
speaker
General
front infrared
sensor
adjustable
foot
Type of display
Poly-silicon Thin Film Transistor (TFT)
Size of liquid
crystal panels
Diagonal: 1.3 inches (33.6 mm)
Lens
F=1.7 to 2.3, f=49 to 63 mm
Resolution
1024 × 768 pixels (native display format)
Color reproduction 24 bit, 16.7 million colors
handle
foot adjust lever
focus ring
zoom ring
Brightness
3000 lumens (ANSI)
Contrast ratio
400 : 1
Image size
22 to 300 inches
Projection distance
3.6 to 47.6 feet (1.1 to 14.5 meters)
Projection methods
Front, rear, upside-down (ceiling mount)
Internal speaker
system
3W × 3W stereo
Optical aspect ratio 4 : 3 (horizontal : vertical)
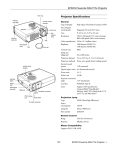
rear infrared
sensor
A/C power inlet
VGA (video in) connector
BNC connectors
(for Computer 2
or component
video source)
VGA /DVI
switch
Monitor Out
connector
Computer 1
38 dB
Video
L-Audio-R
optional remote
receiver connector
Remote
G/Y
L-Audio-R
(S-Video/BNC)
Control (RS-232C)
B/Cb/Pb H/C Sync V Sync
Audio(Computer1) Audio Out
Mouse 2
UHE (Ultra High Efficiency)
Power
consumption
200 W
Lamp life
About 1500 hours
Part number
ELPLP12
Remote Control
Range
32.8 feet (10 meters)
Batteries
Alkaline AA (2)
Supports PS/2, USB, serial, ADB (optional cable required for
serial and ADB)
Computer 2 /Component Video
R/Cr/Pr
Type
Mouse Compatibility
Analog Digital
Monitor Out
S-Video
audio
connectors
for
composite
video
Noise level
Projection Lamp
DVI connector
composite
(RCA)
video
connector
1 : 1.3
Keystone correction
angle
± 30° maximum
connector panel
(see below)
S-video
connector
Zoom ratio
Mouse 1
Computer 1
audio
connector
Audio out
connector
Remote IR Receiver
Supports EPSON Remote IR Receiver, 10-foot cable (typical
use for rear screen projection)
S-Video/BNC
audio
connector
serial connector for computer
running EMP Link V software
Mouse connectors
11/00
EPSON PowerLite 7700p Projector - 1
EPSON PowerLite 7700p Projector
Dimensions
.
Mode
Refresh Rate (Hz)
Resolution
VGACGA
70
640 × 400
VGAEGA
70
640 × 350
VGA60
59.94
640 × 480
VGA72
72.809
640 × 480
Electrical
VGA75
75
640 × 480
Rated frequency
50 to 60 Hz
VGA85
85.008
640 × 480
Power supply
100 to 120 VAC, 3.4 A
200 to 240 VAC, 1.7A
NEC400
56.65
640 × 400
SVGA56
56.25
800 × 600
SVGA60
60.317
800 × 600
SVGA72
72.188
800 × 600
SVGA75
75
800 × 600
Height
6.1 inches (156 mm)
Width
11 inches (280 mm)
Depth
15.8 inches (403 mm)
Weight
15.2 lb (6.9 kg)
Power
consumption
Operating: 285W
Standby: 9 W
Environmental
SVGA85
85.061
800 × 600
Temperature
Operating: 41 to 104° F (5 to 40° C),
non-condensing
XGA43i
86.958
1024 × 768
XGA60
60.004
1024 × 768
Storage: 14 to 140° F (–10 to 60° C),
non-condensing
XGA70
70.069
1024 × 768
XGA75
75.029
1024 × 768
Operating: 20 to 80% RH,
non-condensing
XGA85
84.997
1024 × 768
SXGA1—70
70.012
1152 × 864*
Storage: 10 to 90% RH,
non-condensing
SXGA1—75
75
1152 × 864*
SXGA1—85
84.999
1152 × 864*
1280 × 960*
Humidity
Safety
United States
Canada
CE Marking
SXGA2—60
60
FCC Part 15B Class B
UL1950 Rev. 3
SXGA2—75
75
1280 × 960*
SXGA2—85
85.002
DOC ICES003 Class B
CSA C22.2 No. 950 Rev. 3
1280 × 960*
SXGA3—43i
86.871
1280 × 1024*
SXGA3—60
60.02
1280 × 1024*
SXGA3—75
75.025
1280 × 1024*
SXGA3—85
85.024
1280 × 1024*
UXGA48i
96.08
1600 × 1200*
UXGA60
60
1600 × 1200*
UXGA65
65
1600 × 1200*
UXGA70
70
1600 × 1200*
UXGA75
75
1600 × 1200*
UXGA80
80
1600 × 1200*
UXGA85
85
1600 × 1200*
Directive 89/336/EEC, 92/31/EEC
EN 60950
Compatible Video Formats
The projector supports the following international video
standards: NTSC, HDTV, PAL, and SECAM, as well as the
monitor display formats listed below.
To project images output from a computer, the computer’s
video card must be set at a refresh rate (vertical frequency)
that’s compatible with the projector; see the following table
for compatible formats. As noted below, some images are
automatically resized to display in one of the projector’s
“native” formats (such as XGA). In addition, the frequencies
of some computers may not allow images to display correctly;
see your computer’s documentation for details.
2 - EPSON PowerLite 7700p Projector
11/00
EPSON PowerLite 7700p Projector
Mode
Refresh Rate (Hz)
Resolution
MACL13
66.62
640 × 480
MAC II 13
66.67
640 × 480
MAC16
74.55
MAC19—60
Pin #
Computer 1 port
Monitor Out port
10
Synchronous GND
GND
832 × 624
11
Monitor (ID bit 0)
Reserved
59.28
1024 × 768
12
SDA
Reserved
MAC19
74.93
1024 × 768
13
Horizontal sync
Horizontal sync
MAC21
75.062
1152 × 870*
14
Vertical sync
Vertical sync
HDTV480P (ANSI/
SMPTE)
59.94
720 × 483
15
Reserved
Vertical sync
HDTV480P
(ATSC)
59.94
704 × 480
HDTV480I (ANSI/
SMPTE)
59.94
720 × 487
HDTV480I
(ATSC)
59.94
704 × 480
HDTV720P
(SMPTE)
59.94
1280 × 720
❏ Place the projector on a sturdy, level surface, between
3.6 and 48 feet from the screen.
HDTV1080P (ANSI/
SMPTE)
59.94
1920 × 1080
HDTV480I (ANSI/
SMPTE)
59.94
1920 × 1080
❏ Make sure there is plenty of space for ventilation around and
under the projector.
NTSC (SVGA)
60
800 × 438
NTSC (XGA)
60
1024 × 438
PAL (SVGA)
50
800 × 512
PAL (XGA)
50
1024 × 512
SECAM (SVGA)
50
800 × 512
SECAM (XGA)
50
1024 × 512
*
The image is resized so that it displays using one of the projector’s
native formats.
Computer Video Port Pin Assignments
The Computer 1 analog port and the Monitor Out port are
female video RGB, 15-pin micro-D-style connectors. Here are
their pin assignments:
Pin #
Computer 1 port
Monitor Out port
1
Red video
Red out / red video
2
Green video
Green out / green video
3
Blue video
Blue out / blue video
4
Monitor (ID bit 2)
Reserved
5
GND
GND
6
Red video GND
GND
7
Green video GND
GND
8
Blue video GND
GND
9
+5V
Reserved
Positioning the Projector
Follow these guidelines to get the best results when projecting:
❏ Make sure the projector is within 10 feet of a grounded
electrical outlet or extension cord and within 5 feet of the
image source.
❏ Face the projector squarely toward the screen. Otherwise,
your image won’t be square.
Note: It’s easier to position the projector when the screen is
directly in front of the room. If the screen is placed diagonally in a
corner, it’s much more difficult to aim the projector squarely at
the screen and get a non-distorted image.
If you place the projector below the level of the screen, you’ll
have to tilt it up by extending the feet as shown. Tilting the
projector upward causes the image to lose its square shape, but
you can correct the distortion by pressing the Keystone
button as described on page 6.
ideal
height
11/00
EPSON PowerLite 7700p Projector - 3
EPSON PowerLite 7700p Projector
If you place the projector level with the bottom of the screen,
the image will be square and you won’t have to adjust it. If
you place the projector higher than the bottom of the screen,
the image will still be square, but you won’t be able to fill the
whole screen with the image.
Image Size and Projection Distance
The projector can be installed for three different viewing
setups: front projection, ceiling mounting, or rear projection
onto a semi-transparent screen, as shown:
Note that if you tilt the projector upward by extending the
feet or use electronic keystone correction, your image size may
vary.
Use the tables below to estimate how far to place the projector
from the screen. Since the size of the image can be changed by
rotating the zoom ring, a range of distance is given for each
screen size.
Standard lens
front projection
Diagonal screen
size
Distance
30 inches
3.6 - 4.3 feet (1.1 - 1.3 meters)
60 inches
7.2 - 9.2 feet (2.2 - 2.8 meters)
100 inches
12.1 - 15.7 feet (3.7 - 4.8 meters)
200 inches
24.3 - 31.8 feet (7.4 - 9.7 meters)
300 inches
36.7 - 47.6 feet (11.2 - 14.5 meters)
Long throw zoom lens (ELPAL01)
ceiling mounting
Diagonal screen
size
Distance
30 inches
4.46 - 5.87 feet (1.36 - 1.79 meters)
60 inches
9.35 - 12.2 feet (2.85 - 3.71 meters)
100 inches
15.8 - 20.5 feet (4.82 - 6.25 meters)
200 inches
32.1 - 41.5 feet (9.77 - 12.64 meters)
300 inches
48.3 - 62.4 feet (14.72 - 19.02 meters)
rear projection
Wide angle lens (ELPAW01)
To project from overhead, you’ll need to select Ceiling in the
projector’s Advanced menu. To project from the rear, select
Rear Proj.
If you’re ceiling-mounting the projector and you place it
above screen level, you’ll have to tilt it down to position the
image on-screen. This causes the image to lose its square
shape. You can then correct the distortion by using the
Keystone function in the projector’s menu system or by using
the Keystone button on the projector’s control panel.
If you place the projector’s lens so it’s level with the top of the
screen, the image will be square and you won’t have to adjust
it. If you place the lens lower than the top of the screen, you’ll
have to tilt the projector upward if you want to fill the whole
screen with the image.
4 - EPSON PowerLite 7700p Projector
11/00
Diagonal screen
size
Distance
30 inches
2.8 - 3.6 feet (0.85 - 1.09 meters)
60 inches
5.5 - 7.2 feet (1.69 - 2.19 meters)
100 inches
9.3 - 12.0 feet (2.82 - 3.66 meters)
200 inches
18.6 - 24.0 feet (5.67 - 7.33 meters)
300 inches
28.1 - 36.1 feet (8.57 - 11.00 meters)
EPSON PowerLite 7700p Projector
2. Click the Arrange icon and drag one monitor icon on top of
the other.
Displaying an Image
Click here
Once the projector is connected to your computer or video
source and plugged in, press the red Power button on top of
the projector to turn it on. The power light flashes green as the
projector warms up, and the projection lamp comes on in
about 30 seconds. The power light stays green, and you may
see a blue screen with the message No Signal displayed. This is
normal.
Do one of the following:
❏ Turn on or restart your computer. In a few moments, you
should see your computer display projected.
Drag one monitor
icon on top of
the other
(Windows only: If you see a New Hardware Found message
saying that it has found a plug-and-play monitor, click
Cancel.)
❏ If you’re projecting a video, press the Play button on your
video source.
If this option isn’t available, you may need to select one of the
Simulscan resolution settings:
If a projected image fails to appear, see the next section for
help.
1. Click the Monitor icon.
Click here
What To Do If You See a Blank Screen
If you see a blank screen or a blue screen with the message
No Signal after turning on your computer or video source, do
one of the following:
❏ Make sure the cables are connected correctly, as described in
the User’s Guide.
Select a
Simulscan
resolution
❏ Make sure the power light is green and not flashing and the
lens cover is off.
❏ Try restarting your computer.
2. Select a Simulscan resolution as shown. Allow a few seconds
for the projector to sync up after making the selection.
❏ If you’ve connected more than one computer and/or video
source, you may need to press the Computer or Video
button on top of the projector to select the correct source.
Allow a few seconds for the projector to sync up after
pressing the button.
If you’re using a PC laptop:
If you’re using a PowerBook:
You may need to set up your system to display on the
projector screen as well as the LCD screen. Follow these steps:
❏ Press the function key that lets you display on an external
monitor. It’s often labelled with an icon such as
but
it may also be labelled CRT/LCD. You may have to hold
down the Fn key while pressing it. Check your laptop’s
manual or online help for details.
On most systems, the
key lets you toggle between the
LCD screen and the projector, or display on both at the
same time. Allow a few seconds for the projector to sync up
after pressing it.
1. From the Apple menu, select Control Panels, then click
Monitors and Sound.
❏ Depending on your computer’s video card, you might need
to use the Display utility in the Control Panel to make sure
that both the LCD screen and external monitor port are
enabled. See your computer’s documentation or online help
for details.
11/00
EPSON PowerLite 7700p Projector - 5
EPSON PowerLite 7700p Projector
Resizing the Image
Some computer images need to be resized to display in the
projector’s native format: 1024 × 768 pixels. If only part of
your computer image is displayed, you can correct it with the
Resize button.
Projector Status Lights
The lights on top of the projector indicate the projector’s
operating status.
❏ Press the Resize button on the control panel. The screen
image is automatically compressed.
Power
❏ Continue pressing the Resize button to pan around the
screen in the original resolution.
Computer
A/V mute
power light
If you’re projecting from video equipment, pressing the
Resize button switches the aspect ratio between 4:3 and 16:9.
If you’ve zoomed in on your image (using the E-Zoom button
on the remote), you can press the Resize button to restore the
original display size.
lamp light
Resize
temperature light
Adjusting the Image Shape
If the projected image isn’t square or has a “keystone” shape,
do one or more of the following:
❏ If your image looks like
or
, you’ve placed the
projector off to one side of the screen, at an angle. Move it
directly in front of the center of the screen, facing the screen
squarely.
Light
Status
Description and action
❏ If your image looks like
or
, press the + or —
side of the Keystone button to correct the shape of the
image. After correction, your image will be slightly smaller.
Orange
The projector is in sleep mode. You can
unplug it to turn it off, or press the Power
button to turn it on.
You can also perform electronic keystone correction using the
projector’s Setting menu.
Flashing
green
The projector is warming up. Wait for the
image to appear.
Green
The projector is operating normally.
Flashing
orange
The projector is cooling down. When the light
is flashing, you cannot turn the projector on,
and you should not unplug it.
Red
Power is cut off because of an internal
problem. Remove the power plug and contact
EPSON for help.
Flashing
orange
The lamp is almost burned out. This is a good
time to replace it.
Flashing red
The lamp is burned out or there is a problem
with the ballast power. Replace the lamp and
make sure the cover is fastened securely.
Flashing
orange
The projector is too hot. Turn it off and let it
cool. Make sure the temperature surrounding
the projector does not exceed 104° F and
there is plenty of space around and under the
projector for ventilation. Clean the air filter if
necessary.
Switching Between Picture Sources
If your projector is connected to more than one computer
and/or video source, you can use the buttons on the control
panel (or remote control) to switch between the different
sources.
On the control panel, press the Computer button to switch
between the computer sources and press the Video button to
switch between standard (composite) video, S-Video, and
component video (BNC).
On the remote control:
❏ Press the Video button to switch between a standard
composite video source and an S-Video source.
❏ Press the Comp1 button to select your first computer.
❏ Press the Comp2/YCbCr button to select your second
computer or a component video source.
After you select a source, the screen goes dark for a moment
before the image appears.
6 - EPSON PowerLite 7700p Projector
11/00
EPSON PowerLite 7700p Projector
Light
Status
Description and action
Button
Function
Red
The projector has turned off automatically
because it has overheated. Let it cool for a few
minutes, then turn it back on. Make sure there
is plenty of space around and under the
projector for ventilation. If it continues to
overheat, you may need to change the air
filter.
Tracking –
Tracking +
Matches the projector’s internal clock to computer
graphic signals (tracking adjustment). Use these
buttons to adjust an image with vertical fuzzy lines, or
to change settings during menu operations.
Enter
Selects a menu option or the next menu/help screen.
Pressing Enter when no menu or help screen is
displayed optimizes the computer image.
Shift
Pressing the shift and Keystone buttons at the same
time increases or decreases the sound volume.
– Keystone +
Squares up a raised image, correcting up to a ±30°
tilt.
– Volume +
Adjusts the volume when pressed with the Shift
button.
Flashing red
There is a problem with the cooling fan or
temperature sensor. Turn off the projector and
unplug it. Contact EPSON for help.
Using the Control Panel
Power
Computer Video
Menu
Sync
Esc
Help
Using the Remote Control
A/V mute
Tracking
Tracking
Keystone
Resize
Shift
Volume
Sync
The following table summarizes the functions on the control
panel.
The remote control uses a line-of-sight infrared signal. It lets
you access the projector’s features from anywhere in the
room—up to 32 feet away. (This distance may be shorter if
the remote control batteries are low.) If you have connected
the mouse cable, you can also use the remote control as a
wireless mouse.
The projector may not respond to remote control commands
in these conditions:
Button
Function
❏ You are too far away or not within 30° to the left or right of
the front or rear sensor or 15° above or below
Power
Starts or stops projection.
❏ The R/C (remote control) switch is in the OFF position
Help
Displays the online help menu.
❏ Batteries are weak
Computer
Switches between Computer 1 and Computer 2.
❏ Ambient light is too bright
A/V mute
Turns off the audio and video, displaying the black,
blue, or user logo background.
❏ A fluorescent light is shining into the infrared receiver
Resize
Resizes SXGA and other video formats so they
appear correctly on the screen. Switches the aspect
ratio between 4:3 and 16:9 when video images are
being projected.
Video
Switches between standard (composite) video,
S-Video, and component video (BNC).
Menu
Displays or hides the menu screen.
Esc
Stops the current function. Pressing Esc while viewing
a menu or the online help displays the previous
screen or menu.
Sync +
Sync –
Synchronizes the computer’s graphic signal. Use
these buttons to adjust an image that is fuzzy or
streaked, or to select menu items. Allows selection of
a menu if the menu screen is displayed.
❏ A strong light source (such as direct sunlight) shines into the
infrared receiver
❏ Other equipment emitting infrared energy is present (such as
a radiant room heater)
11/00
EPSON PowerLite 7700p Projector - 7
EPSON PowerLite 7700p Projector
The remote control buttons are shown in the following
illustrations.
This table summarizes the functions on the remote control.
IR output
Button
Function
Power
Starts or stops the projector.
Power
R/C on/off
Turns the remote control on or off.
on/off switch
Freeze
Keeps the current computer or video image on the
screen.
A/V mute
Turns off the audio and video, displaying the black,
blue, or user logo background.
E-Zoom
Enlarges or reduces the image size from 1x to 4x
(in 32 steps). Pressing the right side of the button
enlarges the image, pressing the left side of the button
reduces the image. To display a portion of an enlarged
image which is outside the display area, press the
Enter button and scroll the image to the desired
location.
Effects buttons
Display preprogrammed special drawing effects on the
screen. Additional effects can be selected through the
Effect menu or programmed using the EMP Link V
software.
Enter
(pointer button)
Use the Enter button to navigate the menus or use the
remote as a mouse pointer when the projector is
connected to the computer with the main cable and
the mouse cable. When the image source is a
computer, the Enter button acts as a mouse left-click.
Light
Illuminates all buttons on the remote control
temporarily.
Esc
Stops the current function. Pressing Esc while viewing
a menu or the online help displays the previous screen
or menu. When the image source is a computer, the
Esc button acts as a mouse right-click.
Menu
Displays or hides the menu.
Help
Help
Displays the online help menu.
Comp2/YCbCr
Comp1
Switches to the Computer 1 image.
Comp2/YCbCr
Switches to the Computer 2 or component video
source.
Video
Switches to the standard composite video or S-Video
source.
Auto
Optimizes the computer image.
Resize
Resizes SXGA and other video formats so they
appear correctly on the screen. Switches the aspect
ratio between 4:3 and 16:9 when video images are
being projected.
P in P
Displays a video or S-video image in a subscreen on
the main display. Use the Enter button to reposition
the Picture in Picture (P in P) screen, or the E-Zoom
button to enlarge or reduce the image. Changes made
to the P in P screen location and size are
automatically carried over to the next P in P session.
Freeze
A/V Mute
Power
Freeze
A/V Mute
E-Zoom
E-Zoom
3
4
5
1
2
Special effects
buttons (1-5)
R/C ON
OFF
Enter
Esc
light button
Enter (pointer) button
Esc button
Open the cover just below the Esc button to access these
remote control buttons:
Menu
Comp1
E@sy-MP
Auto
P in P
Video
Resize
Preset
Volume
8 - EPSON PowerLite 7700p Projector
11/00
EPSON PowerLite 7700p Projector
Button
Function
Preset
Saves and recalls up to five different session settings
(resolution, tracking, sync signal, and position). To
save the current session settings, press the Preset
button and it will be assigned the next available
number, 1 through 5. To recall a setting, press the
Preset button a second time and move to the desired
session number. To overwrite a saved setting, move
to the setting you want to replace and press Enter.
When the confirmation message displays, choose Yes
and press Enter.
– Volume +
Cleaning the Projector Case
Before you clean the projector case, turn off the projector and
unplug the power cord.
❏ To remove dirt or dust, wipe the case with a soft, dry, lintfree cloth.
❏ To remove stubborn dirt or stains, moisten a soft cloth with
water and a neutral detergent. Then wipe the case.
❏ Do not use alcohol, benzene, thinner, or other chemical
detergents. These can damage the case.
Adjusts the volume.
The five special effects buttons are preprogrammed with the
following functions.
Cleaning or Replacing the Air Filter
Clean the air filter at the bottom of the projector after every
100 hours of use. If it is not cleaned periodically, it can
become clogged with dust, preventing proper ventilation. This
can cause overheating and damage the projector.
Button
Function
1
Changes the mouse cursor to a pointer or cursor stamp
2
Lets you draw one or more boxes on the screen
Follow these steps:
3
Spotlights a section of the screen
4
Lets you place a vertical or horizontal bar on the screen to
highlight a part of your image
1. Turn off the projector, allow it to cool down, and unplug the
power cord.
5
Erases the drawing effects on the screen
2. Turn the projector on its side so that the handle is on top
and you can access the filter easily.
3. To clean the filter, EPSON recommends using a small
vacuum cleaner designed for computers and other office
equipment. If you don’t have one, gently clean the filter
using a very soft brush (such as an artist’s camel-hair brush).
Note: You can use the projector’s Effect menu to select different
options for each of the drawing tools.
Cleaning the Lens
Warning: Before you clean any part of the projector, turn it off
and unplug the power cord. Never open any cover on the
projector, except the lamp and filter covers. Dangerous electrical
voltages in the projector can injure you severely. Do not try to
service this product yourself, except as specifically explained in this
Product Information Guide. Refer all other servicing to
qualified service personnel.
Clean the lens whenever you notice dirt or dust on the surface.
❏ Use a canister of compressed air to remove dust.
If the dirt is difficult to remove or if the filter is torn, replace
it. Contact your dealer or call EPSON at (800) 873-7766 in
the United States and Canada to obtain a new one.
❏ To remove dirt or smears on the lens, use lens cleaning
paper. If necessary, moisten a soft cloth with an alcoholbased cleaner and gently wipe the lens surface.
Note: When you get a replacement lamp for your projector, a
new air filter is included. You should replace the filter when
you replace the lamp.
11/00
EPSON PowerLite 7700p Projector - 9
EPSON PowerLite 7700p Projector
4. If you need to replace the filter, remove it as shown below.
Make sure the projector is on its side as shown (not turned
upside down) to prevent dust from falling inside.
Follow these steps to replace the lamp:
1. Turn off the projector and unplug the power cord.
2. Allow the projector to cool down for at least an hour (if it
has been on).
3. Use a screwdriver to loosen the screw on the lamp cover.
(You can’t remove the screw from the cover.)
When the screw is loose, slide off the lamp cover.
5. To install the new filter, first insert the tabs, then press on
the catch until it clicks in place.
4. Use a screwdriver to loosen the two screws holding the lamp
in place. (You can’t remove these screws.)
5. Lift up the wire handle, as shown, and pull the lamp straight
out. (The plastic flap above the lamp will flex out of the way
as you remove the lamp.)
tabs
handle
Replacing the Lamp
The projection lamp typically lasts for about 1500 hours of
use. It is time to replace the lamp when:
6. Fully insert the new lamp. (The plastic flap will flex out of
the way.)
❏ The projection image gets darker or starts to deteriorate.
❏ The lamp warning light
is flashing red or orange.
❏ The message LAMP REPLACE appears on the screen when
the projector lamp comes on (after about 1400 hours of use).
To maintain projector brightness and image quality, replace
the lamp as soon as possible.
Note: You can check to see how many hours the lamp has been
used through the About menu.
Contact your dealer or call EPSON at (800) 873-7766 in the
United States and Canada for a replacement lamp. Request
part number ELPLP12.
10 - EPSON PowerLite 7700p Projector
Caution: Do not touch the glass portion of the lamp assembly.
7. Once the lamp is fully inserted, tighten its screws.
11/00
EPSON PowerLite 7700p Projector
8. Replace the lamp cover and tighten its screw securely. (The
projector won’t come on if the lamp cover is loose.)
9. Reset the lamp timer as described in the following section.
You can purchase these accessories from your dealer or by
calling EPSON at (800) 873-7766; or visit the EPSON Store
at www.epson.com (U.S. sales only). In Canada, please call
(800) 873-7766 for dealer referral.
Resetting the Lamp Timer
After you install a new lamp, you need to reset the timer so the
projector can keep track of how many hours it has been used.
Follow these steps:
1. Press the Help button and hold it down for at least 5
seconds. The Help menu will be displayed and then you will
see a menu asking if you want to reset the lamp ON time.
2. Use the left arrow button (control panel) or press left on the
Enter button (remote control) to select Yes.
3. Press Enter to reset the timer.
Related Documentation
CPD-11436
EPSON PowerLite 7700p User’s Guide
CPD-11437
EPSON PowerLite 7700p Quick Setup
Poster
Service Manual
TBD
Parts Price Lists
PL-EMP7700
Optional Accessories
Product
Product number
Replacement lamp and air filter
ELPLP12
Long throw zoom lens
ELPAL01
Wide angle lens
ELPAW01
Customized carrying cases:
Samsonite® wheeled soft case
ATA molded hard shell case
ATA shipping case
ELPKS35
ELPKS38
ELPKS39
Ceiling mount
ELPMB34
Suspension adapter for ceiling mount
ELPMBAST
Kensington security lock
ELPSL01
Portable projection screens:
60-inch
80-inch
ELPSC07
ELPSC08
Wireless microphone and two satellite
speakers
ELPCUS1
Auxiliary audio system
ELPPAS1
Remote control receiver (plugs into projector
to extend range of remote control)
ELPST02
Remote control receiver kit (includes standard
receiver and clip-on receiver for attachment
directly to remote control)
ELPST04
Macintosh adapter set (includes monitor
adapter and desktop adapter)
ELPAP01
VGA to 13W3 video cable (for connecting to
certain high-end workstations)
ELPKC06
Digital video cables:
DVI to DVI, 10 feet (3 meters)
DVI to DFP, 10 feet (3 meters)
ELPKC20
ELPKC21
11/00
EPSON PowerLite 7700p Projector - 11