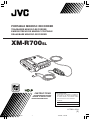
1
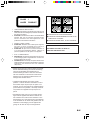
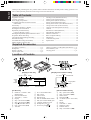
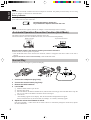
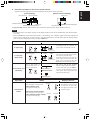
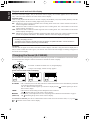
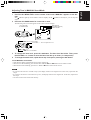
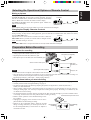
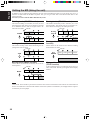
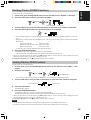
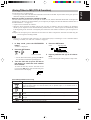
PORTABLE MINIDISC RECORDER
TRAGBARER MINIDISC-RECORDER
ENREGISTREUR DE MINIDISC PORTABLE
DRAAGBARE MINIDISC-RECORDER
XM-R700SL
INSTRUCTIONS
BEDIENUNGSANLEITUNG
MANUEL D’INSTRUCTIONS
GEBRUIKSAANWIJZING
For Customer Use:
Enter below the Model No. is located on
the bottom of the cabinet and Serial No.
is located inside of the cabinet. Retain
this information for future reference.
Model No.
Serial No.
LVT0621-001A
[E]
XM-R700(E)_Cover1-4.p65
1
10/30/00, 1:26 PM
WICHTIGER HINWEIS FÜR LASER-PRODUKTE / IMPORTANT POUR LES PRODUITS LASER /BELANGRIJKE
INFORMATIE VOOR LASERPRODUKTEN
ACHTUNG! DIESES PRODUKT ERZEUGT LASERSTRAHLEN. DIE VERWENDUNG DER BEDIENUNGS- UND EINSTELLELEMENTE ZU ANDEREN ZWECKEN ALS DEN HIER BESCHRIEBENEN KANN ZUR FREISETZUNG GEFÄHRLICHER
LASERSTRAHLUNG FÜHREN. ÖFFNEN SIE KEINE ABDECKUNG UND FÜHREN SIE KEINE REPARATUREN SELBST
DURCH. REPARATUREN DÜRFEN NUR VON QUALIFIZIERTEM FACHPERSONAL DURCHGEFÜHRT WERDEN.
WARNUNG : ZUR VERHÜTUNG EINES BRANDES ODER STROMSCHLAGS MUSS DIESES GERÄT VOR REGEN UND
FEUCHTIGKEIT GESCHÜTZT WERDEN.
• • • • • • • • • • • • • • •
ATTENTION! CET APPAREIL EST DOTÉ D’UN LECTEUR AU LASER. L’UTILISATION DE COMMANDES OU LE
RECOURS À DES RÉGLAGES AUTRES QUE CEUX INDIQUÉS DANS CE MANUEL PEUVENT PRÉSENTER DES
RISQUES D’EXPOSITION À DES RADIATIONS.
NE PAS OUVRIR LE BOÎTIER. TOUTE RÉPARATION DOIT ÊTRE FAITE PAR UN PERSONNEL QUALIFIÉ ET NON PAR
L’USAGER.
MISE EN GARDE : AFIN DE PRÉVENIR TOUR RISQUE D’INCENDIE OU DE CHOCS ÉLECTRIQUES, NE PAS L’EXPOSER À LA PLUIE OU À UNE HUMIDITÉ EXCESSIVE.
A pleine puissance, l’écoute prolongée du baladeur peut endommager l’oreille de l’utilisateur.
Utilisez toujours le casque stéréo fourni.
• • • • • • • • • • • • • • •
WAARSCHUWING! IN DIT APPARAAT WORDT EEN LASER GEBRUIKT. HET GEBRUIK VAN REGELAARS EN HET
MAKEN VAN AFSTELLINGEN OF BEDIENINGEN DIE NIET IN DEZE GEBRUIKSAANWIJZING STAAN BESCHREVEN,
KAN LEIDEN TOT BLOOTSTELLING AAN GEVAARLIJKE STRALING. MAAK HET APPARAAT NIET OPEN EN GA NIET
ZELF REPAREREN. LAAT HET ONDERHOUD AAN ERKENDE VAKMENSEN OVER.
WAARSCHUWING : TENEINDE HET GEVAAR VOOR BRAND OF ELEKTRISCHE SCHOKKEN TE VERKLEINEN, MAG
DIT APPARAAT NIET WORDEN BLOOTGESTELD AAN REGEN OF VOCHT.
ACHTUNG!
1. Blockieren Sie keine Belüftungsschlitze oder -bohrungen. (Wenn die Belüftungsöffnungen oder -löcher durch eine Zeitung oder ein Tuch
etc. blockiert werden, kann die entstehende Hitze nicht abgeführt werden.)
2. Stellen Sie keine offenen Flammen, beispielsweise angezündete Kerzen, auf das Gerät.
3. Wenn Sie Batterien entsorgen, denken Sie an den Umweltschutz. Batterien müssen entsprechend den geltenden örtlichen Vorschriften
oder Gesetzen entsorgt werden.
4. Setzen Sie die Anlage nicht in einem Badezimmer oder an Orten ein, an denen Wasser verwendet wird. Stellen Sie auch keine Behälter,
die mit Wasser oder anderen Flüssigkeiten gefüllt sind (beispielsweise Kosmetik- oder Medikamentenbehälter, Blumenvasen, Topfpflanzen, Tassen etc) auf diese Anlage.
ACHTUNG (Lithiumionen-Batterie)
1. Es besteht Explosionsgefahr, wenn die Batterie falsch ausgewechselt wird.
2. Tauschen Sie sie nur gegen denselben oder einen äquivalenten Typ aus.
• • • • • • • • • • • • • • •
ATTENTION!
1. Ne bloquez pas les orifices ou les trous de ventilation .
(Si les orifices ou les trous de ventilation sont bloqués par un journal un tissu, etc., la chaleur peut ne pas être évacuée correctement de
l’appareil.)
2. Ne placez aucune source de flamme nue, telle qu’une bougie, sur l’appareil.
3. Lors de la mise au rebut des piles, veuillez prendre en considération les problèmes de l’environnement et suivre strictement les règles et
les lois locales sur la mise au rebut des piles.
4. N’utilisez pas cet appareil dans une salle de bain ou un autre endroit avec de l’eau. Ne placez aucun récipient contenant de l’eau (tel que
des cosmétiques ou des médicaments, un vase de fleurs, un pot de fleurs, une tasse, etc.) sur cet appareil.
ATTENTION (Batterie au lithium-ion)
1. Danger d’explosion si la pile est remplacée de façon incorrecte.
2. Remplacez-la uniquement par une pile de type équivalent.
• • • • • • • • • • • • • • •
WAARSCHUWING!
1. Zorg dat u de ventilatieopeningen en -gaten niet afsluit. (Als de ventilatieopeningen en -gaten worden afgesloten door bijvoorbeeld papier
of een doek, kan er hitte in het apparaat worden opgebouwd.)
2. Zet geen bronnen met open vuur, zoals brandende kaarsen, op het apparaat.
3. Wees milieubewust en gooi lege batterijen niet bij het huishoudelijk afval. Lege batterijen dient u in te leveren met het KCA of bij een
innamepunt voor batterijen.
4. Gebruik dit apparaat niet in een badkamer of in andere natte ruimten. Zet ook geen voorwerpen op het apparaat die zijn gevuld met water
of andere vloeistoffen (zoals cosmetica, medicijnen, bloemenvazen, bloempotten, kopjes enz.).
WAARSCHUWING (Lithium-ion-batterij)
1. Er bestaat explosiegevaar als de batterij verkeerd wordt geplaatst.
2. Vervang de batterijen alleen door identieke of soortgelijke batterijen.
G-1
XM-R700(E)_Safety.p65
1
10/27/00, 9:14 AM
CLASS
1
LASER
PRODUCT
1. LASER-PRODUKT DER KLASSE 1
2. GEFAHR: Unsichtbare Laserstrahlung bei Öffnung und
fehlerhafter oder beschädigter Spre. Direkten Kontakt mit
dem Strahl vermeiden!
3. ACHTUNG: Das Gehäuse nicht öffnen. Das Gerät enthält
keinerlei Teile, die vom Benutzer gewartet werden
können. Überlassen Sie Wartungsarbeiten bitte
qualifizierten Kundendienst-Fachleuten.
1. PRODUIT LASER CLASSE 1
2. ATTENTION: Radiation laser invisible quand l’appareil
est ouvert ou que le verrouillage est en panne ou
désactivé. Eviter une exposition directe au rayon.
3. ATTENTION: Ne pas ouvrir le couvercle du dessus. Il
n’y a aucune pièce utilisable à l’intérieur. Laisser à un
personnel qualifié le soin de réparer votre appareil.
● WARNETIKETTE IM GERÄTEINNEREN
● ETIQUETTE D’AVERTISSEMENT PLACÉE À L’INTERIEUR DE L’APPAREIL
● WAARSCHUWINGSLABEL, IN HET APPARAAT
DIE LINSE NICHT BERÜHREN.
NE JAMAIS TOUCHER LA LENTILLE.
RAAK DE LENS NOOIT ANN.
1. KLAS 1 LASERPRODUKT
2. GEVAARLIJK: Onzichtbare laserstraling wanneer open
en de beveiliging faalt of uitgeschakeld is. Voorkom het
direkt blootstaan aan de straal.
3. VOORZICHTIG: De bovenkap niet openen. Binnenin het
toestel bevinden zich geen door de gebruiker te repareren
onderdelen: laat onderhoud over aan bekwaam
vakpersoneel.
• Dieses Gerät wurde mit großer Präzision hergestellt.
Äußere Gewalteinwirkung durch Stoß oder Schlag
oder ein Herunterfallen des Gerätes kann zu
Funktionsstörungen führen. Wenn sich das Gerät
z.B. beim Hinsetzen in der hinteren Hosentasche
befindet, kann der hierbei ausgeübte Druck zum
Versagen des Gerätes führen.
• L’appareil a été fabriqué avec la plus grande
précision. Le fait de le heurter violemment ou de le
faire tomber risque de provoquer une panne : Par
exemple, si vous vous asseyez sur l’appareil dans la
poche arrière de son pantalon, cela risque d’exercer
une pression sur l’appareil et de provoquer une
panne.
• Dit apparaat is met grote zorg en precisie vervaardigd. Laat het apparaat niet vallen en stel het niet
aan schokken bloot, want dit kan resulteren in een
beschadiging. Als u gaat zitten terwijl u het apparaat
in de achterzak van uw broek hebt gestoken, kan dit
resulteren in beschadiging van het apparaat als
gevolg van de druk die erop wordt uitgeoefend.
G-2
English
Thank you for purchasing this JVC product. Please read these instructions carefully before starting operation to be
sure to obtain optimum performance and a longer service life from the unit.
Table of Contents
Supplied Accessories .................................................... 1
Location of Controls ..................................................... 1
Power Supply Preparations ........................................... 2
Accidental Operation Prevention Function
(Hold Mode) ............................................................ 3
Normal Play .................................................................. 3
Changing the Sound (A.C.BASS) ................................ 5
Showing the Disc Information ..................................... 7
Repeat Play and Random Play
(Using the Remote Control) ..................................... 7
Selecting the Operational Options of Remote Control ....... 8
Preparation Before Recording ...................................... 8
Check Items Before Starting Recording ....................... 9
Standard Recording ...................................................... 9
SYNCHRO Recording (SYNCHRO) ........................ 10
Editing the MD (Using the unit) ................................. 11
Dividing Tracks (DIVIDE Function) .......................... 12
Joining Tracks (JOIN Function) ................................. 12
Moving Tracks (MOVE Function) ............................. 13
Erasing Tracks (ERASE Function) ............................. 13
Erasing All the Tracks (ALL ERASE Function) ........ 13
Giving Titles to MD (TITLE Function) ..................... 14
Using the Unit with Optional Accessory .................... 15
Cautions ...................................................................... 15
Information on MDs (Minidiscs) ............................... 16
MD (Minidisc) Messages ........................................... 17
Minidisc Limitations .................................................. 18
Rules of Digital Dubbing ........................................... 18
Maintenance ............................................................... 18
Troubleshooting Guide ............................................... 19
Specifications ............................................................. 20
Supplied Accessories
AC adaptor (AA-R557) .........................................
Headphones ...........................................................
Remote controller ..................................................
Optical digital cable ...............................................
1 pc.
1 pc.
1 pc.
1 pc.
Lithium–ion battery (rechargeable) (BN-R3610) .. 1 pc.
External Battery case ............................................. 1 pc.
Carrying pouch ...................................................... 1 pc.
Location of Controls
[Display on the unit]
Synchro
A.C.
BASS
[Display on the remote control]
A.C. BASS
Battery
-dB
40
12
TRAIN
Manual Mode
OVER
MONO
REC
TOC
Repeat
Long playback
Modes
RANDOM Disc Mark
Peak Level Meter
Disc Mark
[On the remote control]
[On the unit]
A DISPLAY / CHARA. / REC
MODE button
B EDIT/ENTER button
C VOLUME +, – button
D Display
E Skip / search button (¢)
F Skip / search button (4)
G Stop (7)/CHARGE button
H Play / pause button (6)
I JOG dial
1
Repeat Battery
Random
J
K
L
M
N
O
P
Q
R
SET / SYNCHRO button
REC switch
OPEN switch
HOLD switch
MIC IN MARK MODE switch
MIC (PLUG IN POWER) jack
LINE IN (OPTICAL) jack
Headphones jack ( )
DC IN 6V jack (
)
S
T
U
V
W
X
Y
Z
a
b
Play / pause button (6)
Skip / search button (¢)
HOLD switch
Stop button (7)
A.C.BASS (Active Clear Bass)
button
Display
VOLUME +/– button
DISPLAY button
P.MODE button
Skip / search button (4)
English
Power Supply Preparations
As a power supply source, you can use the rechargeable battery and/or dry-cell batteries, or AC adaptor.
For information on operating times of batteries, refer to the specifications (page 20).
Using lithium–ion battery (rechargeable battery) (BN-R3610)
1 Insert the rechargeable battery into the unit.
Cut part
Slide the cover and open it.
Insert the battery with its “–” terminal facing you and its cut part
facing up.
Firmly close the cover.
2 To charge the rechargeable battery, connect the supplied AC adaptor.
To AC power outlet
AC adaptor
3 Press the 7/CHARGE button twice on the unit.
“CHARGE” appears on the display and charging starts. When charging is completed, “CHARGE” will disappear.
• “CHARGE” will appear for 5 seconds even when no lithium-ion battery is inserted.
4 Disconnect the AC adaptor.
Notes
• Recharging is not made if the unit is being used.
• It takes approximately 2 hours to recharge the rechargeable battery.
• Rechargeable battery has a service life of approximately 500 charge-discharge cycles. If the operating time on one
full charge becomes noticeably shorter than it used to be, the battery has reached the end of its service life and
should be replaced.
• The AC adaptor may become warm while recharging is in progress. This is not a malfunction.
• Before starting recording, fully charge the rechargeable battery. Otherwise, the unit may shut off during recording.
• Recharging with this unit shall be made at the temperature from +5°C to +35°C. Otherwise, “HIGH TEMP” or
“LOW TEMP” will appear on the display.
Using dry-cell batteries (not included)
1
As explained below, open the battery cover of the battery case and insert three LR6 (UM3) alkaline batteries into the battery compartment.
2
Turn the knob of the battery case in the direction as shown by the arrow until it stops.
(To detach the battery case, turn the knob toward in reverse until the battery case is removed.)
(Bottom View)
Note
To lengthen the battery life, you can use both rechargeable battery and the dry-cell batteries.
Using the AC adaptor
Connect the supplied AC adaptor to the unit.
Refer to the connecting diagram in “Using lithium-ion battery (rechargeable battery)”.
When the unit is turned off with a lithium-ion battery inserted, “CHARGE” is displayed and recharging automatically starts.
2
English
Note
The unit is in the standby condition when the AC adaptor is connected. The primary circuit is always “live” as long
as the AC adaptor is connected to an electrical outlet.
Battery indicator
The battery indicator appears on the display of the unit and remote control. When the indication changes as follows,
power will be shut off a short while after.
Rechargeable battery: Recharge it.
Dry-cell batteries: Replace them with new ones.
Note
The battery indicator also appears when the AC adaptor is connected, though it has no meaning.
Accidental Operation Prevention Function (Hold Mode)
This function prevents accidental operation of buttons on the unit.
The unit and remote control have the HOLD switches, each of which works independently.
Bottom of the unit
Top of the remote control
Slide the HOLD switch in the direction shown by the arrow to activate it.
In HOLD mode, no button operation is possible.
• Once the HOLD switch of the unit has been activated, “HOLD” will appear each time a button on the unit is
pressed.
To operate the unit or remote control normally, release the HOLD switch.
Normal Play
Follow the numbers in the figure to perform normal-play.
1
Connect the headphones plug firmly.
2
Connect the remote control plug firmly.
3
Release the HOLD switches.
4
Load an MD.
1 Slide the OPEN switch to open the lid.
2 Open the lid by hand.
3 Insert the MD into the MD slot beneath the lid, with its label side facing up. Insert the MD until it stops. Be
sure % or ] mark on the MD are oriented as shown in the figure.
4 Close the lid.
“TOC Reading” appears on the display. Then the track number and playback time appear.
When a sound mode is set, the mode name (for example, “A.C.BASS”) will firstly appear.
5
Adjust the volume level between 0 and 25.
Press the VOLUME+, – button on the unit or remote control. To continuously change the volume level, depress
the VOLUME button.
3
6
Press the 6 button on the unit or remote control.
[Unit’s display]
Disc mark turns.
English
Playback will start from the first track and ends after playing all the tracks of the MD.
[Remote control’s display]
Playing time
Peak Level Meter
Playback mode and track title
Playing time
Number of tracks being played
Disc mark turns.
Number of tracks being played
To eject the MD, slide the OPEN switch to open the lid and open it by hand. Then, the MD comes out.
Notes
• If no MD is loaded, “NO DISC” appears on the display and the power will be automatically shut off after approx.
10 seconds.
• When the 6 button is pressed for the first time, “TOC Reading” and “T.READ” appear on the unit’s display and
remote control’s display for several seconds, to read the information on the MD. Wait until this message disappears except when stopping the unit by pressing the 7 button.
Operation
Display/reference
Button
Press during play.
Blinks.
Press again to restart play.
If nothing is done for 2 minutes, the
power will be automatically shut off.
Blinks.
To pause play
or
Press during play.
Stops.
Stops.
To stop play
(Stop mode)
or
Push in Stop mode, or
press for more than 1 second in any other mode.
To turn off the unit
(Off mode)
or
• Unit
(Blank display)
• Remote Control
Press the 6 button to restart play.
The current track will be played from
the beginning (Resume Play).
If nothing is done for 45 seconds, the
power will be automatically shut off.
In this case, to restart play, press the
6 button for more than one second.
The power is shut off after “POWER
OFF” and “BYE” appear on the display.
To turn on the unit, press the 6 button. Then, the last track before turning
off the power will be played from the
beginning (Resume Play).
(Blank display)
Operation
Fast forward/
reverse
Display/reference
Button
Skip function (unit)
Press during play or in Stop mode.
Search function (unit)
Keep depressed during play.
Skip function (remote control)
Press during play or in Stop mode.
Search function (remote control)
Keep depressed during play.
Reverse
Reverse
Forward
• During Random Play, the
skip buttons cannot be used
to skip back to tracks that
were played previously in the
random sequence.
Forward
4
English
Playback mode and track title display
When an MD is played back, the playback mode and the title recorded on the track being played back appear at the
lower part of the unit’s display. Also, on the remote control’s display, the track title appears once if it is recorded.
Also, “LP2” and “LP4” indicators are on the remote control’s display.
Playback mode:
There are four playback modes shown on the unit’s display; SP (STEREO), LP2, LP4, and MN (MONO). Note that
MDs are played back in the same recording length as they were recorded.
SP: Indicates the tracks recorded in standard stereo recording mode on this unit or those recorded on an MD recorder incompatible with MDLP*.
LP2: Indicates the tracks recorded in 2 times long-hour stereo recording mode. The “LP2” indicator on the remote
control’s display also lights up.
LP4: Indicates the tracks recorded in 4 times long-hour stereo recording mode. The “LP4” indicator on the remote
control’s display also lights up.
MN: Indicates the tracks recorded in standard monaural recording mode on this unit or those recorded on an MD
recorder incompatible with MDLP*. The “MONO” indicator on the unit’s display also lights up.
* MDLP features a new sound compression method (ATRAC3) and a 2 times (or 4 times) long-hour stereo
recording and playing function.
The MDLP logo is marked on the MD recorders and players compatible with MDLP. It is also marked on
MDs prerecorded in ATRAC3 (excluding recordable MDs).
Track title:
The track title will appear on the unit’s and remote control’s displays. If the title is long and cannot be displayed at a
time, it will be scrolled. If no title is given, “NO TITLE” will scroll on the unit’s display but nothing will appear on
the remote control’s display.
Changing the Sound (A.C.BASS)
You can choose one of the following sound modes. Each time you press the A.C.BASS button on the remote control,
the sound mode name changes as follows on both unit’s and remote control’s displays:
A.C.BASS
A.C.BASS = TRAIN = MANUAL* = (Original display)
*: On the Unit’s display, “MANUAL EQ” appears.
[In the case of remote control’s display]
A.C.BASS : The A.C.BASS (Active Clear Bass) function is enabled and the bass level is automatically controlled
in conjunction with the sound volume.
The “A.C.BASS” indicator lights up on the unit’s display and the
indicator lights up on the remote control’s display.
TRAIN
: The amount of sound leaking from the headphones will be reduced.
The indicator lights up on the remote control’s display.
MANUAL : In this mode, you can adjust the tone. See “Adjusting Tone in MANUAL Sound Mode” on page 6.
(MANUAL EQ)
The indicator lights up on the remote control’s display.
To cancel above function, press the A.C.BASS button on the remote control to exit above mode, i.e., to go out
, or indicator on the remote control’s display.
5
,
Adjusting Tone in MANUAL Sound Mode
1
Press the A.C.BASS button on the remote control until “MANUAL” appears on the display.
The
indicator lights up on the remote control’s display. (If the
step.)
2
English
You can adjust the tone by changing the bass and treble.
indicator is already lit, you can skip this
Press the A.C.BASS button for 2 seconds or more.
The following tone level meter appears on the remote control’s display.
Bass level bar
Fixed bars (flat level)
Treble level bar
(For 2 seconds)
A.C.BASS button
¢: Press to select Treble.
VOLUME +/– : Press to adjust the level.
4: Press to select Bass.
3
To change the bass level, press the 4 button. The bass level bar blinks. Then, press
the VOLUME + or – button to move the bass level bar up or down ( in 3 steps each).
4
To change the treble level, repeat above step 3 except for pressing the ¢ button.
To exit MANUAL sound mode:
• Wait until the display automatically returns to the original one.
• When no level bar is blinking, press a button other than the 4 and ¢ buttons on the remote control.
• When the level bar is blinking, press the A.C.BASS or 7 button on the remote control.
Notes
• If you leave the unit for 8 seconds in step 2, the display returns to the original one. In this case, repeat from the
step 2.
• If you leave the unit for 16 seconds in step 3 or 4, the display returns to the original one. In this case, repeat from
the step 2.
• The tone levels set here is stored in memory.
6
English
Showing the Disc Information
Each time you press the DISPLAY / CHARA. (or DISPLAY) button in Stop mode or during playback, the disc information is displayed as follows.
The DISPLAY / CHARA. button on the unit and the DISPLAY button on the remote control work independently.
or
Display change on the unit:
In Stop mode:
Disc title*, total track number, and total playback time
of the MD = Recordable capacity (remaining time) of
the MD (e.g. REMAIN -69:20) = Normal display =
(back to the beginning)
During Playback:
Playback remaining time of the track = Normal display = (back to the beginning)
Display change on the remote control:
In Stop mode:
Disc title* = Total track number and total playback
time of the MD = Track title* = Normal display =
(back to the beginning)
During Playback:
Track title* = Normal display = (back to the beginning)
*: The disc title or track title will scroll if it is long. If no title is given, “NO TITLE” appears on the unit’s display
and “
~” appears on the remote control’s display.
Repeat Play and Random Play (Using the Remote Control)
You can select Repeat Play or Random Play. In Repeat Play, you can repeat all the tracks or individual track as
many times as you like. In Random Play, you can play all the tracks in random order.
Selecting Repeat Play and Random Play in Stop mode
In Stop mode, press the P.MODE button on the remote control. Each time you press the button, the play mode
changes as follows:
P.MODE button
P1 = P = RND = P1 RND = PRND = Original display = (back to the beginning)
P1:
Repeats 1 track.
P:
Repeats all the tracks.
RND:
Random play
P1 RND: Repeats one track randomly selected.
PRND: Repeats all the tracks in random order.
(On the unit’s display, “RANDOM” indicator lights up instead of “RND”.)
After selecting one of the above modes, press the 6 button.
For example, to start Random Play, press the P.MODE button until “RND” indicator appears and then press the 6 button.
To exit Repeat Play or Random Play, stop the MD and then press the P.MODE button until the display returns to
the original one.
Repeat Play during Playback
7
During Normal Play:
Each time you press the P.MODE button, the play mode changes as follows:
P1 = P = Original display = (back to the beginning)
Select “P1” to repeatedly play the current track. Select “P” to repeat all the tracks.
During Random Play:
Each time you press the P.MODE button, the play mode changes as follows:
P1 RND = PRND = Original display = (back to the beginning)
Select “P1 RND” to repeatedly play a randomly selected track. Select “PRND” to repeat all the tracks in random
order. (On the unit’s display, “RANDOM” indicator lights up instead of “RND”.)
When you stop Random Play once and then restarts it, the track lastly played is played back. After that, Random
Play is carried out.
To exit Repeat Play, stop the MD and then press the P.MODE button until the display returns to the original one.
English
Selecting the Operational Options of Remote Control
Muting a pip tone
When you press the buttons on the remote control, a pip tone is issued except for the A.C.BASS and VOLUME +, – buttons.
To mute the pip tone, in Stop mode or during playback, press and
A.C.BASS
hold the A.C.BASS button, and within one second, press the P.MODE
button. “BEEP OFF” scrolls on the remote control’s display.
To resume a pip tone, do the same operation again. “BEEP ON”
(Within 1 second)
will scroll on the display.
(Press and hold)
Note
If the P.MODE button is not pressed within one second, Sound mode will changed.
Changing the Display Character Contrast
The character display contrast can be adjusted when the characters become less clear due to ambient temperature or
during scrolling. In Stop mode or during playback, press and hold the A.C.BASS button and, within one second,
press the 4 or ¢ button.
A.C.BASS
Adjustment can be made between LCD00 and LCD15. While the
4 or ¢ button is pressed, the contrast will be changed continuor
ously. The initial setting is “LCD10”.
(Within 1 second)
(Press and hold)
Note
If the 4 or ¢ button is not pressed within one second, Sound mode will be changed.
Preparation Before Recording
Connection for recording
Connect one of the following music sources to the unit.
• Analog input to the LINE IN (OPTICAL) jack
• Digital input to the LINE IN (OPTICAL) jack
• Microphone input to the MIC (PLUG IN POWER) jack
Stereo connection cable (not supplied)
Notes
Optical digital cable (supplied)
Microphone (not supplied)
MD player,
tape deck, etc.
CD player, etc.
• You cannot mix the microphone sound with the LINE IN source.
• Since the priority for each input is as follows, be sure to disconnect the other music source before recording. For
example, disconnect the microphone before recording an analog input.
Digital input (LINE IN) > MIC input > Analog input (LINE IN)
Things to know before you start recording
• It may be unlawful to record or play back copyrighted material without the consent of the copyright owner.
• Carefully read the “Rules of Digital Dubbing” on page 18.
• The MD recorder supports the following sampling frequencies for digital source, LINE IN (OPTICAL).
32 kHz, 44.1 kHz and 48 kHz
• When recording a digital input or microphone input, the recording level is automatically set correctly. When recording an analog input, it is necessary to adjust the recording level properly. Recording is not affected by the
A.C.BASS or tone level setting.
• The accidental erasure prevention knob is provided on the back of an MD cartridge to prevent accidental erasure
or recording. It must be set to the close position before recording or editing.
Accidental erasure prevention knob
• Remote control operation will be disabled during recording or editing.
• Unplugging or plugging of the connection cord or microphone should be avoided during recording.
Open
Close
• Removal of the rechargeable battery should be avoided
For recording
For protecting
during recording. Otherwise, you cannot open the lid unor editing
erasure
less the rechargeable battery is reinserted or AC adaptor is
connected to the unit.
8
English
Check Items Before Starting Recording
• The MD is not the Play-only type one.
• The accidental erasure prevention knob of the MD cartridge is set to the close position.
• The MD has enough space for recording. If not, carry out ALL ERASE or ERASE function mentioned later to
erase all the tracks or desired tracks in the MD. You can check the recordable remaining time of the MD by repeatedly pressing the DISPLAY/CHARA. button on the unit in Standby mode. (See “Showing the Disc Information” on page 7.)
Standard Recording
CAUTIONS:
• Be sure that the rechargeable battery is fully charged. Otherwise, the unit may shut off, leaving recording unfinished.
• While “UTOC Writing” appears on the display, to avoid improper recording, do not give a shock to the Unit and
do not disconnect any cable from the Unit, including the AC adaptor’s cable.
Notes
• The recording operation is possible only with the buttons on the unit.
• When a stereo signal is recorded in MONO mode, stereo sound will be heard though the signal is correctly recorded in
MONO mode.
1
Check the things before recording.
See “Check Items Before Starting Recording” above.
2
Insert an MD with its label side facing up.
Proceed to the next step after “TOC Reading” goes out on the display.
3
Slide the REC switch.
The unit enters Rec/Standby mode, the REC indicator lights up, and the disc mark blinks. The track number is
increased by one.
(Appears only if MONO is selected.)
Total track number
Remaining time
Recording mode
• To cancel Rec/Standby mode, press the 7/CHARGE button.
4
Within two minutes, press the REC MODE button to select the recording mode.
Each time you press the button, the display changes as follows:
SP = LP2 = LP4 = MONO
SP:
Signifies standard-hour stereo recording. The number of hours usable for recording is the same
shown on the package of the MD.
LP2:
Signifies 2 times long-hour stereo recording. The number of hours usable for recording is twice
long as shown on the package of the MD.
LP4:
Signifies 4 times long-hour stereo recording. The number of hours usable for recording is 4 times
long as shown on the package of the MD.
MONO: Signifies standard-hour monaural recording. The number of hours usable for recording is twice
long as shown on the package of the MD.
5
6
as
as
as
as
Play the recording source.
Adjust the recording level for analog input only.
See “Adjusting the recording level” on page 10.
7
Press the 6 button to start recording.
When the MD becomes full, “UTOC Writing” appears on the display, indicating that the recording is successfully completed. The “TOC” indicator will light up during this period. Then, the MD stops. (The “TOC” indicator goes out.)
To pause, press the 6 button. (The track number is increased by one.)
To cancel pause, press the 6 button again.
To stop recording, press the 7/CHARGE button. “UTOC Writing” appears on the display and then the MD stops.
(The “TOC” indicator goes out.)
Notes
• During recording, recording mode does not change even if the REC MODE button is pressed. To change it, you
need to stop the Unit.
• Once you have set the recording mode, it remains until the Unit is turned off. When the Unit is turned on, SP
(Stereo) recording mode is always selected.
9
Title “LP:” ON/OFF
English
To increase the space usable for a title, you can delete the recording mode name “LP:” that will be added immediately before the title.
In stop mode, press the SET button for two seconds or more. Each time you press the button, the display alternates
as follows:
TITLE LP: OFF Ô TITLE LP: ON
To delete from the title, select “TITLE LP: OFF”. Otherwise, select “ON”.
Note
The recorded “LP:” cannot be deleted (edited) with the TITLE function mentioned on page 14.
Adjusting the recording level (for analog input only)
The recording level should be adjusted so that the peak level meter does not reach the OVER mark to avoid distorting the recording signal.
Press the 4 or ¢ buttons on the unit to decrease or increase the recording level.
You can change the recording level between “REC LEVEL 00” (nothing will be recorded) to “REC LEVEL 25”.
Track marking (When recording LINE IN input signals)
• Whenever playback at the source side advances from one track to another during digital recording, the track
number of the MD is automatically incremented by 1.
• Whenever no sound at the playback side continues for 3 or more seconds during analog/digital recording, the track
number of the MD is automatically incremented by 1.
• During analog/digital recording, you can increment the track number by 1 by sliding the REC switch. (By adding the
track number in this way, you can edit the recording contents later using the edit functions, such as erase, move, and
join. Also, you can quickly locate the desired track using the fast forward or reverse button.)
Track marking (When recording MIC input signals)
You can choose the way to make a track for the MIC input, with the MIC IN MARK MODE switch on the bottom of
the unit.
• If you need to change the setting, you must set this switch before starting recording.
MANUAL: You can increase the track number by 1 by sliding the REC switch.
3 MIN:
The track number is automatically increased by 1 approx. every three minutes. You can also increase it by sliding the REC switch.
10 MIN:
The track number is automatically increased by 1 approx. every 10 minutes. You can also increase
it by sliding the REC switch.
SYNCHRO Recording (SYNCHRO)
The synchro recording automatically starts when an input signal is given and ends if no signal condition continues
for 30 seconds.
• Use the buttons on the unit.
1
Insert an MD with its label side facing up.
Proceed to the next step after “TOC Reading” goes out on the display.
2
3
Slide the REC switch.
Press the SYNCHRO button.
The “SYNC” indicator lights up, and the current recording mode and “SYNCHRO” appear on the display.
Then, the disc mark blinks.
To cancel the synchro recording, press the SYNCHRO button again to go out the “SYNC” indicator.
4
Press the 6 button.
The “SYNC” indicator blinks, indicating that the unit enters Rec/Standby mode.
5
Play the recording source.
When an input signal is detected by the unit, recording automatically starts.
The recording will automatically end if no signal condition continues for 30 seconds.
Note
Once the 6 button is pressed during the SYNCHRO recording, the unit enters Rec/Pause mode and the SYNCHRO
recording is disabled. To restart the SYNCHRO recording, repeat the above steps.
XM-R700E_ENG_P1-11.p65
10
10/27/00, 1:59 PM
10
English
Editing the MD (Using the unit)
In addition to its recording and play functions, the unit comes with editing functions. You can divide, join, move, or
erase the recorded tracks in the MD as required. Also, you can give a disc title to the MD and track titles to the
tracks in the MD.
Note that you cannot edit the MD in Random Play mode.
Dividing tracks (DIVIDE function)
Erasing tracks (ERASE function)
This involves adding a track mark (see Note) at some
point during the track which is to be made into the start
of an additional track so that the original track is divided into two tracks. Track No.
This enables unnecessary tracks. Narration, etc. to be
erased speedily. The erased parts do not remain as silences but are closed up by the subsequent tracks.
Track A Track B Track C
Track D
Track A Track B Track C
Track D
DIVIDE
Track No.
Erasing
Track B
Track A
Track B Track C
Track D
tracks can
Track A Track C Track D New
be recorded.
Joining tracks (JOIN function)
Erasing all the tracks (ALL ERASE
function)
This involves erasing a track mark and turning two adjoining tracks into one track.
All the tracks can be erased at once without recording
fresh material over them.
Track No.
Track No.
Track A Track B Track C
Track D
Track A + Track B Track C
Track D
JOIN
Moving tracks (MOVE function)
Tracks can be moved around so that they are in the desired sequence.
Track No.
Track A Track B Track C
Track D
Track A Track C Track D
Track B
ALL
ERASE
Track A
Track B Track C
Track D
New tracks can be recorded.
Giving titles to
(TITLE function)
discs
and
tracks
A title consisting of up to 61 characters can be given to
a disc and a track. The title given appears in the display
window.
MOVE
Note
Note
Track marks: These marks are provided to locate the start of each track. Whatever lies between one track mark and
the next is considered to a track and the numbers of the tracks (called “track numbers”) are displayed in the sequence
in which they are to be played.
11
English
Dividing Tracks (DIVIDE Function)
Use the unit to carry out this function.
1
In Stop mode, press the EDIT/ENTER button and turn the JOG dial until “DIVIDE?” is displayed.
2
Press the SET button and then press the 6 button.
JOG dial
Track to be divided
Playing time
3
Turn the JOG dial (or press the 4 or ¢ button) to select the track number to be divided.
4
Press the SET button at the point where the track is to be divided.
• The recording lasting for 4 seconds starting where the track was divided is repeatedly played for your reference.
• Movement is possible within the POSITION-128 to +128 range (the following period of time before and after
the position).
Recording mode SP:
About 8 seconds
Recording mode MONO or LP2: About 16 seconds
Recording mode LP4:
About 32 seconds
To move the point, turn the JOG dial while listening the music.
5
Press the EDIT/ENTER button.
“COMPLETE” and “TOC” appear, indicating successful recording.
• The selected track is divided into two tracks and the track number will increase by 1.
• When you turn off the power by pressing the 7/CHARGE button, “UTOC Writing” will be displayed and the
edited contents are written. (The “TOC” indicator goes out.)
To cancel the operation, press the 7/CHARGE button in step 1 through 4.
Joining Tracks (JOIN Function)
Use the unit to carry out this function.
1
In Stop mode, press the EDIT/ENTER button and turn the JOG dial until “JOIN?” is displayed.
2
Press the SET button.
JOG dial
Selected track
• You can listen to the track by pressing the 6 button. The selected track is repeatedly played.
3
Turn the JOG dial (or press the 4 or ¢ button) to select the track number to be joined.
Track to be joined
4
Selected track
Press the SET button.
“PUSH ENTER” appears.
5
Press the EDIT/ENTER button.
“COMPLETE” and “TOC” appear, indicating successful recording.
The selected track and the previous track are joined and the track number is decreased by 1.
• When you turn off the power by pressing the 7/CHARGE button, “UTOC Writing” will be displayed and the
edited contents are written. (The “TOC” indicator goes out.)
To cancel the operation, press the 7/CHARGE button in step 1 through 4.
Notes
• The tracks recorded in different recording modes cannot be joined. (For example, SP and LP2.)
• The track recorded with the analog input and that recorded with the digital input cannot be joined.
12
English
Moving Tracks (MOVE Function)
Use the unit to carry out this function.
1
In Stop mode, press the EDIT/ENTER
button and turn the JOG dial until
“MOVE?” is displayed.
2
Press the SET button.
5
Turn the JOG dial (or press the 4 or
¢ button) to select the destination to
which the track is to be moved.
JOG dial
Track to be moved
• You can listen to the track by pressing the 6
button. The track to be moved is repeatedly
played.
3
4
Turn the JOG dial (or press the 4 or
¢ button) to select the track number
to be moved.
Press the SET button.
Destination track
• If you are playing back the MD, the destination
track is repeatedly played.
Track to moved
6
Press the SET button.
“PUSH ENTER” appears.
7
Press the EDIT/ENTER button.
“COMPLETE” and “TOC” appear, indicating successful recording.
• When you turn off the power by pressing the 7/
CHARGE button, “UTOC Writing” will be displayed
and the edited contents are written. (The “TOC” indicator goes out.)
To cancel the operation, press the 7/CHARGE button
in step 1 through 6.
Erasing Tracks (ERASE Function)
Use the unit to carry out this function.
1
2
In Stop mode, press the EDIT/ENTER
button and turn the JOG dial until
“ERASE?” is displayed.
4
Press the SET button.
“COMPLETE” appears, indicating successful erasing.
The selected track is erased and the track number
is decreased by 1.
• When you turn off the power by pressing the 7/
CHARGE button, “UTOC Writing” will be displayed
and the edited contents are written.
To cancel the operation, press the 7/CHARGE button
in step 1 through 4.
JOG dial
Track to be erased
• You can listen to the track by pressing the 6
button. The track to be erased is repeatedly
played.
3
Turn the JOG dial (or press the 4 or
¢ button) to select the track number to
be erased.
Press the SET button.
“ERASE OK? PUSH ENTER” appears.
5
Press the EDIT/ENTER button.
Erasing All the Tracks (ALL ERASE Function)
Use the unit to carry out this function.
1
2
In Stop mode, press the EDIT/ENTER button and turn the JOG dial until “ALL ERASE?”
is displayed.
Press the SET button.
“ERASE OK? PUSH ENTER” appears.
3
Press the EDIT/ENTER button.
“COMPLETE” appears, indicating successful erasing.
All the tracks in the MD are erased and “BLANK DISC” is displayed.
• When you turn off the power by pressing the 7/CHARGE button, “UTOC Writing” will be displayed and the
edited contents are written.
To cancel the operation, press the 7/CHARGE button in step 1 or 2.
13
English
Giving Titles to MD (TITLE Function)
Use the unit to carry out this function.
• You can give a disc title to the MD and a track title to the tracks in the MD. Any title name can be given up to 61
characters using the provided character sets.
About the number of characters inputted for an MD
The total number of characters that can be input for an MD is 1792, and the maximum number that can be input for
each track is 61. (However, the actual number you can input may be slightly less than this maximum numbers due to
the MD limitations — see page 18.)
• A space can be counted as one character.
• When the stereo long-hour recording (LP2 or LP4: see page 9) method is used for recording, the maximum
number you can input for a track title automatically reduced since “LP:” and four spaces are automatically added
to the beginning of the track title. Consequently this reduces the total number of characters you can input for an
MD.
Example: You can input up to 10 characters for each track if an MD is composed of 120 tracks recorded using the
stereo long-hour recording method.
Note
• When “LP:” is recorded to head of the title, you cannot delete (edit) it. Attaching it or not is selectable before
recording. For details, see “Title “LP:” ON/OFF” on page 10.
1
In Stop mode, press the EDIT/ENTER
button.
4
Press the SET button.
Cursor
Title name area
“TITLE?” is displayed.
2
Press the SET button.
Characters to be input
Track to be entitled
5
• You can listen to the track by pressing the 6 button. The track to be entitled is repeatedly played.
3
Input a preferred title (up to 61 characters).
Use the following title editing buttons to input a title.
Turn the JOG dial (or press the 4 or
¢ button) to select the track number
to be entitled.
To select the disc title, turn the JOG dial reverse
(or press the 4 button) until the following disc
mark is shown on the display.
Disc mark
[Title editing buttons on the unit]
Button
Function
Changes the type of characters to be input as follows.
Upper-case letters (ABC) = Lower-case letters (abc) = Symbols (space, !”) = Numbers (012) =
(back to the beginning)
Adds the character being selected to the title name area.
JOG
(forward)
JOG
(reverse)
¢
4
Moves the cursor for the character to be input to the right. When continue turning, the characters scroll to
the left.
Moves the cursor for the character to be input to the left. When continue turning, the characters scroll to
the right.
Moves the cursor for the title name to the right.
Moves the cursor for the title name to the left.
14
English
Example: When input the title “M1”
1) Select “M” (put the cursor to the letter M using the JOG dial).
2) Press the SET button. The letter M is now displayed in the title name area.
3) Press the DISPLAY / CHARA. button until the numbers are displayed.
4) Select “1” and press the SET button. The title name “M1” will be displayed.
• If the wrong character has been input, clear it by pressing the 7/CHARGE button.
• To clear a particular character which has been input, use the ¢ or 4 button to align the cursor with the
character, and press the 7 /CHARGE button. Then, select the correct character and press the SET button.
[Character sets table]
Upper-case letters
Lower-case letters
A
B
C
D
E
a
b
c
d
e
F
G
H
I
J
f
g
h
i
j
K
L
M
N
O
k
l
m
n
o
P
Q
R
S
T
p
q
r
s
t
U
V
W
Z
6
X
Y
u
v
w
x
y
Symbols
Numbers
(space)
!
”
#
$
0
1
2
3
4
%
&
’
(
)
5
6
7
8
9
+
,
–
.
/
:
;
<
=
>
?
@
_
`
z
Press the EDIT/ENTER button.
“COMPLETE” and “TOC” appear, indicating successful recording.
• When you turn off the power by pressing the 7/CHARGE button, “UTOC Writing” will be displayed and the edited contents are written. (The “TOC” indicator goes out.)
To cancel the operation, press the 7/CHARGE button in step 1 through 3 or depress it in step 4 or 5, until the
display returns to the original display.
Using the Unit with Optional Accessory
Listening to MDs with an audio system
You can listen to MDs through your audio system.
• Connect a stereo connection cable (not supplied) as
shown on the right after turning off the amplifier.
• Adjust the volume level of the unit to an appropriate
level.
• Adjust the volume level on the amplifier.
• Use the unit’s buttons for operation. (The remote
control will issue a pip tone.)
Amplifier
or
Stereo connection cable
(not supplied)
Cautions
Batteries
• Before replacing batteries, always turn off the unit.
Rechargeable lithium–ion battery (BN-R3610):
• Use only the rechargeable battery (BN-R3610) supplied with the unit.
• If the power delivered by the battery lasts for a very short time after recharging, it means that the battery’s service
life is over. Do not use it any more.
• Recharging already charged battery will shorten its service life.
• When recharging battery for the first time or when it has not been used for a long period of time, the play time
may be shorter than usual. In a case like this, repeatedly recharge and discharge the battery. This will restore it to
its regular state.
• Do not allow any metal objects to touch the terminals of rechargeable battery since this may cause short-circuiting
which is dangerous.
• Recharging shall be made at the temperature from 0°C to 40°C.
Dry cell battery and rechargeable battery:
To prevent damage to the batteries and electrolyte leakage, heed the following points.
• Align the ª and · polarities properly when inserting the batteries.
• Remove the batteries if you do not plan to use the unit for a long period of time.
• Do not throw batteries into a fire, and do not short-circuit, disassemble or subject them to excessive heat.
• Do not attempt to recharge dry cell batteries.
15
English
Carrying batteries:
When putting dry cell or rechargeable battery in a pocket or bag, ensure that no other metal objects such as a necklace are placed together with them. Contact with metal may cause short-circuiting which, in turn, may cause a fire.
Notice about the rechargeable battery.
The battery is designated recyclable.
Please follow your local recycling regulations.
AC adaptor
• Handle the AC adaptor carefully. Improper handling is dangerous.
• Do not touch it with wet hands.
• Do not place heavy objects on top of it.
• Do not forcibly bend it.
• Be sure to connect only the AC adaptor provided with the unit.
• Disconnect the AC adaptor from the power outlet if the unit is not going to be used for a long time.
Unit
No altering or remodelling
This can cause malfunctioning.
No dropping or strong impacts
This may damage the unit.
Locations to be avoided
Avoid using the unit in the following locations since they can cause malfunctioning.
1. Bathrooms and other moisture-prone places.
2. Warehouses and other dusty places
3. Very hot places near heating appliances, etc.
Do not leave the unit exposed to direct sunlight for long periods of time
This may deform or discolor the cabinet and may also cause malfunctioning.
Precautions for Listening with the headphones
•
•
•
•
•
Do not play your headset at a high volume. Hearing experts advise against continuous extended play.
If you experience a ringing in your ears, reduce volume or discontinue use.
Do not use while operating a motorized vehicle. It may create traffic hazard and is illegal in many areas.
You should use extreme caution or temporarily discontinue use in potentially hazardous situations.
Even if your headphones is an open-air type designed to let you hear outside sounds, don’t turn up the volume so
high that you cannot hear what’s around you.
When driving a car
In the interest of traffic safety, do not operate the unit while driving.
Information on MDs (Minidiscs)
This is a new digital audio disc format: it has a diameter of 64 mm and enables up to 80 minutes (SP mode) of playback and
recording.
The cartridge
Playback-only MD
The diameter of the disc itself is 64 mm, smaller than a CD
single. The disc sits inside a 68 × 72 mm cartridge, which
also being pocket size, makes minidiscs extremely handy
for carrying and storage. Since the disc is protected by the
cartridge, dust and dirt cannot easily get into it. And thanks
to a shutter which is closed at all times except during use,
there is no need to worry about scratches or finger marks,
making the handling of minidiscs very simple.
This is the type used for commercially-available pre-recorded MDs, on which recording cannot be done. Like a
CD, data is recorded based on the presence or absence of
small indentations called pits. A disc recorded with this format is called an “optical disc.”
Two types of minidisc
There are two types of minidisc, “recordable MDs” and
“playback-only MDs.” The playback method for each is the
same: a laser irradiates the disc and the signal is read from
the beam which comes back. However, the recording
method for each type is different.
Recordable MDs
These are the so-called “blank” MDs you can use to make
your own recordings. Data is recorded by magnetism,
which is easily processed, so that recording can be done
again and again. By using a laser to heat the disc, the magnetism is erased and the magnetic head records the new
data. Discs with this type of recording method are called
magneto-optical (MO) discs.
16
English
ATRAC (Adaptive TRansform Acoustic
Coding)/ ATRAC3
The MD provides 80 minute recording and playback time,
much more than an audio CD, but in a diameter of only
64mm. This ability to store such a large amount of data is
the result of ATRAC, an audio compression technique developed for MD. This technology cuts out faint sounds that
would not be heard by the human beings. This technology,
based on human sensitivity to sounds, reduces recorded
data volume up to about one-fifth of the original data volume.
Furthermore, this unit takes advantage of the latest ATRAC 3
techniques, which can reduce the amount of data to record
to one-10th or one-20th of the original data volume. This
allows for 2 times or 4 times long-hour stereo recording on
this unit.
Sound skip guard memory
With the minidisc, the data of the track being played can be
temporarily stored up using a function called “sound skip
guard memory”. Even when data cannot be collected properly from the disc due to shaking or vibrations, information
is stored in the “sound skip guard memory”, so that there is
no break in the sound which is actually delivered.
UTOC (User Table Of Contents)
In a minidisc, apart from the recorded tracks, there is the
“UTOC”. In this area, information such as the position
where each track is recorded, the track divisions, and track
order are listed. When music search is done, the UTOC is
consulted, and the tracks are quickly found and played
back. When editing is done, only the UTOC is changed, so
there is no need to re-record the tracks.
MD (Minidisc) Messages
Message
BLANK DISC
CANNOT JOIN
You have tried to join tracks which cannot be joined.
DISC ERROR
There is a problem (damage) with the disc.
(Replace the disc.)
DISC FULL
There is not enough space left on the disc.
There are over 254 tracks.
DISC
PROTECTED
EMERGENCY STOP
NO DISC
NON AUDIO
CANNOT COPY
PLAYBACK DISC
TRACK
PROTECTED
SCMS
CANNOT COPY
DIGITAL IN
UNLOCK
BATT ERROR
HIGH TEMP
LOW TEMP
17
Meaning/Action
A disc has been inserted with nothing recorded on it.
The disc is in accidental erasure protection mode.
(Slide the accidental erasure protection tab so that the hole is covered.)
A malfunction occurred during recording.
(Stop the disc by pressing the 7 button and redo the operation.)
There is no disc in the unit.
You have tried to digitally dub a CD-ROM.
(Stop recording.)
You have tried to record or edit on a playback-only disc.
The track is protected. (This unit cannot undo track protection. Undo the protection using the appliance that created it.)
You have tried to make a copy of a copy by digital dubbing.
(Dub using analog input (LINE IN).)
The digital cable is disconnected.
The life of battery has ended.
The temperature of rechargeable battery is out of acceptable range.
English
Minidisc Limitations
The minidisc records information in an original format that differs from that of conventional cassette tapes or DATs.
Since there are some limitations with this recording format, the following types of conditions may arise. These conditions are not malfunctions.
Condition
Cause
“DISC FULL” is displayed, even though the pos- With the minidisc, there is a maximum number of tracks which
sible recording time is not used up.
can be recorded, regardless of time. More than 254 tracks cannot
be recorded on a disc.
“DISC FULL” is displayed, even though the num- When parts of the disc are erased and re-recorded, blank spots are
ber of tracks and recording time are not at the limit. created on the disc. When recording to such a disc, one track of
data is divided and recorded in the blank areas. During recording,
The JOIN function sometimes does not work.
The remaining usable time on the disc does not in- when these divided parts become numerous, the “DISC FULL”
message may be displayed. When a part of 8 seconds or less (SP
crease even when tracks are erased.
mode) is created by division, that track cannot be joined by the
The sound skip during fast forward or fast rewind.
JOIN function, and even if it is erased, the remaining usable time
on the disc does not increase. Tracks divided into small pieces
may skip when fast forward or fast rewind is done.
The amount of recorded time on the disc added to Minidiscs must have at least 2 seconds (SP mode) of continuous
the amount of remaining time falls shout of the space in order to record. For this reason, the actual recording time
of discs with a lot of short blank areas becomes shorter.
disc’s total possible recording time.
Rules of Digital Dubbing
The following rules regarding copyright exist for dubbing to MDs from CDs or DATs through digital terminals.
SCMS (Serial Copy Management System)
Minidiscs can record clear sound with low loss of quality from CDs or DATs through each component’s digital input/output
terminal. However, minidiscs are set up so that a disc recorded in this way cannot be recorded onto another minidisc through
digital input/output terminals. In other words, you can not make a copy of a copy. This rule is called SCMS (Serial Copy
Management System).
The recorder is designed in compliance with this rule. If you try to make a copy of a copy the error message “SCMS
CANNOT COPY” is displayed, and dubbing can not be done.
OK
DIGITAL
NO
DIGITAL
It may be unlawful to record or play back copyrighted material without the consent of the copyright owner.
Maintenance
Unit:
Wipe the unit and remote control with a soft cloth. Remove stubborn dirt using a cloth which has been dipped in
water or soapy water and wrung out, and then wipe dry.
• If you intend to use a chemically treated cleaning cloth, read its directions first.
• Do not use alcohol or paint thinners.
MDs:
If the MD cartridge is dirty, wipe it with a damp cloth and then wipe dry.
When storing MDs, avoid locations which are
• Exposed to direct sunlight.
• Susceptible to high levels of humidity or dust.
• Directly exposed to heat from a heating appliance.
• On top of a car dashboard or near the rear window.
Handling the MDs
• Do not open the shutter. The shutter is usually locked to prevent opening. Do not force to open it or the disc may
be destroyed.
18
English
Troubleshooting Guide
Before requesting service for this unit, check the chart below for a possible cause of the problem you are experiencing.
Some simple checks or a minor adjustment on your part may eliminate the problem and restore proper operation.
If you are in doubt about some of the check points, or if the remedies indicated in the chart do not solve the problem,
refer to the directory of Authorized Service Centers (enclosed with this unit) to locate a convenient service center, or
consult your dealer for instructions.
Problem
Cannot operate.
Cannot play the MD.
Tracks on MD do not play in order.
Recording cannot be made on MD.
Cannot hear music—too noisy.
TV picture is distorted.
Power is not turned on.
Check this
Is the MD loaded? If not loaded, “NO DISC” will appear.
• Is the HOLD switch released?
• Is the battery low?
• Is the MD faulty? (Play other MD.)
• Is there moisture condensation on the lens?
(Wait for about an hour and then try again.)
Is the Repeat Play or Random Play selected?
Is the accidental erasure prevention knob of the MD set to the open position?
(Set it to the close position.)
• Is the headphones plug inserted all the way?
• Is the plug dirty? (Wipe away dirt on the plug.)
• Is music recorded on the MD? If not, “BLANK DISC” will appear.
Is the unit too near a TV or tuner? (If the TV or tuner is connected to a simple
indoor antenna, connect it to an outdoor antenna.)
Was the power source removed from the unit with the HOLD switches activated?
(Release both HOLD switches and try to operate again.)
Discs recorded in long-hour stereo If the MD recorder or MD player has not MDLP logo on it, you cannot reproduce
recording mode (LP2 or LP4) with the track recorded using the LP mode. No sound comes out for that track, but this
this unit cannot be played back is not a malfunction.
with the other MD recorders and
MD players.
19
English
Specifications
Portable minidisc recorder
Type
Sampling frequency
Audio compression system
Number of channels:
Frequency response
Wow & flutter
Input
Output
Duration of battery
:
:
:
:
:
:
:
Minidisc digital audio system
44.1 kHz
ATRAC (Adaptive TRansform Acoustic Coding)/ATRAC3
2 channels (stereo) / 1 channel (mono)
20 Hz to 20 000 Hz
Unmeasurable
LINE IN: 100 mV / 47 kohms,
OPTICAL: –23 to –14 dBm,
(*Same jack is used for LINE IN and OPTICAL)
MIC: 1.3 mV / 200 ohms to 2 kohms
: Headphones (3.5 mm dia. stereo × 1)
3 mW / ch at 10% THD / 16 ohms to 47 kohms
:
When Playing back
Rechargeable battery
(BN-R3610)
Alkaline batteries
(LR6 DURACELL ULTRA)
Rechargeable battery
+
Alkaline batteries
When recording
SP
LP2
LP4
SP
LP2
LP4
13 hours
16 hours
18 hours
6 hours
8.5 hours
11 hours
37 hours
46 hours
51 hours
14 hours
19 hours
25 hours
55 hours
67 hours
75 hours
22 hours
31 hours
41 hours
* Above duration may differ depending on the ambient temperature and conditions.
* A rechargeable battery (BN-R3610) is charged for 2 hours.
Power requirements
Dimensions (W×H×D)
Mass
: DC 3.6 V (rechargeable battery),
DC 4.5 V (R6 size battery × 3),
DC IN 6 V
: 81.7 × 19.5 × 88.9 mm (excluding buttons and controls)
: Approx. 155 g (without battery)
AC adaptor (AA-R557)
Input power source
Output voltage
: AC 230 V, 50 Hz
: DC 6 V, 600 mA
Design and specifications are subject to change without notice.
US and foreign patents licensed from Dolby Laboratories Licensing Corporation.
20
VICTOR COMPANY OF JAPAN, LIMITED
GE, FR, NL
XM-R700(E)_Cover1-4.p65
1000MNMCREJES
2
10/30/00, 1:26 PM