1
,QVWDOODWLRQ
DQG2SHUDWLRQ
(;%
PP7DSH'ULYH
,QVWDOODWLRQ
XQG%HWULHE
(;%
PP%DQGODXIZHUN
,QVWDODFLyQ\
IXQFLRQDPLHQWR
(;%
8QLGDGGHFLQWDGHPP
,QVWDOODWLRQ
HWXWLOLVDWLRQ
(;%
8QLWpGHEDQGHPP
([DE\WH&RUSRUDWLRQ
WK6WUHHW
%RXOGHU&286$
3KRQH
(1*/,6+
'(876&+
(63$f2/
)5$1d$,6
Preparation . . . . . . . . . . . . . . . . . . . . . . . . . . . . . . . . . 3
Installation . . . . . . . . . . . . . . . . . . . . . . . . . . . . . . . . . 4
Operation . . . . . . . . . . . . . . . . . . . . . . . . . . . . . . . . . 11
Cleaning . . . . . . . . . . . . . . . . . . . . . . . . . . . . . . . . . . 18
Troubleshooting. . . . . . . . . . . . . . . . . . . . . . . . . . . . 21
Returning the Tape Drive. . . . . . . . . . . . . . . . . . . . 26
Index . . . . . . . . . . . . . . . . . . . . . . . . . . . . . . . . . . . . . 27
Vorbereitung . . . . . . . . . . . . . . . . . . . . . . . . . . . . . . . 3
Installation . . . . . . . . . . . . . . . . . . . . . . . . . . . . . . . . . 4
Betrieb . . . . . . . . . . . . . . . . . . . . . . . . . . . . . . . . . . . . 11
Reinigung . . . . . . . . . . . . . . . . . . . . . . . . . . . . . . . . . 18
Fehlerbehebung . . . . . . . . . . . . . . . . . . . . . . . . . . . . 21
Zurückgabe des Bandlaufwerks . . . . . . . . . . . . . . 26
Index . . . . . . . . . . . . . . . . . . . . . . . . . . . . . . . . . . . . . 27
Preparación. . . . . . . . . . . . . . . . . . . . . . . . . . . . . . . . . 3
Instalación. . . . . . . . . . . . . . . . . . . . . . . . . . . . . . . . . . 4
Funcionamiento . . . . . . . . . . . . . . . . . . . . . . . . . . . . 11
Limpieza . . . . . . . . . . . . . . . . . . . . . . . . . . . . . . . . . . 18
En caso de problemas . . . . . . . . . . . . . . . . . . . . . . . 21
Devolución de la unidad de cinta . . . . . . . . . . . . . 26
Índice . . . . . . . . . . . . . . . . . . . . . . . . . . . . . . . . . . . . . 27
Préparation . . . . . . . . . . . . . . . . . . . . . . . . . . . . . . . . . 3
Installation . . . . . . . . . . . . . . . . . . . . . . . . . . . . . . . . . 4
Utilisation . . . . . . . . . . . . . . . . . . . . . . . . . . . . . . . . . 11
Nettoyage . . . . . . . . . . . . . . . . . . . . . . . . . . . . . . . . . 18
Résolution des problèmes . . . . . . . . . . . . . . . . . . . 21
Renvoi de l’unité de bande. . . . . . . . . . . . . . . . . . . 26
Index . . . . . . . . . . . . . . . . . . . . . . . . . . . . . . . . . . . . . 27
Copyright 1995, 1996 by Exabyte Corporation. All rights
reserved.
EXABYTE, EXAPAK, EXB, FileSECURE, LANCourier, and
NetSECURE are registered trademarks of Exabyte Corporation.
Eagle, EXA, EXATAPE, EXAFacts, EXAsoft, and SCIMON are
trademarks of Exabyte Corporation.
5HYLVLRQ+LVWRU\
000 – May 1995
001 – July 1995
002 – September 1995
003 – February 1996
Copyright 1995, 1996 by Exabyte Corporation. Alle Rechte
vorbehalten.
EXABYTE, EXAPAK, EXB, FileSECURE, LANCourier und
NetSECURE sind eingetragene Warenzeichen der Exabyte
Corporation. Eagle, EXA, EXATAPE, EXAFacts, EXAsoft und
SCIMON sind Warenzeichen der Exabyte Corporation.
5HYLVLRQVGDWHQ
000 – Mai 1995
001 – Juli 1995
002 – September 1995
003 – Februar 1996
Copyright por Exabyte Corporation 1995, 1996. Reservados todos
los derechos.
EXABYTE, EXAPAK, EXB, FileSECURE, LANCourier y
NetSECURE son marcas registradas de Exabyte Corporation.
Eagle, EXA, EXATAPE, EXAFacts, EXAsoft y SCIMON son
marcas comerciales de Exabyte Corporation.
+LVWRULDOGHUHYLVLRQHV
000 – Mayo de 1995
001 – Julio de 1995
002 – Septiembre de 1995
003 – Febrero de 1996
Copyright 1995, 1996 par Exabyte Corporation. Tous droits
réservés.
EXABYTE, EXAPAK, EXB, FileSECURE, LANCourier et
NetSECURE sont des marques déposées d’Exabyte Corporation.
Eagle, EXA, EXATAPE, EXAFacts, EXAsoft et SCIMON sont des
marques commerciales d’Exabyte Corporation.
+LVWRULTXHGHVUpYLVLRQV
000 – Mai 1995
001 – Juillet 1995
002 – Septembre 1995
003 – Février 1996
3UHSDUDWLRQ
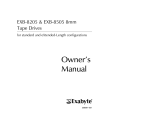
Thank you for selecting the EXABYTE® EXB-8700 8mm
Tape Drive. This high-capacity tape drive stores up to
14 GB (2:1 compression) on a 160m XL data cartridge.
The tape drive can write and read data in 8500 or 8500c
format. If the data cartridge is write-protected, the tape
drive can read data in 8200 format.
9RUEHUHLWXQJ
7DSH
/HQJWK
P
P
P
P;/
FIRUPDW
FRPSUHVVLRQ
*%
*%
*%
*%
/lQJHGHU
.DVVHWWH
P
P
P
P;/
)RUPDWF
.RPSUHVVLRQ
*%
*%
*%
*%
/RQJLWXG
GHODFLQWD
P
P
P
P;/
)RUPDWRF
FRPSUHVLyQ
*%
*%
*%
*%
IRUPDW
*%
*%
*%
*%
(1*/,6+
Vielen Dank für den Erwerb des EXABYTE® EXB-8700
8mm-Bandlaufwerks. Dieses Hochkapazitätsbandkassettenlaufwerk speichert bis zu 14 GB (2:1
Kompression) auf einer 160m XL Datenkassette.
Das Bandlaufwerk kann Daten im Format 8500 oder
8500c schreiben bzw. lesen. Ist die Datenkassette
schreibgeschützt, kann das Bandlaufwerk Daten im
Format 8200 lesen.
3UHSDUDFLyQ
)RUPDW
*%
*%
*%
*%
'(876&+
Gracias por haber elegido la unidad de cinta de 8mm
EXABYTE® EXB-8700. Esta unidad de cinta de alta
capacidad puede almacenar hasta 14 GB (compresión
2:1) en una unidad de datos 160m XL.
La unidad de cinta puede escribir y leer datos en los
formatos 8500 ó 8500c. Si el cassette tenga protección
antiescritura, la unidad de cinta sólo podrá leer datos
en formato 8200.
3UpSDUDWLRQ
)RUPDWR
*%
*%
*%
*%
(63$f2/
Nous tenons tout d’abord à vous remercier d’avoir
choisi l’unité de bande 8mm EXABYTE® EXB-8700.
Cette unité de bande à haute capacité peut stocker un
maximum de 14 gigaoctets (compression 2:1) sur la
cartouche de données 160m XL.
/RQJXHXUGH
)RUPDWF
ODEDQGH
FRPSUHVVLRQ
P
*R
P
*R
P
*R
P;/
*R
L’unité de bande est capable d’écrire des données en
format 8500 ou 8500c. Si la cartouche de données est
)RUPDW
*R
*R
*R
*R
)5$1d$,6
protégée en écriture, l’unité de bande peut lire les
données en format 8200.
,QVWDOODWLRQ
² ,QVWDOOD6&6,DGDSWHUFDUG
(1*/,6+
&$87,21
%HIRUHLQVWDOOLQJWKHWDSHGULYHWXUQRIIDOOGHYLFHV
DWWDFKHGWR\RXUFRPSXWHUWKHQWXUQRII\RXUFRPSXWHU
7KH(;%LVDVLQJOHHQGHG6&6,GHYLFH'RQRW
LQVWDOOLWRQDGLIIHUHQWLDO6&6,EXV
,QVWDOODWLRQ
The tape drive is a SCSI device and must be connected
to a SCSI adapter card. If necessary, install the card in
your computer and configure it to operate with your
system. Refer to the documentation that accompanied
the card.
² ,QVWDOODWLRQHLQHU6&6,$GDSWHUNDUWH
'(876&+
9256,&+7
6FKDOWHQ6LHYRU,QVWDOODWLRQGHV%DQGODXIZHUNVDOOHDQ
GHQ&RPSXWHUDQJHVFKORVVHQHQ*HUlWHXQGGDQQGHQ
&RPSXWHUDXV
'DV(;%LVWHLQ6LQJOH(QGHG6&6,*HUlW1LFKWDQ
HLQHP'LIIHUHQWLDO6&6,%XVLQVWDOOLHUHQ
,QVWDODFLyQ
(63$f2/
35(&$8&,Ð1
$QWHVGHLQVWDODUODXQLGDGGHFLQWDDSDJXHWRGRVORV
GLVSRVLWLYRVFRQHFWDGRVDVXFRPSXWDGRUD\OXHJR
DSDJXHODFRPSXWDGRUD
Das Bandlaufwerk ist ein SCSI-Gerät und muß an eine
SCSI-Adapterkarte angeschlossen sein. Installieren Sie
ggf. die Karte im Computer, und konfigurieren Sie die
Karte so, daß sie auf den Computer abgestimmt ist.
Informationen hierzu finden Sie in der Dokumentation
der Karte.
² ,QVWDODUXQDWDUMHWDDGDSWDGRUD6&6,
La unidad de cinta es un dispositivo SCSI y debe ser
conectada a una tarjeta adaptadora SCSI. Si es
necesario, instale la tarjeta en la computadora y
configúrela para que funcione en su sistema. Consulte
la documentación de la tarjeta.
/DXQLGDG(;%HVXQGLVSRVLWLYRPRQRVHxDO6&6,
1RODLQVWDOHHQXQEXV6&6,GLIHUHQFLDO
,QVWDOODWLRQ
)5$1d$,6
$77(17,21
$YDQWG·LQVWDOOHUO·XQLWpGHEDQGHPHWWH]KRUVWHQVLRQ
WRXVOHVSpULSKpULTXHVFRQQHFWpVjO·RUGLQDWHXUSXLV
O·RUGLQDWHXUOXLPrPH
² ,QVWDOODWLRQG·XQDGDSWDWHXU6&6,
L’unité de bande est un périphérique SCSI qui doit être
connecté à un adaptateur SCSI. Si besoin est, installez
la carte dans l’ordinateur et configurez-la pour qu’elle
fonctionne sur votre système. Pour ce faire, consultez
la documentation livrée avec la carte.
/·XQLWp(;%HVWXQSpULSKpULTXH6&6,jVLPSOH
WHUPLQDLVRQ1HO·LQVWDOOH]SDVVXUXQEXV6&6,
GLIIpUHQWLHO
² (LQVWHOOHQGHU6&6,,GHQWLILNDWLRQVQXPPHU
+LQZHLV Wenn Sie die SCSI-ID zu einem späteren
Zeitpunkt ändern, schalten Sie das
Bandlaufwerk und den Computer aus, und
schalten Sie beide Geräte nachher wieder ein,
damit die Änderung in Kraft tritt.
Die SCSI-Identifikationsnummer des Bandlaufwerks
ist werkseitig auf 2 eingestellt. Wenn Sie das Laufwerk
an einem bereits vorhandenen SCSI-Bus installieren
und einem anderen Gerät (z.B. einer Festplatte) wurde
diese Identifikationsnummer bereits zugewiesen,
drehen Sie den Drehschalter mit einem Schraubenzieher, bis die Pfeilspitze auf die gewünschte
Identifikationsnummer zeigt.
² (VWDEOHFHUODLGHQWLILFDFLyQ6&6,
1RWD Si decide cambiar la identificación SCSI más
adelante, apague la unidad de cinta y la
computadora, y enciéndalas de nuevo para que
el cambio surta efecto.
La unidad de cinta se envía de fábrica con la
identificación establecida en 2. Si la va a instalar en un
bus SCSI existente, y hay otro dispositivo (por ejemplo,
una unidad de disco duro) que ya esté utilizando dicha
identificación, haga girar el conmutador con un
destornillador pequeño hasta que la flecha señale la
identificación deseada.
² 3DUDPpWUDJHGHO·,'6&6,
5HPDUTXH Si vous changez d’ID ultérieurement,
mettez l’unité de bande et l’ordinateur hors
tension, puis remettez-les sous tension pour que
la modification entre en vigueur.
L’unité de bande est livrée avec l’ID SCSI réglée sur 2.
Si vous l’installez sur un bus SCSI existant et qu’un
autre périphérique (un disque dur, par exemple) est
déjà affecté à cette ID, faites tourner le commutateur
rotatif à l’aide d’un petit tournevis jusqu’à ce que la
flèche désigne l’ID souhaitée.
'(876&+
The tape drive is shipped with the SCSI ID set to 2. If
you are installing it on an existing SCSI bus and
another device (for example, a hard drive) is already
assigned to that ID, use a small screwdriver to turn the
rotary switch until the arrow points to the desired ID.
(63$f2/
1RWH If you change the SCSI ID later, turn off the tape
drive and your computer, then turn them on
again to make the change take effect.
)5$1d$,6
² 6HWWKH6&6,,'
(1*/,6+
² &RQQHFWWKH6&6,FDEOH
➤ ,PSRUWDQW
(1*/,6+
2QHRIWKH6&6,FDEOHVDWWDFKHGWRWKH
WDSHGULYHPXVWKDYHDIHUULWHEHDGLQVWDOOHGRQLW8VHWKH
6&6,FDEOHLQFOXGHGZLWK\RXUWDSHGULYH'RQRWXVHD
GLIIHUHQWFDEOH
Plug the end of the SCSI cable nearest the ferrite bead
into one of the SCSI connectors on tape drive. Plug the
other end of the cable into the SCSI connector on the
back of your computer.
If the tape drive does not terminate the SCSI bus,
connect the cable to the next device on the SCSI bus.
² $QVFKOLHHQGHV6&6,.DEHOV
➤ :LFKWLJ
'(876&+
(LQHVGHUDQGDV%DQGODXIZHUN
DQJHVFKORVVHQHQ6&6,.DEHOPXEHUHLQHQLQVWDOOLHUWHQ
)HUULWULQJYHUIJHQ9HUZHQGHQ6LHGDVPLWGHP
%DQGODXIZHUNJHOLHIHUWH6&6,.DEHO9HUZHQGHQ6LHNHLQ
DQGHUHV.DEHO
Stecken Sie das eine Ende des SCSI-Kabels, an dem sich
der Ferritring befindet, in einen der SCSI-Konnektoren
am Bandlaufwerk. Stecken Sie das andere Ende des
Kabels in den SCSI-Konnektor an der Rückseite des
Computers.
Wenn das Bandlaufwerk nicht das Ende des SCSI-Bus
darstellt, schließen Sie das Kabel an das nächste Gerät
des SCSI-Bus an.
² &RQHFWDUHOFDEOH6&6,
➤ ,PSRUWDQWH
(63$f2/
(VLPSUHVFLQGLEOHTXHXQRGHORVFDEOHV
FRQHFWDGRVDODXQLGDGGHFLQWDWHQJDLQVWDODGRXQ
DLVODGRUWLSRSHUODGHIHUULWR8WLOLFHHOFDEOH6&6,TXHVH
HQYtDFRQODXQLGDGGHFLQWDQRXWLOLFHQLQJ~QRWURFDEOH
Enchufe el extremo del cable SCSI más cercano al
aislador tipo perla de ferrito en uno de los conectores
SCSI de la unidad de cinta. Enchufe el otro extremo del
cable en el conector SCSI situado en la parte trasera de
la computadora.
Si la unidad de cinta no se encuentra en el extremo de
la cadena de dispositivos SCSI, conecte el cable al
siguiente dispositivo del bus SCSI.
² &RQQH[LRQGXFkEOH6&6,
➤ ,PSRUWDQW
)5$1d$,6
8QWRUHGHIHUULWHGRLWrWUHLQVWDOOpVXUXQ
GHVFkEOHV6&6,FRQQHFWpVjO·XQLWpGHEDQGH8WLOLVH]
H[FOXVLYHPHQWOHFkEOH6&6,IRXUQLDYHFO·XQLWpGHEDQGH
Branchez l’extrémité du câble SCSI la plus proche du
tore de ferrite sur un des connecteurs SCSI de l’unité de
bande. Branchez l’autre extrémité du câble sur le
connecteur SCSI situé à l’arrière de l’ordinateur.
Si l’unité de bande ne constitue pas la terminaison du
bus SCSI, connectez le câble au périphérique suivant
du bus SCSI.
² 7HUPLQDWHWKH6&6,EXV
,IDQRWKHU6&6,GHYLFHSUHYLRXVO\
WHUPLQDWHGWKH6&6,EXVDQGZLOOQRORQJHUEHDWWKH
SK\VLFDOHQGRIWKHEXVUHPRYHWKHWHUPLQDWRUVIURPWKDW
GHYLFH,IDQLQWHUQDO6&6,GHYLFHIRUH[DPSOHDKDUG
GULYHLVDWWDFKHGWRWKHVDPH6&6,DGDSWHUFDUGUHPRYH
WKHWHUPLQDWRUVIURPWKHDGDSWHUFDUG5HIHUWRWKH
DGDSWHUFDUGGRFXPHQWDWLRQ
The SCSI bus must be terminated correctly to ensure
proper operation. If your tape drive will be located at
the physical end of the SCSI bus, install the terminator
in the accessory kit onto either of the SCSI connectors
on the tape drive.
² $EVFKOLHHQGHV6&6,%XV
(1*/,6+
➤ ,PSRUWDQW
%HIDQGVLFKDP6&6,%XVDEVFKOX]XYRUHLQ
DQGHUHV6&6,*HUlWHQWIHUQHQ6LHGLH$EVFKOVVHYRQ
GLHVHP*HUlW,VWHLQLQWHUQHV6&6,*HUlW]%HLQH
)HVWSODWWHDQGLHJOHLFKH6&6,$GDSWHUNDUWHDQJH
VFKORVVHQHQWIHUQHQ6LHGLH$EVFKOVVHYRQGHU
$GDSWHUNDUWH1lKHUH,QIRUPDWLRQHQILQGHQ6LHLQ
GHU'RNXPHQWDWLRQGHU$GDSWHUNDUWH
Der SCSI-Bus muß ordnungsgemäß abgeschlossen
werden, um richtig zu funktionieren. Wenn sich das
Bandlaufwerk am Ende des SCSI-Bus befindet, stecken
Sie den Abschlußwiderstand aus dem Zusatzkit in
einen der SCSI-Anschlüsse am Bandlaufwerk.
² &RORFDUXQWHUPLQDGRUHQHOEXV6&6,
'(876&+
➤ :LFKWLJ
6LWLHQHRWURGLVSRVLWLYR6&6,FRORFDGR
HQHOH[WUHPRGHODFDGHQDGHGLVSRVLWLYRV6&6,\QRGHVHD
PDQWHQHUORHQHOH[WUHPRItVLFRGHOEXVUHWLUHORV
WHUPLQDGRUHVGHGLFKRGLVSRVLWLYR6LWLHQHXQGLVSRVLWLYR
LQWHUQRSRUHMHPSORXQDXQLGDGGHGLVFRGXUR
FRQHFWDGRDODPLVPDWDUMHWDDGDSWDGRUD6&6,UHWLUHORV
WHUPLQDGRUHVGHGLFKDWDUMHWD&RQVXOWHOD
GRFXPHQWDFLyQGHODWDUMHWDDGDSWDGRUD
Es necesario colocar un terminador en el bus SCSI para
que el mismo funcione correctamente. Si va a colocar la
unidad de cinta en el extremo físico del bus SCSI,
instale el terminador que se incluye en el kit de
accesorios en cualquiera de los dos conectores SCSI de
la unidad de cinta.
² 7HUPLQDLVRQGXEXV6&6,
(63$f2/
➤ ,PSRUWDQWH
6LOHEXV6&6,VHWHUPLQDLWDXSDUDYDQWSDU
XQDXWUHSpULSKpULTXH6&6,TXLHVWjSUpVHQWUHWLUpGH
O·H[WUpPLWpSK\VLTXHGXEXVUHWLUH]OHVWHUPLQDLVRQVGH
FHSpULSKpULTXH6LXQSpULSKpULTXH6&6,LQWHUQHXQ
GLVTXHGXUSDUH[HPSOHHVWFRQQHFWpDXPrPH
DGDSWDWHXU6&6,UHWLUH]OHVWHUPLQDLVRQVGHO·DGDSWDWHXU
&RQVXOWH]ODGRFXPHQWDWLRQGHO·DGDSWDWHXU
Assurez-vous de la bonne terminaison du bus SCSI
pour que l’unité fonctionne correctement. Si l’unité de
bande est située à l’extrémité physique du bus SCSI,
installez la terminaison fournie dans le jeu d’accessoires sur un des deux connecteurs SCSI de l’unité de
bande.
)5$1d$,6
➤ ,PSRUWDQW
² &RQQHFWWKHSRZHUVXSSO\
(1*/,6+
&$87,21
² &RQQHFWWKHSRZHUFRUG
Plug the power cord into the power supply and the
other end into a power outlet.
0DNHVXUHWKDWWKHSRZHUVZLWFKHVRQWKHFRPSXWHUDQG
WKHWDSHGULYHDUHWXUQHGRII
Plug the power supply into the tape drive. The
connector is keyed and only fits one way.
² $QVFKOXGHV1HW]DGDSWHUV
'(876&+
9256,&+7
9HUJHZLVVHUQ6LHVLFKGDGLH1HW]VFKDOWHUDP&RPSXWHU
XQGDP%DQGODXIZHUNDXVJHVFKDOWHWVLQG
² $QVFKOXGHV1HW]NDEHOV
Stecken Sie das eine Ende des Netzkabels in den
Netzadapter und das andere Ende in die
Netzsteckdose.
Stecken Sie das Kabel des Netzadapters in das
Bandlaufwerk. Bei dem Stecker handelt es sich um
einen formschlüssigen Stecker, der nur paßt, wenn er
richtig eingesteckt wird.
² &RQHFWDUODIXHQWHGHDOLPHQWDFLyQ
(63$f2/
35(&$8&,Ð1
$VHJ~UHVHGHTXHORVLQWHUUXSWRUHVGHODFRPSXWDGRUD\GH
ODXQLGDGGHFLQWDVHHQFXHQWUHQDSDJDGRV
² &RQHFWDUHOFDEOHGHDOLPHQWDFLyQ
Enchufe un extremo del cable de alimentación en la
fuente de alimentación, y el otro en una toma de
corriente.
Enchufe la fuente de alimentación en la unidad de
cinta. El conector tiene guías de posicionamiento y sólo
encajará si se introduce de la manera correcta.
² &RQQH[LRQGXERvWLHUG·DOLPHQWDWLRQpOHFWULTXH
)5$1d$,6
$77(17,21
9pULILH]TXHOHVLQWHUUXSWHXUVGHPLVHVRXVWHQVLRQGH
O·RUGLQDWHXUHWGHO·XQLWpGHEDQGHVRLHQWELHQVXUODSRVLWLRQ
KRUVWHQVLRQ
² &RQQH[LRQGXFkEOHG·DOLPHQWDWLRQ
Connectez une extémité du câble d’alimentation sur le
boîtier et branchez l’autre extrémité sur une prise de
courant.
Branchez le boîtier d’alimentation électrique sur l’unité
de bande. Le connecteur est détrompé et ne s’adapte
que d’une seule façon.
² 3RZHURQWKHWDSHGULYH
7XUQRQWKHWDSHGULYHEHIRUH\RXWXUQRQ
WKHFRPSXWHU2WKHUZLVHWKH6&6,DGDSWHUFDUGZLOOQRW
GHWHFWWKHWDSHGULYH
Turn on the tape drive and then the computer. Wait
while the tape drive completes its power-on self-test
(the Power LED remains on).
1RWH The Open button is disabled during this test.
² (LQVFKDOWHQGHV%DQGODXIZHUNV
(1*/,6+
➤ ,PSRUWDQW
6FKDOWHQ6LHHUVWGDV%DQGODXIZHUNHLQ
EHYRU6LHGHQ&RPSXWHUHLQVFKDOWHQ'LH6&6,
$GDSWHUNDUWHNDQQVRQVWGDV%DQGODXIZHUNQLFKW
HUNHQQHQ
Schalten Sie erst das Bandlaufwerk und dann den
Computer ein. Warten Sie, bis das Bandlaufwerk den
Einschalt-Selbsttest durchgeführt hat (die LED „Power“
bleibt an).
+LQZHLV Die Taste „Open“ ist während der
Durchführung des Tests deaktiviert.
² (QFHQGHUODXQLGDGGHFLQWD
'(876&+
➤ :LFKWLJ
(QFLHQGDODXQLGDGGHFLQWDDQWHVGH
HQFHQGHUODFRPSXWDGRUD'HORFRQWUDULRODWDUMHWD
DGDSWDGRUD6&6,QRGHWHFWDUiODXQLGDGGHFLQWD
Encienda la unidad de cinta y a continuación la
computadora. Espere hasta que la unidad de cinta haya
terminado la autocomprobación de encendido (el
indicador LED Power permanece iluminado).
1RWD El botón Open se encuentra desactivado durante
la autocomprobración.
² 0LVHVRXVWHQVLRQGHO·XQLWpGHEDQGH
(63$f2/
➤ ,PSRUWDQWH
$OOXPH]O·XQLWpGHEDQGHDYDQW
O·RUGLQDWHXUVLQRQO·DGDSWDWHXU6&6,QHVHUDSDVHQ
PHVXUHGHODGpWHFWHU
Allumez l’unité de bande, puis l’ordinateur. Attendez
que l’unité de bande ait terminé l’auto-test de mise sous
tension (la diode électroluminescente de mise sous
tension « Power » reste allumée).
5HPDUTXH Le bouton « Open » permettant l’ouverture
de l’appareil est désactivé pendant ce test.
)5$1d$,6
➤ ,PSRUWDQW
(1*/,6+
² ,QVWDOODQGFRQILJXUH\RXUVRIWZDUH
² 7HVW\RXULQVWDOODWLRQ
If necessary, install your application software and learn
how to use it. When configuring the software, select
the EXB-8700 device driver. If this driver is
unavailable, select a driver for the EXB-8505.
Insert a data cartridge (see pages 12 – 16). Back up and
restore a small amount of data to verify that the tape
drive and software are operating correctly.
If you experience problems with your application
software, contact the software vendor for assistance.
² ,QVWDOODWLRQXQG.RQILJXUDWLRQ,KUHU
'(876&+
6RIWZDUH
Installieren Sie ggf. Ihre Backup-Software und lernen
Sie, diese zu gebrauchen. Wählen Sie bei der Konfiguration der Software den Gerätetreiber EXB-8700. Steht
dieser Treiber nicht zur Verfügung, wählen Sie einen
Treiber für EXB-8505.
² 7HVWHQGHU,QVWDOODWLRQ
Legen Sie eine Datenkassette ein (siehe Seite 12 – 16).
Sichern Sie eine kleinere Datenmenge, und stellen Sie
diese wieder her, um zu überprüfen, ob das Bandlaufwerk und die Software richtig funktionieren.
Falls Sie Schwierigkeiten mit Ihrer AnwendungsSoftware haben, wenden Sie sich bitte an Ihren
Software-Händler.
(63$f2/
² ,QVWDODU\FRQILJXUDUHOVRIWZDUH
² 3UREDUODLQVWDODFLyQ
Si es necesario, instale el software de seguridad y
aprenda a utilizarlo. Cuando configure el software,
seleccione el controlador de dispositivo para la unidad
EXB-8700. Si este dispositivo no se encuentra disponible,
seleccione un controlador para la unidad EXB-8505.
Inserte un cassette de datos (consulte las páginas 12 – 16).
Lleve a cabo una operación simple de copia de seguridad
y restauración de datos para verificar que la unidad de
cinta y el software funcionan correctamente.
Si tiene problemas con la aplicación de software,
póngase en contacto con el distribuidor del software
para obtener ayuda.
)5$1d$,6
² ,QVWDOODWLRQHWFRQILJXUDWLRQGXORJLFLHO
² 7HVWGHO·LQVWDOODWLRQ
Si besoin est, installez le logiciel de sauvegarde et
apprenez à l’utiliser. Lors de sa configuration,
sélectionnez le gestionnaire de périphérique EXB-8700.
Si ce gestionnaire n’est pas disponible, sélectionnez un
gestionnaire EXB-8505.
Insérez une cartouche de données (voir pages 12 – 16).
Sauvegardez puis restaurez une petite quantité de
données pour vérifier le bon fonctionnement de l’unité
de bande et du logiciel.
Si votre application ne fonctionne pas correctement,
contactez votre revendeur pour obtenir de l’aide.
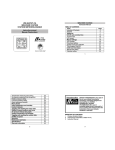
2SHUDWLRQ
➎ &ORVHEXWWRQ
➊ 3RZHU/('JUHHQ²3RZHURQVROLGRUWDSHPRWLRQ
➏ 3RZHUVZLWFK
➋ &OHDQ/('\HOORZ²7LPHWRFOHDQVROLG
1RWH All three LEDs turn on briefly (2 to 3 seconds)
during the power-on self-test. When the test is
complete, the Power LED remains on.
IODVKLQJ
➌ (UURU/('DPEHU²(UURUFRQGLWLRQIODVKLQJ
➍ 2SHQEXWWRQGLVDEOHGZKHQSRZHULVRIIDQGGXULQJWKH
SRZHURQVHOIWHVW
%HWULHE
(1*/,6+
GDV*HUlWDXVJHVFKDOWHWLVWXQGZHQQGHU6HOEVWWHVWEHLP
(LQVFKDOWHQGHV*HUlWVGXUFKJHIKUWZLUG
➊ /('Å3RZHU´1HW]JUQ²'DV*HUlWLVWHLQJHVFKDOWHW
/('OHXFKWHWRGHUGDV%DQGOlXIW/('EOLQNW
➎ 7DVWHÅ&ORVH´6FKOLHHQ
➋ /('Å&OHDQ´5HLQLJHQJHOE²(VLVWDQJHEUDFKWHLQH
➏ 1HW]VFKDOWHUÅ3RZHU´
+LQZHLV Alle drei LEDs leuchten (2 bis 3 Sekunden)
während der Durchführung des EinschaltSelbsttests kurz auf. Nach Beenden des Tests
bleibt die LED „Power“ leuchten.
5HLQLJXQJGXUFK]XIKUHQ/('OHXFKWHW
➌ /('Å(UURU´)HKOHUJHOEEUDXQ²(VOLHJWHLQ)HKOHUYRU
/('EOLQNW
)XQFLRQDPLHQWR
'(876&+
➍ 7DVWHÅ2SHQ´gIIQHQGLHVH7DVWHLVWGHDNWLYLHUWZHQQ
HQFXHQWUDDSDJDGD\GXUDQWHODDXWRFRPSUREDFLyQGHO
HQFHQGLGR
➊ ,QGLFDGRU/('3RZHUGHHQFHQGLGRYHUGH(QFHQGLGR
QRSDUSDGHDQWHRFLQWDHQPRYLPLHQWRSDUSDGHDQWH
➎ %RWyQ&ORVHFHUUDU
➋ ,QGLFDGRU/('&OHDQGHOLPSLH]DDPDULOOR6HQHFHVLWD
➏ ,QWHUUXSWRUGHHQFHQGLGR
OLPSLH]DQRSDUSDGHDQWH
1RWD Todos los indicadores LED se encienden durante
2 ó 3 segundos durante la autocomprobación de
encendido. El indicador LED Power permanece
encendido una vez que se ha completado la prueba.
➌ ,QGLFDGRU/('(UURUGHHUURUDQDUDQMDGR&RQGLFLyQGH
HUURUSDUSDGHDQWH
8WLOLVDWLRQ
(63$f2/
➍ %RWyQ2SHQDEULU'HVDFWLYDGRFXDQGRODXQLGDGVH
HVWKRUVWHQVLRQHWSHQGDQWO·DXWRWHVWGHPLVHVRXV
WHQVLRQ
➊ 'LRGHpOHFWUROXPLQHVFHQWHGHPLVHVRXVWHQVLRQ
© 3RZHU ªYR\DQWYHUW²6RXVWHQVLRQOXPLqUHFRQWLQXH
RXGpILOHPHQWGHODEDQGHOXPLqUHFOLJQRWDQWH
➎ %RXWRQGHIHUPHWXUH© &ORVH ª
➏ ,QWHUUXSWHXUGHPLVHVRXVWHQVLRQ© 3RZHU ª
5HPDUTXH Les trois diodes électroluminescentes
s’allument pendant 2 à 3 secondes lors de l’autotest de mise sous tension. A la fin du test, la diode
de mise sous tension « Power » reste allumée.
➋ 'LRGHpOHFWUROXPLQHVFHQWHGHQHWWR\DJH© &OHDQ ªYR\DQW
MDXQH²1HWWR\DJHQpFHVVDLUHOXPLqUHFRQWLQXH
➌ 'LRGHpOHFWUROXPLQHVFHQWHG·HUUHXU© (UURU ªYR\DQW
RUDQJH²&RQGLWLRQG·HUUHXUOXPLqUHFOLJQRWDQWH
)5$1d$,6
➍ %RXWRQG·RXYHUWXUH© 2SHQ ªGpVDFWLYpORUVTXHO·DSSDUHLO
²6HOHFWGDWDFDUWULGJHV
(1*/,6+
Exabyte recommends using EXATAPE™ 8mm data
cartridges. The EXB-8700 supports 15m, 54m, 112m,
and 160m XL data cartridges.
&$87,21
1HYHUXVHYLGHRJUDGHWDSHIRUGDWDVWRUDJH
²$XVZDKOGHU'DWHQNDVVHWWHQ
'(876&+
Exabyte empfiehlt die Verwendung von EXATAPE™
8mm-Datenkassetten. EXB-8700 unterstützt XL-Datenkassetten folgender Längen: 15m, 54m, 112m und 160m.
9256,&+7
9HUZHQGHQ6LHQLH9LGHRElQGHU]XU'DWHQVSHLFKHUXQJ
The EXATAPE 160m XL data cartridge has a
Recognition System (RS) stripe on the tape leader
and the Recognition System logo on the cartridge.
The tape drive checks the stripe to distinguish 160m XL
data-grade metal-particle media from other 160m
media.
When purchasing 160m tapes, make sure they have the
RS logo.
Die Datenkassette EXATAPE 160m XL verfügt am
Vorspann über einen Streifen für das Erkennungssystem (Recognition System, RS), und auf der Kassette
befindet sich das Logo des Erkennungssystems
„Recognition System“. Das Bandlaufwerk überprüft
den Streifen und erkennt, ob es sich um einen 160mXL-Metallpartikel-Datenträger oder um einen anderen
160m-Datenträger handelt.
Achten Sie beim Kauf von 160m-Bändern darauf, daß
sich auf der Kassette ein RS-Logo befindet.
²6HOHFFLRQDUFDVVHWWHVGHGDWRV
(63$f2/
Exabyte recomienda que se utilicen cassettes de datos de
8mm EXATAPE™. La unidad EXB-8700 soporta
cassettes de 15m, 54m, 112m y 160m XL.
35(&$8&,Ð1
1RXWLOLFHFLQWDGHFDOLGDGYtGHRSDUDDOPDFHQDPLHQWR
GHGDWRV
²6pOHFWLRQGHFDUWRXFKHVGHGRQQpHV
)5$1d$,6
Exabyte recommande l’utilisation de cartouches de
données EXATAPE™ 8mm. L’unité EXB-8700 accepte
les cartouches de données 15m, 54m, 112m et 160m XL.
$77(17,21
1HVWRFNH]MDPDLVGHGRQQpHVVXUXQHEDQGHYLGpR
Los cassettes de datos EXATAPE de 160m XL tienen
una banda de Recognition System (Sistema de
reconocimiento, RS) en la cinta de guía y el logotipo de
Recognition System en el cassette. La unidad de cinta
comprueba la banda para distinguir los soportes
magnéticos con partículas metálicas de calidad datos,
de otros soportes de 160m XL.
Cuando compre cintas de 160m, asegúrese de que
tengan el logotipo RS.
La cartouche de données EXATAPE 160m XL possède
une bande Recognition System (RS) sur l’amorce de
bande et porte le logo Recognition System sur la
cartouche elle-même. L’unité de bande vérifie la bande
pour distinguer les supports de données à particules
de métal 160m XL des autres supports 160m.
Lors de l’achat de bandes 160m, vérifiez qu’elles
portent le logo RS.
² 2SHQWKHGRRU
Make sure that the Power LED is on solid, indicating
that the tape drive has passed its power-on self-test
and is ready to accept a data cartridge.
Press the Open button.
² 3UIHQGHU/('Å3RZHU´
² gIIQHQGHU.ODSSH
Die LED „Power“ muß ununterbrochen leuchten,
wenn das Bandlaufwerk den Einschalt-Selbsttest
bestanden hat und eine Datenkassette eingelegt
werden kann.
Drücken Sie die Taste „Open“.
² &RPSUREDUHOLQGLFDGRU/('3RZHU
² $EULUODSXHUWD
Asegúrese de que el indicador LED Power se encuetra
iluminado y no parpadea, lo que indica que la unidad
de cinta ha superado la prueba de autocomprobación y
está preparada para recibir un cassette de datos.
Pulse el botón Open.
² 9pULILFDWLRQGHODGLRGHGHPLVHVRXV
² 2XYHUWXUHGHODSRUWH
WHQVLRQ© 3RZHU ª
Appuyez sur le bouton d’ouverture « Open ».
Assurez-vous que cette diode est allumée en continu,
ce qui signifie que l’unité de bande a réussi l’auto-test
de mise sous tension et qu’elle est prête à recevoir une
cartouche de données.
)5$1d$,6
(63$f2/
'(876&+
(1*/,6+
² &KHFNWKH3RZHU/('
(1*/,6+
'(876&+
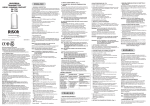
² 6HWWKHZULWHSURWHFWVZLWFK
² ,QVHUWWKHFDUWULGJH
If you are reading data, make sure the data cartridge is
write-protected (➊). If you are writing data, make sure
that the data cartridge is write-enabled (➋).
Slide the data cartridge into the tape drive, with the
write-protect switch to your right and the window up.
² (LQVWHOOHQGHV6FKUHLEVFKXW]HV
² (LQOHJHQGHU.DVVHWWH
Wenn Sie Daten nur lesen, sollte die Datenkassette
schreibgeschützt (➊) sein. Wenn Sie Daten schreiben
wollen, darf der Schreibschutz der Datenkassette nicht
aktiviert sein (➋).
Schieben Sie die Datenkassette in das Bandlaufwerk, so
daß sich der Schreibschutzschieber auf der rechten
Seite befindet und das Fenster nach oben zeigt.
² (VWDEOHFHUHOFRQPXWDGRUGHSURWHFFLyQ
² ,QVHUWDUHOFDVVHWWH
(63$f2/
DQWLHVFULWXUD
Si va a leer datos, asegúrese de que el cassette tenga
protección antiescritura (➊). Si, por el contrario, va a
escribir datos, asegúrese de que la protección
antiescritura haya sido desactivada (➋).
² 5pJODJHGHO·LQWHUUXSWHXUGHSURWHFWLRQHQ
pFULWXUH
)5$1d$,6
Si vous lisez des données, vérifiez que la cartouche de
données soit protégée en écriture (➊). Si vous écrivez
des données, vérifiez que la cartouche est en mesure de
recevoir des données en écriture (➋).
Deslice el cassette de datos en la unidad de cinta con el
conmutador de protección antiescritura situado a su
derecha y la ventana de la cinta en la parte superior.
² ,QVHUWLRQGHODFDUWRXFKH
Introduisez la cartouche de données dans l’unité de
bande, avec l’interrupteur de protection en écriture à
droite et la fenêtre orientée vers le haut.
² &ORVHWKHGRRU
When the Power LED stops flashing, the tape drive is
ready to perform backup and restore operations.
Wenn die LED „Power“ nicht mehr blinkt, ist das
Bandlaufwerk bereit und kann Sicherungs- und
Wiederherstellungsfunktionen durchführen.
Drücken Sie die Klappe des Bandlaufwerks nach
unten, um sie zu schließen.
Die LED „Power“ blinkt, während das Bandlaufwerk
die Datenkassette lädt, das Band auf den Anfang
positioniert sowie das Bandformat und die Bandlänge
feststellt. Ist das Band zurückgespult, nimmt dieser
Ladevorgang ca. 45 Sekunden in Anspruch.
² &HUUDUODSXHUWD
Cuando el indicador Power deje de parpadear, la
unidad de cinta se encontrará preparada para realizar
operaciones de copia de seguridad y de restauración.
Empuje hacia abajo el botón Close para cerrar la puerta
de la unidad de cinta.
El indicador LED Power parpadea mientras ocurren
estas cosas: se carga el cassette de datos, la cinta se
coloca al principio, y se determina el formato y la
longitud de la cinta. Suponiendo que la cinta esté
rebobinada, la operación de carga dura
aproximadamente 45 segundos.
² )HUPHWXUHGHODSRUWH
Lorsque la diode de mise sous tension « Power » cesse
de clignoter, l’unité de bande est prête à effectuer des
opérations de sauvegarde et de restauration.
Enfoncez le bouton de fermeture « Close » pour fermer
la porte de l’unité de bande.
La diode électroluminescente de mise sous tension
« Power » clignote pendant que l’unité charge la
cartouche de données, rembobine la bande et
détermine son format et sa longueur. Dans le cas d’une
bande rembobinée, le chargement prend environ
45 secondes.
(63$f2/
² 6FKOLHHQGHU.ODSSH
)5$1d$,6
The Power LED flashes while the tape drive loads the
data cartridge, positions the tape to its beginning, and
determines the tape format and length. Assuming that
the tape is rewound, the load operation requires about
45 seconds.
'(876&+
(1*/,6+
Push down on the Close button to close the tape drive
door.
² %DFNXSRUUHVWRUHGDWD
(1*/,6+
Using the application software, back up or restore data.
The tape drive can write and read data in 8500 or 8500c
format. If the data cartridge is write-protected, the tape
drive can read data in 8200 format.
7DSH
/HQJWK
P
P
P
P;/
➤ ,PSRUWDQW
7KHWDSHGULYHFDQQRWZULWHIRUPDW
LWHMHFWVZULWHHQDEOHGIRUPDWGDWDFDUWULGJHV7KH
WDSHGULYHFDQQRWZULWHRUUHDGGDWDLQFIRUPDW
² 6LFKHUQXQG:LHGHUKHUVWHOOHQYRQ'DWHQ
'(876&+
/lQJHGHU
.DVVHWWH
P
P
P
P;/
➤ :LFKWLJ
'DV%DQGODXIZHUNNDQQNHLQH'DWHQLP
)RUPDWVFKUHLEHQ'DWHQNDVVHWWHQLP)RUPDW
PLWGHDNWLYLHUWHP6FKUHLEVFKXW]ZHUGHQGHVKDOE
² 2SHUDFLRQHVGHFRSLDGHVHJXULGDGR
(63$f2/
/DXQLGDGGHFLQWDQRSXHGHHVFULELUHQ
HOIRUPDWRH[SXOVDUiORVFDVVHWWHVGHGDWRVHQ
/RQJLWXG
GHODFLQWD
P
P
P
P;/
² 6DXYHJDUGHRXUHVWDXUDWLRQGHGRQQpHV
)5$1d$,6
Utilisez le logiciel pour sauvegarder ou restaurer des
données. L’unité de bande est capable d’écrire des
données en format 8500 ou 8500c. Si la cartouche de
données est protégée en écriture, l’unité de bande peut
lire les données en format 8200.
➤ ,PSRUWDQW
/·XQLWpGHEDQGHQ·HVWSDVHQPHVXUH
G·pFULUHOHVGRQQpHVHQIRUPDWHWHOOHpMHFWHOHV
FDUWRXFKHVGHGRQQpHVGHIRUPDWQRQSURWpJpHVHQ
*%
*%
*%
*%
)RUPDWF
.RPSUHVVLRQ
*%
*%
*%
*%
)RUPDW
*%
*%
*%
*%
IRUPDWRTXHQRWHQJDQODSURWHFFLyQDQWLHVFULWXUD
DFWLYDGD/DXQLGDGGHFLQWDQRSXHGHHVFULELUQLOHHU
GDWRVHQIRUPDWRF
UHVWDXUDFLyQGHGDWRV
➤ ,PSRUWDQWH
IRUPDW
DXVJHZRUIHQ)HUQHUNDQQGDV%DQGODXIZHUN'DWHQLP
)RUPDWFZHGHUOHVHQQRFKVFKUHLEHQ
Sichern Sie mit der Anwendungssoftware Daten oder
stellen Sie diese wieder her. Das Bandlaufwerk kann
Daten im Format 8500 oder 8500c schreiben bzw. lesen.
Ist die Datenkassette schreibgeschützt, kann das
Bandlaufwerk Daten im Format 8200 lesen.
Haga copias de seguridad o restaure datos utilizando
el software de aplicación. La unidad de cinta puede
escribir y leer datos en los formatos 8500 ó 8500c. Si el
cassette tenga protección antiescritura, la unidad de
cinta sólo podrá leer datos en formato 8200.
FIRUPDW
FRPSUHVVLRQ
*%
*%
*%
*%
)RUPDWRF
FRPSUHVLyQ
*%
*%
*%
*%
)RUPDWR
*%
*%
*%
*%
pFULWXUH/·XQLWpQHSHXWQLOLUHQLpFULUHOHVGRQQpHVHQ
IRUPDWF
/RQJXHXUGH
)RUPDWF
ODEDQGH
FRPSUHVVLRQ
P
*R
P
*R
P
*R
P;/
*R
)RUPDW
*R
*R
*R
*R
The Power LED flashes while the tape drive completes
the current operation, writes any data in its memory to
tape, rewinds the tape, unloads the tape from the tape
path, and ejects the cartridge. Depending on the
position of the tape, the eject process may take several
minutes.
² $XVZHUIHQGHU.DVVHWWH
+LQZHLV Prüfen Sie, ob die LED „Power“ leuchtet,
wenn das Bandlaufwerk die Kassette nach
einigen Minuten nicht auswirft. Ist die LED an,
schlagen Sie in der Dokumentation der Software
nach, ob die Software die Taste „Open“
deaktiviert.
Drücken Sie zum Auswerfen der Kassette die Taste
„Open“.
Die LED „Power“ blinkt, während das Bandlaufwerk
die gerade auszuführende Funktion beendet, die Daten
vom Speicher auf das Band schreibt, das Band
zurückspult, das Band von der Bandführung entlädt
und die Kassette auswirft. Je nach Bandposition kann
der Vorgang einige Minuten in Anspruch nehmen.
² ([SXOVDUHOFDVVHWWH
1RWD Si, transcurridos unos minutos, la unidad de
cinta no expulsa el cassette, compruebe si el
indicador Power se encuentra encendido. Si lo
está, consulte la documentación del software
para determinar si el software desactiva el botón
Open.
Para expulsar un cassette, pulse el botón Open.
El indicador LED Power parpadea mientras se realizan
las siguientes operaciones: escribir los datos de su
memoria en la cinta, rebobinar la cinta, descargar la
cinta del trayecto de la misma y expulsar el cassette. El
proceso de expulsión puede durar varios minutos,
dependiendo de la posición de la cinta.
² (MHFWLRQGHODFDUWRXFKH
5HPDUTXH Si au bout de quelques minutes l’unité n’a
toujours pas éjecté la cartouche, regardez si la
diode de mise sous tension « Power » est
allumée. Si oui, consultez la documentation du
logiciel pour voir s’il désactive le bouton
d’ouverture « Open ».
Pour éjecter la cartouche, appuyez sur le bouton
d’ouverture « Open ».
La diode de mise sous tension « Power » clignote
pendant que l’unité de bande termine l’opération en
cours, écrit sur bande les données qu’elle a en
mémoire, rembobine la bande, décharge la bande du
chemin de la bande et éjecte la cartouche. Selon la
position de la bande, le processus d’éjection peut
prendre plusieurs minutes.
'(876&+
To eject the cartridge, press the Open button.
(63$f2/
1RWH If the tape drive does not eject the cartridge after
several minutes, make sure that the Power LED
is on. If it is, refer your software documentation
to determine whether the software disables the
Open button.
)5$1d$,6
² (MHFWWKHFDUWULGJH
(1*/,6+
&OHDQLQJ
(1*/,6+
Clean the tape drive whenever the Clean LED turns on.
Use an Exabyte 8mm Cleaning Cartridge or an
Exabyte-approved cleaning cartridge. For best results,
clean the tape drive as soon as possible after the Clean
LED turns on.
&$87,21
7RSUHYHQWFRQWDPLQDWLRQRIWKHWDSHGULYHDQGGDPDJH
WRWKHKHDGVGRQRWUHZLQGDQGUHXVHWKHFOHDQLQJ
FDUWULGJH
8VLQJFOHDQLQJFDUWULGJHVQRWDSSURYHGE\([DE\WHZLOO
YRLGWKHWDSHGULYHZDUUDQW\
5HLQLJXQJ
'(876&+
Reinigen Sie das Bandlaufwerk, wenn die LED „Clean“
aufleuchtet. Verwenden Sie dazu eine Exabyte-8mmReinigungskassette oder eine von Exabyte genehmigte
Reinigungskassette. Reinigen Sie das Bandlaufwerk
am besten, sobald die LED „Clean“ aufleuchtet.
9256,&+7
8PGDV%DQGODXIZHUNQLFKW]XYHUXQUHLQLJHQE]ZGLH
.|SIH]XEHVFKlGLJHQVSXOHQ6LHGDV5HLQLJXQJVEDQG
QLFKW]XUFNXQGYHUZHQGHQ6LHHVQXUHLQPDO
'LH*DUDQWLHIUGDV%DQGODXIZHUNHUO|VFKWZHQQ
5HLQLJXQJVNDVVHWWHQYHUZHQGHWZHUGHQGLHQLFKWYRQ
([DE\WHJHQHKPLJWVLQG
/LPSLH]D
(63$f2/
Limpie la unidad de cinta siempre que el indicador
LED Clean se encienda. Utilice un cassette de limpieza
Exabyte de 8mm o un cassette de limpieza aprobado
por Exabyte. Para obtener óptimos resultados, limpie
la unidad de cinta lo antes posible, una vez que se haya
encendido el indicador Clean.
35(&$8&,Ð1
3DUDHYLWDUTXHODXQLGDGGHFLQWDVHFRQWDPLQH\VH
GDxHQORVFDEH]DOHVQRUHERELQHQLYXHOYDDXWLOL]DUHO
FDVVHWWHGHOLPSLH]D
/DXWLOL]DFLyQGHFDVVHWWHVGHOLPSLH]DTXHQRKD\DQVLGR
DSUREDGRVSRU([DE\WHDQXODUiODJDUDQWtDGHODXQLGDG
GHFLQWD
1HWWR\DJH
)5$1d$,6
Nettoyez l’unité de bande lorsque la diode
électroluminescente de nettoyage « Clean » s’allume.
Utilisez une cartouche de nettoyage Exabyte 8mm ou
une cartouche acceptée par Exabyte. Pour obtenir de
meilleurs résultats, n’attendez pas trop longtemps
avant de nettoyer l’unité de bande après l’allumage de
la diode.
$77(17,21
3RXUpYLWHUGHFRQWDPLQHUO·XQLWpGHEDQGHHW
G·HQGRPPDJHUOHVWrWHVYRXVQHGHYH]SDVUHPERELQHU
OHVFDUWRXFKHVGHQHWWR\DJHSRXUOHVUpXWLOLVHU
/·XWLOLVDWLRQGHFDUWRXFKHVGHQHWWR\DJHDXWUHVTXH
FHOOHVUHFRPPDQGpHVSDU([DE\WHSURYRTXH
O·DQQXODWLRQGHODJDUDQWLHGHO·XQLWpGHEDQGH
Check the cleaning cartridge to make sure there is
cleaning tape on the supply reel.
Insert the cleaning cartridge in the tape drive. The
cleaning cycle is performed automatically and takes
about one minute. When the cleaning cycle is complete,
the cleaning cartridge is ejected.
²3UIHQGHU5HLQLJXQJVNDVVHWWH
² (LQOHJHQGHU.DVVHWWH
Prüfen Sie, ob sich Reinigungsband auf der
Abwickelspule der Reinigungskassette befindet.
Legen Sie die Reinigungskassette in das Bandlaufwerk
ein. Der Reinigungsvorgang wird automatisch durchgeführt und nimmt ca. 1 Minute in Anspruch. Wenn
der Reinigungsvorgang abgeschlossen ist, wird die
Reinigungskassette ausgeworfen.
²&RPSUREDUHOFDVVHWWHGHOLPSLH]D
² ,QVHUWDUHOFDVVHWWH
Compruebe el cassette de limpieza para asegurarse de
que haya cinta limpiadora en la bobina de provisión.
Inserte el cassette de limpieza en la unidad de cinta. El
ciclo de limpieza se realiza automáticamente y dura
aproximadamente un minuto. Cuando dicho ciclo
termina, el cassette es expulsado.
²9pULILFDWLRQGHODFDUWRXFKHGHQHWWR\DJH
² ,QVHUWLRQGHODFDUWRXFKH
Vérifiez qu’il y a une bande de nettoyage sur la bobine
débitrice de la cartouche.
Introduisez la cartouche de nettoyage dans l’unité de
bande. Le cycle de nettoyage se met en route
automatiquement et prend environ une minute.
Lorsqu’il est terminé, la cartouche est éjectée.
'(876&+
² ,QVHUWWKHFDUWULGJH
(63$f2/
²&KHFNWKHFOHDQLQJFDUWULGJH
(1*/,6+
)5$1d$,6
(1*/,6+
'(876&+
(63$f2/
)5$1d$,6
² &RQILUPWKHFOHDQLQJ
² &KHFNWKHFOHDQLQJFDUWULGJH
Confirm that a cleaning was done. If the cleaning cycle
was successful, the Clean LED will be off. If the
cleaning cycle was not performed, the Clean LEDs will
remain on.
Check the cleaning cartridge and discard it if there is
no more cleaning material on the supply reel.
² 3UIHQGHV5HLQLJXQJVYRUJDQJV
² 3UIHQGHU5HLQLJXQJVNDVVHWWH
Prüfen Sie, ob der Reinigungsvorgang stattfand.
Wurde der Reinigungsvorgang erfolgreich
durchgeführt, leuchtet die LED „Clean“ nicht mehr.
Die LED „Clean“ leuchtet, wenn der Reinigungsvorgang nicht durchgeführt wurde.
Prüfen Sie die Reinigungskassette, und entsorgen Sie
die Kassette, wenn sich kein Reinigungsband mehr auf
der Abwickelspule befindet.
² &RQILUPDUTXHODOLPSLH]DVHKDUHDOL]DGR
² &RPSUREDUHOFDVVHWWHGHOLPSLH]D
Confirme que el proceso de limpieza se ha llevado a
cabo. Si dicho proceso se realizó con éxito, el indicador
LED Clean estará apagado. Si el ciclo de limpieza no se
llevó a cabo, el indicador Clean estará encendido.
Compruebe el cassette de limpieza y descártelo si no
queda más material de limpieza en la bobina de
provisión.
² &RQILUPDWLRQGXQHWWR\DJH
² 9pULILFDWLRQGHODFDUWRXFKHGHQHWWR\DJH
Vérifiez que le nettoyage a bien été effectué. Si le cycle
de nettoyage a fonctionné, la diode de nettoyage
« Clean » est éteinte, sinon, elle reste allumée.
Vérifiez la cartouche de nettoyage et mettez-la au rebut
s’il ne reste plus de bande de nettoyage sur la bobine
débitrice.
✔
Verify that all devices on the SCSI bus are
single-ended (not differential).
✔
Verify that you installed and configured your SCSI
adapter card correctly.
✔
Überprüfen Sie, ob die SCSI-Identifikationsnummer
des Bandlaufwerks nicht mit der Identifikationsnummer eines anderen SCSI-Gerätes (inkl. der SCSIAdapterkarte) übereinstimmt.
✔
Überprüfen Sie, ob es sich bei allen Geräten auf
dem SCSI-Bus um Single-Ended-Geräte (keine
Differentialgeräte) handelt.
✔
Überprüfen Sie, ob die SCSI-Adapterkarte richtig
installiert und konfiguriert ist.
✔
Verifique que la identificación SCSI de la unidad de
cinta sea diferente a la identificación utilizada por el
resto de los dispositivos SCSI, incluida la tarjeta
adaptadora SCSI.
✔
Verifique que todos los dispositivos que se
encuentren en el bus SCSI, sean monoseñal (no
diferenciales).
✔
Verifique que ha instalado y configurado
correctamente la tarjeta adaptadora.
✔
Vérifiez que l’ID SCSI de l’unité de bande est
différente de l’ID utilisée par tout autre périphérique
SCSI, y compris l’adaptateur.
✔
Vérifiez que tous les périphériques du bus SCSI sont
à simple terminaison, et non différentiels.
✔
Vérifiez que l’adaptateur SCSI est bien installé et
configuré.
,QVWDOODWLRQSUREOHPV
Verify that the total length of all the SCSI cables (both
internal and external) does not exceed 6.0 meters
(19.7 feet).
✔
)HKOHUEHKHEXQJ
Wenn Sie auf Probleme stoßen, die sich auch nach
Durchlesen dieses Abschnitts nicht beheben lassen,
wenden Sie sich an Ihren Händler bzw. an Ihren
Kundendienstvertreter.
3UREOHPHEHLGHU,QVWDOODWLRQ
Vergewissern Sie sich, daß die Gesamtlänge aller SCSIKabel (intern und extern) nicht mehr als 6 Meter beträgt.
✔
(QFDVRGHSUREOHPDV
Si surgen problemas a los que no encuentra respuesta
en esta sección, póngase en contacto con su
distribuidor o con el servicio técnico.
3UREOHPDVGXUDQWHODLQVWDODFLyQ
Verifique que la longitud total de los cables SCSI
(externos e internos) no exceda los 6 metros
(19,7 pies).
✔
5pVROXWLRQGHVSUREOqPHV
En cas de problème dont vous ne trouvez pas la
solution dans cette section, appelez le revendeur ou le
service après-vente.
3UREOqPHVG·LQVWDOODWLRQ
✔
Vérifiez que la longueur totale de tous les câbles SCSI
(internes et externes) n’excède pas 6 mètres
(19,7 pieds).
'(876&+
Verify that the tape drive SCSI ID is not the same as
the ID used by any other SCSI device, including the
SCSI adapter card.
(63$f2/
If you encounter problems that you cannot resolve by
referring to this section, call your dealer or service
provider.
✔
)5$1d$,6
7URXEOHVKRRWLQJ
(1*/,6+
(1*/,6+
'(876&+
(63$f2/
)5$1d$,6
✔
Check the SCSI cable connections. Try replacing the
cables with known good ones.
✔
Make sure that your application software is installed
correctly.
✔
Terminate the ends of the SCSI bus.
✔
✔
Make sure that you turn on the tape drive (➊) before
you turn on the computer (➋). The tape drive
completes its power-on self-test after the computer is
on.
The SCSI bus may be hung. Try turning the tape drive
off, then on again. If necessary, reset the SCSI bus by
turning off the computer. Make sure that you turn on
the tape drive (➊) before you turn on the computer
(➋).
✔
Überprüfen Sie die SCSI-Kabelverbindungen.
Ersetzen Sie die vorhandenen Kabel durch Kabel,
deren gute Qualität bekannt ist.
✔
Überprüfen Sie, ob die Anwendungssoftware richtig
installiert wurde.
✔
✔
Schließen Sie die Enden des SCSI-Bus ab.
✔
Schalten Sie das Bandlaufwerk (➊) ein, bevor Sie den
Computer (➋) einschalten. Das Bandlaufwerk führt
den Einschalt-Selbsttest durch, nachdem der
Computer eingeschaltet wurde.
Der SCSI-Bus hängt evtl. Schalten Sie das
Bandlaufwerk aus und wieder ein. Setzen Sie den
SCSI-Bus ggf. zurück. Schalten Sie dazu den
Computer aus. Schalten Sie das Bandlaufwerk (➊)
ein, bevor Sie den Computer (➋) einschalten.
✔
Verifique las conexiones de los cables SCSI. Pruebe a
sustituir los cables por otros que ofrezcan plena
confianza sobre su estado.
✔
Asegúrese de que el software de aplicación haya sido
instalado correctamente.
✔
✔
Coloque un terminador en los extremos del bus SCSI.
✔
Asegúrese de haber encendido la unidad de cinta (➊)
antes de encender la computadora (➋). La unidad de
cinta completa la prueba de autocomprobación de
encendido con la computadora encendida.
Es posible que el bus SCSI se encuentre bloqueado.
Apague y vuelva a encender la unidad de cinta. Si
fuera necesario, apague la computadora para
restablecer el bus SCSI. Recuerde que debe encender
la unidad de cinta (➊) antes de encender la
computadora (➋).
✔
Vérifiez les connexions des câbles SCSI. Remplacer
les câbles par d’autres que vous savez fonctionnels.
✔
Vérifiez la bonne installation du logiciel.
✔
✔
Mettez une terminaison aux extrémités du bus SCSI.
✔
N’oubliez pas de mettre l’unité de bande sous tension
(➊) avant l’ordinateur (➋). L’unité de bande termine
son auto-test de mise sous tension après la mise en
route de l’ordinateur.
Il se peut que le fonctionnement du bus SCSI soit
suspendu. Eteignez puis rallumez l’unité de bande.
Si besoin est, réinitialisez le bus SCSI en mettant
l’ordinateur hors tension. N’oubliez pas de mettre
l’unité de bande sous tension (➊) avant l’ordinateur
(➋).
✔
Check the setting of the write-protect switch.
✔
Use only EXATAPE™ 8mm Data Cartridges.
3UREOHPHPLWGHU.DVVHWWH
✔
Verwenden Sie nur 160-m-Datenkassetten, die über
das RS-Logo verfügen.
✔
Überprüfen Sie die Stellung des
Schreibschutzschiebers.
✔
Si utiliza cassettes de datos de 160m, asegúrese de
que tengan el logotipo de Recognition System.
✔
Compruebe la posición del conmutador de
protección antiescritura.
✔
Utilice exclusivamente cassettes de datos
EXATAPE™ de 8mm.
3UREOqPHVGHFDUWRXFKH
✔
Si vous utilisez des cartouches de données 160m,
vérifiez qu’elles portent le logo RS.
✔
Vérifiez le réglage de l’interrupteur de protection en
écriture.
✔
Do not attempt to read a tape written in 8200 format
without write protecting it and make sure that you
are not attempting to read or write a tape written in
8200c format.
✔
The cartridge may be damaged or worn. Try using a
new data cartridge.
✔
Die Kassette muß richtig eingelegt werden.
✔
Versuchen Sie nicht, Daten im Format 8200 ohne
Schreibschutz zu lesen oder ein Band mit Daten im
Format 8200c zu lesen bzw. zu schreiben.
✔
Die Kassette ist evtl. beschädigt oder abgenutzt.
Verwenden Sie eine neue Datenkassette.
✔
Asegúrese de haber insertado el cassette
correctamente.
✔
No intente leer una cinta escrita en formato 8200 sin
colocar la protección antiescritura, y asegúrese de
que no está tratando de leer o escribir una cinta que
está en formato 8200c.
✔
Es posible que el cassette haya sufrido daños o esté
gastado. Utilice otro cassette.
✔
Insérez la cartouche correctement.
✔
N’essayez pas de lire une bande écrite en format 8200
sans la protéger en écriture, ni de lire ou d’écrire sur
une bande contenant des données en format 8200c.
✔
Il se peut que la cartouche soit abîmée ou usée.
Changez de cartouche.
Verwenden Sie ausschließlich EXATAPE™ 8mmDatenkassetten.
3UREOHPDVFRQHOFDVVHWWH
✔
✔
N’utilisez que des cartouches de données
EXATAPE™ 8mm.
'(876&+
If you are using 160m data cartridges, make sure they
have the RS logo.
Be sure to insert the cartridge correctly.
(63$f2/
✔
✔
)5$1d$,6
&DUWULGJHSUREOHPV
(1*/,6+
2SHUDWLRQSUREOHPV
(1*/,6+
✔
✔
Make sure that the power is turned on. The Open
button is disabled when the tape drive power is off.
'(876&+
✔
Das Gerät muß eingeschaltet sein. Die Taste „Open“
ist deaktiviert, wenn das Bandlaufwerk
ausgeschaltet ist.
(63$f2/
✔
Asegúrese de que la unidad está encendida. El botón
Open se encuentra desactivado cuando la unidad de
cinta está apagada.
)5$1d$,6
✔
Try cleaning the tape drive. Some problems can be
solved by cleaning the recording heads. If the Clean
LED is on, clean the tape drive as soon as possible.
✔
Falls Sie Schwierigkeiten mit Ihrer AnwendungsSoftware haben, wenden Sie sich bitte an Ihren
Software-Händler.
✔
Reinigen Sie das Bandlaufwerk. Manche Probleme
können durch Reinigen der Aufzeichnungsköpfe
behoben werden. Wenn die LED „Clean“
aufleuchtet, reinigen Sie das Bandlaufwerk so bald
wie möglich.
✔
Si tiene problemas con la aplicación de software,
póngase en contacto con el distribuidor del software
para obtener ayuda.
✔
Limpie la unidad de cinta. Algunos problemas se
solucionan limpiando los cabezales de escritura. Si el
indicador LED Clean está encendido, limpie la
unidad de cinta lo antes posible.
✔
Si votre application ne fonctionne pas correctement,
contactez votre revendeur pour obtenir de l’aide.
✔
Nettoyez l’unité de bande. Certains problèmes
peuvent être résolus par un simple nettoyage des
têtes d’enregistrement. Si la diode de nettoyage
« Clean » est allumée, nettoyez l’unité dès que
possible.
Si el software de aplicación desactiva el botón Open
de la unidad de cinta, utilice el software para expulsar
el cassette de datos.
3UREOqPHVGHIRQFWLRQQHPHQW
✔
✔
Wenn Ihre Anwendungssoftware die Taste „Open“
des Bandlaufwerks deaktiviert, werfen Sie die
Datenkassette unter Verwendung der Software aus.
3UREOHPDVGHIXQFLRQDPLHQWR
✔
If you experience problems with your application
software, contact the software vendor for assistance.
If your application software disables the tape drive’s
Open button, use the software to eject the data
cartridge.
%HWULHEVSUREOHPH
✔
✔
Assurez-vous que l’unité est sous tension. Le bouton
d’ouverture « Open » est désactivé lorsque l’unité de
bande est hors tension.
Si le bouton d’ouverture « Open » de l’unité de bande
est désactivé par le logiciel, éjectez la cartouche à
l’aide du logiciel.
&$87,21
To clear the error, press the Open button. If an error
cannot be cleared by pressing the Open button, reset
the tape drive by turning the power off, then on again.
If the problem persists, contact your service provider.
9256,&+7
Drücken Sie die Taste „Open“, um den Fehler zu
beseitigen. Kann ein Fehler nicht durch Drücken der
Taste „Open“ beseitigt werden, setzen Sie das
Bandlaufwerk zurück. Schalten Sie dazu das Gerät
aus und wieder ein. Besteht das Problem weiterhin,
wenden Sie sich an den Kundendienst.
✔
/DGHQ6LHQDFKGHU%HVHLWLJXQJHLQHV)HKOHUVHLQH
'DWHQNDVVHWWHGLHNHLQHZLFKWLJHQ,QIRUPDWLRQHQHQWKlOW
XPVLFKHU]XVWHOOHQGDGDV%DQGODXIZHUNLQGHU/DJHLVW
GLH.DVVHWWHULFKWLJDXV]XZHUIHQEHYRU6LHGHQ%HWULHE
IRUWVHW]HQ
El indicador LED Error parpadea cuando la unidad
de cinta sufre una condición de error.
Para normalizar una condición de error, pulse el
botón Open. Si el error no se normaliza de este modo,
apague y vuelva a encender la unidad de cinta para
restablecerla. Si el problema sigue existiendo,
póngase en contacto con el servicio técnico.
✔
'(876&+
Die LED „Error“ blinkt, wenn im Bandlaufwerk ein
Fehler vorliegt.
35(&$8&,Ð1
(63$f2/
✔
$IWHUFOHDULQJDQHUURUORDGDGDWDFDUWULGJHZLWKQR
YDOXDEOHLQIRUPDWLRQRQLWWRPDNHVXUHWKDWWKHWDSHGULYH
FDQVXFFHVVIXOO\HMHFWWKHFDUWULGJHEHIRUHUHVXPLQJ
RSHUDWLRQ
(1*/,6+
The Error LED flashes when the tape drive
experiences an error condition.
$77(17,21
)5$1d$,6
✔
8QDYH]QRUPDOL]DGDODFRQGLFLyQGHHUURUFDUJXHXQ
FDVVHWWHGHGDWRVTXHFRQWHQJDLQIRUPDFLyQVLQQLQJ~Q
YDORUSDUDDVHJXUDUVHGHTXHODXQLGDGGHFLQWDSXHGD
H[SXOVDUHOFDVVHWWHFRUUHFWDPHQWHDQWHVGHFRQWLQXDUFRQ
ODRSHUDFLyQ
La diode électroluminescente d’erreur « Error »
clignote lorsque l’unité de bande est en condition
d’erreur.
/RUVTXHYRXVDYH]PLVXQWHUPHjXQHFRQGLWLRQG·HUUHXU
FKDUJH]XQHFDUWRXFKHGHGRQQpHVQHFRQWHQDQWSDV
G·LQIRUPDWLRQVLPSRUWDQWHVSRXUYpULILHUTXHO·XQLWpGH
EDQGHSXLVVHFRQYHQDEOHPHQWpMHFWHUODFDUWRXFKHDYDQW
GHUHSUHQGUHOHFRXUVGHVRSpUDWLRQV
Pour corriger cette erreur, appuyez sur le bouton
d’ouverture « Open ». Si vous ne parvenez pas à
remédier à cette erreur de cette manière, réinitialisez
l’unité en la mettant hors tension puis en la rallumant.
Si cela ne résout toujours pas le problème, contactez
le service après-vente.
5HWXUQLQJWKHWDSHGULYH
(1*/,6+
If you are returning the tape drive to Exabyte, contact
Exabyte Direct Service to obtain a Return Materials
Authorization (RMA) number and the shipping
address. Packages received without an RMA number
clearly marked on the box will be returned unrepaired,
freight collect.
&$87,21
,I\RXDUHUHWXUQLQJWKHWDSHGULYHIRUVHUYLFHEHVXUHWR
LQFOXGHWKHSRZHUVXSSO\
7RDYRLGGDPDJLQJWKHWDSHGULYHDQGYRLGLQJ\RXU
ZDUUDQW\XVHWKHRULJLQDOVKLSSLQJPDWHULDOVRU
UHSODFHPHQWPDWHULDOVIURP\RXUGHDOHU
=XUFNJDEHGHV%DQGODXIZHUNV
'(876&+
Wenn Sie vorhaben, das Bandlaufwerk an Exabyte
zurückzusenden, wenden Sie sich an den ExabyteDirektservice, um eine Rücksendenummer (Return
Materials Authorization; RMA) sowie die
Versandadresse zu erhalten. Befindet sich auf dem
zurückgesandten Karton keine deutlich lesbare
Rücksendenummer, werden keine Reparaturen
durchgeführt, und das Paket wird gegen
Nachnahmegebühren zurückgeschickt.
9256,&+7
:HQQ6LHGDV%DQGODXIZHUNDQGHQ:DUWXQJVGLHQVW
HLQVHQGHQPVVHQ6LHDXFKGHQ1HW]DGDSWHUPLWVHQGHQ
9HUZHQGHQ6LHGLH2ULJLQDOYHUSDFNXQJE]Z
9HUSDFNXQJVPDWHULDOYRQ,KUHP+lQGOHUXPGDV
%DQGODXIZHUNQLFKW]XEHVFKlGLJHQXQGGDGXUFKGLH
*DUDQWLH]XYHUOLHUHQ
'HYROXFLyQGHODXQLGDGGHFLQWD
(63$f2/
Si va a devolver la unidad de cinta a Exabyte, póngase
en contacto con el Servicio directo de Exabyte (Exabyte
Direct Service) a fin de obtener un número de
Autorización para devolución de materiales (RMA) y
la dirección a la que lo debe enviar. Los paquetes
enviados a Exabyte que no tengan el número RMA
escrito claramente en la caja, serán devueltos sin ser
reparados, a cargo del remitente.
35(&$8&,Ð1
&XDQGRHQYtHODXQLGDGGHFLQWDDOVHUYLFLRWpFQLFR
DVHJ~UHVHGHLQFOXLUODIXHQWHGHDOLPHQWDFLyQ
3DUDHYLWDUTXHODXQLGDGGHFLQWDVXIUDGDxRV\TXHVH
DQXOHVXJDUDQWtDXWLOLFHHOPDWHULDOGHHPEDODMHRULJLQDO
RPDWHULDOGHUHFDPELRSURSRUFLRQDGRSRUVX
GLVWULEXLGRU
5HQYRLGHO·XQLWpGHEDQGH
)5$1d$,6
Pour renvoyer l’unité de bande à Exabyte, contactez le
service des ventes directes Exabyte (Exabyte Direct
Service) pour obtenir un numéro d’autorisation de
renvoi de matériel (RMA), ainsi que l’adresse à laquelle
vous devez renvoyer l’unité. Les paquets reçus sans
numéro de RMA extérieurement apparent seront
retournés sans réparation en port dû.
$77(17,21
6LYRXVUHQYR\H]O·XQLWpGHEDQGHSRXUHQWUHWLHQQ·RXEOLH]
SDVGHMRLQGUHOHERvWLHUG·DOLPHQWDWLRQpOHFWULTXH
3RXUQHSDVHQGRPPDJHUO·XQLWpGHEDQGHHWpYLWHU
O·DQQXODWLRQGHODJDUDQWLHXWLOLVH]O·HPEDOODJHG·RULJLQH
RXXQHPEDOODJHVLPLODLUHTXHYRXVSRXYH]YRXV
SURFXUHUDXSUqVGHYRWUHUHYHQGHXU
,QGH[
$
5
adapter card, installing 4
address
See SCSI ID
resetting the tape drive 25
restoring data 16
returning the tape drive 26
RMA number 26
%
SCSI adapter card 4
SCSI bus
connecting the tape drive 6
differential bus caution 4
single-ended 4
terminating 7
SCSI cable
ferrite bead 6
length 21
SCSI ID, setting 5
SCSI terminator, installing 7
software
device driver 10
installing 10
&
cartridges
capacity 16
cleaning, selecting 18
data, selecting 12
ejecting 17
loading 12 – 15
using after clearing an error 25
cleaning the tape drive 18 – 20
controls and LEDs 11
'
data cartridges
capacity 16
selecting 12
data formats, supported 16
device driver for software 10
differential SCSI bus, caution 4
7
tape drive
cleaning 18 – 20
clearing an error 25
connecting the power 8
connecting to the SCSI bus 5 – 6
controls 11
ejecting a cartridge 17
installing 4 – 10
items included in kit 3
LEDs 11
loading a cartridge 12 – 15
operating 11 – 17
power-on procedure 9
resetting 25
selecting data cartridges 12
terminating the SCSI bus 7
troubleshooting
improper cartridge use 23
installation problems 21 – 22
operation problems 24 – 25
(
ejecting a cartridge 17
errors, clearing 25
,
installation
connecting the power 8
connecting the SCSI bus 6
power-on procedure 9
SCSI adapter card 4
setting the SCSI ID 5
software 10
terminating the SCSI bus 7
testing 10
/
LEDs, described 11
loading a cartridge 12 – 15
0
maintenance 18 – 20
2
operating the tape drive 11 – 17
3
packing the tape drive 26
power connection 8
power-on procedure 9
(1*/,6+
6
backing up data 16
buttons 11
,QGH[
$
.
Adapterkarte, installieren 4
Adresse
Siehe SCSI-Identifikationsnummer
Auswerfen einer Kassette 17
Kassetten
Auswählen der Reinigungskassette 18
Auswerfen 17
Daten, auswählen 12
Kapazität 16
Laden 12 – 15
Verwenden nach Beseitigung eines Fehlers 25
%
Bandlaufwerk
Abschließen des SCSI-Bus 7
Anschließen an das Netz 8
Anschließen an SCSI-Bus 5 – 6
Auswählen der Datenkassetten 12
Auswerfen einer Kassette 17
Beseitigen eines Fehlers 25
Betreiben 11, 17
Im Kit enthalten 3
Installation 4 – 10
Laden einer Kassette 12, 15
LEDs 11
Reinigen 18, 20
Steuerungen 11
Vorgehen beim Einschalten 9
Zurücksetzen 25
Betreiben des Bandlaufwerks 11 – 17
'
'(876&+
Datenformate, unterstützte 16
Datenkassetten 12
Auswählen 12
Kapazität 16
Differential-SCSI-Bus, Vorsicht 4
)
Fehler, beseitigen 25
Fehlerbehebung
Betriebsprobleme 24 – 25
Probleme bei der Installation 21 – 22
Verwendung falscher Kassetten 23
*
Gerätetreiber für Software
/
Laden einer Kassette 12, 15
LEDs, Beschreibung 11
1
Netzanschluß
5
Reinigen des Bandlaufwerks 18 – 20
Rücksendenummer (RMA) 26
6
SCSI-Abschluß, installieren 7
SCSI-Adapterkarte 4
SCSI-Bus
Abschließen 7
Anschließen des Bandlaufwerks 6
Single-Ended 4
Vorsicht bei Differential-Bus 4
SCSI-Kabel
Ferritring 6
Länge 21
SCSI-Identifikationsnummer, einstellen
Sichern von Daten 16
Software
Gerätetreiber 10
Installieren 10
Steuerungen und LEDs 11
7
Tasten
10
,
Installation
Abschließen des SCSI-Bus 7
Anschließen an das Netz 8
Anschließen des SCSI-Bus 6
Einstellen der SCSI-Identifikationsnummer 5
SCSI-Adapterkarte 4
Software 10
Testen 10
Vorgehen beim Einschalten 9
8
11
9
Verpackung des Bandlaufwerks
Vorgehen beim Einschalten 9
26
:
Wartung 18, 20
Wiederherstellen von Daten
16
=
Zurückgabe des Bandlaufwerks 26
Zurücksetzen des Bandlaufwerks 25
5
ÌQGLFH
0
%
mantenimiento 18, 20
4
5
&
restablecer la unidad de cinta 25
restaurar datos 16
RMA, número 26
cable SCSI
aislador tipo perla de ferrito 6
longitud 21
cargar un cassette 12, 15
cassettes
capacidad 16
cargar 12 – 15
expulsar 17
limpieza, seleccionar 18
utilizar después de normalizar un error 25
cassettes de datos 12
conectar la fuente de alimentación 8
controlador de dispositivo para software 10
controles e indicadores LED 11
copias de seguridad de datos, hacer 16
6
SCSI, bus
colocar terminador 7
conectar la unidad de cinta 6
dispositivo monoseñal 4
precaución sobre bus diferencial
SCSI, tarjeta adaptadora 4
software
controlador de dispositivo 10
instalar 10
7
tarjeta adaptadora, instalar 4
terminador SCSI, instalar 7
'
datos, cassettes de
capacidad 16
seleccionar 12
devolver la unidad de cinta 26
dirección
Véase instalación, establecer la identificación SCSI
8
unidad de cinta
cargar un cassette 12, 15
colocar un terminador en el bus SCSI 7
conectar al bus SCSI 5 – 6
conectar la fuente de alimentación 8
controles 11
elementos que se incluyen en el kit 3
expulsar un cassette 17
funcionamiento 11, 17
indicadores LED 11
instalar 4 – 10
limpiar 18, 20
normalizar un error 25
procedimiento de encendido 9
restablecer 25
seleccionar cassettes de datos 12
(
embalar la unidad de cinta 26
en caso de problemas
funcionamiento, problemas de 24 – 25
problemas durante la instalación 21 – 22
uso inadecuado del cassette 23
encendido, procedimiento de 9
errores, normalizar 25
expulsar un cassette 17
)
formatos de datos soportados 16
funcionamiento de la unidad de cinta
4
11 – 17
,
identificación SCSI, establecer 5
indicadores LED, descripción 11
instalación
colocar un terminador en el bus SCSI 7
conectar el bus SCSI 6
conectar la fuente de alimentación 8
establecer la identificación SCSI 5
probar 10
procedimiento de encendido 9
software 10
tarjeta adaptadora SCSI 4
/
limpiar la unidad de cinta 18 – 20
(63$f2/
botones 11
bus SCSI diferencial, precaución
,QGH[
$
0
adaptateur, installation 4
adresse
Voir installation, paramétrage de l’ID SCSI
alimentation électrique, connexion 8
mise sous tension, procédure
1
nettoyage de l’unité de bande
numéro de RMA 26
%
18 – 20
boutons 11
bus SCSI
connexion de l’unité de bande 6
terminaison 7
bus SCSI différentiel, attention 4
3
&
5
câble SCSI
longueur 21
tore de ferrite 6
cartouches de données
capacité 16
chargement 12 – 15
données, sélection 12
éjection 17
nettoyage, sélection 18
utilisation après suppression d’erreur 25
chargement d’une cartouche 12, 15
contrôles et diodes électroluminescentes 11
réinitialisation de l’unité de bande
renvoi de l’unité de bande 26
restauration de données 16
'
terminaison SCSI, installation
problèmes, résolution
problèmes d’installation 21 – 22
problèmes de fonctionnement 24 – 25
utilisation incorrecte de la cartouche 23
diodes électroluminescentes, description
éjection d’une cartouche 17
emballage de l’unité de bande
entretien 18, 20
erreurs, suppression 25
sauvegarde de données 16
SCSI, adaptateur 4
SCSI, bus
à simple terminaison 4
bus différentiel, attention 4
SCSI, paramétrage de l’ID 5
7
11
)
formats de données acceptés 16
*
,
installation
adaptateur SCSI 4
connexion du bus SCSI 6
connexion électrique 8
logiciel 10
paramétrage de l’ID SCSI 5
procédure de mise sous tension
terminaison du bus SCSI 7
test 10
10
unité de bande
chargement d’une cartouche 12, 15
connexion au bus SCSI 5 – 6
connexion électrique 8
contrôles 11
diodes électroluminescentes 11
éjection d’une cartouche 17
éléments compris dans le jeu d’accessoires
installation 4 – 10
nettoyage 18, 20
procédure de mise sous tension 9
réinitialisation 25
sélection de cartouches de données 12
suppression d’une erreur 25
terminaison du bus SCSI 7
utilisation 11, 17
utilisation de l’unité de bande 11 – 17
9
/
logiciel
gestionnaire de périphérique
installation 10
7
8
26
gestionnaire de périphérique pour le logiciel
25
6
(
)5$1d$,6
9
10
3
6DIHW\6WDQGDUGV
When installed in a manner consistent with Exabyte’s product integration (that is, using shielded cables, proper grounding of the SCSI
bus and input power), the EXB-8700 can be expected to maintain its compliance to the standards listed in this section.
■
■
■
UL1950, 2nd Edition, Information Technology Equipment Including Electrical Business Equipment
CSA-C22.2 No. 950-M89, Safety of Information Technology Equipment including Electrical Business Equipment
EN60950/IEC950/DIN VDE 0805/5.90, Safety of Information Technology Equipment including Electrical Business Equipment
)&&1RWLFH
This equipment has been tested and found to comply with the limits for a Class B digital device pursuant to Part 15 of FCC rules.
These limits are designed to provide reasonable protection against harmful interference in a residential installation. This equipment
generates, uses, and can radiate radio frequency energy and, if not installed and used in accordance with the instructions, may cause
interference to radio and television communications. However, there is no guarantee that interference will not occur in a particular
installation. If this equipment does cause interference to radio or television reception, which can be determined by turning the
equipment off and on, the user is encouraged to try to correct the interference by one or more of the following measures:
■
■
■
■
Reorient or relocate the receiving antenna.
Increase the separation between the equipment and receiver.
Connect the equipment into an outlet on a circuit different from that to which the receiver is connected.
Use shielded cables.
Consult the dealer or an experienced radio/TV technician for help.
Accessories: This device has been tested and found to comply with the limits for a Class B digital device. The accessories associated with
this equipment are a shielded SCSI cable and a modular power supply.
According to FCC regulations, changes or modifications not expressly approved by Exabyte Corporation could void your authority to
operate the equipment.
&DQDGLDQ'2&1RWLFH
This digital apparatus does not exceed the Class B limits for radio noise emissions from digital apparatus as set out in the radio
interference regulations of the Canadian Department of Communications.
/LPLWHG:DUUDQW\
Exabyte Corporation (“Exabyte”) warrants to the original consumer (“Purchaser”) that this computer product is free from manufacturing
defects in material and workmanship for a period of two (2) years from the date of sale. At its option, the Exabyte authorized dealer will
repair or replace defective parts with new or comparable rebuilt replacement parts and return the product to the Purchaser free of charge.
If your authorized Exabyte dealer fails to provide this warranty service, contact Exabyte at the address in this manual for instructions
about how to obtain warranty service. Exabyte also reserves the option to replace the entire product with a comparable product or to
refund the purchase price of the product. This constitutes the Purchaser’s sole and exclusive remedy in the event of a defect. To receive
in-warranty service, a defective product must be returned to the authorized Exabyte dealer from whom the product was purchased or to
Exabyte. The product must be accompanied by a copy of Exabyte’s authorized dealer’s dated bill of sale evidencing the date of purchase
and unit serial number and a complete explanation of the problem. The Purchaser must prepay all shipping charges to return any
defective Exabyte computer product under this warranty policy. This limited warranty covers defects encountered in the normal use of
the product and does not apply under the following conditions:
■
■
■
■
■
The product is damaged due to physical abuse, mishandling, accident, negligence or failure to follow operating instructions;
The product is modified by Purchaser in any manner other than those approved by Exabyte; including, but not limited to
tempestizing, ruggedizing and/or militarizing the product;
Damage or defects are caused by the use of unauthorized parts or by unauthorized service;
The product has had its serial numbers altered or removed; or
The product is damaged due to improper packaging of the warranty return to the authorized Exabyte dealer or Exabyte.
EXCEPT FOR THE EXPRESS WARRANTY STATED ABOVE, EXABYTE MAKES NO OTHER WARRANTIES, WHETHER EXPRESSED
OR IMPLIED, WITH RESPECT TO THIS EXABYTE PRODUCT. ALL IMPLIED WARRANTIES, INCLUDING THOSE OF
MERCHANTABILITY AND FITNESS FOR A PARTICULAR PURPOSE, ARE LIMITED TO THE DURATION OF THE EXPRESS
WARRANTY SET FORTH ABOVE.
Exabyte shall have no liability or responsibility to the purchaser or any other person for any loss or damage or any special, incidental or
consequential damages caused or alleged to be caused directly or indirectly by the product, including, but not limited to, any
interruption of service, loss of customer goodwill, loss of business, anticipatory profits or consequential damages resulting from the use
or operation of the product. In no event shall Exabyte be liable for loss of profits or any indirect, special, incidental or consequential
damages arising out of any breach of this warranty or in any manner arising out of or connected with the sale or anticipated use of the
product. In no event shall Exabyte be liable for any damages whatsoever in excess of the purchase price of the product. This warranty
gives you specific legal rights, and you may also have other rights that vary from state to state. Some states do not allow the exclusion or
limitation of incidental or consequential damages, so the above limitation or exclusion may not apply to you.
(1*/,6+
■
6WDQGDUGPlLJH6LFKHUKHLW
Das EXB-8700-Gerät erfüllt die in diesem Absatz beschriebenen Standarderwartungen, vorausgesetzt, daß es unter Einhaltung von
Exabytes Produktintegration (d.h. Verwendung von abgeschirmten Kabeln, sachgemäße Erdung des SCSI-Bus und des Eingangsstroms)
installiert wurde.
■
■
■
UL1950, 2nd Edition, Information Technology Equipment Including Electrical Business Equipment
CSA-C22.2 No. 950-M89, Safety of Information Technology Equipment including Electrical Business Equipment
EN60950/IEC950/DIN VDE 0805/5.90, Safety of Information Technology Equipment including Electrical Business Equipment
)&&9RUVFKULIW
Dieses Gerät hat im Test die Funkentstörungsgrenzwerte für digitale Datenverarbeitungsgeräte der Klasse B gemäß Paragraph 15 der
FCC-Vorschrift eingehalten.
Diese Grenzwerte sind so ausgelegt, daß schädliche Interferenzen in Wohnanlagen vermieden werden. Dieses Gerät erzeugt und
verwendet Rundfunkfrequenzen und kann diese auch emitieren. Wenn es nicht entsprechend der Gebrauchsanweisung aufgestellt und
betrieben wird, kann es ernsthafte Störungen des Funkverkehrs verursachen. Es kann jedoch nicht gänzlich ausgeschlossen werden, daß
in bestimmten Konfigurationen Interferenzen auftreten. Wenn dieses Gerät störende Interferenzen im Rundfunk- und Fernsehempfang
verursacht (was man durch Ein- und Ausschalten des Geräts herausfinden kann), sollten Sie versuchen, die Funkentstörung durch eine
oder mehrere der folgenden Maßnahmen zu beheben:
■
■
■
■
■
Richten Sie die Empfangsantenne anders aus, oder verlagern Sie ihren Standort.
Vergrößern Sie den Abstand zwischen dem Gerät und dem Rundfunk- bzw. Fernsehgerät.
Schließen Sie das Gerät an eine Steckdose an, die zu einem anderen Stromkreis gehört als das Empfangsgerät.
Verwenden Sie abgeschirmte Kabel.
Wenden Sie sich an Ihren Händler oder einen erfahrenen Rundfunk- und Fernsehtechniker.
Zubehör: Dieses Gerät hat im Test die Funkentstörungsgrenzwerte für digitale Datenverarbeitungsgeräte der Klasse B eingehalten. Das
zum Gerät gehörende Zubehör besteht aus einem abgeschirmten SCSI-Kabel und einem modularen Netzadapter.
Veränderungen oder andere Eingriffe, die am Gerät ohne ausdrückliche Genehmigung der Exabyte Corporation vorgenommen werden,
können die Berechtigung des Benutzers zum Gebrauch dieses Geräts außer Kraft setzen.
%HJUHQ]WH*DUDQWLH
'(876&+
Die Exabyte Corporation („Exabyte”) garantiert dem ursprünglichen Käufer („Kunde“), daß dieses Computerprodukt für den Zeitraum
von zwei (2) Jahren ab Verkaufsdatum keinerlei Herstellungsfehler bzgl. Material oder Fertigung aufweist. Der von Exabyte autorisierte
Händler kann je nachdem die beschädigten Teile reparieren oder durch neue und vergleichbare Ersatzteile ersetzen und das Produkt
gebührenfrei an den Kunden zurücksenden. Für den Fall, daß Ihr autorisierter Händler diesen Garantieservice nicht erfüllt, wenden Sie
sich bitte an Exabyte unter der im vorliegenden Handbuch erwähnten Adresse. Sie erfahren dort, wie Sie den Garantieservice erfüllt
bekommen. Exabyte behält es sich vor, das gesamte Produkt durch ein vergleichbares Produkt zu ersetzen oder den Kaufpreis des
Produktes zu erstatten. Der Kunde verfügt darüber hinaus über keinerlei Rechte im Falle eines Schadens. Um einen Garantieservice in
Anspruch nehmen zu können, muß das defekte Produkt an einen autorisierten Exabyte-Händler, bei dem das Produkt erworben wurde,
oder an Exabyte zurückgegeben werden. Dem Produkt muß ein Rechnungszettel, aus dem das Verkaufsdatum sowie die Seriennummer
ersichtlich ist, sowie eine Beschreibung des vorliegenden Problems beiliegen. Der Kunde muß sämtliche Versandkosten vorausbezahlen,
um ein defektes Exabyte-Computerprodukt unter dieser Garantieerklärung zurückzusenden. Diese begrenzte Garantie umfaßt Schäden,
die unter normaler Verwendung des Produkts auftreten und bezieht sich nicht auf folgende Situationen:
■
■
■
■
■
Das Produkt wurde beschädigt aufgrund von Mißbrauch, Mißhandlung, Unfall, Vernachlässigung oder Nichtbeachtung der
Bedienungsanleitungen;
Das Produkt wurde vom Kunden auf eine Art und Weise modifiziert, die Exabyte nicht genehmigt; dies bezieht sich (jedoch nicht
ausschließlich) auf Wetterfest- und Robustmachung und/oder Anpassung des Produkts für militärische Zwecke;
Der Schaden oder die Defekte wurden durch die Verwendung nichtgenehmigter Teile oder durch nichtautorisierten Service
verursacht;
Die Seriennummer des Produktes wurde verändert oder entfernt;
Das Produkt wurde beschädigt, weil es bei der Rücksendung unter der Garantie an den autorisierten Exabyte-Händler bzw. an
Exabyte nicht sachgemäß verpackt wurde.
DIE OBENSTEHENDE GARANTIE IST DIE EINZIGE GARANTIE. EXABYTE ÜBERNIMMT KEINE ANDERE GEWÄHRLEISTUNG,
OB AUSDRÜCKLICH ODER STILLSCHWEIGEND, HINSICHTLICH DIESES PRODUKTES. ALLE STILLSCHWEIGENDEN
GARANTIEN, INKL. DER GARANTIE BZGL. HANDELSÜBLICHER QUALITÄT UND EIGNUNG FÜR EINEN BESTIMMTEN
ZWECK, SIND BEGRENZT AUF DIE DAUER DER OBEN BESCHRIEBENEN GARANTIE.
Exabyte übernimmt keinerlei Verantwortung gegenüber dem Kunden oder einer anderen Person für Verluste oder Schäden bzw.
beliebige bestimmte, zufällige Schäden oder Folgeschäden, die direkt oder indirekt durch oder zurückführbar auf den Gebrauch des
Produkts verursacht wurden. Dies bezieht sich u.a. jedoch nicht ausschließlich auf jegliche Unterbrechung des Service, Verlust des
geschäftlichen Ansehens oder Geschäftsverluste, Verlust erwarteter Verdienste oder Folgeschäden, die auf die Verwendung oder den
Betrieb des Produktes zurückzuführen sind. Exabyte ist zu keiner Zeit für Einnahmeverluste oder beliebige indirekte, bestimmte oder
zufällige Schäden oder Folgeschäden verantwortlich, die sich aus der Nichterfüllung dieser Garantie ergeben oder im Zusammenhang
mit dem Verkauf oder der geplanten Verwendung des Produkts stehen. Exabyte ist in keinem Fall verantwortlich für Schäden, die den
Kaufpreis des Produkts übersteigen. Diese Garantie gibt Ihnen bestimmte Rechte; Sie verfügen evtl. je nach Land/Staat über andere
Rechte. In manchen Ländern/Staaten ist es nicht legal, zufällige Schäden oder Folgeschäden auszuschließen bzw. zu beschränken. Die
o.g. Beschränkung oder Ausschließung trifft deshalb evtl. nicht auf Sie zu.
1RUPDVGHVHJXULGDG
Si la unidad EXB-8700 se instala de acuerdo con la integración de productos de Exabyte (es decir, utilizando cables blindados y
conexiones de tierra apropiadas para el bus SCSI y la alimentación eléctrica), dicha unidad cumple con las siguientes normas:
■
■
■
UL1950, 2nd Edition, Information Technology Equipment Including Electrical Business Equipment
CSA-C22.2 No. 950-M89, Safety of Information Technology Equipment including Electrical Business Equipment
EN60950/IEC950/DIN VDE 0805/5.90, Safety of Information Technology Equipment including Electrical Business Equipment
1RUPDVGHOD)&&
Este equipo ha sido sometido a pruebas y se ha demostrado que cumple con los límites para un dispositivo digital de Clase B, de acuerdo
con lo dispuesto en el Apartado 15 de las normas de la FCC (Comisión Federal de Comunicaciones de EE.UU).
Estos límites están diseñados para proporcionar una protección razonable contra interferencias perjudiciales en una instalación
residencial. Este equipo genera, utiliza y puede emitir energía de radiofrecuencia y, si no se instala y utiliza conforme al manual de
instrucciones, podría interferir adversamente con las comunicaciones radiofónicas. Sin embargo, no existe garantía alguna de que no se
producirán interferencias en una instalación específica. Si este equipo interfiere adversamente con la recepción de señales de
radiofrecuencia o de televisión, lo cual puede establecerse encendiendo y apagando el equipo, se insta al usuario a que intente corregir
dicha interferencia tomando una o más de las siguientes medidas:
■
■
■
■
■
Reorientar o cambiar la posición de la antena receptora.
Aumentar la separación entre el equipo y el receptor.
Conectar el equipo a una toma de corriente que se derive de un circuito diferente del circuito al cual está conectado el receptor.
Utilizar cables blindados.
Solicitar ayuda al distribuidor o a un técnico especializado en radio y televisión.
Accesorios: Este dispositivo ha sido sometido a pruebas y se ha demostrado que cumple con los límites para un dispositivo digital de
Clase B. Los accesorios que acompañan a este equipo son un cable SCSI blindado y una fuente de alimentación modular.
De acuerdo con las normas de la FCC, cualquier cambio o modificación realizados sin la autorización expresa de Exabyte Corporation
podría anular el derecho del propietario a utilizar este equipo.
*DUDQWtDOLPLWDGD
■
■
■
■
■
El producto ha sufrido daños causados por abuso físico, maltrato, accidente, negligencia o incumplimiento de las instrucciones de
funcionamiento.
El producto ha sido modificado por el Comprador sin la aprobación de Exabyte; esto incluye, pero no se limita a ello,
acondicionamiento contra la entrada de agua, reforzamiento para aumentar su robustez o resistencia y/o modificaciones para fines
militares.
El producto ha sufrido daños o defectos provocados por el uso de piezas no autorizadas o de reparaciones realizadas por un servicio
técnico no autorizado.
Los números de serie del producto han sido modificados o eliminados.
El producto ha sufrido daños provocados por un embalaje incorrecto del mismo para el envío bajo garantía al distribuidor autorizado
de Exabyte o a Exabyte.
CON EXCEPCIÓN DE LA GARANTÍA EXPRESA MENCIONADA ANTERIORMENTE, EXABYTE NO OFRECE NINGUNA OTRA
GARANTÍA, YA SEA EXPRESA O IMPLÍCITA, CON RESPECTO A ESTE PRODUCTO EXABYTE. TODAS LAS GARANTÍAS,
INCLUIDAS LAS DE COMERCIABILIDAD E IDONEIDAD PARA UN PROPÓSITO ESPECÍFICO, ESTÁN LIMITADAS A LA
DURACIÓN DE LA GARANTÍA EXPRESA DESCRITA ANTERIORMENTE.
Exabyte no se hace responsable por el comprador ni por ninguna otra persona, de pérdidas o daños, ni de ningún daño especial,
incidente o consecuente, derivado o supuestamente derivado, directa o indirectamente del producto, incluidos, pero sin limitarse a ello,
la interrupción del servicio, la pérdida de la reputación, del negocio o de beneficios anticipados, o daños consecuentes que resulten del
uso o funcionamiento del producto. Exabyte no se hace responsable, bajo ninguna circunstancia, de pérdidas de beneficios, ni de ningún
daño indirecto, especial, incidente o consecuente derivado del incumplimiento de esta garantía, ni provocado por o asociado con la venta
o uso esperado del producto. Exabyte no se hace responsable, bajo ninguna circunstancia, de ningún tipo de daño superior al precio de
compra del producto. Esta garantía concede derechos legales específicos al comprador, que además, puede tener otros derechos según la
jurisdicción estatal o nacional que rija en el caso. Algunas jurisdicciones no permiten la exclusión o limitación de daños incidentes o
consecuentes, de manera que es posible que la limitación o exclusión mencionada anteriormente no afecte a su caso particular.
(63$f2/
Exabyte Corporation (en adelante, “Exabyte”) garantiza al comprador original (en adelante, “Comprador”) que este producto
informático está libre de defectos de fabricación en cuanto a materiales y mano de obra durante un período de dos (2) años desde la fecha
de compra. Los distribuidores autorizados de Exabyte repararán o sustituirán, a discreción, las piezas defectuosas por piezas de
recambio nuevas o reconstruidas, pero de calidad comparable, y enviarán el producto al Comprador sin cargo alguno. Si algún
distribuidor autorizado de Exabyte no proporcionara este servicio de garantía, póngase en contacto con Exabyte, en la dirección que se
incluye en este manual, para recibir instrucciones sobre cómo obtener dicho servicio. Exabyte se reserva la opción de sustituir el producto
completo por un producto comparable, o bien, devolver el importe de la compra del producto. Esto constituye la única opción para el
Comprador en el caso de que reciba un producto defectuoso. Para recibir servicio técnico bajo garantía, deberá enviar el producto
defectuoso al distribuidor autorizado de Exabyte donde adquirió el producto, o directamente a Exabyte. El producto debe ir
acompañado de una copia fechada de la factura emitida por el distribuidor autorizado de Exabyte que incluya la fecha de compra, y que
contenga el número de serie de la unidad. Asimismo, deberá adjuntar una explicación completa del problema. De acuerdo con la
garantía, el Comprador deberá correr con los gastos de envío del producto informático defectuoso de Exabyte. Esta garantía limi tada
cubre los defectos descubiertos durante el uso normal del producto y no será aplicable en las siguientes situaciones:
1RUPHVGHVpFXULWp
Lorsqu’elle est installée de façon conforme à l’intégration des produits Exabyte (c’est-à-dire en utilisant des câbles blindés, et une mise à
la terre adéquate du bus SCSI et de la puissance d’entrée), l’unité EXB-8700 ne doit pas dévier des normes indiquées dans la présente
section.
■
■
■
UL1950, 2nd Edition, Information Technology Equipment Including Electrical Business Equipment
CSA-C22.2 No. 950-M89, Safety of Information Technology Equipment including Electrical Business Equipment
EN60950/IEC950/DIN VDE 0805/5.90, Safety of Information Technology Equipment including Electrical Business Equipment
$YLV)&&
Ce matériel a été testé et déclaré conforme aux limites imposées à un appareil numérique de classe B, conformément à l’alinéa 15 de la
notice FCC relative aux interférences radioélectriques.
Ces limites sont conçues pour assurer une protection raisonnable contre les interférences dangereuses dans une installation résidentielle.
Ce matériel produit, utilise et peut émettre une énergie à haute fréquence et, s’il n’est pas installé et utilisé conformément aux
instructions, il peut provoquer des interférences dans les communications radio et télévisuelles. Il n’est toutefois pas garanti que ces
interférences ne se produiront pas sur une installation particulière. S’il s’avère que cet équipement produit des interférences, ce qui peut
être déterminé en éteignant et en rallumant le matériel, il est conseillé d’y remédier en prenant une ou plusieurs des mesures suivantes :
■
■
■
■
■
Modifiez l’orientation ou l’emplacement de l’antenne de réception.
Augmentez la distance séparant le matériel de l’antenne de réception.
Raccordez le matériel à une prise appartenant à un circuit différent de celui du récepteur.
Utilisez des câbles blindés.
Contactez votre revendeur ou un technicien radio/TV expérimenté.
Accessoires : Ce matériel a été testé et déclaré conforme aux limites imposées à un appareil numérique de classe B. Les accessoires
associés à cet équipement sont un câble SCSI blindé et un boîtier modulaire d’alimentation électrique.
Selon l’avis FCC relatif aux interférences radioélectriques, toute modification n’ayant pas été expressément approuvé par Exabyte
Corporation peut se traduire par la révocation du droit d’exploitation de ce matériel dont jouit l’utilisateur.
5pJOHPHQWDWLRQFDQDGLHQQH'2&
Le présent appareil numérique n’émet pas de bruits radioélectriques dépassant les limites applicables aux appareils numériques de
Classe B prescrites dans le règlement sur le brouillage radioélectrique édicté par le Ministère des Communications du Canada.
*DUDQWLHOLPLWpH
Exabyte Corporation (« Exabyte ») garantit à l’utilisateur original (« l’Acheteur ») que le présent produit informatique est exempt de
défaut dans la fabrication et les matériaux, pendant une période de deux (2) ans à partir de la date d’acquisition. Au choix, le revendeur
Exabyte agréé réparera ou remplacera les pièces défectueuses par des pièces neuves ou réparées similaires et renverra le produit à
l’Acheteur sans frais. Si le revendeur Exabyte agréé manque à cette obligation de garantie, prenez contact avec Exabyte à l’adresse
indiquée dans ce manuel pour voir comment faire respecter la garantie. Exabyte se réserve le droit de remplacer intégralement le produit
par un produit similaire ou de rembourser à l’Acheteur le prix d’achat du produit. Ceci constitue le recours unique et exclusif de
l’Acheteur en cas de défaut. Pour être couvert par la garantie, un produit défectueux doit être renvoyé soit au revendeur agréé auprès
duquel a été effectué l’achat, soit à Exabyte. Le produit doit être accompagné d’une copie de la facture établie par le revendeur Exabyte
agréé portant la date d’acquisition et le numéro de série de l’unité et d’une description détaillée du problème. L’Acheteur doit acquitter
par avance tous les frais d’expédition pour renvoyer tout produit informatique Exabyte selon les termes de la présente garantie. Cette
garantie limitée concerne uniquement les défauts découverts dans le cadre d’une utilisation normale du produit et ne s’applique pas
dans les conditions suivantes :
■
■
■
■
■
Le produit a été endommagé à la suite de mauvais traitements, de manipulations hasardeuses, d’un accident, d’une négligence ou
d’un manquement aux instructions d’utilisation ;
L’Acheteur a apporté des modifications au produit autres que celles approuvées par Exabyte, y compris, mais sans s’y limiter, des
modifications destinées à protéger le matériel contre les intempéries, les chocs et vibrations et les aménagements à des fins militaires ;
Les dommages et défauts proviennent de l’utilisation de pièces non agréées ou par un entretien non agréé ;
Le numéro de série du produit a été altéré ou retiré ; ou
Le produit a été endommagé parce qu’il était mal emballé lors d’un renvoi dans le cadre de la garantie au revendeur agréé ou à
Exabyte.
A L’EXCEPTION DE LA GARANTIE EXPRESSE DECRITE CI-DESSUS, EXABYTE NE PROPOSE AUCUNE AUTRE GARANTIE,
EXPRESSE OU IMPLICITE, CONCERNANT CE PRODUIT EXABYTE. TOUTES LES GARANTIES IMPLICITES, Y COMPRIS CELLES
DE COMMERCIALISATION ET D’ADEQUATION A UN OBJECTIF PARTICULIER, SONT LIMITEES A LA DUREE DE LA GARANTIE
EXPRESSE PRESENTEE CI-DESSUS.
)5$1d$,6
En aucun cas Exabyte ne pourra être tenu pour responsable envers l’acheteur ou toute autre personne pour toute perte ou préjudice
spécial, direct ou indirect provoqué ou prétendument provoqué directement ou indirectement par le produit, y compris, mais sans s’y
limiter pour quelque interruption de service, perte de clientèle, de bénéfices, d’avances ou préjudices que ce soit résultant de l’utilisation
du produit. En aucun cas Exabyte ne pourra être tenu pour responsable pour quelque perte de bénéfices ou quelque préjudice spécial,
direct ou indirect que ce soit provoqué par tout manquement à cette garantie ou provoqué par ou lié de quelque manière que ce soit à la
vente ou à l’utilisation attendue de ce produit. En aucun cas Exabyte ne pourra être tenu pour responsable pour quelque préjudice que ce
soit dépassant le prix d’achat du produit. Cette garantie vous donne des drois légaux spécifiques susceptibles de varier d’une juridiction
à l’autre. Certaines juridictions n’admettent pas l’exclusion ou la limitation des préjudices directs ou indirects, et il se peut que les
limitations et exclusions susmentionnées ne vous concernent pas.