1
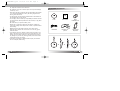
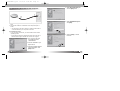
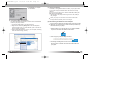
FL200-ENG-a_4th
10/27/97 5:57 PM
Page 2
designing your digital dream
User’s Guide
FL200
<FL200> User's Guide
Date of Publication : Oct. 2003
Date of First edition : Oct. 2003
Publishing Company : Digitalway Co., LTD.
Address : E-23F Huadu, NO.838 Zhangyang Road Pudong,
Shanghai, 200-122, China
Tel : 21-5058-6018
Fax : 21-5058-6017
© 2003 Digitalway, Inc.
English
Chinese
The contents of user's guide are subject to change without prior notice,
depending on updates and changes in specification, etc.
Please read all instructions in the user's guide before using the player.
FL200-ENG-a_4th
10/27/97 5:57 PM
Page 2
Table of Contents
Designing Your Digital Dream
1. Technical Specifications / 04
2. System Requirements / 05
Thanks you for purchasing MPIO FL200. This Manual provides
safety and operating. Be sure to read this manual before using the
product. MPIO will always try to make better product.
3. Warnings / 05
4. Included Accessories / 07
All other system, products and brand names are property of their
respective owner.
5. Location of Control / 08
Any form of imitation, copying, reproduction or translation in part
or in whole of both the product and its accompanying documents
or shrinking the product in such a form as to be read by electronic
means without Digitalway's prior consent is prohibited by the
Copyrights Act.
6. Operating the Player
/ 09
• Microsoft, Windows, Windows Explorer, and Windows Logo are
trademarks or registered trademarks of Microsoft Corporation.
• Intel & Pentium are registered trademarks of Intel Corporation.
• Macintosh, Macintosh Logo is trademarks or registered trademarks of Apple Computer, Inc.
• The system and products appearing in this manual are covered
by trademarks or registered trademarks of each company or
organization concerned; the mark TM or ® is not always indicated.
7. Connecting the FL200 to Your Computer / 10
(1) Turning on the Player/Playback / 09
(2) Selecting a File / 09
(3) Volume Control / 09
(4) Turning off the Player/Stop / 09
(1) Installing the Driver / 10
(2) Transferring Music and Data Files / 12
(3) Charging the Battery / 13
(4) Disconnecting the FL200 from Your Computer / 13
8. Ripping(Converting) Audio CD Tracks to MP3 Files
/ 14
9. Troubleshooting / 15
2
English
English
3
FL200-ENG-a_4th
10/27/97 5:57 PM
Page 4
1. Technical Specifications
Model
MPIO FL200
Decoding Format
MP3
Memory Capacity
128/256 MB
Transfer Rate
Maximum 5 Mbps
Earphone Output Power
R: 4mW, L: 4mW
Frequency Range
20Hz ~ 20KHz
Battery
3.7V Rechargeable Lithium-Ion
Operational Temperature
0°C ~ 40°C
Maximum Playing Time
Apporx. 8hrs
Dimensions
42(W) x 42(H) x 10(D) / mm
Weight
15g(Including rechargeable battery)
• Actual formatted capacity may be less than the storage’s capacity
marked on box and user’s guide.
• Transfer rate may vary depending on the computer systems.
• Playing time may vary depending on the usage, configuration and condition.
2. System Requirements
Windows
- Main Body: USB Interface (Rev 1.1) Standard Equipment & CDROM Driver Mounted
- CPU: 300MHz or faster
- Memory: 64MB or more
- Free Hard Disk Space: 20MB or more
- OS: Windows 98/ME/2000/XP
Macintosh
- Main Body: USB Interface (Rev V1.1) Standard Equipment &
CD-ROM Driver Mounted
EX) Power Mac G3 (Blue&White)/G4/G4 Cube, iMac/iBook,
Powerbook, Powerbook G4
- Memory: above 64MB
- Available Hard Disk Space: above 20MB
- Operation System Supported: Mac OS Version 8.6 or later
Connecting MPIO Player to the PC via USB Hub & Extension
Cord may cause failure in operating the device.
3. Warnings
You should be fully aware of the notice below, before using
the product.
The company does not take any responsibility for the defect
of the product (accessory, connecting device etc.), damage,
data loss, accident & disorder etc., occurred from not fully
understanding the notice below, so please be sure to check
this notice.
- Do not use the product for other purposes except for the matters
described in the manual.
- Be Careful when you handle the product box, manual, accessory
4
English
English
5
FL200-ENG-a_4th
10/27/97 5:57 PM
Page 6
etc. Keep the manual for future reference.
4. Included Accessories
- Pay attention not to have a severe impact on the product damage
or loss may occur.
- Never leave the player in places with high temperature and humidity or of big thermal difference, and by the strong magnetic field.
- Do not get the device wet.
- The device that you discretionary disassembled or remodeled can
be exempted from the free service.
- The company does not take any responsibility for data loss caused
by product defect, failed operation and other reasons, so pay attention to this.
FL200
User's Guide
Driver
Installation CD
USB Cable
Necklace earphones
Clip for fixed
earphones
- Be careful when you open the battery cover.
- Please plug or unplug the earphones and cable by holding the
cords not by pulling out the earphones or cable, to prevent internal
line breaking.
- Maintain and keep the USB connection of the device clean.
- Wipe the player surface with a soft cloth. Do not use any type of
chemical solvent.
- Your auditory sense may adapt to a high volume of sound as you
listen to the music for long time, and it can cause damage to your
hearing. Set your player volume to a safe level before to prevent
any damage. If you have any hearing problem, reduce the volume
or discontinue using your player.
- Avoid listen to the player in situations that require your full attention. For example, while driving.
6
English
English
7
FL200-ENG-a_4th
10/27/97 5:57 PM
5. Location of Control
Page 8
6. Operating the Player
If the red LED blinks during playback, it indicates that battery is
out.
(1) Turning On the Player/Playback
Be sure the earphones are connected to the player properly.
Press and hold the
button to turn on the player.
If the earphones are not connected to the player, you can't turn
the player on.
(2) Selecting a File
- Pressing the
button during playback, will move to next
track with beep sound.
- Pressing the REW button within first 10 seconds of a track will
move back one track with beep sound.
- Pressing the REW button after first 10 seconds of a track will
move back to the beginning of current track with beep sound.
- Adjust the volume to desired sound level.
1.
2.
3.
4.
5.
Earphones &USB Jack
LED
Volume Button
Play/Pause & FF Button
REW Button
(3) Volume Control
Adjust the volume by pressing the volume button to your desired
level.
UP: + button
DOWN: - button
(4) Turning Off the Player/Stop
Press and hold the
button, the player will stop the operation with beep sound. Then the player will automatically power
off.
If you unplug the earphone jack during playback, the player will
automatically turn off.
8
English
English
9
FL200-ENG-a_4th
10/27/97 5:58 PM
Page 10
7. Connecting the FL200 to Your Computer
4. Select [Recommended] and
click the [Next] button.
5. Select [CD-ROM drive] and
click [Next].
1. Connect the large end of USB cable to the USB port of your computer.
2. Connect the small end of USB cable to the earphones jack of
FL200.
-> The red LED on the player will turn on after the USB cable is
connected between your computer and FL200.
(1) Installing the Driver
If you are using windows 98, you must install the driver before
operating FL200.
* FL200 doesn't require to install driver before using the unit on
Windows ME or higher and Mac OS version 8.6 or higher.
6. Click the [Next], to install
the driver.
1.Turn on the PC and insert
the install CD into the
CD-ROM Drive.
2. Connect USB cable to your
player and PC
3. "Add New Hardware Wizard"
window will appear. Click
[Next] button.
10
English
English
11
FL200-ENG-a_4th
10/27/97 5:58 PM
Page 12
7. Click [Finish] to complete
the Installation.
(3) Charging the Battery
The built-in, rechargeable Lithium-Ion battery in your player lasts
up to 8 hours of play and takes about 150 minutes to be fully
charged.
If you connect your player to PC with the USB cable, battery will
start charging automatically.
-> When LED on the player turns the green from red, battery is
fully charged.
When your player is connected to PC with the USB cable
through USB Hub, Battery will not be charged.
(2) Transferring Music and Data Files
Use Microsoft Windows Explorer to transfer music and data files
between your player and PC.
1. Connect the USB cable to your player and PC.
2. Right-click the Windows [Start] button and select Explorer
from the popup menu. For easier transfer, open a second window such as My Computer.
3. Select desired files/folders to copy in your computer, and drag
them the Mass Storage. (FL200)
(4) Disconnecting the FL200 from Your Computer
It is important to follow this procedure before removing the USB
cable from your player and PC. Failure to follow procedure may
cause data loss in your player.
1. Click the USB icon on the right side of your windows taskbar
to perform a windows safe USB removal function.
2. From the popup, select the Stop command.
3. A message indicating that it is safe to remove your FL200
from the system. Click OK and remove the USB cable from
your player.
12
English
English
13
FL200-ENG-a_4th
10/27/97 5:58 PM
Page 14
8. Ripping(Converting) Audio CD Tracks to MP3 Files
1. Select a Real Networks item
from the MENU of the Install
CD, and install the downloaded RealOne Player on
the computer.
2. Insert an audio CD into the
CD-ROM driver, and then
run RealOne Player.
3. Select the [CD] button on
RealOne Player's bottom
menu bar.
4. Click [Save Tracks] on the
left side of green bottom bar,
then "Select Tracks" window
will appear.
5. Mark all the tracks to store in
the PC, and then click on
[Change Settings].
6. Select MP3 audio format on
"Preferences" window.
7. Select a desirable bit rate on
Select a Quality Level, and
then click on [OK].
9. Troubleshooting
Q1. The LED on the player becomes neither red nor green during
the battery charge.
A1. Stop charging the player immediately and try again later. If
that happens frequently, contact the service center.
Q2. Failed battery charge.
A2. Connecting MPIO Player to the PC via USB Hub cause a
failure of charging battery.
If you connect the USB cable to your player and PC
through the USB Hub, remove the USB Hub. Then connect
the USB cable to your player and PC directly.
* MP3 files are stored in My
Music on C: drive. If you want to
change designated folder to
store MP3 files. Click General
category on the left side of
"Preferences" window, and then
choose a desired folder by clicking [Browse].
8. Click on [OK] to select
tracks.
* The RealOne Player which the company provides is the special edition that
MP3 encoding function(56~320Kbps) is added to the Basic Version of
RealOne Player. Digitalway will not be responsible for any other features
added by the customers to the RealOne Player.
14
English
English
15
FL200-ENG-a_4th
10/27/97 5:58 PM
MEMO
16
English
Page 16