1
Contents
Thank you for purchsing this product.
* Please read this owner's manual carefully before installation and operating
this unit and follow up all instructions for safe connecting, operating this product.
Otherwise, the unit can be damaged.
* Pleas keep this manual in a handy place for future use.
Contents
Precaution................................................................................... 2
Handling Discs ............................................................................ 3
Operating with the main unit........................................................ 4
Operating with the Remote Control............................................. 5~6
Basic Opreations.......................................................................
7
Radio Opration............................................................................ 8
Basic Opreations with Touch Keys.............................................. 9~10
System Settings with Touch Keys.............................................
11
Radio Opration with Touch Keys................................................
12
TV Opration with Touch Keys.....................................................
13
DVD/CD Changer Operation with Touch Keys........................... 14
Navigation Operation with Touch Keys....................................... 14
Rear View Camera Operation with Touch Keys......................... 15
DVD System Settings with Touch Keys......................................
16
General Setup............................................................................. 17
Speaker Setup............................................................................ 17
Audio Setup................................................................................ 18
Preference.................................................................................. 19~20
DVD Video Operation with Touch Keys.....................................
21
VCD Operation with Touch Keys................................................
22
Listening to CD with Touch Keys...............................................
23
Listening to MP3 with Touch Keys.............................................
24
Accessories................................................................................ 25
Installation..................................................................................
26
Wire Connections.......................................................................
27
Connection for AV Equipments................................................... 8~29
Specifications.............................................................................
30~31
Troubleshooting Guide...............................................................
32
1
Precautions
WARNING
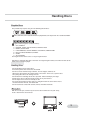
Warning Screen
While the vehicle is in motion, the monitor only shows "WARNING PICTURE"
to prevent trafficaccident. Stop the car in a safe location and apply the parking
break to watch the picture.
1. Driving on extremely bumpy roads which cause severe vibration may cause the sound to skip.
2. When the temperature of the unit falls such as during winter, the monitor screen will become
darker than usual. Normal brightness will return after using the monitor for a while.
3. This unit uses a precision mechanism. Even in the event that trouble arises, never open
the case, disassemble the unit, or lubricate the rotating parts. Be sure to consult your supplier.
4. Any changes or modifications to this product not approved by the supplier could void
the warranty and will violate FCC approval.
2
Handling Discs
Playable Discs
This product only requires using of 12cm following circular discs.
DVD-R, DVD-RW, CD-R and CD-RW can be played back, but it depends on the recorded condition.
Region number(Regional restriction number)
1 - USA, CANADA
2 - EUROPE, JAPAN, SOUTH AFRICA, MID EAST ASIA
3 - KOREA, SOUTH ASIA
4 - LATIN AMERICA, SOUTH AMERICA, AUSTRALIA, NEW ZELAND
5 - RUSSIA, INDIA, MONGOLIA, AFRICA
6 - CHINA
7 - ALL COUNTRY
The Region number of this unit is set at your region number.
DVD players and DVD video discs each have an assigned region number, and if this numbers do not
match, a disc cannot be played.
Handling Discs
*Do not forcibly insert or remove discs.
*Turn off the power after remove the disc loaded.
*Do not use discs that have large scratches, are misshappen, cracked, etc.
When those discs loaded, the monitor shows " Disc Error". In this case, eject the discs.
No ejecting those discs can damage the unit.
*Do not touch the recording side of discs by hands. Hold it carefully by the edges
*Donot expose discs to direct heat from heaters or any heat sources.
*Do not expose discs to excess humidity or dust.
*To remove fingermarks and dust, wipe in a straight line from the center of the disc to
the circumference with soft, well- dried cloth.
*Do not clean discs surface with solvent, thinner, and other chemicals.
With the screen open, a driver may not see the disc insertion slot. For your safety,
insert a disc with the screen closed.
3
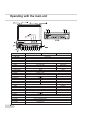
Operating with the main unit
Number
1. VOLUME
2. VOLUME
3. MODE
POWER
4.OPEN/CLOSE
5. JOG
6. JOG
7. JOG
8. JOG
9. JOG Center
10. MUTE
11. FUNC
12. Preset 1
Radio
TV
Volume Down
Volume Up
Short Key: Mode/Power On
Long Key: Powe Off
Monitor Open/Close
Ch Seek Up
Ch Seek Down
Ch Tune Down
Ch Tune Up
Band
Mute
Setting Sounds
Preset 1
DVD/CD
Upper
Downward
To the Left
To the Right
Enter
Track/Chapter/Fast Forward
13. Preset 2
Preset 2
14. Preset 3
RPT
15. Preset 4
RDM
16. Preset 5
SUB-T
17. Preset 6
AUDIO
18. Eject
19. R/Sensor
20. Reset
21. PS/AS
22. ASPECT
23. SLIDE
Preset 3
Track/Chapter/Fast Forward
4
Repeat
Preset 4
Random
Preset 5
Sub Title
Preset 6
Audio
Disc Eject
Remote Sensor
Reset
Preset Scan/Auto Store
Aspect
Sliding Monitor
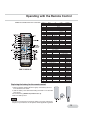
Operating with the Remote Control
REMOTE CONTROLLER KEY FUNCTION
Number
1
2
3
4
5
6
7
8-
9
10
11
12 -I
13 I
14 15 16 - II
17
18
19 -
20
21
22
23
24
25
26
27
28
29
30
31
32
Radio
TV
CDC
POWER ON/OFF
OPEN/CLOSE
MODE
MUTE
Auto Store/Preset Scan
Function
ASPECT
Preset 1
Ch No
Preset 2
Ch No
Preset 3
Ch No
Preset 4
Ch No
Preset 5
Ch No
Preset 6
Ch No
Ch No
Intro
Ch No
Random
Ch No
Disc Up
Ch No
Disc Down
DVD/CD
Figure.10
Clear
Volume Up/Down
TILT Up/Down
Ch Seek Up
Ch Seek Down
Ch Tune Down
Ch Tune Up
Band
Track/Chapter Down
Track/Chapter Up
Fast Backward
Fast Forward
Pause/Play
STEP
DISPLAY
Upper
Downward
To the Left
To the Right
Enter/Play
TITLE
SUB-TITLE
AUDIO
REPEAT
SLOW
ZOOM
A-B
STEP
RANDOM
PROGRAM
SEARCH
DVD SETUP
Replacing the battery for the remote control
1.Slide and hold the hooker (®Á in the figure) of the battery cover to
in the direction of the arrow
2. Slide the battery cover downward hoding the hooker in the direction
of the arrow.
3.insert the battery (CR2025 3V) with O+ face up.
4.Close the battery cover.
*Do not use metal tweezers to hold the battery to prevent short-circuit.
*Dispose of spent batteries in compliance with all applicable regulation.
5
Basic Operations
Resetting
*In case the unit does not operate normally, press the [RESET] button with
a pointed object to restart the operation when the power of the unit is on.
*Pressing the [RESET] button will turn off the power. Press the [MODE/POWER]
button to turn power on.
*When the screen shows touch key [RADIO] on another mode, change the mode
to radio mode and then return to the original mode.
Turning On the Power
Press the [MODE/POWER] button shortly to switch on the unit,
When the power of the unit is off, pressing the [OPEN/CLOSE] button will turn on
the power and the monitor will automatically open.
Turning Off the Power
Press the [MODE/POWER] button for more than 2 seconds again to switch off the unit.
*When the monitor is open, pressing the [OPEN/CLOSE] button will close
the monitor and video is off, but sound is still working.
*When the monitor is open, pulling out the car key (ACC OFF) will turn off
the power and close monitor automatically.
Selecting a Mode
1.Press the [MODE/POWER] button shortly to change the mode of operation.
2.Each time this button is pressed, the mode switches in the following order
RADIO -> CDC (DVDC) -> DVD -> TV -> NAVI -> AV1 -> AV2 -> RVC -> RADIO
*[OFF] or [NONE] for set up CDC, AV1, AV2, RVC is selected, thoes modes do not appear on the monitor .
Adjusting the Volume
Press the Volume [ ] or [ ] button on any mode to adjust the volume.
The volume level is indicated in the monitor from 0 (minimum) to 50 (maximum).
While driving, Keep the volume level at which external sounds can be heard.
Mute On/Off
Each time the [MUTE] button is pressed, mute is turned on and off.
Opening the Monitor
Press the [OPEN/CLOSE] button. The monitor comes out and stand up automatically.
*When the unit is off, pressing the [OPEN/CLOSE] button will turn on the power and
the monitor will be automatically opened.
*If the monitor touches an obstacle while it is opening or closimg, the monitor
will stop moving or close. Close the monitor after removing the obstacle.
*Do not touch the monitor when it is opening or closing. Doing so may damage the unit.
*To prevent the battery from going dead, operate this unit with the engine running.
6
iGv͑͑
jGGtG
ΣΖΤΤ͑ΥΙΖ͑[OPEN/CLOSE] ͑ΓΦΥΥΠΟ͑ΒΘΒΚΟ͑ΥΠ͑ΙΠΦΤΖ͑ΥΙΖ͑ΞΠΟΚΥΠΣ͟
!
j
* The monitor can be closed only when it is positioned parallel with the front
of unit. Position manually the monitor parallel with the front of unit by holding
left and right side of the monitor with hands and then press the [OPEN/CLOSE]
button to close it.
* When a picture displays on the monitor, pressing the [OPEN/CLOSE] button
will close the monitor. But the sound can still be heard. If you want to turn off
the sound, press the [MODE/POWER] button more than 2 seconds to turn off
the power and the sound.
hGGzGwG
͢͟ΣΖΤΤ͑ΥΙΖ [SLIDE] ΓΦΥΥΠΟ͟
ͣ͟ͶΒΔΙ͑ΥΚΞΖ͑ΥΙΖ͑[SLIDE] ͑ΓΦΥΥΠΟ͑ΚΤ͑ΡΣΖΤΤΖΕ͑͝ΥΙΖ͑ΞΠΟΚΥΠΣ͑ΤΝΚΕΖΤ͑ΗΠΣΨΒΣΕ͑ΠΣ͑ΓΒΔΜΨΒΣΕ͑͑͢ΤΥΖΡ͝
͑͑ΥΠΥΒΝ͑ͣ͑ΤΥΖΡΤ͑ΨΚΥΙ͑ͤ͑ΡΠΤΚΥΚΠΟΤ͑͟΅ΙΖ͑ΒΕΛΦΤΥΖΕ͑ΡΠΤΚΥΚΠΟ͑ΚΤ͑ΤΥΠΣΖΕ͑ΚΟ͑ΞΖΞΠΣΪ͟
hGGsG}GhG
΅ΙΖ͑ΞΠΟΚΥΠΣ͘Τ͑ΝΖΗΥ͠ΣΚΘΙΥ͑ΧΚΖΨΚΟΘ͑ΒΟΘΝΖ͑ΔΒΟ͑ΓΖ͑ΒΕΛΦΤΥΖΕ͑ΞΒΟΦΒΝΝΪ͑ΒΤ͑ΥΙΖ͑ΡΚΔΥΦΣΖ͑ΓΖΝΠΨ͟
hGGG G GGGGGGGGGG
GGGGUG
hGGwGtGOhP
ͶΒΔΙ͑ΥΚΞΖ͑ΥΙΖ͑[ASPECT] ΓΦΥΥΠΟ͑ΚΤ͑ΡΣΖΤΤΖΕ͑͝ΥΙΖ͑ΡΚΔΥΦΣΖ͑ΞΠΕΖ͑ΔΙΒΟΘΖΤ͑ΚΟ͑ΗΠΝΝΠΨΚΟΘ͑ΠΣΕΖΣ͟
FULL -> WIDE -> NORMAL -> FULL
[FULL]: ͑ΣΚΘΚΟΒΝ͑ͥͫͤ͑ΡΚΔΥΦΣΖ͑ΚΤ͑ΖΩΡΒΟΕΖΕ͑ΤΚΕΖΨΒΪΤ͑ΥΠ͑ΗΚΝΝ͑ΥΙΖ͑ΤΔΣΖΖΟ͟
͑͑͑͑͑͑͑͑͑͑͑͑͑΅ΠΡ͑ΒΟΕ͑ΓΠΥΥΠΞ͑ΠΗ͑ΥΙΖ͑ΡΚΔΥΦΣΖ͑ΒΣΖ͑ΤΦΒΤΙΖΕ͟
[WIDE]: v GGGGGGG[aZGGGG U
[NORMAL]: GvGGG[aZGGU
QG{G GGG [NORMAL] U
hGGiGs
͢͟ΣΖΤΤ͑ΥΙΖ͑ [FUNC] ΓΦΥΥΠΟ͑ΣΖΡΖΒΥΖΕΝΪ͑ΦΟΥΚΝ [BASS]͑ΚΤ͑ΤΖΝΖΔΥΖΕ͟
ͣ͟ΣΖΤΤ͑ΥΙΖ͑ }vs|tlGඖGΓΦΥΥΠΟ͑ ΥΠ͑ΚΟΔΣΖΒΤΖ͑ΥΙΖ͑ΓΒΤΤ͑ΝΖΧΖΝ͟
ͤ͟ΣΖΤΤ͑ΥΙΖ͑ }vs|tlGඔGΓΦΥΥΠΟ͑ ΥΠ͑ΕΖΔΣΖΒΤΖ͑ΥΙΖ͑ΓΒΤΤ͑ΝΖΧΖΝ͟
hGG{Gs
͢͟ΣΖΤΤ͑ΥΙΖ͑ [FUNC] ΓΦΥΥΠΟ͑ΣΖΡΖΒΥΖΕΝΪ͑ΦΟΥΚΝ [TREBLE]͑ΚΤ͑ΤΖΝΖΔΥΖΕ͟
ͣ͟ΣΖΤΤ͑ΥΙΖ͑ }vs|tlGඖGΓΦΥΥΠΟ͑ ΥΠ͑ΚΟΔΣΖΒΤΖ͑ΥΙΖ͑ΥΣΖΓΝΖ͑ΝΖΧΖΝ͟
ͤ͟ΣΖΤΤ͑ΥΙΖ͑ }vs|tlGඔGΓΦΥΥΠΟ ͑ΥΠ͑ΕΖΔΣΖΒΤΖ͑ΥΙΖ͑ΥΣΖΓΝΖ͑ΝΖΧΖΝ͟
hGGiGs
͢͟ΣΖΤΤ͑ΥΙΖ͑ [FUNC] ΓΦΥΥΠΟ͑ΣΖΡΖΒΥΖΕΝΪ͑ΦΟΥΚΝ [BALANCE]͑ΚΤ͑ΤΖΝΖΔΥΖΕ͟
ͣ͟ΣΖΤΤ͑ΥΙΖ͑ }vs|tlGඖ͑ΓΦΥΥΠΟ͑ΥΠ͑ΖΞΡΙΒΤΚΫΖ͑ΥΙΖ͑ΣΚΘΙΥ͑ΔΙΒΟΟΖΝ͟
ͤ͟ΣΖΤΤ͑ΥΙΖ͑ }vs|tlGඔ͑ΓΦΥΥΠΟ͑ΥΠ͑ΖΞΡΙΒΤΚΫΖ͑ΥΙΖ͑ΝΖΗΥ͑ΔΙΒΟΟΖΝ͟
hGGmGs
͢͟ΣΖΤΤ͑ΥΙΖ͑ [FUNC] ΓΦΥΥΠΟ͑ΣΖΡΖΒΥΖΕΝΪ͑ΦΟΥΚΝ͑[FADER]͑ΚΤ͑ΤΖΝΖΔΥΖΕ͟
͑
ͣ͟ΣΖΤΤ͑ΥΙΖ͑ }vs|tlGඖ͑ΓΦΥΥΠΟ͑ΥΠ͑ΖΞΡΙΒΤΚΫΖ͑ΥΙΖ͑ΗΣΠΟΥ͑ΔΙΒΟΟΖΝ͟
ͤ͟ΣΖΤΤ͑ΥΙΖ͑ }vs|tlGඔ͑ΓΦΥΥΠΟ͑ΥΠ͑ΖΞΡΙΒΤΚΫΖ͑ΥΙΖ͑ΝΖΗΥ͑ΔΙΒΟΟΖΝ͟
7
Radio Operation
Press the [MODE/POWER] button repeatedly until radio mode is selected.
In case the radio is tuned over 3 hours wih closing the monitor, The unit will be hotter.
Please make sure to open the monitor when you want to listen to radio over 2 hours,
or else the unit may be damaged.
Selecting Radio Reception Area
See "Selecting Radio Reception Area" in page 12.
Selecting the Radio Band
1. Press the [MODE/POWER] button repeatedly until the radio mode is selected.
Both the sub LCD and the monitor displays information on the radio station tuned in.
2. Press the [ENTER ] button to selct the desired radio band. Each time the [ENTER]
button is pressed, the radio band switches in following order.
FM1 -> FM2 -> FM3 -> AM1 -> AM2 ->FM1
Seek Tuning
Push the JOG [ ] or [ ] button to automaticaly seek a station.
Tuning automatically stops at a broadcasting frequency.
Manual Tuning
Push the JOG [ ] or [ ] button repeatedly until the desired station is selected.
The frequecy changes one step at a time.
Manual Memory
1. Tune in the station to be preset with seek or manual tuning.
2. Press one of the [PRESET] buttons for more than 2 seconds at which you want
to store the selected station.
3. Each band can store 6 stations in the [PRESET] buttons as follows.
FM1: 6, FM2: 6, FM3: 6, AM1: 6, AM2: 6, Total: 30staions
Auto Memory
1. Press the [ENTER] button to select the band for the stations to be preset.
2. Press the [PS/AS] button for more than 2 seconds. Stations are automatically
stored in the [PRESET] buttons in order of signal strength.
3. Each band can store 6 stations in the [PRESET] buttons as follows.
Preset Scan
This function is useful when searching the stations stored in each [PRESET] buttons.
1. Press the [PS/AS] button shortly. The unit starts scanning each station for 5 seconds sequentially
2. Press the [PS/AS] button shortly again to stop scanning and retain the station currently selected.
Recalling the Preset Station
Press one of the [PRESET] button which the desired station is preset .
8
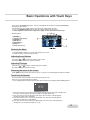
Basic Operations with Touch Keys
This unit has Touch Screen feature. You can select/adjust the functions by touchung touch keys
displaying on the monitor.
You can touch the screen with finger or the plastic pen supplied with this unit.
1. Press the [OPEN/CLOSE] button to open the monitor and turn on the power.
2. Touch anywhere of the screen softly with a finger to show the menu of touch keys.
BASiC MODE
1. [MODE] key
2. Current mode display
3. [EQ/DSP] key
4. [SETUP] key
5. [PICTURE] key
6. [EXIT] Key
7. [TILT] Up/Down key
Selecting the Mode
1. Touch [MODE] to show the menu of each mode on the screen
2. Touch one of the mode key that you want.
Adjusting Sound Volume
Touch VOL [ ] or [ ] to adjust the volume of the sound.
The adjusted sound volume is stored in memory.
Adjusting Tilt Angle
Touch TILT [ ] or [ ] to adjust vertical angle of the monitor.
The adjusted angle is stored in memory.
Removing the menu on the screen
Touch [EXIT] to exit from the menu on the screen, or else the menu will disappear within 10 seconds.
Touch Point Calibration
The touch point may be moved a little after long using of the unit.
In this case, reset the touch point as follows
1. Press [FUNC] button of the main unit for more than 10 seconds. The monitor shows following picture .
2. Press the center of cross mark on the left upper side with a plastic pen with a rounded end.
The cross mark disappears and appears again on the right upper side.
3. Press the center of cross mark on the right upper side. The cross mark disappears
and appears again on the left bottom.
4. Press the center of cross mark on the left bottom side. The cross mark disappears
and appears again on the right bottom.
5. Press the center of cross mark on the right bootom side. The cross mark disappears
and appears. The correct touch point is set up.
9
System Settings with Touch Keys
Adjusting the Bass Level
1. Touch [EQ/DSP] to show the audio menu.
2. Touch [ ] or [ ] to decrease or increase the bass level.
Adjusting the Treble Level
1. Touch [EQ/DSP] to show the menu.
2. Touch [ ] or [ ] to decrease or increase the treble level.
Adjusting the Balance Levels
1. Touch [EQ/DSP] to show the menu.
2. Touch [ ] or [ ] to emphasize the sound in the left or the right channel.
Adjusting the Fader Levels
1. Touch [EQ/DSP] to show the menu.
2. Touch [ ] or [ ] to emphasize the sound in the front or the rear channel.
Selecting EQ
1. Touch [EQ/DSP] to show the menu.
2. Touch [EQ] to select one of EQ mode
Each time [EQ] is touched, the EQ mode switches as follows.
OFF -> CLASSIC -> ROCK -> POPS -> JAZZ -> OFF
Setting Up 3D Sound
1. Touch [EQ/DSP] to show the menu.
2. Touch [3D] to select 3D sound [ON] or [OFF].
[ON]: 3D sound on
[OFF]: 3D sound off
Setting Up 4.1 Channel Output
1. Touch [EQ/DSP] to show the menu.
2. Touch [4.1 Ch] to select 4.1 channel [ON] or [OFF].
[ON]: 4.1 Ch on
[OFF]: 4.1 Ch off
Setting Up A/V 1 or A/V 2 Input
1. Touch [SETUP] and then Touch [EXT. DEVICE] to show the menu.
2. Touch [AV 1] or [AV 2] to select [ON] or [OFF].
Each time [AV 1] or [AV 2] is touched, [ON] or [OFF] is selected.
3. Select [ON] when a external device is connected to [AV 1] or [AV 2].
Select [OFF] when no external device is connected to [AV 1] or [AV 2].
*When a navigation unit is connected to AV 1 or AV 2 input, make sure to set
[OFF] for AV 1 or AV 2 which it is connected to.
10
System Settings with Touch Keys
Setting Clock
1. Touch [SETUP] and then Touch [SYSTEM] to show the menu.
2. Touch HOUR [ ] or [ ] to adjust the hour.
3. Touch MIN [ ] or [ ] to adjust the minute.
* The screen dispalys 24 hours and sub LCD dispalys 12 hours.
* Clock on the sub LCD displays only when the power of the unit is off and ACC on.
Adjusting the Volume of Subwoofer
1. Touch [SETUP] and then Touch [VOLUME] to show the menu.
2. Touch Woofer VOL [ ] or [ ] to adjust the subwoofer volume.
Adjusting the Brightness of Picture
1. Touch [PICTURE] to show the picture menu.
2. Touch BRIGHT [ ] or [ ] to adjust the brightness of picture.
Adjusting the Color Density of Picture
1. Touch [PICTURE] to show the menu.
2. Touch COLOR [ ] or [ ] to adjust the color density of picture.
Adjusting the Tint of Picture
1. Touch [PICTURE] to show the menu.
2. Touch HUE [ ] or [ ] to adjust the tint of picture.
Selecting the Brightness of Backlight
1. Touch [PICTURE] to show the menu.
2. Touch [DIMMER] to select the brightness of backlight.
Each time [DIMMER] is touched, the menu switches as follows.
USER -> STD -> DAY -> NIGHT -> AUTO -> USER
[USER] :
[STD] :
[DAY] :
[NIGHT] :
[AUTO] :
To adjust the dimmer level by end user
Standard level of the dimmer adjusted by the factory
Recommended when the surrouding is very bright.
Recommended for night time or dark surrounding.
Automatically adjusted according to the surroundung brightness.
11
Radio Operation with Touch Keys
1. Touch softly with finger anywhere of the screen to show touch key menu.
2. Touch [MODE] to show the mode menu and then touch [RADIO] to select radio mode.
Selecting Radio Reception Area
1. Touch [SETUP] and then Touch [SYSTEM] to show the menu.
2. Touch [RADIO AREA] to select radio area for your country.
USA
EUROPE
KOREA
CHINA
USA, Canada, S.America
EU, S/E Asia, M/E Asia, Africa
Korea, Taiwan, Philipine
China
Selecting the Radio Band
Touch [BAND] to select radio band.
Each time [BAND] is touched, the radio band switches in following order.
FM1 -> FM2 -> FM3 -> AM1 -> AM2 ->FM1
Seek Tuning
Touch [ ] or [ ] to automaticaly seek a radio station.
Tuning automatically stops at a broadcasting frequency.
Manual Tuning
Touch [ ] or [ ] repeatedly until the desired station is selected.
The frequecy changes one step at a time.
Manual Preset Memory
1. Tune in the station to be preset with seek or manual tuning.
2. Touch one of the preset [CH1 - CH6] for more than 2 seconds at which you want to store
the selected station.
3. Each band can store 6 stations.
FM1: 6, FM2: 6, FM3: 6, AM1: 6, AM2: 6, Total: 30staions
Auto Preset Memory
1. Touch [BAND] to select the band for the stations to be preset.
2. Touch [AS] to store the stations automatically. The stations will be automatically
stored in the [PRESET] buttons in order of signal strength.
Preset Scan
The frequency of the stations stored in the preset [CH1 - CH6] is being displayed on the screen.
1. Touch [PS] shortly. The unit starts scanning each station for 5 seconds sequentially.
2. Touch [PS] shortly to stop scanning and retain the station currently selected.
Recalling the Preset Station
1. Touch [BAND] to select the desired band.
2. Touch one of preset [CH1 - CH6] shortly at which the desired station is preset.
Cautions
In case the radio is worked over 3 hours without opening the monitor, The unit
becomes hotter. It is strongly recommended to open the monitor when you want
to listen to radio over 3 hours, or else the unit can be damaged.
12
{}GvGG{Gr ͑
zGG}Gz
͢͟΅ΠΦΔΙ͑[SETUP] ΒΟΕ͑ΥΙΖΟ͑΅ΠΦΔΙ͑[SYSTEM] ͑ΥΠ͑ΤΙΠΨ͑ΥΙΖ͑ΞΖΟΦ͟
ͣ͟΅ΠΦΔΙ͑[VIDEO STD] ͑͑ΥΠ͑ΤΖΝΖΔΥ͑΅·͑ΤΪΤΥΖΞ͑ΗΠΣ͑ΪΠΦΣ͑ΔΠΦΟΥΣΪ͟
͑͑͑ͶΒΔΙ͑ΥΚΞΖ͑[VIDEO STD] ΚΤ͑ΥΠΦΔΙΖΕ͑͝ΥΙΖ͑΅·͑ΤΪΤΥΖΞ͑ΚΤ͑ΤΨΚΥΔΙΖΕ͟
NTSC -> PAL BG -> PAL DK -> PAL I -> PAL AUS -> NTSC
ͤ͟΅ΠΦΔΙ͑vrGGGG{}G G GU
͑
<TV System for Your Country>
NTSC
PAL BG
PAL I
PAL DK
PAL AUS
Ά΄Ͳ͑͝ʹΒΟΒΕΒ͑͝;ΖΩΚΔΠ͑͝ʹΙΚΝΖ͑͝·ΖΟΖΫΦΖΝΒ͑͟΅ΒΚΨΒΟ͑͝ͼΠΣΖΒ͑
ΖΣΞΒΟΪ͑͝ͺΥΒΝΪ͑͟΄ΡΒΚΟ͑͝΄ΨΚΥΫΖΣΝΒΟΕ͑͝΄ΨΖΕΖΟ͑͝ͿΖΥΙΖΣΝΒΟΕΤ
΅ΦΣΜΖΪ͑͝;͠Ͷ͑ͲΤΚΒ͑͝΄͠Ͷ͑ͲΤΚΒ
Άͼ͑͝ͼ͑͝΄͠ͲΗΣΚΔΒ͑͝
ʹΙΚΟΒ͑͝ΠΝΒΟΕ
ͲΦΤΥΣΒΝΚΒ
~G{}
͑͢͟΅ΠΦΔΙ͑[MODE] ͑ΜΖΪ͑͑ΥΠ͑ΤΙΠΨ͑ΥΙΖ͑ΞΠΕΖ͑ΞΖΟΦ͑ΒΟΕ͑ΥΙΖΟ͑ΥΠΦΔΙ͑[TV] ͑ΥΠ͑ΤΖΝΖΔΥ͑΅·͑ΞΠΕΖ͟
ͣ͑͟΅ΠΦΔΙ͑[BAND] ͑ΥΠ͑ΤΖΝΖΔΥ͑ΥΙΖ͑ΕΖΤΚΣΖΕ͑ΓΒΟΕ͟
͑͑͑͑ͶΒΔΙ͑ΥΚΞΖ͑[BAND] ͑ΚΤ͑ΥΠΦΔΙΖΕ͑͝ΥΙΖ͑΅·͑ΓΒΟΕ͑ΤΨΚΥΔΙΖΤ͑ΚΟ͑ΗΠΝΝΠΨΚΟΘ͑ΠΣΕΖΣ
TV1 -> TV2 -> TV3 -> TV1
ͤ͟΅ΠΦΔΙ͑ΠΟΖ͑ΠΗ͑͑Ͷ΄Ͷ΅ [1-36] ͑ΨΙΚΔΙ͑ΚΤ͑ΡΣΖΤΖΥ͑ΥΙΖ͑ΕΖΤΚΣΖΕ͑ΤΥΒΥΚΠΟ͟
hGz
͢͟΅ΠΦΔΙ͑[BAND] ͑ΥΠ͑ΤΖΝΖΔΥ͑ΥΙΖ͑ΕΖΤΚΣΖΕ͑ΓΒΟΕ͟
ͣ͟΅ΠΦΔΙ͑[AS] ͑ΥΠ͑ΒΦΥΠ͑ΤΔΒΟ͑ΒΟΕ͑ΤΥΠΣΖ͑΅·͑ΔΙΒΟΟΖΝΤ͟
͑͑ͲΝΝ͑ΣΖΔΖΚΧΒΓΝΖ͑΅·͑ΔΙΒΟΟΖΝΤ͑ΒΣΖ͑ΒΦΥΠΞΒΥΚΔΒΝΝΪ͑ΤΥΠΣΖΕ͑ΚΟ͑ΖΒΔΙ͑΅·͑ΓΒΟΕ͑͟
͑͑΅ΙΖ͑ͤͧ͑ΤΥΒΥΚΠΟΤ͑ΨΚΥΙ͑ΘΠΠΕ͑ΣΖΔΖΡΥΚΠΟ͑ΒΣΖ͑ΤΥΠΣΖΕ͑ΚΟ͑ΡΣΖΤΖΥ͑ΠΟ͑ΖΒΔΙ͑ΓΒΟΕ͟
tG{GGzGG
͢͟΅ΠΦΔΙ͑[BAND] ͑ΥΠ͑ΤΖΝΖΔΥ͑ΥΙΖ͑ΕΖΤΚΣΖΕ͑ΓΒΟΕ͟
ͣ͟΅ΠΦΔΙ͑ඔGGඖ͑ΗΠΣ͑ΞΒΟΦΒΝ͑ΥΦΟΚΟΘ͑ΒΟΕ̵͑GG̷͑ΗΠΣ͑ΒΦΥΠ͑ΤΖΖΜ͑ΥΦΟΚΟΘ͟
ͤ͟΅ΠΦΔΙ͑ΠΟΖ͑ΠΗ͑͑Ͷ΄Ͷ΅ [1-36] ͑ΥΠ͑ΤΥΠΣΖ͑ΥΙΖ͑ΤΖΝΖΔΥΖΕ͑ΤΥΒΥΚΠΟ͟
j
͛͑ͷΠΣ͑ΪΠΦΣ͑ΤΒΗΖΥΪ͑͝ΥΙΚΤ͑ΦΟΚΥ͑ΥΦΣΟΤ͑ΠΗΗ͑ΥΙΖ͑ΡΚΔΥΦΣΖ͑ΨΙΖΟ͑ΥΙΖ͑ΔΒΣ͑ΚΤ͑ΞΠΧΚΟΘ͑͟ΟΝΪ͑ΥΙΖ͑ΒΦΕΚΠ͑ΔΒΟ͑
͑͑ΓΖ͑ΙΖΒΣΕ͑͟΅ΙΖ͑ΡΚΔΥΦΣΖ͑ΔΒΟ͑ΠΟΝΪ͑ΓΖ͑ΨΒΥΔΙΖΕ͑ΨΙΖΟ͑ΥΙΖ͑ΡΒΣΜΚΟΘ͑ΓΣΖΒΜ͑ΚΤ͑ΒΡΡΝΚΖΕ͟
͑͑΄ΥΠΡ͑ΥΙΖ͑ΧΖΙΚΔΝΖ͑ΚΟ͑Β͑ΤΒΗΖ͑ΝΠΔΒΥΚΠΟ͑ΒΟΕ͑ΒΡΡΝΪ͑͑ΥΙΖ͑ΡΒΣΜΚΟΘ͑ΓΣΖΒΜ͑ΥΠ͑ΨΒΥΔΙ͑ΥΙΖ͑ΡΚΔΥΦΣΖ͟
u
͛͑ΈΙΖΟ͑ΣΖΔΖΚΧΚΟΘ͑ΥΙΖ͑΅·͑ΓΣΠΒΕΔΒΤΥΤ͑͝ΥΙΖ͑ΤΥΣΖΟΘΥΙ͑ΠΗ͑ΥΙΖ͑ΤΚΘΟΒΝΤ͑ΔΙΒΟΘΖΤ͑ΤΚΟΔΖ͑ΥΙΖ͑ΔΒΣ͑ΚΤ͑ΞΠΧΚΟΘ͑͝
͑͑͑ΤΠ͑ΚΟ͑ΤΠΞΖ͑ΔΒΤΖΤ͑ΚΥ͑ΞΒΪ͑ΟΠΥ͑ΓΖ͑ΡΠΤΤΚΓΝΖ͑ΥΠ͑ΣΖΔΖΚΧΖ͑ΔΝΖΒΣ͑ΡΚΔΥΦΣΖΤ͟
͛͑΅·͑ΤΚΘΟΒΝΤ͑ΒΣΖ͑ΤΥΣΠΟΘΝΪ͑ΝΚΟΖΒΣ͑͝ΤΠ͑ΣΖΔΖΡΥΚΠΟ͑ΚΤ͑ΒΗΗΖΔΥΖΕ͑ΓΪ͑ΓΦΚΝΕΚΟΘΤ͑͝ΞΠΦΟΥΒΚΟΤ͑ΒΟΕ͑ΠΥΙΖΣ͑ΠΓΤΥΒΔΝΖΤ͟
͛͑΄ΦΔΙ͑ΖΩΥΖΣΟΒΝ͑ΗΒΔΥΠΣΤ͑ΤΦΔΙ͑ΒΤ͑ΖΝΖΔΥΣΚΔ͑ΥΣΒΚΟ͑ΝΚΟΖΤ͑͝Β͑ΙΚΘΙ͑ΧΠΝΥΒΘΖ͑ΝΚΟΖΤ͑͝ΒΟΕ͑ΤΚΘΟΒΝ͑ΕΖΧΚΔΖΤ͑ΞΒΪ͑
͑͑͑͑ΕΚΤΥΦΣΓ͑ΥΙΖ͑ΡΚΔΥΦΣΖ͑ΠΣ͑ΔΒΦΤΖ͑ΟΠΚΤΖ͟
͛͑ͺΗ͑ΥΙΖ͑ΣΖΔΖΡΥΚΠΟ͑ΚΤ͑ΡΠΠΣ͑͝ΤΨΚΥΔΙ͑ΥΠ͑Β͑ΤΥΒΥΚΠΟ͑ΨΚΥΙ͑ΘΠΠΕ͑ΣΖΔΖΡΥΚΠΟ͟
13
DVD/CD Changer Operation with Touch Keys
Setting Up a DVD/CD Changer
1. Touch [SETUP] and then Touch [EXT. DEVICE] to show the menu.
2. Touch [CDC] to select DVD or CD changer source.
Each time [CDC] is touched, the source is switched as follows.
NONE -> MPIRE -> DVDC 12 -> DVDC 10 -> S CDC -> CDC 6 -> NONE
3. Select [6 CDC], [10 DVDC] or [12 DVDC] when it is connected to the AV control box.
Select [S CDC] when Sanyo 6 CD changer is connected to the AV control box.
Select [NONE] when no DVD or CD changer is connected to the AV control box.
*The factory default setting is [NONE].
*The car DVD or CD changer is an optional item. This unit only offers input for the system.
*Only when 6 disc CD changer, 10 or 12 disc DVD changers which we are supplying is
connected, all the functions are working as mentioned in here.
*To control of the 10 or 12 DVD changer, see the owner's manual of the DVD changer.
Operating the10/12 DVD Changer or the 6 CD Changer
Touch [MODE] key and then touch [CDC] key to select CD/DVD changer mode.
STATUS: This shows the current CD status (Disc check, Seek, Etc).
TIME: This shows playing time of the disc being played.
Selecting a Disc
Touch [ ] or [ ] button to select "DISC".
Pausing Disc Play
Touch [ II] to pause playback. Touch [ II] again to resume playback.
Stopping Disc Play
Touch [ ] to stop playback. Touch [ II] to resume playback.
Fast Forward Play
] for fast forward.
Touch [
Fast Backward play
] for fast backward.
Touch [
Track/Chapter Search
] or [
I] to search the track/chapter number of the current disc.
Touch [I
Repeat Play
Touch [RPT] to select [ONE]. [ALL] or [OFF]
[ALL] : All the track on the current disc plays repeatedly
[ONE] :The selected track on the current disc plays repeatedly.
[OFF] : Repeat play will be off.
Intro Play
Touch [INT] to select [ONE]. [ALL] or [OFF]
[ALL] : The first 10 seconds of each track of all discs plays in succession.
[ONE] :The first 10 seconds of each track of the current disc plays in succession.
[OFF] : Intro play will be off.
Random Play
Touch [RDM] to select [ONE]. [ALL] or [OFF]
[ALL] : All the tracks of all discs plays in random order.
[ONE] : All the tracks on the current disc plays in random order.
[OFF] : Randpm play will be off.
14
Navigation Operation with Touch Keys
Setting Up
1. Touch [SETUP] and then Touch [EXT. DEVICE] to show the menu.
2. Touch [NAVI] to select a navigation Input source.
Each time [NAVI] is touched, Input source is switches as follows.
<Version 1>
NONE -> NOVA -> DW -> NONE
[NONE]:Select no navigation unit is connected to the unit.
[NOVA]or [DW]:Select RGB output of your navigation is connected to [RGB] input of the main unit.
* The factory default setting is [NONE].
<Version 2>
NONE -> RGB -> AV 1 -> AV 2 -> NONE
[NONE] No navigation unit is connected to the unit.
[RGB] RGB output of your navigation is connected to [RGB] input of the main unit.
[AV1] AV output of your navigation is connected to [AV1] input of the AV control box.
[AV2] AV output of your navigation is connected to [AV2] input of the AV control box.
* The factory default setting is [NONE].
* Check the version of your unit and set up according to the version
Watching the Picture of Navigation
1. Touch [MODE] to show the mode menu.
2. Touch [NAVI]. The screen shows the picture of the navigation
or press [MODE] button on the main unit repeatedly until [NAVI] mode is selected.
*When your navigation unit is connected to AV1 or AV2 input of the AV control
box, set up AV1/AV2 [ON] and then select AV1/AV2 mode to watch the picture of the navigation.
*The car navigation system is an optional item. This unit only offers input for the system.
Rear View Camera Operation with Touch Keys
Setting Up
1. Touch [SETUP] and then Touch [EXT. DEVICE] to show the menu.
2. Touch [RVC] to select [ON] or [OFF]
Each time [RVC] is touched, [ON] or [OFF] is selected.
3. Select [ON] when a rear view camera is connected to [RVC] input of the AV control box.
or select [OFF] when no rear view camera is connected to.
*The factory default setting is [OFF].
*Connect video output of your rear view camera to video input [RVC IN] of the AV control box.
Watching the Picture of Rear View Canmera
1. Touch [MODE] to show the mode menu.
2. Touch [RVC] or set the rear gear on any mode.The monitor shows the picture of
the back view camera picture.
*A rear view camera is an optional item. This unit only offers input for the system.
15
k}kGz GzGG{Gr XU{G[MODE] G GGGGGGGGGG[DVD] GGGk}kGU
YU{G[Setup] GGGk}kGGUG{GGGGU
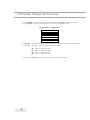
SETUP MENU -- MAIN PAGE
GENERAL SETUP
SPEAKER SETUP
AUDIO SETUP
PREFERENCES
EXIT SETUP
QGpG[Setup] GGSG GGGGGGGGGGU
ZU{G̵SG̷SGඔSGGඖGGGGGGU
GGG̵GaGwGGGGU
GGG̷GaGwGGGGU
GGGඔGaGwGGGGU
GGGඖGaGwGGGGU
[U{Gඔ̅G(Enter)G GGGGGGGG
16
General Setup
PIC MODE
Select according to the disc recording format. If you are not sure of the recording
format, it is recommended to select [AUTO].
[AUTO]: Automatically select the image mode according to the disc recording format.
[HI-RES]: Play with high resolution for TV format.
[NON-FLICKER]: Selected to lower flash playing for movie format.
*The factory default setting is [AUTO].
ANGLE MARK
Select according to the disc-recording format. You can set up so that the angle mark
appears on the screen where the angles can be swithced.
[ON] : To show angle mark on the screen.
[OFF] : To close angle mark.
*The factory default setting is [ON].
OSD LANGUAGE
Select a desired language for On-Screen Display (OSD) to set it.
[ENGLISH] : English OSD is selected.
[KOREAN] : Korean OSD is selected.
*The factory default setting is [ENGLISH].
CAPTIONS
Select [ON] or [OFF] to set the display captions on or off.
*The factory default setting is [OFF].
MAIN PAGE
Select [MAIN PAGE] to return to "SETUP MENU -- MAIN PAGE" menu.
17
zGzGVGhGz
kv~utp
zGGGGGU
[LT/RT]: zGGwGsGGGGGU
[STEREO]: zGGGGU
[OFF]: zGG\UXGjGGU
QG{G GGG [STEREO] U
h|kpvGv|{
GzGGGGGGGU
[ANALOG]: vGGGGGyjhGU
[SPDIF/RAW]: GvG\UXGGGGGGGGGGU
[SPDIF/PCM]: vGYGGGGGGGGGGU
QG{G GGG [ANALOG] U
QGz [SPDIF/RAW] G [SPDIF/PCM] GGGGG
GGGGGh}GGU
vwGtvkl
zGGGUGGGG
[LINE OUT]aGzGGGUGG
[RF REMOD]aGpGGGUGG
QG{G GGG [RF REMOD] U
k|hsGtvuv
zGGGGGU
[STEREO]aGzGGGG
[L-MONO]aGsGGG GG
[R-MONO]aGyGGG UGG
[MIX-MONO]aGsGGGGGGG
QG{G GGG [STEREO] U
wyvGsvnpj
zGGk GwGs
[OFF]: k GwGsGvU
[ON]: k GwGsGvU
[AUTO]: k GwGsGhU
QG{G GGG [ON] U
swjtGv|{w|{
zGGGwjtGG GG GGU
[LPCM 48K]
[LPCM 96K]
QG{G GGG [LPCM 96K] U
18
Preferences
AUDIO
Select a desired audio language.
KOREAN, ENGLISH, FRENCH, SPANISH, CHINESE, JAPANESE
*The factory default setting is [ENGLISH].
*This option is available only when the language selected is recorded in the disc.
SUBTITLE
Select a desired subtitle language.
KOREAN, ENGLISH, FRENCH, SPANISH, CHINESE, JAPANESE, OFF
*This option is available only when the language selected is recorded in the disc.
*The factory default setting is [ENGLISH].
DISC MENU
Select a desired DVD menu language.
KOREAN, ENGLISH, FRENCH, SPANISH, CHINESE, JAPANESE
*This option is available only when the language selected is recorded in the disc.
*The factory default setting is [ENGLISH].
PARENTAL
This is to cut scenes that are unfavorable for children. Select a desired parential lock.
When a parential lock is selected, you need to input a password to see the picture.
1. G
2
3. PG
4. PG - 13
5
6. PG - R
7. NC - 17
8. ADULT
*The factory default setting is [8 ADULT].
PASSWORD
You can change the old password (4-digit) to new one (4-digit).
1. Select [PASSWORD] and [CHANGE].
2. Input an old password with number button on the remote control and touch [ENTER].
3. Input a new password with number button on the remote control, and touch [ENTER].
4. Input a new password again in the [CONFIRM] and touch [ENTER].
*Factory default setting is "No Password".
DEFAULTS
Select [RESET] and touch [ENTER] to reset all saved items to the factory defaults.
19
DVD Video Operation with Touch Keys
1. Insert a DVD disc into the disc slot hole.
The mode automatically switches to DVD mode and Playback starts.
2. Press the [OPEN/CLOSE] button to open the monitor.
*In case playback does not operate normally, press the [RESET]
button with a pointed object to restart the operation.
Switching the NTSC/PAL system.
You can switch the video system. See "Selecting Video System" in
TV operations with Touch Key in Page 13.
Pausing Disc Play
Touch [ II] to pause playback. Touch [ II] again to resume playback.
Stopping Disc Play
Touch [ ] to stop playback. Touch [
] or [ II] to resume playback.
Fast Forward Play
Touch [
] for fast forward.
Each time [
] is touched, the fast forward speed goes from 2X, 8X, 16X, 32X, 64X
to normal playback.
Fast Backward play
Touch [
] for fast backward.
] is touched, the fast backward speed goes from 2X, 8X, 16X, 32X, 64X
Each time [
to normal playback.
Chapter Search
1.Touch [I
2.Touch [
] to search the chapter number to backward.
I] to search the chapter number to forward.
DVD Video operations with the remote control
Disc Menu
1. Press the [TITLE] button to show root menu on the screen.
2. Press the [ ], [ ], [ ], or [ ] button to select the desired menu.
3. Press the [ENTER] button to confirm and play the selected menu.
Switching the Subtitle Language
Press the [SUB-T] button repeatedly until the desired subtitle languge is selected.
*This function only available when there are two or more languages recorded in the disc.
Switching the Audio Language
Press the [AUDIO] button repeatedly until the desired audio languge is selected.
*This function only available when there are two or more languages recorded in the disc.
20
Slow Playback
1. Press the [SLOW] button. Each time the [SLOW] button is pressed, the slow playback
speed goes from forward 2X, 4X, 8x, backward 2X, 4X, 8X to normal playback.
2. Press the [ II] button to return to normal playback.
*There is no sound during slow playback.
Frame by Frame Playback
1. Press the [STEP] button. Press the button again to show next image.
2. Press the [ II] button to return to normal playback.
*There is no sound during frame by frame playback.
Repeat Playback
Each time the [REPEAT] button is pressed, the repeat function switches as follows.
CHAPTER REPEAT -> TITLE REPEAT -> REPEAT OFF -> CHAPTER REPEAT
Repeat between A and B Scene
1. Press the [A-B] button at the beginning of the desired scene.
2. Press the [A-B] button again at the end of the desired scene.
The scene from A to B continues repeating.
3. Press the [A-B] button again to cancel REPEAT A-B.
Searching with a Chapter/Title number
1. Press the [SEARCH] button to show chapter and title number.
2. Press the [ ] or [ ] button to select chapter or title.
3. Input the number of the chapter or title that you want to play back with the [0] to [9] key.
4. Press the [ENTER] button to confirm and play the selected chapter/title number.
Viewing Zoom
1.Each time the [ZOOM] button is pressed. The size of image changes from X1.5, X2, X3 to normal.
2. While zooming, press [ ], [ ], [ ], or [ ] to scroll the image.
3. Press [ II] button to return to normal playback.
Time Display
*Each time the [DISPLAY] button is pressed, the time display during playback switches as follows.
1. Displaying the elapsed time of the current title.
2. Displaying the remaining time of of the current title.
3. Displaying the elapsed time of the current chapter.
4. Displaying the remaining time of of the current chapter.
5. Time display off.
21
VCD Operation with Touch Keys
1. Insert a VCD disc into the disc slot hole.
The mode automatically switches to DVD mode and Playback starts.
2. Press the [OPEN/CLOSE] button to open the monitor.
3. Touch the screen to show the touch keys.
Pausing Disc Play
Touch [ II] to pause playback. Touch [ II] again to resume playback.
Stopping Disc Play
Touch [ ] to stop playback. Touch [
] or [ II] to resume playback.
Fast Forward Play
Touch [
] for fast forward.
] is touched, the fast forward speed goes from 1X, 2X, 3X, 4X to normal playback.
Each time [
Fast Backward play
Touch [
] for fast backward.
Each time [
] is touched, the fast backward speed goes from 1X, 2X, 3X, 4X to normal playback.
VCD operations with the remote control
Slow Playback
1. Press the [SLOW] button. Each time [SLOW] button is pressed, the slow playback speed goes
from forward 2X, 4X, 8x, backward 2X, 4X, 8X to normal playback.
2. Press [ II] button to return to normal playback.
*There is no sound during slow playback.
Frame by Frame Playback
1. Press the [STEP] button. Press the button again to show next image.
2. Press the [ II] button to return to normal playback.
*There is no sound during frame by frame playback.
Repeat between A and B Scene
1. Press the [A-B] button at the beginning of the desired scene.
2. Press the [A-B] button again at the end of the desired scene.
The scene from A to B continues repeating.
3. Press the [A-B] button again to cancel REPEAT A-B.
Viewing Zoom
1.Each time the [ZOOM] button is pressed. The size of image changes from X1.5, X2, X3 to normal.
2. While zooming, press the [ ], [ ], [ ], or [ ]button to scroll the image.
3. Press the [ II] button to return to normal playback.
22
Listening to CD with Touch Keys
1. Insert a Music CD disc into the disc slot hole.
The mode automatically switches to DVD mode and Playback starts.
2. Press the [OPEN/CLOSE] button to open the monitor.
3. Touch the screen to show the touch keys.
Pausing Disc Play
Touch [ II] to pause playback. Touch [ II] again to resume playback.
Stopping Disc Play
Touch [ ] to stop playback. Touch [
] or [ II] to resume playback.
Fast Forward Play
Touch [
] for fast forward.
] is touched, the fast forward speed goes from 1X, 2X, 3X, 4X to normal playback.
Each time [
Fast Backward play
Touch [
] for fast backward.
Each time [
] is touched, the fast backward speed goes from 1X, 2X, 3X, 4X to normal playback.
Track Search
1.Touch [I
2.Touch [
] to search the track number to backward.
I] to search the track number to forward.
CD operations with the remote control
Repeat Play
Press the [REPEAT] button to select [ONE], [ALL] or [OFF].
[ALL]: All the track on the current disc plays repeatedly
[ONE]:The selected track on the current disc plays repeatedly.
[OFF]: Repeat play will be off.
Random Play
Press the [RANDOM] button to select [ON] or [OFF].
[ON]: All the tracks on the current disc plays in random order.
[OFF]: Randpm play will be off.
Repeat between A and B Section
1. Press the [A-B] button at the beginning of the desired section.
2. Press the [A-B] button again at the end of the desired section.
The section set from A to B continues repeating.
3. Press the [A-B] button again to cancel REPEAT A-B.
23
Listening to MP3 with Touch Keys
1. Insert an MP3 disc into the disc slot hole.
The mode automatically switches to DVD mode and Playback starts.
2. Press the [OPEN/CLOSE] button to open the monitor.
3. Touch the screen to show the touch keys.
] key.
4. Touch [ ], [ ], [ ] or [ ] to select the folder and touch [
5. Touch [ ], [ ], [ ] or [ ] to select the file that you want to play and touch [
] key.
Pausing Disc Play
Touch [ II] to pause playback. Touch [ II] again to resume playback.
Stopping Disc Play
Touch [ ] to stop playback. Touch [
]or [ II] to resume playback.
Fast Forward Play
Touch [
] for fast forward.
Each time [
] is touched, the fast forward speed goes from 2X, 4X, 6X, 8X to normal play.
Fast Backward play
Touch [
] for fast backward.
is touched, the fast backward speed goes from 2X, 4X, 6X, 8X to normal playback.
Each time [
Track Search
1.Touch [I
2.Touch [
] to search the track to backward.
I] to search the track to forward.
MP3 operations with the remote control
Repeat Play
Press the [REPEAT] button to select [REP-ONE], [FOLDER REPEAT] or [FOLDER].
[REP-ONE]: The selected track on the current folder plays repeatedly.
[FOLDER REPEAT]: All the tracks on the current folder play repeatedly
[FODER]: Repeat play will be off.
Random Play
Press the [RANDOM] button to select [RANDOM], [SHUFFLE-ON] or [FOLDER].
[RANDOM]: All the tracks on the current folder plays in random order.
[SHUFFLE ON]:The selected track on the current folder plays in random order.
[FOLDER]: Random play will be off.
24
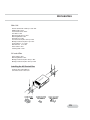
Accessries
Main Unit
Remote control with a battery x each 1EA
NINET Cable x 1EA
Touch Ceramic Pen x1EA
Trim Plate x 1EA
Mounting Half Sleeve x 1EA
Mounting Bracket x1EA
Removal Key x 2EA
Hex Head Screw (M5 x 15mm) x 4EA
Binding Head Screw (#15 x 15) x 1EA
Spring Washer 5.2 x 1EA
Plate Washer 5.2x 1EA
Power Cable x 1EA
Cleaning Cloth x 1EA
AV control Box
Power Cable x 1EA
Mounting Bracket x 2EA
Binding Head Screw (M4 x 6mm) x 4EA
Binding Head Screw (M5 x 16mm) x 4EA
Installing the A/V Control Box
Install the A/V Control Box on
somewhere under a front seat.
25
Installation
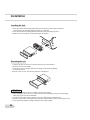
Installing the Unit
1. Place the universal mounting bracket (Half Sleeve) into the instrument panel and bend
each stopper of the mounting bracket inward by a screwdriver.
2. Insert the unit into the mounting bracket until it locks after connecting the wires.
3. Mount the outer escutcheon so that all the hooks are looked.
Removing the unit
1. Unfasten the hex nut when the rear of the unit has been secured with it.
2. Remove the outer escutcheon.
3. Insert the 2 keys as the figure between the spring and the mounting bracket,
then pull the unit out.
*Keep the 2 keys in safe. You cannot remove the unit without it.
1. Make sure to ground the unit to a negative 12V DC power supply
2. When replacing a fuse, only use a new one with the prescrived rating. Using a fuse with wrong
rating may cause the unit to malfunction.
3. To prevent short circuits when replacing a fuse, first disconnect the wiring harness.
4. Do not use any screws except for the ones provided. Using improper screws may damage the unit.
5. If you experience problems during installation, consult your supplier.
26
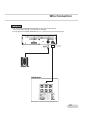
Wire Connection
1. Be sure that the PARKING SENSOR WIRE must be grounded or opened.
If it is connected to ACC (B+). The unit can be damaged.
2. Do not ground the POWER ANTENNA wire. If it is grounded, the unit can be damaged.
27
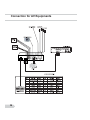
Connection for AV Equipments
28
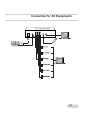
Connection for AV Equipments
29
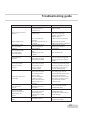
Troubleshooting guide
What might appear to be malfunction in your unit may just be the result of slight misoperation or
miswiring. Before calling service, first check the following table for possible problems.
Problem
Possible Cause
The fuse has blown.
The power does not turn
Nothing happens when
the buttons are pressed.
The monitor does not
open / close.
No ACC position on
vehicle ignition.
The computer chip in the
unit is not functioning
normally.
The parking brake is not
engaged.
The unit is not connected
to the parking brake
detection switch.
No television/video
image appears
The parking brake is not
engaged.
Television/video
image appears black-white.
The color system is set
incorrectly.
The screen is dark.
The unit is a location
where temperature is low.
The screen does not
darken when the
vehicle's lights are
turned on.
AM/FM radio reception
is poor and/or
there is noise.
No sound can be heard,
or the volume is low.
30
The unit is set to auto
dimmer.
The illumination wire has
not been connected.
(If manual dimmer is set)
The TV antenna and
vehicle's radio antenna
are to close.
Attenuator is turned on.
The fader or balance
settings are set all the
way to one side.
The input/output wires or
wiring harness are
connected in correctly.
Solution
After checking for short
circuits in the wires, replace
the fuse with one having the
same rating.
Connect the same wire to the
ignition as the battery wire.
Press the reset button on
the unit.
For safety reasons, the
monitor does not open
while the vehicle is
moving. Engaging the
parking brake.
Make proper connections
according to "wire
connection"
For safety reasons no
television/video images
are displayed while the
vehicle is moving.
Engaging the parking
brake will cause images
to be displayed.
Please switch to correct
color system from menu.
If the temperature of the
monitor drops, the screen
may appear darker when
power is first turned on
due to the characteristics
of a liquid crystal panel.
Wait a while Normal
brightness will return.
When the unit is set to
auto dimmer, it is not
linked to the vehicle's
light switch.
Make propper connections
according to
" Wire connection."
Separate the two antennas
as far as possible.
Turn off the main unit.
Turn off Attenuator.
Reconnect the input/output
wires or the wiring
harness correctly.
Reconnect the input/output
wires or the wiring
harness correctly.
Troubleshooting guide
Problem
The sound quality is poor or
distorted.
Radio reception is poor.
The memory is erased
when the ignition is
turned off.
The sound/picture skips
on a DVD/VCD/CD.
A track will not play.
The subtitle is not
displayed.
The voice(or subtitle)
language cannot be
changed.
The viewing angle cannot
be changed.
Playback will not start
even after a title is
selected.
The voice or subtitle
language selected in the
]initial setting is not
played.
Remote control does not
work
Possible Cause
One of the speaker wires
is being pinched by a
screw in the car.
The speakers are not
wired correctly.
The car antenna is not
extended.
The antenna control wire is not
connected.
The battery wire has not
been connected to the
proper terminal.
The disc is scratched or
dirty.
Random play has been
selected.
The DVD disc being
played does not contain
the recording of subtitles.
The DVD disc being
played does not contain
the recording of more
than one audio (or
subtitle) language.
The DVD disc being
played does not contain
the recording of more
than one angle.
You are attempting to
switch the angle in a
DVD section where more
than one angle is not
recorded.
A viewing restriction
(RATING) has been set
for the disc.
The DVD disc being
played does not contain
the recording of the
selected voice or subtitle
language.
The battery runs out.
Solution
Reset the fader and/or
balance settings.
Reconnect the speaker
wires so that each output
terminal is connected to a
different speaker.
Pull the antenna out all the way.
Connect the wire correctly,
referring to the section on "connections".
Connect the wire correctly,
referring to the section on
"connections".
Clean the disc.
Turn off random play.
The subtitle cannot be displayed
when the DVD disc being played
does not contain the recording of
subtitles.
The voice (or subtitle) language
cannot be changed when the DVD
disc being played does not contain
the recording of more than one
voice(or subtitle) language.
The viewing angle cannot be
changed when the DVD disc being
played does not contain the
recording of more than one angle.
More than one viewing angle may
be recorded only in limited
sections in a disc.
Check the viewing restriction
level(RATING) setting.
level(RATING) setting.
recording of the selected voice or
subtitle language.
Replace the batteery with one
having the same rating.
31
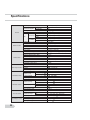
Specifications
Power Requirement
Current Consumption
General
Monitor Section
Audio Section
DVD Player Section
FM Radio Section
AM Radio Section
TV Tuner Setion
Input/Output Section
32
DVD Monitor
Junction Box
Operating Temperature
Storage Temperature
Total
DVD Monitor Install
Size
Weight
Total
JunctionBox
Weight
Display Size
LCD Type
Drive Method
Number of Pixels
Back Lighting
Viseo System
Maximum Power Output
Pre Output Voltage
Subwoofer Output Voltage RMS
Speaker Impedance
Decoder
EQ
3D Sound
Bass/Treble Control Range
System
D/A converter
Channels
MP3 Decoding Format
Frequency Range
Manual Tuning 50
Frequency Step
Seek Tuning 100
Usable Sensitivity
Stereo Separation
S/N Ratio
USA Band
Frequency Range
Europe Band
USA Band
Frequency Step
Europe Band
Usable Sensitivity
Image Rejection Ratio
System
NTSC
Channel Coverage
PAL
Antenna Input
Video Input Voltage
Video Output Voltage
Audio Input Voltage
14.4V DC (11~16V)
2A
10A
-10 ~ 60
-20 ~ 80
178(W) X 50(H) X 190(D)
178(W) X 50(H) X 165(D)
257(W) X 40(H) X 187(D)
7 Inch Wide
Transparent Type TN LCD
TFT Active Matrix
336,960(1,440 X 234)
U-Shaped Cold Cathode Fluorescent Tube
NTSC/PAL Switchable
4ch
35W
1ch (Center)
45W
1VRMS 5chRMS1V
1.2VRMS
4
Linear PCM / Dolby Digital /Dolby Pro Logic / DTS
Classic/Rock/Pops/Jazz
Available
10dB
DVD Video / VCD /CD / dtsCD / MP3
96 / 24bit
5.1ch / 4ch Don Mix
MPEG-1&2 Audio Layer 3
87.5 ~ 108
15dB (S/N=30dB)
25dB
50dB
530 ~ 1710
522 ~ 1620
10
9
35dB (S/N=20dB)
45dB
NTSC / PAL-BG / PAL-DK / PAL-I
2 ~ 13 (VHF), 14 ~ 69 (UHF)
E2 ~ S41 (VHF), E21 ~ E69 (UHF)
4 ch Diversity (75 )
1.0Vpp / 75
1.0Vpp / 75
1.0V / 22


![HomeSullivan 401393BK-24[2PC] Instructions / Assembly](http://vs1.manualzilla.com/store/data/006934915_1-531c68b4e233a29a0ba12108c987ec76-150x150.png)