1
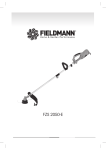
GPSMAP 60
®
map navigator
owner’s manual
© Copyright 2006 Garmin Ltd. or its subsidiaries
Garmin International, Inc.
1200 East 151st Street, Olathe, Kansas 66062, U.S.A.
Tel. 913/397.8200 or 800/800.1020
Fax 913/397.8282
Garmin (Europe) Ltd.
Unit 5, The Quadrangle, Abbey Park Industrial Estate, Romsey, SO51 9DL, U.K.
Tel. 44/0870.8501241
Fax 44/0870.8501251
Garmin Corporation
No. 68, Jangshu 2nd Road, Shijr, Taipei County, Taiwan
Tel. 886/2.2642.9199
Fax 886/2.2642.9099
All rights reserved. Except as expressly provided herein, no part of this manual may be reproduced, copied, transmitted, disseminated, downloaded or stored in any storage medium, for any purpose without the express prior written consent of Garmin. Garmin hereby grants permission
to download a single copy of this manual onto a hard drive or other electronic storage medium to be viewed and to print one copy of this manual
or of any revision hereto, provided that such electronic or printed copy of this manual must contain the complete text of this copyright notice and
provided further that any unauthorized commercial distribution of this manual or any revision hereto is strictly prohibited.
Information in this document is subject to change without notice. Garmin reserves the right to change or improve its products
and to make changes in the content without obligation to notify any person or organization of such changes or improvements.
Visit the Garmin web site (www.garmin.com) for current updates and supplemental information concerning the use and operation of this and other Garmin products.
Garmin®, MapSource®, BlueChart®, TracBack® and GPSMAP® are registered trademarks of Garmin Ltd. or its subsidiaries and may not be
used without the express permisison of Garmin.
March 2006
Part Number 190-00331-00 Rev. B
Printed in Taiwan
GPSmap 60
Introduction
Preface
Thank you for choosing the Garmin GPSmap 60 handheld navigation
system. This Owner’s Manual and Reference Guide is comprised of the
following sections:
Introduction—contains the Garmin software license agreement, FCC
and safety information, the Table of Contents and an overview of the
GPSmap 60 functional features.
Getting Started— takes you through installing batteries, using the
unit control buttons, initializing the GPS receiver, etc.
GPS Navigation—takes you through the process of navigating with
your GPSmap 60 and how to use GPS Navigation to customize the
operation of your GPSmap 60.
GPS Features—provides detailed descriptions of additional GPS
enhanced features such as the Calendar, Hunt and Fish, Sun and Moon
and Games, Also included in this section are a few non-GPS features
such as the Calculator, a non-GPS enhanced game, etc.
Appendices—provides you with additional information about your
GPSmap 60 and an index by subject.
Preface
Contact Garmin
If you should encounter any difficulty while using
your GPSmap 60, or if you have any questions,
in the U.S.A. contact Garmin Product Support by
phone at 913-397-8200 or 800-800-1020,
Monday – Friday, 8 am – 5 pm Central Time; or
by e-mail at [email protected].
In Europe, contact Garmin (Europe) Ltd. at
44/1794.519944.
iii
GPSmap 60
Introduction
Software License Agreement
Software License Agreement
BY USING THE GPSmap 60, YOU AGREE TO BE BOUND BY
THE TERMS AND CONDITIONS OF THE FOLLOWING SOFTWARE LICENSE AGREEMENT. PLEASE READ THIS AGREEMENT CAREFULLY.
Garmin grants you a limited license to use the software embedded
in this device (the “Software”) in binary executable form in the normal
operation of the product. Title, ownership rights and intellectual
property rights in and to the Software remain in Garmin.
You acknowledge that the Software is the property of Garmin and
is protected under the United States of America copyright laws and
international copyright treaties. You further acknowledge that the
structure, organization and code of the Software are valuable trade
secrets of Garmin and that the Software in source code form remains
a valuable trade secret of Garmin. You agree not to decompile,
disassemble, modify, reverse assemble, reverse engineer or reduce to
human readable form the Software or any part thereof or create any
derivative works based on the Software. You agree not to export or
re-export the Software to any country in violation of the export control
laws of the United States of America.
iv
GPSmap 60
Introduction
The GPSmap 60 complies with Part 15 of the FCC interference limits
for Class B digital devices FOR HOME OR OFFICE USE. These limits
are designed to provide more reasonable protection against harmful interference in a residential installation, and are more stringent than “outdoor”
requirements.
FCC Compliance
Information
Operation of this device is subject to the following conditions: (1)
This device may not cause harmful interference, and (2) this device must
accept any interference received, including interference that may cause
undesired operation.
This equipment generates, uses and can radiate radio frequency
energy and, if not installed and used in accordance with the instructions,
may cause harmful interference to radio communications. However,
there is no guarantee that interference will not occur in a particular
installation. If this equipment does cause harmful interference to radio or
television reception, which can be determined by turning the equipment
off and on, the user is encouraged to try to correct the interference by one
of the following measures:
• Reorient or relocate the receiving antenna.
• Increase the separation between the equipment and the receiver.
• Connect the equipment into an outlet on a circuit different from that
to which the receiver is connected.
• Consult the dealer or an experienced radio/TV technician for help.
The GPSmap 60 does not contain any user-serviceable parts. Repairs should only be made by an
authorized Garmin service center. Unauthorized
repairs or modifications could result in permanent
damage to the equipment, and void your warranty
and your authority to operate this device under Part
15 regulations.
v
GPSmap 60
Introduction
Warnings and Precautions
CAUTION: Use the GPSmap® 60 at your own risk. To reduce the
risk of unsafe operation, carefully review and understand all aspects of
this Owner’s Manual—and thoroughly practice operation using the Demo
Mode prior to actual use. When in actual use, carefully compare indications from the GPSmap® 60 to all available navigation sources, including
the information from other NAVAIDs, visual sightings, charts, etc. For
safety, always resolve any discrepancies before continuing navigation.
CAUTION: IT IS THE USER’S RESPONSIBILITY TO USE THIS
PRODUCT PRUDENTLY. THIS PRODUCT IS INTENDED TO BE
USED ONLY AS A NAVIGATIONAL AID AND MUST NOT BE USED
FOR ANY PURPOSE REQUIRING PRECISE MEASUREMENT OF
DIRECTION, DISTANCE, LOCATION OR TOPOGRAPHY. THIS
PRODUCT SHOULD NOT BE USED AS AN AID TO DETERMINE
GROUND PROXIMITY FOR AIRCRAFT NAVIGATION.
CAUTION: The electronic chart is an aid to navigation and is
designed to facilitate the use of authorized government charts, not replace
them. Only official government charts and notices to mariners contain
all information needed for safe navigation – and, as always, the user is
responsible for their prudent use.
vi
GPSmap 60
Introduction
MAP DATA INFORMATION: One of the goals of Garmin is to
provide customers with the most complete and accurate cartography that
is available to us at a reasonable cost. We use a combination of governmental and private data sources, which we identify as required in product
literature and copyright messages displayed to the consumer. Virtually
all data sources contain inaccurate or incomplete data to some degree.
This is particularly true outside the United States, where complete and
accurate digital data is either not available or prohibitively expensive.
Warnings and Precautions
WARNING: The Global Positioning System (GPS) is operated by
the United States government, which is solely responsible for its accuracy
and maintenance. The system is subject to changes which could affect
the accuracy and performance of all GPS equipment. Although the
Garmin GPSmap 60 is a precision electronic NAVigation AID (NAVAID),
any NAVAID can be misused or misinterpreted and, therefore, become
unsafe.
WARNING: This product, its packaging, and its components contain
chemicals known to the State of California to cause cancer, birth defects,
or reproductive harm. This Notice is being provided in accordance with
California’s Proposition 65. If you have any questions or would like
additional information, please refer to our web site at http://www.garmin.
com/prop65.
vii
GPSmap 60
Introduction
Warnings and Precautions
Important
Because the Garmin GPSmap 60 can be used
for vehicular navigation, important safety considerations must be observed. Please read and observe
the instructions on this page.
Do Not Mount Where
Driver’s Field of Vision
is Blocked
Do Not Mount in
Front of Airbag
Panels
viii
Do Not Place Unsecured
on the Vehicle Dash
Do Not Mount in Front of an
Airbag Field of Deployment
Safety Warnings and Cautions—Read This First!
WARNING: For use in vehicles, it is the sole responsibility of the
owner/operator of a vehicle with the GPSmap 60 installed to place and
secure the device so that it will not interfere with the vehicle operating
controls and safety devices, obstruct the driver’s view of driving conditions, or cause damage or personal injury in the event of an accident.
Do not mount the unit over airbag panels or in the field of airbag
deployment. Airbags expand with a rapid force that can propel objects
in their path towards the vehicle driver or passengers causing possible
injury. Refer to airbag safety precautions contained in the vehicle owner’s
manual.
Do not mount the unit in a place where the driver or passengers are
likely to impact it in a collision. The mounting hardware provided by
Garmin is not warranted against collision damage or the consequences
thereof.
WARNING: When used in vehicles, it is the sole responsibility of
the driver of the vehicle to operate the vehicle in a safe manner, maintain
full surveillance of all driving conditions at all times, and not become
distracted by the unit to the exclusion of safe driving practices. It is
unsafe to operate the controls of the unit while you are driving. Failure
by the driver of a vehicle equipped with a GPSmap 60 installed to pay
full attention to operation of the vehicle and road conditions while the
vehicle is in motion could result in an accident with property damage and
personal injury.
GPSmap 60
Introduction
Table of Contents
Section 1: Introduction...............................................i-viii
Preface.........................................................................................i
Software License Agreement........................................................ii
FCC Compliance Information....................................................iii
Warnings and Precautions......................................................iv-vi
Table of Contents................................................................vii-viii
Section 2: Getting Started..........................................1-7
Battery Installation and Start Up.................................................1 .
Key Functions.............................................................................2 ..
Unit Features.............................................................................3 ...
Initialization..............................................................................4 ...
The Satellite Page.......................................................................4..
Navigating with the GPSmap 60................................................5 .
The Main Page Sequence............................................................6 .
The Main Page Features............................................................7
Section 3: GPS Navigation.......................................8-56
The Map Page............................................................................8 ..
The Compass Page...................................................................14 ..
The Trip Computer Page..........................................................16 ..
Using Waypoints......................................................................17 ..
Using Find...............................................................................21 ..
The Main Menu.......................................................................33
Using Tracks......................................................................34
Using Routes......................................................................39
The Highway Page.............................................................44
The Setup Menu................................................................45
System Setup..............................................................45
Interface Setup...........................................................46
Tones Setup...............................................................48
Page Sequence Setup..................................................48
Map Setup.................................................................49
Routing Setup............................................................52
Geocache Setup..........................................................53
Marine Setup..............................................................53
Time Setup.................................................................54
Units Setup.................................................................54
Heading Setup............................................................55
Welcome Page Setup...................................................55 .......
Proximity Waypoints.........................................................56
ix
GPSmap 60
Introduction
Table of Contents
Section 4: GPS Features.........................................57-65
Calendar...................................................................................57
Alarm Clock.............................................................................58
Calculator.................................................................................58
Stopwatch.................................................................................59
Sun and Moon Tables..............................................................60H
unt and Fish Tables..............................................................61 ....
GPS Enhanced Games............................................................62 .
Non-Enhanced Game............................................................65
Section 5: Appendices............................................66-82
Accessories...............................................................................66 .
Specifications............................................................................68
Data Field Definitions..............................................................70
Connecting the GPSmap 60 to a Computer.............................74 .
Downloading MapSource Map Data........................................75
UTC Offset Chart....................................................................76 .
Map Datums and Position Formats..........................................77 .
WAAS and DGPS.....................................................................78W
iring Diagram ......................................................................79 .....
Index.......................................................................................80...
Limited Warranty.........................................................................82
x
GPSmap 60
Getting Started
Installing the Batteries
The GPSmap 60 operates on two “AA” batteries (not included), which
are located in the back of the unit. Alkaline or NiMH batteries may be
used (see page 45 for setting the battery type.) Stored data will not be
lost when batteries are removed.
Important Note
When replacing batteries, use only new or fully charged batteries.
Do not mix Alkaline and NiMH batteries. Rechargeable batteries
may typically display less capacity than disposable batteries.
To install batteries:
1. Remove the battery cover from the
back of the unit by turning the D-Ring 1/4
turn counter-clockwise and pulling out.
Remove the batteries from the unit if you don’t plan to use it
for several months. Storing batteries in the unit for prolonged
periods may result in leakage and damage to the battery
compartment.
2. Insert the batteries, observing the
proper polarity. A polarity diagram
can be found molded into
Locking
Pin Slot
the battery compartment.
Follow the manufacturer’s instructions for proper care and
disposal of used batteries. Do not incinerate used batteries, as
internal materials may ignite with explosive violence.
USE BY: 2009
Extensive use of backlighting and/or WAAS as well as key beep
tones will significantly reduce battery life.
USE BY: 2009
3. Reinstall the battery cover by inserting
the bottom slot over the tab at the
base of the unit and reinserting the
locking pin in the back of the unit.
Turn the D-Ring 1/4 turn clockwise
to lock in place.
Battery Installation and
Start Up
To set backlighting intensity and timeout, see page 46.
To disable WAAS, see page 45.
To mute the beep tones, see page 48.
Battery Compartment
1
GPSmap 60
Getting Started
POWER/BACKLIGHT/CONTRAST Key
• Press and hold to turn unit On/Off.
• Press and release to display backlighting and contrast controls.
Key Functions
IN/OUT Zoom Keys
• From the Map Page, press to zoom
in or out.
• From any other page, press to scroll
up or down a list.
ROCKER Key
• Move Up/Down or Right/Left to
move through lists, highlight fields,
on-screen buttons, icons, enter data
or move the map panning arrow.
GPSmap 60
PAGE Key
• Press to cycle through the main
pages.
• Press when using the on-screen
keyboard to close.
FIND Key
• Press and release at any time to
view the Find Menu Page.
• Press and hold for MOB.
MARK Key
• Press and release at any
time to mark your current location
as a waypoint.
QUIT Key
• Press and release to cancel data
entry or exit a page.
2
IN
OUT
FIND
PAGE
MENU
MARK
QUIT
ENTER
MENU Key
• Press and release to view options
for a page.
• Press twice to view the Main
Menu.
ENTER Key
• Press and release to enter highlighted options, data or confirm
on-screen messages.
Belt Clip/Auxiliary Connector Mount
• Clips to a belt for convenient access
when hiking or walking.
Auxiliary GPS Antenna Connector (under
weather cover)
GPSmap 60
Getting Started
Unit Features
GPS Helix Antenna
• Provides quick satellite acquisition.
• Provides connection to a remote GPS
antenna with MCX connector.
External Power and Data Connector
Port (under weather cover)
• Provides interface to a PC for data
transfer.
• Provides auxiliary AC or DC power
adapter connection.
USB Connector Port (under weather cover)
• Provides interface to a PC for fast
data transfer.
Battery Compartment Locking D-Ring
• Turn 1/4 turn counter-clockwise
and lift to remove cover.
Battery Compartment Cover
Auxiliary Mount Alignment Slots
3
GPSmap 60
Getting Started
Initialization & the Satellite Page
The GPSmap 60 locates satellites above its position
Starting Up the GPS Receiver
When you turn on the GPSmap 60, the GPS receiver begins to search
for satellites in order to determine (fix) its location. This process is called
“initialization” and can take up to 15 minutes the first time you use your
unit. Thereafter, if you haven’t moved more than 600 miles from your
original location, it takes only seconds to minutes. In order to receive
satellite signals, you must be outdoors and have a clear view of the sky.
Satellite signals cannot pass through solid materials (except glass) or
dense overhead tree cover. To shorten the time required for this first
initialization, select “New Location” from the options menu, then you
can use the Map Page to determine your general location so the GPSmap
60 can search for just those satellites above your position.
To initialize your GPSmap 60:
1. Press and release the POWER key to turn on the unit.
GPS Status/
Current
Location
Field
Position of
overhead
satellites
2. Observe the “Power On” Page followed by the Satellite Page.
Options
Menu
Received
satellite
signal
strength
Satellite Page Displaying Satellite Signals
4
3. While the GPS receiver is searching for the satellite signals,
a “Locating Satellites” message followed by an “Acquiring
Satellites”appears until enough satellites signals are acquired
to fix its location.
You will also see a sky view array of the satellites overhead with your
position centered in the array. The outer circle represents the horizon and
the inner circle a position 45o from the horizon. The numbers displayed
indicate the number assigned to each satellite. A bar graph displays the
strength of signals from each satellite.
GPSmap 60
Getting Started
4. When the receiver has signals from at least three satellites, the
display at the top of the page will change to indicate position
accuracy and location coordinates. The Status Bar at the top of
the display indicates the GPS status and status of other features.
If, for any reason, you have difficulty initializing your GPSmap 60, the
solution could be as simple as moving slightly to avoid objects that are
blocking or deflecting the satellite signals.
5. Press and release the PAGE key until the Map Page is displayed. You are now ready to begin GPS-aided navigation.
Initialization & The Satellite Page
Map Item
Details
Position
Arrow
Map Scale
Map Pointer
Active Navigation is supported by three of the Main Pages:
The Map Page graphically shows you, your current location, marks
your route to a destination with a route line, and leaves a trail (track log)
of where you’ve been.
The Compass Page indicates direction to go and direction of travel.
The Trip Computer Page records and displays travel data.
There are three methods of navigating to a destination when using the
GPSmap 60, each graphically displayed on the Map Page.
Go To - A direct path to a selected destination (waypoint, city, address, etc.).
Track - A previous path of travel that has been stored (logged) in the
GPSmap 60. A Track allows you to repeat a path or retrace the path.
Route - A path to a destination consisting of intermediate stops along
the way (waypoints, cities, exits, points of interest, intersections, etc.).
Refer to the sections on Tracks, Routes and Waypoints for details.
Map Page with Current Position Arrow
Navigating with the GPSmap 60
A Go To
A Track
A Route
5
GPSmap 60
Getting Started
The Main Page Sequence
Whenr you turn on the GPSmap 60, you can see the Power On Page, followed by the Satellite Page,
which is the first of the Main Pages in sequence.
To view each Main Page:
1. Press and release the PAGE key repeatedly to cycle through the main pages.
2. With a page displayed, press the MENU key to display the list of options for that page.
Satellite Page
Satellite Page Options
6
Trip Computer Page
Trip Computer Page
Options
Map Page Options
Map Page
Compass Page
“Power On” Page
Main Menu
There are no Options at
the Menu level
Compass Page
Options
GPSmap 60
Getting Started
Status Bar, Backlighting, Contrast and On-Screen Messages
At the top of each page, a Status Bar (which is always displayed)
provides current status information for several unit features.
• Power to the unit is provided either by batteries or by
an auxiliary source (AC or DC Adapter). The Battery Power icon
displays the remaining power as the battery becomes depleted.
• Satellite signal status is shown when searching for (acquiring)
satellites, when a two-dimensional fix is attained and when four or
more satellites have been received (three dimensional fix).
• Backlighting is Off when you power up the unit. When On, it
uses a significant amount of battery power. This icon displays
when the backlight is functioning.
• The Alarm Clock icon displays whenever the Alarm is set.
• The USB cable connection icon, displays when the unit is in communication with a PC Universal Serial Bus.
You may want to adjust the backlight level by pressing down on the
POWER key and releasing. Then tap the POWER key or ROCKER key
Up/Down arrows to cycle through the levels of backlight adjustment. To
adjust the screen contrast to improve readability for diffentent lighting
conditions, use the ROCKER key Left/Right arrows to move the contrast
slider.
Whenever a significant event in the operation of the unit occurs, an onscreen message appears to advise you of the occurrence. In each case, the
condition is described and often a remedy provided. Pressing the ENTER
key will acknowledge and close the message window.
The Main Page Features
Status Bar
Battery Power Acquiring Satellites
2-Dimension Navigation
Auxiliary Power
Backlight is On
Alarm is Set
USB is Connected
3-Dimension Navigation
Backlight and
Contrast Adjustment
Sliders
(Brightnesses varies
according to battery
power level.)
On-Screen Messages
7
GPSmap 60
GPS Navigation
The Map Page
“North Up”
Mode
with Map
oriented with
North at the top
The Map Page
Position Arrow
The Map Scale
Data Fields
“Track Up”
Mode
North
Orientation
Arrow
Guidance Text
Street Level
Detailed
Mapping
The Map Page with Data Fields and Guidance Text
8
Using the Map Page
The Map Page is the primary navigation feature of the GPSmap 60.
The Map Page displays a detailed map of the area surrounding your
current location. It allows you to pan the map with the ROCKER key
and view your progress when navigating. When in the “Track Up” mode
(oriented in the direction of travel), a north reference arrow appears at the
top left corner to orient the map. When in the “North Up” mode the map
is oriented like a paper map. When you activate the Track Log feature,
your path of movement is indicated by a dotted line. The map display can
be changed to “Night” mode for easier viewing in dim light. The factory
set default automatically changes the display at sunrise and sunset.
The map also displays geographic details such as rivers, lakes, highways and towns. The maps to the left show a higher level of detail than the
basemap provided with the unit (i.e. residential streets, parks, etc.) because
Garmin MapSource® detailed mapping data has been downloaded from a
CD-ROM program.
You can use the Map Page to do the following:
• Determine your current location and progress while moving.
• Select and save a map point as a waypoint.
• Locate and navigate to map items by following a Route displayed
on the map.
• Customize the map display to your requirements.
GPSmap 60
GPS Navigation
Using Map Page Features
Use the Zoom IN and OUT buttons to change the map scale. You can
show more map area with less detail or less map area with more detail.
Press and hold to Zoom the map scale rapidly.
The map scale in the lower left hand side of the display is shown in
units of measurement selected in the “Units” field of the Unit Setup Page.
If you zoom in so far that the resolution of the map data is exceeded and
the appearance of the map is no longer accurate, the word, “overzoom”
displays just below the map scale. When using MapSource detailed maps,
“mapsource” appears below the scale.
In many instances the map displays an “Accuracy Circle” surrounding
the “Position Icon.” The GPSmap 60 uses both map resolution and GPS
accuracy in defining your location to a point within the circle. The smaller
the circle, the more accurate your location.
When using the “Pan Map” feature, a small outline arrow (Panning
Arrow) can be moved about the page to highlight and identify map items
or to scroll the map to view areas not shown on the display screen. If
there is more than one map item under the Panning Arrow. A list of those
items displays with the item highlighted on the map and on the list.
Optional data fields can be added at the top of the display to provide a
variety of travel and navigational information, see pages that follow.
The Map Page
Zoom In
Zoom Out
Map Features
Map Scales
Panning Arrow
Accuracy Circle
When navigating, Guidance Text will be displayed at the top of the map.
Guidance Text
9
GPSmap 60
GPS Navigation
The Map Page
The Map Page Options Menu
A Quick Look at the Map Page Options
10
Stop Navigation - Stops navigation and is disabled when
there is no active navigation.
Recalculate - Recalculates a route and is disabled when
there is no active navigation.
Data Fields - Allows two to four fields to display at the top
of the page showing Speed, Heading, Elevation and Time.
Guidance Text - Displays messages on the screen to advise
you of your next navigation move when navigating to a destination.
Change Data Fields - Allows you change data field types.
Setup Map - Access to six pages of Map display settings
so you can customize the map to your preferences.
Measure Distance - Measures the distance from your
current location to the Map Pointer.
Turn Declutter On - Eliminates the display of items on
the map that can block out road details when the map
is zoomed out.
Restore Defaults - Returns the map display to the factory
set map display defaults.
The Map Page Options Menu
The Map Page can be changed to display a variety of information for
navigation. You can stop navigation to a destination and arrange up to
four data fields to display the type of navigation information you desire.
Include a navigation guidance text message on the map page. You can
select the type of data fields to display and change the way the map
displays items by selecting your own settings for text size, what items are
displayed and more. You can display the distance from your current location to other locations on the map and reduce the amount of map clutter
(map item icons and names) to increase the visibility of roads and other
geographic features. You can restore the Map Page display to the factory
default settings.
To arrange the Map Page:
1. With unit turned On, press and release the QUIT key until the
Map Page displays.
2. Press the MENU key to display the Map Page Options Menu.
3. Use the ROCKER key to select the feature you want to use to
customize the Map Page and press the ENTER key.
Some of these options contain sub-menus that allow you to further
control how the option is used.
The pages that follow discuss each option in detail.
GPSmap 60
GPS Navigation
To display Data Fields:
1.
With the Map Page Options Menu displayed, use the
ROCKER key to highlight the Data Fields option and press
ENTER.
2. Observe the sub-menu options: “Map Only,” “2 Data Fields,”
“3 Data Fields” and “4 Data Fields.”
You can choose to leave the Map Page as is (full page map),
or add two, three or four navigation data fields.
3. Highlight your choice and press ENTER.
To change Data Fields:
1. After you display the data fields, a “Change Data Fields”
option appears on the options menu when you press the
MENU key.
2. Select this option and press ENTER.
3. Press ENTER again to select from a list of types of navigation
data to display in the first data field.
4. After making your selection and entry, use the ROCKER key to
move to the next field and repeat the process.
Some Data Field Options are related to the display of data
received from other devices interfaced to the GPSmap 60. For an
explanation of what each option represents, see page 70 of the Appen-
The Map Page
Data Field
Sub-Menu
Two Data
Fields
Three Data
Fields
List of
Data Field
Options
Four Data Fields
11
GPSmap 60
GPS Navigation
The Map Page
Guidance Text Options Menu
GPS Status Message when not navigating
To display Guidance Text:
1.
With Map Page displayed, press the MENU key to display
the Map Page Options Menu.
2. Highlight the Guidance Text Option and press ENTER to
display the Guidance Text Options Menu.
3. Select the desired option “Always Show,” “Never Show” or
“Show When Navigating” then press ENTER to activate.
If you select “Always Show,” a guidance message will always be
displayed whether or not you are navigating.
If you select “Show When Navigating,” a guidance message will be
displayed until you select “Stop Navigation” from the Options Menu.
Guidance Text shows you useful information when using one of the
navigation methods described on page 5. If you select “Always Show”
and you are not navigating, the message field will display GPS Status
information,
To set up the Map:
Refer to the “Map Setup” section on page 49.
12
Guidance Message when navigating
GPSmap 60
GPS Navigation
Measuring Distance
This Map Page option allows you to determine the distance to a point
on the map from your current location. Access the Map Page Options
Menu, select “Measure Distance” and press ENTER to activate. To
measure between two selected points on the Map, move the Map Pointer
to the first map point you want to measure from, press ENTER and then
move the Map Pointer to the second map point. Press QUIT to cancel.
The Map Page
Measured
Distance
Turning Declutter On/Off
This Map Page option allows you to remove map item titles and icons
that clutter the view of roadways, especially when the map is zoomed in.
To turn Declutter On, access the Map Page Options Menu, select
“Declutter On” and press ENTER to activate. Do the same to cancel the
“Declutter” option.
The “Measure Distance” Option Enabled
Restoring Default Settings
This option allows you to return the map settings to factory settings.
Map Declutter “Off”
Map Declutter “On”
13
GPSmap 60
GPS Navigation
The Compass Page
The Compass Ring
moves to indicate
North orientation
when you are
moving.
Compass Page
Course Pointer
Bearing Pointer
14
The Course Pointer
indicates your
course of travel
and the distance
you drift off
course.
The Bearing
Pointer always
indicates the
direction to your
destination.
Using the Compass Page
The Compass Page is your guide to accurate and efficient navigation.
It uses traditional navigation displays to provide navigation information.
When navigation is in progress, the Compass Page provides navigation data and directions. It uses a graphic compass display, a bearing
pointer and digital data fields to display information such as current
speed, distance to the next point on the route, estimated arrival time, etc.
You can choose from three or four data fields and select the type of data
displayed in each from a list of options.
When moving, the rotating graphic compass indicates the direction
you are heading. The Bearing Pointer indicates the direction (bearing) to
your destination relative to your current heading direction. The compass
dial and Bearing Pointer work independently to show your direction of
movement and the direction to your destination. You can choose between
a Bearing Pointer or a Course Pointer for guidance.
The compass does not function as a magnetic compass when you are
stationary. However when you move, the dial rotates to keep you oriented
in relation to North. This is especially helpful when using a paper map in
conjunction with your unit for navigation.
GPSmap 60
GPS Navigation
To use the Compass Page Options:
1. Press the MENU key to display the Options Menu.
The Compass Page
2. The first option is “Stop Navigation” which can be highlighted
and activated by pressing ENTER to stop navigating.
3. The second option is “Course Pointer” or “Bearing Pointer.”
The Bearing Pointer and Compass Ring work independently of the
direction of your movement and the direction to your destination. The
Bearing Pointer always points directly to the destination, no matter what
your current location might be.
For example: if the arrow is pointing straight up, you are going
directly to your destination. If it points any direction other than up, turn
towards that direction until the arrow is pointing up and then continue
in that direction. If you are using the “Course Pointer” option instead
and you drift away from the line of travel to your destination, the Course
Deviation Indicator (CDI) provides graphic indication of drift (right or
left) and displays the distance off course.
Compass Page Options Menu
Course
Deviation
Distance
Course
Deviation
Indicator
(CDI)
4. The third option is “Data Fields.” Highlight the data fields
option and press ENTER to display the Show “3 Data Fields”
or “4 Data Fields” options. Highlight your selection and press
ENTER.
Course Pointer Option
5. The next option is “Change Data Fields” which allows you to
determine what data is displayed in the fields. When you select
this option, the topic of the first data field on the page will be
highlighted. When you press ENTER, a list of data options will
appear. Refer to page 11 for details on changing data fields.
Change Data Fields Option
15
GPSmap 60
GPS Navigation
The Trip Computer Page
Select
“Change
Data Fields”
or press the
ROCKER key
to highlight a
field you want
to change.
Options Menu
Big Numbers
Option
16
Using the Trip Computer Page
The Trip Computer Page provides you with a wide variety of travel
data that is useful when navigating long distances. It indicates your current speed, average speed, trip odometer and many other statistics useful
for navigation.
You can customize the Trip Computer display to meet your personal
requirements. Selecting the type of data to display is done in the same
manner as for the data fields on the Map Page. (See page 11 for details.)
If you want to record new data for each trip, a “Reset” option is available. If you want to view significant trip data at a glance, you can use the
“Big Numbers” option, which shows fewer fields with larger displays.
Before each trip, be certain to reset the trip information by highlighting “Reset” from the options menu and pressing ENTER.
The Reset Page offers options for resetting trip computer data, clearing the Track Log and deleting Saved Tracks,
Waypoints and Routes. This page allows you
select individual items, select all and unselect
all. Once your selections are made, highlight
the “Apply” button and press ENTER. Answer
“OK” to the Yes/Cancel prompt and press
ENTER to complete the reset.
Selecting the “Restore Defaults” option will
return the page to factory settings.
Reset Page
GPSmap 60
GPS Navigation
The Mark Waypoint Page
The Mark Waypoint Page allows you to mark and record your current (or any other) location as a waypoint and displays a name for that
waypoint and a waypoint symbol. You can mark your current location
from any page on the GPSmap 60.
To mark your current location as a waypoint:
1. Press in and hold the ENTER key until the Mark Waypoint Page
appears.
2. To change the name of the waypoint, use the ROCKER key to
highlight the waypoint name field and press ENTER to display
the on-screen keypad. Use the ROCKER key and ENTER key
to select a name for the waypoint. If you choose a name that
has already been used, a “Waypoint Already Exits” message
will appear. Press ENTER to acknowledge and choose a new
name.
Using Waypoints
MARK
Press the
MARK key
to display
the Mark
Waypoint
Page
Mark Waypoint Page
3. To assign an identifying symbol to a waypoint, use the
ROCKER key to highlight the symbol block next to the
waypoint name and press ENTER to display the Symbols Chart.
4. To save the waypoint to the Find Menu Waypoints List, highlight “OK” and press ENTER.
5. If you do not want to save it as a new waypoint, press the
QUIT key, before pressing any other key, to cancel.
Symbols Chart
Naming a Waypoint
17
GPSmap 60
GPS Navigation
Using Waypoints
To create a waypoint with the map panning arrow:
1. With the Map Page displayed, move the panning arrow (map
pointer) to the map item you want use as a waypoint. If there
is information in the mapping database for that location it will
highlight momentarily and display a name or address.
2. Press ENTER to display the information page. With the
Waypoint Information Page displayed, highlight the “Save”
button at the bottom of the page and then press ENTER to
save it to the Find Menu Waypoints List.
Map Item selected as a
Waypoint
If the map selected does not contain any information, a message will appear, stating “No map information at this point. Do
you want to create a user waypoint here?”. Select “Yes” and
press ENTER to display a new waypoint page.
Another method for creating a waypoint is the Man Overboard (MOB)
feature. Typically, this is an application for marking a location on water
where you cannot stop quickly and must return to a point where there are
no land marks for reference.
To create a waypoint using the MOB feature:
1. Press and hold the FIND key to display the MOB prompt.
18
Information Page for a
Map Point with Data
Waypoint Page for a
Map Point without Data
2. Select “Yes” and press ENTER to display
the Map Page showing the path from your
current location to the MOB point. Use the
Compass Page for additional guidance to
the MOB point.
MOB Prompt
GPSmap 60
GPS Navigation
A waypoint location can be averaged over time for more accuracy, but
only while the GPS has a fix on the location and before saving it.
Using Waypoints
To average a Waypoint Location using measurements over time:
1. With the “New Waypoint” information page displayed, press
the MENU key to display the page options menu.
3. Select “Average Location” and press ENTER to display the
Average Location Page. It will begin to average automatically.
4. Highlight the “Save” button and press ENTER when desired.
Editing a Waypoint
A waypoint can be selected from the Find Feature Waypoints list and
edited to change the map symbol, name, location coordinates, elevation
or to delete it. Refer to page 21 for details on using the Find Feature.
Waypoint
Symbols Chart
Delete Button
To edit a Waypoint:
1. Use the Find Feature to display the desired waypoint information page.
2. Make changes as required by highlighting each field and using
the waypoint symbol chart and alpha/numeric keypad to enter
new data.
3. Press the QUIT key to close and save the changes.
Waypoint Options
Menu
To delete a Waypoint:
1. Use the Find Feature to display the desired waypoint information page.
2. Highlight the “Delete” button at the bottom of the page and
press ENTER. Answer “Yes” to the pop-up prompt and press
ENTER to delete.
Average Location Page
19
GPSmap 60
GPS Navigation
To move a Waypoint on the Map Page:
Using Waypoints
New
Location
Original
Location
1. Use the Find Feature to display the Information Page for the
desired waypoint (refer to page 23).
2. Highlight the “Map” button at the bottom of the page and
press ENTER to display the waypoint on the map.
3. Press ENTER again to place a “Move” marker next to the
waypoint.
4. Use the ROCKER key to drag the waypoint to the desired
location on the map and release to place it there. Then press
ENTER.
Projecting a Waypoint
Moving a Waypoint
Projecting a waypoint from any map item (another waypoint, etc.)
allows you to establish a new waypoint othat is a certain bearing and
distance away from that map item.
To project a waypoint:
1. Select an item from the Find Menu and display the Information
Page.
2. Press the FIND key to display the Options Menu and select
“Project Waypoint.”
3. Press ENTER to display the Project Waypoint Page.
20
Project Waypoint
Page
Projected Waypoint on
the Map
4. Enter the distance and bearing to the projected waypoint in
the appropriate fields at the bottom of the page and press the
MENU key to save and exit.
GPSmap 60
GPS Navigation
Using the Find Menu
The Find Feature provides you with a method for searching for Cities
and Exits which are included in the GPSmap 60 basemaps. If you have
downloaded Garmin MapSource mapping data that contains additional
map detail, you can search for Points of Interest, Addresses and Intersections. If you download BlueChart® data,* you can find detailed Marine
items such as Wrecks and Obstructions, NAVAIDS, and Anchorages.
If this additional data is not loaded, these options are not available.
Waypoints and Geocache Points are items you can create and add to the
Find Menu.
Searching for a map item is simplified because the map database is
separated into groups, which are shown as icons on the Find Menu Page.
• When you access a Find group list, by default it will contain only
those items near your current location or the Panning Arrow (if active).
• To save effort in searching again for an item already found, you can
use the “Recent Finds” group, which contains a list of 50 last found
items of all categories.
The options menu for each map item group offers its own unique search
options such as “Find By Name,” “Find Nearest,” “Select Symbol” (for
Waypoints), “Change Reference” (by moving the map Panning Arrow to
a new location), “Nearest Containing” (a key word you enter) and “Select
Category” (for those groups such as Food and Drink, Lodging, etc.). Using
these options can effectively shorten your search.
* Refer to the Garmin website: http://www.garmin.com//cartography/mapSource/
bluechartCD.jsp
Using Find
FIND
Press the
FIND key to
display the
Find Menu
Options Menu
for Waypoints
Auto Ordering
Option places
the last selected
category at the
top of the page.
Find Menu
Options Menu
for groups with
Sub-Categories
Find By Name
Option
21
GPSmap 60
GPS Navigation
Using Find
Searching for a location using Find By Name
If you know the name of the location you want to find, the Find By
Name search option may be the easiest method of searching.
To find a location using Find By Name:
1. Press the FIND key to display the Find Menu.
2. Use the ROCKER key to highlight the Group icon for the type
of item you want to search for and press ENTER to display the
page. Or, if you want to search the entire item database, select
“All Points of Interest.”
3. Press the MENU key to select “Find By Name.”
4. Use the ROCKER key and ENTER key to operate the keypad
at the base of the display and enter the name of the location, when the list displays a match, highlight “OK“ and press
ENTER to go a list where you can select the item.
5. Next, the Information Page for that location will display.
“Finding” icon
displays while
searching
Searching for a location using Recent Finds
The Recent Finds Page saves all of your most recent searches in a list.
Your last found location appears at the top of the list. When you exceed
the number of entries the list can hold, the oldest is deleted.
Pressing the
FIND key with
Find Menu
displayed will
take you to this
page.
To return to a recently found item:
Recent Finds List
22
1. With the Find Menu displayed, use the ROCKER key to highlight the Recent Finds icon and press ENTER to display the
Recent Finds List.
2. Use the ROCKER key to select the list item you want view and
press ENTER to display the Information Page for that item.
GPSmap 60
GPS Navigation
Using the Find Item Information Page
When you select a Find item and press the ENTER key, an Information Page displays with detailed information about the item. This page
contains the following information:
• A title (if a waypoint, it can be renamed and a map symbol assigned).
• An information field (if a waypoint, information you add, if
a map item, an address or other description).
• Location coordinates, if the item is a waypoint.
• Elevation and depth, if a waypoint.
• Direction and distance from current location or the map pointer.
At the bottom of the page are three on-screen buttons. These buttons
will appear differently depending on whether you are selecting a Find
item to navigate to or adding a Find item to a route list as a waypoint.
• If selecting an item as a destination, the buttons display as follows:
Delete - remove from the Waypoints list.
Map - display on the Map Page.
Go To - start a Go To navigation.
• If selecting an item to add to a list of points, these three buttons will
be displayed:
Save - save as a waypoint.
Map - display on the Map Page.
Use - insert into a list of points on a route.
Using Find
Select as a
destination
Information Page
for a Waypoint
Select as a
Point on a
Route
Information Page
for a Map Item
23
GPSmap 60
GPS Navigation
Using Find
The Find Information Page Options Menu offers eight options for
using a Find Item as a tool for navigation.
To use the Find Item Information Page Options Menu:
1. With an Information page displayed for a Find item, press the
MENU key to display the Options Menu.
2. Use the ROCKER key to highlight the desired option and press
ENTER. The following items appear in the Options Menu:
Waypoint Information
Page Options include
“Average Location”
• Average Location - Used when marking
waypoints only, it samples a waypoint location over time and averages the result for a more
accurate position reference.
(Refer to page 19 for detailed information on
Location Averaging.)
• Project Waypoint - Create a new waypoint by
entering a bearing and distance from this point.
(Refer to page 20 for detailed instructions.)
Find Map Database Item
Information Page Options
24
• Find Near Here - Returns you to the Find
Menu, where you can search for map items near this point.
• Change Reference - Point to a new location on the map
Page using the
Panning
Arrow and press ENTER.
• Set Proximity - Program an alarm to
sound when you are within a specified radius of an item defined by the
Information Page.
(Refer to the Section on Proximity
Waypoints on page 56 for detailed
information.).
• Add To Route - Include this item on a
New Route or add it to an existing route.
(See “Using Routes” page on 39 for
details.)
GPSmap 60
GPS Navigation
Using Find
• View Sun and Moon View the Sun and Moon tables
for this item location.
(Refer to page 60 for detailed
information about the Sun and
Moon Tables.)
• View Hunt and Fish View the Hunt and Fish tables
for this item location.
(Refer to page 61 for detailed
information about the Hunt and
Fish Tables.)
• Map Information Displays information about
the map that the item
originated from.
(Refer to page 75 of the Appendicies for information about downloading detailed maps.)
25
GPSmap 60
GPS Navigation
Searching for a Waypoint
The Waypoints List is your storage file for all created and saved
waypoints. Waypoints are stored in alpha/numerical order and are also
identified by a symbol assigned from a list of symbol types. Waypoints
can be selected as destinations and added as points on a route.
Using Find
Find Waypoint
Options
Find Waypoints List
Waypoint Information Page
Waypoint
Name and
Symbol
Enter a
notation
using the
on-screen
keypad
Waypoint
Location
Coordinates,
Elevation
and Depth (if
applicable)
Remove
Waypoint
from List
26
Distance and
Direction from
Current Location
View Waypoint on
Map Page
Navigate to
a Waypoint
Location
To find a Waypoint:
1. Press and hold the FIND key to display the Find Menu.
2. Highlight the Waypoint icon and press ENTER to display the
Waypoints List.
3. Use the ROCKER key to scroll up and down the list to find a
waypoint. If the list is large, you can press the MENU key to
display a list of search options.
“Find By Name” allows you to enter the name of the waypoint
in a search field.
“Find Nearest” allows you to list only those waypoints near
your current location.
“Select Symbol” allows you to search for only those waypoints
of a specific type.
“Change Reference” allows you to use the Panning Arrow to
select a point on the map other than your current location.
4. Once you find a waypoint, press ENTER to view the Waypoint
Information Page. You can edit the data or select “Go To” to
navigate to the waypoint.
GPSmap 60
GPS Navigation
Searching for a Geocache
The Find Geocache feature allows you to view the list of geocache
locations that you have created using the GPSmap 60 or downloaded
from your computer. A geocache location is actually a waypoint with
a special geocache symbol assigned to separate it from others on the
waypoints list. For more information on creating a geocache point, refer
to “Geocache Setup” instructions on page 53.
Using Find
Options
Menu
To find a Geocache:
1. Press and hold the FIND key to display the Find Menu.
2. Use the ROCKER key to highlight the Geocache icon and press
ENTER to display the Geocache List. You can display either
found geocaches or those that have not been found.
3. Use the ROCKER key to highlight the desired geocache in the
list and press ENTER to display the information page.
4. Highlight the “Go To” button and press ENTER to navigate to
the geocache location. When you navigate to a geocache, the
Compass Page changes to “Geocache Navigation” mode and
any additional information about downloaded cache location is
displayed in the field.
Note: When you find a geocache, the unit will mark the cache as
found, log an entry into the calendar and provide an option that, when
activated, will show the next nearest cache.
Find Geocache List
Information Page
Use Found button
when you reach a
geocache
Use Data button
for information
about a geocache “Find Next” Option
27
GPSmap 60
GPS Navigation
Using Find
Find Cities
List
Searching for a City
The Find Cities feature allows you to search for any city listed in the
mapping database (either in the basemap or from downloaded detailed
mapping data).
To find a city:
1. Use the ROCKER key to select the “Cities” option, then press
ENTER to display the find by “Nearest” list of cities.
Cities Options
Menu
2. Use the Options Menu to find a city “By Name,” find by “Nearest Containing,” use “Select Map” to select a different map to
search from or “Chance Reference” from your current location
using the Map Pointer.
Select Maps
Options
City Information
Page
3. If using find “By Name,” begin spelling the name of the city by
using the keyboard. When you have entered enough characters
to define the name, a match list displays. Scroll through the
list to find the city you want. If using “Nearest Containing,”
use the keyboard to enter a key word to display a list of cities
containing that word.
4. Use the ROCKER key to select the desired city from the list and
then press ENTER to display the Information Page for that city.
5. With the Information Page displayed, you can select “Go To,”
“Map,” or “Save” options.
City Page
Options
28
GPSmap 60
GPS Navigation
Searching for an Interstate Exit
The Find Exits feature allows you to search for the nearest Interstate
Exits.
1. Press and hold the FIND key to display the Find Menu. Select
the Exits icon, then press ENTER to display the Exit List.
2. Highlight and select an exit type by pressing ENTER. A list
of exits nearest to you displays. The title box indicates the
interstate highway which is served by the exits. Two fields at the
bottom of the page indicate distance and bearing to the exit.
3. Scroll through the list to highlight the desired exit. Press ENTER
to display the Information Page for that exit. This page contains
the exit description with a list of available services near that
exit along with the distance and bearing fields.
4. Use the ROCKER key to move to the list of services and highlight a selection from the list.
5. Press ENTER to display the Information Page for the selected
service.
The Exit Services Information Page displays the name of the service,
its direction from the exit, and a list of the services available.
Using Find
Find Exits List
Exit Information Page
Options
Menus
Exit Services Info Page
29
GPSmap 60
GPS Navigation
Using Find
Searching for an Address
The Find Addresses feature allows you to search for an address if you
have downloaded detailed mapping data. Enter the street number, street
name and city and the Find Feature will match that data with addresses in
the map database.
To find an Address:
Find Addresses Search
Page
Find Address Matches
30
Address Information
Page
1. Press and hold the FIND key to display the Find Menu.
2. Highlight the Addresses icon and press ENTER to display the
“Find Addresses” page.
3. If your unit has a GPS fix, the “Region” field at the top of the
page will be completed with your current region and the <Enter
Number> field will be highlighted. Identifying a city is not
necessary as the database has information for the entire region.
4. Enter the Street Number “<Enter Number>” using the onscreen keypad. Select “OK” to enter the number.
5. Finally press ENTER to display the street list. Use the on-screen
keypad to enter enough of the street name to display a match
on the list below. For name streets, like Main or Elm, enter the
core name instead of “E,” “W,” etc., will make the search
faster.
6. When done, a list of matches appears below. Select one and
press ENTER to display the Information Page.
GPSmap 60
GPS Navigation
Searching for an Intersection
The Find Intersections feature allows you to search for an intersection if you have downloaded detailed mapping data. Enter the two street
names and city and the Find Feature will match that data with intersections in the map database.
Using Find
To find an Intersection:
1. Press and hold the FIND key to display the Find Menu.
2. Highlight the Intersections icon and press ENTER to display the
“Find Intersections” search page.
3. If your unit has a GPS fix, the “Region” field at the top of the
page will be completed with your current region and the <Enter
Street 1> field will be highlighted. Identifying a city is not necessary, as the database has information for the entire region.
4. With <Enter Street 1> highlighted, follow instructions in step 6
of the previous page. Repeat for <Enter Street 2>.
5. Press ENTER to display the street list. Use the on-screen
keypad to enter enough of the street name to display a match
on the list below. For name streets, like Main or Elm, enter the
core name instead of “E,” “W,” etc., to make the search faster.
6. When done, a list of matches appears below. Select one and
press ENTER to display the Information Page.
Options
Menu
Intersections Search Page
Intersection Matches
Intersection Info Page
31
GPSmap 60
GPS Navigation
Searching for a Point of Interest
You can use the Find Point of Interest feature to locate a nearby
restaurant, lodging, landmark, public building, park, etc. However, you
must have downloaded MapSource detailed mapping that supports this
feature; otherwise these options, plus Address and Intersection options,
are not functional.
Using Find
To find a point of interest:
1. Press the FIND button to display the Find Menu.
2. Highlight a desired “Points of Interest” icon and then press
ENTER to display the list of nearest points.
3. Press the MENU key to choose from search options or choose
“Select Category” to narrow your search.
4. Highlight the desired item from the list and then press ENTER
to display the Information Page for that item.
Find POI Topic List
Search Method
Select Category
If you are searching for a restaurant that is part of a national chain,
only the nearest restaurant to your location is displayed when you search
using the “Find Nearest” method. If you search using the “By Name”
method, then all of the locations for that chain in the mapping database
will be displayed, with the closest to your current location listed first.
32
Category List
POI Information Page
GPSmap 60
GPS Navigation
About the Main Menu
The Main Menu
The Main Menu is the directory for all unit features not in the Main Page sequence. Use the
ROCKER key to highlight a feature name and then press ENTER to display the feature page.
• Tracks - This feature allows you to maintain a record of your movements (track log) with information.
• Routes - Allows you to create a list of points that you wish to navigate to in a specific order and save
for later use.
• Highway - A useful graphic perspective for navigating a route.
• Setup - Controls the settings for many of the unit operating system features.
• Proximity - Activates an alarm for a defined radius around a specified waypoint.
• Calendar - An outdoor calendar with data access and waypoint association.
• Alarm Clock - Allows you to use the GPSmap 60 as an Alarm Clock.
• Calculator - A standard or scientific calculator for measurement conversions, etc.
• Stopwatch - A multi-featured stopwatch.
• Sun & Moon - Sunrise and sunset times, moon phases and sun and moon positions for any given date and time.
• Hunt & Fish - A table of time frames for best hunting and fishing opportunities for any given location and date.
• Games - A series of challenging games, some incorporating GPS navigation.
33
GPSmap 60
GPS Navigation
Using Tracks
Using a Track Log
The Tracks feature creates an electronic trail on the map page as you
travel about and is referred to as a Track Log. A track log contains information about points along its path, including time, position and elevation.
Use a Track Log to do the following:
• Record your movements for a given time and place and save it.
• Measure the area of any space you encompass with a track.
• Retrace your path in either direction.
To create a Track Log:
Tracks Page with Saved Track Log
1. Press and release the QUIT key until the Main Menu displays.
Then use the ROCKER key to highlight the Tracks icon.
2. Press ENTER to display the Tracks Page. The page contains On
and Off buttons to activate or cancel the Track Log and a Track
Log meter which displays the percentage of track log space used.
Track Log Options
3. Beneath the Track Log field are four on-screen buttons to
“Setup” a track log, “Clear” the track log, “Save” a track log
and activate the “TracBack®” feature for the current log.
4. To setup a track log, highlight the “Setup” button and press
ENTER to display the Setup page. Check ”Wrap When Full”to
continue recording when full by overwriting the oldest data with
new.
Setup Options
34
Track Log Setup Page
GPSmap 60
GPS Navigation
5. Highlight the “Record Method” field and press ENTER to display
the Distance, Time and Auto options. Because a track is made
of a series of points that define your path of travel, they can
be placed a specified “Distance” apart or placed at a “Time”
interval you specify. The “Auto” option allows you choose from
five intervals.
6. Next, set the interval for setting track points. You can choose
from distance, time or frequency values.
7. When completed, press the QUIT key to return to the Track Log Page.
Using Tracks
To save a Track Log:
1. With the Tracks Page displayed, highlight the “Save” button and
press ENTER. You will be asked “Do You Want To Save the Entire
Track?”. If you select “Yes,”a “Saving Track” message appears
followed by the Saved Track Page. The new saved track will be a
representation of the entire track log from beginning to end.
2. If you select “No,” a map showing the entire track appears and
prompts “Select the beginning point for the saved track.” Use
the ROCKER key to move the Panning Arrow to the point on the
track line that you want to become the beginning of the Saved
Track and press ENTER.
3. The next prompt asks you, “Select the ending point for the saved
track.” Use the Panning Arrow to identify a point on the track
that you want as the End Point and press ENTER. A “Saving
Track” message appears followed by the Saved Track Page.
(cont. on page 36)
Saved Track Page
Saved Track
on Map
Select Track
Ending Point
Select Track Beginning Point
35
GPSmap 60
GPS Navigation
Using Tracks
4. The Saved Track Page allows you to rename the track, view the
track distance, view the calculated area encompassed by the
track (an area is defined even if the track is open ended) and
specify a color for the track when displayed on the map page
(Show On Map). On-screen buttons at the bottom of the page
allow you to Save the track (OK), delete, view it on the Map, and
navigate the track back to any point along the track (TracBack).
To view a Track on the Map:
Saved Track Page
Saved Track on the Map Page
Area Calculation
Option
To calculate the area of a Track:
Start
Calculation
Stop Calculation
36
1. With the Saved Tracks Page for the track or the Track Log
displayed, highlight the Map button and press ENTER to display
the Map Page.
2. A map showing the entire track appears with Begin and End
markers. Any User Waypoints added to the Track will be displayed
as well.
Save Calculated Track
1. With the Track Log Page displayed and the Track Log On, press the
MENU key, highlight the Area Calculation option and press ENTER.
2. Press ENTER to start the calculation as you begin to move and
define the area’s boundaries. The page now displays a Stop
button.
3. When you have completed defining the area, press ENTER to
display the page with a Save button.
4. Press ENTER again to save the new track to the Saved Tracks List.
GPSmap 60
GPS Navigation
Track Profiles
A Track Elevation Profile can be created from Digital Elevation
Models (DEM) maps (MapSource U.S. Topo 24K) which include
elevation data contained in the map. To create a track profile, you must
be located within the geographic area supported by the DEM map data
loaded on your GPSmap 60. A Track Profile page displays when you
select “Profile.” See page 75 for more information about MapSource
U.S. Topo 24K maps.
Using Tracks
View Profile
Page Option
To view a Track Profile:
1. With the Saved Tracks Page for the Track displayed, press the
MENU key to display the Profile option.
2. Then press ENTER to display the Track Profile.
The beginning of the track is marked by a flag and you can scroll
across the profile by pressing the left ROCKER key arrow.
As you scroll the profile, the elevation for each point on the
profile is displayed at the top of the page and the distance from
the Start point and the End Point is displayed at the bottom.
3. At any point along the profile, you can press ENTER to display
that point on the map.
4. Press the MENU key to use “Zoom Ranges” and “Hide Symbols” options.
Track Profile Page
Zoom Ranges Page
37