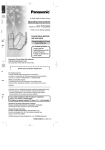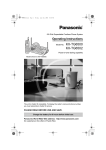
1
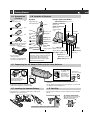
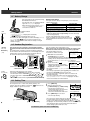
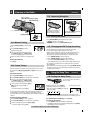
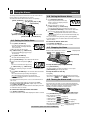
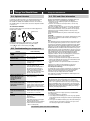
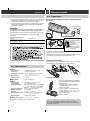
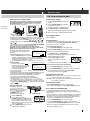
Sección 6
6-C Configuración del temporizador para dormir
Con la radio encendida, presione [SLEEP]
repetidamente para seleccionar la hora
(minutos).
•Con cada presión de [SLEEP] la hora
cambia como sigue:
30 60 90 120 OFF
Ej.: Tiempo de temporizador
para dormir: 30 min.
5.8 GHz Expandable Cordless Handset
Operating Instructions
Model No.
•La radio se apagará automáticamente después de que transcurra el
tiempo de temporizador para dormir seleccionado.
Pulse-or-tone dialing capability
The KX-TGA523 will only
work with the Panasonic
cordless phone systems:
KX-TG5200/KX-TG5202/
KX-TG5210/KX-TG5212/
KX-TG5230/KX-TG5240/
KX-FPG391
6-D Uso de las alarmas
Para configurar la alarma de radio
1 Presione [RADIO, ALARM SET].
2
3
4
5
• Si no procede al paso siguiente durante 5 segundos, la pantalla
regresa a la de la hora actual.
Ajuste la hora de la alarma presionando [+, TUNE/CLOCK] o
[–, TUNE/CLOCK].
• Manteniendo presionado [+] o [–] se cambia la hora más rápidamente.
Presione [RADIO, ALARM SET].
• La radio se encenderá automáticamente.
Presione [FM/AM, RADIO] para cambiar de FM a AM y viceversa.
Presione el botón de memoria deseado
([M1] a [M5]).
O
Sintonice la estación deseada
presionando [+, TUNE/CLOCK] o
[–, TUNE/CLOCK].
Ajuste el volumen por medio del mando VOLUME.
6
Presione [RADIO, ALARM SET] para guardar la hora de la alarma
7 de
radio y la estación.
PLEASE READ BEFORE
USE AND SAVE.
Charge the battery for
6 hours before initial use.
1
2
3
4
5
6
Contents by Section
Getting Started
Listening to the Radio
Using the Sleep Timer
Using the Alarms
Things You Should Know
Referencia rápida
Panasonic World Wide Web address:
http://www.panasonic.com
for customers in the USA or Puerto Rico
Attach your purchase receipt here.
• La radio se apagará.
Para configurar la alarma de timbre
KX-TGA523
1 Presione [BUZZER, ALARM SET].
For product service
• Visit our website: http://www.panasonic.com/support
• Contact us via the web at: http://www.panasonic.com/contactinfo
• Call us at: 1-800-211-PANA(7262)
la hora de la alarma presionando
2 Ajuste
[+, TUNE/CLOCK] o [–, TUNE/CLOCK].
When you ship the product
• Carefully pack your unit, preferably in the original carton.
• Attach a letter, detailing the symptom, to the outside of the carton.
• Si no procede al paso siguiente durante
5 segundos, la pantalla regresa a la de
la hora actual.
• Manteniendo presionado [+] o [–] se cambia la hora más rápidamente.
3
Presione y luego suelte [BUZZER, ALARM SET] para guardar la
hora de la alarma de timbre.
Para detener la alarma
Para detener la alarma temporalmente (SNOOZE):
Presione [SNOOZE/MUTE].
Para detener la alarma para todo el día: Presione [OFF].
•La configuración no cambia y la alarma sonará diariamente a la
misma hora, a no ser que usted la detenga completamente.
6-E Encendido y apagado de la alarma
Una vez que se han configurado los tiempos de las alarmas para la alarma
de radio y la alarma de timbre, las dos alarmas se pueden encender y
apagar juntas y por separado. Si se enciende una alarma, sonará a la hora
configurada todos los días. Si se apaga una alarma, no sonará.
Presione [ALARM ON/OFF] repetidamente para seleccionar el modo
de alarma deseado. Hay 4 modos disponibles.
— Alarma de radio encendida (aparece “
”.)
— Alarma de timbre encendida (aparece “
”.)
— Las dos alarmas encendidas (aparecen “
”y“
”.)
— Las dos alarmas apagadas (“
”y“
” desaparecen.)
Symptom
• Send the unit to an authorized servicenter, prepaid and adequately
insured.
• Do not send your unit to the Panasonic Consumer Electronics
Company listed below or to executive or regional sales offices.
These locations do not repair consumer products.
If you need assistance with the setup or operation,
please call 1-800-211-PANA(7262)
For hearing or speech impaired TTY users, TTY : 1-877-833-8855
Panasonic Consumer Electronics Company,
Division of Matsushita Electric Corporation of America
One Panasonic Way, Secaucus, New Jersey 07094
Panasonic Sales Company,
Division of Matsushita Electric of Puerto Rico, Inc.
Ave. 65 de Infantería, Km. 9.5, San Gabriel Industrial Park
Carolina, Puerto Rico 00985
© 2004 Panasonic Communications Co., Ltd. All Rights Reserved.
PQQX14029YA S0104-1034
1
Getting Started
Gettin
1-A Accessories
1-B Location of Controls
(included)
Handset
Battery ..............................one
Order No. HHR-P104
Charger (with Clock Radio)
[SNOOZE/MUTE] Button (2-D, 4-C)
Ringer/Message
Alert Indicator
Antenna
[RADIO, ALARM SET]
Button (4-A)
Handset Cover ..................one
Order No. PQKK10142Z1
Display
Belt Clip ............................one
Order No. PQKE10377Z1
Charger Unit .....................one
Charger Order No. KX-TGA523M
AC Adaptor Order No. PQLV1Z
Loop Antenna Order No.
N1DAEYY00002
[BUZZER, ALARM SET]
Button (4-B)
Soft Keys (1-G)
Headset Jack
(5-A)
[OFF] Button
[ ] (TALK)
Button
[MENU] Button
[ ] (Speakerphone) Button
[Y] (TONE)
Button
[HOLD/INTERCOM]
Button
VOLUME
Control (2-A)
Display
Navigator Key
[REDIAL] Button
[FLASH/
CALL WAIT]
Button
Charge Contacts
(1-F)
Note: The steps necessary to start up the
handset are described in these Operating
Instructions. Please read the KX-TG5200/
KX-TG5202/KX-TG5210/KX-TG5212/
KX-TG5230/KX-TG5240/KX-FPG391
operating instructions for further details
about the handset operations.
•For extra orders, call
1-800-332-5368.
For hearing or speech impaired
TTY users, call 1-866-605-1277.
Charge Contacts
(1-F)
CHARGE
Indicator (1-F)
[+, -, TUNE/CLOCK]
Button (1-H, 2-A)
[TIME SET]
Button (1-H)
Memory Buttons ([M1], [M2],
[M3], [M4] and [M5]) (2-B)
[ALARM ON/OFF]
Button (4-D)
[SLEEP] Button (3-A)
[OFF] Button (2-A, 4-C)
[FM/AM, RADIO] Button (2-A)
1-C Connecting the AC Adaptor/Setting Up the Loop Antenna
Hook
3
2
1
Loop
Antenna
Stand the antenna up by
inserting the tab into the slot
until it clicks into place.
Make sure the
AC adaptor plug
is securely
connected to the
unit. Feed the
cord through the
hooks as shown.
Power Outlet
(AC 120 V, 60 Hz)
AC Adaptor
Hooks
•To disconnect the antenna, firmly pull the
antenna cord, holding the cord near the plug.
1-D Installing the Handset Battery
Insert the battery (#), and press it down until it snaps into the
compartment ($). Close the cover.
2
•USE ONLY WITH Panasonic AC ADAPTOR PQLV1 (Order No.
PQLV1Z).
•The AC adaptor must remain connected at all times. (It is normal for
the adaptor to feel warm during use.)
1-E Belt Clip
You can hang the handset on your belt or pocket using the included
belt clip.
To attach the belt clip
1
To remove the belt clip
While pressing the top of the clip
(A), pull the right edge in the
direction of the arrow (B).
B
A
For assistance, please call: 1-800-211-PANA(7262)
Getting Started
Section 1
1-F Battery Charge
Place the handset on the charger and charge
for 6 hours before initial use.
•The unit beeps once, the CHARGE indicator
lights and “Charging” is displayed.
•When the battery is fully charged, “Charge
completed” is displayed if there are no
new calls in the Caller List.
LUME
trol (2-A)
CHARGE Indicator
•Recharge the battery when:
– “Recharge battery” is displayed on the handset,
–“
” flashes, or
– the handset beeps intermittently while it is in use.
•If the battery has been discharged, the handset will display “Charge
for 6 HRS” and “
” when you place the handset on the
charger. The handset will not work unless the battery is charged.
Continue charging.
Battery information
After your Panasonic battery is fully charged, you can expect the
following performance:
Operation
Operating time
While in use (TALK)
Up to 5 hours
While not in use (Standby)
Up to 11 days
While using Clarity Booster feature
Up to 3 hours
•Clean the charge contacts of the handset and the charger with a
soft, dry cloth once a month. Clean more often if the unit is
subject to grease, dust or high humidity. Otherwise the battery
may not charge properly.
A nickel metal hydride battery that is recyclable
powers the product you have purchased. Please call
1-800-8-BATTERY for information on how to recycle
this battery.
1-G Handset Registration
ME SET]
tton (1-H)
RM ON/OFF]
(4-D)
This handset must be registered to a KX-TG5200/KX-TG5202/
KX-TG5210/KX-TG5212/KX-TG5230/KX-TG5240/KX-FPG391 base
unit.
The handset will be assigned an extension number at registration.
The KX-TGA523 will not work without one of the following Panasonic
cordless phone systems: KX-TG5200/KX-TG5202/KX-TG5210/
KX-TG5212/KX-TG5230/KX-TG5240/KX-FPG391.
[-]
Press LOCATOR
on base unit
for 3 sec.
Then press OK
BACK
OK
Only one handset can be registered at a time.
Make sure the base unit and the other handsets are not being used.
Have both the handset and base unit nearby during registration.
Press LOCATOR
The handset display shows the
on base unit
instructions as shown on the right.
for 3 sec.
Then press OK
Base unit: Press and hold the
OK
*LOCATOR button for 3 seconds.
• The CHARGE indicator flashes. After the CHARGE indicator starts
flashing, the rest of the procedure must be completed within 1 minute.
•On the KX-FPG391, “HS REGISTRATION” is displayed.
Handset:
Ex. Extension number 2
#Press the soft key ( OK ).
[2]
SP
PRIVACY
$Wait until a long beep sounds and the
display shows the new extension number.
•Registration is complete.
•The registered number “[1]” to “[4]” is shown on the top right of
the display.
•You can stop registration by pressing [OFF] on the handset and
pressing the *LOCATOR button on the base unit.
•To cancel the handset’s registration, please see the base unit
Operating Instructions.
•If you try to register this handset to the KX-TG6500 base unit,
“Wrong handset Refer to manual” is displayed. The base
units for this handset are mentioned above.
1
2
CHARGE Indicator
Soft Key ( OK )
*LOCATOR Button
r Outlet
20 V, 60 Hz)
•Base unit model shown here is KX-TG5240.
*The location of LOCATOR button varies by base unit model.
KX-TG5200/KX-TG5202: LOCATOR [ ], [ ], [ ], [ ] or [
]
KX-TG5210/KX-TG5212: LOCATOR/INTERCOM [ ], [ ], [ ],
[ ] or [
]
KX-TG5230/KX-TG5240/KX-FPG391: [LOCATOR/INTERCOM/TRANSFER]
Handset [2]
Registered
1-H Setting Time
The charger unit has a 12-hour clock (monthly accuracy ±30
seconds). After the AC adaptor is connected, “
” flashes on the
display. Follow the steps to set the clock.
1 Press [TIME SET].
the time by pressing
2 Adjust
[+, TUNE/CLOCK] or [–, TUNE/CLOCK].
• Pressing [+] or [–] increases or
decreases the time in one-minute units.
• Pressing and holding [+] or [–]
increases or decreases the time faster.
Ex. 3:30PM is set.
3 Press [TIME SET] to set the clock.
• The time stops flashing.
[+, -, TUNE/CLOCK]
[OFF]
B
[TIME SET]
•You can exit time setting mode any time by pressing [OFF].
•If a power failure occurs, the display will show “ ” for about 10
minutes, then it will become blank. After power returns, “
” will
be displayed. The clock memory will be lost. Set the clock. The radio
alarm and buzzer alarm memory will be retained for about 10
minutes during a power failure (4-A, 4-B).
For assistance, please call: 1-800-211-PANA(7262)
2
Listening to the Radio
Section 2
2-C Improving Reception
Memory Buttons
([M1], [M2], [M3], [M4] and [M5])
[SNOOZE/MUTE]
[+, -, TUNE/CLOCK]
[OFF]
VOLUME Control
For FM
For AM
Extend the cord and place
the antenna in a location
where reception improves.
Reorient the antenna horizontally
until reception improves.
[FM/AM, RADIO]
Loud
2-D Muting the Radio
Press [SNOOZE/MUTE] while listening to the radio.
•“
” flashes on the display.
•To release the mute, press [SNOOZE/MUTE] again.
2-A Manual Tuning
[FM/AM, RADIO] to turn the radio
1 Press
on.
2-E Changing the FM Tuning Sensitivity
[FM/AM, RADIO] to switch
2 Press
between FM and AM.
You can change the sensitivity used for tuning in FM stations
from 0.2 MHz (factory preset) increments to 0.1 MHz.
•Note that if you change the sensitivity, all FM station presets (2-B)
and the station used for the radio alarm (4-A) will return to the
factory preset. The buzzer will sound at the set radio alarm time.
in to the desired station by pressing
3 Tune
[+, TUNE/CLOCK] or [–, TUNE/CLOCK].
• Press and hold [+] or [–] to search faster.
4 Adjust the volume using the VOLUME control.
1. Press [FM/AM, RADIO] to turn the radio on.
To turn the radio off
3. Press and hold [FM/AM, RADIO] for about 5 seconds.
Press [OFF].
2. Press [FM/AM, RADIO] to switch to the FM band.
•The display changes to show the lowest available FM frequency.
2-B Preset Tuning
You can assign one FM station and one AM station to each of the 5
memory buttons ([M1], [M2], [M3], [M4] and [M5]) for a total of 10
stations.
To preset stations
1 Press [FM/AM, RADIO] to turn the radio on.
2 Press [FM/AM, RADIO] to switch between FM and AM.
in to the desired station by pressing
3 Tune
[+, TUNE/CLOCK] or [–, TUNE/CLOCK].
•To change the sensitivity back to 0.2 MHz increments, repeat the
procedure above.
•If the AM band is selected and you press and hold [FM/AM, RADIO]
for about 5 seconds, the band will change to FM but the FM tuning
sensitivity will not change.
3
Using the Sleep Timer
3-A Setting the Sleep Timer
The sleep timer turns the radio off
after a set time.
• Press and hold [+] or [–] to search faster.
[SLEEP]
and hold a memory button ([M1] to
4 Press
[M5]) until the memory number is
While the radio is on, press [SLEEP]
repeatedly to select the time (minutes).
displayed.
• To turn the radio off, press [OFF].
Ex. Memory Number 1
•If you assign another station of the same band (FM or AM) to the
memory button, the previously assigned station will be erased.
•If a power failure occurs, station presets will be retained for about 10
minutes.
To listen to preset stations
1 Press [FM/AM, RADIO] to turn the radio on.
2 Press [FM/AM, RADIO] to switch between FM and AM.
3 Press the desired memory button ([M1] to [M5]).
• To turn the radio off, press [OFF].
Section 3
Ex. Sleep Time: 30 min.
•Each time you press [SLEEP], the time will
change as follows:
30 60 90 120 OFF
•The radio will automatically turn off after the selected sleep time.
•You cannot set the sleep timer while an alarm is sounding (4-A, 4-B).
To view the time remaining: Press [SLEEP].
To change the setting
1. Press [SLEEP]. (The time remaining is displayed.)
2. Immediately after the time remaining is displayed, press [SLEEP]
repeatedly to select the sleep time.
For assistance, please call: 1-800-211-PANA(7262)
4
Using the Alarms
Section 4
The charger unit features an alarm clock. You can set the alarm to
play the radio or to sound a buzzer at a set time.
The radio alarm and the buzzer alarm can be set separately.
[RADIO, ALARM SET] Memory Buttons
([M1], [M2], [M3], [M4] and [M5])
[SNOOZE/MUTE]
4-B Setting the Buzzer Alarm
1 Press [BUZZER, ALARM SET].
• If you do not proceed to the next step
within 5 seconds, the display will return
to the current time.
the alarm time by pressing
2 Adjust
[+, TUNE/CLOCK] or [–, TUNE/CLOCK].
• Pressing and holding [+] or [–] changes the time faster.
3 Press [BUZZER, ALARM SET] to save the buzzer alarm time.
[+, -, TUNE/CLOCK]
[BUZZER, ALARM SET]
[OFF]
[FM/AM, RADIO]
VOLUME Control
[ALARM ON/OFF]
4-A Setting the Radio Alarm
•You can exit alarm setting mode any time by pressing [OFF].
•If a power failure occurs, the buzzer alarm time will be retained for
about 10 minutes.
To confirm the buzzer alarm time
Press [BUZZER, ALARM SET].
•The alarm time will be displayed for about 5 seconds.
1 Press [RADIO, ALARM SET].
• If you do not proceed to the next step
within 5 seconds, the display will return
to the current time.
4-C Stopping the Alarm
the alarm time by pressing
2 Adjust
[+, TUNE/CLOCK] or [–, TUNE/CLOCK].
When the alarm sounds at the set time, “
“
” and/or “
” flashes.
• Pressing and holding [+] or [–] changes
the time faster.
3
• The time stops flashing and returns to the current time.
•“
” is displayed while the buzzer alarm is turned on.
• The buzzer will start at the set time and will automatically stop
after 10 minutes.
[SNOOZE/MUTE]
Press [RADIO, ALARM SET].
• The radio will automatically turn on.
4 Press [FM/AM, RADIO] to switch between FM and AM.
Press the desired memory button ([M1] to
5 [M5]).
OR
Tune in to the desired station by pressing
[+, TUNE/CLOCK] or [–, TUNE/CLOCK].
6
” is displayed and
Adjust the volume by using the VOLUME
control.
[OFF]
To stop the alarm temporarily (SNOOZE)
Press [SNOOZE/MUTE].
Ex. Memory Number 1 is
set to AM 520 kHz.
Press [RADIO, ALARM SET] to save the radio alarm time and the
7 station.
• The selected station stops flashing and disappears.
• The selected alarm time returns to the current time.
•“
” is displayed while the radio alarm is turned on.
• The radio will turn off.
•The radio will automatically turn on at the set time and will turn off
after 1 hour.
•You can exit alarm setting mode any time by pressing [OFF].
•To change only the radio alarm time, repeat steps 1 to 3, then
press [RADIO, ALARM SET].
•If a power failure occurs, the radio alarm time and station preset will
be retained for about 10 minutes.
•The alarm will then start again in 6 minutes. You can press
[SNOOZE/MUTE] again to stop the alarm.
To stop the alarm for the day
Press [OFF].
•The setting is retained and the alarm will sound daily until you turn the
alarm off (4-D). “
” and/or “
” will remain on the display.
4-D Turning the Alarm on/off
Once alarm times have been set for the radio alarm and buzzer
alarm, the two alarms can be turned off and on independently and
together. If an alarm is turned on, it will sound at the set time
everyday. If an alarm is turned off, it will not sound.
To confirm the radio alarm time and station
Press [RADIO, ALARM SET].
•The alarm time and the station will be displayed for about 5 seconds.
[ALARM ON/OFF]
Press [ALARM ON/OFF] repeatedly to select the desired alarm
mode. 4 modes are available.
— Radio alarm on (“
” is displayed.)
— Buzzer alarm on (“
” is displayed.)
— Both alarms on (“
” and “
” are displayed.)
— Both alarms off (“
” and “
” disappear.)
•When an alarm mode is selected, the alarm time is displayed briefly.
If the alarm time is not set, “
” is displayed briefly.
For assistance, please call: 1-800-211-PANA(7262)
5
Things You Should Know
5-A Optional Headset
5-C FCC and Other Information
Connecting an optional headset to the handset allows hands-free
phone conversation. Please use only a Panasonic KX-TCA60,
KX-TCA86, KX-TCA88, KX-TCA88HA, KX-TCA91, KX-TCA92 or
KX-TCA98 headset. To order, call the accessories telephone number
in section 1-A.
To connect a headset
Open the headset jack cover, and insert the headset plug into the
headset jack as shown.
Headset Jack
H
Headset sold separately. Model shown here is KX-TCA88.
•To switch to the speakerphone while using the headset:
Press [ ]. To return to the headset, press [ ].
5-B Troubleshooting (for Charger Unit)
Problem
Things You Should Know
Cause & Remedy
“
” is flashing on the
display.
•The clock needs to be set (1-H).
There is excessive noise
from the radio.
•Move the charger away from other
electrical appliances.
No sound from the radio.
•Make sure the AC adaptor is
connected and the antenna is
standing (1-C).
“ ” is displayed below the
time.
•A power failure may have occurred
or the AC adaptor may be
disconnected. Reconnect power. If
the unit loses power for about 10
minutes, clock memory will be lost
(1-H). Radio and buzzer alarm
settings (4-A, 4-B), and radio station
presets (2-B) will also be lost.
While programming, the
display will return to the
current time and you
cannot program any
function.
•Do not pause for over 60 seconds
while programming.
All preset FM stations have
been erased and the radio
alarm does not sound at
the set time.
•If you have changed the FM tuning
sensitivity (2-E), all preset FM
stations and the radio alarm setting
will be erased. The buzzer alarm
will sound at the set time instead of
the radio.
The radio/buzzer alarm
does not sound at the set
time.
•A power failure may have occurred
and the alarm time may be erased.
Set the time (1-H, 4-A, 4-B).
If you cannot solve your
problem
•For handset troubleshooting,
please see the base unit Operating
Instructions.
•Visit our website:
http://www.panasonic.com/support
•Contact us via the web at:
http://www.panasonic.com/contactinfo
•Call our customer call center at:
1-800-211-PANA(7262)
WHEN PROGRAMMING EMERGENCY NUMBERS AND(OR)
MAKING TEST CALLS TO EMERGENCY NUMBERS:
1)Remain on the line and briefly explain to the dispatcher the
reason for the call.
2)Perform such activities in the off-peak hours, such as early
morning or late evenings.
This device complies with Part 15 of the FCC Rules. Operation is
subject to the following two conditions: (1) This device may not
cause harmful interference, and (2) this device must accept any
interference received, including interference that may cause
undesired operation.
Privacy of communications may not be ensured when using this
phone.
CAUTION:
Any changes or modifications not expressly approved by the party
responsible for compliance could void the user’s authority to
operate this device.
Note:
This equipment has been tested and found to comply with the limits
for a Class B digital device, pursuant to Part 15 of the FCC Rules.
These limits are designed to provide reasonable protection against
harmful interference in a residential installation. This equipment
generates, uses, and can radiate radio frequency energy and, if not
installed and used in accordance with the instructions, may cause
harmful interference to radio communications. However, there is no
guarantee that interference will not occur in a particular installation.
If this equipment does cause harmful interference to radio or
television reception, which can be determined by turning the
equipment off and on, the user is encouraged to try to correct the
interference by one or more of the following measures:
—Reorient or relocate the receiving antenna.
—Increase the separation between the equipment and receiver.
—Connect the equipment into an outlet on a circuit different from
that to which the receiver is connected.
—Consult the dealer or an experienced radio/TV technician for
help.
Operating near 5.8GHz electrical appliances may cause
interference. Move away from the electrical appliances.
FCC RF Exposure Warning:
To comply with FCC RF exposure requirements, the handset unit
may be carried and operated with only the specific provided
belt-clip. Other non-tested belt-clips or similar body-worn
accessories may not comply and must be avoided.
This equipment is hearing aid compatible as defined by the FCC
in 47 CFR Section 68.316.
When you hold the phone to your ear, noise might be heard in
your Hearing Aid. Some Hearing Aids are not adequately
shielded from external RF (radio frequency) energy. If noise
occurs, use an optional headset accessory or the speakerphone
option (if applicable) when using this phone. Consult with your
audiologist or Hearing Aid manufacturer about the availability of
Hearing Aids which provide adequate shielding to RF energy
commonly emitted by digital devices.
CAUTION:
To reduce the risk of fire or injury to persons, read and follow
these instructions.
1. Use only the battery(ies) specified.
2. Do not dispose of the battery(ies) in a fire. They may explode.
Check with local waste management codes for special disposal
instructions.
3. Do not open or mutilate the battery(ies). Released electrolyte is
corrosive and may cause burns or injury to the eyes or skin.
The electrolyte may be toxic if swallowed.
For assistance, please call: 1-800-211-PANA(7262)
Section 5
6
Referencia rápida
6-A Preparación
4. Exercise care in handling batteries in order not to short the battery
to conductive materials such as rings, bracelets, and keys. The
battery and/or conductor may overheat and cause burns.
5. Charge the battery(ies) provided with or identified for use with this
product only in accordance with the instructions and limitations
specified in this manual.
Para conectar el adaptador de CA o instalar la antena
de cuadro
Toma de corriente
(120 V CA, 60 Hz)
WARNING:
TO PREVENT FIRE OR SHOCK HAZARD, DO NOT EXPOSE
THIS PRODUCT TO RAIN OR ANY TYPE OF MOISTURE.
•The AC adaptor is used as the main disconnect device, ensure that
the AC outlet is located/installed near the unit and is easily
accessible.
Antena de
cuadro
Adaptador
de CA
For your future reference
Serial No.
Date of purchase
Gancho
(found on the bottom of the unit)
Name and address of dealer
3
2
1
Ganchos
Asegúrese de que la
clavilla del adaptador
de CA esté
firmemente conectada
a la unidad.
Enchufe el cable a
través de los ganchos
como se muestra en
la ilustración.
•USAR SÓLO CON EL ADAPTADOR DE CA KX-TCA1 (N°. de
pedido: KX-TCA1-G) de Panasonic.
•El adaptador de CA debe permanecer conectado en todo momento.
(Es normal que el adaptador se caliente durante su uso.)
Instalación de la batería
Inserte la batería (#), y empújela hacia abajo hasta que encaje con
un chasquido en el compartimento ($). Cierre la cubierta.
5-D Specifications
■ Handset
Power Supply:
Frequency:
Dimensions (H x W x D):
Mass (Weight):
Security Codes:
■ Dialing Mode:
■ Charger
Power Supply:
Power Output:
Frequency Range:
Frequency Response:
Monthly Accuracy:
Speaker:
Dimensions (H x W x D):
Mass (Weight):
■ Operating Environment:
Ni-MH battery (3.6 V, 830 mAh)
5.76 GHz – 5.84 GHz
Approx. 220 mm x 53 mm x 37 mm
(8 21⁄32" x 2 3⁄32" x 1 15/32")
Approx. 210 g (0.46 Ib.)
1,000,000
2
1
Carga de la batería
Tone (DTMF)/Pulse
AC Adaptor (120 V AC, 60 Hz)
300 mW (RMS....max.)
FM: 87.9 – 107.9 MHz (200 kHz steps)
87.5 – 108.0 MHz (100 kHz steps)
AM: 520 – 1710 kHz (10 kHz steps)
40 Hz – 4 kHz for FM band
±30 seconds
3.6 cm (1 13⁄32") 8 Ω x 1
Approx. 85 mm x 194 mm x 87 mm
(3 11⁄32" x 7 5⁄8" x 3 7⁄16")
Approx. 270 g (0.6 Ib.)
Coloque la unidad portátil en la unidad de
carga y cárguela durante 6 horas antes de
empezar a usarla.
•La unidad emite un pitido, el indicador
CHARGE se ilumina, y “Cargando”
aparece en pantalla.
•Cuando la batería está completamente
cargada, aparece “Carga completada”
si no hay llamadas nuevas en la lista de
personas que llaman.
Indicador CHARGE
5 ˚C – 40 ˚C (41 ˚F – 104 ˚F)
Specifications are subject to change without notice.
Para usar la presilla para el cinturón, consulte la sección 1-E. Para
usar un auricular opcional (modelos KX-TCA60, KX-TCA86,
KX-TCA88, KX-TCA88HA, KX-TCA91, KX-TCA92 o KX-TCA98),
consulte la sección 5-A.
Referencia rápida
6-B Para escuchar la radio
Para registrar la unidad portátil
Sintonizacíon manual
Esta unidad portátil deberá ser registrada en la unidad base
KX-TG5200/KX-TG5202/KX-TG5210/KX-TG5212/KX-TG5230/
KX-TG5240/KX-FPG391. A la unidad portátil se le asignará su
número de extensión al registrarla.
[FM/AM, RADIO] para encender
1 Presione
la radio.
a de corriente
V CA, 60 Hz)
[FM/AM, RADIO] para cambiar
2 Presione
de FM a AM y viceversa.
[-]
Press LOCATOR
on base unit
for 3 sec.
Then press OK
BACK
la estación deseada presionando
3 Sintonice
[+, TUNE/CLOCK] o [–, TUNE/CLOCK].
OK
• Mantenga presionado [+] o [–] para buscar más rápido.
Indicador CHARGE
4 Ajuste el volumen por medio del mando VOLUME.
Tecla blanda ( OK )
Botón LOCATOR*
•El modelo de la unidad base mostrado aquí es un KX-TG5240.
*La ubicación del botón LOCATOR varía según el modelo de unidad base.
KX-TG5200/KX-TG5202: LOCATOR [ ], [ ], [ ], [ ] o [
]
KX-TG5210/KX-TG5212: LOCATOR/INTERCOM [ ], [ ], [ ],
[ ]o[
]
KX-TG5230/KX-TG5240/KX-FPG391: [LOCATOR/INTERCOM/TRANSFER]
Sólo se puede registrar una unidad portátil cada vez.
Asegúrese de que la unidad base y las demás unidades
portátiles no se están utilizando. Tenga a mano tanto la unidad
portátil como la unidad base durante el registro.
Press LOCATOR
La pantalla de la unidad portátil muestra
on base unit
las instrucciones tal y como aparecen a
for 3 sec.
la derecha.
Then press OK
base: Mantenga presionado el
1 Unidad
botón de LOCATOR* durante 3 segundos.
OK
• Indicador CHARGE parpadea. Después de que el indicador
CHARGE empiece a parpadear, el resto del procedimiento debe
completarse antes de que pase 1 minuto.
• En la pantalla de KX-FPG391, se visualizará “HS REGISTRATION”.
portátil:
2 Unidad
#Presione la tecla blanda (
Ej.: Número de extensión 2
[2]
).
OK
SP
PRIVACY
$Espere hasta que suene un pitido
largo y que la pantalla muestre el
nuevo número de extensión.
• El registro ha finalizado.
•El número registrado “[1]” a “[4]” aparece en la esquina superior
derecha de la pantalla.
•Puede detener el proceso de registro presionando [OFF] en la unidad
portátil y presionando el botón de LOCATOR* en la unidad base.
•Para cancelar el registro de la unidad portátil, consulte las
instrucciones de funcionamiento de la unidad base.
•Si intenta registrar esta unidad portátil en la unidad base
KX-TG6500, aparece, “Wrong handset Refer to manual”.
Las unidades base para esta unidad portátil se mencionan arriba.
•Para cambiar el idioma de pantalla de inglés a español en la unidad
portátil, presione [MENU][0][8][2], y a continuación presione la tecla
blanda ( GUARDAR ).
Handset [2]
Registered
Presione [OFF].
Presintonización
Se puede asignar una estación FM y una estación AM a cada uno de
los 5 botones de memoria ([M1], [M2], [M3], [M4] y [M5]) para
presintonizar un total de 10 estaciones.
Para presintonizar estaciones:
1 Presione [FM/AM, RADIO] para encender la radio.
2 Presione [FM/AM, RADIO] para cambiar de FM a AM y viceversa.
la estación deseada presionando
3 Sintonice
[+, TUNE/CLOCK] o [–, TUNE/CLOCK].
• Mantenga presionado [+] o [–] para buscar más rápido.
presionado un botón de
4 Mantenga
memoria ([M1] a [M5]) hasta que
aparezca en pantalla el número de la
memoria.
• Para apagar la radio, presione [OFF].
Ej.: Número de memoria 1
Para escuchar las estaciones presintonizadas:
1 Presione [FM/AM, RADIO] para encender la radio.
2 Presione [FM/AM, RADIO] para cambiar de FM a AM y viceversa.
3 Presione el botón de memoria deseado ([M1] a [M5]).
• Para apagar la radio, presione [OFF].
Para mejorar la recepción
Para FM: Extienda el cable y coloque la antena en un lugar en el que
se observe una mejora en la recepción.
Para AM: Vuelva a orientar la antena horizontalmente hasta observar
una mejora en la recepción.
Para silenciar la radio
Presione [SNOOZE/MUTE] mientras escucha la radio.
•Para anular el silenciamiento, presione [SNOOZE/MUTE] de nuevo.
Para poner la hora
La unidad de carga tiene un reloj de
12 horas (con una desviación
mensual máxima de ±30 segundos).
Una vez conectado el adaptador de
CA, “
” parpadea en la
pantalla. Siga los pasos a
continuación para poner la hora.
Para apagar la radio
Para cambiar la sensibilidad FM
[OFF]
[TIME SET]
[+, -, TUNE/CLOCK]
1 Presione [TIME SET].
la hora presionando
2 Ajuste
[+, TUNE/CLOCK] o [–, TUNE/CLOCK].
• Presionando [+] o [–] se aumenta o se
reduce la hora en unidades de un minuto.
• Manteniendo presionado [+] o [–] se aumenta o se reduce la
hora más rápidamente.
[TIME SET] para poner la hora.
3 •Presione
La hora deja de parpadear.
La sensibilidad utilizada para sintonizar emisoras FM se puede
cambiar desde incrementos de 0.2 MHz (preconfiguración de fábrica)
hasta 0.1 MHz.
•Tenga en cuenta que si cambia la sensibilidad, todas las presintonías
de emisoras FM (6-B) así como la emisora utilizada para la alarma
de radio (6-D) recuperarán la preconfiguración de fábrica. El timbre
sonará a la hora configurada para la alarma de radio.
1. Presione [FM/AM, RADIO] para encender la radio.
2. Presione [FM/AM, RADIO] para cambiar a la banda de FM.
3. Mantenga presionado [FM/AM, RADIO] durante unos 5 segundos.
•Para volver a cambiar la sensibilidad a incrementos de 0.2 MHz,
repita el procedimiento anterior.
Sección 6
6-C Configuración del temporizador para dormir
Con la radio encendida, presione [SLEEP]
repetidamente para seleccionar la hora
(minutos).
•Con cada presión de [SLEEP] la hora
cambia como sigue:
30 60 90 120 OFF
Ej.: Tiempo de temporizador
para dormir: 30 min.
5.8 GHz Expandable Cordless Handset
Operating Instructions
Model No.
•La radio se apagará automáticamente después de que transcurra el
tiempo de temporizador para dormir seleccionado.
Pulse-or-tone dialing capability
The KX-TGA523 will only
work with the Panasonic
cordless phone systems:
KX-TG5200/KX-TG5202/
KX-TG5210/KX-TG5212/
KX-TG5230/KX-TG5240/
KX-FPG391
6-D Uso de las alarmas
Para configurar la alarma de radio
1 Presione [RADIO, ALARM SET].
2
3
4
5
• Si no procede al paso siguiente durante 5 segundos, la pantalla
regresa a la de la hora actual.
Ajuste la hora de la alarma presionando [+, TUNE/CLOCK] o
[–, TUNE/CLOCK].
• Manteniendo presionado [+] o [–] se cambia la hora más rápidamente.
Presione [RADIO, ALARM SET].
• La radio se encenderá automáticamente.
Presione [FM/AM, RADIO] para cambiar de FM a AM y viceversa.
Presione el botón de memoria deseado
([M1] a [M5]).
O
Sintonice la estación deseada
presionando [+, TUNE/CLOCK] o
[–, TUNE/CLOCK].
Ajuste el volumen por medio del mando VOLUME.
6
Presione [RADIO, ALARM SET] para guardar la hora de la alarma
7 de
radio y la estación.
PLEASE READ BEFORE
USE AND SAVE.
Charge the battery for
6 hours before initial use.
1
2
3
4
5
6
Contents by Section
Getting Started
Listening to the Radio
Using the Sleep Timer
Using the Alarms
Things You Should Know
Referencia rápida
Panasonic World Wide Web address:
http://www.panasonic.com
for customers in the USA or Puerto Rico
Attach your purchase receipt here.
• La radio se apagará.
Para configurar la alarma de timbre
KX-TGA523
1 Presione [BUZZER, ALARM SET].
For product service
• Visit our website: http://www.panasonic.com/support
• Contact us via the web at: http://www.panasonic.com/contactinfo
• Call us at: 1-800-211-PANA(7262)
la hora de la alarma presionando
2 Ajuste
[+, TUNE/CLOCK] o [–, TUNE/CLOCK].
When you ship the product
• Carefully pack your unit, preferably in the original carton.
• Attach a letter, detailing the symptom, to the outside of the carton.
• Si no procede al paso siguiente durante
5 segundos, la pantalla regresa a la de
la hora actual.
• Manteniendo presionado [+] o [–] se cambia la hora más rápidamente.
3
Presione y luego suelte [BUZZER, ALARM SET] para guardar la
hora de la alarma de timbre.
Para detener la alarma
Para detener la alarma temporalmente (SNOOZE):
Presione [SNOOZE/MUTE].
Para detener la alarma para todo el día: Presione [OFF].
•La configuración no cambia y la alarma sonará diariamente a la
misma hora, a no ser que usted la detenga completamente.
6-E Encendido y apagado de la alarma
Una vez que se han configurado los tiempos de las alarmas para la alarma
de radio y la alarma de timbre, las dos alarmas se pueden encender y
apagar juntas y por separado. Si se enciende una alarma, sonará a la hora
configurada todos los días. Si se apaga una alarma, no sonará.
Presione [ALARM ON/OFF] repetidamente para seleccionar el modo
de alarma deseado. Hay 4 modos disponibles.
— Alarma de radio encendida (aparece “
”.)
— Alarma de timbre encendida (aparece “
”.)
— Las dos alarmas encendidas (aparecen “
”y“
”.)
— Las dos alarmas apagadas (“
”y“
” desaparecen.)
Symptom
• Send the unit to an authorized servicenter, prepaid and adequately
insured.
• Do not send your unit to the Panasonic Consumer Electronics
Company listed below or to executive or regional sales offices.
These locations do not repair consumer products.
If you need assistance with the setup or operation,
please call 1-800-211-PANA(7262)
For hearing or speech impaired TTY users, TTY : 1-877-833-8855
Panasonic Consumer Electronics Company,
Division of Matsushita Electric Corporation of America
One Panasonic Way, Secaucus, New Jersey 07094
Panasonic Sales Company,
Division of Matsushita Electric of Puerto Rico, Inc.
Ave. 65 de Infantería, Km. 9.5, San Gabriel Industrial Park
Carolina, Puerto Rico 00985
© 2004 Panasonic Communications Co., Ltd. All Rights Reserved.
PQQX14029YA S0104-1034