1
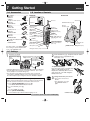
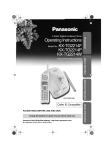
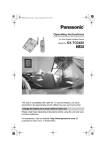
n5
2.4GHz Digital Cordless Phone
Operating Instructions
Model No.
KX-TG2302
Pulse-or-tone dialing capability
PLEASE READ BEFORE
USE AND SAVE.
NO
Charge the battery for 6 hours
before initial use.
stán
d
1
2
3
4
5
Contents by Section
Getting Started
Making/Answering Calls
Special Features
Things You Should Know
Guía rápida
Panasonic World Wide Web address:
http://www.panasonic.com
for customers in the USA or Puerto Rico
Attach your purchase receipt here.
án
For product service
• Visit our website: http://www.panasonic.com/support
• Contact us via the web at: http://www.panasonic.com/contactinfo
• Call us at: 1-800-211-PANA(7262) or 1-800-833-9626
ara
When you ship the product
• Carefully pack your unit, preferably in the original carton.
• Attach a letter, detailing the symptom, to the outside of the carton.
Symptom
, se
La
ma
• Send the unit to an authorized servicenter, prepaid and adequately insured.
• Do not send your unit to the Panasonic Consumer Electronics
Company listed below or to executive or regional sales offices.
These locations do not repair consumer products.
If you need assistance with the setup or operation,
please call 1-800-211-PANA(7262)
For hearing or speech impaired TTY users, TTY : 1-877-833-8855
Panasonic Consumer Electronics Company,
Division of Matsushita Electric Corporation of America
One Panasonic Way, Secaucus, New Jersey 07094
Panasonic Sales Company,
Division of Matsushita Electric of Puerto Rico, Inc.
Ave. 65 de Infantería, Km. 9.5, San Gabriel Industrial Park
Carolina, Puerto Rico 00985
© 2004 Panasonic Communications Co., Ltd. All Rights Reserved.
PQQX13980YA S1203-1014
1
Getting Started
1-A Accessories
Section 1
1-B Location of Controls
AC Adaptor ..................................one
Order No.
PQLV1Z
(PQLV1)
Telephone Line Cord ...................one
Order No.
PQJA10075Z
Battery..........................................one
Order No.
HHR-P104
Handset Cover .............................one
Order No.
PQKK10140Z2
Belt Clip........................................one
Order No.
PQKE10375Z2
Shoulder Rest Attachment ...........one
Order No.
PQKE10364Z1
For extra orders, call 1-800-332-5368.
For hearing or speech impaired TTY
users, call 1-866-605-1277.
Handset
Base unit
Back side
Antenna (4-F)
Antenna
Speaker
CHARGE Indicator (1-C)
Charge
Contacts (4-A)
TALK Indicator
(2-A, 2-B)
Receiver
RECHARGE
Indicator (4-A)
[ ] (TALK)
Button (2-A)
[OFF] Button (2-A)
[REDIAL]
Button (2-A)
[SP-PHONE]
(Speakerphone) Button
(2-A)
Headset Jack (4-D)
VOL. (VOLUME) Key
([▼], [▲]) (2-A, 2-B)
[ ] (TONE)
Button (3-B)
[VOICE ENHANCER]
Button and Indicator
(1-C, 2-A)
[FLASH/CALL WAIT]
Button (3-C, 3-D)
IN USE Indicator
(2-B, 3-A)
[HANDSET LOCATOR] Button (3-A)
Microphone (2-A)
Charge Contacts (4-A)
1-C Settings
1
2
Connect as shown.
Fasten the AC adaptor
cord.
Hooks
Single-Line Telephone Jack (RJ11C)
Telephone Line
Cord Power Outlet
(AC 120 V, 60 Hz)
Insert the battery (#), and press it down until it
snaps into the compartment ($).
Close the cover.
2
1
AC
Adaptor
To replace the battery:
Press the notch on the cover firmly and
slide it as indicated by the arrow.
Replace the old battery with a new one
(4-A). Close the cover and charge the
battery for 6 hours.
• USE ONLY WITH Panasonic AC ADAPTOR PQLV1 (Order No. PQLV1Z).
• The AC adaptor must remain connected at all times. (It is normal
for the adaptor to feel warm during use.)
• The unit will not work during a power failure. We recommend
connecting a standard telephone to the same telephone line or to
the same telephone jack using the Panasonic KX-J66 T-adaptor.
To select the dialing mode TONE (preset) or PULSE
Make sure the handset and base unit are not being used. The handset
must be operated near the base unit and while off the base unit.
1. Press [VOICE ENHANCER], then press [8].
• The VOICE ENHANCER indicator flashes.
2. To select PULSE, press [1].
OR
To select TONE, press [2].
3. Press [VOICE ENHANCER].
• The handset beeps and the indicator light goes out.
STOP
3
Charge the battery for 6 hours.
• See section 4-A for more
details.
• The unit beeps once and
the CHARGE indicator
lights.
For assistance, please call: 1-800-211-PANA(7262)
CHARGE Indicator
OR
1
2
Making/Answering Calls
2-A Making Calls
1
2-B Answering Calls
Press [ ] then dial a phone number.
OR
To have a hands-free phone conversation, press
[SP-PHONE] and dial a phone number. When the other
party answers, talk into the microphone.
• The TALK indicator lights.
• If an alarm tone sounds, see section 4-H.
2
To hang up, press [OFF] or place the handset on the
base unit.
• The indicator light goes out.
To redial the last number dialed
3-A)
it
Press [
When a call is received, the handset rings, and the TALK indicator
on the handset and the IN USE indicator on the base unit flash
rapidly.
If the handset is off the base unit, press [
] or [SP-PHONE].
• You can also answer a call by pressing any button except [▼], [▲]
or [OFF].
OR
If the handset is on the base unit, just lift up.
Selecting the ringer volume
• For the best operating performance, see section 4-F.
ator
Section 2
] or [SP-PHONE], then press [REDIAL].
To adjust the receiver/speaker volume during a
conversation
There are 3 volume levels for the receiver and 6 volume levels for
the speaker.
To increase volume, press [▲]. To decrease volume, press [▼].
• If you try to increase/decrease volume when it is at the
maximum/minimum level, the handset will beep 3 times.
Lighted handset keypad
The handset dialing buttons will light for a few seconds after
pressing a button or lifting the handset off the base unit.
Voice Enhancer Technology
Panasonic’s Voice Enhancer Technology clarifies the voice of the
person you are talking to, reproducing a more natural-sounding
voice that is easier to hear and understand.
Voice Enhancer Technology can be turned on or off. The factory
preset is OFF.
• Depending on the condition and quality of your telephone line,
Voice Enhancer may emphasize existing line noise. If it becomes
difficult to hear the caller, turn this feature off.
To turn this feature on, press [VOICE ENHANCER] during a
conversation.
• The indicator lights in talk or speakerphone mode.
• The indicator light goes out after hanging up a call, but this
feature still remains on.
• To turn this feature off, press [VOICE ENHANCER] again.
The indicator light goes out.
Make sure the handset and base unit are not being used. The
handset must be operated near the base unit and while off the
base unit.
• To select high (preset), medium, or low,
press [▼] or [▲] to select volume.
The volume will change and ring. To stop ringing, press [OFF]
or [VOICE ENHANCER].
• To turn the ringer off, press and hold [▼] until 2 beeps sound.
• To turn the ringer on, press [▼] or [▲].
The handset will ring at the low level.
• You can adjust the ringer volume while a call is ringing.
Press [▼] or [▲] while the handset is ringing.
To turn the ringer off, press and hold [▼] until 2 beeps sound.
Temporary ringer off
While the handset is ringing for an outside call, you can turn the
ringer off temporarily by pressing [OFF]. The handset will ring
again as normal the next time a call is received.
Selecting the ringer tone
Make sure the unit is not being used and the handset is lifted off
the base unit. 7 ringer tones are available (3 bell ringer patterns
and 4 melody patterns).
• If you subscribe to a Distinctive Ring Service (such as IDENTARING) from your telephone company with 2 or 3 consecutive
rings, select a bell ringer pattern (1 to 3). If you select a melody
pattern, you will not be able to distinguish lines by their ringers.
• If you select one of the melody ringer patterns, the ringer will
continue to sound for several seconds if:
— the caller hangs up before you answer the call, or
— another person answers the call using another phone
connected on the same line.
Press [▼] or [▲], then select the desired ringer tone by pressing
[1] (preset) to [7].
[1] to [3]: Bell ringer patterns [4] to [7]: Melody patterns
• After pressing [▼] or [▲], the handset will ring using the current
ringer tone.
• The handset will ring and the ringer tone will change.
• To stop ringing, press [OFF] or [VOICE ENHANCER].
For assistance, please call: 1-800-211-PANA(7262)
2
3
Special Features
3-A Handset Locator
or
E].
[▲]
You can locate the handset or page the handset user with beep
tones from the base unit.
1. Press [HANDSET LOCATOR] on the base unit.
• The TALK indicator on the handset and the IN USE indicator on
the base unit flash rapidly, and the handset beeps for 1 minute.
2. To stop paging, press [HANDSET LOCATOR] again or press
[OFF] on the handset.
• You can also stop paging on the handset by pressing any
button except [▼] or [▲].
(For Rotary or Pulse Service Users)
Press [ ] (TONE) before entering access numbers which require
tone dialing.
• The dialing mode changes to tone. You can enter numbers to
access an answering service, electronic banking service, etc.
When you hang up, the dialing mode will return to pulse.
d.
e
ff
s
Ady
s.
g
nt
Things You Should Know
4-A Battery
3-B Temporary Tone Dialing
]
4
3-C For Call Waiting Service Users
Press [FLASH/CALL WAIT] if you hear a call waiting tone during a
conversation.
• The first call is put on hold and you can answer the second call.
• To return to the first caller, press [FLASH/CALL WAIT] again.
• If this function does not operate properly, consult your telephone
company for details.
3-D FLASH Button
Pressing [FLASH/CALL WAIT] allows you to use special features of
your host PBX such as transferring an extension call, or accessing
optional telephone services such as call waiting.
• Pressing [FLASH/CALL WAIT] cancels Temporary Tone Dialing mode.
3-E Re-registering the Handset
If an alarm tone sounds when you press [ ], [SP-PHONE] or
[VOICE ENHANCER] even when using the handset near the base
unit, the handset may have lost communication with the base unit.
You need to re-register the handset to the base unit.
• Have both the handset and base unit nearby during registration.
• Follow steps 1 and 2 listed below. You have about 1 minute to
complete them.
1. Base unit: Press and hold [HANDSET LOCATOR].
• The CHARGE indicator flashes.
2. Handset: Press and hold [FLASH/CALL WAIT] until a beep
sounds.
• The VOICE ENHANCER indicator flashes.
• When registration is complete, a beep sounds from the handset
and the indicator lights go out.
• Wait for 20 seconds after registration is complete while the
handset establishes communication with the base unit.
Recharge
RECHARGE
When the RECHARGE indicator flashes or Indicator
the handset beeps intermittently, place the
handset on the base unit for 6 hours to
recharge the battery.
• The RECHARGE indicator will flash when the handset battery is
charged less than 15 minutes and the handset is lifted off the base unit.
Battery replacement:
If you cleaned the charge contacts and fully charged the battery, but
after a few telephone calls, the RECHARGE indicator flashes, the
battery may need to be replaced. Please order a new Panasonic
HHR-P104 battery at the telephone number shown on section 1-A.
To replace the battery, see section 1-C, step 2.
A nickel metal hydride battery that is recyclable
powers the product you have purchased. Please call
1-800-8-BATTERY for information on how to recycle
this battery.
Battery information
After your Panasonic battery is fully charged, you can expect the
following performance:
Operation
While in use (TALK)
While not in use (Standby)
Operating time
Up to about 5 hours
Up to about 11 days
• A fully charged battery will give you up to 5 hours of continuous talk
time, or keep your handset in Standby mode to receive incoming calls
for up to 11 days (if no phone calls are made). Battery power is
consumed whenever the handset is off of the base unit, even when the
handset is not in use. The longer you leave the handset off of the base
unit, the time you can actually talk on the handset will be shortened.
Actual battery performance depends on a combination of how often
the handset is in TALK mode and how often it is in Standby mode.
• If the battery is fully charged, you do not have to place the handset
on the base unit until the RECHARGE indicator flashes. This will
maximize the battery life.
• If you want to keep the battery fully charged at all times, place the
handset on the base unit when the handset is not used. The battery
cannot be overcharged.
• Clean the charge contacts of the handset and the base unit with
a soft, dry cloth once a month. Clean more often if the unit is
subject to grease, dust or high humidity. Otherwise the battery
may not charge properly.
4-B Belt Clip
You can hang the handset on your belt or pocket using the included
belt clip.
To attach the belt clip
• If the handset beeps 3 times in step 2, an error occurred. Try again
from step 1.
• You can stop registration by pressing [OFF] on the handset, and
pressing [HANDSET LOCATOR] on the base unit.
For assistance, please call: 1-800-211-PANA(7262)
To remove the belt clip
T
ow
Things You Should Know
4-C Shoulder Rest Attachment
Use the shoulder rest attachment if you need to keep your hands
free during a phone conversation.
e unit.
, but
he
c
-A.
To attach the shoulder
rest attachment
To remove the shoulder
rest attachment
Attach the included belt clip to
the handset (4-B), then attach
the shoulder rest attachment to
the belt clip as shown below.
You will hear a click when the
shoulder rest attachment is in
place.
Slide the base of the attachment
in the direction of the arrow as
shown below.
he
4-D Optional Headset
alk
calls
en the
base
ed.
en
e.
dset
ill
Connecting an optional headset to the handset allows hands-free
phone conversation. Please use only a Panasonic KX-TCA60,
KX-TCA86, KX-TCA88, KX-TCA88HA, KX-TCA91, KX-TCA92, or
KX-TCA98 headset.
To order, call the accessories telephone number on section 1-A.
Connecting an optional headset
Open the headset jack cover, and insert the headset plug into the
headset jack as shown below.
he
ttery
t with
is
ery
uded
Headset Jack
lip
• Headset sold separately. Model shown here is KX-TCA88.
To switch to the speakerphone while using the headset:
Press [SP-PHONE]. To return to the headset, press [ ].
For assistance, please call: 1-800-211-PANA(7262)
4
Things You Should Know
4-E Wall Mounting
4-F Base Unit Location/Noise
This unit can be mounted on a wall phone plate.
1
Press the tabs in the
direction of the arrows
(#), then remove the
wall mounting adaptor
($).
T
1
Calls are transmitted between the base unit and handset using
wireless radio waves. For maximum distance and noise-free
operation, the recommended base unit location is:
1
Away from electrical appliances
such as a TV, personal computer
or another cordless phone.
In a HIGH and CENTRAL
location with no obstructions
such as walls.
2
2
Connect the AC adaptor.
• Fasten the AC adaptor
cord to prevent it from
being disconnected.
Raise the
antenna.
Hook
To
Power
Outlet
3
Tuck the telephone line
cord inside the wall
mounting adaptor, then
push the adaptor in the
direction of the arrows
(# and $) while
pressing the tabs.
• The word “UP WALL”
should face upward.
4
Connect the telephone
line cord. Mount the unit,
then slide it down.
• Raise the antenna.
Note:
• If you use the handset near a microwave oven which is being used,
noise may be heard from the receiver or the speaker. Move away
from the microwave oven and closer to the base unit.
• If you use the handset near another cordless phone’s base unit,
noise may be heard. Move away from the other cordless phone’s
base unit and closer to your base unit.
4-G Specifications
■ Base unit
Power Supply:
Power Consumption:
2
1
Frequency:
Dimensions (H x W x D):
Mass (Weight):
■ Handset
Power Supply:
Frequency:
Dimensions (H x W x D):
AC Adaptor (120 V AC, 60 Hz)
Standby: Approx. 2.1 W
Maximum: Approx. 5.0 W
2.4 GHz–2.48 GHz
Approx. 124 mm x 155 mm x 174 mm
(4 7⁄8" x 6 3⁄32" x 6 27⁄32")
Approx. 330 g (0.73 lb.)
Mass (Weight):
Security Codes:
■ Dialing Mode:
Ni-MH battery (3.6 V, 830 mAh)
2.4 GHz–2.48 GHz
Approx. 208 mm x 52 mm x 39 mm
(8 3⁄16" x 2 1⁄16" x 1 17⁄32")
Approx. 190 g (0.42 lb.)
1,000,000
Tone (DTMF)/Pulse
■ Operating Environment:
5°C–40°C (41°F–104°F)
Specifications are subject to change without notice.
5
To charge the handset battery:
Place the handset on the base unit.
• The unit beeps once and
the CHARGE indicator lights.
For assistance, please call: 1-800-211-PANA(7262)
Things You Should Know
Section 4
4-H Troubleshooting
Cause & Remedy
Problem
The unit does not
work.
ns
sed,
ay
,
’s
• Check the settings (1-C).
• Check whether the dialing mode setting is
correct (1-C).
• Fully charge the battery (4-A).
• Clean the charge contacts and charge again
(4-A).
• Check battery installation (1-C).
• Unplug the AC adaptor to reset it. Plug in,
and try again.
• Re-install the battery (1-C) and fully charge it.
An alarm tone sounds
when you press [ ],
[SP-PHONE] or
[VOICE ENHANCER].
• You are too far from the base unit. Walk closer
to the base unit and try again.
• Confirm the AC adaptor is plugged in.
• Raise the base unit antenna.
• If the above remedies do not solve the
problem, the handset may have lost
communication with the base unit. Register the
handset again (3-E).
Static, sound cuts
in/out, fades.
Interference from
other electrical units.
• Move the handset and the base unit away
from other electrical appliances (4-F).
• Walk closer to the base unit.
• Raise the base unit antenna.
The handset does not
ring.
• The ringer volume is turned off. Set to high,
medium, or low (2-B).
You cannot redial.
• If the last number dialed was more than
48 digits long, the number will not be
redialed correctly.
You cannot make long
distance calls.
• Please make sure you have long distance
service.
You cannot page the
handset.
• The handset is too far from the base unit or
is engaged in an outside call. Try again later.
Problem
Cause & Remedy
[FLASH/CALL WAIT]
does not work
properly.
• Set the flash time.
Press [VOICE ENHANCER], [9] and [8],
then press [VOICE ENHANCER] again.
The RECHARGE
indicator flashes or the
unit beeps
intermittently.
• Fully charge the battery (4-A).
You charged the
battery fully, but the
RECHARGE indicator
continues to flash.
• Clean the charge contacts and charge again
(4-A).
• The battery may need to be replaced. If you
install a new battery, fully charge it (1-C).
The CHARGE
indicator light does
not go out after the
battery has been
charged.
• This is normal.
You cannot have a
conversation using
the headset.
• Make sure the optional headset is connected
properly (4-D).
• [SP-PHONE] may have been pressed. Press
[ ] to switch to the headset.
If you cannot solve
your problem
• Visit our website:
http://www.panasonic.com/support
• Contact us via the web at:
http://www.panasonic.com/contactinfo
• Call our customer call center at:
1-800-211-PANA(7262)
4-I Helpful Information
mm
m
• Environment—do not place the unit in a room where the temperature is
less than 5˚C (41˚F) or greater than 40˚C (104˚F). Allow 10 cm (4")
clearance around the unit for proper ventilation. Avoid excessive smoke,
dust, mechanical vibration, shock, or direct sunlight.
• Medical—consult the manufacturer of any personal medical devices, such
as pacemakers or hearing aids, to determine if they are adequately
shielded from external RF (radio frequency) energy. (The unit operates in
the frequency range of 2400MHz to 2481MHz, and the power output level
can range 0.04 to 0.1 watts.) Do not use the unit in health care facilities if
any regulations posted in the area instruct you not to do so. Hospitals or
health care facilities may be using equipment that could be sensitive to
external RF (radio frequency) energy.
• Routine care—wipe the unit with a soft cloth. Do not use benzine, thinner,
or any abrasive powder. When you leave the unit unused for a long period
of time, unplug the AC adaptor from the outlet.
• If there is any trouble—disconnect the unit from the telephone line and
connect a known working phone. If the known working phone operates
properly, have your unit repaired by one of the authorized Panasonic
Factory Service Centers. If the known working phone does not operate
properly, consult your telephone company.
For your future reference
Serial No.
(found on the bottom of the unit)
Name and address of dealer
For assistance, please call: 1-800-211-PANA(7262)
Date of purchase
4
5
Guía rápida
Sección 5
5-A Preparación
1
Conecte como se muestra.
Toma telefónica de una sola línea (RJ11C)
Cable de línea
telefónica
Toma de corriente
(120 V CA, 60 Hz)
Asegure el cable
del adaptador de CA.
Ganchos
3
Cargue la batería durante unas
6 horas.
• La unidad emite un pitido y el
indicador CHARGE se ilumina.
O
Adaptador
de CA
ain
ou
Indicador CHARGE
Para obtener el máximo alcance y un funcionamiento sin ruidos,
ponga la unidad base en un lugar ELEVADO y CÉNTRICO sin
obstrucciones ni interferencias de aparatos eléctricos.
• El adaptador de CA debe permanecer conectado en todo momento.
ted
2
Inserte la batería (#), y presionela hacia abajo hasta que
se acomode en el compartimiento ($). Cierre la cubierta.
ss
Asegúrese de que la unidad portátil y la unidad base no se están
utilizando. La unidad portátil debe operarse cerca de la unidad
base, y descolgada de la misma.
1. Presione [VOICE ENHANCER], y luego presione [8].
2. Para seleccionar PULSACIÓN, presione [1].
O
Para seleccionar TONO, presione [2].
2
1
Para seleccionar el modo de marcación por TONO
(preajustado) o PULSACIÓN
3. Presione [VOICE ENHANCER].
5-B Funcionamiento
Indicador
RECHARGE
[
]
Para seleccionar el volumen del timbre
[▼], [▲]
[OFF]
[SP-PHONE]
Micrófono
[HANDSET LOCATOR]
• Cuando el indicador RECHARGE parpadea o la unidad portátil
emite un pitido intermitente, coloque la unidad portátil sobre la
unidad base durante 6 horas para recargar la batería.
Para hacer llamadas
1. Presione [ ] y luego marque el número de teléfono.
O
Para tener una conversación con las manos libres, presione
[SP-PHONE] y marque el número de teléfono. Cuando la otra
persona conteste, hable dirigiéndose hacia el micrófono.
2. Para colgar, presione [OFF] o ponga la unidad portátil en la
unidad base.
Para contestar llamadas
Si la unidad portátil no está en la unidad base, presione [
[SP-PHONE] o cualquier tecla excepto [▼], [▲] u [OFF].
O
Si está en la unidad base, levántela solamente.
],
Asegúrese de que la unidad portátil y la unidad base no se están
utilizando. La unidad portátil debe operarse cerca de la unidad
base, y descolgada de la misma.
• Para seleccionar alto (preajustado), medio o bajo,
•presione [▼] o [▲] para seleccionar el volumen.
El volumen será cambiado y el timbre sonará a tal volumen. Para
silenciar el timbre, presione [OFF] o [VOICE ENHANCER].
• Para apagar el timbre, mantenga presionado [▼] hasta que
suenen 2 pitidos.
• Para encender el timbre, presione [▼] o [▲].
La unidad portátil sonará a bajo volumen.
Desactivación temporal del timbre
Mientras la unidad portátil suena al recibir una llamada externa, se
puede desactivar temporalmente el timbre presionando [OFF]. La
unidad portátil volverá a sonar de nuevo normalmente la próxima
vez que se reciba una llamada.
Localización de la unidad portátil
Presione [HANDSET LOCATOR] en la unidad base.
• La unidad portátil emite pitidos durante 1 minuto.
• Para detener la localización, presione de nuevo [HANDSET
LOCATOR] o presione [OFF] en la unidad portátil.
For assistance, please call: 1-800-211-PANA(7262)