1
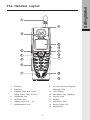
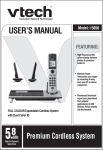
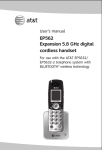
Introduction EXPAND YOUR i 5853, i 5857, i 5866 OR i 5867 SYSTEMS. YOUR BASE WILL WORK WITH UP TO 8 HANDSETS!!! IMPORTANT: Your i 5803 is an Accessory Handset for use with the i 5853, i 5857, i 5866 OR i 5867 systems. You must have one of these Base Units in order to use the i 5803 Accessory Handset. This manual is designed to familiarize you with the i 5803 Accessory Handset setup, registration and basic functions. For detailed operational instructions, please refer to the i 5853, i 5857, i 5866 OR i 5867 User's Manual. 1 Important Safety Instructions When using your telephone equipment, basic safety precautions should always be followed to reduce the risk of fire, electric shock and injury, including the following: 1. Read and understand all instructions. 2. Follow all warnings and instructions marked on the product. 3. Unplug this product from the wall outlet before cleaning. Do not use liquid or aerosol cleaners. Use a damp cloth for cleaning. 4. Do not use this product near water (for example, near a bath tub, kitchen sink or swimming pool). 5. Do not place this product on an unstable surface, such as a table, shelf, or stand. The product may fall, causing serious damage. 6. Slots and openings in the back or bottom of the Base Unit and Handset are provided for ventilation. To protect them from overheating, these openings must not be blocked by placing the product on a soft surface such as a bed, sofa or rug. This product should never be placed near or over a radiator or heat register. This product should not be placed in any area where proper ventilation is not provided. 7. This product should be operated only from the type of power source indicated on the marking label. If you are not sure of the type of power supply in your home, consult your dealer or local power company. 8. Do not allow anything to rest on the power cord. Do not install this product where the cord may have anyone walking on it. 9. Never push objects of any kind into this product through slots in the Base or Handset as they may touch dangerous voltage points or short out parts that could result in a risk of fire or electric shock. Never spill liquid of any kind on the product. 10. To reduce the risk of electric shock, do not disassemble this product, but take it to an authorized service facility. Opening or removing parts of the Base or Handset other than specified access doors may expose you to dangerous voltages or other risks. Incorrect reassembling can cause electric shock when the product is subsequently used. 11. Do not overload wall outlets and extension cords as this can result in the risk of fire or electric shock. 12. Unplug this product from the wall outlet and refer servicing to an authorized service facility under the following conditions: A. When the power supply cord or plug is damaged or frayed. B. If liquid has been spilled onto the product. C. If the product has been exposed to rain or water. D. If the product does not operate normally by following the operating instructions. Adjust only those controls that are covered by the operating instructions, as improper adjustment of other controls may result in damage and often requires extensive work by an authorized technician to restore the product to normal operation. E. If the product has been dropped and the Base and/or Handset has been damaged. 2 Important Safety Instructions F. If the product exhibits a distinct change in performance. 13. Avoid using a telephone (other than cordless) during an electrical storm. There is a remote risk of electric shock from lightning. 14. Do not use the telephone to report a gas leak in the vicinity of the leak. 15. Only put the Handset of your telephone next to your ear when it is in normal talk mode. WARNING: To insure your safety from possible electric shock, only use the enclosed VTech Audio Patch Cable to record custom ring tones. Do NOT leave the Audio Patch Cable attached to the Handset while charging in its cradle. 3 Getting Started Parts Check List 1. Handset 2. Belt Clip 3. Handset Charger 4. 5. 6. 7. Battery Cells User's Manual Special Features Guide Audio Patch Cable To purchase replacement battery cells, call VTech Communications, Inc. at 1-800-5959511. In Canada, call VTech Telecommunication Canada Ltd. at 1-800-267-7377. Note: Use only VTech batteries P/N 80-5461-00-00 or equivalent AA NiMH rechargeable batteries. Battery Cells Handset Users Manual Belt Clip Special Features Guide Image Editor Software USB Cabel 4 Charger Audio Patch Cable 1 8 2 9 10 3 11 12 4 13 5 6 14 7 15 1. Antenna 2. Earpiece 3. 8. In Use/ Incoming Ringing/ Message LED Headset Jack and Audio Patch Cable Jack (2.5mm) 9. LCD Display 4. Soft/Select Key 11. Volume Keys 5. On/Flash Key 12. Softkey 6. Dialing Keys (0-9, *, #) 13. Off/Cancel Key 7. Speakerphone Key 14. Sound Select Key 10. Navigation Key (NavKey) 15. Microphone 5 Getting Started The Handset Layout Getting Started Setup Connecting Power to Handset Charger Because the i 5803 is an accessory Handset to the i 5853, i 5857, i 5866 or i 5867, all you need to do is choose the location for your Handset Charger and plug in the power supply into an electrical outlet. Installation and Charge of Battery Cells in Handset 1. Remove the battery compartment cover and place the new battery cells in the Handset with the positive and negative poles aligned in the battery compartment. 2. Replace the battery cover by sliding it upwards. 3. If the new battery cells are not already charged, place the Handset in its Charger or Base Unit, and allow it to charge for 12 hours. After initial charge, a maintenance charge of 8 hours should be sufficient. 6 Battery Life Fully charged battery cells provide an average talk time of about 8 hours or standby time of 5 days. NOTE: Talk time and standby time may vary depending on operating conditions. Battery Indicator Ten minutes before the battery charge level gets too low to operate the Handset, an empty battery icon will start flashing, five short tones will sound, and a LOW BATTERY message is displayed. If you continue to use the Handset without charging or replacing the battery cells (spare battery cells purchased separately), the Handset will turn off automatically when the battery charge level is no longer sufficient to power up the Handset, and the call will be dropped. Charging the Handset Battery Cells After a low battery indication, place the Handset in the charger, and ensure that the CHARGING light turns on. With the exception of the first charge, the battery cells are typically charged in 8 hours. NOTE: If you repeatedly get a low battery cells indication, even after 8 hours of charging, then the battery should be replaced. As you register additional Handsets to your i 5853, i5857, i5866 or i 5867 system, they will be assigned extension numbers in the following order: HANDSET 2, HANDSET 3, HANDSET 4, and so forth. Whenever a charged Handset battery cells are installed, the Handset will automatically begin Searching for Base... (if previously registered), or it will prompt you to Enter Base ID to register the new Handset. BEFORE USING YOUR HANDSET(S), CAREFULLY PEEL OFF THE PROTECTIVE FILM COVERING THE DISPLAY. 7 Getting Started Setup Getting Started Registration Registering the i 5803 Handset for the first time Enter Base ID After charging, the screen will display: ################ If your Base Unit is model i 5866 or i 5867: 1) Fine the Base ID Code on the underside of the Base Unit. 2) Enter the 15-digit Base ID Code into the Handset. If you make a mis -take, press the left NavKey to backspace or press the right softkey to erase a character. 3) Press OK to complete the registration process. If your Base Unit is model i 5853 or i 5857, find the Base ID Code (Base Unit must be OFF) and register the Handset by: 1) At the Base, press MENU. 2) Scroll down to DISPLAY BASE-ID, then press OK. 3) Enter the 15-digit Base ID Code into the Handset. If you make a mistake, press the left NavKey to backpace or press the right softkey to erase a character. 4) Press OK to complete the registration process. NOTE: If the Handset, after charging, says Searching for Base..., press the NEW softkey. Enter Base ID will now be displayed. Follow the steps above. Wait approximately 15-60 seconds. You will hear confirmation beeps from the Base and Handset. The newly registered Handset will now be assigned the lowest extension number not previously assigned to a different system Handset (1 - 8). If you do not enter the correct digit sequence, you will see Invalid Base ID! and hear an error tone. Press the left NavKey to backpace or press the right to erase a character, and carefully re-enter the Base ID Code. softkey NOTE: The 15-digit BASE ID Code may contain numbers and characters, including *. Make sure you carefully enter all 15 digits. 8 Handset Indicators Handset Icons Description Line In Use Indicator • On steady with one or more numbers next to it, indicating which extensions are using the line. For example, 12 indicates that Handset 1 and Handset 2 are on an outside call. • Appears in idle or phone on modes to indicate a parallel set in use. It replaces phone on icon during phone on mode and parallel set is detected. • On when the answering machine is answering an incoming call. NOTE: This is only applicable to the Handset registered to i 5866 or i 5867 Base. 1234 5678 Handset Number Indicator • Indicates the Handset number. It's permanently displayed at the top left corner after the Handset has found the Base. Searching for Base Indicator • Indicates that the Handset is still searching for the Base. Intercom Indicator • On steady with the extension numbers currently on an intercom call. For example, 12 indicates that Handset1 and Handset 2 are on intercom call. H Hold indicator • On steady when the line is on hold. M Mute indicator • On steady when the Handset microphone is muted. Ringer Off indicator • is displayed when the ringer is turned off. Battery indicator • When the Handset is removed from the charger, this lets you know the level of charge in the battery pack, from FULL( ) to EMPTY ( ). • Cycles (Low, Medium, and Full) when Handset battery is charging. • Flashes when a low battery condition is detected. Handset LEDs LED Description SPEAKERPHONE • LED is on when in speakerphone mode. IN USE • Lights when in the handset off-hook mode. • Flashes following by the ring cadence when incoming call. 9 Basic Operation Icon Handset Menu Navigation Key (NavKey) • Press any NavKey button to display Main Menu. Press the NavKey buttons (Left, Right, Up and Down) to navigate through menus. Press the Middle NavKey button to select highlighted menu item. Basic Operation Menu Shortcuts • When viewing menu options, pressing the corresponding number on the dialing keypad will automatically go to and select that item. For example, in the Main Menu screen, pressing the 1 key will automatically take you to the Intercom menu screen, pressing the 6 key will automatically take you to the Settings menu screen. • Similarly, when viewing a list menu, pressing the corresponding number will automatically select that option and save it, if necessary. For example, pressing the 2 key when in the Language screen will select and save the Spanish option. Main Menu Press any Navkey to display the 6 menu options. Then use the Navkey buttons to navigate to the desired menu option for selection. You can also press the dialing key assigned for each icon (see information below for the assigned keys), to activate the menu option. Intercom !"# (dialing key 1) - Talk between Handsets(s) and Base Unit, or use to page the cordless Handset(s). Phonebook (dialing key 2) - Enter and retrieve up to 50 phone numbers with name, along with a distinctive ring and image for each. Calls Log (dialing key 3) - Review Caller ID data, select and dial from the Caller ID data or from the Redial list that accounts for the last 10 dialed phone numbers. Pictures (dialing key 4) - Choose from the many preset images to be used as your idle screen (wallpaper) or assign an image to a specific phonebook directory. Sounds & Alerts (dialing key 5) - Record custom sound clips, turn ringer and vibrate feature on or off, select main ringer tone, turn tones (low battery, keypad, and out-of-range) on or off. Settings (dialing key 6) - Set the time, adjust screen contrast, reset to default settings, register new Handsets, change screen language. Press the NavKeys to navigate to the desired menu option, then press the middle NavKey button to select. You can also press the dialing key assigned to each menu item. The top menu is assigned to dialing key 1 and so forth on down the menu. 10 Handset Menu Intercom Global Page from Handset: • With the Intercom icon highlighted, press the middle NavKey or left softkey. • Press the up or down NavKey to maneuver to and highlight GLOBAL PAGE. Press the middle NavKey, left softkey or the * key to confirm. • Any registered Handset or Base can answer the global page, thus entering Intercom mode. • To end the intercom call, To end the intercom call, press OFF on the Handset or INTERCOM on the Base. Basic Operation From Handset to Handset: • With the Intercom icon highlighted, press the middle NavKey or left softkey. • Press the up or down NavKey to navigate to and highlight the desired Handset. • Press the middle NavKey, left softkey or the assigned dialing key (1- 8). • The ringing Handset can answer by pressing ON or any of the number keys. • To end an intercom call, press OFF on either Handset. Performing global page Phonebook With this icon highlighted, press the middle NavKey or left softkey to reveal the contents of your Phonebook. If there are no entries, the screen will display Phonebook is empty. Your i 5803 Handset can store up to 50 numbers with names in the phonebook directory, along with a distinctive ring and image for each. Each memory location can hold up to 32 digits and up to 16 characters, including spaces. When prompted to Enter Name, use the digit keys to spell the name. Each press of a key will cause characters to be displayed as follows: 11 Basic Operation Handset Menu Number Key 1 Space & Characters (in order) ’ , . 1 2 3 A D B E C F a d b e c f 2 3 4 5 G J H K I L g j h k i l 4 5 6 7 M P N Q O R m S n p o q 6 r s 7 8 9 T W U X V Y t Z u w v x 8 y z 9 0 0 * * # # Adding Phonebook Entries • From the Handset idle (OFF) mode, press the NavKey in any direction. The Phonebook icon should be highlighted. !"# Press the middle NavKey or left softkey. • Press NEW. NOTE: When the phonebook is full and NEW is pressed, Phonebook is full will display and an error tone will sound. • You will then be prompted to Enter Name. Use the digit keys to spell the name. If you make a mistake, press the softkey. To add a space between characters, press the 1 key or the right NavKey twice. When finished, press OK. 12 VTech Handset Menu Enter the number you want to store in the Phonebook. Press and hold the # key to insert pauses if neces -sary. If you make a mistake, press the softkey. When finished, press OK. The screen will display: NOTE: If you do not wish to assign a distinctive ring tone or image to this Phonebook entry, press SAVE now. • 18005959511 VTech 18005959511 If you wish to be alerted to calls from this phone number, you can assign a unique ring tone to this Phonebook entry. Press the up or down NavKey to scroll to RINGER : Default . Press the left or right NavKey to sample the ringer options. — OR — • Press the middle NavKey then press the up or down NavKeys to sample the ringer options. • Press OK to confirm. • VTech 18005959511 NOTE: There are 8 traditional ring tones and 12 musical ringers. For Recordable Ringer, please refer to page 19 for details. NOTE: If you do not wish to assign a distinctive image to this Phonebook entry, press SAVE now. • • • • If you wish to be visually alerted to calls from this number by changing to a distinctive image, press the up or down NavKey to scroll to PICTURE : (none) . Press the left or right NavKey to sample the pictures and images options. — OR — Press the middle NavKey then press the up or down NavKey to sample the picture and image options. Press OK to confirm. 13 VTech 18005959511 Basic Operation • Handset Menu • Once you’ve selected a picture, press SAVE. 3 of 11 Basic Operation • Your phonebook entry has been saved and the screen will display: VTech Pat Johnson Rose Searching for and Dialing Phonebook Entries • From the Handset idle (OFF) mode, press any NavKey, the Phonebook icon should be highlighted. Press the middle NavKey or left softkey. • Press the up or down NavKey to scroll through the contents in alphabetical order. Pat Johnson Rose Sam 1 of 10 — OR — You can enter the first characters of the name. The closest match alphabetically will be displayed: VTech Pat Johnson Rose — OR — You can press the FIND softkey, enter the first few characters of the name and then press OK to search. If you make a mistake, press the softkey. The closest match alphabetically will be displayed. • Once you find the entry you want, simply press ON or SPEAKERPHONE to dial the number. V Editing Phonebook Entries • Following the first 2 steps in Searching for and Dialing Phonebook Entries, locate the entry you want to edit. 14 VTech Pat Johnson Rose Handset Menu • Press the middle NavKey. The screen will display: • Press the EDIT softkey. VTech 1-800-595-9511 RINGER: Melody 1 PICTURE: Press the up or down NavKey to the option you want to edit then enter the corrections as needed. Press the softkey to delete. VTec h 18005959511 RINGER: Melody 1 PICTURE: VTech • When finished, press the SAVE softkey. The screen will display the edited entry. 1-800-595-9511 RINGER: PICTURE: Melody 1 (none) 3 of 11 Deleting Phonebook Entries • Following the first 2 steps in Searching for and Dialing Phonebook Entries, locate the entry you want to delete. VTech Pat Johnson Rose VTech • Press the middle NavKey. The screen will display: 1-800-595-9511 RINGER: Melody 1 PICTURE: • Press the DELETE softkey. The screen will display: • To confirm deletion, press YES. To exit without deleting, press NO. & '"()*)'"+ YES 15 %&& NO Basic Operation • %&& Handset Menu Calls Log With this icon highlighted, press the middle NavKey or left softkey to view your Caller ID and Redial options: Basic Operation Review CID Log Clear CID Log Review Redial Clear Redial Move the up or down NavKey to highlight the desired option, then press the middle NavKey or left softkey. You can also press the dialing key assigned to each menu item. The top menu is assigned to dialing key 1 and so on down the menu options. NOTE: You can also view your Caller ID and redial options from the idle menu by selecting the and using the softkey options. Review CID Log (dialing key 1) - Allows you to scroll through the 50 current Caller ID and Call Waiting records received. With a CID record displayed, press SAVE to store it in the Phonebook, or press DELETE to delete the entry from the log. VTech 800-595-9511 11:15 A Oct12 You can also dial a CID record while reviewing. With the desired CID displayed, press OK. The possible options to choose from will be either 7, 8, 10, or 11 digits. For example, if the original number in Caller ID memory was 808-880-8808, then the display options will be: 1 of 11 & Dial Options 595-9511 1-595-9511 800-595-9511 1-800-595-9511 Press the NavKeys to make the selection, then press OK, ON or SPEAKERPHONE to dial the number. Clear CID Log (dialing key 2) - Choose this option if you want to delete all CID records at once. You will be asked Are you sure? Choosing YES clears all records. Choosing NO returns you to the previous screen. Review Redial (dialing key 3) - Select this option to display the last 10 numbers dialed. Use the NavKeys to highlight the desired number, press and hold the middle NavKey to view numbers that are longer than 11 digits, then press ON or SPEAKERPHONE to dial. You can press SAVE to save it in the phonebook, or press DELETE to erase. Clear Redial (dialing key 4) - Select this option to delete all phone numbers stored in redial memory. You will be asked Are you sure? Choosing YES clears all records. Choosing NO returns you to the previous screen. 16 Handset Menu Settings With this icon highlighted, press the middle NavKey or left softkey to reveal the following menu: Set Time (dialing key 2) - Use this option to set the time to be displayed on the bottom of the idle screen. If you subsribe to Caller ID, the clock will be set upon receipt of your first Caller ID record. Use the number keys if you wish to manually change the time. To view the time on the Handset while in idle mode, press the volume keys on the side of the Handset to illuminate the screen. Contrast (dialing key 3) - This option allows you to adjust the Handset screen contrast. Phone Setup (dialing key 4) - This option allows you to return the Handset to the Enter Base ID and change the TONE/PULSE. Language (dialing key 5, preset to English) - This option allows you to change the screen prompts to English, Spanish or French. Reset Settings (dialing key 6) - This option allows you to return the Handset to factory preset settings. There are four options that can be reset: Clear My Clips Clear Phonebook Default Settings Choose the feature you want to reset. You will be asked Are you sure? Choose YES to reset. Choose NO to return to the previous screen. Press the NavKeys to maneuver to the desired option and to make the change, or press the dialing key that is assigned to the icon. To confirm, press the middle NavKey or the SAVE softkey. Sounds & Alerts With this icon highlighted, press the middle NavKey or the left softkey to reveal the following options: Sound Clips (dialing key 1) - This option allows you to record and access your personal melodies. See the Recordable Ringer section on page 19 for details. Ringer Control (dialing key 2) - This option allows you to change the Ringer Volume, turn the Ringer On/Off and control the Vibrating Ringer. Ringers (dialing key 3) - This option allows you to assign a new Ring Tone. You can choose one of 8 traditional ringers or 12 musical ringers. Please refer to the Recordable Ringer section on page 19 for details on how to record your own personalized ringer. 17 Basic Operation Clock on/off (dialing key 1) - This option allows you to turn the clock on/off.