1
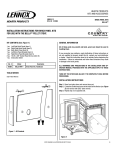
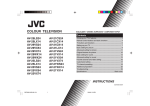
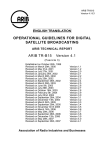
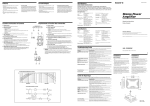
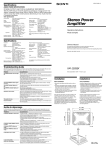
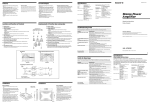
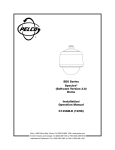
Monogram.™
ZISB36DC - GE Monogram 36" Built-In Refrigerator with Dispenser and
Water Filter
Design Information
Advanced Planning for a Flush Installation
Side Panels Requirements:
• Side panels are not required whenever the refrigerator
is installed into an enclosure or between pantry and
oven cabinets.
• Side panels are required whenever the sides of the
refrigerator are exposed.
• Side panel sizes vary depending on type of installation
being made.
For a flush installation, you must:
1. Determine the need for side panels.
2. Determine side panel thickness.
3. Order matching side panels from the cabinet
manufacturer. Be sure to provide the exact dimensions.
The following cutout dimensions examples will provide a flush fit. If
you have a unique installation situation (other than those illustrated
here), see Product Dimensions to calculate the rough-in dimensions.
Monogram built-in refrigerators are designed to be
installed with typical 24-3/4” deep cabinetry.
In a flush installation, the refrigerator doors will align
evenly with the front face of adjacent cabinets.
Installation Between Wall Oven and Pantry Cabinet
Side panels are not required
whenever the refrigerator
is installed into an enclosure or
between pantry and oven
cabinets.
The minimum cutout for a
custom enclosure should be:
84”Hx36”Wx24-3/4”D
36"
Finished Dimension
For answers to your Monogram,®
GE Profile Performance Series,™
GE Profile™ or GE appliance questions, call
GE Answer Center® service, 800.626.2000.
Specification Created 12/99
R
Listed by
Underwriters
Laboratories
Monogram.™
ZISB36DC - GE Monogram 36" Built-In Refrigerator with Dispenser and
Water Filter
Design Information
Installation Between Base & Wall Cabinets
1/4" Thick
Side Panels
Finished Dim.
Roughed-In Dim.
Refrigerator
Cabinet
35-1/2"
36"
Refrigerator door
Note: 1/4” thick side panels can be
inserted into the case trim, making
the rough-in the same as the outside
trim width, 36”.
Cabinet
1/4” Side Panels. Insert end of side panel
into trim.
Installation at End of Run
1/2" Thick
Side Panels
Finished Dim.
36"
Roughed-In Dim.
37"
Refrigerator
Cabinet
Note: 1/2” thick side panels shown.
Side panels can be any thickness.
Add side panel thickness to outside
trim width (36”)to calculate the roughin dimension
Refrigerator door
Cabinet
1/2” To 3/4” Side Panels. Leading Edge Flush
With Cabinet.
Frameless Cabinets
Side panels, 1/2” minimum thickness are
required when using frameless cabinets. The
side panel acts as a spacer between the
cabinet and the case trim and prevents
interference with cabinet door swing.
Refrigerator
Cabinet
36"
Finished Dimension
Refrigerator door
Cabinet
1/2” To 3/4” Side Panels. Leading Edge Flush
With Cabinet.
For answers to your Monogram,®
GE Profile Performance Series,™
GE Profile™ or GE appliance questions, call
GE Answer Center® service, 800.626.2000.
Specification Created 12/99
R
Listed by
Underwriters
Laboratories
Monogram.™
ZISB36DC - GE Monogram 36" Built-In Refrigerator with Dispenser and
Water Filter
Semi-Flush Installation
True Flush Installation
3/4"
0"
These refrigerators
can also be installed
semi-flush into an enclosure
using the minimum cutout
width. The case trim provides
a frame around the refrigerator.
In a flush installation, the
refrigerator doors will align
evenly with the front-face
of adjacent cabinet doors.
Advantage
• The flush appearance allows the refrigerator to blend into the
surrounding cabinetry or wall.
• The flush fit uses less floor space.
• A custom continuous toekick may be used to form an unbroken line
at the base of cabinetry.
Disadvantage
• The enclosure must be constructed accurately and perfectly
square, otherwise, gaps between case trim and surrounding
cabinetry will show.
Advantage
• If cabinetry or enclosure is not perfectly square, the case
trim will cover the surrounding cabinetry edges.
Disadvantage
• The refrigerator will project forward, approximately
3/4” beyond the front face of surrounding cabinetry. The
top grille panel will project forward of upper cabinetry
or soffit.
PRODUCT
DIMENSIONS
F
36" Models 12-3/8"
42" Models 18-3/8"
48" Models 20-3/8"
E
7"
D
Electrical
Area 5"
5"
74" From Floor
to Bottom
of Electrical
Water Supply
3 1/2"
A
5"
3 1/2"
C
B
See Installation Instructions for Details, Order Pub. No. 49-6964-2
for ZIS36 models, Pub. No. 49-6963-2 for ZIS42 models and Pub.
No. 49-6962-2 for ZIS48 models.
Specification Created 12/99
FINISHED
FLUSH
ENCLOSURE
FINISHED
SEMI-FLUSH
ENCLOSURE
A*
B
C
D*
E†
F
D*
E†
F
ZISW48D
ZISB48D
ZIS48N
83”
48”
24-3/4”
84”
48” Min.
24-3/4” Min.
84”
47-1/2” Min.
24” Min.
ZISW42D
ZISB42D
ZIS42N
83”
42”
24-3/4”
84”
42” Min.
24-3/4” Min.
84”
41-1/2” Min.
24” Min.
ZISW36D
ZISB36D
ZIS36N
83”
36”
24-3/4”
84”
36” Min.
24-3/4” Min.
84”
35-1/2” Min.
24” Min.
*Factory set installation height is 84”. Height adjustments are
accomplished with optional grille panel frame kits.
Order ZG2 grille panel kit for all ZIS models.
† Side panels are not required when installing into an enclosure.
Side panels are required whenever the sides of the refrigerator are
exposed. If side panels are used, add side panel thickness to
calculate finished cutout width.
For answers to your Monogram,®
GE Profile Performance Series,™
GE Profile™ or GE appliance questions, call
GE Answer Center® service, 800.626.2000.
R
Listed by
Underwriters
Laboratories
Monogram.™
ZISB36DC - GE Monogram 36" Built-In Refrigerator with Dispenser and
Water Filter
Dimensions and Specifications (in inches)
Front View
(not to scale)
Side View
(not to scale)
24 3/4"
35" Case Width
36" Overall Width
12 1/4" max
10 3/4" min
Design Information: Designed to be installed flush with surrounding
cabinetry. Cutout dimensions, clearances and side panel sizes are
determined by the many installation options available. Side panels must
be used whenever the sides of the refrigerator will be exposed. Side panels
are not required when refrigerator is installed into an enclosure or between
pantry and oven cabinets. Important-Side panels, 1/2” min. thickness are
required for frameless cabinets.
Field installed custom panels, Lexan® or stainless steel panels are required.
Custom door panels and grille panel sizes vary to accommodate the kit
being used.
84 1/2" max*
83" min
72 1/4"
*84" Shipping
*84”
ShippingHeight.
Height.For
For84-1/2"
Other
Height Installation
Installation
Heightsorder
orderZG2.
ZG2.
4"
*35 1/2" - 37 1/2"
Wall View
(not to Scale)
7"
84 1/2" max
83" min
Finished
Rough
Opening
Locate Grounded
Electrical outlet
Within Solid
Area Above
5"
Locate W ater
Supply Within
the Shaded
Area Below
5"
A custom toekick can be installed to match or complement the surrounding
cabinetry. A standard toekick is supplied. For a custom toekick, use supplied
toekick as a template to cut notches for hinges and water lines.
Optional Kits:
• ZWBP36: Black Lexan® Panel Kit (no trim kit required).
• ZWWP36: White Lexan® Panel Kit (no trim kit required).
• ZWSP36: Stainless Steel Panel Kit (no trim kit required).
• ZKH1: Provides for the installation of a custom handle on 1/4” custom
panels.
• ZG2: Provides 1/4” grille panel frame side pieces for 83”, 83-1/2” and 841/2” installation heights. Factory set height is 84”.
• ZKT36: Provides for the installation of 3/4” custom door and grille panels.
• ZKHT1: Provides for the installation of a custom handle using 3/4”
custom panels. (This kit must be used in combination with ZKT36.)
• ZKHSS1: Tubular stainless steel handles on 1/4” panels.
• ZKHTSS1: Tubular stainless steel handles on 3/4” panels. This kit must
be used in combination with ZKT48.
• ZWCD1: Provides for the installation of a custom collar trim on the
dispenser for one continuous custom panel on the freezer door. This kit
can be used alone, or with one or more kits.
12 3/8"
74"
From Floor to
Bottom of
Electrical Area
5"
3 1/2"
3 1/2"
*The finished and rough-in dimensions are determined by the
type of installation being made. The rough-in cutout width
includes side panel thicknesses. See “Advanced Planning For
A Flush Installation.”
Additional Specifications: A 115 volt 60 Hz., 15 or 20 amp power supply
is required. An individual properly grounded branch circuit or circuit breaker
is recommended. Install a properly grounded 3-prong electrical receptacle
recessed into the back wall. Electrical must be located on rear wall.
Water line can enter opening through the floor or back wall. The water line
should be 1/4” O.D. copper tubing between the cold water line and water
connection location, long enough to extend to the front of the refrigerator.
Installation of an easily accessible shut off valve in the water line is
recommended.
Clearances: If the refrigerator is to be installed in a corner, a 4” min.
clearance between the case trim and adjacent wall on both sides of the
refrigerator will assure a 90° door opening and access to all drawers. A 10”
clearance is required on both sides for removal of pans.
For answers to your Monogram,®
GE Profile Performance Series,™
GE Profile™ or GE appliance questions, call
GE Answer Center® service, 800.626.2000.
Specification Created 12/99
R
Listed by
Underwriters
Laboratories
Monogram.™
ZISB36DC - GE Monogram 36" Built-In Refrigerator with Dispenser and
Water Filter
Dimensions and Specifications (in inches)
Custom Door Panel Dimensions When Using Trim Kit
ZKT36, 3/4” thick panel with standard handle and/or ZWCD1
custom collar trim (not to scale)
Freezer Panel
Standard
Dispenser
Freezer Panel
Custom
Dispenser
For standard dispenser trim: Cut panels to size, rout the bottom of the upper
freezer panel and the top of the lower freezer panel to allow placement of
support brackets and install (see detail A).
Fresh Food
Panel
17-11/16"
16-11/16"
The ZKT36 trim kit provides for the installation of 3/4” custom door and
grille panels, using the standard full-length handle. Cut panels to size and
install.
For custom dispenser trim ZWCD1 kit must be used: Cut panels to size,
refer to detail B for dispenser cutout routing instructions and install. When
a raised panel design is used, custom width stiles and custom middle rail
is required. A 13-1/2” wide middle rail must be used because the custom
collar trim must be located within the raised portion of the panel. This area
must be 3/4” thick. See Detail C for raised panel.
67-15/16"
2-5/16"
37"
Custom Grille Panel
(not to scale)
15-1/16"
19-1/16"
15-1/16"
Detail A
35 1/2"
Detail C
Raised Panel Design
Upper
Freezer
Panel
*3"
Stile
Left
Side
1"
A
*2 3/16" Stile
Right Side
Grille Panel height can vary to fill installation height.
A
XInstallation Height
3/32"
Hole is
Cut After
Door
Fabrication
1"
Panel
Face
A
Lower
Freezer
Panel
Detail B
Custom Dispenser Cutout
Over 1/4" Thick (3/4" max) Panel
13 1/2"
Wide
Middle
Rail
83"
83-1/2"
84"
84-1/2"
Dimension A
8-1/4"
8-3/4"
9-1/4"
9-3/4"
Important: Maintain 1-1/2" minimum gap between
top of doors and bottom of grille panel.
Handle
Side
Section AA
9 7/16"
12 5/16"
7/8" wide rout
The Cutout is 9 7/16" wide
by 12 5/16" high. 3/4" panels
must be routed on all four
sides of the cutout. Rout
the back side of the panel
1/4" deep 7/8" wide.
(shaded area)
Specification Created 12/99
For answers to your Monogram,®
GE Profile Performance Series,™
GE Profile™ or GE appliance questions, call
GE Answer Center® service, 800.626.2000.
R
Listed by
Underwriters
Laboratories
Monogram.™
ZISB36DC - GE Monogram 36" Built-In Refrigerator with Dispenser and
Water Filter
Dimensions and Specifications (in inches)
Custom Door Panel Dimensions Using Standard Trim
Standard Trim with 1/4” Panels: 1/4” Panels: Cut panels to size.
1/4" thick panels or Panels secured to 1/4" thick backing
Freezer Panel
Standard
Dispenser
Freezer Panel
Custom
Dispenser
Fresh Food Panel
Tubular stainless steel handle kit ZKHSS1.
Custom collar dispenser trim with 1/4” door panels require trim kit ZWCD1.
17-11/16"
16-5/8"
Custom handles with 1/4” door panels require Trim Kit ZKH1. When using
ZKH1 with the standard dispenser trim, the length of the custom handle,
top to bottom cannot exceed 11-3/4”.
Standard Trim with Panels secured to 1/4” thick backing: Applying a
raised panel design to a 1/4” thick backing (screwed or glued): Cut 1/4”
panels to size, fabricate the raised panel to permit clearances of at least 2”
from the handle side for fingertip clearance, 1-1/4” from the hinge side to
avoid striking adjacent cabinetry and 5/16” from the top and bottom edges
to allow for the trim flange, then install.
67-7/8"
2-9/16"
36-7/8"
Countertops adjacent to refrigerator installation should be mitered 45°
degrees.
Note: ZWCD1 custom collar dispenser trim and ZKHT1 custom handle kits
cannot be used in this configuration.
15-1/4"
15-1/4"
Custom Grille Panel
(not to scale)
19-1/4"
Custom Dispenser
Cutout
35"
9 7/16"
Raised Panel on 1/4" Thick Backing
1/4"
Thick
Backing
9"
Panel frame is factory assembled for 84"
installation height. If installation height
varies, order ZG2 trim kit which provides
optional side trim panels. Cut Lexan® or
stainless panels to sizes shown below.
Appearance
Panel
1 1/4"
Clearance
hinge side
2" Clearance
handle side
XInstallation Height
83"
83-1/2"
84-1/2"
Case Trim
Door
Handle
Specification Created 12/99
1/4" Thick Panel
12 5/16"
The Cutout is 9 7/16"
wide by 12 5/16" high.
Dimension A
8"
8-1/2"
9-1/2"
Important: Maintain 1-1/2” min. gap
between top of doors and bottom of panel
frame.
For answers to your Monogram,®
GE Profile Performance Series,™
GE Profile™ or GE appliance questions, call
GE Answer Center® service, 800.626.2000.
R
Listed by
Underwriters
Laboratories
Monogram.™
ZISB36DC - GE Monogram 36" Built-In Refrigerator with Dispenser and
Water Filter
Dimensions and Specifications (in inches)
Custom Door Panel Dimensions When Using Trim Kit
ZKT36 3/4" thick panel with custom handle and/or
ZWCD1 custom collar trim.
Freezer Panel
Standard
Dispenser
Freezer Panel
Custom
Dispenser
Fresh Food
Panel
For standard dispenser trim: Cut panels to size, rout the handle side of the
panels as shown in detail B, rout the bottom of the upper freezer panel and
the top of the lower freezer panel to allow placement of support brackets
(see detail A) and install.
17-11/16"
16-11/16"
67-15/16"
For custom dispenser trim ZWCD1 kit must be used: Cut panels to size,
refer to detail C for dispenser cutout routing instructions and install. When
a raised panel design is used, custom width stiles and custom middle rail is
required. A 13-1/2” wide middle rail must be used because the custom
collar trim must be located within the raised portion of the panel. This area
must be 3/4” thick. See Detail D for raised panel.
2-9/16"
37"
15-5/16"
19-5/16"
15-5/16"
Detail A
Detail B
Rout panels to specification below on
the handle side of each panel
Upper
Freezer
Panel
ZKT36 and ZKHT1 installed together provides for the installation of 3/4”
custom door and grille panels, using a custom handle of your choice. Cut
panels to size, rout the handle side of the panels as shown below and
install (see detail B). For ZKHTSS1, tubular stainless steel handle kit, cut
panels to size and rout the handle side of the panels as shown in detail B.
1-13/16"
When using the standard full-width dispenser trim, the length of the custom
handle, top to bottom cannot exceed 11-3/4”. Locate the handle a minimum
of 3/4” and a maximum of 1-1/2” from the edge of the panel. There are no
length restrictions on handles for models using a custom collar dispenser
trim (ZWCD1).
1-13/16"
Custom Grille Panel
(not to scale)
1"
35 1/2"
3/32"
Freezer Door Face
1"
1/4"
max
Fresh Food Door Face
A
Over 1/4" Thick (3/4" max) Panel
Detail D
Raised Panel Design
Panel
Face
*3"
Stile
Left
Side
Lower
Freezer
Panel
Detail C
Custom Dispenser Cutout
*2 3/16" Stile
Right Side
A
A
12 5/16"
7/8" wide rout
The Cutout is 9 7/16" wide
by 12 5/16" high. 3/4" panels
must be routed on all four
sides of the cutout. Rout
the back side of the panel
1/4" deep 7/8" wide.
(shaded area)
Specification Created 12/99
XInstallation Height
83"
83-1/2"
84"
84-1/2"
Hole is
Cut After
Door
Fabrication
9 7/16"
Grille Panel height can vary to fill installation height.
13 1/2"
Wide
Middle
Rail
Handle
Side
Dimension A
8-1/4"
8-3/4"
9-1/4"
9-3/4"
Important: Maintian 1-1/2" minimum gap between
top of doors and bottom of grille panel.
For answers to your Monogram,®
GE Profile Performance Series,™
GE Profile™ or GE appliance questions, call
GE Answer Center® service, 800.626.2000.
Section AA
R
Listed by
Underwriters
Laboratories
Monogram.™
ZISB36DC - GE Monogram 36" Built-In Refrigerator with Dispenser and
Water Filter
Dimensions and Specifications (in inches)
24 3/4"
Side panels must be used whenever the sides of the refrigerator will be exposed.
23 9/16"
1/4" Side Panels
Insert end of
side panel into trim.
1/2" to 3/4" Side Panels
Leading Edge
Flush with Cabinet
Front.
84"
84"
Trim
3 3/4"
Standard 4" high toekick or trim to fit.
Height may vary depending on application.
2 9/16"
24 3/4"
Standard 4" high toekick or trim to fit.
Height may vary depending on application.
1 1/2"
1/2" to 3/4" Side Panels
Leading edge routed
1/4" deep, 1-1/2" top to
bottom.
23 5/16"
1/2" to 3/4" Side Panels
Recessed front edge.
84"
84"
3 3/4"
Standard 4" high toekick or trim to fit.
Height may vary depending on application.
2 5/16"
Standard 4" high toekick or trim to fit.
Height may vary depending on application.
For answers to your Monogram,®
GE Profile Performance Series,™
GE Profile™ or GE appliance questions, call
GE Answer Center® service, 800.626.2000.
*Not to scale.
Specification Created 12/99
R
Listed by
Underwriters
Laboratories
Monogram.™
ZISB36DC - GE Monogram 36" Built-In Refrigerator with Dispenser and
Water Filter
Features and Benefits
• 21.2 cu. ft. Capacity (Fresh Food 12.0 cu.
ft., Freezer 9.2 cu. ft.)
• GE SmartWater™ Filtration System
• Exterior Dispenser with Cubes, Crushed
Ice and Chilled Water
• 2 Adjustable Humidity Vegetable/
Fruit Pans
• Sealed Snack Pan
• 4 Adjustable Spill-Proof Glass Fresh
Food Shelves
• Slide-Back Shelf
• 5 Adjustable Fresh Food Door Bins
• Dairy Compartment
• Wine Holder
• Glass-Covered Butter Dish
• 4 Adjsutable Wire Freezer Shelves
• 2 Utility Baskets
• 3 Adjustable Freezer Door Bins
• Full-Length Aluminum Door Handles
• Model ZISW36DC—White Dispenser
• Model ZISB36DC—Black Dispenser
Specification Created 12/99