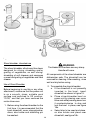
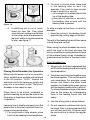
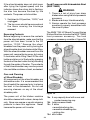
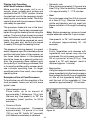
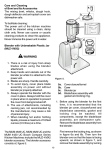
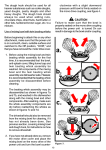
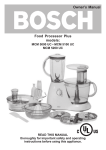
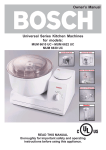
1
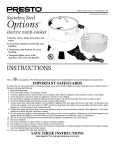
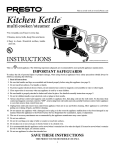
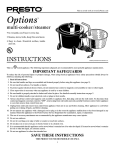
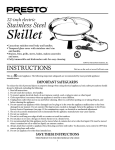
Tips:
The power unit of the kitchen machine
should be cleaned with a clean, damp cloth
only. Never use coarse or caustic cleaning
products to clean this appliance. Never
immerse the power unit in water.
The blender should be operated with careful
consideration as to what is required and/or
desired. The speed at which the blender is
operated and the length of operation for a
given job will depend upon the degree of
fineness desired or the amount being
blended.
Slicer/Shredder, w/Unbreakable Bowl
(MUZ 7 TS1)
When the blender is being used on dry
materials, such as nuts or dry bread, the
best results will be obtained when the
blender jar is filled with approximately 1/2
cup of material to be blended.
WARNING
1. Blades on discs are sharp. Handle
carefully. Do not grip the discs by the
blades.
2. When operating slicer/shredder keep
hands clear of filling tube. Only work
with pusher.
3. Always operate the slicer/shredder with
the cover in place.
If the blender does not start (even after trying
the highest speed) after having switched it
On and the control status indicator is
flashing, the blade has become blocked by
the contents. The power unit should be:
1. Switched to off, “0/Off,” and unplugged.
2. The mixture should be removed and the
contents at the bottom of the jar
loosened.
The MUM 7220 UC Bosch Concept Series
Kitchen Machine includes the MUZ 7 TS1
slicer/shredder attachment. The slicer/
shredder attachment consists of, figure 15:
Removing Contents
Before beginning to remove the contents
from the blender, make sure that the power
unit has been turned to off position “O/Off”.
Remove the blender from the power unit by
turning the blender to the clockwise while
lifting. With the blender removed from the
power unit, the contents of the blender may
now be poured into a suitable container or
bowl, as desired.
a.
b.
c.
d.
e.
Cover closure/pusher
Cover
Unbreakable 12-cup capacity bowl
Driveshaft
3 slicer/shredder discs:
• reversible slicing disc
• reversible shredding disc
• grating disc
f. disc holder
g. stabilizing pin
Care and Cleaning of Blender
All components of the blender, except the
blade/base assembly, are dishwasher safe.
It is recommended that the blade/base
assembly be cleaned only under flowing
water rather than in the dishwasher. Soap
and detergent will tend to wash out the
bearing lubricant of the blade/base
assembly. Do not use scouring cleaners on
any of the blender parts.
17
Figure 15.
Slicer/shredder, intended use
WARNING
The blades on the discs are very sharp.
Handle with care.
The slicer/shredder attachment has been
designed for slicing, shredding and/or
grating of vegetables, as well slicing/
shredding of soft cheeses and sausages
or meat and grating of vegetables and hard
cheese.
All components of the slicer/shredder are
dishwasher safe. The driveshaft can be
removed for cleaning. After washing, rinse
well and dry before using.
Use of Slicer/Shredder
2. To assemble the slicer/shredder:
a. If the driveshaft is not presently
inserted in the bowl, insert
driveshaft as shown in figure 15.
b. Place slicer/shredder bowl on
power unit by placing over mono
drive and while pressing down turn
it counterclockwise to stop and
lock the bowl in place, see figure
16a.
c. Select disc to be used and place
on disc holder and place over
driveshaft, see figure 16b.
Before beginning to use this or any other
attachment, make sure that the power unit
is on a smooth, clean, suitable work
surface and switched to Off position,
“O/Off,” and that you have removed the
motor drive cover.
1. Before using the slicer/shredder for the
first time, it is recommended that the
bowl, driveshaft, cover, closure/pusher,
discs, disc holder and stabilizing pin
be washed.
18
b.
2. For short or circular slices, place food
in the feeding tube on end. For
example, If you wish to have circular
slices of zucchini or carrots:
• cut to length not to extend above the
top of the feeding tube.
• place the cut zucchini or carrots in
the feeding tube on end until the
feeding tube is packed.
d. If stabilizing pin is not in cover,
insert pin, see 15e. Then place
cover on bowl, making sure the tabs
on the cover enter the recesses in
the bowl, and turn counterclockwise
to stop, see figure 17.
To slice a single narrow item, a carrot for
example:
• place the carrot in the feeding funnel
opposite the cutting edge of the disc.
a.
Figure 16.
The wall of the feeding funnel will then serve
to hold the piece vertical.
When using the slicer/shredder be sure to
watch the level in the bowl and stop the
slicing, shredding or grating before the level
of the material being sliced, shredded or
grated reaches the level of the disc holder.
Slicer/shredder tips:
1. Shopping for fruits and vegetables that
will fit into the feeding funnel will simplify
food preparation.
Figure 17.
Placing Slicer/Shredder into Operation
Make sure the power unit is on a smooth,
clean, suitable work surface and switched
to the Off position, “O/Off.” Unwind the
electrical cord to the necessary length and
plug into a convenient outlet. The slicer/
shredder is now ready for use.
2. Foods that are to be used together may
be sliced together. This can be used to
your advantage. For example, green
onions and celery are often used
together, but feeding the green onions
into the feeding funnel alone is difficult.
Try slicing the green onions at the same
time as the celery by interspersing
them in the feeding funnel with the
celery.
Place items to be sliced, shredded or
grated in feeding funnel and be sure to use
the pusher to feed items into the discs when
in operation.
3. Use the slicing disc to shred lettuce.
Learning how to feed food properly into the
feed funnel is the most important factor for
proper slicing and grating:
1. For long slices or long shreds, place
food into the feeding funnel lengthwise.
4. Do not overcook potatoes that are to
be sliced. Also it is recommended that
you let them cool first. Potatoes must
be cool and firm to obtain the regular
slices.
19
Food Processor with Unbreakable Bowl
(MUZ 7 MM2)
If the slicer/shredder does not start (even
after trying the highest speed) and the
indicator above the rotary dial is flashing:
the disc has become blocked by the
contents. The power unit should be:
WARNING
1. There is a risk of injury from sharp
blades when using the food processor
accessory.
2. Blades are sharp. Handle carefully.
3. Always operate the food processor
accessory properly assembled with
the cover in place.
1. Switched to Off position, “O/Off,” and
unplugged.
2. The top cover should be removed and
the items causing the blockage
removed.
The MUM 7150 UC Bosch Concept Series
Kitchen Machine includes the MUZ 7 MM2
food processor accessory. The food
processor accessory consists of, figure 18:
Removing Contents
Before beginning to remove the contents
from the slicer/shredder, make sure that the
power unit has been turned to the Off
position, “O/Off.” Remove the slicer/
shredder from the power unit by turning the
slicer/shredder bowl clockwise while lifting.
With the slicer/shredder removed from the
power unit, remove the top cover, by turning
it clockwise while lifting. Next lift the disc
holder and disc out of the bowl by grasping
the knob of the disc holder that is protruding
through the center of the disc. The contents
of the slicer/shredder may now be poured
into a suitable container or bowl, as desired.
Care and Cleaning
of Slicer/Shredder
All components of the slicer/shredder are
dishwasher safe. It is recommended that
the driveshaft be removed prior to placing
the bowl in the dishwasher. Do not use
scouring cleaners on any of the slicer/
shredder parts.
Figure 18.
The power unit of the kitchen machine
should be cleaned with a clean, damp cloth
only. Never use coarse or caustic cleaning
products to clean this appliance. Never
immerse the power unit in water.
18a. 5-cup capacity bowl with cover and
pusher/measuring cup.
18b. food processor blade
18c. 3 discs
• reversible slicing disc
• reversible shredding disc
• grating disc
18d. disc holder
20
How to Use the Food Processor Blade
The food processor blade and its bowl are
intended to be used for mincing, pureeing
and pulverizing of fruit, vegetables, meat,
nuts and dried bread (for bread crumbs) and
the preparation of sauces, special diet and
infant foods and mixing.
Note: The processor blade should not be
used to process hard cheeses
(Parmesan, Romano, etc.)
Figure 19.
4. Food to be processed may be placed
in the bowl now or added after the bowl
cover has been put in place.
Use of 5-cup capacity bowl with food
processor blade
Before beginning to attach this or any other
attachment, make sure that the power unit
is on a smooth, clean, suitable work surface
and switched to the Off position, “O/Off,” and
that you have removed the motor drive cover.
5. Place the cover on the bowl, as shown
in figure 20a. There is a safety
interlock in the handle of the 5-cup
capacity bowl that is engaged by the
cover. Push up on the interlock button
(step 1) and turn the cover (step 2)
counterclockwise until stop and
interlock is engaged.
1. Before using the food processor for
the first time, it is recommended that
the bowl, bowl cover, pusher/
measuring cup and food processor
blade be washed. All components of
the food processor attachment are
dishwasher safe. Or they may be
washed in warm soapy water. After
washing, rinse well and dry before
using.
2. If you have not already done so,
remove the motor drive cover from the
power unit’s mono drive and place the
bowl on the mono drive of the power
unit and turn the bowl counterclockwise with a slight downward
pressure until the bowl is firmly seated
on the drive coupling, see figure 19a.
Figure 20.
Note: The processor blade will not turn
when the power unit is started
unless the cover has properly
engaged the interlock. This is a
special safety feature of the food
processor bowl.
3. Grasping the processor blade by the
knob at the top of the center column,
lift it up and place it over the center
column of the bowl, see figure 19b.
Once in place, check to make sure
that the blade has engaged the
driveshaft by turning the blade slightly
clockwise.
The cover has an integral feeding funnel
with a pusher/measuring cup. The
pusher/measuring cup may be
removed to add ingredients, but the
cover and pusher must be in place
whenever the power unit is in operation.
21
• Almonds, nuts
Place nuts approximately 1/4 pound at a
time (100 g.) into the bowl dry. Use speed
4 for approximately 1 - 1 1/2 minutes.
Placing into Operation
with Food Processor Blade
Make sure that the power unit is on a
smooth, clean, suitable work surface and
switched to the Off, “O/Off,” position. Unwind
the electrical cord to the necessary length
and plug into a convenient outlet. The 5-cup
capacity bowl with food processor blade is
now ready for operation.
• Meat
Do not process more than 3/4 of a pound
at a time (375 g.). Remove the bones,
gristle and tendons and cut meat into
pieces suitable to fit through the feeding
tube.
The processor blade sits low in the bowl,
near the bottom. Food to be processed must
be fed through the feeding funnel using the
pusher. The food is then minced or pureed
near the bottom of the bowl by the spinning
blade. Food should be prepared as usual
(wash, dry, peel, etc.) and cut into pieces
to readily fit through the feeding funnel.
Note: Before processing, spices or bread
maybe added as called for in your recipe.
Use speed 4, or “M,” until desired result
is obtained (approximately 30 - 60
seconds).
• Pureeing
Fruits, vegetables and cheeses with
ingredients and spices may also be
processed. Do not process more than
3/4 of a pound at a time (375 g.). Use
speed 4 or “M” until desired result is
obtained (approx. 1 minute).
The degree of mincing desired, to a great
extent, depends upon the intended purpose
and the individual taste of the preparer, so
the times listed below in the examples
should be taken as a general guide only.
Also, the processing times depend upon
the quantity of food being processed; that
is, for small quantities and/or coarser result,
use a shorter operating time, for larger
quantities and/or finer result, use a longer
operating time.
• Mayonnaise
Using the recipe from the blender section,
place ingredients into the food processor
bowl, except the final 2/3 cup of vegetable
oil. Mix all the ingredients briefly, then
add the rest of the vegetable oil. Use
speed for approximately 1 1/2 minutes.
Examples of Use of Food Processor
To familiarize you with the operation of the
food processor, below you will find some
typical uses:
• Herbs (except chives)
Place herbs, up to an amount of
approximately 1 tablespoon (10 g.) into
the bowl dry. Use speed 4, or “M,” the
momentary “pulse” position, for 20-30
seconds.
• Onions or Garlic
Cut onions into quarters. Processing
approximately 1/4 pound at a time
(100 g.) use “M,” briefly (5-7 seconds)
until desired consistency is obtained.
Figure 21.
22
The disc holder, three discs and its 5-cup
capacity bowl are intended to be used for
slicing, shredding and/or grating of
vegetables, as well slicing/shredding of soft
cheeses and sausages or meat and grating
of vegetables and hard cheeses.
Removing Contents
Before beginning to remove the contents
from the food processor, make sure that the
power unit has been turned to the Off
position, “O/Off.” Remove the top cover from
the bowl by depressing the interlock button
on the handle, step 1, and turning the cover
clockwise, step 2, while lifting, see figure
21a. With the cover removed the bowl can
be removed from the power unit by turning
it clockwise while lifting, see figure 21b.
The contents of the bowl may now be
poured into a suitable container or bowl, as
desired. Be sure to hold the processor blade
in the bowl by placing a finger on the top of
the processor blade’s center column while
pouring.
Use of disc holder and discs
Before beginning to attach this or any other
attachment, make sure that the power unit
is on a smooth, clean, suitable work surface
and switched to the Off position, “O/Off,” and
that you have removed the motor drive cover.
1. Before using the bowl with the disc
holder and discs for the first time, it is
recommended that the bowl, bowl
cover, pusher/measuring cup, disc
holder and discs be washed. All
components of the food processor
attachment are dishwasher safe. Or
they may be washed in warm soapy
water. After washing, rinse well and
dry before using.
Next lift the processor blade out of the bowl
by grasping the knob of the center column
of the processor blade and lifting.
CAUTION
Processor blade is very sharp.
Handle with care.
2. If you have not already done so,
remove the motor drive cover from the
power unit’s mono drive and place the
bowl on the mono drive of the power
unit and turn the bowl counterclockwise with a slight downward
pressure until the bowl is firmly seated
on the drive coupling, see figure 19a.
Care and Cleaning
of Food Processor Blade and Bowl
All components of the food processor are
dishwasher safe. Do not use scouring
cleaners on any of the food processor parts.
3. Select disc to be used and place on
disc holder and place over driveshaft,
see figure 22a.
The power unit of the kitchen machine
should be cleaned with a clean, damp cloth
only. Never use coarse or caustic cleaning
products to clean this appliance. Never
immerse the power unit in water.
How to Use Discs w/5-Cup Capacity Bowl
The food processor attachment provided with
the MUM 7150 UC Bosch Concept Series
Kitchen Machine also has a disc holder with
3 discs, in addition to the processor blade,
see figure 18.
Figure 22.
23
Removing Contents
Before beginning to remove the contents
from the 5-cup capacity food processor bowl,
make sure that the power unit has been
turned to the Off position, “O/Off.” Remove
the top cover from the bowl by depressing
the interlock button on the handle, step 1,
and turning the cover clockwise, step 2,
while lifting, see figure 21a. With the cover
removed the bowl can be removed from the
power unit by turning it clockwise while
lifting, see figure 21b. Next lift the disc holder
and disc out of the bowl by grasping the
knob of the disc holder that is protruding
through the center of the disc.
4. Place the cover on the bowl, as shown
in figure 22b. There is a safety
interlock in the handle of the 5-cup
capacity bowl that is engaged by the
cover. Push up on the interlock button,
step 1, and turn the cover, step 2,
counterclockwise until it stops and
the interlock is engaged.
Note: The disc and disc holder will not
turn when the power unit is started
unless the cover has properly
engaged the interlock. This is a
special safety feature of the food
processor bowl.
The cover has an integral feeding funnel
with a pusher/measuring cup. The
pusher/measuring cup may be
removed to add ingredients, but the
cover and pusher must be in place
whenever the power unit is in operation.
CAUTION
Blades on discs are very sharp.
Handle with care.
Placing into Operation with Discs
Make sure the power unit is on a smooth,
clean, suitable work surface and switched
to the Off position, “O/Off.” Unwind the
electrical cord to the necessary length and
plug into a convenient outlet. The 5-cup
capacity food processor bowl is now ready
for use with the disc you have selected.
The contents of the bowl may now be
poured into a suitable container or bowl, as
desired.
Care and Cleaning
of Discs, Disc Holder and Bowl
All components of the food processor are
dishwasher safe. Do not use scouring
cleaners on any of the slicer/shredder parts.
Place items to be sliced, shredded or grated
in feeding funnel and be sure to use the
pusher to feed items into the discs when in
operation.
Refer to Slicer/Shredder section of this
manual, page19, for examples and tips on
how the discs may be used for slicing,
shredding and grating.
The power unit of the kitchen machine
should be cleaned with a clean, damp cloth
only. Never use coarse or caustic cleaning
products to clean this appliance. Never
immerse the power unit in water.
Just as when using the slicer/shredder, be
sure to watch the level in the bowl and stop
the slicing, shredding or grating before the
level of the material being sliced, shredded
or grated reaches the level of the disc
holder.
24
Service and Repair
TROUBLESHOOTING
The Bosch Concept Series Kitchen
Machines require no special care other than
the care and cleaning noted in this manual.
If you are having a problem with your
machine, before calling our Customer
Support group, please refer to the
TROUBLESHOOTING section below. If after
reviewing the troubleshooting section and
trying its remedies you are still having a
problem, please do contact us by either
writing to us at:
•
Status
Indicator
Off
A circuit breaker may have
tripped or a fuse has blown in
power supply circuit. Reset
circuit breaker or replace
fuse.
Status
Indicator
Flashing
Power supply to the power
unit has been interrupted and
become reestablished (there
was a temporary power
outage).
1. Turn the power unit to Off
and wait 5 seconds.
2. Restart.
Status
Indicator
Flashing
[email protected]
or calling us at:
•
Possible Cause and Remedy
Bosch Small Appliances
Customer Support
BSH Home Appliances
5551 McFadden Avenue
Huntington Beach, CA 92649
or e-mailing us at:
•
Problem
The power unit has been
overloaded; for example, the
blender blade may have
become blocked.
1. Turn the power unit to Off
and unplug.
1 (866) 44BOSCH
[1 (866) 442-6724]
2. Remove contents of
attachment being used
and loosen whatever has
caused the jam.
If you do write to us, please include your
e-mail address or a daytime telephone
number where you may be reached.
3. Reinstall attachment and
restart.
Also, to view our full product line, please
visit our Web site:
• www.boschsmallappliances.com
25
Sample Recipes
Fruit Smoothies
Salsa
2
2
1/2
1
1-2
1
Chop the following ingredients in Bosch
blender or food processor, on speed 3 or 4:
1-4
1
1/8
8
Dried Arabol Chilies
(start with one, add more for
increased spiciness)
clove garlic
cup water
ounces tomato sauce (add
half)
cups fruit juice
cups frozen fruit
can frozen juice concentrate
cup fruit flavored yogurt
cups of ice
fresh banana
Place all ingredients in Bosch blender and
mix until smooth, on speed 3 or 4.
Experiment with different flavor combinations
such as tropical, berry or melon.
Next add:
1 & 1/2 teaspoons oregano
3/4
teaspoons cumin
1
bunch of fresh cilantro
1
pinch of salt
second half of tomato sauce
French Bread
4
4
6
2
1
10 -12
4
Blend all ingredients, on speed 1 or 2, until
smooth.
Pesto
cup loosely packed basil
leaves
1/2
cup grated parmsean
1/3-1/2 cup olive oil (enough for
desiredconsistency)
1-2
cloves garlic
1/4
cup shelled pinenuts
tablespoons active dry yeast
cups hot water
tablespoons sugar
tablespoons salt
cup vegetable oil
cups of flour (white or wheat)
tablespoons gluten
1
Place all ingredients in Bosch mixing bowl.
Thoroughly knead on speed 1 or 2 (8 - 10
minutes). Let rise in the bowl 10 minutes,
then punch down. Punch down 4 or 5 times.
Divide into 3 - 4 regular loaf pans or shape
into rounds. Slash tops with sharp knife and
brush with egg wash. Let raise until doubled
in size. Bake 30 minutes at 400 °F.
Lightly toast pinenuts. Let cool. Place olive
oil in Bosch blender or food processor. Turn
on power and gradually add parmesan
cheese, garlic and basil leaves. Process,
on speed 1 or 2, until smooth. Add pinenuts
and blend thoroughly.
Toss with cooked pasta or spread on bread
or crackers.
26
Oatmeal
Cookies
2
1
2
1
1 - 3/4
1
1/2
3
1
Chocolate
Chip
cups packed brown sugar
cup shortening
eggs
teaspoon vanilla
cups flour
teaspoon baking soda
teaspoon salt
cups quick-cooking rolled oats
cup chocolate chips
Cream the brown sugar, shortening, eggs
and vanilla in the mixing bowl, on speed 1
or 2. Add flour, baking soda and salt. Blend
well, stir in rolled oats and chocolate chips
by hand. Drop by spoonfuls onto greased
baking sheets. Bake in 350 °F oven for 8 10 minutes. Cool before removing from pan.
Makes 5 dozen.
Acknowledgement:
The sample recipes listed bove were submitted by:
Salsa - Caroline Ciarelli, BSH Home
Appliances
Pesto - Kitchen Resource
Fruit Smoothies - Marni Rader, BSH
Appliances
French Bread - Kitchen Resource
Oatmeal Chocolate Chip Cookies Kitchen Resource.
27
Important Notes
28
Important Notes
29
SPECIAL ACCESSORIES
30
BOSCH Small Appliance Warranty
BSH Home Appliances (“BOSCH”) warrants all new small appliances to be free from original
defects in design, materials and workmanship for one (1) year after the sale to the original
owner.
Within the stated warranty period, BOSCH will repair or replace, at its sole option, any
small appliance or parts thereof which prove defective under the conditions of normal use
and service at no charge to you. It is the owner’s responsibility to return the appliance for
repair. Repaired and replacement small appliances and parts shall be the same or as
close in appearance as possible to the original for the purposes of this warranty.
Should you require service of your BOSCH small appliance, please contact customer
service at 1-866-44-BOSCH. Repair of BOSCH appliances should only be performed by
qualified technicians.
This warranty is limited to the original consumer purchase and is not transferable. Specifically
excluded from this warranty are failures caused by accident, misuse, neglect, abuse,
including tampering, use of frequency or voltage other than marked on the product, and
use for commercial purposes.
To the extent allowed by law, this warranty sets out your exclusive remedies, whether for
negligence or otherwise. BOSCH will not be liable for any consequential or incidental
damages, losses or expenses. THIS WARRANTY IS IN LIEU OF ALL OTHER EXPRESSED
WARRANTIES. ANY WARRANTY IMPLIED BY LAW, WHETHER FOR
MERCHANTABILITY OR FITNESS FOR A PARTICULAR PURPOSE OR OTHERWISE,
SHALL BE EFFECTIVE ONLY FOR THE PERIOD THAT THIS EXPRESSED WARRANTY
IS EFFECTIVE. BOSCH DOES NOT ASSUME ANY RESPONSIBILITY FOR INCIDENTAL
OR CONSEQUENTIAL DAMAGES.
No attempt to alter, modify or amend this warranty shall be effective unless authorized in
writing by an officer of BOSCH. Some states do not allow limitations on how long implied
warranties last or the exclusion or limitation of incidental or consequential damages, so
the foregoing limitations and exclusions may not apply to you. This warranty gives you
specific legal rights and you may also have other rights which vary from state to state.
31
Looking for more information about BOSCH products?
Visit our Web site:
www.boschsmallappliances.com
32