1
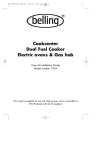
TOUCHTRONC
Model No.
XOU174
Electric Built-in Oven
INSTALLATION AND USER INSTRUCTIONS
Introduction ........................·......................................................................... 4
For Your Own Safety .................................................................................. 5
Installation Instructions ............................................................................... 6
Building-In The Appliance ........................................................................... 7
Accessories .............................................................................................8-9
Know Your Cooker .................................................................................... 10
Automatic Cooking ............................................................................... 11-12
Oven Functions ......................................................................................... 13
Cooking Functions .................................................................................... 14
Cooking Functions Continued .............................................................. 15-17
Meat Probe ............................................................................................... 18
Cookery Notes .......................................................................................... 19
Fan Oven Cooking Guide ......................................................................... 20
Conventional Oven Cooking Guide ........................................................... 21
Grilling Guide ............................................................................................ 22
Cooking Guide- Fan oven plus bottom heat ............................................ 23
Cooking Guide- Bottom Heat and Fan .................................................... 23
Cooking Guide- Bottom Heat only ........................................................... 23
Cooking Guide- Top Heat only ................................................................ 23
Cleaning And Maintenance ....................................................................... 24
Is There Something Wrong With Your Cooker? ........................................ 25
Service ...................................................................................................... 26
Installation & User's instructions
3
Introduction
Your Belling Oven
Thank you for purchasing a new Belling Touchtronic electric oven. Its stylish and practical
design will enhance your kitchen and make cooking a pleasure. It features a large multifunction
oven with a grill. The oven function and temperature are set electronically, via a simple touch
control interface, for accurate temperature control, and feature a childlock safety feature.
There is also a clock/timer which features a minute minder and an automatic oven switch on
and off feature. As an additional feature an 'easiglide' shelf system may be installed as an
optional extra. The kit can be purchased from our spares department by telephoning 01709
579907 and quoting part number XOU174002.
Even if you have used an electric cooker before, it is important that you read these instructions
thoroughly before starting to cook, as there may be many new features not featured on your
previous cooker. Pay particular attention to the installation and safety instructions.
Getting Help
If you have any problems with installation, operating or cooking with your Belling oven please
check through these instructions thoroughly to make sure that you have not missed anything. If
you still need help, then please contact (including a daytime telephone number if possible):
Consumer Relations Department
Belling Appliances Ltd.,
Talbot Road,
Mexborough.
South Yorkshire.
564 8AJ.
BELLING HELPLINE Tel: 01709 579902
Please quote the cooker model and serial number with your enquiries. This can be found on the
rating label, positioned below the main oven door seal.
WARNING! For your own safety, make sure that these instructions on installation, use and
maintenance are followed. We advise you to keep these instructions in a safe place for future
reference. If you sell or transfer ownership of this product, please pass on these instructions to
the new owner.
This appliance conforms to EN55014 regarding suppression of Radio and Television reception
interference.
Unpacking
After unpacking your cooker, make sure that you remove all the packing from the oven and
grill and any stickers from the oven/grill door. Our products use environmentally friendly
packaging, which can be either recycled or disposed of in the appropriate manner and
individual packaging materials are accordingly clearly marked. The packaging materials should
carefully discarded and not left within easy reach of children as they are a potential safety
hazard.
Disposal of your product
To minimise the risk of injury to children please dispose of your product carefully and safely.
Remove the mains cable (where fitted) by cutting off flush with the appliance and always
ensure that no plug is left in a condition where it could be connected to the electricity supply.
To help the environment, Local Authority instructions should be followed for the disposal of
your product.
4
Installation & User's instructions
For Your Own Safety
When used properly your Belling oven is completely safe but as with any electrical
product there are certain precautions that must be observed.
PLEASE READ THE PRECAUTIONS BELOW BEFORE USING YOUR APPLIANCE.
Never ..
•
•
•
•
•
•
•
•
•
•
Never allow anyone except an authorised Belling Service Agent to service or repair your
cooker.
Never remove any part of the cooker other than those intended in normal use, or
attempt to modify the cooker in any way.
Never use the cooker for commercial catering. It is designed for domestic use and for
cooking food only.
Never allow young children to operate or play with the cooker .
Never line the shelves, floor, or sides of the oven or grill, with aluminium foil as
overheating and damage may result.
Never store anything which might catch fire in the oven or grill.
Never heat unopened containers .
Never dry clothes on the oven door .
Never store flammable liquids, aerosols, etc. in adjacent cabinets .
Never wear garments with long flowing sleeves whilst cooking .
Always ..
•
•
•
•
•
•
•
•
•
•
Always take care when touching any part of the cooker which may be hot. Use dry,
good quality, oven gloves when removing or replacing food or dishes.
Always stand back when opening the oven door to allow any build-up of heat or steam
to disperse.
Always keep the oven door closed when not in use to prevent accidents, but remember
that the grill door must be kept open when grilling to prevent overheating.
Always keep your cooker clean, as build-up of grease or fat from cooking may be a fire
hazard.
Always switch off at the mains before cleaning your cooker .
Always supervise children and pets, particularly when grilling, as exposed parts of the
grill may become hot.
Always make sure that all controls are switched off when you have finished cooking .
Always remember that your cooker may stay hot for a time even after you have finished
cooking.
Always keep ventilation slots clear of obstructions .
Always keep children away from the cooker when cleaning at maximum setting .
Installation & User's instructions
5
Installation Instructions
General
This equipment is designed specifically for domestic purposes and Belling Appliances Limited
cannot accept responsibility if used in any other type of installation.
All Belling oven units are suitable for installation under Belling hob units.
This appliance must not be installed over any appliance that generates heat.
Important
For your own safety, we recommend that your appliance is installed by a qualified electrician.
The cooker should be installed in accordance with the latest Edition of the lEE Regulations.
Technical Data
XOU174
595/594/554
600/560/550
AC 230 V
AC 230 V, 50 Hz
3,4
0,95
Type
Dimensions of the appliance H/W /D (mm)
Dimensions for mounting H/W /D (mm)
Mains voltage
Operating voltage
Oven: Power (kW)
Upper element (kW)
Lower element (kW)
Grill element (kW)
Fan element (kW)
Fan only (W)
Oven light (W)
Cooling fan (W)
1'1
2,2
2,2
35
25
25
Electrical Installation
WARNING: THIS APPLIANCE MUST BE EARTHED!
This cooker should be installed by a competent electrician in accordance with the current
edition of lEE Regulations.
This appliance must be earthed and connected to a 230 volt, 50 Hz, single phase supply
through a suitable cooker control unit with a fuse rating of 20 amps. The control unit should
incorporate a double pole switch having a contact separation of at least 3 mm in all poles and
should be located adjacent to the cooker to allow easy access in case of an emergency.
We recommend that you use a rubber cable (type HO 3RR-F) to connect the cooker to the
control unit or other protective cables with similar type characteristics. The minimum cable
size is 3 x 2.5 mm sq. The cooker mains terminal block is located at the rear of the cooker
and should be connected as shown in the diagram.
L
6
N
AC230V
PE
Installation & User's instructions
Building-In The Appliance
Installation Dimensions
WARNING Always use the recommended measurements of the build-in opening, as shown in the table
on the previous page and the diagrams below.
Fixing the Appliance
Push the appliance into the cabinet, open the oven door and drill pilot holes 2mm X Smm
deep, through the holes in the frame at the sides into the sides of the cabinet. Fix the oven to
the cabinet with the enclosed screws.
Take care not to tighten the screws too much as this may cause damage to the cabinet sides or
the appliance enamel.
Before Cooking
Before you cook for the first time, we recommend that you switch on each element in turn to
burn off any odours remaining from manufacture. Simply operate the grill on maximum for a
few minutes, and the oven for about 30 mins. Although the smell is harmless, we would
recommend that you open the window to allow fresh air to circulate during this procedure.
Installation & User's instructions
7
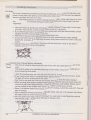
Accessories
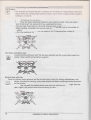
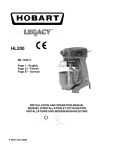
Shelf Runners
Your oven is supplied with chromed wire shelf supports, which offer the user 3 different
cooking positions. These are fitted by hanging the tops of each shelf support through the two
metal eyelets fitted to the top of each side of the oven cavity and allowing them to hang down
against the walls of the oven. 2 shelves are supplied with the oven.
)_
~
3
r-
~
2
/-
-="-
1
/:
-
'Easi-glide' telescopic shelf runners are available as an optional extra. These allow the shelves
to be slid fully out of the oven for inspection of food being cooked during use, without the user
having to support the weight of the shelf and food, or stoop to see to the rear of the shelf.
These are fitted in exactly the same way as the conventional wire shelf supports, but with the
addition of a fixing screw at the lower front corner of each runner, for added safety. Shelves or
pans are fitted onto the runners by pulling the required pair of supports fully out, locating the
shelf or pan against the vertical stop at the rear of each runner before lowering the pan or
shelf into position. The runners must always be pushed fully into the oven before closing the
door.
Easi-glide shelf runners can not be used with the supplied Cookclean liners in position.
An 'Easi-glide' telscopic shelf runner kit can be obtained from the Belling Spares department
tel. 01709 579907, quoting reference number XOU174002.
8
Installation & User's instructions
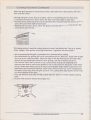
Grease Filter
During use, especially when cooking with a function which utilizes the circulating fan, the
grease filter should be fitted. This prevents airborn particles of fat being drawn into the fan
and over the fan oven element, reducing soiling of the oven and resultant smoke and odours.
Grill Pan
Use this pan directly under the shelf for grilling. Do not insert the deep frying pan into the
bottom guide, as damage to the appliance or adjacent cabinetry may occur, due to
overheating. When removing the tray from the oven, use the handle provided. Hook the handle
to the edge of the tray and pull it out, slightly lifting it as you do so. Use the handle also to
remove the wire shelves.
Enamel Drip Tray
This tray should be used for baking only. Other foods can be placed into a meat pan and then
onto a shelf, or alternatively food can be placed directly onto the wire shelf with the drip tray
positioned underneath.
Protective shield
A shield is used when grilling in the oven with the door open at temperatures over 220 ° C. It is
slotted into position below the control panel.
7
7
Meat Probe
The meat probe fits into the plug located on the upper front corner of the left hand side of the
oven. The plug is fitted with a removable protective cap, which should be re-fitted when the
meat probe is not being used.
Installation & User's instructions
9
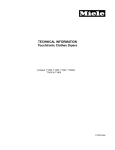
Know Your Cooker
Control Panel
Progranma Function lndimtors (4)
OlEn Set Tanpadure lndimtor (10)
Progranma Time Dispay (1)
OlEn PrEhEat lndimtor (9)
OlEn Function lndimtor (6)
OlEn Activelndmtor (ll)
Stat I Stop Pc:d (3)
Function Sea:t Pc:d (5)
Progranma Edt Peds (2)
TanpadureAdjustment Peds (7)
Progranma Function Sea:t Pc:d (8)
Olild Led< lndcdor (12)
Programmer
To Set The Time Of Day
· After connecting the cooker to the mains supply the programmer time display (1) will
show 12:00 and the 0 symbol while flashing simultaneously. Please note that only a small
amount of finger pressure is necessary to activate the pads.
Using the programmer edit pads (2), adjust the displayed time to that required.
To confirm the time is correct, touch the START/STOP pad (3). Alternatively, the timer display
will stop flashing after 5 seconds, and the 0 symbol will go out.
If the timer requires resetting at any time, touch the programmer function select pad (8)
repeatedly, until the 0 symbol and the time display flash, and repeat the procedure outlined
above.
The oven controller features a short back-up power supply, so in the event of a power cut
lasting less than 1 minute, the timer will not require resetting.
10
Installation & User's instructions
Automatic Cooking
The oven programmer offers you the following features:
1. Time of Day
2. Minute Minder
3. Automatic Cooking with cook and delay cooking functions.
We recommend following the guidelines below, to ensure the best performance from you oven
when using automatic cooking programs,
1.
2.
3.
4.
5.
6.
7.
8.
9.
10.
11.
12.
Select foods which will take the same time to cook and require approximately the same
temperature.
Set the oven programmer so that the food has just finished or about to finish cooking on
your return to the oven. This will ensure the food has not cooled down and does not
require reheating before serving.
Food should be as cold as possible when it goes into the oven, ideally straight from the
refrigerator. Frozen meat and poultry should be thawed thoroughly before it is put in
the oven.
We advise that warm food should never be placed in the oven if there is to be a delay
period. Stews prepared by frying the meat and vegetables should be cooked as soon as
possible.
We advise dishes containing left-over cooked poultry or meat, for example
Shepherds Pie, should not be cooked automatically if there is to be a delay period.
Stews and joints should be cooked by the long slow method, so that the delay period is
kept to a minimum.
On warm days, to prevent harmful bacterial growth in certain foods (i.e. poultry, joints,
etc) the delayed start should be kept to a minimum.
Wine or beer may ferment and cream may curdle during the delay period, so it is best
to add these ingredients just before serving.
Foods which discolour should be protected by coating in fat or tossing in water to which
lemon juice has been added, prior to placing food in the oven.
Dishes containing liquid should not be filled too full to prevent boiling over.
Foods should be well sealed (but not airtight) in a container to prevent the loss of liquid
during cooking. Aluminium foil gives a good seal.
Ensure food is cooked thoroughly before serving.
Installation & User's instructions
11
Minute minder (from 0 hours 01 minute to 0 hours 99 minutes)
symbol will appear and
Touch the programmer function select pad (8) once. The
00:00 will flash. Adjust the minute minder duration using the programmer edit pads (2),
until the desired period is set. The minute minder will start counting down 5 seconds
after the last adjustment is made to the duration. At the end of the set time the
symbol will disappear from the display and the buzzer will sound and continue for 7 minutes or
until any pad is touched.
0
0
The minute minder duration can be recalled for checking or adjustment at any point by
touching the programmer function select pad (8). The duration can be cancelled by recalling
the duration as above and touching both the programmer edit pads(+ and-) (2) for 5 seconds.
The display will show 00:00.
To set timer to switch OFF automatically (with cooking duration from 0 hour 01 minute to 06
hours 00 minutes)
Select cooking function and temperature. Set the cooking duration by touching programmer
function select pads (8) once. The symbol and 00:011-~U flash simultaneously. Set the length
of cooking time with the programmer edit pads (+and-) (2). At the end of the cook duration
the oven will switch off, the 1~1 symbol will disappear from the display and the buzzer will
sound and continue for 7 minutes or until any pad is touched once.
The cooking duration can be recalled for adjustment at any time during use, by touching the
programmer function select pad (8). The duration can be cancelled by recalling the duration as
above and touching both the programmer edit pads (+and -) (2) for 5 seconds. The display will
show 00:00.
To set timer to switch ON and OFF automatically (with the start of cooking time delayed from 0
hours 01 minutes to 10 hours 00 minutes)
Select cooking function and temperature. First programme the desired cooking duration, by
following the procedure described above.
Set the cooking stop time by touching programmer function select pads (8) twice. The
-+1 symbol will flash, accompanied by the display showing the time of day, with the cooking
duration automatically added on. The stop time is set using the programmer edit pads (+) (2),
until the desired time is reached. The program will resume 5 seconds after the last adjustment
is made to the programmer.
symbol will reappear on the display again when cooking in the oven starts. At
The -+I
the end of the cooking time the oven will switch off, the -+1 symbol will disappear from the
display, and the buzzer will sound and continue for 7 minutes or until any pad is touched.
Child Lock
Your Touchtronic oven features a safety lock facility, which is used to block the operation
of the control panel touch pads. It can be used both during cooking and when the oven is off. If
the lock facility is used whilst the oven is operating, the oven can be stopped and re-started at
any time by touching the START I STOP pad (3).
To operate the lock, touch and hold the programmer function select pad (8) and
programmer edit pad(-) (2) simultaneously for 5 seconds. The oven will beep to indicate
that it is locked, and the~ symbol will light. To unlock the appliance, the procedure is
repeated.
12
Installation & User's instructions
Oven Functions
Selecting the Oven Function
Your Touchtronic oven features 10 functions, each suitable for different kids of food and food
preparation.
Cooking function is selected by touching the function select pad (5) repeatedly until the
desired function is set. The function order is as follows,
D
1.
Light Only
2.
Fan Oven plus bottom heat
3.
Fan Oven
4.
Conventional Oven
5.
Fan Grill
6.
Grill
7.
Bottom Heat plus fan assist
8.
Bottom Heat only
9.
Top Heat
10.
Fan Defrost
~
~
D
~
D
~
D
D
~
Each cooking function (excludes light only and fan defrost) features a preset temperature
which automatically appears when the function is selected. This can be adjusted using the
temperature adjustment pads (+ and -) (7).
Once the desired cooking mode and temperature (if required) have been set, the oven is
started by touching the START/STOP pad (3). It is stopped by touching the same pad.
WARNING:- DURING USE THE APPLIANCE BECOMES HOT. CARE SHOULD BE TAKEN TO AVOID
TOUCHING HEATING ELEMENTS INSIDE THE OVEN.
If automatic cooking is required, this must be programmed before the START /STOP pad is
touched.
Preheat Thermometer
The control panel features a thermometer symbol (4), which allows the user to monitor the
oven during its preheat period. The two portions of the symbol progressively illuminate as the
oven heats up, before going out indicating that the oven has preheated to the set temperature.
The symbol will continue to illuminate and go out as the oven elements cycle.
Installation & User's instructions
13
Cooking Functions
Fan Oven
The oven is heated by an element at the rear of the oven. Air is drawn into the hole in the
center of the ovens rear panel by a circulating fan, before being forced over the radial fan
element and back into the oven cavity.
This heating system is useful for baking biscuits, cakes, many small pieces of meat,
the
accelerated thawing of frozen foods and preserving/drying fruits and
vegetables.
• The oven heats up quickly but preheating is usually required. Please refer to the table
provided. Food can be cooked simultaneously on one or two levels.
• If you need to put food in a preheated oven, please wait until the thermometer symbol
(4) goes off before putting food in the oven.
• Feel free to use your own cake tins and other smaller tins.
• As you can insert two or even three trays in the oven simultaneously (when baking
biscuits for example), this additional economy saving feature saves on further time and
money.
• Baking temperatures are lower, therefore the loss of nutrition value of the food is
reduced, as is also energy consumption.
Conventional Oven (Top and Bottom elements)
The oven is heated by elements at the top of the oven and underneath the floor of the
oven.
This heating mode can be used for preparing various foods: meat, bread, cakes, pies or
even preparing whole meals.
D
• With this heating system you can only use one level at a time.
• If you need to put food in a preheated oven, please wait until the thermometer symbol
(4) goes off before putting food in the oven.
• Feel free to use your own cake tins and smaller tins other than the ones included
• When roasting meat please remember that larger and thicker pieces of meat should be
roasted on the lower shelf position at a lower temperature, and smaller thinner pieces
can be cooked on the middle shelf position at a higher temperature setting.
• Some 5-10 minutes before the food has completed cooking, switch the oven OFF. This will
save on energy.
• After roasting is finished and before cutting the meat; wait for 5-10 minutes; this allows
the meat juices to settle inside the meat.
• You can cook frozen meat without thawing it first, just bear in mind that the roasting
time will be longer, depending on the size of the meat joint.
/
14
Installation & User's instructions
Cooking Functions Continued
When the grill operates at temperatures lower than 220°( (from 150 to 220°(} the oven
door must be closed.
• Although the grill can be used up to 250°(, 220°( is usually adequate for most foods.
• At operating temperatures above 220°( the door must remain open or half open.
• The front panel shield should be inserted between the front panel and the oven in order to
protect the panel from high temperatures.
• If grilling with the door closed, allow the grill to cool with the door dosed to protect the
control panel and controls.
·
This heating system is used for cooking pieces of meat, not thicker than 3 em (e.g. steaks,
chops, sausages, fish) and for browning sandwiches, vegetables and sweet dishes.
• We recommend that the grill is preheated for 5 minutes before cooking.
• Use meat suitable for grilling and cut it into uniform pieces. Add spices, brush with oil and
place on the pre-oiled wire shelf. Place the shelf in the top shelf position and insert the
enamel drip tray underneath the grill. After grilling, add salt if desired, and serve.
• The choice of which shelf position to use, temperature setting and the grilling time
depends on the kind of meat being grilled as well as the thickness and quality of the meat
pieces. Smaller and thinner pieces of meat can be grilled using a higher temperature and
positioned closer to the grill element. With larger thicker pieces use a lower temperature
and place further away from the grill element. The cooking time also depends on how well
you want your food to be done.
• Turn the food over once after -having cooked them for about 2/3 of the required cooking
time.
• Frozen meat should be thawed thoroughly first.
/
Installation & User's instructions
15
Cooking Functions Continued
Fan Grilling
[71
~
This function uses the grill and fan. A uniform air circulation is created which makes this
system perfect for roasting larger joints of meat (1 kg or more). It gives similar results to
cooking on a rotisserie.
I.
Preheating is not necessary.
II.
Place the meat (oiled and salted) on a pre-oiled wire shelf. Place the shelf on
level 2 and insert the enamel drip tray underneath at level 1.
• You can roast more joints at the same time but only on one level.
• When roasting, remember that you do need to turn the meat over in the middle of
cooking.
• After the roasting is finished let the meat sit for 10 minutes before cutting it.
Fan Oven with Bottom heat
Using the bottom elements with the fan oven element and fan is particularly useful for
pizzas, cheese souffle and potatoes au gratin.
Bottom Heat with Fan
Using the bottom heating element and fan is particularly useful for baking moulded cakes with
raisins, brioches, for warming ready-made dishes and dishes requiring intensive browning
on the bottom.
Use only small-size baking dishes and cake tins with the rims not higher than the
cake. Higher rims prevent cakes from browning on the top.
16
Installation & User's instructions
Cooking Functions Continued
Fan Defrost
When the fan only is in operation, air is circulated evenly throughout the entire oven and
is useful for defrosting frozen dishes that need to be thawed at room temperature, and
will be consumed unheated (cream, custard pastry, tarts, fruit etc.)
D
Bottom Heat only
Using the bottom heating element is useful for warming plates and for cleaning the oven.
A simple wet cleaning procedure is possible with no cleaning agents necessary. Pour 0.4 l
of water into a deep baking dish and insert it into the lower guides. Set the temperature to
sooc and leave for 30 minutes to allow the steam to soften the soiled surfaces. Wipe with
a moist cloth or sponge.
Caution the oven will be hot immediately after use.
==
==
/
Installation & User's instructions
17
Meat Probe
This can be used with any heating function (excludes light only and fan defrost), and
determines the cooking period for meat based on the core temperature of the joint. The core
temperature required is preset, but can be adjusted by the user to suit the type of meat being
cooked. Recommended core temperatures are as follows,
Pork
Lamb
Poultry
Ham
Beef
Rare
Medium
Well done
85°C
75°C
90°C
75°C
60°C
70°C
75°C
The meat probe is most suitable for joints without bones, as these can effect temperature
distribution within the meat, and as a result can lead to uneven cooking. Whole chickens or
rabbits are not suitable for this function.
Connection of the probe
The meat probe fits into the socket located on the upper front corner of the left hand side of
the oven. The socket is factory fitted with a removable protective cap, which should be refitted when the meat probe is not being used, to prevent damage to the contacts in the socket.
Programming the probe
Connect the probe as described above and push the meat probe 'skewer' into the joint of
meat to be cooked. Position the probe so that the tip of its 'skewer' is as close to the
center of the meat as possible, whilst ensuring that no part of it can come into contact
with the oven elements. Thel\symbol will appear on the control panel
Select the desired cooking function using the function select pad (5), and set the required
cooking temperature using the temperature adjustment pads(+ and-) (7).
The programmer display shows 2 temperatures, the one to the left being the actual core
temperature of the joint, the one to the right showing the user defined core temperature. This
can be adjusted using the programmer edit pads (+and -) (2), between 30°C and 99°(.
Switch the oven on by touching the START/STOP pad (3). As the joint cooks, the programmer
display will update to reflect the rising core temperature within the meat.
When the core set temperature is achieved, the oven will switch off and its buzzer will sound,
to indicate to the user that cooking is complete. The buzzer may be cancelled by touching any
pad.
After cooking, remove the probe 'skewer' from the meat, and unplug the other end. Re-fit the
protective cap to the socket.
CAUTION- The oven and its accessories may still be hot when removing the probe
18
lnstaliation & User's instructions
Cookery Notes
Temperature and Time
When two shelves are used to cook large quantities of food for home freezing or parties, it may
be necessary to increase the cooking times given in the charts on page 19 by a few minutes, to
allow for the loss of heat due to the extra time taken to load the oven, and the larger mass of
food. Baking trays should allow an equal gap on all sides of the oven.
To prepare Meat and Poultry for Roasting in your Fan Oven
(a) Wipe the meat or poultry, dry well and weigh it. Meat which has for been stored in a
refrigerator should be allowed to come to room temperature before cooking, and frozen meat
or poultry must be completely defrosted before placing in the oven.
(b) The weight of any stuffing used should be added before calculating the cooking time.
(c) Place meat/poultry in the main oven meat pan supplied with your cooker. Small joints
weighing less than 1. 75kg (31 /2 lbs) should be roasted in a smaller meat pan/tin - or they may
be 'pot roasted' - a small joint or a large meat pan causes unnecessary oven splashing and
evaporation of meat juices.
(d) Additional fat should not be added, except for veal, very lean meat or poultry which can
either be 'larded' with fat bacon or brushed very sparingly with cooking oil or melted fat.
(e) Beef, lamb, mutton and poultry may be dusted lightly with seasoned flour to give a crisp
outer surface. The skin of duck and goose should be pricked to release excess fat during
cooking, and the rind of pork should be scored, brushed lightly with oil, and rubbed with salt to
give crisp crackling.
(f) Meat and poultry wrapped in, or covered with a tent of aluminium foil will be juicy and
tender. Roasting bags offer the same advantages. Always follow the manufacturer's pack
instructions, and remember to reduce the temperatures given for conventional ovens by
approximately 25 ° C and the time by approximately 10 minutes per hour.
(g) Potatoes for roasting only require to be brushed with cooking oil or melted fat.
(h) It is not necessary to baste when roasting in an electric oven and stock or liquid should not
be added to the meat pan since this only causes unnecessary soiling, steam and condensation.
Frozen Meat and Poultry
Joints of meat and whole birds should be defrosted slowly, preferably in a domestic
refrigerator (allowing 5-6 hours per 450g, 1 lb), or at room temperature (allowiog 2-3 hours per
450g, 1 lb ).
Frozen meat or poultry must be completely defrosted before placing in the oven. It is essential
to wash thoroughly and cook meat and poultry immediately after defrosting.
Installation & User's instructions
19
Fan Oven Cooking Guide
The charts on the following pages serve as a guide for positioning and temperature for
cooking in
the fan oven. Always preheat the oven until thermometer symbol goes out, unless otherwise
stated.
MEAT
Beef I Lamb
(slow roasting)
Beef I Lamb
(foil covered)
Pork
(slow roasting)
Pork
(foil covered)
Veal
(slow roasting)
Veal
(foil covered)
Poultry I Game
(slow roasting)
Poultry I Game
(foil covered)
Casserole Cooking
BAKING
Scones
Small Cakes
Victoria Sandwich
Sponge Sandwich
(fatless)
Swiss Roll
Semi-rich fruit
cakes
Rich Fruit Cakes
Shortcrust Pastry
Puff Pastry
Yorkshire Pudding
Individual Yorkshire
Puddings
Milk Pudding
Baked Custard
Meringues
Preheat
Temperature
(OC)
No
170 I 180
No
190 I 200
No
170 I 180
No
190 I 200
No
170 I 180
No
190 I 200
No
170 I 180
No
No
Preheat
Time (approximate)
35 mins per 450g (1 lb)
+ 35 mins over
35-40 mins per 450g (1 lb)
40 mins per 450g (1 lb)
+ 40 mins over
40 mins per 450g (1 lb)
Position in Oven
(from base)
1 or 2
1 or 2
1 or 2
1 or 2
40-45 mins per 450g (1 lb)
+ 40 mins over
40-45 mins per 450g (1 lb)
1 or 2
1 or 2
190 I 200
25-30 mins per 450g (1 lb)
+ 25 mins over
25-30 mins per 450g (1 lb)
1 or 2
150
2- 2Yz hrs
1 or 2
Temperature ( 0C)
Time (approximate) in
mins
1 or 2
Position in
Oven (from
base)
1 and 3
1 and 3
2 and 3
1
Yes
Yes
Yes
Yes
200
160
160
170
Yes
Yes
200 I 210
150 I 160
10 - 15
60 - 75 (7" tin)
1
2
No
Yes
Yes
Yes
Yes
130
200
200
190
200
I
I
I
I
I
Time dependant on size
Time dependant on recipe
Time dependant on recipe
30 - 40
20- 30
2
2
1
1 and 2
1 and 2
Yes
Yes
Yes
130 I 140
140 I 150
100
90- 120
40- 50
150 - 180
1
1
1
I
I
I
I
220
180
170
180
140
210
210
200
210
10 15 2520-
15
20
30
25
Note: If soft tub margarine is used for cake making, we would recommend using the all in one method
and to reduce the temperature by 10 ° C. Temperatures recommended in this chart refer to cakes
made with block margarine or butter only.
20
Installation & User's instructions
Conventional Oven Cooking Guide
D
The charts on the following pages serve as a guide for positioning and temperature for
cooking in the conventional oven. Always preheat the oven until thermometer symbol goes
out, unless otherwise stated.
MEAT
Beef I Lamb
(slow roasting)
Beef I Lamb
(foil covered)
Pork
(slow roasting)
Pork
(foil covered)
Veal
(slow roasting)
Veal
(foil covered)
Poultry I Game
(slow roasting)
Poultry I Game
(foil covered)
Casserole Cooking
BAKING
Scones
Small Cakes
Victoria Sandwich
Sponge Sandwich
(fatless)
Swiss Roll
Semi-rich fruit
cakes
Rich Fruit Cakes
Shortcrust Pastry
Puff Pastry
Yorkshire Pudding
Individual Yorkshire
Puddings
Milk Pudding
Baked Custard
Meringues
Preheat
No
170 I 190
No
190 I 210
No
170 I 190
No
190 I 210
No
170 I 190
No
190 I 210
No
170 I 190
No
No
Preheat
Time (approximate)
Temperature
(OC)
35 mins per 450g (1 lb)
+ 35 mins over
35-40 mins per 450g (1 lb)
Position in Oven
(from base)
2
2
40 mins per 450g (1 lb)
+ 40 mins over
40 mins per 450g (1 lb)
2
2
40-45 mins per 450g (1 lb)
+ 40 mins over
40-45 mins per 450g (1 lb)
2
2
2
190 I 210
25-30 mins per 450g (1 lb)
+ 25 mins over
25-30 mins per 450g (1 lb)
150
2 - 2Yz hrs
2
Temperature (0C)
I
I
I
I
225
190
180
190
Time (approximate) in
mins
10 202520-
15
25
30
25
Yes
Yes
Yes
Yes
210
170
170
180
Yes
Yes
200 I 210
160 I 170
10 - 15
60 - 75 (7" tin)
Yes
Yes
Yes
Yes
Yes
140 I 160
2151225
200 I 210
195 I 215
200 I 215
Time dependant on size
Time dependant on recipe
Time dependant on recipe
30-40
20- 30
Yes
Yes
Yes
140 I 150
14050 I 160
100
90- 120
40- 50
150 - 180
2
Position in
Oven (from
.base)
2
2
2
2
2
2
-
2
2
2
2
2
2
2
2
Note: If soft tub margarine is used for cake making, we would recommend using the all in one method
and to reduce the temperature by 10° C. Temperatures recommended in this chart refer to cakes
made with block margarine or butter only.
Installation & User's instructions
21
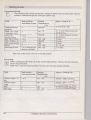
Grilling Guide
Conventional Grilling
19
L_j
The cooking chart below serves as a guide as to how various food types may be
cooked. Preheat the grill for 5minutes before use,
Food
Shelf position
from base of oven
Grilling
Temperature
Approx. Cooking Time
("C)
Toasting of bread
products
Small cuts of meat
- Sausages, bacon
Chops, etc.
Gammon Steaks
Fish. Whole, Fillets
Fish in breadcrumbs
Pre-cooked potatoe
Pizzas
Browning of food
3
200-220
45 seconds per side
3
180-200
2 or 3
180-200
2 or 3
2 or 3
3
3
2 or 3 (dish placed
directly on shelf)
180- 200
180-190
200
170 - 180
200- 220
10 - 30 mins (Depends on size
and thickness)
10 - 30 mins (Depends on size
and thickness)
15 mins
15 mins
30 mins
10- 12 mins
5-7 mins
After use, always return controls to the off position
Fan Grilling
Before cooking place the drip tray in the lowest shelf position. Position the meat centrally
~ below the grill element
Cook from a cold start ensuring meat is turned over half way through cooking.
ff1
Food
Shelf position
from base of oven
Cooking
Temperature
Approx. Cooking Time
("C)
Chicken weight 1.52kg
Chicken weight
1.0kg
Beef
Pork (leg)
22
1 or 2
130 - 150
25mins I 450g +25-30mins
'
2
160 - 170
20mins I 450g +20-25mins
2
2
150
140 - 160
20-25minsl450g +20-25mins
40-45minsl 450g+40-50mins
Installation & User's instructions
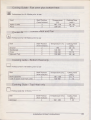
Cooking Guide - Fan oven plus bottom heat
I@ I
Preheat oven for 10-15mins prior to use
Food
Shelf Position
(from bottom)
Temperature
2
160 - 170
200-210
r--Apple Crumble
Pizza
'--
oc
2
Cooking Time
(min.)
30- 60
10-15
Cooking Guide - Bottom Heat and Fan
l.h I
Preheat oven for 10-15mins prior to use
Dish
Brioche
Shortbread
Pizza
Bakewell Tart
Shelf Position
(from bottom)
2
2
2
2
Temperature (0 C)
195
140-160
190-210
190-200
Cooking Time
(min.)
20- 25
30
10- 15
30- 40
Cooking Guide - Bottom Heat only
I I Preheat oven for 10-15mins prior to use
Dish
Beef Casserole
Cook-in sauce (Cook from .cold)
'--f-
Shelf Position
(from bottom)
2
2
Temperature (0 C)
Cooking Time
(Hrs.)
130 - 150
130-150
2111 - 4
1 - 1~
Temperature (0 C)
Cooking Time
(mins.)
5- 30
Cooking Guide -Top Heat only
I I.Preheat oven for 10-15mins prior to use
Dish
Merinque
'--
Shelf Position
(from bottom)
2
160- 200
Installation & User's instructions
23
Cleaning And Maintenance
Replacement of Oven Lamp
WARNING: TURN OFF THE COOKER ELECTRICITY SUPPLY BEFORE REPLACING LAMP.
Open the oven door and remove the rod shelves. Using a thick cloth, grip the light glass lens,
unscrew anti -clock-wise and lift out. Reach into the aperture, and carefully unscrew the faulty
lamp anti-clockwise. Fit replacement lamp (E 14, 220-230 V 25W 300°C SES), and refit lens,
after cleaning with warm soapy, if necessary.
PLEASE NOTE: As a consumable item, the oven lamp is not covered by the warranty, please
contact Belling After Sakes Division on 01709 579902 for a replacement.
Oven Interior
Use a fine steel wool soap pad to remove stubborn stains from the rod shelves, trays and the
floor of the oven. Refer to the instruction supplied for cleaning the 'Cookclean' panels.
Do not use aerosol cleaners on this oven as they could adversely affect the fan motor unit, and
cannot be wiped off the fan blade.
Oven Exterior
All the parts of the cooker exterior (Handle, side trims, door glass) must be cleaned frequently
with a mild detergent and a little water and then dried with a soft cloth.
Do not wash the parts if they are still hot and never use abrasive powders, pads or corrosive
spray products.
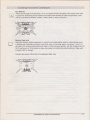
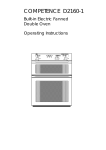
Removing and Reinserting the Oven Door
Open the door completely and press back the hooking clamp (Fig.1 ). By slowly opening the
door (about 15 ° ) let the clamps lean in their seat. When the door is opened about 15 ° , slightly
lift it up and pull it out of the seats (Fig.2).
Reinsert the door using the reverse order. Lean the door about 15 ° and insert it into the hinge
seats by pushing it forward and down, so that the hinges snap into the correct position (Fig.3).
Open the door entirely and push the clamps into their original, horizontal position. Close the
door slowly and monitor how it closes (Fig.4). Should anything be wrong, check that the hinges
are correctly inserted into the hinge seats.
fig. 1
24
fig. 2
fig. 3
Installation & User's instructions
fig . 4
Is There Something Wrong With Your Cooker?
Fault finding guide
Before contacting your Belling service Centre I Installer, check the
problem guide below: there may be nothing wrong with your cooker
Problem
Nothing works
Check
Is the main cooker wall switch turned on?.
Is the timer display blank?.
If the timer is not working it is likely that there is no electricity supply
to your cooker.
The electricity supply to the cooker has been interrupted for more
than 1 minute. The timer must be reset.
Touch any pad to cancel.
This is normal during use, as the grill maintains temperature.
Timer flashing
Timer bleeping
Grill keeps turning on and
off.
Oven lamp does not work.
The oven lamp is not covered by the guarantee. The part is easily
changed - see the section on Oven Lamp Replacement. A new lamp
may be obtained from our spares department by calling :- 01709
579907
Are cooking results not satisfactory?
Problem
Grilling
Uneven Cooking front
back
Baking - General
Uneven rising of cakes
Sinking of cakes
Over I Under cooking
Fast/Slow cooking
Check
to
Ensure that the grill is positioned centrally below the grill element
Ensure that the oven shelves are level by using a spirit level on the
rod shelf and adjusting the wheels/feet. The oven should be checked
both left to right and front to back.
The following may cause cakes to sink:
1. Preheating of fan ovens.
2. Cooking at to high a temperature.
3. Using normal creaming method with soft margarine. (Use the allin-one method)
Refer to the cooking times and temperatures . given in the charts
provided, however, it may be necessary to increase or decrease
temperatures by 10°C to suit personal tastes. Do not use oven/meat
tins greater than 56mm (21/4 ") in height.
Installation & User's instructions
25
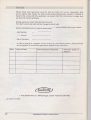
Service
Please check your guarantee card for who to contact for service. Remember that
service agents may charge for visits (even during the guarantee period) if nothing is
found to be wrong with the appliance, so always check the instructions to make sure
you have not missed anything.
Belling Appliances After Sales Division (Service)
Tel: 08457 454540 (all calls will be charged at local rate)
Before contacting a service agent, please note the following details about your cooker:
Model Number
Serial Number
Date of Purchase
In order to provide a complete service history for your Belling product, please ask the
service engineer to record the appropriate details in the chart below.
Date
Nature of fault
Parts Replaced or Repaired
Authorised Stamp or
Signature
<§elling)
Belling Appliances Ltd., Mexborough, South Yorkshire S64 8AJ
XOU174001 01/10/01
26
Installation & User's instructions
EVP655-18T
(012)650443/en