1
User’s Manual
ClassMaster™ Notebook
Dear Parent,
At VTech®, we know that kids have a lot to juggle these days - busy school schedules, sports, extracurricular activities, and of course, homework. That’s why we
created the XL Series™ — an innovative line of portable learning companions
designed to fit the always on-the-go lifestyle of your school-aged child.
The XL Series™ is a powerful system of learning tools that helps give your child
the much-needed competitive edge in school through fun, age appropriate activities
— and helps them learn essential skills. Created with portability in mind, XL products have a sleek, compact design in both handheld and notebook formats that
allow kids to bring the learning fun anywhere, anytime. Plus, all the XL Series™
products are easily connectable to a PC and the Internet. Using the vPort accessory, kids can wirelessly access reference tools or download new educational activity sets for their XL Series™ products.
At VTech®, we are committed to creating fun learning toys that foster a child’s
intellectual and social development. We thank you for trusting VTech® with the
important job of helping your child succeed in school!
Sincerely,
Your Friends at VTech®
To learn more about XL Series™ and other VTech® toys, visit www.vtechkids.com
ClassMaster™ Notebook
Thank you for purchasing the VTech® ClassMaster™ Notebook learning toy. The
ClassMaster™ Notebook is a sleek, computer-connected learning device in a
compact design that provides kids age 9+ with a competitive edge in the classroom. ClassMaster features powerful school tools as well as fun game-style activities where children can practise key skills such as grammar, reading comprehension and advanced math. ClassMaster also allows kids to research information,
access the web, and practise important writing and communication skills. Children
can express themselves with tools such as a dynamic word processor, dictionary
and a thesaurus.
Get connected to school success. Excel with the XL Series™!
We at VTech® are committed to providing the best possible products to entertain and
educate your child. Should you have any questions or concerns, please call our Consumer Services Department at 1-800-521-2010 in the US, 1-800-267-7377 in Canada,
or (01235) 546810 in the UK.
Contents
INTRODUCTION .......................................................... 1
PREPARATION ............................................................ 2
GETTING STARTED ......................................................................
CONNECTING THE MOUSE .............................................................
CONNECTING A PRINTER ..............................................................
POWER SOURCE.........................................................................
BATTERY INSTALLATION ...............................................................
STANDARD FOR BATTERY TOYS ......................................................
AC ADAPTOR .............................................................................
2
2
2
2
3
3
4
USING THE AC ADAPTOR ............................................................................................. 4
STANDARD FOR TRANSFORMER TOYS ....................................................................... 4
NOTICE TO PARENT ...................................................................................................... 4
BACKUP BATTERY INSTALLATION .................................................... 5
AUTOMATIC SHUT-OFF ................................................................. 5
IF YOUR ClassMaster™ Notebook STOPS WORKING OR DOESN’T TURN ON . 5
RESETTING YOUR ClassMaster™ Notebook ........................................ 5
RECONFIGURING YOUR ClassMaster™ Notebook ..................................5
MOUSE .................................................................... 6
CONNECTING THE MOUSE ........................................................................................... 6
USING THE MOUSE ...................................................................................................... 6
CLEANING THE MOUSE ................................................................................................ 6
PLAYER GUIDE ........................................................... 7
SPECIAL ICONS .......................................................................... 7
CONTRAST/VOLUME CONTROL BUTTON ............................................ 7
GENERAL BUTTONS ..................................................................... 7
Power Button ................................................................................................................ 7
Main Menu Button ........................................................................................................ 7
Creation Station Button ................................................................................................. 7
Print Screen Button ....................................................................................................... 7
Sync Button .................................................................................................................. 7
IR Button ....................................................................................................................... 7
41
I
KEYBOARD & CURSOR PAD............................................ 8
BASIC OPERATION ....................................................... 9
MOVING THE CURSOR FROM ONE FIELD TO ANOTHER ........................... 9
CONFIRMING A SELECTION OR COMMAND ..........................................9
SELECTING A FOLDER ...................................................................9
SELECTING OPTIONS FROM A PULL-DOWN MENU ................................ 9
LAUNCH THE ACTION MENU ............................................................9
INTRODUCTION TO COMMON COMMANDS ........................ 10
CREATING A NEW DOCUMENT ....................................................... 10
EDITING A DOCUMENT ................................................................ 10
DELETING DOCUMENT(S) ............................................................. 10
COPYING/CUTTING AND PASTING TEXT ............................................ 11
SORTING RECORDS OR FILES ........................................................ 11
SEARCHING FOR RECORDS OR FILES .............................................. 11
PRINTING A RECORD OR FILE ........................................................ 11
SAVING A DOCUMENT ................................................................. 11
MANAGING YOUR PROGRAMS ....................................... 12
OPEN A PROGRAM ..................................................................... 12
DELETE A PROGRAM .................................................................. 12
DESCRIPTION OF PROGRAMS ........................................ 12
SCHOOL TOOLS......................................................................... 12
DICTIONARY ............................................................................................................... 12
NETLINK ENCYCLOPEDIA ........................................................................................... 12
PERIODIC CHART ....................................................................................................... 12
SIMPLE CALCULATOR ................................................................................................ 13
SCIENTIFIC CALCULATOR .......................................................................................... 14
ADVANCED WORD PROCESSOR ................................................................................ 15
LANGUAGE LAB .......................................................................................................... 16
UNIT CONVERTER ...................................................................................................... 16
TYPING CHALLENGE .................................................................................................. 17
CLASS SCHEDULE ...................................................................................................... 17
GRAMMAR CORRECTION ........................................................................................... 17
READING COMPREHENSION ...................................................................................... 17
GEOMETRY ................................................................................................................. 18
42
II
PRE-ALGEBRA ............................................................................................................ 18
ENTERTAINMENT ....................................................................... 18
SOLITAIRE .................................................................................................................. 18
DOMINO CRISIS ......................................................................................................... 19
FENCES ....................................................................................................................... 19
BALLOON BLOW OUT ................................................................................................. 19
BRIXX ......................................................................................................................... 20
CATCH IT! ................................................................................................................... 20
SOCCER ...................................................................................................................... 20
REVERSI ..................................................................................................................... 21
3D TIC TAC TOE .......................................................................................................... 21
PEGGED ...................................................................................................................... 21
PUZZLER .................................................................................................................... 22
MUSIC PLAYER ........................................................................................................... 22
TRIVIA ........................................................................................................................ 23
BIO-TRIVIA ................................................................................................................. 23
TECH-TRIVIA .............................................................................................................. 23
MY WORLD .............................................................................. 24
ADDRESS BOOK ......................................................................................................... 24
PERSONAL PROFILE ................................................................................................... 24
CALENDAR .................................................................................................................. 25
MEMO PAD ................................................................................................................. 25
TO DO LIST ................................................................................................................. 26
DIARY ......................................................................................................................... 26
CREATIVITY ............................................................................. 27
CREATION STATION .................................................................................................... 27
ART WORK STUDIO .................................................................................................... 27
ANIMATION EDITOR ................................................................................................... 29
MUSIC COMPOSER .................................................................................................... 29
ACCESSORIES .......................................................................... 30
MY SETUP .................................................................................................................. 30
ON BOARD HELP ........................................................................................................ 31
FILE AND UPLOAD MANAGER .................................................................................... 32
WORLD TIME .............................................................................................................. 32
WELCOME .................................................................................................................. 32
Sync ...................................................................... 33
VTech vPort .............................................................................. 33
Add a New User Account in Desktop Software ..................................... 33
Syncing Your ClassMaster™ Notebook with Your Computer .................... 34
Adding New Activities into Your ClassMaster™ Notebook ....................... 34
43
III
Deleting Activities From Your ClassMaster™ Notebook ......................... 35
Uploading Files From Your ClassMaster™ Notebook to Your Computer ...... 35
IR .......................................................................... 36
Effective Working Position for IR Communication ................................ 37
TROUBLE SHOOTING ................................................... 38
DISCLAIMER AND LIMITATION OF LIABILITY....................... 39
TECHNICAL SUPPORT.................................................. 39
FCC NOTICE ............................................................. 40
COPYRIGHT NOTICES .................................................. 40
44
IV
INTRODUCTION
Thank you for buying the VTech® ClassMaster™ Notebook learning aid! We at VTech®
are committed to providing the best possible products to entertain and educate your child.
Should you have any questions or concerns, please call our Consumer Services
Department at 1-800-521-2010 in the U.S. or 1-800-267-7377 in Canada.
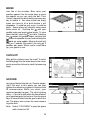
ClassMaster™ Notebook is one of the VTech® XL Series™ products. It is an electronic
learning aid that challenges young minds with 47 activities ranging from word, math and
logic games, to school tools like Unit Converter.
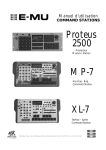
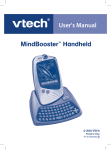
Front
Device Lock
Caps Lock
Indicator
ClassMaster™ Notebook
LCD Screen
Insert
Indicator
Volume
Control
Power
Indicator
Contrast
Control
Main Menu
Creation Station
Print Screen Button
Power Button
Main
Menu
Creation
Station
Sync
Print
Screen
Sync
IR Button
IR
Adapter
Port
@
#
$
%
^
&
2
3
4
5
6
7
E
W
Q
Tab
R
~
Symbol
X
Z
Shift
C
V
N
B
+
=
O
K
M
L
<
>
,
.
Action
Alt
Left Button
Delete
:
=
;
Enter
ESE
Reset
Page
?
/
Up
Shift
Home
Insert
Backspace
}
]
{
[
P
+
x
J
H
G
0
I
U
÷
+/
C
F
D
S
(
9
T
Keyboard
A
Y
T
CE
Caps Lock
*
8
R
!
1
(
Esc
Page
Down
End
Help
Right Button
Cursor Pad
1
Back
Mouse Port
Printer Port
irPort
PREPARATION
GETTING STARTED
Please remove tab from the backup battery cover located on the back of
ClassMaster™ Notebook before playing, otherwise the saved information might be
lost.
CONNECTING THE MOUSE
•
Make sure the unit is off.
•
Locate the mouse port on the back of the unit and plug the mouse into it.
CONNECTING A PRINTER
•
Make sure both your unit and the printer are off.
•
Only the VTech® VT-41 is compatible with your unit.
•
Locate the printer port on the back of the unit and plug the printer cable into it
•
Turn the unit on, then turn the printer on
POWER SOURCE
ClassMaster™ Notebook operates on 4 “AA” size batteries (UM-3 / LR6) or VTech® 9V
adaptor (sold separately).
2
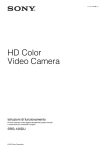
BATTERY INSTALLATION
1. Make sure the unit is OFF.
2. Open the battery cover on the bottom of the unit.
3. Insert 4 new “AA” batteries (UM-3 / LR6) as
illustrated.
DO NOT USE RECHARGEABLE BATTERIES in this
unit.
4. Close the battery cover.
NOTE: Remove all pre-installed batteries and the use
of new, alkaline batteries is recommended for
maximum performance.
STANDARD FOR BATTERY TOYS
•
Non-rechargeable batteries are not to be recharged;
•
Rechargeable batteries are to be removed from the toy before being charged;
•
Rechargeable batteries are only to be charged under adult supervision;
•
Different types of batteries or new and used batteries are not to be mixed;
•
Only batteries of the same or equivalent type as recommended are to be used;
•
Batteries are to be inserted with the correct polarity;
•
Exhausted batteries are to be removed from the toy;
•
The supply terminals are not to be short-circuited;
•
The toy is not to be connected to more than recommended number of power supplies.
NOTE: If the unit suddenly stops working or the sound becomes weak, turn the unit OFF
for 15 seconds, then turn it back ON. If the problem persists it may be caused by
weak batteries. Please install a new set of batteries and try the unit again.
3
AC ADAPTOR
Use VTech® or any standard adaptor complying with EN61558 DC 9V
AC centre-positive adaptor.
300mA
USING THE AC ADAPTOR
1. Make sure the unit is OFF.
2. Locate the adaptor jack on the left side of the unit.
3. Insert the adaptor plug into the unit’s adaptor jack.
4. Plug the adaptor into a wall outlet.
5. Turn the unit ON.
NOTE: If the unit suddenly stops working or the sound seems weak, it may be the result of
the adaptor connection. Turn the unit OFF and unplug the adaptor for 15 seconds.
Next, plug the adaptor back in and turn the unit ON. If the problem persists, it may
be the result of the adaptor’s wiring or the unit.
Do not leave the adaptor plugged in for long periods of time if the unit is not in use.
STANDARD FOR TRANSFORMER TOYS
•
The toy is not intended for children under 3 years old;
•
The toy must only be used with the recommended transformer;
•
The transformer is not a toy;
•
Toys liable to be cleaned with liquid are to be disconnected from the transformer before
cleaning;
•
The toy is not to be connected to more than recommended number of power supplies.
NOTICE TO PARENT
The transformer used with the toy is to be regularly examined for damage to the cord,
plug, enclosure and other parts, and that, in the event of such damage, the toy must not
be used with this transformer until the damage has been repaired.
4
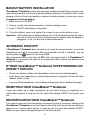
BACKUP BATTERY INSTALLATION
ClassMaster™ Notebook comes with a backup already installed. Before using the unit,
remove the protective strip from the backup battery by pulling on the plastic tab. To avoid
damage to the unit from leaky batteries, replace the backup battery at least once a year.
To replace the backup battery:
1. Make sure the unit is OFF.
2. Using a a small cross-head screwdriver, loosen the battery cover.
3. Insert 1 CR2032 size battery as illustrated.
4. Close the battery cover and tighten the screws to secure the battery cover.
Important: While replacing the backup battery, the 4 “AA” size batteries must be kept in
the unit or the unit must be connected to the 9V adaptor while the adaptor is
plugged in. If not, you will lose all saved information.
AUTOMATIC SHUT-OFF
If ClassMaster™ Notebook does not receive any input for several minutes, the unit will
automatically shut off to save power. After the automatic shut-off is activated, you will
button to turn the unit ON.
need to press the
We recommend that you turn the unit OFF when not playing with it. If ClassMaster™
Notebook is not going to be used for a long period of time, remove the batteries and
unplug the adaptor.
IF YOUR ClassMaster™ Notebook STOPS WORKING OR
DOESN’T TURN ON
•
Check your batteries. Make sure the batteries are fresh and installed properly.
•
Insert the tip of a paperclip (or a similar object without a sharp tip) into the small hole
labeled “Reset” on unit.
•
If you are still having problems, visit our website at www.vport.com for troubleshooting tips.
RESETTING YOUR ClassMaster™ Notebook
If your unit freezes up or stops responding, you can insert the tip of a paperclip (or a
similar object without a sharp tip) into the small hole labeled “RESET” and restart your
unit.
RECONFIGURING YOUR ClassMaster™ Notebook
If you want to erase all of the information and restore the unit to the factory setting on the
ClassMaster™ Notebook, press the Power button while at the same time as inserting a
paperclip (or a similar object without a sharp tip) into the small hole labeled ‘RESET’.
Make sure you release the paperclip prior to the Power button.
5
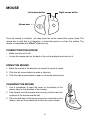
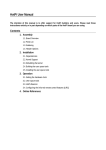
MOUSE
Left mouse button
Right mouse button
Mouse door
Once the mouse is installed, you may move the cursor around the screen freely. The
mouse has a roller ball in it; therefore, it should be used on a clean, flat surface. The
mouse is compatible with VTech® products only.
CONNECTING THE MOUSE
•
Make sure the unit is off.
•
Locate the mouse port on the back of the unit and plug the mouse into it.
USING THE MOUSE
1. Move the mouse in the direction you want the cursor to move.
2. Click the left mouse button to make a selection.
3. Click the right mouse button to open or close the action menu.
CLEANING THE MOUSE
1. Use a screwdriver to open the cover on the bottom of the
mouse (twist in the direction of the arrows).
2. Take the ball out of the mouse and use a dry cloth to clean the
contents of the mouse and the ball.
3. Place the ball back in the mouse, place the cover back on the
mouse, and use the screwdriver to twist the cover closed.
6
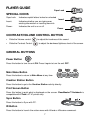
PLAYER GUIDE
Caps Lock
SPECIAL ICONS
Caps Lock:
Indicates capital letters locked or unlocked
Insert:
Indicates whether you are typing over
existing information or inserting new info
Power:
Indicates the unit is on or off
Insert
Power
CONTRAST/VOLUME CONTROL BUTTON
•
Slide the Volume control
•
Slide the Contrast Control
to adjust the loudness of the sound.
to adjust the darkness/lightness level of the screen.
GENERAL BUTTONS
Power Button
Press this button to turn the unit ON. Press it again to turn the unit OFF.
Main Menu Button
Press this button to return to Main Menu at any time.
Creation Station Button
Press this button to go to the Creation Station activity directly.
Print Screen Button
Press this button to print what is displayed on the screen. ClassMaster™ Notebook is
compatible with VTech’s VT-41 printer only.
Sync Button
Press this button to Sync with PC.
IR Button
Press this button to launch the action menu with IrSend or IrReceive command.
7
KEYBOARD & CURSOR PAD
Here are some special function keys:
Esc
Press to exit the current activity
Tab
Press to move the blinking cursor forward
Caps Lock
Press to type in capital letters, press again to type in lower
case letters
Shift
Hold the Shift key down to type letters in upper case
Symbol
Press to display the Symbol screen
Insert
Toggle between Insert mode (add new info) and Overwriting
mode (typing over existing info)
Alt
Press together with other keys to access a special function
Space
Press to insert a space between words or letters
Action
Press to open the Action menu
Backspace
Press to delete any character to the left of the cursor
Delete
Press to delete selected files, symbols, words or phrases
Enter
Press to confirm your selection
Help
Press to see the help information available for the current
program
Arrow Keys
Use these four keys to move the cursor up, down, left and right
Cursor Pad
Use the Cursor Pad a lot like your mouse. To move the pointer
around the screen, put your finger on the pad and move it
around. The buttons on the Cursor Pad sides have the same
functions as the buttons on the mouse — to view options and
make selections.
8
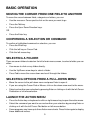
BASIC OPERATION
MOVING THE CURSOR FROM ONE FIELD TO ANOTHER
To move the cursor between fields, categories or folders, you can:
• Use the mouse or Cursor pad to click on the area you want to go
•
Press the Tab key.
•
Press the Up or Down Direction keys.
OR
•
Press the Enter key.
CONFIRMING A SELECTION OR COMMAND
To confirm a highlighted command or selection, you can:
• Press the Enter key.
•
Click the left key on Cursor Pad.
•
Click the left mouse key.
SELECTING A FOLDER
There are seven folders located on the left of main menu screen, to select a folder you can
either:
• Use mouse to click on any folder directly.
•
Use the Up/Down arrow keys to select a folder.
•
Press Tab to move the cursor down and scroll through the folders.
SELECTING OPTIONS FROM A PULL-DOWN MENU
•
Move the cursor to the pull-down menu and press Enter to open it.
•
If you are using the Cursor Pad or Mouse, click on the down arrow next to the menu.
•
Select and confirm your selection by pressing Enter or clicking on it with the left Cursor
Pad button or left mouse button.
LAUNCH THE ACTION MENU
•
Press the Action key on keyboard or click on right mouse key to open the action menu.
•
Select the command you want to use and confirm your selection by pressing Enter or
clicking on it with the left Cursor Pad button or left mouse button.
•
Some programs may have up to three Action menu levels. Press Action again to display
these additional menus.
9
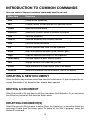
INTRODUCTION TO COMMON COMMANDS
Here are some of the most common commands used in our unit:
Menu Item
Functions
New
Create a new document
Edit
Change, delete, or add new text to a selected record
Delete
Remove selected record
Delete All
Remove all records, words or phrases in program
Save
Save the document
Save As
Save the document with another filename
Print
Print the current document
Cut
Cut the selection and store it in the clipboard
Paste
Insert the clipboard contents at the insertion point
Copy
Copy the selection and store it in the clipboard
Find/Replace
Find and replace a letter, word or phrase
Sort
Arrange records in an order that you set
IrSend
Send information to other device (See IR for details)
IrReceive
Receive information from other device (See IR for details)
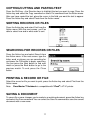
CREATING A NEW DOCUMENT
Press the Action key and then select New from the Action menu. Or you can press the onscreen New button if no document has already been opened.
EDITING A DOCUMENT
Select the record or file you want to edit first, then press the Edit button. Or you can press
the Action key and select Edit from the Action menu.
DELETING DOCUMENT(S)
Select the record or file you want to delete. Press the Delete key, or press the Action key
and select Delete from the Action menu. To delete all the files in program, select the
Delete All command.
10
COPYING/CUTTING AND PASTING TEXT
Press the Shift key + the Direction keys to highlight the text you want to copy. Press the
Action key and select the Copy command or select Cut command from the Action menu.
After you have copied the text, place the cursor in the field you want the text to appear.
Press the Action key and select Paste from the Action menu.
SORTING RECORDS OR FILES
Press the Action key and select Sort from the
Action menu. With the next screen, you'll be
able to select how and in what order to sort.
SEARCHING FOR RECORDS OR FILES
Press the Action key and select Search from
the Action menu. In the next screen, type the
letter, word or phrase you are searching for
and press the OK button to begin searching.
You can press the Next button to find next
match or press the Back button to go to the
previous match. To end, press the Close
button.
PRINTING A RECORD OR FILE
Select the record or file you want to print, press the Action key and select Print from the
Action menu.
Note: ClassMaster™ Notebook is compatible with VTech®’s VT-41 printer.
SAVING A DOCUMENT
To save a file or save changes you’ve made to an existing document, press the Action key
and select the Save command. You can select the Save As command to save the current
document with a new name.
11
MANAGING YOUR PROGRAMS
OPEN A PROGRAM
The ClassMaster™ Notebook helps you organize by saving programs in files. To open
program, open the folder first, then you’ll see the folder’s programs displayed on the screen.
Select the program you want to use by moving the cursor with your mouse or the arrow
keys and press Enter.
DELETE A PROGRAM
If you want to delete a program you’ve downloaded, go to the Main Menu Screen and
choose the program you want to delete. Select the Delete App command from the action
menu and then press Enter. Note: Only download programs can be deleted.
DESCRIPTION OF PROGRAMS
SCHOOL TOOLS
DICTIONARY
Put away the big books: with the ClassMaster™
Notebook you can access professional
dictionaries from the World Wide Web! First,
select the New Search option, then type the
word(s) or phrase(s) you want to look up and
press the Done button or the Esc key.
Then perform the IR Sync with your computer and select the View Result option. In the
next screen, select the result you want to view and press Enter. To clear the input fast,
select the Clear All command from Action menu.
NETLINK ENCYCLOPEDIA
With the NetLink Encyclopedia you can get information at your fingertips! It's as easy as
following the “Dictionary” directions above.
PERIODIC CHART
You’ll be at the head of the class with the
Periodic Chart. The Periodic Chart details the
world of chemistry showing element names,
symbols, atomic numbers and atomic mass.
Select an element with mouse or arrow keys ,
the corresponding information about the
element will be displayed in the message box
of the screen. If you want to find a specific
element, press Action and select the Search
command.
12
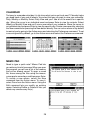
SIMPLE CALCULATOR
The simple calculator lets you solve everyday
math problems of addition, subtraction,
multiplication and division. Use the mouse to
click on the calculator buttons or use the
keyboard to enter numbers and math symbols.
Then click the “=” button or press Enter to get
the correct answer. You can change numbers
from positive to negative or vice versa by
clicking the “+/-” button. To add the displayed
value to value in memory, you need click “M+”
button.
Also you can click “M-” button to subtract the displayed from value in memory. If you want
to display the value stored in memory, press “MR” button, or press “MC” button to clear
any value stored in memory. For best results, clear the display before each calculation by
click CE or C.
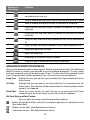
You can use these keys on the keyboard for the following functions:
Hard Keys
Buttons on
Calculator
Function
Shift + =
+
L
+
K
-
-
-
Shift + 8
x
J
x
H or /
÷
Divide
Enter
=
Performs the operation
=
=
G
+/-
Toggles between negative and positive value
D
CE
Clears the displayed number
F
C
Clears the current calculation
Add
Subtract
Multiply
13
SCIENTIFIC CALCULATOR
This is an advanced, fully functional calculator
that allows you to calculate square roots, sine,
cosine and more. Use the mouse or keyboard
to perform calculations just like the simple
calculator. Below you'll find a description of the
more advanced functions and buttons:
Buttons on
Calculator
Function
Set the unit of angular measurement as degrees
Set the unit of angular measurement as radians
Set the unit of angular measurement as grads
For input of degree, minutes and seconds as sexagesimal values
Convert the answer from sexagesimal values to decimal values
Close the scientific calculator
Press this key and then enter a number to calculate the sine
Press this key and then enter a number to calculate the cosine
Press this key and then enter a number to calculate the tangent
Convert the displayed number to the next higher engineering unit, by
shifting the decimal point three places to the right
Convert the displayed number to the next lower engineering unit, by
shifting the decimal point three places to the left
Calculate the arc sine
Calculate the arc cosine
Calculate the arc tangent
Enter a number, then press this key to get its square
Enter a number for x, press this key, then enter a number for y to
calculate x to the power of y
Press this key, then enter a number to calculate its square root
Press this key, then enter a number to calculate its cube root
14
Buttons on
Calculator
Function
Enter a number for x, press this key, then enter a number for y to
calculate the xth root of y
Enter a number and press this key to calculate the factorial of value
Enter a number and press this key to calculate its reciprocal
Press this key and then enter a number to calculate its common
logarithm
Press this key and then enter a number to calculate its natural
logarithm
Press this key and then enter a number to see it as an exponent of
10
Press this key then enter a number to see it as an exponent of e
Delete one digit from the right
Enter the value of pi
Allow entry of scientific notation number
Press this key to recall the most recent calculation
ADVANCED WORD PROCESSOR
Got a school research project or book report? Want to write a note or letter? Use Advanced
Word Processor to create, save and edit all your text-based documents. To save, select
the Save command and you'll be able to open it later. Or select the Print command to print
it out. For professional-quality documents you can easily access these features:
Copy Text: Highlight the text you want to copy and select the Copy command from the
Action menu.
Cut Text:
Highlight the text you want to cut and select the Cut command from the
Action menu. The selection will be removed from its current position and be
saved in the clipboard.
Paste Text: Place the cursor where you want the text to go and select the Paste
command from the Action menu to move text from the clipboard.
Set Font Style and Text Format:
Get your point across by using these formatting options:
: Makes the text bold. Either select the icon before typing text or highlight text and
then select Bold.
: Makes the text italic. (See Bold directions above.)
: Underlines the text. (See Bold directions above.)
15
Set Alignment for Your Text:
Set alignment for selected text with the following:
: Left-aligns the selected content or left justifies new text
: Centers the selected content or center new text.
: Right-aligns the selected content or right justifies new text
: Creates a numbered list
: Creates a bulleted list
Insert Clip Art: Place cursor where you want to insert the clipart. Select Insert Clip Art
from the Action menu, then choose the clipart from the next screen.
Insert a Table: Select Insert Table from the Action menu, then enter the number of
rows and columns for the table in the next screen.
Insert a Row in the Table: Place cursor in the table where you want to insert a row, then
select Insert Row from the Action menu.
Delete a Row in the Table: Highlight the row you want to delete, then select Delete Row
from the Action menu.
Delete Table: Highlight the Table you want to delete and select Delete Table from the
Action menu. Note: This deletes the table and all of its contents.
SPELL CHECK
Select the Spell Check function from the Action Menu to proof read your spelling. Or
choose Word Count from the Action Menu to count the number of words and characters
you’ve used in your document. To check the spelling or count number of words in a specific
paragraph, highlight it before choosing the appropriate command in the Action Menu.
LANGUAGE LAB
Translate words from one language to another
with Language Lab. Choose the language you
want to translate from. Type the word to
translate then press Enter. Translation results
from two other languages will appear.
UNIT CONVERTER
The Unit Converter converts values from
different measurement units. On the right of
Converter, select the units you want to convert
from. Then all the units you can convert them
into will be displayed. Enter the number in any
unit field, and the results will appear in the
related unit fields automatically.
16
TYPING CHALLENGE
Try this cool game to improve your typing
speed and accuracy. Select the appropriate
level. Words will cascade down from the top
of the screen, try your best to type all the words
with the keyboard!
CLASS SCHEDULE
List your daily Class Schedule with the times
and room numbers. Select the cell you want
to change or edit by using the mouse or arrow
keys and then press Enter. You can also use
the copy, cut and paste functions to move
classes or times around. Select the Day Format
command from the Action menu to select the
day format you prefer: Day 1 to Day 7 or
Monday to Sunday. Select the Time Format
Command from the Action menu to choose
school day start time and set class time lengths.
GRAMMAR CORRECTION
Grammar Correction challenges you to refine
your English-language skills. You’ll see a
sentence with a grammatical error and be
given three multiple choice answers to choose
from to correct the sentence. To select an
answer, use the mouse or the Up/Down arrow
keys and then press Enter. Or you can type
the numbers 1, 2 or 3 to select an answer.
Press the Answer button to see the correct
answer.
READING COMPREHENSION
Improve your reading ability! First, you’ll see a
paragraph appear and you will then be asked
a multiple-choice question related to the
reading. Answer the question related to the
paragraph with multiple choices given. To
select an answer, use the mouse or the Up/
Down arrow keys and then press Enter. Or you
can type the numbers 1, 2 or 3 to select an
answer. Press the Answer button to see the
correct answer.
17
GEOMETRY
Want a geometry refresher? At random, a 2dimensional or 3-dimensional object will
appear and you’ll be asked to find its area,
perimeter or volume. Input your answer by
button
typing in the number then press the
to confirm your answer. For a hint on how to
button to
approach the problem, press the
button
show the relevant formula. Press the
to get the correct answer, but you’ll forfeit one
“life” in the game. When user has lost all lives,
game is over. Before starting this activity, you’ll
be asked to select the appropriate level.
PRE-ALGEBRA
Xs and Ys got you confused? In this game,
you’ll see an mathematical problem and asked
to find the value of the unknown number (X).
Input your answer by typing in the number then
button to confirm your answer.
press the
For a hint on how to approach the problem,
button to show the relevant
press the
button to get the correct
formula. Press the
answer, but you’ll forfeit one “life” in the game.
When user has lost all lives, game is over.
Before starting this activity, you'll be asked to
select the appropriate level.
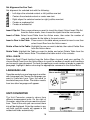
ENTERTAINMENT
SOLITAIRE
Try this classic card game all by yourself. Your
goal: to pile up all your cards by suit. To start,
you have six card stacks. To play, you must
place black cards on gray ones (and vice
versa) in descending order from 10 to Ace.
Move cards from one stack to another and turn
over the top card that’s faced down. When you
have an empty stack, you can start a new one
by moving a ten over to it. To start building on
the suit piles, place cards with matching suits
in order from Aces to 10s. The game is over
when you have successfully sorted cards by
each suit or when you can no longer play your
cards.
18
DOMINO CRISIS
A fun game that tests your reactions as it
challenges your mathematical skills. The object
of Domino Crisis is to eliminate dominos. Use
the Up and Down arrow keys to move the flying
domino. You can rotate the flying domino by
pressing the Enter or Space key. When you
match dominos with the same number and that
add up to the same total, the dominos will
automatically be cleared. For example: to clear
a domino with two, you have to place two
dominoes with number two together.
FENCES
Good fences make good neighbors! In this
game you can play against the machine or
against a pal via the IR communicator. Your
objective is to build a fence from one side of
the board to the other. The one who builds the
fence first wins. To make a move, press the
arrow keys and press Enter on the place you
want. Or use mouse to move the cursor then
click the left mouse button when ready. You've
got to act quickly, otherwise if you exceed the
time limit, you miss your turn.
Note: Select “2 PLAYERS” to play the game
with a friend via IR.
BALLOON BLOW OUT
Don’t be the last to burst the balloon. You can
play against the machine or against a friend
using the IR communicator. You’re racing
against the clock but be careful — whoever
breaks the last balloon loses. Use the arrow
keys to move the cursor to the balloon you want
to break and press Enter to pop it. Or use the
mouse to move the cursor and use the left
mouse button to choose the balloon to burst.
During your timed turn, you can break
anywhere from 1 to 4 balloons. When you’re
button
done with your turn, press the
to pass the turn to opponent. The player who
breaks the last balloon looses.
Note: Select “2 PLAYERS” to play the game
with a friend via IR.
19
BRIXX
Just like in the arcades, Brixx tests your
reaction speed. Use the arrow keys to move
the paddle so you can catch the ball. Then
“throw” it against the brick wall by pressing any
key to launch it. You never know how many
times you have to hit a brick before it will
disappear. It could be only once, it could be
twice. Some bricks will actually make more
with your
bricks when hit. Catching the
paddle helps you break some bricks. To slow
as it falls. Catching
down the ball, catch the
makes the paddle larger; catching the
the
makes the paddle shorter; and catching the
adds an extra paddle. Missing the ball will
cost you 1 paddle. Be careful, you only get 3
paddles per game. When you've used them
up, your game is over.
CATCH IT!
Why did the chicken cross the road? To catch
the falling egg! Use the arrow keys or the cursor
pad to move the chicken to catch the bouncing
eggs.
SOCCER
Just shoot the ball into the net. Sounds simple,
right? No way! In this game you can play
against the machine or against a friend via the
IR communicator. While you shoot, your
opponent guards the goal. The clock’s ticking
away — if you fail to kick within the time allotted,
your opponent gets his/her turn. Use the arrow
keys to shoot the ball into the goal or block the
net. The player who scores the most amount
of goals wins.
Note: Select “2 PLAYERS” to play the game
with a friend via IR.
20
REVERSI
The ultimate game of skill and strategy: You’ve
got to get more of the board filled with your
discs than your opponent’s. There are white
discs on one side, black discs on the other.
You and your opponent alternate placing discs
on to the board, placing them so they enclose
your rival’s pieces. Doing so will convert your
rival’s discs to your color. You can move
vertically, horizontally or diagonally.
3D TIC TAC TOE
Takes Tic Tac Toe to a new dimension. The
first player who gets “3-in-a-row” in any
direction wins. Before starting, select the level
you want to play. Use the arrow keys, the cursor
pad or the mouse to move to the place you
want to put your chip. You can use the Tab key
to change the perspective of the playing field.
PEGGED
The objective of Pegged is to remove all but 1
peg from the board. First select the level of
difficulty you wish to play. Find an open space,
then find a Peg (Peg1) next to it that you want
to delete. Then find a peg (Peg 2) next to Peg
1 that you want to delete. Press Enter to select
the Peg2, then use the arrow keys to select
the open space and press Enter. Peg 2 will
now move to the open space, deleting Peg1 in
the process. Only horizontal and vertical jumps
are allowed. At any time, you can select the
Undo command to undo your last action(s) or
select Restart to restart a new game. The
game is over when you have only 1 peg left
(YOU WIN!!) or you have no more valid moves
available (you lose).
21
PUZZLER
The object of Puzzler is to move blocks of the
same pattern together so that they will be
cleared from the screen. To move a block, click
the mouse on the block you want to move and
drag to the right or left position, and then lift
the mouse. When you are playing, you can click
button to undo the last move(s) you
on the
have made. When all blocks are cleared from
the screen, Puzzler will take you to next level.
To go to any previously passed level, click the
left and right arrow keys on navigator bar.
If you are puzzled on how to clear the blocks from any screen, press the Show Solution or
Restart command from the action menu. Before starting the game, you can select transition
effects and block types for the game by pressing the Option button on the opening screen.
MUSIC PLAYER
Music Player’s like having your very own juke box, playing built-in music or music you’ve
downloaded. To play the built-in music, select a song from the list with the mouse or the
arrow keys, then press Enter or click the left mouse button to start playing. Or you can
click on the screen’s Play button to start music. To play downloaded music, go to the
Download folder in the Main menu and select the song you want. Here’s a list of the most
frequently used function buttons:
Control Button
Function
Plays the selected song
Stops playing
Pauses the playback. Click it again to continue playback.
Plays the previous song from the list
Plays the next song in the list
Moves back in the song
Skips forward in the song
Change the set up of the Music Player
Plays songs randomly from the list
Continuously plays the selected song
Continuously plays all the songs on the list
22
TRIVIA
Ready to prove what you know? This
challenging trivia game tests your knowledge
of Sports, Entertainment and more. First select
the topic you want to be tested on. Then you’ll
be given a series of multiple-choice questions.
Use the mouse, cursor pad or the arrow keys
to move between the answers. Press Enter to
select your answer. Or you can type 1, 2, or 3.
At any time, you can change the level of the
questions by selecting the Level common from
the Action menu.
BIO-TRIVIA
No bones about it, this game test your
knowledge of biology. First select the level you
want to be tested at. Then you’ll be given a
series of multiple choice questions. Use the
mouse, cursor pad or the arrow keys to move
between the answers. Press enter to select
your answer. Or you can type 1, 2, or 3.
TECH-TRIVIA
Tech-Trivia is all about science. First select the
level you want to be tested at. Then you’ll be
given a series of multiple choice questions. Use
the mouse, cursor pad or the arrow keys to
move between the answers. Press enter to
select your answer. Or you can type 1, 2, or 3.
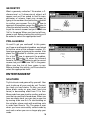
23
MY WORLD
ADDRESS BOOK
Address Book helps you keep track of your
friends and family by storing their names,
phone numbers, e-mail address and other
information. Use the mouse, cursor pad or
arrow keys to move among entries, then press
Enter to open a record. At any time you can
select the New command from the Action
menu to create a new entry. Or you can edit
an existing record by selecting the Edit
command. To print a record, select the Print
command. Delete a record by selecting Delete
or clear your entire Address Book by selecting
Delete All.
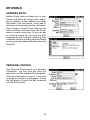
PERSONAL PROFILE
Your Personal Profile stores your personal
information. The first time you open the
application, you'll be asked to fill out the profile.
Press the Done button to save it. If you want
to modify or change any information, choose
the Edit button or select the Edit command
from the Action menu.
24
CALENDAR
Too busy to remember what day it is let alone what you’ve got to do next? Calendar helps
you keep track of any and all events. You select the way you want to view your schedule:
Daily, Weekly or Monthly. Select Daily View and you’ll see all of the events for a specific
day. Move the cursor to an individual event and press Enter to view its contents. Select
Weekly or Monthly View and you’ll see an overview of your schedule. Move the cursor to
an individual day and press Enter to view the specific day. Create a new event by selecting
the New command or pressing the New button directly. You can set an alarm on by default
to remind you by going to the Action menu and selecting the Preference command. To set
a recurring event by default, go to the Action menu and select the Preference command.
MEMO PAD
Need to type a quick note? Memo Pad lets
you write any kind of message. When you open
the program, you will see a list of the memos
that you've already saved. To open a saved
file, move among the files using the mouse,
cursor pad or arrow keys and then press Enter.
To create a new memo, select the New
command from the Action menu. To save it,
select Done from the Action menu. Using the
Edit command lets you modify an existing
memo. Selecting Delete or Delete All lets you
delete any unnecessary file(s).
25
TO DO LIST
Use the To Do List to create reminders and
assign due dates to tasks. When you open the
To Do List, you’ll see a list of your tasks you’ve
previously entered. You can open an existing
task by moving the cursor with the mouse,
cursor pad or arrow keys and pressing Enter.
To create a new task, select the New command
from the Action menu. To save it, press Done
from the Action menu. Using the Edit command
lets you modify an existing task. Selecting
Delete or Delete All lets you delete any
unnecessary task(s). To mark off a completed
task press Completed button. Pressing
Completed again cancels the mark.
DIARY
Want a safe place to jot down your thoughts?
When you open the Diary program, you’ll see
a list of your previous entries. You can open
an existing entry by moving the cursor with the
mouse, cursor pad or arrow keys and pressing
Enter. To create a new entry, select the New
command from the Action menu. To save it,
select Done from the Action menu. Using the
Edit command lets you modify an existing
entry. Selecting Delete or Delete All lets you
delete any unnecessary entry(ies). Select the
Statistics command to track your mood status
by month and date.
26
CREATIVITY
CREATION STATION
Create your own creature with Creation
Station. Then use IR and send it to your friend
while you chat. To create a new character,
press the New button or select the New
command from Action menu, then enter the
name of character and select the components.
At any point, you can press Random All to
generate a character by randomly. You can
press Undo to resume making your own
selections. By pressing the Restore button you
can revert to the latest saved version of your
character.
Press the Done button to save the character. Use the Preference Settings to make your
character appear in other screens or as your screen saver. To chat and send the image to
a friend, press the IR Chat button or select the IR Chat command. Start talking! Enter your
words into the blank field and press Send. To store a friend’s character, press the Add
button. To view a friend’s character, press the Guest Book button. To delete a character
select the Delete command from the Action menu.
ART WORK STUDIO
Draw your own picture with the Art Work Studio. When you open the Art Work Studio,
you'll see a list of the previous art files you've made. You can open an existing file by
moving the cursor with the mouse, cursor pad or arrow keys and pressing Enter. To create
a new art file, select the New command from the Action menu. To save it, select Save from
the Action menu. Selecting Delete or Delete All lets you delete any unnecessary file(s).
You’ll find the drawing tools on the left side of the screen.
1 2 3
5
6
8
9
11
12
4
7
10
1. Select Icon
8. Filled Circle Icon
2. Text Icon
9. Square Icon
3. Line Icon
10. Filled Square Icon
4. Pen Icon
11. Clipart Icon
5. Fill Icon
12. Clear Icon
6. Eraser Icon
13. Undo Icon
7. Circle Icon
13
27
Select Icon
Click on this to define the area you want to draw in. Then, while
holding down the left key of the mouse, drag the mouse to cover
the area you want to draw in. When you release the mouse, the
area will be covered with a rectangular box. You can now cut or
copy into the selected area.
Text Icon
Click on this to add text to your drawing. Then select the icon
and select the font and type style you want, place the mouse
where you want to insert the text, then type.
Line Icon
Click on this to draw a straight line. Then, while holding the left key of
the mouse down, drag the mouse to the place you want to end. When
you release the button, a straight line will be drawn on the screen.
Before drawing, you can select the line type and color.
Pen Icon
Click on this to draw a freehand line. Then, while holding the left
key of the mouse down, drag the mouse to the place you want
to end. When you release the button, a freehand line will appear.
Fill Icon
Click on this to fill a shape with a color you select. Choose the
color you want, then place the mouse pointer inside the shape
you want to fill and click on the left mouse button.
Eraser Icon
Click on this to erase a portion of your drawing. Then, while
holding the left key of the mouse down, drag the mouse to the
area you want to erase.
Circle Icon
Click on this to draw circles/ovals. Select the circle/oval's line type
and color. Then, while holding the left key of the mouse down,
drag the mouse to where you want the circle/oval. When it’s the
size you want, release the button and a circle/oval will appear.
Filled Circle
Icon
Click on this to draw circles/ovals that are filled with color. See
directions under the Circle Icon and select the fill color before
drawing.
Square Icon
Click on this to draw squares and rectangles. See directions
under the Circle Icon.
Filled Square
Icon
Click on this to draw squares and rectangles with color fill. See
directions under the Circle Icon.
Clipart Icon
Click on this to insert clipart into your drawing. Then select the clipart
you want from the following screen. Place the mouse where you want
to insert the clipart, then click the left mouse button.
Clear Icon
Click on this to clear a selected area or the whole picture. Click
Select Icon and drag the mouse to select an area to clear then
click on the Clear Icon.
Undo Icon
Click on this to undo the previous operation.
NOTE: Remember to save your drawing by selecting Save from the Action menu. You can
also send your picture to a friend using the IrSend command.
28
ANIMATION EDITOR
Create your own cartoon with Animation Editor!
When you open the program, you’ll see a list
of files that you can open. Select any file with
the mouse or the arrow keys and press Enter
to open the animation. To create your own
animation, press the New button. Select a
frame from the draw area and start drawing
with the drawing tools (See above Art Work
Studio.) Remember to save your drawing by
selecting Save from the Action menu. You can
draw a maximum of four pictures.
. Your cartoon will
To play your cartoon, display your frame in the Play area, then click
at any time to stop. Select the Speed
played in the order that you drew it. Click
command to adjust the speed of play. You can rearrange the play sequence by going into
the Preference. You can copy, cut and paste a frame from one area to another and you can
select the Delete Frame command to erase an added frame at any time.
MUSIC COMPOSER
Compose your own music with Music Composer. When you open the program, you’ll see
a list of music files. Select any file with the mouse or arrow keys and press the Play button
to start playing. Press the Stop button to stop playing. Press the New button to compose
your own music. Select the instrument you want to play. On the left side of the screen
you’ll see the music tools. Use the mouse to click on them, or use the keyboard to start
composing music on the Staff. You can enter a note by clicking on the LCD music keyboard
or pressing keys on the keyboard. Pressing the Tips button shows which keys relate to the
corresponding notes. To clear notes, select them then press the Delete button. By pressing
the Tempo button you can set the music tempo. Remember to save by selecting the Save
to play.
command. At any time you can press
Here are the music tools with their functions:
Music Tools
Function
Inserts dotted crotchet notes
Inserts quaver notes
Inserts semi quaver notes
Click on this icon to select notes on the staff
Cuts the selected notes
29
Music Tools
Function
Inserts dotted crotchet rest
Inserts quaver rest
Inserts semi quaver rest
Copies the selected notes
Pastes the notes to the staff from the clipboard
Flattens a note
Sharpens a note
Resets a sharp or flat note to normal
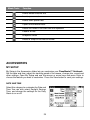
ACCESSORIES
MY SETUP
My Setup in the Accessories folder lets you customize your ClassMaster™ Notebook.
Set the date and time, adjust the tracking speed of the mouse, change skin, sound and
other settings. Open My Setup and use the mouse or arrow keys and press Enter to
choose the feature you want to customize. Press the Save button to save your settings.
DATE AND TIME
Select this category to customize the Date and
Time. You can also select Daylight Savings
Time, and change the settings for the Daily
Alarm to on or off.
30
SYSTEM
Select this category to change the screen
wallpaper, program icons and select the
number format. You can turn the Intro and Main
Animations on or off and set the timing for Autosleep.
MOUSE/KEY
With the Mouse/Key category, you can set the
tracking speed of your mouse. You can also
program the mouse buttons so that the leftbutton or right-button make selections.
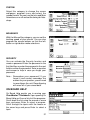
SECURITY
You can activate the Security function and
create a password. Enter the password in the
first field then re-enter the password in the next
field to confirm the password. Enter a question
and answer to help in case you forget your
password.
Note : Remember your password! If you
forget it and cannot remember the
answer for your question, you will need
to reconfigure the unit. Reconfiguring
will erase all of your saved data.
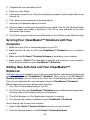
ON BOARD HELP
On Board Help assists you in running your
ClassMaster™ Notebook. Upon opening On
Board Help you’ll see a list of all the programs.
Scroll down the list using the mouse or arrow
keys and press Enter to select a program.
Scroll through the topics with the mouse or
the arrow keys and press Enter to select a
topic.
31
FILE AND UPLOAD MANAGER
File and Upload Manager lets you organize
and transfer files. Select the file you want to
upload then press the Upload button. Press
the Sync key so that the file can be transferred.
To open a program, select it and press Launch.
You can delete a file by selecting it and
pressing Delete. Press the Sort button to
rearrange files on the main screen by name,
size or type.
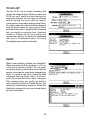
WORLD TIME
Use World Time to set your local time and view
times around the world. Open the program and
you'll see a list of cities. Click on a city and
select the City Info. command from the Action
menu to get vital stats about it. To change your
local city, select the Set Local City & Time
command. You can also add a new city by
selecting the Add City command and typing in
the city name and location. Select the Edit City
command to set Daylight Savings Time. You
can delete a city by selecting the Delete City
command.
Note : Only user added cities may be deleted
using Delete City command.
WELCOME
The Welcome Program provides a basic
tutorial of the ClassMaster™ Notebook, its
functions and basic operations. Press the Next
or Back button to view information.
32
Sync
“Syncing” is the process of connecting your ClassMaster™ Notebook to your computer.
It exchanges and updates information between your ClassMaster™ Notebook and your
personal computer. Changes you make on your ClassMaster™ Notebook or your PC
will appear in both places after the Sync process. For example, if you changed records in
your ClassMaster™ Notebook, after Sync, the changes will be updated on the related
files in your computer. Similarly, if there are files that have been changed in your computer,
Sync will update the related files in your ClassMaster™ Notebook
To enhance ClassMaster™ Notebook with this Sync function, an accessory VTech vPort
is needed. The vPort is an electronic device which offers Infrared wireless communication
between your ClassMaster™ Notebook (or any selected VTech learning unit) and your
PC. In the vPort package, there is a CD ROM with the Desktop Software inside. And to
perform a Sync, the Desktop Software must be installed.
With everything ready, the following applications can be synchronized during a Sync
session.
Class Schedule
Address Book
Memo Pad
Netlink Encyclopedia
Dictionary
Calendar
To Do List
Besides, you can download new activities or data from our VTech website (www.vport.com)
to your ClassMaster™ Notebook with the Desktop Software (internet access is required).
VTech vPort
To purchase the vPort, please directly contact our Customer Service Department at 1800-521-2010 in the U.S. or 1-800-267-7377 in Canada.
For details on how to install vPort, please refer to the vPort user manual.
For additional information about using the XL Series™ Desktop Software, open the XL
Series™ Desktop Software and then choose Desktop Help from the Help menu.
To start the XL Series™ Desktop Software, click Start, then Applications, then select
ClassMaster™ Notebook (US).
Add a New User Account in Desktop Software
XL Series™ Desktop Software allows multiple users to share the same Desktop Software.
XL Series™ Desktop Software does this by managing different User Accounts.
Each User Account must have a unique name. To create a User Name:
1. Make sure you have been logged out from any account by clicking the Logout button
on the left.
2. Click the New button on the bottom.
33
3. Complete the User Information form.
4. Enter your User Name.
5. If you want to protect your User Account with a password, click the option box to set
Security On.
6. Then, enter your password into the password box.
7. And enter your password again to confirm.
8. Personal folder is where your uploaded files are saved. Click the Set Personal Folder
icon to change your folder, if necessary. Click OK to save and back to the User
Information form screen.
9. Click OK to save your User Account information or click Cancel to quit without saving.
Syncing Your ClassMaster™ Notebook with Your
Computer
1. Make sure your vPort is connected properly to your PC.
2. Make sure the IR Lens of vPort and ClassMaster™ Notebook are in an effective
position.
3. Make sure the XL Series™ Desktop Software is installed on your computer.
4. Make sure the VTech® vPort Manager is installed and running on your computer.
Press the Sync button on your ClassMaster™ Notebook.
Adding New Activities into Your ClassMaster™
Notebook
Visit www.vport.com frequently so you’ll be up-to-date with the new learning activities and
games created for your ClassMaster™ Notebook. While you’re in the XL Series™
Desktop Software, you can click on the vPort icon to automatically go to the website.
Then you can download the new information into your ClassMaster™ Notebook.
Before adding new activities, please make sure that:
1. Your vPort is connected properly to your PC.
2. The IR Lens of vPort and ClassMaster™ Notebook are in an effective working position.
(You may refer to the following section for information).
3. The vPort Manager (or vPort Application Launcher) is running.
4. You have enough memory available on your ClassMaster™ Notebook.
Here’s what you do to load in the activities:
1. Open the XL Series™ Desktop Software and log in to your account.
2. Click the Download button in the XL Series™ Desktop Software.
34
3. Now you can select the activities you want to add to your ClassMaster™ Notebook.
To select an activity or file, click on it, and then click the Add to List button. The number
of activities and data you can add to ClassMaster™ Notebook is limited by the amount
of available memory on your ClassMaster™ Notebook.
4. To remove an activity or file from the list, click on the item you want to remove, and
then click on the Remove from List button.
5. When you have finished making your list, press the Sync button on your ClassMaster™
Notebook. This begins the Sync session.
6. To play the new activities on your ClassMaster™ Notebook, go to the Main Menu
and select the Download Zone category. Then you’ll see a list of the new activities you
have downloaded.
Deleting Activities From Your ClassMaster™ Notebook
1. Go to the Main Menu and select Accessories.
2. Select File and Upload Manager from Accessories.
3. You will see a list of the activities and data files that you have stored in your
ClassMaster™ Notebook.
4. Click on the activity or the data file that you want to delete.
5. Press the Action key to view the commands, then click on Delete or Delete All in the
action menu.
IMPORTANT! Only activities or data that you have added can be deleted from your
ClassMaster™ Notebook. Built-in activities cannot be deleted.
Uploading Files From Your ClassMaster™ Notebook to
Your Computer
You can upload Word Processor files, Animation Editor files and Artwork Studio pictures
to your PC if you want. After uploading the files, they are converted into RTF and BMP
format respectively. RTF format allows you to open the files in some common PC word
editor application. And BMP format is a common graphic format that can be opened in
many graphic applications. Therefore you can edit and/or print the files in your PC.
Here’s how to upload files into your PC:
1. Go to Accessories category. Select the File and Upload Manager.
2. The File and Upload Manager will show you all the files that you can upload from your
ClassMaster™ Notebook into your PC.
3. Select the file you want to upload then press the Upload button. Press the Sync button
on your ClassMaster™ Notebook to begin the Sync session.
All uploaded files will be saved in your personal folder. The default location of your Personal
Folder is the “ My Documents” folder in Windows. To view the current path of your personal
35
folder, select Options in the menu bar and click Set Personal Folder. When uploading files,
if a file with the same name already exists in your Personal Folder, a new “ index number”
will be automatically added after your filename to avoid overwriting. You can check the
sync log for the filename used.
To open the uploaded file, open the application that can read RTF format or BMP format
(for e.g. Microsoft Word for RTF format). Then pick the file open function and select the file
from your Personal Folder.
IR
ClassMaster™ Notebook has an Infrared (IR) Lens that enables wireless communication
between XL-Series learning unit. Through the IR Lens, an XL-Series learning unit can
play IR games with another XL-Series learning unit. Moreover, they can exchange
information, such as Address Book records, Class Schedule, Word Processor files, etc. In
ClassMaster™ Notebook, all games that support IR function will be shown with this icon
in main menu.
To play a game with another XL-Series learning unit, select a game that supports IR
playing. Then select the “2 PLAYERS” IR playing mode on-screen or you can press the IR
button.
Another IR function is to exchange a file to another XL-Series.
To send a record or file:
Open the application you want to use. Select the record or file you want to send. Point the
IR Lens of the one device directly at the IR Lens of the other. Press the IR hotkey, then
select the IrSend command from the Action menu.
To receive a record or file:
Open the application you want to use. Point the IR Lens of the one device directly at the IR
Lens of the other. Press the IR hotkey, select the IrReceive function and wait for the other
device to send the data.
When doing IR communication between two learning units, make sure the IR Lens of the
units are facing correctly to each other and within the working distance.
36
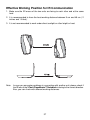
Effective Working Position for IR Communication
1. Make sure the IR lenses of the two units are facing to each other and at the same
level.
2. It is recommended to have the best working distance between 5 cm and 45 cm ( 2
inches and 1.5 feet).
3. It is not recommended to work under direct sunlight or other bright or heat.
Note:
In case you encounter problems in connecting with another unit, please check if
the IR lens of the VTech ClassMaster™ Notebook is facing to the correct direction.
Also, you can check with different working distances.
37
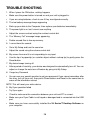
TROUBLE SHOOTING
1. When I press the ON button, nothing happens
•
Make sure the power button is turned on and your unit is plugged in.
•
If you are using batteries, check to see if they are aligned correctly.
2. The low battery message keeps appearing
•
Back up your data to the Computer, then replace your batteries immediately.
3. The power light is on, but I cannot see anything
•
Adjust the screen contrast using the contrast control dial.
4. The “Memory Full” message keeps appearing
•
Delete unused files to free-up memory.
5. I cannot hear the sounds
•
Go to My Setup and turn the sound on.
•
Adjust the sound using the volume control dial.
6. My screen froze and it is not responding to any input
•
Use the tip of a paperclip (or a similar object without a sharp tip) to gently press the
Reset button.
7. My device keeps turning off
•
After a period of inactivity, your device was designed to automatically turn off. You can
adjust or change the auto turn-off feature by going into My Setup.
8. I forgot my Password
•
You can use your special question to get your password. If you cannot remember after
five tries, turn off your unit, then press Power button and Reset in the same time to
erase all the information stored.
NOTE: This will reset your entire device.
9. My Sync operation failed
•
Try Sync again.
•
Check to make sure the connection between your unit and PC is correct.
•
Make sure your Sync Cable is not frayed or damaged and is connected into the USB
port.
•
Make sure you have successfully installed the XL Series™ Desktop Software on
your computer.
38
10. I cannot send and receive information with IR Communication
•
Make sure both devices are on and are directly pointed to each other without any
obstacles in the way. They should only be a few inches apart.
•
Make sure the receiving device has enough memory.
DISCLAIMER AND LIMITATION OF LIABILITY
VTech® Electronics North America, L.L.C. and its suppliers assume no responsibility for
any damage or loss resulting from the use of this handbook. VTech® Electronics North
America, L.L.C. and its suppliers assume no responsibility for any loss or claims by third
parties that may arise through the use of this software. VTech® Electronics North America,
L.L.C. and its suppliers assume no responsibility for any damage or loss caused by deletion
of data as a result of malfunction, dead battery, or repairs. Be sure to make backup copies
of important data on other media to protect against data loss.
TECHNICAL SUPPORT
We make every effort to ensure the accuracy of the information about our products.
However, errors may occur. If you have a problem that cannot be solved by using this
manual, we encourage you to visit us online or contact our Consumer Services Department
with any problems and/or suggestions that you might have. A support representative will
be happy to assist you. Before requesting support, please be ready to provide or include
the information below:
•
The name of your product or model number. (The model number is typically located on
the back or bottom of your product.)
•
The actual error message or problem you are receiving.
•
The actions you took right before the error message or problem.
Internet : www.vtechkids.com
Phone: 1-800-521-2010 in the U.S.
39
FCC NOTICE
This equipment generates and uses radio frequency energy. It must be installed and used
properly, in accordance with the manufacturer’s instructions. Otherwise, it may cause
interference to radio and television reception. It has been type tested and found to comply
within the limits for a Class B computing device in accordance with the specifications in
Subpart J of Part 15 FCC Rules, which are designed to provide reasonable protection
against such interference in a residential installation. However, there is no guarantee that
interference will not occur in a particular installation. If this equipment does cause
interference to radio or television reception, which can be determined by turning the
equipment off and on, the user is encouraged to try to correct the interference by one or
more of the following measures:
•
Reorient the receiving antenna.
•
Relocate this product with respect to the receiver.
•
Move this product away from the receiver.
•
Consult the dealer or an experienced radio/TV technician for help.
The use of shielded I/O cables is required when connecting this equipment to any and all
optional peripherals or host devices. Failure to do so may violate FCC rules.
COMPANY : VTech® Electronics North America, L.L.C.
ADDRESS : 2350 Ravine Way, Glenview, IL 60025 USA
TEL NO.: 800- 521-2010
COPYRIGHT NOTICES
Copyright © 2002 VTech® Electronics North America, L.L.C. All Rights Reserved. VTech®
and the VTech logo are registered trademarks of VTech. ClassMaster™ Notebook is
trademark of VTech® Electronics North America, L.L.C. All other trademarks are property
of their respective owners.
40