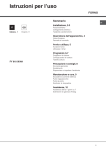
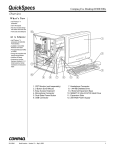
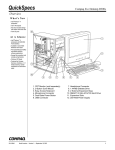
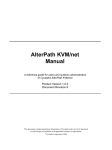
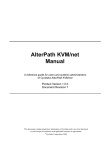
1
Volvo AB, Göteborg, Sweden
Reprinting permitted if source quoted
Source – Volvo AB, Göteborg, Sweden
Source – Volvo AB, Göteborg, Sweden
Reprint 2001 Karl Eric Målberg
page 1(35)
Introduction
The Volvo 1800 S is a two-door sports car. The car is a two-seater but there is space
for a further two passengers in the rear seat. The body is of integral construction so
there is no frame as such. The front and rear suspension, the engine and the
transmission are attached directly to the body. The body surface is cellulose applied
over a rust-protective primer.
The car is protected from theft by having the ignition switch and the ignition coil
connected through the medium of armored cable.
The instruments have been located on the instrument panel so that they are very
easy to see and in keeping with the sports character of the car: revolution counter,
temperature gauge for oil as well as water, loud tone horn, etc. The operation of the
various controls and adjusting instructions for the seats, etc are described in this
chapter in more detail.
Description
Engine
The engine is a four-cylinder, water-cooled gasoline engine with overhead valves.
The max output is 108 b.h.p (SAE), the compression ration 10:1 and the capacity
1.78 litres (108.6 cu.in)
Fuel system
The engine is fitted with twin 1 ¾” SU horizontal carburettors. The fuel is fed from the
tank to the carburettors by a fuel pump driven by a cam on the engine camshaft.
There is a fuel filter incorporated in the fuel pump and this filter traps any water and
other impurities in the fuel.
Lubricating system
Engine lubrication is taken care of by means of a gear pump, which sucks oil from
the oil pan on the lower part of the engine and forces it through the oil cleaner out to
all the lubricating points on the engine. The oil is cooled in an oil cooler, water from
the engine cooling system circulating through the mantle on the oil cooler,
Cooling system
The engine is water-cooled and has a pressure system. Cooling water circulation is
taken care of by a pump, which is fitted, on the fan shaft. A thermostat, which does
not open until the temperature reaches 76 oC (ca 170 oF) prevents the cooling water
from passing through the radiator before the engine has reached its normal operating
temperature.
Steering gear
The car is fitted with a cam and roller type steering gear. Movements of the steering
wheel are transmitted via the worm on the steering rod to the roller on the pitman arm
shaft, which, in its turn, influence the wheels through the medium of the steering
rods.
Source – Volvo AB, Göteborg, Sweden
Reprint 2001 Karl Eric Målberg
page 2(35)
Brakes
The car is fitted with two independent brake systems, a foot brake system and a
hand brake system.
Hand brake system
This is mechanical and only influences the brakes on the rear wheels. Movement of
the hand brake lever is transmitted through a series of pull rod and cables to the rear
wheel brake levers which then apply the brakes.
Foot brake system
This is hydraulic and influences all four wheels. The hydraulic system consists of a
master cylinder filled with brake fluid which, when the brake pedal is depressed,
transfers the brake pressure through the fluid in the line to a further brake cylinder
which further increases the pressure before in continues to the brake cylinder at the
wheels. The plungers in these wheel cylinders are pressed outwards and the brakes
are applied.
The front wheel brakes are of the disc type and the rear wheel brakes of the drum
type.
Wheels and tires
The car is fitted with pressed steel wheels with hubcaps. All the wheels are carefully
balanced. The tires are the braced tread type with inner tubes specially designed for
the stresses occurring at high speed. The tire size is 165x15.
Electrical system
The electrical system has a voltage of 12 volts and is fitted with a voltage control
generator. The starter motor is operated from the instrument panel through the
ignition key. The key is also used to switch on the other electrical equipment. The
cables to the headlights, parking lights and internal lighting, however, are not
connected over the ignition key switch but can be used independently of the ignition
key
Lighting
Lighting on the front of the car consists of the headlights with full and dimmed beams
as well as the combined lamps for directional signal flashes and the parking lights.
Lighting at the rear consists of combined lamps for the directional signals and the
taillights and the brake warning lights. There are also two lamps for rear license plate
lighting
Internal lighting consists of two lamps located at the rear side pillars. There are bulbs
for indirect instrument lighting. For bulb replacement se page 24
Source – Volvo AB, Göteborg, Sweden
Reprint 2001 Karl Eric Målberg
page 3(35)
Fuses
The electrical equipment is protected by means of three 35 A fuses, located in fuse
boxes on the left-hand wheel housing.
1 Flasher and parking light
left
2 Headlight, left
3 Horn
4 Loud tone horn
5 Headlight right
6 Flasher and parking light
right
7 Relay for headlight
signalling
8 Horn relay
9 Distributor
10 Generator
11 Charging relay
12 Foot dimmer switch
13 Horn button
14 Lever for loud tone
horn
15 Ignition coil
16 Starter motor
17 Battery
18 Directional signal
switch
19 Flasher devise,
directional signals
20 Revolution counter
sender
21 Fuses
22 Revolution counter
23 Fuel gauge
24 Clock
25 Brake switch
26 Instrument lighting
27 Instrument lighting
28 Instrument lighting
29 Windshield washers
30 Windshield wipers
31 Warning lamp,
charging
32 Warning lamp
directional signals
33 Warning lamp, full
headlights
34 Heater
35 Switch, map-reading
lamp
36 Instrument lighting
37 Instrument lighting
38 Instrument lighting
39 Controls for windshield
washers and windshield
wipers
40 Lighting switch
41 Ignition switch
Source – Volvo AB, Göteborg, Sweden
Reprint 2001 Karl Eric Målberg
42 Heater controls
43 Cigarette lighter
44 Map-reading lamp
45 Door switch
46 Switch for roof lamp
47 Door switch
48 Roof lamp
50 Tail light, left
51 Fuel gauge sender
52 License plate lighting
53 Tail gate, right
A=White
B=Black
C=Blue
D=Green
E=Light green
F=Yellow
G=Brown
H=Red
I=Purple
page 4(35)
Source – Volvo AB, Göteborg, Sweden
Reprint 2001 Karl Eric Målberg
page 5(35)
Body
Hood
The hood is fitted with a locking device,
which is operated from the driving seat
by means of a handle to the left under
the instrument panel. This releases the
hood, which can then be lifted up after
the handled has been moved forward
and downward.
The hood remains in its lifted position by
means of a stay, which is automatically
locked by a built-in catch, when the hood
is lifted all the way up. When the hood is
to be lowered again, the catch sleeve is
moved upward at the same time as the
hood is lifted to it’s outer position and
then lowered.
Doors and locks
The car is fitted with key locks for both
doors, the luggage compartment and the
fuel tank cap. Before the doors can be
opened, the button in the door handle
must be pressed in. The doors can be
locked from the inside by moving the
handle forward as shown in the
illustration. To open the door, move the
handle to the rear.
If you happen to loose your keys, contact
your nearest who dealer who will supply
you with new keys if you inform them of
the code number that was on the missing
keys.
Source – Volvo AB, Göteborg, Sweden
Reprint 2001 Karl Eric Målberg
page 6(35)
Safety belts
Standard equipment on this vehicle
includes safety belts for both the front
seats. Make a habit of fitting the belts as
soon as you get into the car. The length
of each belt can be easily adjusted by
means of the part attached to the floor.
Adjust the length of the belt very
carefully. It should not be to tight, but on
the other hand, should not be to loose
since it will then not function properly.
The belt is taken down from the button
on which it hangs by pressing in the
spring-loaded handle in the slot. The belt
is then fitted with one part round the
waist and the other part over the
shoulder and the breast and it is then
clipped into position on the fitting
between the seats. To remove the belt,
press in the spring-loaded handle in the
slot.
Check now and then that the bolts
retaining the belt are well tightened. If the
belts have become dirty they can be
cleaned with water and synthetic
detergent.
Adjusting the seats
The front seats can be adjusted
backwards and forwards after the handle
on the adjuster rail has been moved to
one side. Exert pressure with your feet
on the floor and move the seat to the
most comfortable position. The angle of
the backrest can be adjusted by means
of the screw at the bottom behind the
seat.
Instruments and operating controls
Source – Volvo AB, Göteborg, Sweden
Reprint 2001 Karl Eric Målberg
page 7(35)
1. Control for windshield
wipers and windshield
washers
2. Oil pressure gauge
3. Temperature gauge
for cooling water
4. Temperature gauge
for engine oil
5. Revolution counter
6. Warning lamp for
charging
7. Choke control
8. Ignition switch with
built in starter
9. Control for direct
ventilation
10. Fan controls
11. Heater and ventilation
controls
12. Lighting switch
13. Zero setting control for
trip meter
14. Directional signal
switch with built
headlight flasher
15. Overdrive switch
16. Switch for inner
lighting
17. Trip meter
18. Speedometer
19. Mileometer
20. Fuel gauge
21. Clock
22. Recess for radio
23. Switch for map reading
lamp
24. Hood catch
25. Warning lamp for
directional signals
26. Warning lamp for full
headlights
27. Warning lamp for
overdrive
28. Lever for loud tone
horn
29. Cigarette lighter
1 Control for windshield wipers and windshield washers
The windshield wipers are electrical and can be set to two speeds by pulling out the
control. If pulled out to the first notch, the wipers run at half speed, and if pulled out
two notches, they run at full speed. When the control is pushed in the whole way, the
windshield wipers automatically stop in their parked position.
Turning the control nob in a clockwise direction operates the windshield washers.
The windshield washers can be used even when the windshield wipers are switched
off. The fluid container for the windshield washers is located under the hood and
contains about one litre.
Never let the windshield wipers run on a dry and dusty surface since this can easily
scratch the glass.
Source – Volvo AB, Göteborg, Sweden
Reprint 2001 Karl Eric Målberg
page 8(35)
2 Oil pressure gauge
The oil pressure is dependent on the temperature of the oil and the engine speed.
Since the engine is fitted with an oil cooler, there can be some slight delay before the
oil pressure gauge gives a reading. If the engine is cold, it will show relatively high
pressure, which is normal. If the pressure should at any point go down to zero, the
engine must be stopped immediately and the reason determined. See under “driving”
page 13 &15
3 Temperature gauge for cooling water
The temperature gauge shows the temperature of the cooling water and thus the
working temperature of the engine. The temperature should normally be 70-90C
(158-196F). If it should indicate a high temperature for a long time, this can depend
upon the fact that the cooling system channels are blocked and are preventing
circulation or that the thermostat has been damaged. In such cases the cooling
system should be cleaned (see 21) or the thermostat should be replaced.
4 Temperature gauge for engine oil
The oil temperature is a function of the engine speed and can vary quite
considerably. Temperatures above 130C (265F), however, should not be permitted.
5 Revolution counter
The revolution counter shows the engine speed in revolutions per minute. The
indicator should not go up as far as the red field on the instrument.
6 Warning lamp for charging
The lamp lights up when the battery is discharging which is normal at idling speed. If
you accelerate a little, the lamp should go out. Should the lamp remain on while you
are driving, this usually means that there is some fault in the electrical system or that
the fan belt is insufficiently tensioned and is slipping on the generator pulley. The
result of this will be poor charging.
7 Choke control
To use the choke control pull it out
vertically (A) and lock it by turning it
quarter of a turn (B). To return the
control, twist it back to its vertical
position. When the engine is thoroughly
warmed up the choke control should be
all the way in. See under “Driving”, page
13
Source – Volvo AB, Göteborg, Sweden
Reprint 2001 Karl Eric Målberg
page 9(35)
8 Ignition switch with built in starter
1 Radio position. In this position all the
electrical equipment in the car can be
used without having the engine running.
2 Neutral position
3 Running position
4 Starting position. To start the engine
turn the key to this position and the
starter motor will be cut in. As soon as
the engine starts release the key which
will then return to position 3.
9 Control for direct ventilation
There are two scuttles for direct
ventilation, one on the right side and one
on the left side. These are controlled by
means of the knob which is pulled out to
position 1.
10 Fan control
The fan control has three positions. In
position 1 the fan is switched off, in
position 2 it runs at full output and in
position 3 it runs at half output. The
temperature and the distribution of air are
controlled by means of the fan control.
Source – Volvo AB, Göteborg, Sweden
Reprint 2001 Karl Eric Målberg
page 10(35)
11 Heater and ventilation controls
The heater and ventilation system is
controlled by means of three levers.
“AIR” = Stream of air inside the car
“DEFR” = Air to the windshield
“TEMP” = Control for the temperature of
the incoming air.
The controls are closed in their upper
position and fully open in their lower
position.
The fan can then be used to increase the
flow of cold or warm air. The heater is
connected to the engine cooling system
and also to a thermostat which maintains
a constant temperature.
When the “Temp” control is altered, there will be a slight delay before the thermostat
in the heater has stabilised itself at the desired temperature. In very cold weather,
particularly if the car is full of passengers, there can be misting on the windows. The
best way to get rid of this or to avoid it is to have the ventilator window fully or
partially open at the same time as the fan motor is running at full output and the
defroster control in its fully open position.
12 Lighting switch
HEADLIGHTS
The headlights on the car are operated
by means of a pull control on the
instrument panel as well as by a foot
dimmer switch to the left on the floor
plate.
Position 0 = Off
Position 1 = Parking lights
Position 2 = Full or dimmed headlights
depending on position of the foot dimmer
switch.
The headlights are switched from full to
dimmed and visa versa by depressing
the foot dimmer switch.
INSTRUMENT LIGHTING
Turning the headlight switch knob can regulate the intensity of the instrument lighting.
The further the knob is turned in a clockwise direction, the stronger the instrument
lighting will be.
13 Zero-setting control for trip meter
The trip meter is set to zero by pressing up the button and turning it
Source – Volvo AB, Göteborg, Sweden
Reprint 2001 Karl Eric Målberg
page 11(35)
14 Directional signal switch with
headlight flasher
In the directional signal switch there is a
built-in switch which lights the headlights
on full beam when the switch is pulled
upwards towards the steering wheel.
Driving
The driving of your 1800 S should not cause any trouble whatsoever if you follow our
advice and instructions in this book. You will soon find out that everything has been
well arranged so that you can feel relaxed and drive fast without sacrificing the
safety. The brakes and the road holding properties of the car are in direct proportion
to the speed at which it is capable of travelling.
The instruments are located so that you can see them at a glance. Stop the car
immediately if something should go wrong. It may be a minor point but if it is not
remedied in time it can lead to expensive and time-taking repairs.
When you drive your car, always have a little consideration for other road users.
Running in
While it is new you should obviously not run your Volvo as fast as it can go. The
reason for this is that during the first period all the vital parts of the car become
bedded in so that they can stand up stresses even better. Do not utilise full output for
more that short periods during the first 300 miles (500km). It is particularly important
that the engine should not be loaded too hard during the very first miles
Keep an eye on the cooling water temperature
When an engine is new, the cooling water temperature can easily go up if the engine
is subjected to hard loading. For this reason you should keep an eye on the
temperature gauge during the first period.
Inspections during the running-in period
After 600 miles (1000km) operation, the car should be taken to a Volvo workshop for
the first guarantee inspection which is free of charge. The control procedures and
adjustments carried out here include an oil change in the engine. It is very important
to ensure that this oil change is carried out since the oil becomes contaminated
comparatively rapidly during the first period.
Source – Volvo AB, Göteborg, Sweden
Reprint 2001 Karl Eric Målberg
page 12(35)
When the car has been driven 1500 miles (2500km) it should be taken back to the
workshop for the final guarantee inspection. The servicing procedure shown in the
warranty booklet is then carried out.
After 300 miles (5000km) the car should be given all-round lubrication and the oil in
the engine, transmission and rear axle should be changed. At the same time as the
oil in the engine is changed, new oil cleaner should also be replaced with a new unit.
The transmission and the rear axle should be carefully cleaned out with flushing oil.
Following this mileage, oil changes should be carried out at the intervals shown in the
maintenance scheme on page 16 and in the lubrication chart at the end of this book.
All Volvo engines are test-run before delivery, partly in test benches and partly in
vehicles on test tracks. We have therefore carefully checked that all clearance is
satisfactory and we can thus accept no responsibility for seizing of pistons or
bearings depending on careless running in.
Starting the engine
Cold engine
1. Pull out the choke control the whole
way
2. Depress the clutch pedal
3. Turn the ignition key to the starting
position. Release the key as soon as the
engine starts.
4. Push in the choke control as the
engine warms up. Do not let the engine
run to fast. In order to get the engine to
run evenly when you start driving, it may
sometimes be necessary to pull out the
choke control a little. Use the choke as
little as possible while you are driving. By
the time the engine is fully warmed up,
the choke control should be pushed right
in again.
When the engine is started from cold it is
important to attain the normal working
temperature as quickly as possible in
order to avoid unnecessary cold starting
wear. For this reason, do not run the
engine to long on idling speed, it will
attain its working temperature more
rapidly when it is subject to loading.
Warm engine
Source – Volvo AB, Göteborg, Sweden
Reprint 2001 Karl Eric Målberg
page 13(35)
1. Depress the clutch pedal
2. Turn the ignition key to the starting
position. Release the key as soon as
the engine starts.
You can the drive the car as soon as the
oil gauge shows a reading. Since the
engine is fitted with an oil cooler there
can be a slight delay before the oil
pressure gauge shows a reading. If the
engine is cold, the gauge will show a
relatively high reading, which is however
normal.
Gear shifting
The transmission is synchronised on all
gears. If the synchronising is to work, in a
satisfactory way, the clutch must be fully
depressed. Let the engine speed go
down when shifting to a higher gear, and
increase it when shifting to a lower gear.
If the engine is to work in the best
possible way it is important to suit the
point at which the gear shifting is carried
out to the speed of the car so that engine
speed is maintained within certain limits,
neither to high, nor to low. If the engine
speed is to low, the result will be poor
pulling power and unfavourable loading
of the engine and power train.
If the engine speed is to high, on the other hand, fuel consumption will be higher, the
pulling power of the engine will be decreased and better acceleration will not be
obtained. The normal speed range for the engine is1500-5000 r.p.m. Do not exceed
6500 r.p.m.
Never let the engine labour in a high gear but shift down in good time. If you need
good pulling power, however, and the engine is working easily under slight
acceleration, this does naturally not prevent you from going down below 1500 r.p.m.
Source – Volvo AB, Göteborg, Sweden
Reprint 2001 Karl Eric Målberg
page 14(35)
Overdrive
The overdrive (model 18335) which can
be engaged when you are running in
fourth speed, is operated by means of a
switch on the instrument panel. The
overdrive is engaged when the switch is
moved up. No extra operation of the
clutch or accelerator are normally
necessary when engaging and
disengaging the overdrive. Engagement
is, however, easier if the accelerator is
kept depressed. When shifting from
overdrive to forth speed, light pressure
on the clutch ensures a smother shift.
When the overdrive is engaged, the
warning lamp on the instrument panel
lights up.
Advice concerning driving
Starting in a garage
Always open the garage doors when you start the car in your garage. The reason for
this is that the exhaust gases from the engine always contain the poisonous gas
carbon monoxide, which is particularly dangerous, since it is both invisible and
odourless.
Air containing only 0.2% carbon monoxide can be fatal if it is breathed in for half an
hour
Oil pressure
The oil pressure is dependent on the oil temperature and the engine speed. If the oil
pressure should go down to zero at any time, the engine must bee stopped
immediately. After very hard driving with oil temperature up to about 120C (250F) the
oil pressure at idling speed can go down to 0.5 kg/cm3 (7lb/sq.in.) which is however
quite normal.
Braking
Try to use the brakes a little as possible. Instead use the engine as a brake by
releasing the accelerator pedal in good time. Violent braking is only justified in
dangerous situations and even in such cases the wheels should never be locked.
Remember that the best braking result is obtained if the wheels are permitted to
rotate slightly.
Even acceleration and gently braking are typical characteristics of a good driver and
also result in the most economical running.
Tires
When the car is delivered, it is fitted with tires that stand up to the stresses occurring
during high-speed driving. It is however, very important to maintain the correct air
pressure in the tires, particularly when you are driving long distances at a high
average speed. It is better to have too much than too little air in the tires. A tire
becomes heated up more quickly if it contains too little air. If the temperature in the
tires becomes excessively high, the cord and rubber start to separate from each
other and this can have catastrophic consequences.
Source – Volvo AB, Göteborg, Sweden
Reprint 2001 Karl Eric Målberg
page 15(35)
Servicing
Before the car was delivered from the factory it was subjected to a very thorough
inspection. Your dealer, in his turn, carried out a further delivery inspection. In
addition to this there are two cost-free guarantee inspections after 600 miles
(1000km) and 1500 miles (2500km). The warranty booklet, which is supplied together
with the car, contains two coupons, which entitle you to these inspections. If possible
let the dealer who supplied the car carry out this work. If our six months guaranty is
to apply one condition is that the car has otherwise been serviced in accordance with
the instructions in this book.
The servicing of the car should then follow the procedure in the service book, which
is based on a system of coupons with all-round lubrication and service inspections
after every 3000 miles (5,000 km). You can obtain this book from your dealer or
directly from Volvo by sending in the coupon available in the end of the warranty
booklet.
In all countries where Volvos are sold, there are ultra-modern workshops with
specially trained personnel at your service. All these workshops receive a continuous
supply of technical information through the Volvo organisation concerning repairs and
adjustments, and they are also in possession of special tools designed at the Volvo
factory. Our dealers are therefore best equipped to give your car first-class service,
concerning both maintenance and repairs.
The car is serviced in accordance with the service book for fixed prices and the
workshop stamp in the service book is evidence of how the car is being serviced, this
being a very important point as far as its second-hand value is concerned. If you
would prefer to carry out some of the simpler servicing yourself, this chapter contains
a little advice about when and how this work is carried out.
Maintenance scheme
In the maintenance scheme below, the servicing procedures have been given certain
numbers, which refer to the detailed description on the following pages
O = Service workshop operation
X = Operation you can carry out yourself
Operation
Lubricant
1 Chassis lubrication as shown in
lubricating chart
2 Check oil level in engine
3 Change oil in engine
4 Check oil level in transmission
5 Change oil in transmission
6 Check oil level in rear axle
7 Check oil level in steering box
8 Check brake fluid level
9 Check clutch fluid level
Engine
10 Clean oil filter cap
11 Change oil cleaner
Source – Volvo AB, Göteborg, Sweden
Reprint 2001 Karl Eric Målberg
3,000
miles
5,000
km
6,000
miles
10,000
km
X
X
O
X When tanking
X Spring and fall
X
X
X 1)
X 2)
X
X
O 1)
Carried out
12.500
miles
See Note below
20,000
km
X
X
O
page 16(35)
12 Check valve clearance
13 Clean fuel filter
14 Change air cleaners
15 Check fan belt
16 Check cooling water level
17 Clean out cooling system
18 Check spark plugs
19 Change spark plugs
20 Check distribution and ignition
timing setting
21 Clean carburettor
Electrical system
22 Check battery electrolyte level
23 Check state of charge of battery
24 Check headlight alignment
Power train
25 Clean overdrive strainer
26 Check clutch yoke free play
Brakes
27 Check the brakes
28 Overhaul the brakes
Front end
29 Check the front wheel alignment
30 Check ball joints tie rod etc
Wheels and tires
31 Check tire air pressure
32 Check tighten wheel nuts
O
X
X
O
X When tanking
X Spring and fall
O
O
O
O
X When tanking
X
O
X
O
O
O
O
O
X When tanking
O
Body
33 washing
34 Polishing
35 Cleaning
1)
2)
X see page 27
X see page 27
X see page 27
Only after the first 3,000 miles (5,000 km)
The oil is only changed once: after 3,000 miles (5,000km)
In addition to the service procedures mentioned in this scheme you should also
check the following from the point of view of traffic safety
a) Lighting, including brake stop lights
b) Directional signal flashers
c) Horn
Lubrication
Lubrication is the most important procedure in servicing a vehicle. The cost of
lubricant is insignificant compared with the cost of repairs caused by neglected
lubrication. Our recommendations here are based on many years of experience.
It is impossible to avoid wear completely but wear can be decreased and prevented
to a great extend by regular and careful lubrication.
1 Chassis lubrication
The chassis should be lubricated after certain mileage, according to the instructions
in the lubrication chart at the end of this book. All the control linkages on the throttle
system, hand brake, etc, should also be sparingly lubricated.
Source – Volvo AB, Göteborg, Sweden
Reprint 2001 Karl Eric Målberg
page 17(35)
2 Check the oil level in the engine
The oil level in the engine should be checked every time tanking is carried out. This
should be done while the engine is warm and the oil levels is checked by using a
dipstick on the left side of the engine. Dry off the dipstick first to avoid a faulty
reading.
The oil level should be between the two marks on the dipstick. It should never be
permitted to go down below the lower mark but, on the other hand, it should not be
above the upper mark since abnormally high oil consumption will be the result. If
necessary, top up with oil of the same type as already being used in the engine,
through the oil filler cap on the rocker arm cover.
3 Change the engine oil
The intervals between oil changes depend to a great extend on the driving
conditions. During the summer or when the car is being mainly used for long-distance
running, it is sufficient to change the oil every 3,000 miles (5,000 km). During the
winter and when the car is being used under unfavourable conditions with continuous
stopping and starting, the oil should be changed after every 1,500 miles (2,500 km).
At the same time the carburettor-damping cylinder should be lubricated with SAE 20
engine oil, see page 22. During the running-in period the oil should also be changed
after the first 600 miles (1,000 km)
Viscosties
Oil grade
Below 0C
(32F)
SAE 10W *
0C – 30C
(32F – 90F)
SAE 20 *
For Service
*) or SAE 10 W - 30 multi-grade oil
Oil capacity
Above 30C
(90F)
SAE 30 *
When changing
oil
3.25 litres
Including oil
cleaner
3.75 litres
4 Transmission
5 The oil level in to the transmission should be checked after every 3,000 miles
(5,000 km). The oil level should be up to the filler hole.
The oil in the transmission should be changed after every 12,500 miles (20,000
km).(In the case of a new or reconditioned transmission, the oil should be changed
after the first 3,000 miles (5,000 km) and the transmission should also be carefully
rinsed out with flushing oil)
The old oil should be drained off immediately after the car has been run while the oil
is still warm. Every other time the oil is changed, the transmission should be cleaned
out with flushing oil before the new oil is added.
When draining off the oil from a transmission fitted with an overdrive, note that there
is an extra drain plug under the overdrive marked “Drain”. When oil is being added it
takes some time for the oil to run into the overdrive and for this reason the filling
should be carried out relatively slowly. Each time the oil us changed, the overdrive oil
strainer should be cleaned – see servicing procedure 25 page 25
Do not use hypoid oil in the transmission.
Transmission oil
Oils grade
Viscosity
Oil capacity
M40
M 41
Transmission oil
Engine oil
SAE 80 (all year round)
SAE 30 (all year round)
0.75 litres
1.8 litres
6 Rear axle
The oil level in the rear axle should be checked after every 3,000 miles, (5,000 km).
The oil level should be up to the filler hole.
The oil in the rear axle should be changed after the first 3,000 miles (5,000 km). The
old oil is drained off by removing the cover on the back of the housing, and this
Source – Volvo AB, Göteborg, Sweden
Reprint 2001 Karl Eric Målberg
page 18(35)
should be done immediately after the car has been run while the oil is still warm. The
rear axle should then be carefully rinsed out with flushing oil before new oil is added.
After this the oil level only needs checking and topping up carried out if necessary.
Oils grade
Viscosity
Oil capacity
Hypoid oil
SAE 80 (all year round)
1.3 litres
7 Steering box
The oil level in the rear axle should be checked after every 3,000 miles, (5,000 km).
The oil level should be up to the filler plug.
If necessary, top up with new oil of the same grade and viscosity at the already used.
The oil in the steering box usually only needs changing when reconditioning of the
unit is being carried out. Should the oil however, be changed for some reason, the
old oil should be sucked out, by inserting suitable device through the filler hole.
Oils grade
Viscosity
Oil capacity
Hypoid oil
SAE 80 (all year round)
0.2 litres
8 Brake fluid
9 Clutch fluid
The fluid level in the brake and clutch
control hydraulic system should be
checked after every 3,000 miles, (5,000
km). The fluid should be up to a point
about ¾” (15-20mm) below the upper
edge of the containers.
Use only brake fluid satisfying the
conditions laid down in SAE 70 R3
Engine
10 Clean the oil filler cap
The oil filler cap is fitted with a filter to
evacuate water vapour and the gases
that leak past the piston rings. If this filter
should be blocked by dust from the air
being sucked in, there will be excess of
pressure in the crankcase and this can
result in oil leakage. For this reason, this
filter should be cleaned after every 6,000
miles (10,000 km). In case of very dusty
roads, cleaning should be carried out
more often.
Loosen the three screws round the cap
and then take off the upper part. Remove
the filter and clean the whole assembly
thoroughly in clean gasoline.
11 Change the oil cleaner
The engine is fitted with a full flow type oil cleaner, this meaning that all the oil
passes through the cleaner on the way from the oil pump to the various lubrication
points. Impurities in the oil thus collect in the cleaner and gradually block it. For this
Source – Volvo AB, Göteborg, Sweden
Reprint 2001 Karl Eric Målberg
page 19(35)
reason it must be changed at regular intervals, after about every 6,000 miles
(10,000km). This operation should preferably be carried out by a Volvo workshop.
If the oil cleaner is changed without the engine oil being changed, 0.5 litres should be
added to the engine.
12 Valve clearance
Let your Volvo workshop check the engine valve clearance after every 3,000 miles
(5,000 km). Excessively small valve clearance can easily cause burned valves.
13 Clean the fuel filter
In order to avoid dirty fuel from being
pumped into the carburettors, the fuel
filter should also be serviced. Due to the
accessible location of the filter, it is very
easy to clean.
The fuel filter should be cleaned after
every 3,000 miles (5,000 km). Loosen
the nut and move the bail to one side.
Remove the glass bowl and strainer and
clean these parts. When the filter is being
re-fitted, male sure that the gasket seals
properly
14 Change the air cleaners
The air cleaners on the SU carburettors
should be replaced with new units after
every 12,500 miles (20,000 km). The old
unit should be thrown away since the
cleaner and the filter are built together in
one unit. When driving on dusty roads, it
may be advisable to change the air
cleaners more often, for example every
6,000 miles (10,000km)
NOTE. The ventilation air to the lower
part of the carburettor suction chambers,
passes the air cleaner through the two
upper holes in the cleaner so it is
important to see that the gasket and
the air cleaner are fitted correctly in each case, since otherwise theses holes will be
blocked
15 Check the fan belt tension
After about every 6,000 miles (10,000km) you should let your Volvo Workshop check
that the fan belt tension is correct. Due to wear or dirt, this belt can start slipping and
the result will be poor cooling and poor generator output. You can easily check the
tension by pulling the tips of the fan in their correct direction of rotation. There should
be a definite resistance to movement (at a pulling power of 12-14 lb= 5.5-6.5 kg).
before the belt starts slipping. A simple but not so reliable way of testing belt tension
is to press the fan belt with your thumb at a point midway between the generator and
the fan. It should be possible to press down the belt about 1/6” = 3-4 mm with normal
thumb pressure.
Source – Volvo AB, Göteborg, Sweden
Reprint 2001 Karl Eric Målberg
page 20(35)
16 Check the cooling water level
The engine cooling water level should be checked each time the fuel tank is filled.
Water is added through the filler opening on the top of the radiator. Be careful when
you remove the radiator cap. There are two positions on the cap, one to decrease
pressure in the system and a second position to remove the cap.
In order to avoid deposits in the cooling system, only clean water should be used (not
containing calcium or iron) together with some rust preventing agent. Rust
preventive agent with a mineral oil base must not be used since it can damage the
hoses. See page 31 for anti-freeze
Never add cold water to a hot engine. The sudden difference in temperature can
cause cracks in the cast material.
17 Clean the cooling system
If the cooling system is to function in an effective manner, all the channels in the
engine and the radiator must be free from deposit and impurities. The deposits that
build up consist of the salts always present in normal water.
Cleaning can conveniently be carried out in connection with filling or draining of antifreeze in the fall and spring (see page 31) If necessary, however, the cooling system
can be cleaned more often.
18 Check the spark plugs
The spark plugs should be cleaned at a Volvo workshop after every 3,000 miles
(5,000 km) and the electrode gaps are checked at the same time.
The plugs can be cleaned by using a brush or a sand blaster and should the be
blown clean with compressed air. The electrode gap should be 0.028” (0.7 mm). After
the spark plugs have been cleaned and adjusted they should be tested in a spark
plug tester.
19 Replace the spark plugs
When the electrodes have been burnt down by about 50%ö all the spark plugs
should be replaced. This corresponds to about 12,500 miles (20,000 km). This
replacement should preferably be carried out at a Volvo workshop since the spark
plugs should be tightened with a torque wrench.
When fitting new spark plugs, make sure that you fit the right type (see page 32).
20 Ignition system
The distributor contact breaker gap and the engine ignition timing setting should be
checked at a workshop after every 3,000 miles (5,000 km).
All adjusting work in the engine ignition system should be carried out by a workshop
owning the correct equipment for this work. A distributor is among the most sensitive
units in the engine and careless handling can lead to decreased engine output, high
fuel consumption, in the worst case, serious damage to the engine
21 Carburettors
The engine is fitted with a carburettor system consisting of two coupled SU
carburettors of the horizontal type. The carburettor throttles are connected by means
Source – Volvo AB, Göteborg, Sweden
Reprint 2001 Karl Eric Målberg
page 21(35)
of a shaft so that movements of the accelerator pedal influence both the carburettors
simultaneously.
IDLING SETTING
The engine idling setting is correctly
adjusted before the car is delivered from
the factory and should not be altered
later. Should adjustment be necessary it
should be carried out by a Volvo
workshop so that the engine delivers the
highest output. Provisional adjustment
can, however, by listening to the
induction sound on the carburettors while
the setting screws on the carburettors
are screwed inwards or outwards to
increase or decrease the idling speed.
When the setting is correct induction
sound on both the carburettors should be
the same.
LUBRICATION OF DAMPING CYLINDERS
Each time the engine oil is changed, the nut on the top of each carburettor should be
removed and the damping plungers should be taken out. Engine oil with the viscosity
SAE 20 of a standard grade (that is to say not multi-grade oil) should then be added
so that the inner tube is full but not the part above this.
Fuel
The gasoline used as fuel should be at least 97 octane. If gasoline with too low
octane value is used, knocking or glow ignition can result.
When the engine is supplied from the Volvo factory it has been adjusted for operation
on 97 octane fuel.
Electrical system
22 Check the battery electrolyte level
If it is to function correctly, the battery should be regularly checked to ensure that the
electrolyte level is not too low. This check can conveniently be carried out when the
car is being tanked. The electrolyte level should be about ½” (5-10 mm) above the
cell plates. If necessary, top up with distilled water. Never add too much since this
can cause the acid to splash over and cause damage in the engine compartment.
Never check the electrolyte level by using a lighted match. The gases formed in the
cells are very explosive.
23 Check the state of charge of the battery
The state of charge of the battery should be checked after every 3,000 miles (5,000
km). This check is carried out with the help of a hydrometer, which shows the specific
gravity of the battery acid. This varying with the state of charge of the battery, see
page 33 As the same time as the state of charge is checked, the terminals and the
terminal bolts should be checked to make sure that they are well tightened and they
should be smeared with grease or vaseline. If necessary they can be dried with a
cloth or brushed with a steel brush before being greased.
Source – Volvo AB, Göteborg, Sweden
Reprint 2001 Karl Eric Målberg
page 22(35)
24 Check headlight alignment
The alignment of headlights should be checked in a Volvo workshop after every
6,000 miles (10,000 km). Remember that the section of the road lit up by the
headlights can vary depending on the loading of the car.
Replacement of bulbs
The replacement of bulbs in the various lighting units is shown on the following
pages. Some of the bulbs have two functions, for example the headlight bulbs which
have filaments for both full and dimmed lights. The guide pins on the sockets of these
bulbs are either of different thickness or they are staggered so that the bulbs can only
be fitted in one determined position. Certain makes of bulbs have a “Top” mark which
should be turned upwards.
When fitting bulbs, you should never touch the glass with your fingers. The reason for
this is that grease, oil etc. can be carbonised by the heat from the bulb and this
cause damage to the reflector.
REPLACING THE HEADLIGHT BULBS
1. Loosen the screw on the underside of
the rim with a screw driver
2. Pull out the bottom part of the rim
slightly and lift upwards so that the
retainer catch releases it’s grip.
3. Loosen the three screws retaining the
inner ring (upper picture). These
screws do not need to be completely
removed. The inner ring can nthen be
removed by turning it in an
anticlockwise direction. Then lift out
the insert.
4. The insert is more convenient to deal
with if the cable plug is removed
(centre picture)
5. Loosen the spring which retains the
bulb holder.
6. Take out the bulb holder and loosen
the bulb by pushing it inwards and
then turning it in a clock-wise
direction. When fitting the new bulb,
remember that the pins on the socket
have different widths.
7. When the bulb holder is being refitted in the insert, make sure that the
little catch engages in it’s notch.
Source – Volvo AB, Göteborg, Sweden
Reprint 2001 Karl Eric Målberg
page 23(35)
On vehicles fitted with Sealed Beam
headlights, follow the instructions under
points 1-4 and then replace the complete
unit.
REPLACING THE BULBS IN THE INNER LIGHTING UNITS
The bulbs are accessible after the shade has been removed by pulling it outwards
REPLACING THE BULBS IN THE
FRONT PARKING LIGHT FLASHER
First loosen the glass in the rim. These
units can be loosened at the same time,
by turning in an anti-clockwise direction.
The bulb is now accessible for
replacement. The bulb has a bayonet
fitting but remember that the pins on the
socket are in different positions.
REPLACEMENT OF BULBS FOR THE
DIRECTIONAL SIGNAL/TAIL LIGHTS
AND STOPLIGHTS
Loosen the screws with a Philips
screwdriver and remove the glass.
The bulbs are now accessible for
replacment. The outer bulb is the
directional signal and the tail lights, the
inner bulb is the stoplight
Source – Volvo AB, Göteborg, Sweden
Reprint 2001 Karl Eric Målberg
page 24(35)
REPLACING THE BULB FOR THE
LICENSE PLATE LIGHTING
The bulbs for the license plate lighting
are accessible from the inside of the
luggage compartment.
The bulb holder is loosened simply by
pressing it to one side after which the
bulb, which has a bayonet fitting, can be
removed.
Power Transmission
25 Cleaning the overdrive oil strainer
The oil strainer is behind a cover on the
left side of the overdrive (see picture)
and should be cleaned each time the oil
in the transmission is changed (that is
about every 12,500 miles, 20,000 km).
The oil strainer should be cleaned in
gasoline or white spirit and blown dry,
preferably with compressed air. Check
that the gaskets are in good condition
before you fit the strainer and the cover.
26 Checking the clutch yoke free travel
In order to avoid risk of the clutch slipping, the clutch yoke free travel should be
checked at regular intervals and adjusted if necessary after every 3,000 miles (5,000
km). If the clutch does not disengage in a satisfactory manner, the free travel of the
clutch pedal should also be checked. See page 33 for data. The clutch should be
checked and adjusted in a Volvo workshop, which has the equipment for this
purpose.
28 Overhauling the brakes
After every 12,500 miles (20,000 km) the brakes should be examined at a Volvo
workshop for wear, If the car is used for hard driving, this should be done more often.
It is possible that the brake linings can be fully worn and should this happen there is
a risk for the brake discs and the brake drums becoming damaged, so it is important
to have this overhaul carried out at the above-mentioned intervals.
Source – Volvo AB, Göteborg, Sweden
Reprint 2001 Karl Eric Målberg
page 25(35)
Front end
29 Checking the front wheel alignment
Correct front wheel alignment is of vital importance for the steering of the car. Faulty
adjustment can also mean unnecessary heavy tire wear.
For this reason you should let your Volvo workshop carry out a regular check on the
front wheel alignment, for example after every 6,000 mile (10,000 km). If the car has
been involved i a collision or heavy impact and it is suspected that the front end may
have been influenced, the car should be taken as quickly as possible to a workshop
for a check of the front wheel alignment. Volvo workshops have special measuring
equipment for this purpose and can therefore carry out this control very quickly. The
front wheel alignment angles are shown no page 33
30 Checking the ball joints, tie rod etc.
After every 12,500 miles (20,000 km) the car should be taken to a Volvo workshop
for a check of the front end concerning looseness in the ball joints, steering gear etc.
At the same time the front wheel bearings should be disassembled and cleaned and
the packed with grease (see the lubrication chart at the end of this book)
Wheels and tires
31 Check the tire air pressure
Make a habit of checking the tire air pressure regularly, The best way to do this is to
check the pressure at a service station while the car is being tanked. Use a gauge for
this purpose, See page 33 for the correct air pressure. Do not forget the spare wheel.
Even if the spare wheel is not used, the pressure can go down and the tire can be flat
just as you need it. Do not let the spare wheel remain unused for a long length of
time, but change it around at regular intervals with the other tires.
32 Check tightening the wheel nuts, balancing
After every 6,000 mile (10,000 km) the wheel nuts should be tightened to a torque of
72-100 lb.ft (10-14 kgm(. At the same time the wheels should be re-balanced if
necessary.
If the inspection of the tires shows that there are particularly worn spots and unusual
wear on the tread, the car should be taken immediately to a Volvo workshop for the
wheels to be re-balanced.
Changing a wheel
Before the car is jacked up, the hand
brake should be applied. Lay some
blocks and stones in front of and behind
the wheels that remain on the ground as
a further safety measure. Remember that
the hand brake only influences the rear
wheels
Source – Volvo AB, Göteborg, Sweden
Reprint 2001 Karl Eric Målberg
page 26(35)
REMOVING
1. Lever off the hub cap with the help of
the spade shaped lever.
2. Loosen the wheel nuts slightly with
the help of a socket wrench. All the
wheels have right hand thread nuts
which can be loosened by turning in
an anti-clockwise direction.
3. Place the jack in the jack recess
nearest to the wheel that is to be
lifted up. Lift the side of the car so
high that the wheel is clear off the
ground.
4. Remove the wheel nuts completely
and lift off the wheel. Be careful when
lifting up the wheel, so as not to
damage the thread on the wheel
bolts.
FITTING
1. Lift on the new wheel and tighten the
nuts. The lower the car and finally
tighten the nuts. Tighten the nuts
alternately.
2. Fit the hub cap by striking smartly
with the hand a little at a time until it
is firmly in position
Body
33 Washing
When the car is new it should be washed often to harden the surface finish.
Otherwise the car should be washed as soon as it is dirty or dusty. If dirt and dust are
allowed to be in contact with the surface finish for a length of time, damage can
result.
While the car is being washed it should stand so that it is not in direct sunshine since
otherwise drying patches can result. First rinse off the underside of the body with a
jet of water and use a soft brush if necessary. Then rinse down the whole body with a
light jet until the dirt has softened up. Don not be sparing with the water. The dirt is
then washed off with a sponge using plenty of water.
If washing with water alone is not sufficient, washing agents can be used. Be careful
when choosing a washing agent since some of them can be detrimental to the
surface finish.
Source – Volvo AB, Göteborg, Sweden
Reprint 2001 Karl Eric Målberg
page 27(35)
Whenever a washing agent is used, the car should be well rinsed down with clear
water afterwards.
After washing, the car should be carefully dried off with a soft, clean charmois
leather.
34 Polishing and waxing
The car should be polished when the surface finish appears to be a little dull and
normal washing is not sufficient to make it shine again. Under normal conditions it is
sufficient to polish the car a couple of times a year, on condition that it is carefully
serviced and washed as soon as it is dirty or dusty.
The car should be carefully washed and dried off before polishing. If polish should be
applied on a dirty or dusty surface, the result can easily be scratches on the surface
finish. Avoid polishing in direct sunshine since the result of this can be a smeary
surface. Use only a good quality polish intended for synthetic finish.
Polishing a couple of times a year is generally sufficient to give the surface finish of
the car the maintenance it needs. If you want to wax the car yourself, be careful to
see that the surface is absolutely clean before the wax is applied. The car should
also be newly polished. Be careful when using solvents since these can be very
damaging to the surface finish. Waxing may not be carried out before at least one
year has past after the vehicle has been delivered.
CHROMED PARTS
The bumpers, the radiator grille and the hub caps are chromed and should be
washed with clean water as soon as they are dirty. This is particularly important if you
drive a lot on gravel roads which are treated with chemicals to keep the dust down or
if you are driving a lot near the sea. After washing you can apply wax or anti-rust
preparation
TOUCHING UP THE UNDERBODY SEALING, GRAVEL DAMAGE, ETC.
At the same time as you rinse off the underbody, the underbody sealing should be
examined. Should it need touching up, make sure that this is done before there is
any rust damage on the metal.
Paint spraying makes great demands on workshop equipment and professional skill
and for this reason, you should take the car to Volvo workshop if any extensive
damage needs touching up.
Always have minor damages remedied as soon as possible since otherwise there is
a risk of rusting.
35 Cleaning
CLEANING THE UPHOLSTERY
If there are any dirty patches on the upholstery, Remove these by following the
instructions under “Removing stains”. Neither gasoline nor carbon tetrachloride
should be used on the parts of the upholstery which consist of textile reinforced
plastic. These plastic parts should be washed with tepid soap solution, or, in more
difficult cases, with some household detergent.
To remove stains, use a clean rag moistened with a little of the recommended
cleaning agent. Start on the outer edges of the stain and work in towards the centre.
This will avoid a ring being left afterwards.
Source – Volvo AB, Göteborg, Sweden
Reprint 2001 Karl Eric Målberg
page 28(35)
When using carbon tetrachloride, always air out the car well afterwards.
CLEANING THE FLOOR MATS
The floor mats should be taken out at least twice a year and cleaned. This is
particularly important during the winter since it is easy for snow and ice to be brought
into the car on the feet of the passengers and the mats should then often be
removed for drying. At the same time remove gravel and dirt from the floor plating
under the mats.
If the rubber mats have become stained, they can be cleaned with methylated spirits
which his then rinsed off with water.
Removing stains
BATTERY ACID
If any battery acid is spilt on the upholstery, the stain must be removed immediately,
since otherwise a hole can be corroded in the upholstery. The best thing to use is
ammonia, but if no ammonia is available, you can rinse the stain with water. Treat the
stain as soon as possible with ammonia which should the be rinsed off with water.
BLOOD
Rub the stain with a rag moistened with cold water and make sure that a clean part of
the rag is used at all time. If the stain does not disappear, it can be rubbed with a little
ammonia. After about a minute, rinse off with cold water.
CHOCOLATE
Rub the stain with a rag moistened with tepid water. If the stain does not disappear
completely, rub with carbon tetrachloride.
GREASE
Rub the stain with a cloth moistened with carbon tetrachloride. Do not use gasoline
since this will leave a mark on the material.
FRUIT JUICE
Rub hard with a rag moistened in hot water and allow the stain to dry. Then use
carbon tetrachloride.
ICE CREAM
Rub the stain with a rag moistened with hot water. When the stain is dry, rub with
carbon tetrachloride.
LIPSTICK
Pour a little carbon tetrachloride onto the stain and then press on a clean piece of
plotting paper. Repeat the procedure until the stain has disappeared.
CHEWING GUM
Loosen nup the chewing gum with carbon tetrachloride and then scrape off with a
blunt knife, before it has dried.
VOMIT
Dry the stains with cold water before the have dried. Then wash with tepid soap
solution and go over the surface with cold water. Finally treat the stain with a rag
moistened with carbon tetrachloride.
Source – Volvo AB, Göteborg, Sweden
Reprint 2001 Karl Eric Målberg
page 29(35)
URINE
Wash with warm soap solution and the rinse off with cold water. After this pour a little
dilute ammonia (1 part ammonia to 5 parts water) over the stain. Allow the ammonia
to remain for a minute or so and then dry off with a moist cloth.
Servicing before a long distance trip
If you are thinking of travelling abroad with your vehicle or taking a long trip you
should have it overhauled first in a Volvo workshop. You will enjoy your journey
better if you know that your car is in perfect trim. But even if something should go
wrong, your journey need not to be spoiled. Wherever you go you will have a Volvo
workshop within easy distance to take care of your car. The regular servicing of you
car need not be neglected while you are driving abroad. All Volvo service workshops
abroad are fitted out to give your car the service it needs.
IF YOU PREFER TO LOOK OVER YOUR CAR YOURSELF, THE FOLLOWING
TIPS ARE WORTH NOTING.
1. Give the car thorough all-round lubrication
2. Flush out the engine cooling system and check the hose clips
3. Examine the tires carefully. Replace worn tires
4. If you are not sure whether the engine is functioning perfectly and that the fuel
consumption is normal, you can save both time and money by having a thorough
check carried out
5. Examine the state of charge of the battery and clean the terminals
6. Check the brakes, the front wheel alignment and steering gear.
7. Check over the tool kit and check the spare wheel.
8. Check the lighting and adjust your headlights for the left or right hand traffic
where necessary,
Procedure in cold weather
When cold weather is on the way, it is time to think of the winter servicing of your car.
The first night frost can come as a very unpleasant surprise unless you are prepared.
Most people know that anti-freeze should be added to the cooling system but do not
forget that the water in the windshield washer container can also freeze. Moisture in
the door locks can also freeze.
Engine cooling system
Some suitable anti-freeze should be added to the cooling system in good time before
the cold weather. The most usual anti-freeze is methylated spirits or ethylene glycol,
methylated spirits having the disadvantage that it evaporates at normal engine
temperature. Ethylene glycol is more permanent and is therefore preferable. Pure
ethylene glycol, however, has a corrosive effect on the engine cooling system and for
this reason the anti-freeze glycol available on the market also contains additives to
prevent corrosion. For technical reasons these additives cannot be added in greater
quantity than are necessary for one winter season. Under unfavourable conditions
they can even be used up more quickly, for example, if there is sludge, rust or
flushing agent left in the cooling system. Never use the same glycol for more than
one winter season. The cooling system should be carefully cleaned out before antifreeze is added. Drain of the complete cooling system including the heater and rinse
out with water, steam (at a pressure of 14 lb/sq.in.= 1kg/sq.cm) or suitable cleaning
agent.
COOLING SYSTEM DRAIN COCKS
Source – Volvo AB, Göteborg, Sweden
Reprint 2001 Karl Eric Målberg
page 30(35)
Four cocks should be opened when the cooling water is drained off. They are located
as follows:
At the rear on the right side of the engine block
Under the oil cooler
Under the heater
Low down on the left side of the radiator
MIXING TABLE FOR ETHYLENE GLYCOL AND WATER
Cooling
system
capacity
9 litres
-10C
14 F
2.0
Necessary amount of ethylene glycol for frost protection down to:
-15C
-20C
-30C
-40C
5F
-5F
-22F
-40F
2.75
3.25
4.25
5.0
The maximum depression on freezing point, -56C (-69F) is obtained by adding 6.1
litres of glycol.
Engine lubrication system
During the winter engine oil with viscosity of SAE 10W should be used in the engine
lubrication system. This lighter oil reaches the lubrication points in the engine more
easily at low temperatures and also facilitates cold starting. If you are driving mainly
short stretches during the winter, the engine oil should be changed more often nthan
normal, for example after every 1,500 miles (2,500 km)
Electrical system
The electrical system in the car is subjected to greater stresses during the winter
than during the warm summer months. The lighting and the starter motor are used
more and this means higher current consumption, and since the capacity of the
battery is considerably lower with low air temperature, it must be checked more often
and re-charged when necessary. If the battery voltage is excessively low, there is a
risk of frost damage to the battery.
Brake system
During the winter the brakes are more subjected to splash and condensation water.
This can result in the hand brake freezing when it is applied. For this reason the hand
brake should not be applied when the car is parked but first gear or reverse should
be engaged instead.
Windshield washers
At the same time as the engine cooling system has anti-freeze added, the water in
the windshield washer container should also have anti-freeze added. Your Volvo
dealer can supply you with suitable anti-freeze for this purpose.
Anti-freeze for door locks
A frozen door lock is one of the most irritating things that can happen to a car owner.
Many valuable minutes early in the morning can be wasted warming up keys and
melting ice in locks. Remember to lubricate the lock in good time with some antfreeze preparation.
Specifications
This chapter contains the technical data you may have use for as owner of the car.
Consult your dealer if you require more informatioin.
Dimensions and weights
Length………………………………………
Source – Volvo AB, Göteborg, Sweden
Reprint 2001 Karl Eric Målberg
4400 mm
page 31(35)
Width……………………………………….
Height………………………………………
Wheel base………………………………..
Track front…………………………………
Track rear………………………………….
Ground clearance…………………………
Turning circle………………………………
Curb weight (including driver)………….
1700 mm
1285 mm
2450 mm
1315 mm
1315 mm
155 mm
9500 mm
1200 kg
Capacities
Fuel tank……………………………………
Cooling system…………………………….
Engine, when changing oil……………….
Engine, including oil cleaner……………..
Transmission M40…………………………
Transmission M41…………………………
Rear axle……………………………………
Steering box………………………………..
approx 45 litres
approx 9 litres
approx 3.25 litres
approx 3.75 litres
approx 0.75 litres
approx 1.8 litres
approx 1.3 litres
approx 0.2 litres
Engine
Type designation…………………………..
Output (SAE)……………………………….
Max torque (SAE)………………………….
Number of cylinders……………………….
Bore…………………………………………
Stroke……………………………………….
Displacement……………………………….
Compression ratio…………………………
Valves……………………………………….
Valve clearance, warm and cold engine
Inlet………………………………………..
exhaust……………………………………
Idling speed
Carburettors, make and designation……
Cooling system
Type………………………………………..
Thermostat
starts to open at…………………………..
fully open at……………………………….
Fan belt, designation…………………….
Ignition system
Order of firing…………………………………
Ignition setting stroboscope at 1500 r.p.m.
97 octane (research method)……………….
100 octane…………………………………….
Spark plug types……………………………..
Spark plug gap……………………………….
Spark plug tightening torque………………..
Distribution dwell angle………………………
Electrical system
Voltage………………………………………..
Battery type…………………………………..
Battery capacity……………………………..
Source – Volvo AB, Göteborg, Sweden
Reprint 2001 Karl Eric Målberg
B18 B
108 b.h.p at 5,800 r.p.m.
15.2 kgm at 4,000 r.p.m.
4
84.14 mm
80 mm
1.78 litres
10:1
Overhead
0.50-0.55 mm
0.50-0.55 mm
600-800 r.p.m.
S.U-HS 6
Pressure
75-78 C
89 C
HC 38x35”
1-3-4-2
14-19 before TDC
17-19 before TDC
Bosch W22 T-1
0.7-0.8 mm
3.8-4.2 kgm
60 degrees
12V
Bolinden 107GM or corresponding type
60 Ah
page 32(35)
Battery electrolyte, specific gravity…………
Battery electrolyte, specific gravity when
recharging necessary………………………..
Starter motor, rated output………………….
Fuses………………………………………….
Lamp bulbs (12V)
Headlights (2)………………………………..
Directional signals/parking lights front (2)…
Directional signals/tail lights (2)…………….
Brake stoplights (2)…………………………..
License plate lighting (2)…………………….
Internal lighting (2)……………………………
Instrument lighting (6)……………………….
Map-reading lamp (1)………………………..
Warning lamp directional signal……………..
Warning lamp, full headlights………………..
Warning lamp, charging……………………...
Warning lamp, overdrive……………………..
Power train
Clutch
Clutch yoke free travel……………………….
Clutch pedal travel……………………………
Transmission
Type designation……………………………..
Ratio 1st………………………………………………………………..
Ratio 2nd……………………………………………………………….
Ratio 3rd……………………………………………………………….
Ratio 4th………………………………………………………………..
Overdrive………………………………………
Reverse………………………………………..
1.275-1.285
1.230
1 h.p.
35 A (3)
45/40W
20/5W
20/5W
20W
6W
5W
2.4W
2.4W
2.4W
2.4W
2.4W
About 3-4 mm
140 mm
M40
3.13:1
1.99:1
1.36:1
1:1
3.25:1
M41
3.13:1
1.99:1
1.36:1
1:1
0.76:1
3.25:1
Rear axle
Type…………………………………………..
Ratio………………………………………….
Spiral bevel (hypoid)
4.1:1
4.56:1
Front wheel alignment
(unloaded car but including fuel, water and
spare wheel)
Toe-in…………………………………………
Camber……………………………………….
Caster…………………………………………
King pin inclination (with 0 degree camber).
4 mm
0+1 degree
0+1 degree
8 degrees
Wheels and tires
Wheel size……………………………………
Type of tires………………………………….
Tire size………………………………………
Tire pressure (cold tires)
Front………………………………………….
Rear………………………………………….
Tool kit
Jack with lever
Source – Volvo AB, Göteborg, Sweden
Reprint 2001 Karl Eric Målberg
4 ½ J x 15L
Braced tread with inner tube
165-15
1.8 kg/sq.cm
2.0 kg/sq.cm
Pliers
page 33(35)
Wheel wrench
Socket wrench with lever
Adjustable wrench
Screwdriver
Philips screwdriver
Tool bag
Lubrication chart
Source – Volvo AB, Göteborg, Sweden
Reprint 2001 Karl Eric Målberg
page 34(35)
Notes for lubrication chart
Note 1, Check that the oil is up to the filler plug
Note 2. The front wheel bearings should be disassembled after every 12,500 miles
(20,000 KM) or at least once a year. Clean the bearings thoroughly and pack with
heat-resistant bearing grease
Note 3. On a certain production series of this car, the ball joint is designed so that no
lubrication is required and no nipple is fitted in this case.
Note 4. Check that the fluid level is about ¾” (15-20 mm) below the upper edge of
the container.
Note 5. After every 12,500 miles (20,000 km), disconnect the drive cable from the
instrument, pull about 20cm out of the sleeve, dry it off and smear with a thin layer of
grease. Do not use oil since this can seep up into the instrument.
Note 6. Lubricate the pull rod at the cotter pin with light engine oil.
Note 7. After every 25,000 miles (40,000 km), or at least every other year,
disassemble the rear wheel bearings, clean them and pack in with heat-resistant
bearing grease
Note 8. Have the handbrake cables lubricated with graphite grease a couple of times
a year
Note 9. Check the oil level when tanking or at least every 14 days. Change the oil
every 3,000 miles (5,000 km) as well as spring and fall when changing over to oil of
other viscosity. Each time the engine oil is changed, top up the carburettor cylinders,
Note 10. After every 6,000 miles (10,000 km) drop a little light engine oil on nthe felt
wick under the rotor in the distributor. The rotor can be lifted off the shaft after the
distributor cap has been removed. At the same time, lubricate the outside edge of the
cam with a very thin layer of vaseline.
Note 11. Check the oil level every 3,000 miles (5,000 km) and change the oil after
every 12,500 miles (20,000 km)
Lubricant:
Car without overdrive (M40 Transmission): SAE 80 transmission oil (not hypoid oil)
Car with overdrive (M41) Transmission): SAE 30 engine oil. The overdrive drain
nplug is marked “Drain”. Fill up with oil relatively slowly so that the oils runs down into
the overdrive. Check that the oil level does not go down when it comes up to the filler
hole.
Note 12. . Check the oil level every 3,000 miles (5,000 km). Change the oil after the
first 3,000 miles (5,000 km). After this, the oil level only need checking and topping
up when necessary.
Source – Volvo AB, Göteborg, Sweden
Reprint 2001 Karl Eric Målberg
page 35(35)