1
NVS
Network Video Recorder
Hardware Manual
model no.
Please carefully read these instructions before using this product.
Save this manual for future use.
1
NVS8-X
NVS16-X
NVS32-X
ii
iii
Surveillix™ NVS
Hardware Manual
Manual Edition 29102AA –MAY 2009
Printed in USA
No part of this documentation may be reproduced in any means, electronic or mechanical, for any purpose, except as expressed in the
Software License Agreement. Toshiba shall not be liable for technical or editorial errors or omissions contained herein. The information in this
document is subject to change without notice.
THE INFORMATION IN THIS PUBLICATION IS PROVIDED “AS IS” WITHOUT WARRANTY OF ANY KIND. THE ENTIRE RISK ARISING
OUT OF THE USE OF THIS INFORMATION REMAINS WITH RECIPIENT. IN NO EVENT SHALL TOSHIBA BE LIABLE FOR ANY DIRECT,
CONSEQUENTIAL, INCIDENTAL, SPECIAL, PUNITIVE, OR OTHER DAMAGES WHATSOEVER (INCLUDING WITHOUT LIMITATION,
DAMAGES FOR LOSS OF BUSINESS PROFITS, BUSINESS INTERRUPTION OR LOSS OF BUSINESS INFORMATION), EVEN IF
TOSHIBA HAS BEEN ADVISED OF THE POSSIBILITY OF SUCH DAMAGES AND WHETHER IN AN ACTION OR CONTRACT OR TORT,
INCLUDING NEGLIGENCE.
This software and documentation are copyrighted. All other rights, including ownership of the software, are reserved to DVR Support Center.
TOSHIBA, and Surveillix are registered trademarks of TOSHIBA CORPORATION in the United States and elsewhere; Windows, and Windows
XP Embedded are registered trademarks of Microsoft Corporation. All other brand and product names are trademarks or registered trademarks
of the respective owners.
The following words and symbols mark special messages throughout this guide:
WARNING: Text set off in this manner indicates that failure to
follow directions could result in bodily harm or loss of life.
CAUTION: Text set off in this manner indicates that failure to
follow directions could result in damage to equipment or loss of
information.
iv
LIMITED WARRANTY
NETWORK VIDEO RECORDER
The Imaging Systems Division of Toshiba America Information Systems, Inc. ("ISD") makes the following limited
warranties. These limited warranties extend to the Original End-User ("You[r]").
Limited Two (2) Year Warranty of Labor and Parts
The Imaging Systems Division of Toshiba America Information Systems warrants this product and parts against defects in
material or workmanship for a period of two years from the date of original retail purchase by the end-user. During this period,
ISD will repair or replace a defective product or part with a new or refurbished item. The user must deliver the entire product to
the Surveillix DVR Repair Facility. The user is responsible for all transportation and insurance charges for the product to the DVR
Repair Facility. ISD reserves the right to substitute Factory Refurbished Parts and / or Factory Refurbished Product in place of
those in need of repair.
Step-by-step Procedures - How to Obtain Warranty Service
[1] Verify operation of the unit by checking the instruction manual and web site for the latest updates at
www.toshibasecurity.com
[2] If there is a defect in material or workmanship, contact the Surveillix DVR Support Center at (877) 855-1349 [877-855-1-FIX] to
speak to a technical support representative and schedule service.
[3] Arrange for delivery of the product to the Surveillix DVR Repair Facility. Products must be insured and securely packed,
preferably in the original shipping carton. A letter explaining the defect and a copy of the bill of sale or other proof of purchase must
be enclosed with a complete return street address and daytime telephone number. The Tracking Number should also be indicated
on your documents. Charges for transportation and insurance must be prepaid by the end-user.
Critical Use Disclaimer
The product is not designed for any “critical applications.” “Critical applications” means life support systems, exhaust or smoke
extraction applications, medical applications, commercial aviation, mass transit applications, military applications, homeland security
applications, nuclear facilities or systems or any other applications where product failure could lead to injury to persons or loss of life
or catastrophic property damage. Accordingly, Toshiba disclaims any and all liability arising out of the use of the product in any
critical applications.
Your Responsibilities
The above warranty is subject to the following conditions:
[1] You must retain the bill of sale or provide other proof of purchase.
[2] You must schedule service within thirty days after you discover a defective product or part.
[3] All warranty servicing of this product must be made by the Surveillix DVR Repair Facility.
[4] The warranty extends to defects in material or workmanship as limited above, and not to any products or parts that have been
lost or discarded by user. The warranty does not cover damage caused by misuse, accident, improper installation, improper
maintenance, or use in violation of instructions furnished by ISD. The warranty does not extend to units which have been altered or
modified without authorization of ISD, or to damage to products or parts thereof which have had the serial number removed, altered
defaced or rendered illegible.
ALL WARRANTIES IMPLIED BY STATE LAW, INCLUDING THE IMPLIED WARRANTIES OF MERCHANTABILITY AND
FITNESS FOR A PARTICULAR PURPOSE, ARE EXPRESSLY LIMITED TO THE DURATION OF THE LIMITED WARRANTIES
SET FORTH ABOVE. Some states do not allow limitations on how long an implied warranty lasts, so the above limitation
may not apply. WITH THE EXCEPTION OF ANY WARRANTIES IMPLIED BY STATE LAW AS HEREBY LIMITED, THE
FOREGOING EXPRESS WARRANTY IS EXCLUSIVE AND IN LIEU OF ALL OTHER WITH RESPECT TO THE REPAIR OR
REPLACEMENT OF ANY PRODUCTS OR PARTS. IN NO EVENT SHALL ISD BE LIABLE FOR CONSEQUENTIAL OR
INCIDENTAL DAMAGES. Some states do not allow the exclusion or limitation of incidental or consequential damages so
the above limitation may not apply.
No person, agent, distributor, dealer, service station or company is authorized to change, modify or extend the terms of
these warranties in any manner whatsoever. The time within which an action must be commenced to enforce any
obligation of ISD arising under this warranty or under any statute, or law of the United States or any state thereof, is
hereby limited to one year from the date you discover or should have discovered, the defect. This limitation does not apply
to implied warranties arising under state law. Some states do not permit limitation of the time within which you may bring
an action beyond the limits provided by state law so the above provision may not apply to user. This warranty gives the
user specific legal rights, and user may also have other rights, which may vary from state to state.
TOSHIBA AMERICA INFORMATION SYSTEMS, INC.
Imaging Systems Division
Copyright © 2007 Toshiba America Information Systems, Inc. All rights reserved.
v
IMPORTANT SAFEGUARDS
1.
Read Owner’s Manual – After unpacking this product, read the owner’s manual carefully, and
follow all the operating and other instruction
2.
Power Sources – This product should be operated only from the type of power source
indicated on the label. If you are not sure of the type of power supply to your home or business,
consult your product dealer or local power company
3.
Ventilation – Slots and openings in the cabinet are provided for ventilation and to ensure
reliable operation of the product and to protect it from overheating, and these openings must
not be blocked or covered. The product should not be placed in a built-in installation such as a
bookcase or rack unless proper ventilation is provided or the manufacturer’s instructions have
been adhered to.
4.
Heat – The product should be situated away from heat sources such as radiators, heat
registers, stoves, or other products that produce heat.
5.
Water and Moisture – Do not use this product near water. Do not exceed the humidity
specifications for the product as detailed in this manual.
6.
Cleaning – Unplug this product from the wall outlet before cleaning. Do not use liquid cleaners
or aerosol cleaners. Use a damp cloth for cleaning.
7.
Power Cord Protection – Power-supply cords should not be routed so that they are not likely
to be walked on or pinched by items placed against them, paying particular attention to cords
at plugs, convenience receptacles, and the point where they exit from the product.
8.
Overloading – Do not overload wall outlets; extension cords, or integral convenience
receptacles as this can result in a risk of fire or electrical shock.
9.
Lightning – For added protection for this product during storm, or when it is left unattended
and unused for long periods of time, unplug it from the wall outlet. This will prevent damage to
the product due to lightning and power line surges.
10.
Object and Liquid Entry Points – Never insert foreign objects into the NVR, other than the
media types approved by Honeywell, as they may touch dangerous voltage points or short-out
parts that could result in a fire or electrical shock. Never spill liquid of any kind on the product.
11.
Accessories – Do not place this product on an unstable cart, stand, tripod, bracket, or table.
The product may fall, causing serious personal injury and serious damage to the product.
12.
Disc Tray – Keep fingers clear of the disc tray as it is closing. Neglecting to do so may cause
serious personal injury.
13.
Burden – Do not place a heavy object on or step on the product. The object may fall, causing
serious personal injury and serious damage to the product.
14.
Disc – Do not use a cracked, deformed, or repaired disc. These discs are easily broken and
may cause serious personal injury and product malfunction.
15.
LAN Port - This equipment is for indoor use and all the communication wirings are limited to
inside of the building.
vi
IMPORTANT SAFEGUARDS, continued
16.
Damage Requiring Service – Unplug the unit from the outlet and refer servicing to qualified service
personnel under the following conditions:
a.
b.
c.
d.
When the power-supply cord or plug is damaged.
If liquid has been spilled, or objects have fallen into the unit.
If the unit has been exposed to rain or water.
If the unit does not operate normally by following the operating instructions. Adjust only
those controls that are covered by the operating instructions as an improper adjustment
of other controls may result in damage and will often require extensive work by a
qualified technician to restore the unit to its normal operation.
e. If the unit has been dropped or the enclosure has been damaged.
f. When the unit exhibits a distinct change in performance - this indicates a need for
service.
17.
Servicing – Do not attempt to service this product yourself as opening or removing covers may expose
you to dangerous voltage or other hazards. Refer all servicing to qualified personnel.
18.
Replacement Parts – When replacement parts are required, be sure the service technician has used
replacement parts specified by the manufacturer or have the same characteristics as the original part.
Unauthorized substitutions may result in fire, electric shock or other hazards.
19.
Safety Check – Upon completion of any service or repairs to this unit, ask the service technician to
perform safety checks to determine that the unit is in proper operating condition.
BATTERY EXPLOSION CAUTION STATEMENT
CAUTION: Risk of Explosion if Battery is replaced by an Incorrect Type.
Dispose of Used Batteries According to the Instructions
NOTES ON HANDLING
Please retain the original shipping carton and/or packing materials supplied with this product. To ensure the integrity of this product when
shipping or moving, repackage the unit as it was originally received from the manufacturer.
Do not use volatile liquids, such as aerosol spray, near this product. Do not leave rubber or plastic objects in contact with this product for
extended periods of time. Rubber or plastic objects left in contact with this product for extended periods of time will leave marks on the
finish.
The top and rear panels of the unit may become warm after long periods of use. This is not a malfunction.
NOTES ON LOCATING
Place this unit on a level surface. Do not use it on a shaky or unstable surface such as a wobbling table or inclined stand.
If this unit is placed next to a TV, radio, or VCR, the playback picture may become poor and the sound may be distorted. If this happens,
place the DVR away from the TV, radio, or VCR.
vii
NOTES ON CLEANING
Use a soft dry cloth for cleaning.
For stubborn dirt, soak the cloth in a weak detergent solution, wring well and wipe. Use a dry cloth to wipe it dry. Do not use any type of
solvent, such as thinner and benzene, as they may damage the surface of the DVR.
If using a chemical saturated cloth to clean the unit, follow that product’s instructions.
NOTES ON MAINTENANCE
This DVR is designed to last for long periods of time. To keep the DVR always operational we recommend regular inspection maintenance
(cleaning parts or replacement). For details, contact the nearest dealer.
NOTES ON MOISTURE CONDENSATION
Moisture condensation damages the DVR. Read the following information carefully.
Moisture condensation occurs during the following cases:
When this product is brought directly from a cool location to a warm location.
When this product is moved to a hot and humid location from a cool location.
When this product is moved to a cool and humid location from a warm location.
When this product is used in a room where the temperature fluctuates.
When this product is used near an air-conditioning unit vent
When this product is used in a humid location.
Do not use the DVR when moisture condensation may occur.
If the DVR is used in such a situation, it may damage discs and internal parts. Remove any CD discs, connect the power cord of the DVR to
the wall outlet, turn on the DVR, and leave it for two to three hours. After two to three hours, the DVR will warm up and evaporate any
moisture. Keep the DVR connected to the wall and moisture will seldom occur.
viii
WARNING
TO REDUCE THE RISK OF ELECTRICAL SHOCK, DO NOT EXPOSE THIS APPLIANCE TO RAIN OR MOISTURE.
DANGEROUS HIGH VOLTAGES ARE PRESENT INSIDE THE ENCLOSURE.
DO NOT OPEN THE CABINET.
REFER SERVICING TO QUALIFIED PERSONNEL ONLY.
CAUTION
CAUTION
RISK OF ELECTRIC SHOCK
DO NOT OPEN
CAUTION: TO REDUCE THE RISK OF ELECTRIC SHOCK,
DO NOT REMOVE COVER (OR BACK).
NO USER-SERVICEABLE PARTS INSIDE.
REFER SERVICING TO QUALIFIED SERVICE PERSONNEL.
ix
RACK MOUNT INSTRUCTIONS
Elevated Operating Ambient – If installed in a closed or multi-unit rack assembly, the operating ambient temperature of the rack
environment may be greater than room ambient. Therefore, consideration should be given to installing the equipment in an environment
compatible with the maximum ambient temperature (Tma) specified by the manufacturer.
Reduced Air Flow – Installation of the equipment in a rack should be such that the amount of airflow required for safe operation of the
equipment is not compromised.
Mechanical Loading – Mounting of the equipment in the rack should be such that a hazardous condition is not achieved due to uneven
mechanical loading.
Circuit Overloading – Consideration should be given to the connection of the equipment to the supply circuit and the effect that
overloading of the circuits might have on over current protection and supply wiring. Appropriate consideration of equipment nameplate
ratings should be used when addressing this concern.
Grounding – Grounding of rack-mounted equipment should be maintained. Particular attention should be given to supply connections other
than direct connections to the branch circuit (e.g. use of power strips).
FCC STATEMENT
INFORMATION TO THE USER: This equipment has been tested and found to comply with the limits for a Class B digital device, pursuant
to Part 15 of the FCC Rules. These limits are designed to provide reasonable protection against harmful interference in a residential
installation. This equipment generates, uses and can radiate radio frequency energy and, if not installed and used in accordance with the
instructions, may cause harmful interference to radio communications. However, there is no guarantee that interference will not occur in a
particular installation. If this equipment does cause harmful interference to radio or television reception, which can be determined by turning
the equipment off and on, the user is encouraged to try to correct the interference by one or more of the following measures:
•
Reorient or relocate the receiving antenna.
•
Increase the separation between the equipment and receiver.
•
Connect the equipment into an outlet on a circuit different from that to which the receiver is connected.
•
Consult the dealer or an experienced radio/TV technician for help.
USERS OF THE PRODUCT ARE RESPONSIBLE FOR CHECKING AND COMPLYING WITH ALL FEDERAL, STATE, AND LOCAL LAWS
AND STATUTES CONCERNING THE MONITORING AND RECORDING OF VIDEO AND AUDIO SIGNALS. HONEYWELL VIDEO
SYSTEMS SHALL NOT BE HELD RESPONSIBLE FOR THE USE OF THIS PRODUCT IN VIOLATION OF CURRENT LAWS AND
STATUTES.
UL NOTICE
Underwriters Laboratories Inc. has not tested the performance or reliability of the security or signaling aspects of this product. UL has only
tested for fire, shock and casualty hazards as outlined in UL’s Standard for Safety UL 60950-1. UL Certification does not cover the
performance or reliability of the security or signaling aspects if this product. UL MAKES NO REPRESENTATIONS, WARRANTIES OR
CERTIFICATIONS WHATSOEVER REGARDING THE PERFORMANCE OR RELIABILITY OF ANY SECURITY OR SIGNALING
RELATED FUNCTIONS OF THIS PRODUCT.
x
CE NOTICE
This product is in conformity with the following European Directives:
ELECTROMAGNETIC COMPATIBILITY DIRECTIVE, 89/336/EEC
(as amended by 92/31/EECand by Article 5 of 93/68/EEC)
per the provisions of:
EN55022:2006
EN61000-4-2:1995+A1+A2:2001
EN55024:1998+A1:2001+A2:2003
EN61000-4-3:1995+A1:2002
EN61000-4-8:1994+A1:2001
EN61000-3-2:2006
EN61000-4-4:1995+A1+A2:2004
EN61000-4-11:2004
EN61000-3-3:1995+A1:2001+A2:2005
EN61000-4-5:1995+A1:2001
LOW VOLTAGE DIRECTIVE, 73/23/EEC
(as amended by Article 13 of 93/68/EEC)
per the provisions of:
EN 60950-1: 2001
EN61000-4-6:1996+A1:2001
xi
Table of Contents
PREFACE ...................................................................................................................................................................... 2 ABOUT THIS GUIDE ................................................................................................................................................ 2 TECHNICIAN NOTES ............................................................................................................................................... 2 INTRODUCTION............................................................................................................................................................ 4 PRODUCT DESCRIPTION ....................................................................................................................................... 4 FEATURES ............................................................................................................................................................... 4 CONTROLS AND CONNECTIONS ............................................................................................................................... 6 BASIC FEATURES ................................................................................................................................................... 7 FRONT PANEL CONTROLS AND LEDS ................................................................................................................. 8 REAR PANEL CONNECTORS ................................................................................................................................. 9 GETTING STARTED ................................................................................................................................................... 10 IDENTIFYING INCLUDED COMPONENTS ............................................................................................................ 11 KEYBOARD SETUP ............................................................................................................................................... 12 MOUSE SETUP ...................................................................................................................................................... 12 MONITOR SETUP .................................................................................................................................................. 13 POWER SETUP ...................................................................................................................................................... 13 CONNECTING A VIDEO SOURCE ........................................................................................................................ 13 HARD DRIVE ARRAY ............................................................................................................................................. 14 Swapping a Hard Drive ....................................................................................................................................... 14 OPTIONAL COMPONENTS.................................................................................................................................... 15 APPENDIX ................................................................................................................................................................... 16 NVS SPECIFICATIONS .......................................................................................................................................... 17 1
2
PREFACE
ABOUT THIS GUIDE
This manual is a setup and maintenance guide that can be used for reference when setting up the NVS unit and for troubleshooting
when a problem occurs. Only authorized personnel should attempt to repair this unit.
Toshiba reserves the right to make changes to the NVS units represented by this manual without notice.
The following text mark special messages throughout this guide:
NOTE: Text set off in this manner indicates topics of interests that can help the user understand the product better.
TIP: Text set off in this manner indicates topics and points of interests that can be helpful when using or settings up the NVS unit.
TECHNICIAN NOTES
WARNING: Only authorized technicians trained by Toshiba should attempt to repair this NVS unit. All troubleshooting
and repair procedures that may be shown are for reference and minor repair only. Because of the complexity of the
individual components and subassemblies, no one should attempt to make repairs at the component level or to make
modifications to any printed wiring board. Improper repairs can create a safety hazard. And any indications of
component replacement or printed wiring board modifications may void any warranty.
WARNING: To reduce the risk of electrical shock or damage to the equipment:
•
Do not disable the power grounding plug. The grounding plug is an important safety feature.
•
Plug the power cord into a grounded (earthed) electrical outlet that is easily accessible at all times.
•
Disconnect the power from the computer by unplugging the power cord either from the electrical outlet or the
computer.
CAUTION: To properly ventilate your system, you must provide at least 3 inches (7.6 cm) of clearance at the front and
back of the NVS unit.
3
4
INTRODUCTION
PRODUCT DESCRIPTION
A Surveillix NVS is simply a server that performs as a High Definition Digital Recorder. By utilizing the many features of a computer,
including processing power, storage capacity, graphics compression, network cameras and security features, the NVS unit is more
powerful than the analog recorders of the past with its ability to utilize digital network cameras.
The Surveillix NVS server software comes pre-configured for fast and seamless integration within your existing IT infrastructure.
Designed around Microsoft® Windows® XP Embedded, the server software offers unparalleled stability, security, and ease of use.
Accordingly, your security investment has never been easier to maintain. Multiple users may simultaneously connect through any
network connection for instantaneous live viewing, digital search, and off site video storage. Users can also connect remotely through
DSL, Cable Modems, ISDN, or 56K dial-up. This powerful software enables users to establish recording schedules, create motion
detection zones, use PTZ controls, and configure alarm inputs and outputs for each of the system's cameras. With the latest
advancements in the NVS Server Software, searching and indexing your video archive has never been easier. Video can now be
found, viewed, and exported in a number of file formats with just a few clicks.
The Surveillix NVS is high performance security product ready to meet today’s security demands.
FEATURES
Toshiba’s Surveillix NVS’ include the following features:
•
Field Upgradeable, Replaceable HDD Array
•
Large Storage Capacities
•
Internal RAID 5 (optional)
•
Removable HDD bays for quick and easy maintenance
•
PAN / TILT / ZOOM Controls on supported IP Cameras
•
Simultaneous Search, Playback and Backup
•
Up to 32 IP Cameras
•
Multiple Levels of Security Access
•
Output the video to an NTSC/PAL display
•
Advanced POS and ATM support
•
Continuous, Motion Detection and Alarm Recording Modes
•
Video Signal Loss Detection
•
Records at the Encoding Resolution of the IP Camera
•
Digital Signature Support for Tamper Proof Exporting
•
Up to 16 TB External RAID 5 Available
•
Output the Video to a NTSC/PAL Display
5
6
CONTROLS AND CONNECTIONS
This chapter includes the following information:
•
Input/Output connector locations
•
Front Panel Controls and LEDs
•
Rear Panel Connectors
7
BASIC FEATURES
Surveillix™ state-of-the-art High Definition Digital Recorders are housed in a high performance and versatile 4U Aluminum RackMount case allowing easy storage of multiple NVS’ for enterprise applications. Every Surveillix NVS Unit comes equipped with the
latest technology:
•
Intel® CPU
•
100/1000 Gigabit Ethernet
•
1GB of System Memory
•
DVD±RW Recorder
•
Full Duplex High-Fi Sound Functionality
8
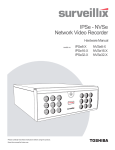
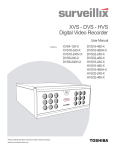
FRONT PANEL CONTROLS AND LEDS
The front panel of the NVS unit contains the devices that will be commonly used for data removal, retrieval, and backup replacement.
The most common components and buttons are shown below.
DVD±RW Drive
Hard Drive Activity &
Power LEDs
Hard Drive Array
LOCK
OPEN
LOCK
OPEN
LOCK
OPEN
LOCK
OPEN
Cooling Fan Air Intake
On / Off Power Switch
USB Ports
9
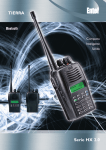
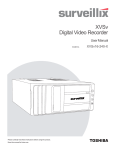
REAR PANEL CONNECTORS
The rear panel of the NVS unit contains virtually all of the connectors you will be using. Below is a diagram that outlines the location
and description of each connector:
SVGA Monitor Out
Fire Wire
S-Video Out
1394
DVI-D
Audio
• Line In
• Speaker Out
• Mic In
AC Power
Connector
Secondary Power Switch
USB Ports
PS/2 Mouse Input
PS/2 Keyboard Input
DVI-D Port
SVGA Output
RJ-45 Network Jack
10
GETTING STARTED
This chapter includes the following information:
•
•
•
Included Components
Setting up your NVS Hardware
Optional Components
11
IDENTIFYING INCLUDED COMPONENTS
Surveillix™ NVS systems come with a mouse, keyboard and selected software and cables. Identify the following components to make
sure everything has been properly included with your new NVS unit. If any of the following items are missing, contact your dealer to
arrange a replacement.
Included Components:
NVS Unit
Mouse
NVS Key
Manual
Repair CD
Software Installation CD
Keyboard
Rackmount Attachments with Screws
Power Cable
HVR/NVR
Digital Video Recor
UserManua
HVR8-X
HVR16-X
HVR32-X
NVR8-X
NVR16-X
model no.
Manual
Please carefully read these instructions before using this product.
Save this manual for future use.
1
12
KEYBOARD SETUP
To attach the keyboard to the DVR unit, plug the end of the Keyboard into the keyboard PS/2 Port located on the back of the machine.
The keyboard PS/2 Port can be identified by the purple color. Refer to the Rear Panel Connectors diagram for more information.
MOUSE SETUP
To attach the mouse to the DVR unit, plug the end of the mouse into the mouse PS/2 Port located on the back of the machine. The
mouse PS/2 Port can be identified by the green color. Refer to the Rear Panel Connectors diagram for more information.
The mouse uses a cursor. Cursors come in many different shapes but are most commonly shaped like an arrow.
Your mouse has two buttons: a left button and a right button. Quickly pressing and releasing one of these buttons is called clicking.
Sometimes you will need to double-click – or click the same button twice quickly.
In this manual, click means to position your mouse cursor on an icon and to single click the left button. When a right click is required,
this is stated clearly. Double-click also refers to the left button.
The scroll wheel in between the two buttons is added to provide easier scrolling capability. By simply moving the wheel with your index
finger, you can quickly move through multiple pages, line, or windows. The wheel may also function as a third button allowing you to
quickly click or double-click an icon or a selected item.
Scroll Wheel / Third Button
Right Button
Left Button
13
MONITOR SETUP
There are 2 available connections for monitors which can be used individually or in tandem.
SVGA Output
To VGA Monitor.
DVI-D Output
To TV / Digital Monitor
Attach the monitor or monitors to the rear of the NVR using the cable supplied by the monitor manufacturer. Refer to the monitor
manual for detailed information on how to setup and use it.
NOTE: The monitor must be capable of having a screen resolution of 1024 x 768 and display colors of at least 32 Bit
POWER SETUP
Attach the AC power cable to the rear of the DVR Unit. See Rear Panel Connectors for more information.
WARNING: To reduce the risk of electrical shock or damage to the equipment:
•
Do not disable the power grounding plug. The grounding plug is an important safety feature.
•
Plug the power cord into a grounded (earthed) electrical outlet that is easily accessible at all times.
•
Disconnect the power from the computer by unplugging the power cord either from the electrical outlet or the
computer.
CONNECTING A VIDEO SOURCE
The NVS, a Network Video Recorder has no visible video inputs because the NVS unit connects and records only using IP / Network
video cameras. To connect video sources to the NVS unit, simply plug in a network cable to the NVS unit.
14
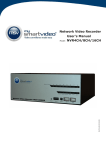
HARD DRIVE ARRAY
Handle Release
Button Lock
Release Handle
Reset Button
LOCK
OPEN
LOCK
OPEN
Hard Drive
Power Buttons
LOCK
OPEN
LOCK
Alarm Light
OPEN
NOTE: The Alarm Light will turn on if the Hard Drives reach a temperature above safe operating conditions
Swapping a Hard Drive
1.
Press the hard drive power button to turn off power to
the hard drive you wish to remove.
2.
Turn the button lock to the open position and push the
handle release button.
3.
Pull the lever outward while removing the hard drive.
Reverse steps to install.
15
OPTIONAL COMPONENTS
To fully utilize the NVR’s potential; several optional Surveillix components are listed below. Contact the dealer for more information.
Extra Video Storage Hard Drive
Each DVR has a virtually unlimited storage potential. Add additional Video Data Hard Drives to extend the amount of Video Data the
DVR system can store before overwriting older data.
UPS
UPS Power Backup
UPS Power Backups allow your DVR to remain fully functional even in the event of a power failure. UPS Power Backups also even
the fluctuating power current out to provide a consistent, reliable power flow. This creates a stable environment for the DVR and
reduces failure.
NP-4PKVM
4 Channel KVM Switch
The 4 Channel KVM switch allows you to have multiple boxes (up to 4) using only one keyboard, mouse and monitor. You can simply
switch between the DVRs using the keyboard.
Hot Swappable Redundant Power Supplies
Every DVR has the option of a dual redundant hot swappable power supply. In the event of a component failure the inoperable power
supply may be removed leaving the DVR running so no break in recording occurs. Simply replace the power supply with a new one
and you are finished.
Raid Controller
A raid controller is available for increased performance or data reliability.
External RAID storage
An external RAID device is used for independent data reliability & provides much greater storage expandability
Gigibit NIC
Provides support for Dual Nic configurations
SCSI Interface adapter
Allows for external storage devices to be connected
16
APPENDIX
The Appendix contains technical specifications for many of the NVR internal components
17
NVS SPECIFICATIONS
8
16
CPU
Intel® CPU
Storage (Hard Drive)
500 GB Standard / 4TB Max
Storage MAX
Up to 4 HDD with DVD±RW
Operating System
Microsoft® Windows® XP Embedded
RAM
2GB
Viewing Rate
Recording Rate
Resolution
Image Compression
32
3 GB
Max 480 PPS
Dependant on Network Video Device Encoding Rate
Recording resolutions dependent upon the resolutions the Network Camera supports
Proprietary MJPEG
360x240 – 3~5k
Average File Size
720x240 – 4~8k
720x480 – 7~12k
Video Outputs
Max PPS Per Channel
SVGA, DVI-D
30 PPS (NTSC) / 25 PPS (PAL)*
Motion Detection
Up to 15 Regions Per Channel / Adjustable Sensitivity
Remote Operation
Full Remote Control Through PSTN, ISDN, ADSL, LAN, and TCP/IP
Remote Software
Compatible with Microsoft Windows 2000, XP, Vista
PAN / TILT / ZOOM
Recording Mode
Backup
Built in Software Interface
Continuous, Motion Detection, Sensor, Scheduled Recording
USB, DVD±RW
Digital Signature
Supports Digital Signature Verification
Emergency Agent
Transmitted through TCP/IP – Pop-Up Window
* Total recording throughput dependent on multiple factors including: system specs, camera codec, camera settings, camera resolution, and network
bandwidth. Refer to the Toshiba IP platform estimator for more information on the specifics of your installation.