1
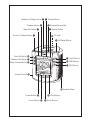
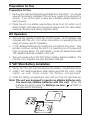
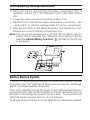
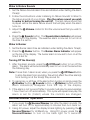
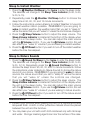
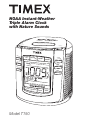
®
NOAA Instant-Weather
Triple Alarm Clock
with Nature Sounds
NOA
A
WEATHER
ON/SLEEP
SOUND
ON/SLEEP
OFF
RESET
SNOOZE
TIME S
ET
ALARM
SET
WEATHER
/DIMMER
SOUNDS
7-5-2
BUZZER
DAILY ALARM
CAL. S
ET
POWER
SLEEP
FWD
VOL.
DST
MONTH
REV
LOW
LOW
DATE
M
D
SUN
OCEAN
Model T150
FOREST
BROOK
WIND
Weather On/Sleep button Sounds Button
Snooze/Dimmer Bar
Weather Button Alarm Set Button Buzzer Button
Sound On/Sleep Button DC Jack
Off/Reset Button
NOA
A
WEATHER
ON/SLEEP
SOUND
ON/SLEEP
OFF
RESET
SNOOZE
/DIMMER
Time Set Button Calendar Set Button Sleep Volume Button TIME SE
T
ALARM
SET
WEATHER
SOUNDS
7-5-2
BUZZER
DAILY ALARM
CAL. SE
T
POWER
SLEEP
FWD
VOL.
DST
MONTH
REV
LOW
LOW
DATE
M
7•5•2 Button
FWD Button
REV Button
D
SUN
Volume Control OCEAN
FOREST
BROOK
WIND
Weather Band
Ocean Button Forest Button Wind Button
Brook Button
Preparation for Use
Preparation for Use
1. Remove the radio and all packing materials from the carton. You should
save all the packing materials if the unit ever needs to be returned for
service. If you do not wish to save the materials, please dispose of
them properly.
2. Place the unit on a stable, level surface, close to an AC outlet, out of
direct sunlight, and away from sources of excess dust, dirt, heat, water,
moisture, vibration and strong magnetic fields.
DC Operation
• This unit can operate on both AC and DC power. An AC adapter was
included with this unit. For further instructions on operating this unit
using AC power, see AC Operation.
• 3 “AA” alkaline batteries can operate the unit without AC power. They
will also continue running the unit if it is operating on AC power and
there is a power failure. For best results, you should always have fresh
“AA” alkaline batteries installed in this unit.
• This unit comes with a CR-2032 lithium battery already installed. The
CR-2032 is to maintain the time and alarm settings.
3 “AA” Main Battery Installation
1. Gently turn the unit over and remove the battery compartment door.
2. Install 3 “AA” alkaline batteries, while making sure that the + and – ends
match up with those inside the battery compartment.
3. Close the battery compartment door and turn the unit right side up.
Note: This unit was designed to operate on alkaline batteries only.
You must use alkaline batteries with this unit. When the
batteries are getting weak the Battery Low Icon ( ) will flash on
the right side of the display.
LOW
Lithium Battery Backup Installation
1. Gently turn the unit over and open the battery compartment door. If
necessary, remove the 3 “AA” batteries to get to the lithium battery
door.
2. Loosen the screw and remove the lithium battery door.
3. Replace the CR-2032 lithium battery, while making sure that the + and
– ends match up with the markings inside the battery compartment.
4. Place the door back on and tighten the screw, then reinstall the 3 “AA”
batteries and close the battery compartment door.
Note: This unit comes equipped with a CR-2032 lithium battery used for
battery backup purposes only. When the lithium battery is getting
weak the Lithium Battery Low Icon ( LOW ) will flash on the left side
of the display.
Battery Backup System
If the unit is being operated through AC power and there is a power
interruption, the 3 “AA” batteries will takeover and run the unit. All settings,
alarms, and instant weather will operate.
If the unit is operating through DC power (3 “AA” batteries) and there is a
power interruption, then the lithium battery (CR-2032) will maintain the time
and alarm time settings and operate the sure alarm. The sure alarm will
default all alarms to buzzer and turn on for 2 minutes.
All settings will be lost if there is a power failure and no batteries are installed.
AC Adapter Operation
• Plug the supplied AC adapter into the
DC Jack on the back of the
unit, then plug the cord into an outlet.
• If you are using a different AC adapter then the one supplied, make
sure that it is a 6V, 300mA Positive Center AC adapter.
Setting the Clock Time and Calendar
Important
• While setting the time or calendar, if you do not press the appropriate
buttons (as explained below) within approximately 8 seconds the display
will stop flashing. If this happens you must follow the steps again from
step 1.
• While setting the time, if you press and hold the FWD or REV
button the minutes will begin at a moderate pace, then get faster. This
will assist you in setting the time both fast and exact.
Setting the Clock Time
1. Press and hold the Time Set button until the display begins flashing.
2. Press the FWD or REV button to set the correct time. REMEMBER
to set the correct AM or PM. The PM Indicator is located on the
upper left side of the display.
3. Press the Time Set button to return to normal mode. A beep will
confirm that the time is set.
Setting the Calendar
1. Press and hold the Calendar Set button until the display begins
flashing.
2. Press the FWD (Month) button to set the correct month.
3. Press the REV (Date) button to set the correct day.
4. Press the Calendar Set button to return to normal mode. A beep
will confirm that the calendar is set.
Listening to Instant Weather
Fully extend the wire antenna and vary the direction for the strongest signal.
Important – If the Weather On/Sleep button is pressed more than
once the unit will enter the sleep mode. At the bottom of
the display the calendar will change to the Sleep Time
Indicator (90, 60, 30, 15). The Sleep Volume Indicator
will also appear at the bottom of the display. Press the Off/Reset button to turn the weather off, then press the Weather On/Sleep button again (only once).
1. Press the Weather On/Sleep button once to turn on the NOAA
weather report.
2. Slide the Weather Band switch to find the number position that
has the best reception for your area. They are as follows:
1 – 162.475MHz
2 – 162.450MHz
3 – 162.400MHz
4 – 162.425MHz
5 – 162.525MHz
6 – 162.500MHz
7 – 162.550MHz
3. Adjust the Volume control as desired.
4. Press the Off/Reset button to turn the weather report off.
Important Information Regarding Weather Broadcasts
• The weather band broadcast transmission is a very low power and not
the same as the transmission of FM radio broadcasts.
• Weather band stations are located in specific geographical locations
and terrain, which means the area in which you live may not be within
the range of such a station. If you receive AM/FM stations in your area
without a problem, but cannot receive weather band information, you
may be beyond the range of the nearest weather station.
• To help improve the reception, move the antenna or rotate the unit until
you get the best reception. Reception also varies from daytime to
nighttime.
Listening to Nature Sounds
Important – If the Sound On/Sleep button is pressed more than once
the unit will enter the sleep mode. At the bottom of the
display the calendar will change to the Sleep Time Indicator
(90, 60, 30, 15). The Sleep Volume Indicator will also
appear at the bottom of the display. Press the Off/Reset
button to turn the weather off, then press the Weather
On/Sleep button again (only once).
1. Press the Sound On/Sleep button once to turn on the nature
sounds.
2. Press any of the four nature sound buttons (Wind, Brook,
Forest, Ocean).
3. Adjust the Volume control as desired.
4. Press the Off/Reset button to turn the nature sounds off.
Note: If you are going to wake to nature sounds, then the last nature
sound you listen to will be the same nature sound you wake to
when the alarm sounds, unless the controls are changed.
Alarm Operation
Important
• While setting the alarm times, if you do not press the appropriate buttons
(as explained below) within approximately 8 seconds the display will
stop flashing. If this happens you must follow the steps again from
step 1.
• While setting the alarm times, if you press and hold the FWD or
REV button the minutes will begin at a moderate pace, then get faster.
This will assist you in setting the time both fast and exact.
Setting the Alarm Time(s)
1. Press the Alarm Set button until the Alarm Indicator that you wish
to wake to appears on the top of the display ( Weather, Sounds,
Buzzer) and the alarm time is flashing.
2. Press the FWD or REV button to set the correct alarm time.
REMEMBER to set the correct AM or PM. The PM Indicator is located
on the upper left side of the display.
3. Press the 7•5•2 button to set the alarm for 7, 5, or 2 days a week.
The Days of the Week Indicators are located at the back of the
display.
4. Repeatedly press the Alarm Set button until the display returns to
normal mode. A beep will confirm that the alarm time is set.
“Wake to” Operation
Wake to Instant Weather
1. Set the Instant Weather alarm time as indicated under Setting the Alarm
Time(s).
2. Follow the instructions under Listening to Instant Weather to tune into
the best weather station possible. The last Weather Band you
listen to will be the one you wake to when the alarm turns on unless
the controls are changed.
3. Adjust the Volume control to find the volume level that you wish to
wake to.
4. Press the Weather button. The Weather Alarm Indicator will
appear on the top of the display. The weather alarm is set to turn on
at the time it is set for.
Wake to Nature Sounds
1. Set the Nature Sounds alarm time as indicated under Setting the Alarm
Time(s).
2. Follow the instructions under Listening to Nature Sounds to listen to
the nature sounds of your choice. Play the nature sound you wish
to wake to before turning the unit off. The last nature sound that
is played will be the same nature sound that will play when the alarm
turns on.
3. Adjust the Volume control to find the volume level that you wish to
wake to.
4. Press the Sounds button. The Sounds Alarm Indicator will appear
on the top of the display. The weather alarm is now set to turn on at
the time it is set for.
Wake to Buzzer
1. Set the Buzzer alarm time as indicated under Setting the Alarm Time(s).
2. Press the Buzzer button. The Buzzer Alarm Indicator will appear
on the top of the display. The buzzer alarm is now set to turn on at the
time it is set for.
Turning Off the Alarm(s)
1. After the alarm sounds, press the Off/Reset button to turn off the
alarm. The alarm will be automatically reset to turn on at the same time
the following day.
Note: If more than 1 alarm is set, when you press the Off/Reset button
to stop the alarm from sounding, this will not affect the other alarm(s)
from turning on at the time(s) they are set for.
2. To cancel any or all three of the alarms from turning on simply press the
Weather button, Sounds button, or Buzzer button until the
alarm indicator(s) disappear from the top of the display.
3. If the alarm is not turned off after it sounds it will play for approximately
1 hour then turn off automatically. This cycle will repeat everyday the
alarm is set for (7•5•2) unless the controls are changed.
Snooze/Dimmer Operation
1. If you press the Snooze/Dimmer bar after the alarm sounds, the
alarm will turn off for approximately 9 minutes then turn back on.
2. Using AC power, adjust the display’s back lighting by pressing the Snooze/Dimmer for Hi/Med/Low. Using DC power, press the Snooze/Dimmer to turn on the back light for 5 seconds.
Sleep to Instant Weather
1. Press the Weather On/Sleep button twice to enter the sleep mode.
The calendar will change to the Sleep Time Indicator (S-90, S-60,
S-30, S-15).
2. Repeatedly press the Weather On/Sleep button to choose the
sleep time in 90, 60, 30, and 15 minute increments.
3. Follow the instructions under Listening to Instant Weather to tune into
the best weather station possible. REMEMBER if you are going to
wake to instant weather, the weather band that you set to “sleep to”
will be the same that you will “wake to” unless the controls are changed.
4. Press the Sleep Volume button to adjust the sleep volume. The
Sleep Volume Indicator is located at the bottom of the display when
the unit is in the sleep mode. You can also adjust the main volume
with the Volume control. If you use the Volume control, this will
also affect your “wake to” volume if you are waking to instant weather.
5. Press the Off/Reset button if you wish to turn off the instant weather
before the time has elapsed.
Sleep to Nature Sounds
1. Press the Sound On/Sleep button twice to enter the sleep mode.
The calendar will change to the Sleep Time Indicator (S-90, S-60,
S-30, S-15). Repeatedly press the Sound On/Sleep button to
choose the sleep time in 90, 60, 30, and 15 minute increments. Follow
the instructions under Listening to Nature Sounds to choose the nature
sound of your choice. REMEMBER if you are going to wake to nature
sounds, the nature sound that you set to “sleep to” will be the same
that you will “wake to” unless the controls are changed.
2. Press the Sleep Volume button to adjust the sleep volume. The
Sleep Volume Indicator is located at the bottom of the display when
the unit is in the sleep mode. You can also adjust the main volume
with the Volume control. If you use the Volume control, this will
also affect your “wake to” volume if you are waking to nature sounds.
3. Press the Off/Reset button if you wish to turn off the nature sound
before the time has elapsed.
Maintenance
1. Protect your furniture when placing the unit on a natural wood and
lacquered finish. A cloth or other protective material should be placed
between the unit and the furniture.
2. You may clean your unit with a soft cloth moistened only with mild soap
and water. Stronger cleaning agents can mar the surface of the case.
This device complies with part 15 of the Federal Communications
Commission Rules. Operation is subject to the following two conditions:
(1) this device may not cause harmful interference, and (2) this device
must accept any interference received, including interference that may
cause undesired operation.
Important Radio FCC Information
Warning: Changes or modifications to this unit not expressly approved by
the party responsible for compliance could void the user’s authority to
operate the equipment.
Note: This equipment has been tested and found to comply with the limits
for a Class B digital device, pursuant to Part 15 of the FCC Rules. These
limits are designed to provide reasonable protection against harmful
interference in a residential installation. This equipment generates, uses
and can radiate radio frequency energy and, if not installed and used in
accordance with the instructions, may caused harmful interference to radio
communications.
However, there is no guarantee that interference will not occur in a particular
installation. If this equipment does cause harmful interference to radio or
television reception, which can be determined by turning the equipment
off and on, the user is encouraged to try to correct the interference by one
or more of the following measures:
Reorient or relocate the receiving antenna.
Increase the separation between the equipment and receiver.
Connect the equipment into an outlet on a circuit different from that to
which the receiver is needed.
Consult the dealer or an experienced radio/TV technician for help.
Limited 90 Day Warranty
Timex Audio Products, Division of SDI Technologies Inc., warrants this product to
be free from defects in workmanship and material under normal use and conditions
for a period of 90 days from the date of original purchase.
Should service be required by reason of any defect or malfunction, it is best to first
return this product and all parts there of, to the store where it was originally
purchased. If you need to send the product for service, and it is during the first 90
days of the warranty period, SDI Technologies Inc. will repair, or at its discretion,
replace this product with proof of purchase, without charge (except for a $3.00
charge for handling, packing, return UPS/postage and insurance). After 90 days
the cost of labor is the customer’s responsibility. The fee for service after the
warranty period or without proof of purchase is $6.00.
Before returning this product for service, replace the batteries (if applicable) with
fresh ones, because exhausted or defective batteries are the most common cause
of problems encountered.
If service is still required:
1. Remove the batteries (if applicable) and pack the unit in a well padded, heavy
corrugated box.
2. Enclose a photocopy of your sales receipt, credit card statement, or other proof
of the date of purchase, if within the warranty period.
3. Also enclose a check or money order payable to the order of SDI Technologies
Inc., for the sum of $3.00 (or $6.00 after the warranty period).
4. Send the unit prepaid and insured, to the Factory Service Center listed below.
Consumer Repair Department
SDI Technologies Inc.
Timex Audio Products Division
1401 Pullman Drive, Suite A
El Paso, TX 79936-7726
Please Note: This warranty is valid only in the United States of America. Any
applicable implied warranties are also limited to 90 days, and SDI Technologies
Inc. will not be liable for consequential damages. (Some states do not allow
limitations on implied warranties or exclusions of consequential damages, so that
these restrictions may not apply to you). This warranty gives you specific legal
rights, and you may also have other rights, which vary from state to state.
For questions or comments regarding this or other products, please call
our toll-free number 1-800-888-4491.
TIMEX is a registered trademark of Timex Corporation in the U.S. and other
countries.
T150V1-03/27/01-0
Printed in China
For additional information, online registration,
and exclusive special offers visit our website:
www.sdidirect.com
For questions or comments regarding this or other products,
please call our toll-free number 1-800-888-4491.
Para instruccionese en Espanol, llame al 1-800-888-4491.