1
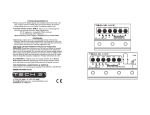
TM
SH
75
0H
z
7 0 Hz
MI
D
M
* Attempting to repair unit is not recommended and may void warranty.
* Missing or altered serial numbers automatically void warranty. For your own
protection: be sure serial number labels on the unit’s back plate and exterior
box are intact, and return your warranty registration card.
AC
TIV
E
20
B
0d
- 2 AD
P
BL
E
0H
z
ONE YEAR LIMITED WARRANTY. PROOF OF PURCHASE
REQUIRED. Manufacturer warrants unit to be free from defects in materials
and workmanship for one (1) year from date of purchase.This warranty does
not include damage resulting from accident, misuse, abuse, alteration, or incorrect current or voltage. If unit becomes defective within warranty period,Tech
21 will elect to repair or replace it free of charge. After warranty expires,Tech
21 will repair defective unit for a fee.
ALL REPAIRS for residents of U.S. and Canada: Call Tech 21 for Return
Authorization Number. Manufacturer will not accept packages without
prior authorization, pre-paid freight (UPS preferred) and proper insurance.
M
TO ND
AN OU CT
H
R
P G NE
& N
CO
EN
D
E
TR
activates battery.To conserve energy, unplug when not in use.
Power Consumption: approx. 7mA.
*USE DC POWER SUPPLY ONLY! Failure to do so may damage the
unit and void warranty. DC Power Supply Specifications:
-9V DC regulated or unregulated, 100mA minimum;
-2.1mm female plug, center negative (-).
Optional factory power supply is available:Tech 21 Model #DC2.
1
FOR PERSONAL ASSISTANCE & SERVICE:
Contact Tech 21, Inc., any weekday from 10:00 AM to 6:00 PM, EST.
R T
XL TPU
U
O
T
OU
P
UT
BL
L
VE
LE
is recommended.
*Utilizes standard 9V alkaline battery (not included). NOTE:The Input jack
WARNINGS:
ID
3K
Hz
IFT
AC
TIV
E
BA
SS
IN
PU
T
PU
IN XLR
TO
T
POWER REQUIREMENTS
*Operable with phantom power supply, minimum 24V DC, however, 48V DC,
MADE IN THE U.S.A.
TECH 21. NYC
333 West 52nd Street, NY, New York 10019
212-315-1116 / Fax: 212-315-0825 / www.tech21nyc.com
PRODUCT OVERVIEW
Tech 21 redefined the term “direct box” with the development of
SansAmpTM Bass DI, and again with SansAmp Bass Driver DI. For
recording and live performances, our exclusive Tube Amplifier Emulation
circuitry delivers the sound of a miked-up bass amp system in a
convenient direct box format.
We have now adapted our proprietary technology specifically for the
acoustic guitar player, whose seemingly simplistic desire to just put a good
quality microphone in front of an acoustic guitar is foiled by feedback or
unbalanced sound. Piezo pickups have helped, but their characteristic high
frequencies tend to sound artificial and abrasive.
With SansAmp Acoustic DI, the parametric equalizer (the Mid Shift control) removes unwanted feedback.The Tube/Microphone Emulation circuitry (engaged via the Blend control) eliminates the unnatural harmonics of
piezo pickups. SansAmp Acoustic DI gives your acoustic guitar a natural
warmth and presence as if you were miking the guitar through a tube
pre-amp.
APPLICATIONS
WITH ACOUSTIC GUITAR:
-Direct to the mixing console of a recorder or a P.A. system: For live
and studio use, you can plug the XLR Output or 1/4” Output directly into the
input of a mixer/recorder.Work with the input trim control on the
mixer/recorder and be sure not to overload its input. Additionally, bear in mind
that full-range systems yield a wide frequency response.Therefore, we suggest
you start with the EQ levels at 12 o’clock and increase/decrease to taste.
-With a conventional acoustic guitar amplifier: To enhance your
acoustic amplifier with a more natural sound, run the 1/4” Output into the
front input of your amp. For best results, keep the Level control of SansAmp
Acoustic DI close to unity gain so as not to overload the amp’s input (which
could yield undesirable distortion).
-With a conventional electric guitar amplifier: To expand the capabilities of your electric amp, run the 1/4” Output into the power amp input, a.k.a.
“effects return” (if available) of the amp.This will bypass the tone-coloring preamp section. If a power amp input is not available, use the cleanest channel
with the amp’s EQ flat and maximum headroom. For best results, keep the
Level control of SansAmp Acoustic DI close to unity gain so as not to overload
the amp’s input (which could yield undesirable distortion).
WITH OTHER INSTRUMENTS:
SansAmp Acoustic DI also functions as a standard direct box with EQ
when the Blend control is at minimum. In bypass (inactive), SansAmp
Acoustic DI functions solely as a standard transparent direct box.
SansAmp Acoustic DI can be used with electric and bass guitars, and upright
bass, as well as drums, sax, harmonica, and even vocals. But don’t stop here.Try
your own experimentation.
As with each SansAmp model, the controls are designed to give you the
flexibility to achieve your desired sound, be it at home, in a local bistro or
on a world tour.
WITHOUT INSTRUMENTS:
-Insert SansAmp Acoustic DI in your mixing board and use it as an outboard
processor to warm up a particular channel.
-Put direct in-line from the microphone to the mixer.
-Enhance existing tracks in the mix-down process.
-Use as a speaker/mic simulator to record your favorite effects/stomp boxes
directly (see Sample Settings).
SansAmp Acoustic DI.
Consistent quality sound studio to studio, club to club, arena to arena.
2
THE INS AND OUTS.
TURN ON FIRST. TURN OFF LAST. To avoid unwanted and
potentially speaker-damaging “pops” when connecting or disconnecting any
equipment, follow Standard Audio Procedures: Always mute mixing board
and/or turn down amp volume before plugging or unplugging !
ACTIVE SWITCH: Active, LED will be on. All controls will respond to
INPUT: 1/4”, 4.7megOhm, instrument level.The unusually high impedance
was designed with piezo pickups in mind to provide maximum output and
dynamics. Switches battery power on/off.To avoid battery drain, unplug when
unit is not in use. AND... DON’T FORGET TO MUTE !
-20dB PAD: Attenuates the volume of the XLR Output between 0 and
-20dB. If you’re using a mixer with a mic level input, be sure to pad at -20dB so
as not to overdrive the input.To obtain a better signal to noise ratio, use the
0dB position. Just be sure your mixer can accept a line level (0dB) signal input
(not all can).
INPUT TO XLR/“Effect Return:” This triple-function 1/4” input converts a high impedance instrument signal to a low impedance, balanced line
through the XLR Output.This input bypasses all the circuitry, which enables the
unit to be used as a standard transparent DI.You can also create an effect loop
by utilizing this input as an “Effect Return” in conjunction with the 1/4” Output.
See illustration below.
1/4” OUTPUT/“Effect Send:” Unbalanced low Z output. Sends signal
to your amp or power amp. It can also be used with a home recorder should
an XLR input not be available. Also functions as an “Effects Send” when
utilized in conjunction with the Input to XLR. See illustration below.
BALANCED XLR OUTPUT: Balanced low Z output sends signal to
mixing console/recorder. Switchable between 0 and -20dB by using the -20 dB
Pad switch. Also accepts phantom power (see page 4).
EFFECT LOOP HOOK-UP:
INPUT
OUTPUT
OUTPUT
their settings. Inactive, LED will be off and SansAmp Acoustic DI is in bypass
mode. It then functions as a transparent direct box and will not sonically
alter the instrument signal.
PHANTOM & GROUND CONNECT SWITCH: When
engaged, the ground connects, and unit will accept phantom power through the
XLR Output. Disengaged, the ground of your stage system and other
interconnected gear is lifted (isolated) from the ground of the mixing console.
PHANTOM POWER OPERABILITY eliminates the need
for an external power supply. If you are using a suitably equipped
mixer, consult its owner’s manual for set-up instructions. For live
and studio use, let the engineer know your SansAmp Acoustic DI
is phantom power operable.
NOTE: When lifting the ground, phantom power disconnects,
and battery (if installed) becomes activated.While operating
under phantom power, we recommend keeping a 9V alkaline
battery installed at all times to avoid the previously mentioned
“pops” when lifting the ground (see page 3).
INPUT
CHORUS
TM
TO
MIXER
XLR
OUTPUT
INPUT TO XLR
4
GUIDE TO CONTROLS
BASS & TREBLE
Unlike passive controls that can only cut, these active tone controls cut or
boost ±12dB from unity gain at 12 o’clock.
MID SHIFT & MID
NOTEWORTHY NOTES & CONSIDERATIONS
1) SansAmp Acoustic DI is very responsive. Our controls are unusually
sensitive and you need not set everything at max to get maximum results. For
instance, to brighten your sound, restrain yourself from automatically boosting
Treble all the way up.Try cutting back on the Bass first.
These sweepable, semi-parametric EQ controls range from 170 Hz to 3.5 kHz,
±16dB, respectively.With the Mid Shift control, you can select the center frequency of the mid-range control (MID).This, in turn, enables you to notch out
any specific frequencies that may be causing your guitar to feed back. To find
the feedback frequency of your guitar, set MID at maximum boost (5
o’clock).Turn Mid Shift to the feedback point and leave it there.Then cut the
MID control until the feedback stops.
Be aware that boosting Treble and Bass increases the high and low frequency
content without changing the gain structure. However, boosting the Mid and
the Mid Shift controls will increase the amount of saturation. (Refer to the
Sample Setting for Electric Guitar.) By taking the time to familiarize yourself
with how the EQ controls interact, you will be able to achieve the proper mix
of frequencies that best suits your needs in any venue.
If you set Mid Shift at 1kHz, Mid operates as a traditional mid-range control.
However, it may amplify noise emanating from the input source.To minimize
noise going into SansAmp Acoustic DI, we recommend active electronic instruments have the volume set at unity gain/maximum and tone controls positioned flat. If you need to boost, do so slowly and sparingly.
BLEND
Allows you to blend the direct instrument signal with SansAmp Tube/Microphone Emulation circuitry. In most cases, you will probably have this set at maximum (100% SansAmp). If you should want to hear some of the distinct timbre
of a piezo pickup, or reduce the amount of “compression,” you can
simply adjust accordingly by turning the Blend control counter clockwise.
At minimum, the SansAmp circuitry is bypassed. However, all the other controls
remain active.The unit then functions as a standard DI with EQ.
2) The noise level of SansAmp Acoustic DI is exceptionally low.
3) Compressors or limiters may not be necessary. Our unique
circuitry emulates the warm, natural, gentle compression of tubes.This limits
transient peaks for an even meter reading, so that outboard units typically
aren’t needed.
4) Using effects. One of the key attributes of SansAmp is the responsive-
LEVEL
Adjusts the output level.
TUBE/MIC EMULATION
Tube/Microphone Emulation is an integral part of the SansAmp Acoustic DI’s
circuitry.The tube emulation yields a warm, gentle saturation to limit dynamic
peaks, while the microphone emulation removes the unnatural harmonics
associated with piezo pickups. It is specifically engineered to yield a smooth,
even response as would be achieved by a properly miked acoustic guitar.
5
ness to the dynamics and nuances of your playing technique.Therefore, your
guitar should be plugged directly into SansAmp and effects should be placed
after SansAmp.
With an amp: use 1/4” Output to effect to amp.
With XLR: place effect in effect loop of SansAmp Acoustic DI
(see page 3).
If, however, you prefer to place an effect before SansAmp, be sure to set the
output level of the effect at unity gain with the output level of the instrument.
6
SAMPLE
SETTINGS
(for acoustic guitars)
LE
VE
L
BL
EN
D
TR
EB
LE
MI
D
BA
SS
SAMPLE(other)
SETTINGS
LE
VE
L
BL
EN
D
TR
EB
LE
MI
z
0H
75
z
17
LE
V
BL
E
TR
EB
D
MI
SH
20
BASS GUITAR
3K
ND
Hz
3K
IFT
17
0 Hz
LE
MI
D
BA
SS
LE
VE
L
BL
E
ND
TR
EB
z
17
EN
D
TR
EB
0H
MI
D
SH
20
BASS GUITAR
IFT
Hz
3K
(hard driven)
17
0 Hz
LE
MI
D
BA
SS
LE
VE
L
BL
EN
D
TR
EB
MI
z
BL
EN
EB
MI
D
SH
SS
0
20
ELECTRIC GUITAR
IFT
Hz
3K
(semi dirty)
17
0 Hz
LE
MI
D
BA
SS
LE
VE
L
BL
EN
D
TR
EB
MI
MI
z
D
SH
IFT
0 Hz
LE
D
BA
z
0H
0H
75
75
z
z
0H
JAZZ
BA
0H
Hz
TR
D
75
3K
D
IFT
Hz
17
L
D
z
0H
75
VE
MI
SH
0 Hz
LE
z
0H
LE
SS
75
20
FINGER PICKING
BA
z
3K
BL
D
0H
Hz
L
IFT
z
0H
VE
SH
0 Hz
MI
75
LE
D
MI
LE
z
0H
20
COUNTRY
SS
0H
Hz
EL
BA
z
0H
75
z
0H
20
FOLK
D
0H
20
Hz
3K
17
D
MI
SH
IFT
0 Hz
NOTE: Sample settings are provided as a starting point. As acoustic guitar
designs vary greatly, controls may have to be adjusted accordingly.
SPEAKER/MIC
SIMULATOR
20
Hz
3K
17
D
MI
0 Hz
SH
IFT
SS
CUSTOM SETTINGS
LE
VE
L
BL
EN
D
TR
EB
LE
MI
D
BA
SS
CUSTOM SETTINGS
LE
VE
L
BL
EN
D
TR
EB
LE
MI
z
D
BA
z
0H
0H
75
75
z
z
0H
0H
20
20
Hz
Hz
3K
3K
17
LE
VE
L
BL
EN
D
TR
EB
MI
D
SH
IFT
17
0 Hz
LE
MI
D
BA
SS
LE
VE
L
BL
EN
D
TR
EB
MI
MI
z
D
D
BA
0H
75
z
0H
Hz
17
BL
EN
D
TR
EB
D
MI
SH
Hz
3K
IFT
17
0 Hz
LE
MI
D
BA
SS
LE
VE
L
BL
EN
D
TR
EB
D
MI
MI
z
D
BA
0H
75
z
0H
Hz
3K
17
BL
E
TR
E
SS
20
Hz
LE
IFT
z
0H
75
ND
SH
0 Hz
LE
z
0H
20
L
VE
SS
20
3K
L
IFT
z
0H
75
VE
SH
0 Hz
LE
z
0H
20
LE
SS
MI
D
I
SH
3K
FT
17
0 Hz
E
BL
MI
D
BA
SS
LE
L
VE
BL
E
ND
TR
E
MI
FT
0 Hz
E
BL
MI
z
D
I
SH
D
BA
z
0H
0H
75
75
z
z
0H
0H
20
20
Hz
Hz
3K
17
MI
0 Hz
D
SH
3K
IFT
17
MI
0 Hz
D
SH
IFT
SS