1
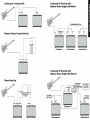
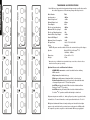
IMPORTANT SAFETY INSTRUCTIONS.
READ AND SAVE THESE INSTRUCTIONS.
HEED ALL WARNINGS.
This symbol, wherever it appears, alerts the user to the presence of uninsulated dangerous
voltage within the product’s enclosure that may be of sufficient magnitude to constitute a
risk of electric shock to persons.
This symbol, wherever it appears, alerts the user to important operating and maintenance
instructions in the accompanying literature. Read the manual.
This unit is powered by potentially hazardous voltage. Therefore,
observe the following safety precautions:
1. Read and follow all instructions before
using product.
2. Do not use product near water (such as
near a bathtub, washbowl, kitchen sink, swimming pool, in a wet basement, etc.).
3. Unit should be located so that its location
or position does not impede the flow of air
through the ventilation openings.
4. Product should be located away from heat
sources such as radiators, heat registers, or
other products, including amplifiers, that produce heat.
5. Product should be connected to a power
supply only of the type described in the operating instructions or as marked on the product.
6. Protect the power cord from being walked on or pinched particularly at plugs,
convenience receptacles, and the point where they exit from the unit.
7. Do not allow objects or liquids to penetrate the enclosure through openings.
8. During heavy use, chassis may get hot to the touch. Handle with care.
9. Protect unit from strong impact.
10. Unplug product before cleaning. Never spray liquid cleaners into the amp: wipe
with a clean, lint-free cloth to remove dirt and film.
11. Only use attachments/accessories specified by the manufacturer.
12. This product should be used only with a cart or stand recommended by the manufacturer. When a cart is used, use caution when
moving the cart/product combination to avoid injury from tipping over.
13. Amplifiers may be capable of producing high volume levels that
could cause permanent hearing loss or damage, if the exposure to such levels is prolonged. Such damage is progressive and irreversible! If you experience any hearing
loss or ringing in the ears, consult an audiologist.
1
14. Unplug unit during lightning storms or when unused for long periods
of time.
15. This unit must be earth grounded. To reduce the risk of electric shock, NEVER
remove or otherwise attempt to defeat the ground pin of the power cord. If the provided plug does not fit into your outlet, consult an electrician for replacement of the
obsolete outlet.
WARNING: To avoid the risk of fire, electric shock or injury, do not expose this unit
to rain or moisture. Do not remove the chassis from its cabinet, or remove metal covering from chassis parts. Removing the chassis from its cabinet exposes extremely
dangerous high voltages. There are no user-serviceable parts inside. Hazardous voltages are present inside the chassis. Refer all servicing to qualified personnel.
CAUTION: Never modify the power cord. If original power cord becomes damaged,
frayed, or has exposed wires, replace immediately with same rating and gauge, or
higher. Replacements are commercially available or you can contact Tech 21 directly.
WARNING: Attempting to repair this unit is not recommended and may void its
warranty. NOTE: In the U.S. and Canada, servicing is performed at factory only. In
other countries, please refer repairs to the local Tech 21 authorized distributor.
FUSE
Fuse holder is located inside A/C cord receptacle. You must unplug
and remove power cord to change fuse. Replace with similar type
and same value:
100V and 117V units: use F 3A L
230V and 240V units: use F 1.6A L
QUICK START AND STOP INSTRUCTIONS
QUICK START: Here’s how you can get your Trademark 60 up and running before
you read the entire manual. Note: By not reading the manual, you’ll miss out on how
to get the most out of your new investment!
1. Plug your instrument into the top-panel Input jack (on the left side).
2. Attach the AC cord to the amp and plug into a wall socket.
3. Be sure the Level controls on the Trademark 60 are down, then turn on the amp.
4. Use the quick start sample settings provided on the amp. If missing, see the first
set of sample settings (Clean Fender® and Dirty Marshall®).
5. Play your guitar and you should hear a sound coming through the amp. If not, check
that your guitar’s volume control is turned up, recheck your connections, and be sure your
cable isn’t faulty. If there is still no sound, refer to factory or qualified technician.
QUICK STOP: After shutting off the Trademark 60 (or any amplifier), wait at least 10
seconds before turning it back on.
2
TECH 21, THE COMPANY
Tech 21 was formed by a guitarist possessing the unusual combination of a
trained ear and electronics expertise. In 1989, B. Andrew Barta made his
invention commercially available to players and studios around the world.
His highly-acclaimed SansAmp™ pioneered Tube Amplifier Emulation in
professional applications for recording direct and performing live, and created an entirely new category of signal processing. While there have since
been many entries into this niche, SansAmp continues to maintain its reputation as the industry standard.
After developing a full line of SansAmp models, Tech 21 expanded its offerings to include effect pedals; a compact, battery operable MIDI footcontroller, the MIDI Mouse; as well as “traditional” style amplifiers for guitar
and bass. Each product is thoughtfully and respectfully designed by
B. Andrew Barta himself with the player in mind. Our goal is to provide you
with flexible, versatile tools to cultivate, control, refine and redefine your own
individual sound. Tech 21 takes great pride in delivering consistent
professional quality sound, studio to studio, club to club, arena to arena.
TRADEMARK 60, AN OVERVIEW
TOP PANEL
The Trademark 60 is designed with active controls, which cut and boost, rather than
traditional passive controls which can only cut. This effectively doubles many of the
control’s capabilities, giving you a much larger range of adjustability and, ultimately,
more variety. It should be noted that you need not necessarily set everything at max
to achieve maximum results.
As you experiment and become familiar with the controls’ interrelationships, you’ll
easily be able to customize your own sounds.
Input Jack
Faithful to the original designs of traditional tube amplifiers, this 1/4" Input is high
impedance 1MOhm. The typically additional low sensitivity input, however, is not needed due to the trimmable Drive control in Channel 1.
Channel Selector Switch
Manually switches between channels when there’s no cable plugged into the rear
panel Footswitch jack. To remotely change channels, refer to section “Triple-Function
Footswitch” on page 8.
CHANNEL 1
The Trademark 60 offers a wide range of the most desirable tube amp
sounds, from Fender® to Marshall®, Mesa/Boogie® and Vox AC30® styles.
The interactive controls give you access to specific tone shaping characteristics to create your own trademark sounds as well. The remotely activated
Boost function increases each channel’s volume level up to 9dB, giving you
4 footswitchable sound options.
Channel 1 offers a range of Fender® styles, from sparkling clean to semi-dirty to
saturated Tweed®-style.
For studio and live applications, our exclusive SansAmp Tube Amplifier
Emulation technology enables you to go straight into the mixer of a recorder
or PA system via the XLR Direct Output.
Drive
With the Trademark 60, you get a truckload of big amp sounds in an
affordable, cost-effective 35 lb. package.
Bite™
Changes the sound from jazzy and mellow to a more “biting,” overdriven style. Going
beyond a normal bright switch, it also tightens the low end to give more definition to
the low strings.
Like the volume control on a non-master-volume tube amp, Drive adjusts the amount
of “power amp” distortion. However, unlike such a control, you can cut or boost from
12 o’clock. In regular use, we recommend you start by setting Drive at unity gain. If
you have an extremely hot pickup and want a clean sound, trim towards the left.
Punch
The Punch control sets the amount of mid-range break-up and overdrive. Cut or boost
from 12 o’clock. Decreasing from the center point produces a softer break-up.
Increasing its setting creates a harder, heavier, more nasal distortion, similar to a
wah pedal at mid position placed before a tube amp.
Level
Adjusts the volume level of Channel 1.
3
4
CHANNEL 2
Channel 2, always a little dirty, offers a range of Marshall®, Mesa/Boogie® and
Vox AC30® styles.
Weep™
Increases the amount of even harmonics and thickens the sound. It provides a
“singing” quality like that of a Class A tube amp. The effect is particularly responsive
to the attack of individual notes and directly proportional to how hard you pick. For
the most pronounced effect, we recommend setting Drive at least half-way (12
o’clock) and varying your pick attack as you listen to the effect.
Drive
Adjusts the amount of “power amp” distortion. Since Channel 2 is not designed for
clean sounds, this Drive has no unity gain position, and increases from the minimum
point (7 o’clock).
Boost
For solos, you can remotely increase your output level via the Footswitch. This
“clean” boost only changes the volume level, not the tonality or amount of overdrive.
Increase from minimum (0dB) to maximum (9dB). Note: When the Footswitch is not
connected, the Boost function will be on, so remember to adjust its level accordingly.
Also Note: Boost is designed for a temporary volume increase when desired, not to
be left on all the time. If you want more overall volume, turn Boost off and increase
each channel Level as needed.
Reverb
The top-of-the-line, full-length Accutronics™ 6-spring reverb can be remotely activated via the Footswitch. Increase from the minimum point (7 o’clock). Note: When the
Footswitch is not connected, the Reverb will be on, so remember to adjust its level
accordingly.
Link
Growl™
This is a powerful and sophisticated mid-range control. It gives you that scooped-out,
heavy sound without making your guitar sound thin --and without any loss of volume.
Increase from the minimum point (7 o’clock).
Level
Adjusts the volume level of Channel 2.
MASTER SECTION EQ
Link works in conjunction with the Footswitch to remotely activate Boost and Reverb.
This unique feature connects the two functions. When Link is engaged, Boost and
Reverb work in tandem. For solos, in particular, this gives you the ability of not only
increasing your volume, but increasing the size of your sound as well. Depending on
its orientation, Link gives you 3 options:
1. Boost only: Disengage Link. Adjust Boost to desired level.
2. Reverb only: Engage Link. Set Reverb to desired level; set Boost at minimum.
3. Boost and Reverb: Engage Link. Set each at desired amount.
For separate footswitchable Boost and Reverb functions, there’s a 4th option:
Use an outboard reverb unit through the Effect Loop. The Trademark 60’s Footswitch
can then control each separately: Effect Loop for Reverb; Boost/Reverb for Boost.
Remember: if the Footswitch is not connected, Boost and Reverb will both be on.
REAR PANEL
The two technologically coordinated channels enable them to share the Master EQ
section. Specifically voiced for guitar, these active controls set the tonal balance of
the amp relative to your environment. The Trademark 60 is designed for optimal
sound quality with Low and High at 12 o’clock. If your taste differs or if you are in a
less than optimal environment, you can compensate accordingly.
In addition to Punch in Channel 1 and Growl in Channel 2, Low and High work
together to alter the mid-range content. By boosting Low and High, you get a
“smiling” frequency curve (mid-range cut), while cutting Low and High gives you a
bell-shaped curve (mid-range boost).
Low
Boost or cut ±12dB by turning from the center point (12 o’clock).
Fuse
High
Fuse holder is located inside A/C cord receptacle. You must unplug the amp
and remove power cord to change fuse. Replace with similar type and same
value: 100V and 117V units: use F 3A L • 230V and 240V units: use F 1.6A L
Boost or cut ±12dB by turning from the center point (12 o’clock).
5
6
Headphone
The Headphone output overrides the speaker for undisturbed (and non-disturbing)
practicing. It can also be used as a 1/4" direct out, should an XLR input not be available on your recorder. You can then use your headphones through the mixer.
NOTE: If you use the XLR Direct out and a mic, you may experience a thin sound
caused by phase cancellation. Try repositioning the mic until it goes away or invert
the phase of one of the signals.
Ground Lift
Speaker
By incorporating Tech 21’s exclusive technology with the 12” Celestion® speaker,
the Trademark 60 gives you the speaker cabinet configuration associated with each
tube amp style --ranging from a tightly focused open-back 1x12 to a big and smooth
closed-back 4x12.
If an external speaker cabinet should be desired, simply plug in the speaker cable
from the external cabinet. This will defeat the internal speaker. We do not recommend
using a speaker rated at less than 8 Ohms, as a 4-Ohm speaker could cause
undesirable distortion and potentially overheat the amp. Using a 16-Ohm speaker
may result in loss of power.
Connects or disconnects the ground circuits between the XLR Output of the amp and
the mixer. We recommend starting with the ground lifted. If necessary, connect the
ground by pushing the button in.
Effect Loop
The Effect Loop allows you to connect both rack and pedal effects between the preamp and power amp section of the Trademark 60. And with the Footswitch, you can
remotely activate them. You can then keep the effect(s) either on top of the amp for
easy access, or stashed neatly in the back of the amp. Note: The Channel Level controls vary the level at the Send jack.
Connect the input of your effect to Send; output of your effect to Return. We recommend that time-based (i.e., chorus or delay) effects be inserted in the Effect Loop and
external distortion/wah pedals be placed between the guitar and the Trademark 60.
On the next page, you’ll find some helpful Effect Loop diagrams for chaining
Trademark 60s to increase your stage volume, adding a remote volume control, as
well as how to hook-up two Trademark 60s for stereo.
TRIPLE-FUNCTION FOOTSWITCH (included)
SansAmp™ Direct Out
For recording in a home studio or pro facility, the SansAmp XLR Output is like having
a built-in direct box. The SansAmp circuitry not only captures the warm, rich, natural
harmonics and sweet overdrive characteristics inherent to tube amplifiers, its
speaker emulation encompasses all aspects of multiply-miked tube amp rigs. So
you can plug straight into the board and get the same sound that comes out of the
Trademark 60 directly onto tape.
The mic level, -20dB output is matched to the output volume of the speaker, as determined by the setting of the Level control. If you place a microphone in front of the
speaker, the volume level of the XLR Direct out will be approximately the same.
If you need to consider family and neighbors, you can defeat the internal speaker by
plugging a dummy cable either into the Speaker jack or the Headphone jack. You can
then use headphones through your mixer.
For live gigs, you can use this output to go direct into a PA system or to chain with
our own Power Engine 60™ powered extension cabinets, in mono or stereo. (See
sample Hook-up Diagrams and refer to Optional Extension Cabinets in the
Specifications for more information.)
7
The Footswitch selects channels, activates the Boost/Reverb function, and engages
the Effect Loop. Corresponding LED indicators let you know the status of each
switch. The
Footswitch is powered via the cable,
so batteries are not
required.
Unlike most amps
which require a
custom multi-pin
connector, this
Footswitch is engineered to utilize
any standard 1/4”
instrument or speaker cable. You can easily replace the included cable should you
lose it, or purchase a different cable length to suit your particular needs.
Replacement Footswitch (Model #AR3) is available through your local authorized
dealer or Tech 21 directly.
In a pinch, you can use any standard latching footswitch to change channels. In this
case, be aware that the Effect Loop and Boost/Reverb function will not be switchable
and they will remain on as if in manual mode.
8
TRADEMARK 60 SPECIFICATIONS
Note: With on-going product development and improvements, specifications and/or
the cosmetic appearance of this unit may change without prior notice.
Model Number
TM60
Input Impedance
1MOhm
Nominal Input Level*
-10dBu
Optimal Output Load
8 Ohms
Power Output
60W
Effect Loop Input Impedance
1MOhm
Maximum Effect Loop Input*
-6dBu
Effect Loop Output Impedance
1KΩ
Nominal Effect Loop Output*
-20dBu
Nominal XLR Output*
-20dBu
Maximum Power Consumption
120W
AC Input Power
100V, 117V, 230V, 240V
Cycles
50/60 Hz
NOTE: AC power cannot be switched. Each unit constructed for specific voltages.
Speaker
Model #CT2112-8, Celestion® 12”
100 Watts - 8 Ohms
Dimensions
20”w x 18”h x 11”d
Weight
35 lbs.
*Measured using a -10dB 400Hz test signal with all amp controls flat, no Reverb or Boost.
Actual levels will vary with your settings.
Optional Accessories and Extension Cabinets:
•ARMD MIDI converter to control footswitch functions with any
MIDI controller
•Vinyl cover, black with silver logo
•Flight case with hammered aluminum finish, lock and casters
•Power Engine 60: matching 1x12 open-back cabinet with 60 watts
of transparent power and 12” Celestion® speaker.
•2x12TM: matching 300-watt, 8-Ohm closed-back cabinet with two
Eminence Tonker® 12” speakers.
•4x12TM: matching 320-watt, 8-Ohm closed-back cabinet with four
Celestion® 12” speakers, available with straight or slant front.
Replacement parts are available, i.e., knobs, grill panel, speaker, logo plate, handle,
footswitch, etc. For more information, contact your authorized dealer or Tech 21.
®Registered trademarks. Names of sample settings are intended for descriptive
purposes only and should not be construed as an endorsement or affiliation with
the companies, products, song titles or artists named. ©All songs copyrighted.


![View User`s Manual [US] - Acoustic Amplification](http://vs1.manualzilla.com/store/data/005834670_1-839e21e8bc31a6b298042e7e04804c8b-150x150.png)