1
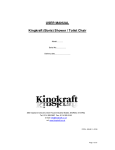
SRCD904
WARNINGS
TO Prevent fire or shock hazard, do not use this plug with an extension cord, receptacle or add other
outlet unless the blades can be can be fully inserted to prevent blade exposure. To prevent fire or shock
hazard, do not expose this appliance to rain or moisture.
WARNING
The lightning flash with arrowhead symbol,within an equilateral triangle is intented to
alert the user to the presence
of uninsulated' dangerous voltage' within the product's enclosure that may be of sufficient magnitude to constitute a
risk of electric shock to persons.
CAUTION : TO REDUCE THE
The exclamation point within
RISK OF ELECTRIC SHOCK
an equilateral triangle is int-
DO NOT REMOVE COVER (
ended to alert the user to the
OR BACK),NO USER SERV-
presence of important opera-
ICEABLE PARTS INSIDE R-
ting and maintenance (servi-
EFER SERVICING TO QUA-
cing) instructions in the liter-
LIFIED SERVICE PERSON-
ature accompany-ing the ap-
NEL
plicance
IMPORTANT SAFETY INSTRUCTIONS
1 Read these instruction.
2 keep these instructions.
3 heed all warnings.
4 Follow all instructions.
5 Do not use this product near water(swimming pool, beach, lake etc.).
6 Clean only with a dry cloth.
7 Do not block any of the ventilation openings.Install in accordance with the manufacturer's instructions .
8 Do not install near any heat sources such as radiators, heat registers . Stoves or other apparatus
(including amplifiers)that produce heat.
9 Do not defeat the safety purpose of the polarized or grounding-type plug, A polarized plug has two
blades with one wider than the other. A grounding type plug has two blades and a third grounding
prong. The wide blade or the third prong is provided for your safety. If the provided plug does not
fit into your outlet, consult an electrician for replacement of the obsolete outlet.
10 Protect the power cord from being walked on or pinched particularly at receptacles and the point
where they exit from the stereo.
11 Only use attachments/accessories specified by the manufacturer.
12 Unplug this apparatus during lightning storms or when unused for long periods of time
13 Refer all servicing to qualified service personnel. Servicing is required when the system has been
damaged in any way, such as a damaged power-supply cord or plug . Has been exposed to rain or
moisture ,does not operate normally , or has been dropped.
14 This appliance should not be exposed to dripping water or splashing water and objects filled with
water, such as vases, should not be placed on this unit
English
1
2
English
SRCD904
SRCD904
MINI HIFI SYSTEM WITH TURNTABLE, 3-CD CHANGER, AM/FM-STEREO RADIO,
DOUBLE AUTOSTOP CASSETTE AND REMOTE CONTROL.
20
18
19
22
21
INSTRUCTION MANUAL
Please read this instruction manual carefully and familiarize yourself with your new Hifi
System before using it for the first time. Please retain this manual for future reference.
TABLE OF CONTENTS
•
Location and Controls-------------------------------------------------------- 3
•
Connecting to Power----------------------------------------------------------- 4
•
Power Supply---------------------------------------------------------------------- 4
•
Connections ------------------------------------------------------------------- 4
•
Tuner Operation------------------------------------------------------------------ 5
•
Cassette Operation ----------------------------------------------------------- 5
•
To Record on a Cassette -------------------------------------------------- 6
•
Sound adjustments --------------------------------------------------------- 7
•
Compact Disc Operation ---------------------------------------------------- 8
•
Track Skip ------------------------------------------------------------------- 9-10
•
Manual Search ---------------------------------------------------------------- 10
•
Repeat ------------------------------------------------------------------------ 11
•
Disc programming ----------------------------------------------------11-12
23
17
24
25
16
15
14
13
12
11
10
9
3-8
•
Turntable ------------------------------------------------------------------------- 12
•
Remote control -------------------------------------------------------------- 13
2
•
Important ------------------------------------------------------------------------------ 14
•
Specifications ------------------------------------------------------------------------ 16
1
26
27
28
29
30
31
32
33 - 37
38
39
English
LOCATION OF CONTROLS
1.
2.
3.
4.
5.
6.
7.
8.
9.
10.
11.
12.
13.
14..
15..
16..
17..
18..
19..
20.
21.
22.
23.
24.
25.
26.
27.
28.
29.
30.
31.
32.
33.
34.
35.
Mains Lead , Speaker Sockets and FM Antenna wire ( at the rear of the unit )
CD Tray
RECORD Key
PLAY Key
REWIND Key
FAST FORWARD Key
STOP / EJECT Key
PAUSE Key
CASSETTE Compartment A
DISC SKIP Button
CD REPEAT Button
PROGRAM Button
PHONES Socket
FUNCTION Selector (Phono/Tuner/Tape/CD)
CD STOP Button
STANDBY/ON Button
PRESET EQUALIZER Button
FM-STEREO Indicator
STANDBY/Mute Indicator
EQ Indicators
LCD Display
REMOTE Sensor
Turntable (PHONO)
VOLUME Up/Down Button
DIAL Pointer
HIGH SPEED DUBBING/ FM Stereo Selector
CD PLAY/PAUSE Button
RADIO Band wave selector
TUNING Knob
CD Skip/Search Forward Button
CD Skip/Search Backward Button
INTRO Button
CASSETTE Compartment B
PLAY Key
REWIND Key
FAST FORWARD Key
3
4
English
36.
37.
38.
STOP / EJECT Key
PAUSE Key
CD OPEN / CLOSE Button
39.
CD DIRECT Access - 1, 2, 3
CONNECTING TO POWER
Before switching on make sure that the voltage of your electricity supply is the same as
that indicated on the rating plate.
For your own safety read the following instructions carefully before attempting to connect
this unit to the mains.
MAINS (AC) OPERATION
This unit is designed to operate on AC 120V 60Hz current only. Connecting it to other
power sources may damage the unit.
CAUTION
To prevent electric shock disconnect from the mains before removing cover. No user
serviceable parts inside. Refer servicing to qualified service personnel.
POWER SUPPLY
Remove the stereo carefully from the box, retaining the packaging for future use.
AC POWER OPERATION
Connect the plug to a mains power inlet 120V AC ~ 60 Hz.
CONNECTIONS
SPEAKER CONNECTION
Connect each speaker to the corresponding speaker terminals on the back of the system.
Ensure that the left speaker is connected to the left connector, and the right speaker to the
right connector.
HEADPHONE
This unit will accept stereo headphones (not included) with a 3.5mm plug and an impedance
of 8 ohms or greater.
The speakers are automatically disconnected when headphones are connected to the
PHONES JACKS (13).
English
5
AM/FM TUNER
OPERATION
•
Press the STANDBY/ON Button (16) to ON . The Standby indicator (19) will go off.
•
Set the Function Selector (14) to the TUNER position.
•
Select the desired frequency band with the Band Selector (28).
•
Tune to the desired radio station by turning the Tuning control (29).
•
Press the STANDBY/ON Button to OFF.
ANTENNA
•
For FM reception there is a built-in FM antenna wire at the rear of the unit. Move the wire
around to obtain the best reception.
•
For AM reception the signals are picked up through a built-in ferrite antenna. Your may
have to orient the unit to obtain the best reception.
6
•
English
Press the Stop / Eject Key (36) when finished. Otherwise the tape will stop automatically
when the end of the tape is reached.
CONTINUOUS PLAYBACK ( ONLY RUNNING FROM TAPE DECK B TO A )
•
Set the Function Selector (14) to the TAPE position.
•
Insert your cassette tapes.
•
Press the PLAY Key (33) of deck B.
•
Press the PAUSE Key (8) and the PLAY Key (4) of deck A.
•
Deck B will now proceed to play its side.
•
Adjust the VOLUME (24) control to the preferred level.
•
When Tape Deck B has finished playing, it will stop. Tape Deck A then starts playing
back automatically.
•
When Tape A reaches its end, it automatically stops.
RECORDING (ONLY ON TAPE DECK A)
FM & FM-STEREO RECEPTION
•
Stereo reception is possible when the tuned FM station is broadcasting in stereo.
•
When the FM Stereo button (26) is “up” and the station is broadcasting in Stereo, the
STEREO indicator (18) lights up.
•
When FM stations are weak and are disturbed, listening can be improved by pressing
down the FM STEREO selector (26). Reception will then be in MONO.
CASSETTE OPERATION
INSERTION AND REMOVAL OF CASSETTES
•
Press the STANDBY/ON Button (16) to ON . The Standby indicator will go off.
•
Set the Function Selector (14) to the TAPE position.
•
Press the Stop / Eject Key (36) to open the Cassette Door of Compartment B.
•
Slip your cassette tape into the door, with the exposed section facing downward
and side A with full spool of tape on left side facing you.
•
Close the Cassette Door securely.
•
When finished, press the Stop / Eject Key to open the Cassette Door, and retrieve your
cassette tape.
PLAYBACK
•
Set the Function Selector (14) to the TAPE position.
•
Insert your cassette tape in the Compartment B.
•
Press the Play Key (33) to activate playback.
•
Use the Pause Key (37) whenever you want to suspend playback.
•
•
This unit has Automatic Level Control circuitry. This means that the recording level is
set automatically. The volume or tone controls will not affect the recording.
Record Key will not be pressed down when the record prevention tab is broken or
removed from the tape.
RECORDING FROM THE RADIO
•
Set the Function Selector (14) to the TUNER position.
•
Tune in your station using the TUNING Control (29) and put in your blank cassette tape
in cassette compartment “A” (9).
•
Press the Record Key (3) and the Play Key (4) at the same time on Tape Deck A to start
recording.
•
Press the Stop / Eject Key ( 7) when finished. Otherwise the tape will stop automatically
when the end of the tape is reached.
RECORDING FROM THE CD
•
Set the Function Selector (14) to the CD position.
•
Put in your blank cassette tape in cassette compartment “A” (9).
•
Select the CD (1,2 or 3) you want to play/record with the Disc Selector button (39).
Press the Record Key (3) and the Play Key (4) at the same time on Tape Deck A to start
recording. Press Play/Pause Key (27) on the CD player.
•
Press the Stop / Eject Key ( 7) when finished. Otherwise the tape will stop automatically
when the end of the tape is reached.
English
7
8
English
SYNCHRONIZED TAPE-TO-TAPE RECORDING
NORMAL SPEED TAPE-TO-TAPE RECORDING
•
Insert a fully rewound prerecorded cassette into Tape Deck B.
•
Insert a fully rewound blank cassette tape into Tape Deck A.
•
Set the Function Selector (14) to the TAPE position and keep the DUBBING Selector
(26) in the “high” position.
•
Press the Pause Key of Tape Deck “A”, and then press both the Play and Record keys
of Tape Deck “A”.
•
Press the Play Key of Tape Deck “B”. The contents of the tape in Deck “B” will now be
copied onto the tape in Deck “A”.
•
Adjust the Volume Control to the desired levels for monitoring purposes. The recording
will be unaffected by changes in these control.
•
To stop recording, press both of the Stop / Eject Keys. Otherwise the tape will stop
automatically when the end of the tape is reached.
•
To remove a disc from its storage case, press down on the centre of the case and lift the
disc out, holding it carefully by the edges.
•
HIGH SPEED TAPE-TO-TAPE RECORDING
•
Press down the DUBBING Button (26) to the “low” position.
•
Follow the steps described above for Normal Speed Tape-to Tape Recording. You will
hear the speeded up tape play through the speakers. Turn down the volume to silence
the sound.
NOTES: If the length of the tape in Deck B is shorter than that in Deck A, the Play Key of Deck
B will be released automatically at the end of the tape. Tape A will continue to record
until the tape reaches its end, or its Stop / Eject key is pressed.
If the length of the tape in Deck A is shorter than that in Deck B. The Record and
Play Keys of Deck A will be released automatically at the end of tape. Tape B will
continue to play back until the tape reaches its end, or its Stop / Eject Key is pressed.
•
Fingerprints and dust should be carefully wiped off the disc’s recorded surface with a
soft cloth. Unlike conventional records, compact discs have no grooves to collect dust
and microscopic debris so gently wiping with a soft cloth should remove most particles.
Wipe in a straight line from the inside to the outside of the disc. Small dust particles and
light stains will have absolutely no effect on reproduction quality.
Never use chemicals such as record sprays, antistatic sprays, benzine, or thinners to
clean compact discs. These chemicals can irreparably damage the disc’s surface.
Discs should be returned to their cases after use. This avoids serious scratches that
could cause the Laser pickup to skip.
Do not expose discs to direct sunlight, high humidity, or high temperatures for extended
periods. Long exposure to high temperatures can warp the disc.
Do not stick paper or write anything with a ballpoint pen on the label side of the disc.
SOUND ADJUSTMENT
•
Press the PRESET EQ button (17) to select between pre-adjusted equalizations. The
indicator of the selected type will light up (20):
•
To Mute the sound instantly press the MUTE Button (7) on the Remote control.
The MUTE (19) indicator lights up and flashes . Pressing this button again or pressing the
VOLUME buttons on the remote Control, will switch the sound on again.
HANDLING COMPACT DISC
•
•
•
COMPACT DISC OPERATION
LOADING AND UNLOADING COMPACT DISCS
•
Press the STANDBY/ON Button (16) to ON . The Standby indicator (19) will go off.
•
Set the Function Selector (14) to the CD position.
•
Press the OPEN/CLOSE (38) button to open the CD drawer.
Note: You do not have to wait for the changer to search all three pockets for Ds. You may
open the CD drawer immediately.
•
The CD pockets are numbered “1,2 and 3”. These numbers correspond to the disc
indicators in the CD display. The disc indicators do not change position. However the
disc symbol will flash to show which disc is in the play position.
Place up to 3 CDs in the pockets of the tray. Place the disc you want to play first in pocket
no. 1. Place the disc you want to play second in pocket no.2 and so on. To load three
CDs in the tray it will be necessary to rotate the tray to expose the third pocket. After you
load the first two discs press the Disc Skip (10) button to rotate the tray and then load
English
•
•
9
your third disc. The discs must be centered in the pockets and loaded with the printed
sides facing up. If the disc is not properly centered in the pocket, it may move when you
close the drawer. This could jam the mechanism or possibly damage the disc, so be
sure to load the disc properly.
After you have loaded up to 3 CDs press the OPEN/CLOSE button (38) to close the
drawer. The changer will read the information of the CD that is in the play position. The
display will show the total number of tracks and total playing time of the disc.One of the
3 disc indicators will be blinking to show you which disc is in the play position. To begin
playback of the disc, simply press the PLAY/PAUSE >II button (27). The changer will
search all three pockets until it locates the disc and then playback will begin.
If no discs are found “disc” will blink on the display.
Playback begins with track 1 of the first disc and continues until the final track on disc 3
has been played. During playback the disc indicator of the disc that is played will flash.
When the last track of the last CD has been played, the changer stops and the display
will show the total tracks and playing time of the first disc again.
Notes: If the disc is deeply scratched, or too dirty, disc play may not start.
If on improperly centred disc is played, noise can be heard in the mechanism. The
use of such discs should be avoided.
IMPORTANT INFORMATION
This compact disc player has built-in error compensation circuits to correct for minor defects
in a disc. There are limits, however, to the amount of correction available. In some cases,
the CD player may skip some tracks on a disc during disc play. This problem may be cause
by defects (such as scratches) in the disc being played, which are too large for the error
compensation circuits to handle. If you encounter this problem, check the CD player’s
operation as follows, before having the unit serviced: Play a new disc. If the CD player
operates normally, the skipping problem is probably due to a defective disc.
TO STOP A CD PART WAY THROUGH
•
Press the Stop button (15). Disc play will stop, and the display will show the total
number of tracks for the CD.
•
To temporarily stop disc Play (Pause mode), press the Play / Pause button (27) . Disc
play will pause at the current play position. The PAUSE indication on LCD will appear.
•
To resume disc play, press the PLAY / PAUSE button again. The PAUSE indicator will
disappear.
TRACK SKIP
10
English
STARTING DISC PLAY FROM THE BEGINNING OF A PARTICULAR TRACK
•
Press the Forward or Reverse Skip Track buttons UP/DOWN
(30) to select the
desired track. The number of the selected track will be shown on the CD display. Press
the Play/Pause button to start play.
TO SKIP TO THE NEXT TRACK ON A DISC
•
For example, to skip ahead to the beginning of the next track .
•
Press the UP Track button once. Disc play will resume at the beginning of the next track.
The CD player will skip ahead to the next track each time the UP
button is pressed.
Continuously pressing the UP Track button makes the CD player skip ahead through
the disc track by track. Once the beginning of the last track is reached the CD player will
advance to the first track again.
TO SKIP BACK TO THE PREVIOUS TRACK ON A DISC
•
For example to skip back to the beginning of the previous track.
•
Press the DOWN button
twice. If this button is pressed in the middle of a track, the
CD player will skip back to the beginning of that track. To make it skip back to the
previous track press the DOWN Button twice.
Continuously pressing the DOWN button makes the CD player skip back through the
disc track by track. Once the beginning of the first track is reached, the CD player will not
go back any further.
Notes: The Skip Forwards and Backwards buttons can be used to select a desired track to
play from before disc play starts. In this case the number of the selected track will be
displayed until the Play / Pause Button is pressed.
MANUAL SEARCH
•
During playback, pressing the UP or DOWN Search buttons
(30) will cause the
player to scan through the current track. At the end of a track the player will skip to the
next track and continue scanning. At the beginning of a track the player will skip to the
previous track and continue scanning.
•
When the player reaches the end of the final track, or the beginning of the first track, it will
stop scanning.
INTRO SCAN
•
Press the INTRO BUTTON (31) in STOP mode to play the first 10 seconds of each track
on the CD. The heading “INTRO” will appear in the display before the track playing.
Press this button again, when a desired track is playing, to resume normal playback.
“INTRO” will disappear from the display.
English
11
12
English
02 d2:00
REPEAT PLAY MODES
Choose the disc you want to repeat first.
There are 3 repeat options for your convenience. Pressing the REPEAT button (11) in STOP
mode will cycle the changer through the three modes as follows:
DISPLAY
MODE
REPEAT ALL DISC
Repeats All the Tracks on All the Discs
REPEAT 1 DISC
Repeats all the tracks on the Current disc.
REPEAT 1
Repeats the current track on the Current disc.
To cancel a repeat mode, keep pressing the REPEAT Button until the REPEAT
Indicator is extinguished.
If the REPEAT button is pressed during PLAY mode, then all tracks of that disc will be repeated.
PROGRAMMED PLAYBACK
The CD changer has a 32 track programmable memory that allows you to program up to a
total 32 tracks on 3 discs for playback in any order you choose. You may also program a
specific track to be played more than once in a program sequence.
To perform programmed playback proceed as follows:
•
Open the CD drawer and insert up to 3 discs in the tray, then close the drawer.
•
Select the first disc you wish to program by pressing the appropriate disc number
button (for example disc 2) of which you want to program the first track (for example track
no. 5).
•
and “EDIT” will blink.
This indicates that the memory is ready to accept the first disc and track to be
programmed.
Select the first track you wish to programm by pressing SKIP FORWARD
button until
the desired track appears in the display.
01 d2:05
•
NOTE:
•
If you press the skip buttons during programmed playback the player skips forward or
back to the next programmed track, not the next track on the disc being played.
•
After the last programmed track has been played the player stops but the program
remains in the memory. If you press the PLAY/PAUSE >II button again the program will
be repeated.
•
To cancel programmed playback, press the STOP button (15) twice. The program can
also be canceled by opening the CD drawer, or by switching the POWER button (16) to
“OFF”.
To confirm the programmed info
After you have entered the last track of your program into the memory you may confirm the
program steps if desired. Press the PROGRAM button (12) once more and the display will
show the programmed tracks .
TURNTABLE OPERATION
Press the PROGRAM button (12) once. The display will show “PROGRAM ”
01 d2:- -
•
•
•
Select the track you wish to programm by pressing SKIP FORWARD
button until the
desired track appears in the display.
Repeat the above steps until you have entered up to 32 tracks into the memory.
When you are finished programming press the PLAY/PAUSE >II button (27) to begin
programmed playback. The PROGRAM indicator appears in the display and the changer
will play back the tracks and the discs in the order in which you entered them in the
program memory.
When the display correctly shows the first disc and track number you wish to program,
press the PROGRAM button (12) again to enter the disc number and track number in
the memory. The display will show
Preparation
Open the Record Player Cover.
Release the Tonearm Clamp, and remove the stylus protector.
Listening to Records
Set the Function Selector (14) to the PHONO position. Place a record on the turntable,
over the central spindle. Place the EP adapter over the central spindle when playing
17cm EP records.
3. Set the Speed Selector Button to 33 or 45 rpm according to the record.
4. Release the tonearm clamp, and remove the protective cap from the stylus.
5. Lift the Tonearm with the Tonearm Lift Lever.
6. Move the tonearm to the beginning of the record, or to the start of a particular track.
English
13
7. Gently lower the tone arm onto the record with the Tonearm Lift lever to start playing.
8. When the record is finished the turntable will automatically stop.
9. To stop the record whilst it is playing. Press the Stop Button, The the turntable will
automatically will stop.
14
•
English
make sure that there are no obstacles between the remote sensor and the remote
control unit.
If you press the MUTE button (7), the sound will be muted. Repress MUTE or the
VOLUME controls to return to normal sound level.
Notes: Do not stop or turn the platter manually.
IMPORTANT
Moving or jarring the turntable without securing the Tonearm clamp could result in
damage to the Tonearm.
Replace the protective cap on the stylus when not in use.
REMOTE CONTROL UNIT
PREPARATION BEFORE USE
1.
2.
3.
Remove the battery cover from the back of the remote control unit.
Insert two “AAA” size batteries (not included). Insert the batteries with the + and - terminals
matching the indication inside the battery compartment.
Replace the cover.
1. Standby/On Button
2. Stop Button
3. Play/Pause Button
4
6
7
5
3
2
1
4. CD Skip Forward / Backward Button
5. Program Button
8
6. Disc Button
7. Mute Button
8. Volume Up/Down Button
BATTERY REPLACEMENT
When the remote control operation becomes unstable or the distance from which remote
control is possible becomes shorter, replace the batteries with new ones.
USING THE REMOTE CONTROL UNIT
•
To use remote control unit, point it at the remote sensor (22) and press the button gently
and frimly. Remote control is possible within about 5m (approx. 16FT). However, since
the remote control range is less when the unit is used at an angle, use directly in front
of the remote sensor, as far as possible.
•
Do not expose the remote sensor to strong light (direct sunlight or artificial lighting) and
Since movement of the CD mechanism and the sensitive circuitry may cause interference
to a radio tuner nearby switch this unit off while operating other radio devices.
This product utilizes a laser
Danger - Invisible laser radiation when opened and interlock failed or defeated. Avoid
direct exposure to the beam.
Caution - Use of controls, adjustments, or procedures not listed in this manual may result
in hazardous radiation exposure.
Concerning Compact Discs
Only compact discs identified with this mark can be used with
this player.
English
15
16
English
AC CONNECTION
CASSETTE CARE
Two common causes of trouble experienced when using cassettes are:—
(a)
Tape jamming — Leading to uneven speed in playback, and
(b)
Tape tangling — Where the tape wraps itself around vital parts of the mechanism.
To reduce the likelihood of these problems occurring, the following precautions should be
observed.
Check that there are no loose layers of tape visible through the
cassette centre window (see Fig. 1). Take up any loose layers, using a
pencil or hexagonal barrelled ballpoint pen, before inserting the
cassette into the machine (see Fig. 2).
If the cassette feels "tight" while performing operation shown in Fig. 2,
the tape may be jamming due to "ridges" formed in the winding of the
tape (visible through the centre window). These may be removed, in
most cases, by fast winding of the cassette from one end to the other
and back again.
Use only well-known brands of tape.
AC CONNECTION
Plug the power cord into an AC outlet having 120V ,60Hz only. Connecting this unit to other power
sources may damage the unit.
NOTES:
*The AC polarized to help minimize the possibility of electric shock.
If the polarized plug does not fit into a nonpolarized AC outlet,
do not file or cut the wide blade; it is the user`s responsibility
to have an electrician replace the obsolete outlet.
*The power cord should be unplugged from the outlet
when the unit is not going to be used for a long period of time.
SPECIFICATIONS
Avoid use of C-120 cassettes.
Do not expose cassettes to direct sunlight, dust or oil, and do not touch the tape surfaces.
HEAD CLEANING
The tape heads, pinch roller and capstan require periodic cleaning. This removes particles of
the metal oxide coating that wear off the tape and accumulate on these parts and impair
performance. Switch off the power, press the Stop/Eject Button to open the cassette door,
and press the Play Button. Clean the tape heads, pinch roller and capstan with a special tape
head cleaner. Avaliable from most HiFi shops.
Erase head
Record/Play
Head
Capstan
Pinch Roller
Power Supply
AC:
120V ~ 60Hz
Radio Frequency Coverage
FM:
87.5 - 108MHz
AM:
530 - 1710kHz
Recording System
Recording System:
AC Bias
CD Player
Pick Up:
Encoding:
3-Beam. Semiconductor Laser
16-Bit Linear, 2 x oversampling
PREVENTION AGAINST ACCIDENTAL ERASURE
Design and specifications are subject to change without notice.
To prevent a recording on a cassette tape being erased accidentally, break off the tab on
the rear of the tape, as in the diagram. Now recording on this side
is no longer possible. You can render this protection ineffective by
covering the hole with a piece of adhesive tape.
TAB FOR SIDE A
For service assistance and product information, please call: 1-800-968-9853.