1
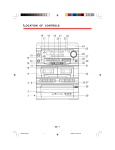
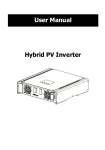
RCD898 INSTRUCTION MANUAL WARNINGS TO Prevent fire or shock hazard, do not use this plug with an extension cord, receptacle or add other outlet unless the blades can be can be fully inserted to prevent blade exposure. To prevent fire or shock hazard, do not expose this appliance to rain or moisture. WARNING The lightning flash with arrowhead symbol,within an equilateral triangle is intented to alert the user to the presence of uninsulated' dangerous voltage' within the product's enclosure that may be of sufficient magnitude to constitute a risk of electric shock to persons. CAUTION : TO REDUCE THE The exclamation point within RISK OF ELECTRIC SHOCK an equilateral triangle is int- DO NOT REMOVE COVER ( ended to alert the user to the OR BACK),NO USER SERV- presence of important opera- ICEABLE PARTS INSIDE R- ting and maintenance (servi- EFER SERVICING TO QUA- cing) instructions in the liter- LIFIED SERVICE PERSON- ature accompany-ing the ap- NEL plicance IMPORTANT SAFETY INSTRUCTIONS 1 Read these instruction. 2 keep these instructions. 3 heed all warnings. 4 Follow all instructions. 5 Do not use this product near water(swimming pool, beach, lake etc.). 6 Clean only with a dry cloth. 7 Do not block any of the ventilation openings.Install in accordance with the manufacturer's instructions . 8 Do not install near any heat sources such as radiators, heat registers . Stoves or other apparatus (including amplifiers)that produce heat. 9 Do not defeat the safety purpose of the polarized or grounding-type plug, A polarized plug has two blades with one wider than the other. A grounding type plug has two blades and a third grounding prong. The wide blade or the third prong is provided for your safety. If the provided plug does not fit into your outlet, consult an electrician for replacement of the obsolete outlet. 10 Protect the power cord from being walked on or pinched particularly at receptacles and the point where they exit from the stereo. 11 Only use attachments/accessories specified by the manufacturer. 12 Unplug this apparatus during lightning storms or when unused for long periods of time 13 Refer all servicing to qualified service personnel. Servicing is required when the system has been damaged in any way, such as a damaged power-supply cord or plug . Has been exposed to rain or moisture ,does not operate normally , or has been dropped. 14 This appliance should not be exposed to dripping water or splashing water and objects filled with water, such as vases, should not be placed on this unit -1- T ABLE OF C ONTENTS Location of controls ..........................................................................................................3-4 Remote Control ................................................................................................................. 5 Headphones ...................................................................................................................... 5 Preparation For Use ........................................................................................................... 6 Listening to the Radio ......................................................................................................... 6 Mute Function .................................................................................................................... 6 Preset Equalizer................................................................................................................ 6 Handling compact discs ..................................................................................................... 7 Loading discs .................................................................................................................... 7 Playing Discs..................................................................................................................... 8 Track Skip ......................................................................................................................... 8 Disc Skip ............................................................................................................................. 9 Repeat Disc Play ............................................................................................................... 9 Programmed Disc Play ....................................................................................................... 9 Record Player .................................................................................................................. 10 Listening to Tape ............................................................................................................. 11 Recording ....................................................................................................................... 12 Cassette Care ................................................................................................................... 13 Prevention against accidental erasure ............................................................................. 13 Important Notes ................................................................................................................ 14 Technical Data .................................................................................................................. 15 -2- L OCATION 17 OF CONTROLS 19 18 21-26 20 27-31 16 15 14 32 33 34 13 12 11 10 9 35 3-8 36-40 41 42-44 2 1 -3- L OCATION OF CONTROLS MAINS LEAD,SPEAKER SOCKETS AND 27. CD PLAY/PAUSE Button FM AERIAL WIRE (AT THE REAR OF 28. CD STOP Button THE UNIT) 29. CD MEMORY Button 2. CD Door 30. CD SKIP/SEARCH Backward 3. RECORD Key (Deck A) 4. PLAY Key (Deck A) 5. REWIND Key (Deck A) 6. FAST Forward Key (Deck A) 32. TUNING Knob 7 STOP / EJECT Key (Deck A) 33. BALANCE Knob 8 PAUSE Key (Deck A) 34. VOLUME Control Knob 9 CASSETTE Compartment A 35. CASSETTE Compartment B 10 HI-SPEED DUBBING FM MONO Button 36. PLAY Key (Deck B) 1. Button 31. CD SKIP/SEARCH Forwards Button 11. RADIO BAND Selector 37. REWIND Key (Deck B) 12. FUNCTION Selector 38. FAST Forward Key (Deck B) 13. HEADPHONES Socket 39. STOP / EJECT Key (Deck B) 14. PRESET EQ (rock, pop, classic, jazz) 40. PAUSE Key (Deck B) 15. CD REPEAT Button 41. CD OPEN/CLOSE Button 16. STANDBY Button 42. DISC 1 Direct Access 17 43. DISC 2 Direct Access STANDBY/ON Indicator 44. DISC 3 Direct Access 18. TUNER Scale 19. LCD Display 20. REMOTE Sensor 21. JAZZ Indicator 22. CLASSIC Indicator 23. POP Indicator 24. ROCK Indicator 25. MUTE Indicator 26. FM Stereo Indicator -4- R EMOTE C ONTROL 1. POWER Button 2. STOP Button 3. PLAY / PAUSE Button 4. CD SKIP/SEARCH Buttons 4 5. PROGRAM Button 6 7 6. DISC SKIP Button 7. MUTE Button 8. VOLUME UP/DOWN Buttons. 5 3 2 1 8 BATTERY INSTALLATION Insert 2 Alkaline (AAA or equivalent) size batteries into the battery compartment of the remote controller and replace the cover(battery not included). BATTERY REPLACEMENT When the batteries become too weak, the operating distance of the remote controller is greatly reduced and you will need to replace the batteries. Notes: To maintain the accuracy and long life of the transmitter, do not press two or more Buttons simultaneously. If the remote control is not to be used for a long time, remove the batteries to prevent possible damage through leaking batteries. Do not mix different types of batteries, or old batteries with new ones. USING THE REMOTE CONTROLLER CORRECTLY Point the remote controller at the Remote Sensor located on the main unit. The functions of the Buttons on the remote control are the same as the corresponding controls on the main unit. When there is a strong ambient light source, the performance of the infrared Remote Sensor may be degraded, causing unreliable operation. The maximum effective distance for remote control operation is about 5 metres (16.5 feet). H EADPHONES Headphones should have a 3.5 mm diameter stereo plug with an impedence of 8-32 ohms. When headphones are connected, the speakers are automatically disconnected. -5- P REPARATION FOR U SE Remove the stereo carefully from the box, retaining the packaging for future use. Read these instructions carefully before use. CONNECTIONS Before switching on your stereo system, ensure that it is connected as follows: SPEAKERS Connect the speakers to the speaker sockets on the back of the music system. Connect the left speaker to the left speaker socket and the right speaker to the right speaker socket. Connect the Mains Lead to an AC outlet. Insert two AAA batteries into the battery compartment of the remote controller. You are now ready to switch on the power. CAUTION The product shall not be exposed to dripping or splashing and that no objects filled with liquids, such as vases, shall be placed on the product. The normal ventilation of the product must not be blocked. L ISTENING R ADIO TO THE OPERATION Press the STANDBY/ON Button to turn the unit on, the Stand-By indicator will go off. Set the FUNCTION Selector to the tuner position and the radio band selector to AM or FM position. Tune into the station using the TUNING knob. Adjust the VOLUME to the desired level using the VOLUME Control Knob. To turn off the radio, press the STANDBY/ON Button. M UTE Press the MUTE Button on the remote control to switch off the sound, the MUTE indicator will light up. Press MUTE again to restore the sound to the previous level. MUTE indicator will go off. P RESET E QUALIZER This unit is equipped with a preset equaliser which has been added to enhance your listening pleasure by altering the frequency response of the music to give it a different feel. Press the PRESET EQ Button repeatedly to cycle through the following equalization modes. ROCK POP CLASSIC -6- JAZZ NORMAL H ANDLING C OMPACT D ISCS To remove a disc from its storage case, press down on the centre of the case and lift the disc out, holding it carefully by the edges. Fingerprints and dust should be carefully wiped off the disc's recorded surface with a soft cloth. Unlike conventional records, compact discs have no grooves to collect dust and microscopic debris so gently wiping with a soft cloth should remove most particles. Wipe in a straight line from the inside to the outside of the disc. Small dust particles and light stains will have absolutely no effect on reproduction quality. Never use chemicals such as record sprays, antistatic sprays, benzine, or thinners to clean compact discs. These chemicals can irreparably damage the disc's surface.Discs should be returned to their cases after use. This avoids serious scratches that could cause the Laser pickup to skip. Do not expose discs to direct sunlight, high humidity, or high temperatures for extended periods. Long exposure to high temperatures can warp the disc. L OADING D ISCS LOADING AND UNLOADING COMPACT DISCS Set the FUNCTION Selector to the CD position. Press the CD Open / Close Button to open the disc compartment. Once the CD door has opened, remove a disc from its case and place it carefully in one of the indentations in the compartment with the label side facing up. Smaller, 3” discs, may also be used with this CD player. To load additional CD's press the CD Skip button to rotate the CD tray, upto 3 discs can be placed in the tray at any one time. Smaller 3 inch discs can be used in this unit. To close the disc compartment press the CD Open / Close Button The unit will go through a cycle to find the first CD there is in the tray, this may take upto 15 seconds. The disc compartment may be opened at any time by pressing the CD Open/Close Button. CAUTION Do not put anything except a compact disc into the compartment. Foreign objects can damage the mechanism. Do not force the compartment by hand during the opening and closing operations. Keep the disc compartment closed when not in use to prevent dirt and dust from entering the mechanism. -7- P LAYING D ISCS Press the CD Open/Close Button to open the disc compartment, and load a CD. Close the disc compartment, the unit will search for the first tray to contain a CD and the display will show the total playing time of the CD. Press the CD SKIP Button to select the CD of your choice or select the disc using the Press the Play/Pause Button, disc play will begin from the start of the first track. direct acceess buttons on the front of the unit. A particular track can be selected by pressing the & Buttons. If this is done before pressing the Play/Pause Button, disc play will start with the selected track when the Play/Pause Button is pressed. At the end of the disc, the unit will switch to stop mode Notes: If the disc is deeply scratched, or too dirty, disc play may not start. If an improperly centred disc is played, noise can be heard in the mechanism. The use of such discs should be avoided. IMPORTANT INFORMATION This compact disc player has built-in error compensation circuits to correct for minor defects in a disc. There are limits, however, to the amount of correction available. In some cases, the CD player may skip some tracks on a disc during disc play. This problem may be caused by defects (such as scratches) in the disc being played, which are too large for the error compensation circuits to handle. If you encounter this problem, check the CD player's operation as follows, before having the unit serviced. Play a different disc. If the CD player operates normally, the skipping problem is probably due to a defective disc. TO STOP A CD PART WAY THROUGH Press the Stop Button. Disc play will stop, the Play indicator will go off, and the display will show the total number of tracks and the total playing time of the CD. To temporarily stop disc play (pause mode), press the Play/Pause Button. Disc play will pause at the current play position. To resume disc play, press the Play/Pause Button again. The Play indicator will be displayed. T RACK S KIP TO SKIP TO THE NEXT TRACK ON A DISC For example, to skip ahead to the beginning of track 5 while track 4 is playing. Press the Button once. Disc play will resume at the beginning of track 5. The CD player will skip ahead to the next track each time the Button is pressed. Repeatedly pressing the Forward Skip Track Button makes the CD player skip ahead through the disc track by track. Once the beginning of the last trackis reached the CD player will not advance any further. -8- TO SKIP BACK TO THE PREVIOUS TRACK ON A DISC For example to skip back to the beginning of track 3 while track 4 is playing. Press the Button twice. Disc play will resume at the beginning of track 3. The CD player will skip back one track each time the Button is pressed. If this Button is pressed once in the middle of a track, the CD player will skip back to the beginning of that track. To make it skip back to the previous track press the Button twice. Repeatedly pressing the Button makes the CD player skip back through the disc track by track. Once the beginning of the first track is reached, the CD player will not go back any further. Notes: The & Buttons can be used to select a desired track to play from before disc play starts. In this case the number of the selected track will be displayed until the Play/Pause Button is pressed. D ISC S KIP To skip to the next disc simply press the DISC SKIP Button the unit will cycle through position 1 - 2 - 3 - 1 - 2 . . . . . .etc Direct access to disc 1, 2 or 3 can be operated by pressing DISC 1, DISC 2 or DISC 3 at the bottom right corner of the unit. R EPEAT D ISC P LAY If the REPEAT Button is pressed during normal or programmed disc play the following repeat functions are displayed in sequence in the CD Display. REPEAT ALL DISC Repeats All the Tracks on All the Discs REPEAT 1 DISC Repeats all the tracks on the Current disc. REPEAT 1 Repeats the current track on the Current disc. To cancel a repeat mode, keep pressing the REPEAT Button until the REPEAT Indicator is extinguished. P ROGRAMMED D ISC P LAY It is not possible to enter programs during disc play. Press the STOP Button first, then follow the instructions below. ENTERING A PROGRAM 1. Press the MEMORY Button on the front panel or the PROGRAM button on the remote control the CD Display will display the word Progam edit and 01 d2:-- 2. Select the disc that the first track is on using the Disc Skip Button or the direct acceess buttons on front of unit. 3. Select the desired track using the Track skip buttons until the desired track is reached, the display will show Progam edit and 01 d2:04. 4. Press the MEMORY button on front panel or PROGRAM Button on the remote control once again, the selected disc and track number is then stored in memory. The CD Display will change to Progam edit and 02 d2:-- -9- 5. Repeat steps 2 - 4 to enter additional tracks. You can store upto 32 programs in memory. Notes: If the PLAY/PAUSE Button is pressed before the MEMORY Button is pressed to store a track, the track will not be programmed, and the disc will start playing from the first selected track. Any track can be programmed to play more than once. If you press the STOP Button during MEMORY mode, the entire program will be erased from memory. LISTENING TO PROGRAMMED TRACKS Program your selection of tracks by following the procedure shown above. Press the PLAY/PAUSE Button. Disc play will start at the beginning of the first programmed track. TO CLEAR THE PROGRAM MEMORY If the disc is playing, press the STOP Button. Press the STOP Button again. All the programs will then be erased from memory. The program memory will also be cleared if the Function Selector is changed to another function, or if the power is switched off. R ECORD P LAYER RECORD PLAYER UNPACKING - Before playing any records: A. 45 RPM ADAPTOR B. TURNTABLE C. PICK UP ARM A B E D. 33/45 SPEED SELECTOR E. TRANSIT SCREW * If this is the first time the record player is used, screw the transit screw clockwise until tight. Failure to do this will cause vibration and hum. * Unlock the PICK UP ARM from the PICK UP ARM REST. * Remove the stylus cover by pulling it gently forward, away from the HEAD SHELL. 1. Turn the unit on using the STANDBY/ON button. 2. Set the Function Selector to PHONO position. 3. Lift the DUST COVER and select the speed to suit the record you are about to play using the 33/45 RPM SPEED SELECTOR switch. 4. Place the record on the TURNTABLE so that the SPINDLE protrudes through the centre hole in the record. 5. Raise the PICK-UP ARM by grasping it lightly at the FINGER LIFT located on the HEAD SHELL and gently move it to the left towards the record. The turntable will now start rotating. Move the stylus to the selected point above the record. Lower the PICK-UP ARM gently onto the record groove. 6. At the end of the record, the PICK-UP ARM will return to its rest position and the turntable will stop. - 10 - CD 7. To stop playing the record mid-way, lift the PICK-UP ARM and swing it gently toward the centre of the record to activate the auto-stop mechanism and the TURNTABLE will stop rotating and the PICK-UP ARM will return to the PICK-UP ARM rest. 8. To turn the unit off, press the STANDBY/ON button again. Note: 1. Do not turn off the main power while the TURNTABLE is still rotating to avoid leaving the player in its engaged position. 2. Never allow the PICK-UP ARM to be lowered onto any surface other than a rotating record to avoid serious damage to the stylus. 3. Be careful never to drop the stylus onto the record surface from its' raised position to avoid damaging the record surface as well as the stylus. L ISTENING TO T APE INSERTION AND REMOVAL OF CASSETTES Press the Stop/Eject Button to open the Cassette Door. Insert your cassette tape into the cassette door with the exposed section of tape at the bottom and the playback side facing you. Close the Cassette Door securely before starting. When finished, press the Stop/Eject Key to open the Cassette Door, and remove your cassette tape. P LAYING T APES You can choose either Tape A or Tape B for playback. Select the TAPE Option using the FUNCTION Selector. Insert your cassette tape. Press the Play Key to start the tape. Use the Pause Key whenever you want to suspend playback. Press the Stop/Eject Key when finished. C ONTINUOUS P LAYBACK Select the TAPE Option using the FUNCTION Selector. Insert two cassette tapes. Press the Play Key of deck B. Press the Pause Key followed by the Play Key of deck A. Deck B will play while Deck A waits. Adjust the Volume Control to the appropriate level. When Tape B reaches the end and stops, Tape A starts playing back automatically. When Tape A reaches the end, it will automatically stop. - 11 - R ECORDING RECORDING FROM THE RADIO Select the AM or FM Option using the RADIO BAND Selector. Tune in your station and insert a cassette tape into tape deck A. Press the Record Key and the Play Key at the same time to start recording. Press the Stop/Eject Key when finished. RECORDING FROM CD Select the CD Option using the FUNCTION Selector, and insert your disc. Press the Record Key and the Play Key at the same time to start recording. Press the CD Play/Pause Button to start the disc. Press the Stop/Eject Key when finished. TAPE-TO-TAPE RECORDING (DUBBING) NORMAL SPEED DUBBING Insert a fully rewound pre-recorded cassette into Tape Deck B. Insert a fully rewound blank cassette tape into Tape Deck A. Select the TAPE Option using the FUNCTION Selector. Press the Pause Key and then the Play and Record Keys of Tape Deck A. Press the Play Key of Tape Deck B. The contents of the tape in Deck B will now be copied onto the tape in Deck A. Adjust the Volume Control to the desired level for monitoring purposes. The recording level will be unaffected by changes in volume. To stop recording, press both of the Stop/Eject Keys. HIGH SPEED DUBBING Press the High Speed button to the ON position. Follow the steps described above for Normal Speed Dubbing. Monitoring is not possible. Notes: If the length of the tape in Deck B is shorter than that in Deck A, the Play Key of Deck B will be released automatically at the end of the tape. Tape A will continue to record until the tape reaches its end, or its Stop/Eject Key is pressed. If the length of the tape in Deck A is shorter than that in Deck B. The Record and Play Keys of Deck A will be released automatically at the end of tape. Tape B will continue to play until the tape reaches its end, or its Stop/Eject Key is pressed. C OPYRIGHT N OTICE W ARNING Most records, compact discs, audio and video cassettes, radio and television broadcasts contain material which is the subject of copyright. It is unlawful to record such material in any form whatsoever, whether on disc or tape, without the permission of the copyright owner concerned. Any person who makes a recording of such material without the consent of the copyright owner infringes copyright and may be liable, to pay substantial damages to the copyright owner, and in some cases to criminal prosecution. - 12- C ASSETTE C ARE Two common causes of trouble experienced when using cassettes are:— (a) Tape jamming — Leading to uneven speed in playback, and (b) Tape tangling — Where the tape wraps itself around vital parts of the mechanism. To reduce the likelihood of these problems occurring, the following precautions should be observed. Check that there are no loose layers of tape visible through the cassette centre window (see Fig. 1). Take up any loose layers, using a pencil or hexagonal barrelled ballpoint pen, before inserting the cassette into the machine (see Fig. 2). If the cassette feels "tight" while performing operation shown in Fig. 2, the tape may be jamming due to "ridges" formed in the winding of the tape (visible through the centre window). These may be removed, in most cases, by fast winding of the cassette from one end to the other and back again. Use only well-known brands of tape. Avoid use of C-120 cassettes. Do not expose cassettes to direct sunlight, dust or oil, and do not touch the tape surfaces. H EAD C LEANING The tape heads, pinch roller and capstan require periodic cleaning. This removes particles of the metal oxide coating that wear off the tape and accumulate on these parts and impair performance. Switch off the power, press the Stop/Eject Button to open the cassette door, and press the Play Button. Clean the tape heads, pinch roller and capstan with a special tape head cleaner. Avaliable from most HiFi shops. Erase head Record/Play Head Capstan Pinch Roller P REVENTION A GAINST A CCIDENTAL E RASURE To prevent a recording on a cassette tape being erased accidentally, break off the tab on the rear of the tape, as in the diagram. Now recording on this side is no longer possible. You can render this protection ineffective by covering the hole with a piece of adhesive tape. TAB FOR SIDE A - 13 - I MPORTANT N OTES Hearing is very important to you and to us so please take care when operating this equipment. It is strongly recommended that you follow the listed guidelines in order to prevent possible damage or loss of hearing. E S T A B L I S H A S AFE S O U N D L E V E L Over time your hearing will adapt to continous loud sounds and will give the impression that the volume has in fact been reduced. What seems normal to you may in fact be harmful. To guard against this BEFORE YOUR HEARING ADAPTS set the volume at a low level. Slowly increase the level until you can hear comfortably and clearly and without distortion. Damage to your hearing is accumulative and is irreversible. Any ringing or discomfort in the ears indicates that the volume is too loud. Remember listening for prolonged period of time at high volume levels will harm your hearing. Once you have established a comfortable listening level, DO NOT INCREASE THE SOUND LEVEL FURTHER. The following list of typical sound levels may assist you in recognising just how loud you have set the volume level. DECIBEL Level (dB) Example 30dB Quiet library, soft whisper. 40 Living room, fridge, freezer, bedroom away from traffic. 50 Normal conversation, quiet office, light traffic. 60 Electric sewing machine. 70 Vacuum cleaner, hair dryer, noisy restaurant. T H E F O L L O W I N G N O I S E C AN B E H A R M F U L U N D E R C O N S T A N T E X P O S U R E 80dB Average city traffic, alarm clock buzzer at 2 feet, food mixer. 90dB Motorcycle, heavy goods vehicle, petrol lawn mower. 100 Pneumatic drill, chain saw, garbage truck, discotheque / night-club. 120 Rock band concert, thunderclap, fast train passing by. PERMANENT LOSS OF HEARING 140 THRESHOLD OF PAIN Gunshot 2 feet away, jet plane taking off. - 14 - T ECHNICAL D ATA D I M E N S I O N S (W X D X H) / W E I G H T ( K G ) Set: 350 x 369 x 433.8mm / 8.6kg Speaker L/R: 225 x 370 x 221mm / 3.6kg x 2 POWER SUPPLY Voltage: AC 120V ~ 60Hz P O W E R CO N S U M P T I O N 60 watt RECEPTION RANGE 3 X FM: 87.5 MHz - 108 MHz AM: 530 - 1710 KHz CD C H A N G E R Converter 16 bit D/A Oversampling 8x (CD / CD-R) T APE Hight speed dubbing: Automatic level control SPEAKER Front L/R: Woofer 5” + Center 3” + Tweeter 2” / 8Ω Subject to technical alteration without notice. - 15 -