1
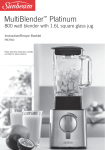
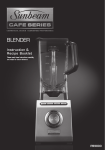
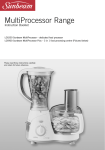
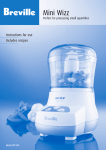
MultiBlender Electronic
850 watt electronic blender with
7 programmed functions
Instruction Booklet
PB7950
Please read these instructions carefully
and retain for future reference.
Contents
Sunbeam’s Safety Precautions
1
Features of your MultiBlender Electronic
2
Before using your MultiBlender Electronic
4
Using your MultiBlender Electronic
5
A Guide to your MultiBlender Electronic
Handy Blending Hints
Care and Cleaning
Recipes
Soups
Dips/Starters/Pastes
Light Snacks
Desserts
Drinks
Thick Shakes
Cocktails
6
7
8
9
11
14
15
17
19
20
Sunbeam’s Safety Precautions
SAFETY PRECAUTIONS FOR YOUR
SUNBEAM MULTIBLENDER ELECTRONIC
PB7950
• Ensure fingers are kept well away from the
blades when in use.
• When using heavy loads this blender should
not be operated for more than 1 minute and
40 seconds, this does not apply to any of the
recipes detailed in this instruction booklet.
• Do not blend hot ingredients.
• Always operate on a flat surface.
Sunbeam are very safety conscious when
• Do not use an appliance for any purpose
designing and manufacturing consumer products,
other than its intended use.
but it is essential that the product user also
• Do not place an appliance on or near a hot gas
exercise care when using an electrical appliance.
flame, electric element or on a heated oven.
Listed below are precautions which are essential
Do not place on top of any other appliance.
for the safe use of an electrical appliance:
• Do not let the power cord of an appliance hang
• Read carefully and save all the instructions
over the edge of a table or bench top or touch
provided with an appliance.
any hot surface.
• Always turn the power off at the power outlet
• For safety reasons and to avoid maintenance
before you insert or remove a plug. Remove
by unskilled persons, some appliances are
by grasping the plug - do not pull on the cord.
‘sealed’ using tamperproof screws. Such
• Turn the power off and remove the plug
when the appliance is not in use and
before cleaning.
• Do not use your appliance with an extension
cord unless this cord has been checked
and tested by a qualified technician or
service person.
• Always use your appliance from a power
outlet of the voltage (A.C. only) marked
on the appliance.
• Close supervision is necessary when your
appliance is being used near children or
infirm persons.
• Never leave an appliance unattended while
in use.
• Young children should be supervised to ensure
that they do not play with the appliance.
appliances should always be returned to the
nearest Sunbeam Appointed Service Centre
for adjustment or repair if required.
• Do not operate any electrical appliance with a
damaged cord or after the appliance has been
dropped or damaged in any manner. If damage
is suspected, return the appliance to the
nearest Sunbeam Appointed Service Centre
for examination, repair or adjustment.
• For additional protection, Sunbeam
recommend the use of a residual current
device (RCD) with a tripping current not
exceeding 30mA in the electrical circuit
supplying power to your appliances.
• Do not immerse the appliance in water
or any other liquid unless recommended.
If you have any concerns regarding the performance and use of your appliance,
please visit www.sunbeam.com.au or contact the Sunbeam Consumer Service Line.
Ensure the above safety precautions are understood.
1
Features of your MultiBlender
Electronic
Ingredient cup.
Handy 70ml ingredient cup. Also acts as a
device to unscrew the blade assembly from the
base of the jug.
Flexible lid with pouring hole.
To provide the necessary safety, the lid seals
tightly to the jug and features a pouring hole,
that allows you to add ingredients during the
blending process.
��
����
��
����
����
����
1.6 litre heat-resistant jug.
The sizeable 1.6 litre glass jug features specially
designed internal ribs to cycle ingredients back
into the blade system for superior results.
���
���
The jug features an easy to pour lip and is
marked in both cups and millilitres (mL) for
ease of use. The heat-resistant jug is ideal
for pureeing warm soups.
���
Detachable blade system assembly.
The detachable blade assembly unit unscrews
from the glass blending jug for convenient and
thorough cleaning.
Motor base.
The base houses a powerful 850 watt motor
providing superior performance for every
blending task.
��
���
��������
����������
Non-slip feet.
Keeps the blender secure on the bench top
during use.
2
���
���������
Serrated stainless steel six-blade system.
Specially designed for extra durability, the
heavy-duty, serrated stainless steel blade with
a six-blade construction, crushes ice cubes to
powder, produces a smooth consistency when
pureeing and combines ingredients perfectly
for a frappé.
��
�
����
�
Recipe programs.
Three blending favourites milkshake,
thickshake and smoothie. Just add
ingredients and each of these programs have
been developed to ensure perfect consistent
results everytime.
�
�
�
Functional programs.
�
To assist with some of the more functional
blender uses, these four programs (mix,
puree, cocktail and ice crush) have been
tested and refined, to remove the guess work
and improve on the final blending result.
Manual operation.
Low and High speed control plus Pulse.
��
����
���������
���������
Cord storage facility.
For tidy, convenient storage of the cord
underneath the motor base.
�����
�����
3
Before using your MultiBlender
Electronic
Important: Always ensure your blender is
unplugged from the power outlet before
fitting or removing the blade assembly.
Always handle the blade assembly with
caution, as the blades are extremely sharp.
2. Place the six-blade assembly into the
glass jug and turn clockwise to secure
firmly into position (see Figure 2).
���
�
���
�
To assemble the six-blade system in the glass
jug (see Figure 1).
1. Place the silicone rubber seal over the sixblade assembly, as shown in figure 1.
Figure 1
Six-blade
assembly
Silicone
seal
Figure 2
Note: The blender jug will leak if the sixblade system is not assembled correctly.
Note: Do not attempt to remove the
stainless steel blades from the blade
assembly.
3. Plug the power cord into a 230-240 volt
power outlet and turn the power ‘ON’.
4
Using your MultiBlender Electronic
1. Place the blender jug onto the motor base.
Note: Do not switch ‘ON’ the MultiBlender
Electronic without the lid in position.
2. Place ingredients into the glass jug. Do
not exceed the maximum indicated level
– 1.6 litres.
while blending by removing the ingredient
cup and pouring ingredients through the
hole in the lid.
Note: The pre-programmed functions can
be stopped by simply pressing the ‘OFF’
button.
3. Position the lid with ingredient cup onto
the blender jug. Ensure the lid is firmly in
place.
5. If using the manual buttons, Low or High,
once you have completed blending, press
the ‘OFF’ button on the control panel.
4. Using the control panel, select the desired
function, either from the pre-programmed
functions or the manual buttons High, Low
and PULSE settings.
Note: When removing the six-blade
assembly from the glass jug you may need
to slightly tilt the blade so that it slides
out easily. You shouldn’t force the blades
out of the glass jug as this will ultimately
damage the blades.
The Blending Guide on page 6 shows
various functions that can be performed
and the suggested speeds to use.
Note: Although the lid fits firmly to the
glass jug, we advise when blending liquid
ingredients, to place your hand on the lid
as you initially select the blending speed/
function. As the powerful 850 watt motor
could cause the liquid to surge up causing
leakage. Once you have started blending
you can remove your hand.
Further ingredients can also be added
5
A Guide to your MultiBlender
Electronic
Processing Task
Food
Suggested Setting
Programme
Suggested Processing Procedure
Aerating
Milkshakes,
Smoothies
HIGH
Milkshake
Use chilled milk. Blend until
desired consistency is achieved.
Chopping
Nuts, Chocolate,
Garlic or Herbs
PULSE
Process ½ cup at a time, to
ensure evenly sized pieces.
Crumbing
Bread Crumbs
PULSE
Tear bread roughly. Process
until desired consistency.
Biscuit Crumbs
PULSE
Break into pieces and
process until crumbed.
Crushing Ice
Crush Ice
Add ¼ cup of water. Use the
PULSE button 3-4 times in
succession for crushed ice.
Emulsifying
Salad Dressing
LOW
Crush Ice &
Cocktails
Blend until well combined.
Oil may be added to the
mixture during processing
through the pouring hole
in the lid.
Mixing
Batters, Cakes
LOW & HIGH
MIX
Process ingredients until
just combined.
DO NOT OVERPROCESS.
Soups,
Vegetables,
Fruits
HIGH
PUREE
Pureeing
6
PULSE
Blend until smooth.
Handy Blending Hints
• Nothing can beat a blender for making
smooth purees and sauces or for whipping
up frothy drinks – from healthy breakfast
shakes to frozen daiquiris.
• Use your blender for chopping small
amounts of food like nuts, bread crumbs
and whole spices.
• Turn any oil-based salad dressing into a
creamy style dressing by blending it until
slightly thickened.
• A brief whirl in the blender will rescue a
lumpy gravy, or an egg-based sauce that
has separated.
• Food items for blending should be cut into
cubes (approximately 2-3cm), this will
assist in achieving an even result.
• Ensure the lid is firmly and securely
placed on the jug. Do not operate the
blender without the lid on, if you wish to
add any additional ingredients remove the
ingredient cup and add as necessary.
• Never fill above the maximum level
indicator – 1.6 litres.
• To ensure efficient mixing when blending
dry mixtures, it may be necessary to stop
the blender and push ingredients down the
sides of the jug with a spatula.
• When pureeing fruit or vegetables, cooked
or raw, cut into small pieces to facilitate
blending.
• When making bread crumbs, use 2 to
3 day old bread, leaving crusts on, to
minimise the possibility of clumping. If
only fresh bread is available, dry it out for
a few minutes in a low heated oven.
• When blending a variety of ingredients
together, blend the liquids first, then add
dry ingredients.
• Always ensure stones are removed from
fruit and bones from meat as these can
harm the blades.
• Don’t allow a used blender to sit for too
long as the food will dry onto the blades,
making it very difficult to clean. If you
can’t clean the blender straight away, pour
some warm water in it and allow to soak.
• Do not process hot liquids in your blender.
Allow to cool before processing.
• Always ventilate the blender jug when
pureéing warm ingredients. This is
achieved by lifting the ingredient cup out
of the lid after starting the blender.
7
Care and Cleaning
Quick cleaning method.
Half fill the blender with warm water and a
small amount of detergent. Press the PULSE
button for 10-20 seconds. Then remove the
jug and rinse it under running water.
For thorough cleaning.
Turn the blender jug upside down. Unscrew
the six-blade assembly from the glass jug by
placing the open end of the ingredient cap
at the base of the blade assembly. Use the 5
grooves on the opening of the ingredient cap
to align the cap to the base of the glass jug.
Turn the ingredient cap in an anti-clockwise
direction to remove the blade assembly. See
Figure 3.
Figure 3
8
Remove the rubber seal from the blade
assembly. Wash the blender lid, ingredient
cup, rubber seal, blade assembly and blender
jug in warm soapy water.
Caution: Take care when cleaning the blades
as they are extremely sharp.
Note: Do not clean any part of the blender in
the dishwasher.
To clean the motor base.
Use a damp, soft sponge with mild detergent
and wipe over the motor base.
Note: Never immerse the motor base in water.
Recipes – Soups
Potato and Leek Soup
Serves 4
Mexican style Tomato Soup
1 tablespoon olive oil
1 tablespoon olive oil
2 small rashers bacon, chopped
2 onions, chopped
3 medium leeks, sliced thinly
2 cloves garlic, crushed
1 kg potatoes, peeled and chopped roughly
2 teaspoons cumin powder
2 litres chicken or vegetable stock
1 teaspoon chilli powder
Freshly ground black pepper
3 x 400g can chopped tomatoes
½ cup grated Parmesan
500ml water
1. Heat oil in a large saucepan; add bacon
and cook, stirring occasionally, until crisp.
Remove from pan.
2. Add leeks to the same pan and cook,
stirring for about 5 minutes or until leeks
are tender. Add potatoes and stock and
bring to the boil; reduce heat and simmer,
uncovered, for about 40 minutes.
3. Remove from heat; cool. Place half of
the soup mixture into the blender jug and
press the ‘PUREE’ button. When the cycle
has finished, pour back in with remainder
of soup.
4. Add cooked bacon to soup and reheat
until soup is hot. Season to taste with
freshly ground pepper.
5. Serve soup topped with parmesan cheese.
Serves 4
1 teaspoon brown sugar
1 tablespoon vinegar
2 x 400g cans red kidney beans, rinsed,
drained
Sour cream and flour tortillas to serve
1. Heat oil in a large saucepan, add onions
and garlic and cook on a medium heat
until onions start to soften; add the cumin
and chilli powder and cook, stirring,
until the spices become fragrant. Add
the tomatoes, and water; simmer for 20
minutes. Remove from heat; cool.
2. Stir through the sugar, vinegar and beans;
allow to cool.
3. Place half of the soup mixture into the
blender jug and press the ‘PUREE’
button. Pour contents of blender jug into
a container and repeat this step with the
remaining soup mixture.
4. Return soup to saucepan to heat through;
serve with sour cream and warm flour
tortillas.
9
Recipes – Soups (continued)
Roast Pumpkin Soup
Serves 6
Vegetable Soup
Serves 4-6
1.5 kg pumpkin
1 tablespoon olive oil
2 tablespoons olive oil
1 onion, chopped
Sea salt & freshly ground black pepper
2 cloves garlic, crushed
20g butter
2 carrots, diced
1 onion, chopped
1 potato, diced
1 litre chicken stock
2 trimmed celery stalks, diced finely
¹/³ cup cream or sour cream to serve (optional)
800g can chopped tomatoes
1. Preheat oven to 200°C.
2. Remove skin and seeds from pumpkin and
cut into even sized chunks.
3. Place pumpkin in an oven dish and drizzle
with half the oil. Season with a little salt
and pepper. Bake in oven for about 40
minutes or until cooked.
4. In a large saucepan heat remaining oil and
butter. Add onion and cook until tender.
Add the pumpkin and stock and bring to
the boil. Reduce heat, simmer, uncovered,
for 10 minutes. Cool before blending.
5. Place half of the soup mixture in blender
and press the ‘PUREE’ button. Repeat
with remaining soup mixture.
6. Reheat until soup is hot. Serve with cream
and extra ground pepper if desired.
6 cups water
1 cup chopped savoy cabbage
2 small zucchini, diced
100g button mushrooms, sliced
sea salt and freshly ground black pepper
1. Heat oil in frying pan on setting 5.
Cook onion and garlic until translucent.
Add carrot, potato and celery; cook,
stirring occasionally for 5 minutes.
2. Add the chopped tomatoes, cabbage,
zucchini, mushrooms and water and
bring the soup to the boil. Reduce heat
to a simmer and cook, covered for about
45 minutes or until vegetables are tender.
3. Remove from heat and allow to cool.
Place the soup in batches into the blender
jug and press the ‘PUREE’ button.
4. Return soup to saucepan and reheat
until hot.
Tip: For a soup with more texture you can
simply puree only half the soup.
10
Recipes – Dips/Starters/Pastes
Hummus
Serves 4
Guacamole
420g can chickpeas, rinsed, and drained
2 ripe avocados, peeled, seeds removed
2 tablespoons tahini
1 clove garlic
¼ cup lemon juice
1 tablespoon lemon juice
¼ cup water
dash Tabasco sauce
¼ cup olive oil
1 jalepeno chilli, sliced
1 clove garlic, crushed
¼ cup fresh coriander leaves
½ teaspoon ground cumin
1 tomato, chopped
½ teaspoon salt
1. Place all ingredients in the blender jug.
1. Place all ingredients except tomato in the
blender jug.
2. Press the ‘PUREE’ button.
2. Press the ‘PUREE’ button.
3. Transfer mixture into a bowl and
refrigerate for 1-2 hours before serving.
3. Transfer mixture to a bowl and stir through
tomato.
Serving suggestions: Serve hummus with
toasted pita crisps; simply cut pita bread into
triangles, brush with olive oil and season with
a little salt and cumin seeds. Bake in oven at
200°C for about 5 minutes or until crisp.
4. Refrigerate for 1 hour before serving.
Serve with corn chips and salsa
11
Recipes – Dips/Starters/Pastes (continued)
Pesto
Serves 4
Whole Egg Mayonnaise
125g fresh basil leaves
1 egg
3 cloves garlic
1 tablespoon lemon juice
2 teaspoons lemon juice
2 teaspoons Dijon mustard
sea salt
pinch sea salt
freshly ground black pepper
1 cup vegetable oil
1 cup extra virgin olive oil
½ cup pine nuts, roasted
60g pecorino or parmesan, grated
1. Place the basil, garlic, juice, salt, pepper
and oil in the blender jug. Blend on
‘HIGH’ for 20 seconds.
2. Push down any ingredients that may have
come up the sides of the jug and add the
nuts and cheese. Blend on ‘HIGH’ for
a further 20 seconds or until a smooth
texture is achieved. If a nutty texture is
desired only blend on ‘HIGH’ for 5-10
seconds.
To serve: Boil a large pot of boiling water
with a little oil in it. Boil 500g pasta until
just tender. Drain pasta well but do not
rinse. Place hot pasta back in to pot and stir
through half of the pesto sauce. Add more
pesto to taste if desired. Serve with extra
cheese and a sprinkle of toasted pine nuts.
Tip: To keep pesto sauce for a few days in
the refrigerator simply place pesto into a
clean container and pour enough olive oil
over top to cover, this will stop the pesto
from discolouring. Cover with lid or plastic
wrap.
12
Approx. 1½ cups
1. Place egg, juice, mustard and salt in
the blender jug. Blend on ‘LOW’ for 10
seconds or until combined.
2. With the motor still running remove the
measuring cup from the lid, start to pour
in the oil in a slow, thin stream until the
mixture is creamy and all the oil has been
added.
3. Keeps in the refrigerator for 1 week.
Recipes – Dips/Starters/Pastes (continued)
Approx. 1½ cups
Baba Ghanoush
Herbed Mushroom Pate
2 large eggplants
50g butter or margarine
2 cloves garlic
1 onion, roughly chopped
2 tablespoons tahini
300g mushrooms, sliced
¼ cup lemon juice
200g cream cheese, cubed
¼ teaspoon sweet paprika
1 tablespoon freshly chopped chives
sea salt and freshly ground black pepper
salt and freshly ground black pepper to taste
1 tablespoon Extra Virgin
olive oil
1. Pierce eggplants all over with a fork. Cook
eggplants under a griller until the skin
blackens and the flesh is soft. Allow
eggplants to cool for 20 minutes before
removing skin; drain for 10 minutes.
2. Place all ingredients into blender jug.
Place lid onto jug and press the ‘PUREE’
button. Check mixture and scrape sides if
necessary. Blend on low to finish blending
if needed.
1. Heat butter in a frying pan over a medium
heat. Cook onion and mushrooms until
soft; cool.
2. Place mushroom mixture into blender jug
with remaining ingredients.
3. Press the ‘PUREE’ button.
4. Pour into serving bowl and refrigerate for
at least 2 hours before serving.
5. Serve with Melba toasts.
3. Transfer mixture into a bowl and
refrigerate for 1-2 hours before serving.
Drizzle extra virgin olive oil over the top
before serving.
Serve with crusty fresh bread
13
Recipes – Light Snacks
Sweet potato and rocket frittata
Serves 8
Bacon and Cheese Quiche
1 small sweet potato
1 large sheet ready made frozen shortcrust
80g baby rocket leaves
pastry
200g fetta cheese, crumbled
6 bacon rashers, rind removed, roughly
250ml thickened cream
chopped
10 eggs
1 small onion, chopped finely
Sea salt and freshly ground black pepper,
1½ cups grated tasty cheese
to taste
4 eggs
½ cup grated tasty cheese
1 cup milk
½ cup cream
1. Preheat oven to 200°C. Grease and line
base of a 19cm square shallow cake tin.
2. Peel the sweet potato and slice thinly.
3. Place a layer of sweet potato then rocket
then fetta into the cake tin and then
repeat layers again. Reserve a few sweet
potato slices if possible for the top.
4. Combine the eggs, cream, salt and pepper
in blender and blend on HIGH until
smooth. Pour egg mixture into the cake
tin and top with the grated cheese.
5. Place frittata into oven and cook for about
30-35 minutes or until cooked through.
If the frittata starts to brown too much
before the inside is completely cooked lay
a piece of foil over the top, this will stop
excessive browning.
½ cup self raising flour
pepper to taste
1. Preheat oven to 180°C. Line quiche dish
with pastry and trim edges. Prick pastry
all over with a fork.
2. Cook bacon in a frying pan until tender,
remove from pan and drain on absorbent
paper; cool.
3. In a large bowl combine the bacon, onion
and cheese.
4. Place all the remaining ingredients into
the blender jug.
5. Press the ‘MIX’ button.
6. Place the bacon mixture into the prepared
quiche dish and pour the egg mixture over
the top.
7. Bake in oven for about 50 minutes or until
cooked. Allow quiche to stand for 10
minutes before cutting.
14
Recipes – Desserts
Baked Lemon Cheesecake
Serves 10
Banana Cake with Cream Cheese Frosting
250g plain biscuit crumbs
2¼ cups self raising flour
2 teaspoons nutmeg
½ teaspoon salt
125g melted butter
1 teaspoon cinnamon
250ml thickened cream
½ teaspoon nutmeg
3 eggs
2 eggs
½ cup caster sugar
180g butter, room temperature, chopped
2 teaspoon grated lemon rind
½ cup buttermilk
2 tablespoons lemon juice
1½ cups raw sugar
500g cream cheese, room temperature, cubed
1 teaspoon white vinegar
1. Crush biscuits 5-6 at a time using the
‘PULSE’ button until crumbled. Remove
jug from base and shake biscuits if
necessary. Combine the nutmeg, melted
butter and biscuit crumbs in a bowl; mix
well. Press crumb mixture into the base
and sides of a greased 20cm springform
pan. Place on a baking tray and
refrigerate for 30 minutes.
2. Place cream, eggs, sugar, rind, juice and
half of the cream cheese in blender.
3. Press the ‘MIX’ button. With the motor
still running, remove the ingredient cup
from the lid and drop in the remaining
cubes of cream cheese one at a time, until
the mixture is smooth.
4. Pour filling into crust and bake in oven
at 160°C for approximately 50 minutes
or until firm. Cool in oven with door
ajar. Refrigerate for several hours before
serving.
1 teaspoon vanilla essence
1½ cups very ripe mashed banana
1. Preheat oven to 180°C. Grease and line a
20cm baba pan.
2. Sift flour, salt, cinnamon and nutmeg into
a large bowl.
3. Place the eggs, butter, milk, sugar,
vinegar, essence, and bananas into
blender jug.
4. Press the ‘MIX’ button. (Mixture will
separate at this stage but will come back
together when mixed with dry ingredients).
5. Pour the banana mixture into the dry
ingredients and mix with a wooden spoon
or whisk until combined.
6. Pour mixture into prepared tin and bake
for about 40 minutes or until cooked when
tested with a skewer.
7. Allow cake to cool in pan for 5 minutes
before transferring to a wire rack to cool.
8. Ice with cream cheese frosting, recipe over
page.
15
Recipes – Desserts (continued)
Cream Cheese Frosting
5. Pour mixture into prepared pan and bake
for about 1 hour or until cooked when
tested with a wooden skewer. Remove
from oven and stand for 5 minutes before
turning out onto a wire rack.
250g softened cream cheese
¼ cup butter
1 teaspoon vanilla
3 cups icing sugar mixture
¼ cup passionfruit pulp
Combine cream cheese, butter and vanilla in
a small bowl. Using an electric mixer beat
until smooth. Add the icing sugar mixture
and beat until smooth. Reduce speed and
add passionfruit. Spread over cooled cake.
Sticky Date Pudding
Serves 8
6. Serve pudding with butterscotch sauce.
To make sauce, heat all ingredients in
a small saucepan over a low heat until
combined.
Honey Pikelets
3 large eggs
¼ cup honey
1 cup milk
200g coarsely chopped dried dates
1½ cups self raising flour
1 teaspoon bicarbonate soda
pinch salt
1 ¼ cups boiling water
60ml olive oil
1 cup firmly packed brown sugar
1 cup self raising flour
¼ teaspoon mixed spice
2 eggs
Makes 30
1. Add all ingredients into the blender jug
and blend on ‘LOW’ for 30 seconds.
Scrape down sides of blender and blend
again on ‘LOW’ for a further 30 seconds.
2. Pour mixture into a jug and refrigerate for
30 minutes.
140g butter
3. Place tablespoon amounts of mixture into
a lightly greased frying pan until golden on
each side.
2/3 cup firmly packed brown sugar
4. Serve with butter.
Butterscotch sauce
1 cup (250ml) thickened cream
1. Preheat oven to 180°C. Grease and line
a 20cm cake pan with baking paper.
2. Place dates, soda and water into the
blender jug. Pace the lid on and allow
the mixture to stand for 5 minutes.
3. Add oil and sugar and pulse 3 times.
4. Add remaining ingredients and pulse
mixture until just combined. Scrape down
sides of jug if necessary. Do not over
process.
16
Recipes – Drinks
Classic Banana Smoothie
Serves 2
Milo Madness
2 cups skim milk
2 cups milk
2 medium bananas, roughly chopped
2 scoops vanilla ice cream
½ cup low fat yogurt
3-4 tablespoons Milo
1 tablespoon honey
1. Place all ingredients into blender jug.
¼ teaspoon cinnamon
2. Press the ‘MILK SHAKE’ button.
1. Place all ingredients into blender jug.
2. Press the ‘SMOOTHIE’ button.
3. Pour into 2 glasses, dust with extra Milo.
Fruity Fantasy
3. Pour into 2 glasses.
Classic Milkshake
Serves 2
Serves 2
180ml fresh orange juice
Serves 2
90ml pineapple juice
250ml milk
1 punnet strawberries
2 scoops ice cream – any flavour
slice honeydew melon
2 tablespoons topping – any flavour
slice rockmelon
1. Place all ingredients into blender jug.
8 small ice cubes
2. Press the ‘MILK SHAKE’ button.
1. Place all ingredients into blender jug.
3. Pour into 2 glasses.
2. Press the ‘SMOOTHIE’ button.
Strawberry Milkshake
Serves 2
3. Pour into 2 glasses.
6 strawberries
2 cups milk
2 scoops strawberry ice cream
1. Place all ingredients into blender jug.
2. Press the ‘MILK SHAKE’ button.
3. Pour into 2 glasses.
17
Recipes – Drinks (continued)
Citrus Buzz
Serves 2
Raspberry Citrus Smoothie
Serves 2
60ml fresh lime juice
1 cup raspberry yogurt
4 dashes Angostura bitters
1 cup frozen yogurt
8 small ice cubes
1 cup orange juice
lemonade
1 cup frozen raspberries
1. Place all ingredients except for lemonade
into blender jug.
1. Place all ingredients into blender jug.
2. Press the ‘SMOOTHIE’ button.
3. Pour into 2 glasses.
3. Pour into 2 glasses, top with lemonade.
Iced Coffee
Serves 2
2. Press ‘SMOOTHIE’ button.
Peach Smoothie
Serves 2
400g can peaches in natural juice, drained
2 tablespoons instant coffee dissolved in
¼ cup plain yogurt
2 tablespoons boiling water
2 teaspoons honey
2 cups milk
1 scoop vanilla ice-cream
2 scoops vanilla ice cream
1 cup milk
whipped cream to serve
1. Place all ingredients into blender jug.
1. Place all ingredients except for cream into
blender jug.
2. Press the ‘MILK SHAKE’ button.
2. Press ‘SMOOTHIE’ button.
3. Pour into 2 glasses.
3. Pour into 2 large glasses, top with
whipped cream and dust with chocolate.
Mango Papaya Smoothie
Frosty Fruity Smoothie
½ small papaya, peeled, seeded, and
Serves 2
1 banana
1 cup tropical juice
½ cup milk
3 ice cubes
1. Place all ingredients into blender jug.
2. Press ‘SMOOTHIE’ button.
3. Pour into 2 glasses.
18
Serves 2
1 mango, peeled, pitted, and chopped
chopped
1 cup plain yogurt
1 tablespoon fresh lime juice
1 tablespoon honey
1. Place all ingredients into blender jug.
2. Press ‘SMOOTHIE’ button.
3. Pour into 2 glasses.
Recipes – Thick Shakes
Tips for great Thick shakes
Berry Yogurt Thick shake
• Don’t use hard ice cream straight from the
freezer
• Leave ice cream out for about 5 minutes
before blending; this time may vary
depending on how cold your freezer is.
• Ice creams with a higher cream content
may need a little extra milk.
• Always put ice cream in the blender jug in
small pieces, never in large chunks as this
may prevent the blender from blending in
the allotted time.
270g frozen berry yogurt
Classic thick shake
chopped
Serves 2
270g chocolate ice cream
¹/³ cup milk
1. Place all ingredients into blender jug.
2. Press the ‘THICK SHAKE’ button.
3. Pour into 2 glasses.
Serves 2
¼ cup frozen mixed berries
½ cup milk
1. Place all ingredients into blender jug.
2. Press the ‘THICK SHAKE’ button.
3. Pour into 2 glasses.
Tim Tam Thick shake
Serves 2
4 Arnott’s Original Tim Tams, roughly
270g vanilla ice-cream
100ml milk
2 Tim Tam Fingers, to garnish
1. Place ingredients into blender jug.
2. Press the ‘THICK SHAKE’ button.
3. Pour into 2 glasses, garnish with Tim Tam
Fingers.
19
Recipes – Cocktails
Sugar Syrup is an essential ingredient to
making great cocktails. Use equal parts of
white sugar and water and bring to the boil
in a small saucepan until the sugar has
dissolved. Cool and store in the refrigerator.
Frozen Lime Margarita
Serves 2
60ml tequila
Pina Colada
Serves 2
90ml Bacardi rum
120ml pineapple juice
60ml coconut cream
30ml Malibu
30ml sugar syrup
14 standard size ice cubes
30ml fresh lime juice
60ml Cointreau or triple sec
1. Combine all ingredients in blender.
30ml sugar syrup
2. Press the ‘COCKTAIL’ button.
14 standard size ice cubes
3. Pour into 2 cocktail glasses.
1. Combine all ingredients in blender.
Splice
2. Press the ‘COCKTAIL’ button.
60ml Midori
3. Pour into 2 cocktail glasses.
60ml Malibu
Strawberry Daiquiri
Serves 2
90ml Bacardi rum
60ml fresh lime juice
Serves 2
120ml pineapple juice
80ml cream
14 standard size ice cubes
60ml sugar syrup
1. Combine all ingredients in blender.
6 strawberries, quartered
2. Press the ‘COCKTAIL’ button.
14 standard size ice cubes
3. Pour into 2 cocktail glasses.
1. Combine all ingredients in blender.
2. Press the ‘COCKTAIL’ button.
3. Pour into 2 cocktail glasses.
20
Recipes – Cocktails (continued)
Mocha Madness
Serves 2
Frozen Cosmopolitan
30ml espresso coffee
20ml citron vodka
60ml Baileys
40ml vodka
60ml vodka
60ml Cointreau
1 scoop chocolate ice cream
120ml cranberry juice
14 standard ice cubes
1 teaspoon lime juice
1. Combine all ingredients in blender.
Serves 2
8 standard size ice cubes
2. Press the ‘COCKTAIL’ button.
1. Combine all ingredients in blender.
3. Pour into 2 cocktail glasses.
2. Press the ‘COCKTAIL’ button.
Eggnog
Serves 2
3. Pour into 2 cocktail glasses.
30ml sugar syrup
60ml brandy
60ml dark rum
2 eggs
8 standard size ice cubes
Milk
1. Combine all ingredients except milk in
blender.
2. Press the ‘COCKTAIL’ button.
3. Pour into 2 cocktail glasses then top up
glasses with milk.
21
Notes
12 Month Replacement Guarantee
We are so confident of the quality of our product,should
this appliance develop any malfunction within 12 months of
purchase (3 Months commercial use) due to faulty materials
or manufacture, we will replace it for you absolutely free.
Should you experience any difficulties
with your appliance, please phone our
free call customer service line for
advice on 1800 025 059 in Australia,
or 0800 786 232 in New Zealand.
Alternatively, simply return the faulty
appliance to your place of purchase,
along with your purchase receipt.
Your Sunbeam 12 Month Replacement
Guarantee naturally does not cover misuse
or negligent handling, and excludes
breakables such as glass or ceramic items,
and normal wear and tear.
Similarly, your 12 Month Replacement
Guarantee does not cover damage to
household surfaces as a result of water
or other substances leaking from your
appliance, not does it cover freight costs.
In Australia, this guarantee is additional
to the conditions and guarantees which
are mandatory as implied under the
Trade Practices Act 1974 and State
and Territory legislation.
Sunbeam Service Centres
Sunbeam has established a network
of authorised service centres throughout
Australia and New Zealand to provide
quick, convenient service for our
customers.
Should your appliance require repair
or service, either during or after the
guarantee period, contact your nearest
service centre.
For a complete list of Sunbeam’s
authorised service centres:
Australia
www.sunbeam.com.au/service centres
1800 025 059
New Zealand
www.sunbeam.co.nz/service centres
0800 786 232
Consumer Hotline
In Australia
Visit www.sunbeam.com.au
Or Call 1800 025 059
In New Zealand
Visit www.sunbeam.co.nz
Or call 0800 786 232
is a registered Trademark of Sunbeam.
‘MultiBlender’ is a trademark of Sunbeam Corporation.
Made in China. Designed and engineered in Australia.
Due to minor changes in design or otherwise,
the product may differ from the one shown in this leaflet.
© Copyright. Sunbeam Corporation Limited 2006.
ABN 45 000 006 771
Sunbeam Corporation is a division of GUD Holdings Ltd.
06/06