1
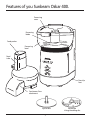
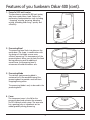
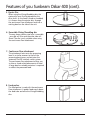
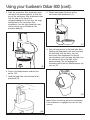
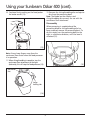
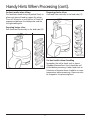
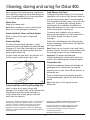
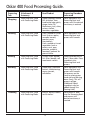
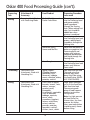
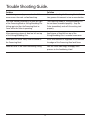
Oskar 400
Continuous Flow Food Processor
INSTRUCTION AND RECIPE BOOKLET
Hero of Oskar 400
LC2700
Sunbeam’s Safety Precautions.
SAFETY PRECAUTIONS FOR YOUR FOOD PROCESSOR.
• Blade and Processing Disc are very sharp, handle with
care when removing, replacing or cleaning.
• Ensure fingers are kept well away from the Processing
Blade and the Slicing/Shredding Disc when in use.
• Use the food processor on a dry, flat level surface.
• Never place Processing Blade on the Base without first
putting the Container properly in place.
• Be certain, Container Cover is securely
locked in place while operating appliance.
• Never feed food by hand, always use Food Pusher.
• Never use the food processor outdoors.
• Never remove the Cover or Processor until the Blade
or Disc has come to a complete stop and the unit has
been unplugged from a power outlet.
SAFETY PRECAUTIONS FOR ALL ELECTRICAL APPLIANCES
Sunbeam are very safety conscious when designing and
manufacturing consumer products, but it is essential that
the product user also exercise care when using an
electrical appliance. Listed below are precautions which
are essential for the safe use of an electrical appliance:
• Read carefully and save all the instructions provided
with an appliance.
• Always turn the power off at the power outlet before
you remove a plug. Remove by grasping the plug - do
not pull on the cord.
• Turn the power off and remove the plug when the
appliance is not in use and before cleaning.
• Do not use your appliance with an extension cord
unless this cord has been checked and tested by your
electricity supplier or qualified technician.
• Always use your appliance from a power outlet of the
voltage (A.C. only) marked on the underside of the
appliance.
• Close supervision is necessary when your appliance is
being used near children or infirm persons.
• Never leave an appliance unattended while in use.
• Young children or infirm persons should be supervised
to ensure that they do not play with the appliance.
• Do not use an appliance for any purpose other than
its intended use.
• Do not place an appliance on or near a hot gas flame,
electric element or in a heated oven. Do not place on
top of any other appliance.
• Do not let the power cord of an appliance hang over
the edge of a table or bench top or touch any hot
surface.
• Do not immerse in water.
• For safety reasons and to avoid maintenance by
unskilled persons, some appliances are ‘sealed’ using
tamperproof means as specified by S.A.A. (Standards
Association of Australia). Such appliances should
always be returned to the nearest Service Centre for
adjustment or repair if required.
• Do not operate any electrical appliance with a
damaged cord or after the appliance has been
dropped or damaged in any manner; If damage is
suspected, return the appliance to the nearest Service
Centre for examination, repair or adjustment. As a
service to Customers, Service Centres will carry out a
free check on your appliance to ensure it is electrically
safe.
• For additional protection Sunbeam recommend the
use of a residual current device (RCD) with a tripping
current not exceeding 30mA in the electrical circuit
supplying the power outlet in use.
If you have any concerns regarding the performance and use of your appliance, please ring our Toll
Free number (Australia only) 1800 025 059. New Zealand - contact the Sunbeam Office in Auckland.
Ensure the above safety precautions are understood.
2
Features of you Sunbeam Oskar 400.
Processing
cover
Processing
blade
Feed pusher
Processing
bowl
Feed
tube
Non-slip
feet
Continuous flow
attachment
Ejector disc
3
Reversible
slicing/shredding disc
Features of you Sunbeam Oskar 400 (cont).
1. Powerful 400 watt motor
The base houses a powerful 400 watt motor,
ideal even under heavy loads. Perfect for
performing food preparation tasks including
- chopping, mincing, pureeing, blending,
mixing, shredding and slicing - quickly and
efficiently.
1
2. Processing Bowl
The processing bowl locks into place on the
motor base. The shape, in combination with
the design of the blade, ensures even,
efficient processing. The transparency of the
processing bowl allows you to check the food
during processing and for additional
convenience, the processing bowl is
microwave safe and dishwasher safe.
2
3. Processing blade
The stainless steel processing blade is
contoured to fit the rounded shape of the
processing bowl to provide a most efficient
chopping/mixing action.
The processing blade is only to be used in the
processing bowl.
3
4. Cover
The transparent cover is the lid for the
processing bowl and activates the automatic
On/Off interlock switch system. The cover also
has a pouring hole, so ingredients can be
added gradually during processing.
4
4
Features of you Sunbeam Oskar 400 (cont).
5. Ejector Disc
When using the Slicing/Shredding disc the
ejector disc must first be placed over the
drive shaft. As the food is sliced or shredded,
it is thrown from the ejector disc, through
the continuous flow attachment and into a
waiting bowl on the side of the unit.
5
6. Reversible Slicing/Shredding disc
The easy clean stainless steel disc is reversible
- one side will Slice and the other side will
Shred. The disc is only suitable when using
the continuous flow attachment.
6
7. Continuous Flow attachment
This attachment locks onto the processing
bowl in a similar manner to that of the
processing bowl cover, and activates the
automatic On/Off interlock switch system.
The continuous flow attachment allows you
to slice or shred unlimited amounts of food.
A large bowl or suitable container is required
to collect the processed food.
7
8. Food pusher
The food pusher is used with the continuous
flow attachment. It guides food evenly down
the feed tube and onto the Slicing/Shredding
disc.
8
5
Using your Sunbeam Oskar 400.
Before using your Oskar 400
4. Place food in the food processor bowl.
• Wash the processing bowl, cover, continuous
flow attachment and all attachments in warm
to hot water using a mild detergent. Dry each
part thoroughly before use.
5. Place the processing bowl cover on the
processing bowl so that the large locking tab
on the cover is to the right side of the bowl,
near the horizontal slot at the back of the
processing body (3).
• Before you assemble the Oskar 400, ensure
that the power cord in unplugged.
Using the processing bowl and cover
1. Set up the motor base facing you on a dry,
level surface.
Note: The tallest side of the motor housing
to the rear.
2. Place the processing bowl over the drive shaft
and rotate the container until it drops down
evenly onto the base. Turn the processing
bowl anti-clockwise firmly until it ‘locks’ into
place (1).
Large locking tab
Horizontal
slot
(3)
6. Plug in the food processor and turn the
power ‘ON”.
7. Turn the processing cover to the left (anticlockwise), this will engage the automatic
switch and the food processor will turn on (4).
(1)
3. Fit the processing blade onto the drive shaft,
rotating it slightly until it settles into place (2).
(4)
Note: Unless the locking tab on the processing
bowl cover is engaged, the unit will not turn on.
(2)
6
Using your Sunbeam Oskar 400 (cont).
8. When processing is complete, turn the cover
to the right (clockwise), this will stop the food
processor (5).
Ejector
disc
Drive
shaft
(6)
For Slicing:
4a.Hold the slicing/shredding disc with the raised
slicing blade facing upwards. Place the
slicing/shredding disc onto the drive shaft,
sitting over the ejector disc (7).
(5)
9. Remove the processing blade from the bowl
before removing the processed food.
Note: The stainless steel processing blade is only
for use in the processing bowl, for in-bowl
chopping, mixing or pureeing functions; NEVER
in the continuous flow attachment.
Slicing
blade
Using continuous flow processing
1. Set up the motor base facing you on a dry,
level surface.
(7)
Note: The tallest side of the motor housing to
the rear.
2. Place the processing bowl over the drive shaft
and rotate the container until it drops down
evenly onto the base. Turn the processing
bowl anti-clockwise firmly until it ‘locks’ into
place (1).
For Shredding:
4b. Hold the slicing/shredding disc with the
series of raised small notches facing upwards.
Place the slicing/shredding disc onto the drive
shaft, sitting over the ejector disc (8).
3. Place the ejector disc into the processing bowl
by holding the shorter stem and placing the
disc onto the drive shaft (6).
Shredding
blade
(8)
7
Using your Sunbeam Oskar 400 (cont).
5. Place the continuous flow attachment onto
the top of the processing bowl, so that the
pin on the continuous flow attachment slides
into the hole at the top of the
slicing/shredding disc. Ensure that the large
locking tab on the continuous flow
attachment is on the right-hand side, near
the horizontal slot at the back of the
processor body (9).
8. Place a bowl under the chute of the
continuous flow attachment (11).
(11)
9. Rest the food pusher in the feed tube. Now,
holding the food pusher with one hand and
the feed tube with the other, turn the
continuous flow attachment to the left
(anti-clockwise) until the large tab slides into
the horizontal slot at the back of the
processor body. This will engage the
automatic switch and the food processor will
turn on (12).
(9)
6. Plug in the food processor and turn the
power ‘ON”.
7. Load the feed tube with the food to be
processed (10).
(12)
Note: Unless the locking tab on the continuous
flow attachment is engaged, the unit will not
turn on.
(10)
8
Using your Sunbeam Oskar 400 (cont).
12. Remove the slicing/shredding disc and ejector
disc from the processing bowl.
10. Continue firmly pushing on the food pusher
for better results (13).
Note: The blades on the stainless steel
slicing/shredding disc are only for use with the
continuous flow attachment.
Disassembly
When processing is completed and the
processing blade or slicing/shredding disc has
been removed, remove the processing bowl. To
do this simply turn the processing bowl to the
right in a clockwise direction, until the bowl is
unlocked (15).
(13)
Note: Always keep fingers away from the
continuous flow chute when the food processor
is in operation.
11. When slicing/shredding is complete, turn the
continuous flow attachment to the right
(clockwise); this will stop the food processor (14).
(15)
Horizontal
slot
Large
locking tab
(14)
9
Handy Hints When Processing.
Chopping
Adding Ingredients
For the best, most consistent results, you should
try to process pieces of food that are
approximately equal in size. When you break,
cut or tear food into uniform pieces before you
begin processing, the finished results will be
more uniform.
When various recipes require dry ingredients
such as flour, add them directly into the
processing bowl before processing. There is no
need to shift ingredients when using your Oskar
400. Liquid ingredients may be added by pouring
the required amount through the pouring hole
in the cover.
More consistent processing results are achieved
if the container is not overloaded.
Note: When processing a heavy load, check to be
sure Oskar 400 is sitting firmly on the bench top.
Note: When processing sauces or semi-liquid
ingredients, stop the food processor and scrape
down the container sides and cover if necessary.
Mincing
Blending
Pre-cut meat into cubes approximately 2cm
square. Place the pieces in the processing bowl,
replace the cover and process for 15-20 seconds
or until evenly processed.
When blending liquids (eg: soup or drinks),
apply pressure to the cover to prevent leakage.
If contents are very hot, place a cloth over the
cover, before applying pressure.
Vegetables
Using the Feed Tube
When processing vegetables such as onions, peel
and quarter. Place into processing bowl and turn
the unit ‘On’ and ‘Off’ 1 or 2 times to coarsely
chop, 3 to 4 times to finely chop. Scrape sides of
the container once or twice during processing if
necessary.
The most important factor for successful slicing
and shredding is the way in which food is
packed into the feed tube.
When Slicing and Shredding
Cut all ingredients to a size that fits comfortably
into the feed tube. Pack the feed tube and while
holding food steady and upright with the food
pusher, press down evenly until all ingredients are
sliced or shredded. The more firmly you push, the
thicker the slices or shreds. Do not use excessive
force or you may damage the Oskar 400.
Mixing
The quantities that can be processed within the
processing bowl will vary with the density of the
mixture.
Note: Never use fingers to push food down the
feed tube. Always use the food pusher.
10
Handy Hints When Processing (cont).
For best results when slicing
Preparing shorter slices
The feed tube should always be packed firmly to
allow each piece of food to support the others.
There will always be a small portion of food left
unprocessed between the food pusher and the
slicing/shredding disc.
Pack food items vertically in the feed tube (17).
Preparing longer slices
Pack food items horizontally in the feed tube (16).
(17)
For best results when shredding
Remember that softer foods such as cheese
(Cheddar, Mozzarella or Swiss) should be well
chilled before processing. Harder foods such as
Parmesan or Romano cheese should be at room
temperature before processing. Cheese can also
be chopped in the processing bowl.
(16)
11
Cleaning, storing and caring for Oskar 400.
When you have finished processing, unplug your
Oskar 400 from the power outlet and remove the
Cover, Slicing/Shredding Disc or Processing Blade
and the Bowl from the Motor Base.
Food Odours and Stains
Strong smelling foods like garlic, fish and some
vegetables such as carrots may leave an odour or
stain on the processing bowl. To remove odour
from the processing bowl, always rinse with cold
water first. To remove slight staining, place a
small portion of bi-carbonate of soda onto a
damp cloth and rub the stain. Allow to stand for
a few minutes before washing up.
To remove more stubborn stains or odours,
immerse processing bowl in water mixed with a
little kitchen bleach and allow to stand
overnight.
Wash with a mild detergent the following day
and dry thoroughly. Store without lid in position
until next required.
Note: Never use any chemical, steel wool, harsh
abrasive cleaners, thinners or chemical dust cloths
for cleaning any parts of your food processor.
Important: The processing blade and
slicing/shredding disc are extremely sharp! Use
caution when handling and storing these parts.
Motor Base
Wipe with a damp cloth.
Note: Never immerse in water or other liquid.
Never use a harsh detergent or abrasive.
Processing Bowl, Cover and Food Pusher
Wash in warm to hot water using a mild
detergent.
Processing Blade
To remove the processed ingredients, simply
remove the processing blade with processed food
clinging to it, then clean the blade with a spatula
before emptying the remaining food from the
processing container (18).
To clean inside the base shaft, use the back of a
knife or spoon handle to get right inside.
Dishwasher Safe
All plastic components deteriorate through the
prolonged use of a dishwasher for cleaning.
However, parts of your Oskar 400 are tolerant to
dishwasher use.
These include the processing blade, reversible
slicing/shredding disc, ejector disc and the food
pusher.
Note: Place only on the top rack of your
dishwasher.
(18)
Processing Blade and Slicing/Shredding Disc.
Wash in warm to hot water using a mild
detergent. The internal shaft can be cleaned with
a bottle brush and then dried thoroughly. If
using a dishwasher, always place in top shelf
away from the elements.
Sunbeam is a registered trademark. Oskar is a trademark of
the Sunbeam Corporation. Made in China. Due to minor
changes in design or otherwise, the product may differ
from the one shown in this leaflet. Approved by the
appropriate Electrical Regulatory Authorities. Backed by
Sunbeam‘s 12 Month Replacement Guarantee and National
Service Network.
© Copyright. SUNBEAM CORPORATION LIMITED 2002.
(INCORPORATED IN N.S.W.) A.C.N. 000 006 771
For more information or advice on this or any other
Sunbeam appliance, visit www.sunbeam.com.au
or contact the Sunbeam Consumer Service Line.
Australia 1800 025 059
New Zealand (09) 912 0747.
12
Oskar 400 Food Processing Guide.
Processing
Task
Attachment &
Accessory
Food Product
Processing Procedure
to be used
Chopping
Processing Bowl fitted
with Processing Blade.
Apples,cabbage, cooked
fish & chicken, ham,
hard boiled eggs, garlic,
ginger, herbs, ice,
mushrooms, nuts, olives,
onions, shallots,
tomatoes, vegetables.
Place ingredients into
Processing Bowl and
process until the desired
consistency is reached.
Puréeing
Processing Bowl fitted
with Processing Blade.
Fresh, cooked or tinned
fruits (such as apples,
avocado, banana,
peaches, pears,
strawberries).
Fresh. cooked or tinned
vegetables (such as
carrots, corn, peas,
potatoes, pumpkin,
tomatoes), peanuts for
peanut butter.
Place ingredients into
Processing Bowl and
process until smooth.
Mincing
Processing Bowl fitted
with Processing Blade.
Chicken fillets (boned),
fish fillets (boned), red
meat bacon rashers.
Food Should be pre-cut
into 5-10cm cubes. Place
ingredients into
Processing Bowl and
process.
Blending
Processing Bowl fitted
with Processing Blade.
Cream, dips, flavoured
butters, salad dressings,
sauces, spreads,
milkshakes.
Place ingredients into
Processing Bowl and
process until smooth.
Put pressure on the
Cover by placing your
hand over and pressing
down firmly. This will
prevent spillage.
(Additional liquid
ingredients may be
added through the
Pouring Hole).
Crumbing
Processing Bowl fitted
with Processing Blade.
Biscuits, bread, crackers,
vanilla wafers.
Place pieces of food
into the Processing Bowl
and process until
desired consistency is
reached.
13
Oskar 400 Food Processing Guide (con’t).
Processing
Task
Attachment &
Accessory
Food Product
Processing Procedure
to be used
Mixing
Processing Bowl fitted
with Processing Blade.
Melt & Mix Cakes and
Packet Cake Mixes.
Place dry ingredients
into the Processing bowl
and process adding
liquid ingredients
through the Pouring
Hole. When making fruit
cake, fruit should be
added later when
mixture is combined.
Batters.
Place dry ingredients
into Processing bowl and
process, adding liquid
ingredients through the
Pouring Hole.
Shortcrust Pastry,
Scones and Muffins.
Place flour and pieces of
butter or margarine into
Processing Bowl and
process until mixture
resembles breadcrumbs.
Add liquid through the
Pouring Hole.
Yeast Doughs.
Place dry ingredients
into Processing bowl and
process until mixture
forms a ball.
Shredding
Continuous Flow
Attachment fitted with
Shredding Disc
Apples, cheeses (Cheddar, Romano,
Mozzeralla, Swiss,
Parmesan), cabbage,
carrots, chocolate, onions,
potatoes, zucchini.
Pack food into the Feed
Tube and using firm
pressure press food
down Feed Tube using
the Food Pusher (NEVER
USE YOUR FINGERS).
Slicing
Continuous Flow
Attachment fitted with
Shredding Disc
Fruits (such as apples,
bananas, lemons, limes,
melons, oranges,
peaches, pears,
pineapples,
strawberries) vegetables
(such as beetroot,
cabbage, capsicum,
carrot, celery,
cucumbers, eggplant,
lettuce, mushrooms,
onions, radishes,
parsnips, potatoes,
tomatoes, zucchini),
chicken, meat, salami.
Large foods should be
cut to fit the Feed Tube.
Pack food into feed
Tube ensuring each
piece of food supports
another to give even
slicing results.
14
Note: Use light pressure
on Food Pusher for
thinner slices. Use form
pressure for thicker
slices. meat and chicken
should be partly frozen
before slicing.
Trouble Shooting Guide.
Problem
Solution
Food is being unevenly processed or the Oskar
moves across the work surface/benchtop.
You are overloading the Processing Bowl. Next
time, process this amount in two or more batches.
The Oskar vibrates unnaturally or there are signs
of the Processing Blade or Slicing/Shredding Disc
hitting against either the Processing Bowl or
Cover while the Oskar is operating.
The Processing Blade or Slicing/Shredding Disc
has not been assembled properly. Stop the
Oskar immediately and refit the cutting tool
properly.
After processing, pieces of food are left on top
of the Slicing/Shredding Disc.
Small pieces of food left on top of the
Slicing/Shredding Disc is a normal occurrence.
Cover does not move freely when attached to
the Processing Bowl.
Use a small amount of vegetable oil to lubricate
the edges of the Processing Bowl and Cover.
Food falls over in the Food Tube during slicing
Pack the Feed Tube snugly and apply even
pressure to the food being sliced
15
Recipes.
Basil and Almond Pesto
Prep time: 5 minutes
Makes: 1 cup
1. In the processing bowl combine the prawns,
chives and mint. Process for 5-10 seconds
until fine.
1 cup basil leaves, preferably Greek
1 birds eye chilli, seeds removed (optional)
1
/4 cup grated Parmesan cheese
1
/4 cup almond kernels
1
/3 cup extra virgin olive oil
2. Using a tablespoon measurer, scoop out
tablespoons of the mixture and place into a
bowl of seasoned flour. Then roll each
tablespoon of mixture into a ball.
3. Immediately place into a pan of hot oil
and cook until golden brown and the cake
springs back when touched with the back
of the tongs and the flesh has turned
opaque (white).
1. Place all ingredients expect the olive oil into
the processing bowl. Process for 5 seconds.
2. Gradually add the oil through the hole in the
processing cover and process for another few
seconds. Scape into a jar and store in the
fridge.
Serving Tip: Serve immediately. If desired serve
with lemon or lime wedges and freshly ground
sea salt.
Note: Will keep in the refrigerator for 3 days.
Balti Lamb Curry with Couscous
Prep time: 10 minutes
Yoghurt and Herb Chicken
Prep time: 10 minutes
Serves 4
Cooking time 1hour 30 minutes
2 BBQ chicken breasts (buy a BBQ chicken
and shred the breast flesh)
1
/2 cup traditional yoghurt
A few Greek basil leaves, opal (purple) basil
leaves and parsley leaves (approx 1/4 of mixed
herbs leaves)
Pinch freshly grinded sea salt and peppercorn
melody
1 onion, peeled and quartered
3 cloves garlic, peeled
2 tablespoons olive oil
600g lamb leg steaks, cut into cubes
1
/2 jar Balti paste (approx. 4 tablespoons)
1 punnet cherry tomatoes
1 x 440g can whole peeled tomatoes in natural
juice, undrained
1 x 440g can chick peas in juice, undrained
1 cup fresh or frozen peas
400mls water
Couscous
1. In the processing bowl combine the yoghurt,
mixed herb leaves and seasonings. Process for
5 seconds.
2. Place shredded chicken in a dish. Pour the
processed mixture over the top of the
shredded chicken and toss.
1. Process the onions and garlic until finely
chopped.
Serving Tip: Serve with salads, as filler for an
entree, on sandwiches, great with fruit chutney,
cheese and crackers.
2. Heat oil in a heavy based stockpot or
saucepan. Add the onions and garlic and
cook over a low heat until onions are soft
and golden. Turn up the heat slightly and
add the meat. Cook until well browned.
Fresh Prawn Cakes Makes approximately 8.
200g prawn meat
8 garlic chives stalks
6 Vietnamese mint leaves
1 egg white
Seasoned flour (1/4 cup plain flour with ground
sea salt and mixed peppercorns)
16
Recipes.
3. Reduce heat and add the balti paste cook
until fragrant. Turn up the heat slightly again
and add the cherry tomatoes, whole peeled
tomatoes, and cook for a few minutes. Add
the chick peas, peas and 400mls of water.
Bring to the boil and reduce to a simmer.
cook covered for 1 hour. Stirring occasionally.
1. In the processing bowl add all of the
marinade ingredients and process together
for 5 seconds until well combined. Pour the
marinade into a large snap lock bag.
2. Place the chicken wings and sesame seeds
into the bag and shake well, ensuring that all
the chicken wings are coated with the
marinade. Leave to marinate in the fridge
over night. Turn the bag over once during
the night.
4. After an hour, taste to see if meat is tender, if
not keep covered and cook for a further 1520 minutes. When meat is very tender and
falls apart when pricked with a fork, remove
the lid and cook uncovered for 5 minutes.
Stirring occasionally.
3. The next day pour the contents of the bag
into a baking dish (lined with baking paper)
and bake the wings at 180°c for
approximately 25-30 minutes or until the
chicken wings are a dark golden colour, but
not burnt. Keep brushing the chicken with
the marinade during cooking.
5. Remove from heat allow to stand for 5
minutes before serving. Serve in large bowls
with spoonfuls of buttered couscous.
6. Buttered couscous. Follow packet instructions
and just before serving fork through knobs
of soft butter to taste.
Serving Tip: Serve immediately with rice and
Asian greens. Wings can also be served cold.
Great cold at a picnic or as an entree at a
summer dinner party.
Soy, Honey and Ginger Chicken Wings Serves 4
Prep time 5 minutes
Avocado Spread
Prep time: 5 minutes
Cooling time 30 minutes
Marinating time: overnight
Makes 1 cup
No cooking required
Marinade:
1 avocado, peeled and flesh removed
1
/2 cup sour cream
Salt and pepper to taste
1
/4 teaspoon crushed hot chilli paste
3 cloves garlic, peeled
4cm piece green ginger, peeled and grated
1
/2 cup soy sauce
1
/2 cup extra virgin olive oil
3
/4 cup honey
1
/2 teaspoon Chinese 5 spice powder
Salt and pepper
12 meaty chicken wings, cut each wing at the
joints (optional)
2 Tablespoons sesame seeds
1. Process all ingredients together in the
processing bowl until smooth and creamy.
2. Serve chilled with an assortment of breads.
17
Recipes.
Salsa Verde
Prep time: 5 minutes
Makes approx 1 cup
Herb and Caper Butter
200g butter, chopped and softened to room
temperature
6 anchovy fillets
1 tablespoon salted capers, soaked, rinsed and
drained
1
/2 cup lemon juice
1
/4 cup cont. parsley leaves
2 tablespoons sunflower oil
Cooking time nil
1 cup mixed herb leaves (sage, rosemary, basil,
and continental parsley)
1
/2 tablespoon salted capers, soaked washed
and drained
1 tablespoon mustard
2 cloves garlic, peeled
1 tablespoon vinegar (white wine
or white balsamic)
1
/2 cup extra virgin olive oil
1
/4 cup lemon juice
Salt and pepper to taste
1. Process all ingredients in the processing bowl
until well blended, do not over blend, as
butter will split.
2. Scoop out mixture onto a sheet of foil lined
with cling wrap. Bring the two short sides
together in the middle. Press together and
fold down toward the butter. Pinch the other
two sides together and twist encasing the
butter. Gently roll into a firm sausage shape.
Freeze or refrigerate until required.
1. Process all ingredients in the processing bowl
for 5 -10 seconds.
2. Store in a jar for 3 days.
Note: Use as an accompaniment with seafood or
pasta dishes.
3. Cut into 1cm slices.
Serving Tip: Serve with prime cuts of beef or
lamb and a creamy potato mash or serve at your
dinner party with warmed bread.
Yoghurt, Parsley, and Tahini Spread
1 cup continental parsley leaves
2 green onion (shallot)
1 slice white bread soaked in 1 tablespoon milk
1
/2 cup thick natural yoghurt
1
/4 cup tahini
2 tablespoons extra virgin olive oil
1 tablespoon lemon juice
1 tablespoon pinenuts toasted
1. Process all ingredients in the processing bowl
until well combined, smooth and creamy.
2. Serve with extra pinenuts and drizzle with
extra virgin olive oil.
Serving Tip: Serve with pita bread, hot naan or
lavish bread.
18
Recipes.
Olive Oil Mayonnaise
Prep time: 5 minutes
Makes approx. 1 cup
Note: Ensure to cook the paste until fragrant
before adding coconut milk when making a
laksa.
Cooking time nil
2 egg yolks
2 teaspoons white vinegar
Freshly ground sea salt
Coarsely ground black pepper
1
/4 teaspoon mustard
75mls good quality extra virgin olive oil
175mls sunflower or vegetable oil
Hazelnut, Choc and Coffee Biscuits
Prep time: 5 minutes
Cooking time: 20 minutes
125g toasted hazelnuts
2 tablespoons cocoa
1 tablespoon plain flour
1 tablespoon instant coffee
1 egg white
110g caster sugar
Raw sugar, to sprinkle
1. Place yolks, vinegar, mustard and seasoning s
into the processing bowl. Commence
processing while gradually pouring the oil
through the hole in the processing cover.
Process until mixture becomes very thick and
creamy.
Note: With this recipe use heaped tablespoon
measure.
2. Add 1 teaspoon boiling water and process for
a second or until well combined. Mixture
should be very thick and creamy.
1. In the processing bowl, process the hazelnuts,
cocoa, flour and coffee until a fine powder.
Mixture should be dry and rich in aroma and
colour.
3. Taste and add extra salt and pepper if
necessary.
2. Using Sunbeam electric beaters beat egg
whites until soft peaks are formed. Gradually
add sugar, beating well after each addition
of sugar until sugar is dissolved and mixture
is thick and glossy. Fold in hazelnut mixture
with a rubber spatula until all is well
combined. Mixture will be dry and stiff but
should hold a firm ball. It will be sticky.
4. Store mayonnaise in a jar. Keep’s well for up
to 2 days, stored in the refrigerator.
Laska Paste
Makes: 40
Makes: 1 cup
Prep time: 5 minutes
Cooking time: nil
3. With wet hands, roll teaspoon size balls and
place 2cm apart on a tray lined with baking
paper. Flatten each ball slightly with a fork.
2 small white onions, peeled and quartered
4cm piece ginger, peeled and sliced
8 cloves garlic, peeled
6 bird eye chillies (seeds removed- optional)
2cm piece fresh turmeric, peeled and grated or
use 1 Tablespoon powdered turmeric
1 lemongrass stalk crushed and roughly sliced or
use 2 tablespoons of jar variety with vinegar,
drained
1
/2 cup peanut or vegetable oil
4. Sprinkle with raw sugar and bake at 150°C
for 15-20 minutes. Cool on a wire rack.
Serving Tip: Best dipped into a freshly brewed
coffee.
1. Process all ingredients in the processing bowl
until the mixture is smooth.
2. Store the paste in a jar for 2-3 days.
19