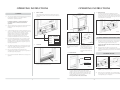
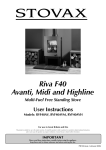
1
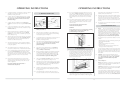
FOR YOUR RECORDS
To assist us in any Guarantee claim please complete the following information:-
Stovax dealer appliance was purchased from
Name:..................................................................................................................................................................
Address:...............................................................................................................................................................
............................................................................................................................................................................
Telephone number: .............................................................................................................................................
Essential Information - must be completed
Date installed:......................................................................................................................................................
Model Description: ..............................................................................................................................................
Serial number: .....................................................................................................................................................
Installation Engineer
Company name: .....................................................................................................................................................................
Address: ..................................................................................................................................................................................
Riva F40 Cube
...............................................................................................................................................................................................
Telephone number: ................................................................................................................................................................
Multi-Fuel Free Standing Stove
Commissioning Checks (to be completed and signed)
User Instructions
Models: RVF40C
For use in Great Britain and Eire
This product is suitable for use in the stated countries. To install the product in other countries it is essential to obtain translated instructions
and in some cases the product may require modifaction. Contact Stovax to obtain further information.
Is flue system correct for the appliance
YES
NO
Flue swept and soundness test complete
YES
NO
Smoke test completed on installed appliance
YES
NO
Spillage test completed
YES
NO
Use of appliance and operation of controls explained
YES
NO
Model details and serial number recorded above
YES
NO
Instruction books handed to customer
YES
NO
Signature: ......................................................................................
IMPORTANT
Please read these instructions carefully before using the appliance.
Keep them safe for future reference and when servicing the fire.
PM134-Issue 2 (April 2005)
2
Print name: ...............................................................
OPERATING INSTRUCTIONS
OPERATING INSTRUCTIONS
1.8
1.12 RIDDLING GATE
De-ash the firebed, using the riddling grate system.
To do this lower the access cover below the door, then
insert the ash pan tool in to the socket as shown and move
the primary air control vigorously left to right, this cases the
ash to fall down in to the ashpan.
SERIAL NUMBER
1. GENERAL
1.1
This number will be required when ordering spare parts or
making warranty claims. It is found on the back of the door
as shown
This stove is designed for domestic heating and should only
be used for this purpose, in accordance with the
manufacturers operating instructions.
1.10 AIR CONTROLS
It should be installed by a competent installer, in
accordance with the relevant local and national
regulations.
1.2
The stove should only be used to burn approved fuels and
should not be used with liquid fuels or used as an
incinerator.
1.3
As with all heating stoves the surfaces will become very hot
when in use, therefore due care should be taken when near
the stove. If it is to be used in the presence of young
children, elderly or infirm persons a suitable fireguard
should be used. Care should also be taken with the
placement of combustible items near the stove as
conducted and radiated heat could cause a fire hazard.
PR7109
1.4
1.5
1.6
1.7
PR7092
EXETER
PRODUCT
Due top the high temperature of the convected air above
the stove we recommend that no valuable photographs,
paintings, porcelain or other items are placed in this area.
Such artefacts may be damaged by long term exposure to
fluctuating temperatures.
MODEL No.
ENGLAND
CLOSE
Never operate the grate with your bare hands.
OPEN
OPEN
PR7091
CLOSE
2. USING THE RIVA FOR THE FIRST TIME
RIVA F40 Cube
RVF40C
SERIAL No.
2.1
When new it is best to burn the fire at a low output for the
first few days of use. This will allow the construction to
settle and all fixing glues and paint to fully cure.
AVOID TOUCHING THE PAINT DURING THE FIRST
PERIOD OF USE.
2.2
During this time the appliance may give off some
unpleasant odours, and we recommend that you keep the
room well ventilated during this period to avoid a build-up
of fumes.
PR7094
PR7092
PR7108
1.9
The additional ventilation may be required for the safe use
of this stove should be kept free of any obstructions, both
inside and outside the building, at all times.
ASHCOVER
Have your Stovax product serviced annually by a
competent service engineer, and if repairs are required use
only Stovax approved spare parts.
PRIMARY AIR CONTROL
AIRWASH
Lower ash pan cover and insert
ash pan tool into a socket as
shown.
This control has a pre-set
"indent ball" stop in the closed
position "opti-burn" setting. If
the control is pushed past this
point the airwash will be fully
closed.
1.11 DOOR HANDLE
3. BURNING WOOD
Do not make unauthorised modifications or changes to the
appliance.
Remove
OPEN
OPEN
PR7095
CLOSE
CLOSE
Pull to Open
To operate the "touch latch" press the centre of the
ashcover to open and close the cover.
PR7092
PR7094
PR7096
To remove the door handle lift the handle without
rotating.To open the door, pull the lower portion of the
handle. To close the door hold the handle in the open
position and push the door to the closed position, then
rotate the handle to the vertical position.
Never open the door with your bare hands.
3
4
3.1
Open the Airwash control fully and open the Primary air
control to approximately 25% open.
3.2
Place some pieces of firelighter or dry crumpled paper on
the grate and cover with some small pieces of dry kindling
wood. Light the paper or firelighters.
OPERATING INSTRUCTIONS
3.3
To avoid the build-up of condensation on the door glass it is
advisable to leave the door slightly open as the fire
establishes, and the glass warms.
3.4
As the fire becomes established add larger pieces of wood
and fully close the door. Do not leave the stove with the
door open as this could over-fire the stove and cause
permanent damage.
3.5
3.6
3.7
3.8
3.9
OPERATING INSTRUCTIONS
4.11 It is not recommended to load large amounts of fuel and
burn with the Primary air control on low settings for long
periods of time. As the will reduce the effectiveness of the
glass cleaning effect of the airwash. Also this will cause a
large build-up of tars and creosotes in the stove and flue
system.
4. BURNING SOLID FUELS
OPEN
OPEN
CLOSE
CLOSE
As the fire becomes established close the Primary air
control and control the burn rate using the Airwash control
only.
hands. Or the ash is placed directly in to a Stovax Ash
Caddie. (Stovax part number 4227)
4.12 We would recommend that the appliance is burnt at high
output for at least 30 minutes each day when it is in use.
This will help reduce the build-up of tars and creosotes
within the stove.
5.3
When burning wood the of ash will be smaller and may
only need removal once every week. To do this, allow the
fire to burn out and cool. Then after removing the log
retainer scoop out the ash with a suitable shovel. It is best
to leave a layer of ash in the stove to form a bed for the
new fire.
5.4
Do not place ash in a bin made from plastic or any other
combustible material.
Do not burn painted, impregnated wood or
manufactured board products.
PR7092
To burn wood efficiently it is best to allow a bed of ash to
build-up on the grate, and control the combustion using the
Airwash control only.
Before re-fuelling the stove it is advisable to first rake the
embers evenly over the firebed then open the Airwash
control fully for a few minutes, to establish a glowing bed
before adding new logs.
Allow the new logs to burn at high output for a few minutes
before adjusting the burn rate with the Airwash control to
the desired setting. It is best to refuel little and often to
maintain clean and efficient burning.
Place some pieces of firelighter or dry crumpled paper on
the grate and cover with some small pieces of dry kindling
wood. Light the paper or firelighters.
4.3
To avoid the build-up of condensation on the door glass it is
advisable to leave the door slightly open as the fire
establishes, and the glass warms.
The symptoms of poor performance related to wet wood
include:-
4.4
As the fire becomes established add pieces of solid fuel and
fully close the door. Do not leave the stove with the door
open as this could over-fire the stove and cause
permanent damage.
•
•
•
•
•
•
Do not use the door as a rest or support when refuelling
or adjusting the air controls as this could cause
permanent damage to the appliance.
PR7097
As the fire becomes established reduce the Airwash air
control to approximately 25% and control the burn rate
using the Primary air control only.
Before re-fuelling the appliance it is advisable to first de-ash
the firebed, using the riddling grate system, operated by
using removable handle to pull the riddling knob in and
out. This causes the ash to fall down into the ashpan. Do
not use bare hands to operate the riddling system.
4.7
Then open the Primary air control fully for a few minutes,
to establish a glowing bed before adding new fuel.
4.8
Allow the new fuel to burn at high output for a few minutes
before adjusting the burn rate with the Primary air control
to the desired setting. It is best to refuel little and often to
maintain clean and efficient burning.
4.9
The ideal control settings to suit the particular installation
and personal preferences will be established by experience
in using the stove.
Do not burn painted, impregnated wood or
manufactured board products.
4.10 The maximum height of fuel in the Riva stove must not
exceed the secondary air holes in the Stainless Steel fascias.
5
Wood: Burn only seasoned timber, with a moisture
content of less than 20%. In most cases this would require
drying cut wood for 12 to 18 months before use. Poor
quality timber could cause low combustion efficiency,
produce large amounts of harmful condensation, which
could reduce the effectiveness of the airwash system, and
ultimately the life of the stove Do not burn painted,
impregnated wood or manufactured board products.
4.2
4.6
3.12 We would recommend that the stove is burnt at high
output for at least 30 minutes each day when it is in use.
This will help reduce the build-up of tars and creosotes
within the appliance.
6.1
Open the Airwash control to approximately 50% and
Primary air control fully.
4.5
3.11 It is not recommended to load large amounts of logs and
burn with the Airwash control on low settings for long
periods of time. As this will reduce the effectiveness of the
glass cleaning effect of the airwash. Also this will cause large
a build-up of tars and creosotes in the stove and flue
system.
WARNING
4.1
The ideal control settings to suit the particular installation
and personal preferences will be established by experience
in using the appliance.
3.10 The maximum height of fuel in the Riva stove must not
exceed the secondary air holes in the Stainless Steel fascias.
6. RECOMMENDED FUELS
PR7094
5. ASH REMOVAL
5.1
difficulty getting a fire going and keeping it burning well,
smoky fires with little flame,
dirty glass,
rapid creosote build-up in the chimney,
low heat output,
Short burn times, excessive fuel consumption and
blue/grey smoke from the chimney.
To help avoid large build-ups of tars and creosote within in
the stove and the flue system, it is recommended to burn at
high output for at least 30 minutes each day. The use of
Stovax Protector chimney cleaner will also help to reduce
this problem.
The burning of any fuel will produce ash, which will have to
be removed after a period of use. This time will depend on
the fuel used. Before removing the ash from the stove it is
advisable to let the fire burn down to a low level, or even
go out completely. The ash pan can the be removed from
the appliance using the tool provided, after lowering the
access cover below the door.
6.2
Solid fuel: - Burn manufactured smokeless fuels, or
anthracite, listed as suitable for use with closed heating
stoves. Do not burn ‘petro-coke’ or other petroleum
based fuels, as this will invalidate and product
guarantee.
6.3
Fuel consumption: Wood:- Approximately 1.8 kg per hour of fuel under ideal
conditions with the Airwash control fully OPEN and the
Primary air control fully CLOSED
Solid Fuel:- Approximately 0.7 kg per hour of fuel under
ideal conditions with the Airwash control fully CLOSED and
the Primary air control fully OPEN.
PR7093
5.2
If you require advice on suitable solid fuels contact your
local Approved Coal Merchant. Details can be obtained by
ringing the Solid Fuel Association advice line on Freephone
0800 600 000. Or their web site at www.solifuel.co.uk
As heat can remain in the ash for a long period after use
care must be taken when removing and carrying the full
ashpan. We suggest that the ashpan is carried using gloved
6
MAINTENANCE and SERVICING
4.3
Clean the internal surfaces of the stove a using a wire brush
and scraper as required. Vacuum and brush the resulting
debris from the stove.
4.4
Clean the Baffle and Grate parts with a wire brush, and
check the parts for any damage. Replace any damaged
parts.
1. GENERAL CLEANING
1.1
1.2
We would recommend that your Riva stove be cleaned fully
on a regular basis, according to the level of use. Attention
should be given to cleaning the baffle system, flueways and
removing ash. Regular cleaning and preventive maintenance
will help give many years of safe use.
4.5
The external paintwork may be cleaned using warm soapy
water and a soft clean cloth. Wipe dry with a soft clean
cloth before re-lighting. Do not leave unit without drying, as
this may cause rust.
4.6
4.7
2. CLEANING GLASS
2.1
2.2
4.8
While the correct use of the Airwash system, and good
quality fuel, will generally keep the glass clean when the
appliance is used you may sometimes need to clean the
glass.
4.9
This can be done as follows. Allow the Riva stove to cool
fully, never attempt to clean hot glass. Any deposits can be
removed using a soft cloth and Stovax Glass Cleaner.
2.3
Alternatively, it is possible to remove some stains using a
soft cloth and warm soapy water, ensure that you do not
wet the door sealing ropes.
2.4
Before re-lighting the appliance, dry the glass fully.
2.5
Do not use abrasive cleaner or cleaning pads.
Product name
Glass cleaning
Stove glass cleaner 500ml –
wipe on
Stove glass cleaner –
spray on
5.1
4130
Sealing flue
pipe joints
Fire Cement - 500g tub
Fire Cement - 600g cartridge
2020
2021
Remove the glass from the door, see section 7, and discard
all old rope seals.
Re-painting
Storm Metallic
Protecting your
hands
Heat resistant leather gloves
4008
Remove the door rope seal from the outer edge of the door
clean the old glue from the door sealing rope grove.
Door sealing rope
16mm White rope seal –
Handy pack
5001
16mm White rope seal –
20m reel
4096
5.2
Allow the stove to cool fully before removing baffle system.
20mm x 2mm Black tape seal –
Handy pack
4998
5.3
To remove the baffle, first remove the Log Guard from the
stove to give access to the firebox.
20mm x 2mm Black tape seal –
20m reel
4997
5.4
Fixing door seal
Thermic seal glue – 50ml
5037
First remove the Lower Baffle by lifting the front edge to
unhook it from the support bars, then pull the baffle
forward to disengage the rear edge from the location above
air inlet holes. Rotate the baffle to remove from the firebox
through the door opening.
Holding Tools
Optional tool holder
Clean the door glass using Stovax Stove Glass cleaner and a
soft cloth, do not use abrasive cleaners to remove tar or
soot deposits from the glass.
4.14 We recommend that only genuine Stovax replacement parts
are use to keep your appliance in safe and efficient working
order. Your local Stovax dealer will be able to provide you
with the genuine parts you require.
Glass sealing tape
Upper baffle
2019sm
Lower baffle
PR7098
RVAC001
These products, all available from you local Stovax dealer,
along with regular maintenance and use of the correct fuels,
will help you to keep your stove in the best possible
condition.
4.15 When using the stove for the first time again it is best to
burn the fire at a low output for the first day of use. This
will allow the new seals to settle and all new fixing glues
and paint to fully cure. Avoid touching the paint during the
first period of use.
Lower baffle
PR7099
During this time the stove may give off some unpleasant
odours, and we recommend that you keep the room well
ventilated during this period to avoid a build-up of fumes.
5.5
If you require help your local Stovax dealer will be able to
carry-out all of your service and maintenance requirements
for a reasonable cost.
Carefully remove all of the following internal parts. 2
Internal Baffles, Firebricks, Complete grate (2 parts), and
Ashpan. See sections 5 and 6 for the instructions on how to
remove the baffles and firebricks.
Vacuum clean any remaining ash and debris from the inside
of the stove
7
To maintain efficient combustion the Riva stove is fitted
with a twin baffle system, consisting of upper and lower
baffles
Re-fit cleaned internal parts.
4.13 To refresh painted finishes it is possible to re-paint using
Stovax Thermolac stove paint. Stainless steel trim parts may
be cleaned using Stovax Stainless steel cleaner.
We would recommend that to maintain the safe and
efficient use of the appliance the flue / chimney is inspected
and swept at least once a year, by a competent person.
Stovax Code
number
4111
7002
7025
4.12 Lightly oil the door catch mechanism and hinge pins. Avoid
getting oil on to the door seals and glass.
At the end of the heating season it is recommended to strip,
inspect and clean the stove as detailed: -
4.2
Task
5. FITTING AND REMOVAL OF BAFFLES
Preventing build-up Protector (15 sachets)
of creosote in flue Protector (1kg tub)
4.11 Fit new door rope seal, glueing it in place with Stovax
Thermic Seal rope adhesive. When fitting new door seals
we recommend closing the stove door and leaving for at
least 12 hours before using. This allows the adhesive to fully
bond to the seal before use.
4. ANNUAL SERVICE
4.1
This is a list of the maintenance products you may need to use
4.10 Replace the glass edge seal with new and re-fit the glass
into place in the door.
3. CHIMNEY SWEEPING
3.1
Check and clean, with a soft brush the Firebricks. Replace
any broken bricks. It is normal for some surface damage to
occur during use.
MAINTENANCE and SERVICING
8
Second remove the Upper Baffle by pulling forward to
disengage it from the hanging points at the top of the
firebox. Rotate the baffle to remove from the firebox
through the door opening..
MAINTENANCE and SERVICING
6.4
Upper baffle
MAINTENANCE and SERVICING
Care should be taken when handling bricks, as they can
become fragile after a period of use. This normal and the
life will depend on the type of fuels burnt and the level of
use. Damaged bricks should be replaced as soon as
possible, and can be purchased from your Stovax dealer.
7. FITTING A NEW DOOR GLASS
Door Rope Seal
PR7100
5.6
The replacement of the system is the reverse of the previous
operations.
5.7
It is important to remove and clean the baffle system to
ensure the flue ways are clear of and soot and debris to
ensure the safe and efficient operation of the appliance.
The frequency of cleaning will depend on the appliance
operating conditions.
The baffle system is designed to give safe and efficient
operation of the appliance. Replace any damaged baffles
immediately.
To maintain the safe use of your Riva stove you may need
to replace a damaged or worn door sealing rope. To
complete this operation, use this method.
8.2
Remove the door from the stove, by opening the door by
approximately 25mm and lifting the door free of the hinge
blocks on the left of the door. Then lie the door face down
on a soft flat surface, to protect the paintwork and glass.
Door
As part of the routine maintenance of the Riva stove you
may have to remove the firebricks from the stove. This can
be carried-out without the use of tools, but the bricks must
be removed and replaced, after removing the baffle system.
7.2
To maintain the safe use of your stove you may need to
replace a damaged door glass. To complete this operation,
use this method.
8.3
Remove the door from the Riva stove, by opening the door
by approximately 25mm and lifting the door free of the
hinge blocks on the left of the door. Then lie the door face
down on a soft flat surface, to protect the paintwork and
glass.
Remove the old rope and scrape old glue from the locating
groove. Clean the locating groove with a clean dry cloth to
remove all old dust and debris.
8.4
Squeeze a generous bead of fresh Thermic Seal glue into
the rope locating groove. Do not glue over the screw
heads. Press the new rope into the locating groove, placing
the joint in the middle of the lower edge of the door.
7.3
2
7.4
1
Remove the old door rope seal and scrape old glue from
the locating groove. Clean the locating groove with a clean
dry cloth to remove all old dust and debris.
8.5
Using a 2.5mm A/F hexagon key, remove the exposed fixing
screws in the rope seal locating groove, then remove the
trim/frame. The old glass can then be lifted clear of the
door. (Note how the edge sealing tape is fixed.) Remember
to dispose of the old glass safely.
Refit the door and close the door to apply pressure to new
rope. Leave the appliance closed for at least 12 hours
before lighting and using at a low output for approximately
one day.
8.6
Using the Riva stove with a damaged door seal could cause
dangerous fumes to enter the room, or the appliance to
overfire, resulting in damage.
8.7
If you require help your local dealer will be able to carryout all of your service and maintenance requirements for a
reasonable cost.
PR7103
3mm Hex Key
PR7104
7
7.5
Clean, and re-paint, the rear of the door if required. Clean
the screws with light oil or WD40®, this will aid future
removal.
7.6
Fit the edge sealing tape to the new glass, and place the
glass into position in the door. Place the door trim/frame
back in to position and re-fix with the clean fixing screws.
6
5
8
PR7101
6.3
Open the door to give access to the fixed part of the door
catch as shown.
Fixing Screws
Allow the stove to cool fully before removing firebricks.
4
9.2
Fit only Stovax ceramic glass, which is suitable to use in
high temperature applications.
8.1
Do not modify the baffle system.
3
To maintain the safe use of your Riva stove, you may need
to adjust the door catch to ensure safe correct closing of the
door. Complete this operating as follows.
8. FITTING A NEW DOOR SEAL
Glass Edge Seal Tape
7.1
6.2
Refit the door on to the appliance and close the door to
apply pressure to new rope. Leave the appliance closed for
at least 12 hours before lighting the appliance and using at
a low output for approximately one day.
9.1
Trim / Frame
6. FITTING AND REMOVAL OF FIREBRICKS
6.1
7.9
9. ADJUSTING DOOR CATCH
7.10 Using the appliance with a damaged door glass could cause
dangerous fumes to enter the room, or the stove to overfire,
resulting in damage.
PR7102
5.9
7.8
Squeeze a generous bead of fresh Thermic Seal glue into
the rope locating groove. Do not glue over the screw
heads. Press the new door sealing rope into the locating
groove, placing the joint in the middle of the lower edge of
the door.
Fixing Screw
Glass
5.8
7.7
Replace the bricks in the reverse order from removal.
9
10
9.3
Using a 3mm A/F hexagon head key (supplied) loosen the 2
fixing screws, as shown, and reposition the catch block to
achieve a correct fit. This may require a trial and error
approach to find the correct position.
9.4
If the door feels loose after correcting the catch the door
rope seal is worn and requires replacement, as detailed in
section 7 of the user instructions.
MAINTENANCE and SERVICING
11. ADJUSTING ASHPAN COVER HINGES
10. ADJUSTING DOOR HINGES
10.1 To maintain the safe use of your Riva stove, you may need
to adjust the door hinges to ensure safe correct closing of
the door. Complete this as follows.
10.2 Open the door to give access to the fixed part of the door
hinge as shown.
Fixing Screws
PR7110
11.1 It is possible to correct the fit of the ashpit door by
loosening the hinge fixing screws and repositioning the
hinges.
PR7106
12. ADJUSTING ASHPAN DOOR TOUCH
LATCH
3mm Hex Key
PR7107
Fixing Screws
10.3 Using a 3mm A/F hexagon head key loosen the fixing
screws, as shown, and reposition the hinge blocks to
achieve a correct fit. This may require a trial and error
approach to find the correct position.
Fixing Screws
PR7111
12.1 It is possible to correct the operation of the ashpit door
touch latch by loosening the latches fixing screws and
repositioning the latch. This may need a trial and error
approach to find the correct position.
Stovax Ltd, Falcon Road, Sowton Industrial Estate, Exeter, Devon, England EX2 7LF
Tel: (01392) 474011 Fax: (01392) 219932 E-mail: [email protected] www.stovax.com
11