1
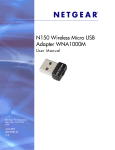
4-679-929-11(1)
Step 1 Installing the Software
4
If your computer is equipped with an internal CD-ROM drive, click “Built-in”. If
not, click “External”.
9
Follow the instructions on the screen to complete the installation.
The installation procedure is performed with an easy-to-use wizard. Before you start, verify the
following.
• The wizard is located on the CD-ROM supplied with the Wireless LAN PC Card. Make sure
that your CD-ROM drive is ready for use.
Wireless LAN PC Card
(2.4 GHz/5 GHz IEEE 802.11a/b/g )
Quick Start Guide
If you are using an external CD-ROM drive, follow the instructions on the screen and copy
the contents of the CD-ROM to your hard disk. When the copy is complete, click “Main
Menu”.
• When using the Wireless LAN PC Card in the Access Point Network connection mode, you
must install the access point and make the necessary settings before proceeding. For details
about these procedures, refer to the documentation provided with your access point.
The Main Menu of the Easy Installation Wizard appears.
Notes
• To install the supplied software on a computer running the Windows 2000 operating system, log on as a user
listed in “Administrators”. To install the supplied software on a computer running the Windows XP operating
system, log on as a user with administrator access privileges. You cannot install the software or modify settings
when logged on as any other user.
5
Click “Install Driver”.
Once the Wireless Panel software is installed,
taskbar.
• To change any of the Wireless Panel software settings on a computer running the Windows 2000 operating
system, log on as a user listed in “Administrators”. You cannot modify settings when logged on as any other user.
What to do next
Make access point connection settings.
When using the Windows 2000 operating system, proceed overleaf.
When using the Windows XP operating system, click “Main Menu” as necessary to return to the
first screen of the wizard, or click
to close the Easy Installation Wizard, and then proceed
overleaf.
• Exit all other programs.
Important
Before reading this guide, be sure to read the
“Read This First” supplement.
appears on the Windows operating system
Computer Firewall Functions
When using the Windows XP “Internet Connection Firewall” function
This guide explains how to install the
software required to use the Wireless LAN
PC Card (2.4 GHz/5 GHz IEEE 802.11a/b/g)
PCWA-C800S and the necessary settings
to establish a connection with the access
point.
Enabling the Windows XP “Internet Connection Firewall” function may prevent your
computer from accessing a wireless network. (By default, this function is disabled on
computers running the Windows XP operating system.) If this function is enabled, your
computer may not be able to connect to your network when you change your access point
settings. If this happens, disable the “Internet Connection Firewall” function, connect to the
network, and then re-enable the function. For details, refer to Windows XP Help.
6
Note
When prompted, insert the Wireless LAN PC Card in the PC card slot.
You do not need to turn off your computer when you insert the Wireless LAN PC Card.
To remove the Wireless LAN PC Card
1 Quit any software accessing the wireless LAN (e.g. Internet Explorer).
2 Click
on the Windows operating system taskbar.
3 Click “Safely remove Sony 802.11a/b/g Wireless LAN Adapter” or “Stop
Sony 802.11a/b/g Wireless LAN Adapter” on the shortcut menu that
appears.
Network security is an important issue. Consider carefully how best to protect your computer.
If your computer has several PC card slots
When using a personal firewall function provided by virus scanning or
network security software
If you insert the Wireless LAN PC Card into a slot other than the one you usually use, the computer treats the
card as a new device and automatically begins installing device drivers for it. Completing the driver
installation makes it possible to use the Wireless LAN PC Card in that slot. Installation is performed
automatically by the installation wizard.
Virus scanning and network security software sometimes includes a function called a
“personal firewall” that prevents illegal access by outside entities. Depending on the
software, the security level of this function may be initially set to a high level. If this high
security level setting is left in effect, it may be impossible for an outside entity to access
your computer. This can cause problems such as not being able to connect to the network
when changing the access point’s settings. In this event, lower the security level to permit
the network connection. For details, refer to the documentation provided with your software.
PCWA-C800S
z Hint
Insert in the
direction of the
arrow
If you are using the Windows 2000 operating system, you can register up to 32 networks for each PC card
slot, but you have to register each network individually. You cannot share the settings across slots.
To PC card slot
Notes
© 2004 Sony Corporation Printed in Japan
• Pay special attention to security issues.
• For questions regarding firewall functions, contact your firewall software manufacturer.
Notes
• If your computer has two PC card slots, insert the Wireless LAN PC Card into the top slot. If inserted into
thebottom slot, the antenna of the Wireless LAN PC Card will block the top slot.
1
Overview
The Wireless LAN PC Card (2.4 GHz/5 GHz IEEE 802.11a/b/g) PCWA-C800S is a wireless
network PC card that allows your computer to connect to a wireless network and the Internet.
With this card, you can build a wireless LAN.
When using the Wireless LAN PC Card in the Access Point Network connection
mode, turn on the access point.
• Depending on the depth and configuration of the PC card slots on your computer, you may not be able to
fully insert the Wireless LAN PC Card.
z Hint
Push the Wireless LAN PC Card into the slot until it is firmly seated. If the card does not fit
easily, do not force it in. Take the card out, and then try reinserting it.
The Access Point Network connection mode is used when building a network around an access point (sold
separately). The Peer to Peer Network connection mode is used when a network is composed mainly of
computers with wireless capabilities (i.e. that do not need to connect through an access point).
2
This guide explains how to use the supplied CD-ROM to install the Wireless LAN PC Card
device driver and Wireless Panel software.
Insert the supplied CD-ROM into the CD-ROM drive of your computer.
When you insert the Wireless LAN PC Card, the device driver is installed automatically. Wait
until the installation is complete.
7
When installation is complete, the following screen appears. Click “Continue” to
install the utility software.
8
Click “Install Software Utility”.
The Easy Installation Wizard starts automatically.
Step 1 Installing the Software
Step 2
Customizing the Access
Point Connection Settings
The procedure in step 2 varies according to your operating system. Refer to the section that
pertains your operating system.
z Hint
If the Easy Installation Wizard does not appear when you insert the supplied CD-ROM into your CD-ROM
drive, double-click “Setup.exe” (
) on the CD-ROM. Depending on the settings of your computer, the file
name may be “Setup”.
3
When the following message appears, click “OK”.
• Microsoft and Windows are registered trademarks of Microsoft Corporation in the United States of America
and/or other countries.
• Sony, VAIO,
,
, and the Eco Info logo are trademarks of Sony Corporation.
• In this document, the Wireless LAN PC Card (2.4 GHz/5 GHz IEEE 802.11a/b/g) PCWA-C800S is referred to as
the Wireless LAN PC Card.
• In this document, Microsoft® Windows® 2000 Professional is referred to as Windows 2000, Microsoft® Windows®
XP Professional and Microsoft® Windows® XP Home Edition are referred to as Windows XP.
The utility software installation starts.
Printed on 100% recycled paper using VOC (Volatile Organic Compound)-free vegetable oil based ink.
Continued overleaf
Step 2
Customizing the Access
Point Connection Settings
3
4
When you are done, click “Next”.
4
Make sure that the settings are correct, and then click “Connect”.
• Data encryption at the selected access point is enabled
Enter the encryption key in the “Network key” text box. (The input is shown only as
asterisks.) For verification, enter the same string one more time in the “Confirm network
key” text box.
The encryption key must be exactly the same as the one of the access point. Permissible
characters and their maximum number are detailed below.
After installing the necessary software, customize the necessary settings to establish a connection
with the access point.
If you want to establish a connection in Peer to Peer Network connection mode, refer to the
Wireless Panel Help for details about the necessary settings.
When using WEP
Windows 2000 Operating System
1
Depending on the data encryption settings of the access point, proceed as
follows.
Using the Wireless Panel Software
The Wireless Panel software shows information about the communication status of the computer
connected to the wireless network. Normally, the Wireless Panel runs in the background and only
shows the radio signal condition with the signal level indicator on your Windows operating
system taskbar. The Wireless Panel window contains more detailed information. When running
under the windows 2000 operating system, communication setup and network switching are also
performed with the Wireless Panel software.
Notes
ASCII
Hexadecimal
Permissible characters
Alphanumeric characters
0 to 9, A to F, a to f
• To use the Wireless Panel software with the Windows 2000 operating system to modify communication settings,
log on as a user listed in “Administrators”. You cannot modify settings when logged on as any other user.
Maximum number
of characters
5 or 13 characters
10 or 26 characters
• On a computer running the Windows XP operating system, communication setup and network switching are not
performed with the Wireless Panel software but with built-in functions of the Windows XP operating system.
However, the Wireless Panel software can be used to check the communication status.
Click “Connect to Access Point”.
Wait until the Wireless LAN PC Card connects to the access point. When the Wireless LAN
PC Card establishes the connection with the access point, the following screen appears.
Signal Level Indicator
The communication status is shown by the signal level indicator on your Windows operating
system taskbar.
• Data encryption at the selected access point is disabled
2
Select the “Allow me to connect to the selected wireless network, even though it is not
secure” check box. (For security reasons, enabling data encryption is recommended.)
Enter a network name and encryption key.
This completes the access point connection settings procedure.
1
Signal level indicator
Meaning of the indicator
z Hint
Excellent
You can change the connection settings and network connection mode from the Wireless Panel software. For
details about how to use the Wireless Panel software, refer to the Wireless Panel Help.
Good
Poor
2
Out of range or not connected
Card not inserted
(The Wireless LAN PC Card is not correctly inserted or it is not detected by the
computer)
Windows XP Operating System
Peer to Peer
(Communicating in Peer to Peer Network connection mode)
Notes
1 Network Name (SSID)
This unique ID is used to identify wireless networks. The setting can be made individually
for Access Point Network connection mode and Peer to Peer Network connection mode.
When connecting to an existing network, consult your network administrator regarding the
proper settings. When changing an existing network name, you can use up to 32
alphanumeric characters (including symbols).
Before configuring the Wireless LAN PC Card
• If Windows XP Service Pack 1 is not already installed on your computer, Sony recommends downloading and
installing it. To verify whether the service pack is installed, click “Start”, and then click “My Computer”. In the
“My Computer” window, click “View system information” on the left. The “System Properties” dialog box
appears. If the service pack is installed, “Service Pack 1” appears under “System” on the “General” tab of the
dialog box.
• Perform the following steps to confirm that the “Use Windows to configure my wireless network settings” check
box is selected. This option is selected by default.
z Hints
• ASCII and hexadecimal characters are automatically identified.
• The data encryption function prevents unauthorized access to the network. When the function is enabled,
only computers configured with the correct encryption key can join the network. For security reasons, it is
strongly recommended that you enable this feature. The setting can be customized for the Access Point
Network connection mode and Peer to Peer Network connection mode. When connecting to an existing
network, consult your network administrator regarding the proper settings. For information on how to control
this setting at the access point, refer to the documentation provided with the access point.
1 In “Control Panel”, click “Network and Internet Connections”, and then click “Network
Connections”.
z Hints
• Clicking the “Network Name” list shows the network names of any access points within range. You can
then select a network name from the list.
z Hint
• For details about the default network name of the access point, refer to the documentation provided with
the access point.
If “Network and Internet Connections” does not appear, click “Switch to Category View” on the left.
2 Right-click “Wireless Network Connection *” (“*” is a number that differs according to the
computer settings), and click “Properties” on the shortcut menu.
2 WEP
3 Click the “Wireless Network” tab.
If data encryption (WEP) is enabled for the access point to which you want to connect,
select this item. When this item is selected, enter the encryption key (WEP key) in the
“Key” and “Confirm key” text boxes.
Data encryption prevents unauthorized access to the network. For security reasons, it is
strongly recommended that you enable this feature. The setting can be configured
individually for Access Point Network connection mode and Peer to Peer Network
connection mode. When connecting to an existing network, consult your network
administrator regarding the proper settings. For more information, refer to the
documentation provided with the access point.
4 Confirm that the “Use Windows to configure my wireless network settings” check box is
selected. If not, select it.
• You must download and install the Windows XP support patch for Wi-Fi protected access
(Q815485_WXP_SP2_x86_ENU.exe) from the Microsoft Web site before you can establish a connection to an
access point using the WPA security method. For details about the connection method, refer to the Wireless Panel
Help.
1
In “Control Panel”, click “Network and Internet Connections”, and then click
“Network Connections”.
The “Network Connections” window appears.
z Hint
If “Network and Internet Connections” does not appear, click “Switch to Category View” on the left.
2
ASCII
Hexadecimal
Right-click “Wireless Network Connection *” (“*” is a number that differs
according to the computer settings), and click “View Available Wireless
Networks” on the shortcut menu.
Permissible characters
Alphanumeric characters
0 to 9, A to F, a to f
The “Wireless Network Connection” dialog box appears.
Maximum number
of characters
5 or 13 characters
10 or 26 characters
z Hint
If the computer is not connected to a wireless network, an “x” appears on the “Wireless Network Connection *”
icon in the “Network Connections” window.
Confirm key
Re-enter the encryption key that you entered in the “Key” text box.
z Hint
This product supports a function called “roaming” that allows the creation of a wireless network with
multiple access points for wider coverage. When using this function, configure all the access points to the
same network name (SSID) and data encryption settings.
5
3
From the “Available Wireless Networks” list in the “Wireless Network Connection”
dialog box, select the access point to which you want to connect.
z Hint
The “Available Wireless Networks” list shows the names of the access points within communication range of
the computer. For details about the default network name of your access point, refer to the documentation
provided with it. If you think that the network name of your access point may have been changed, consult your
network administrator.
To open the Wireless Panel window, double-click the signal level indicator on your Windows
operating system taskbar.
The Wireless Panel window appears.
Click “Connect”.
The connection to the access point is established.
If the access point is already configured, the setup procedure is complete.
If you want to change the access point settings, refer to the documentation provided with the
access point.
Note
To use an access point to connect to the Internet, you must change the access point default settings.
z Hint
Key
If data encryption (WEP) is enabled for the access point, enter the encryption key (WEP
key) here. Because this key functions as a password that enables communication with the
network, the key entered here must be exactly the same as the one of the access point.
Only computers for which the key has been configured correctly can join the network. The
number of characters depends on the “ASCII/Hexadecimal” and “Length” settings (see
table below).
• To establish a connection to an access point using the WPA security method, refer to the Wireless Panel
Help.
Opening the Wireless Panel Window
For additional information on the wireless network capabilities of the Windows XP operating
system, refer to Windows XP “Help and Support”. (Click “Start”, and then click “Help and Support”.
Enter “wireless” in the “Search” text box, and then click the green arrow.) You can also consult
the Windows XP operating system documentation.
z Hints
• When you move the mouse pointer over an item in the Wireless Panel window, a short description of that item
appears.
• For details about how to use the Wireless Panel software, refer to the Wireless Panel Help.