1
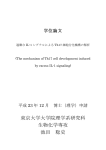
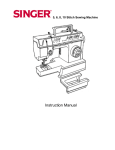
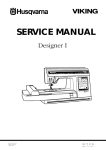
size:6.75*10.25英寸
Why is the thread looping/bunching under my fabric?
Thread looping under your fabric is usually caused by not threading the upper tension
correctly. With the presser foot lever in the UP position and tension set at 4, follow the
threading guides/graphics on the top of the machine.
1.Place the thread spool on the spool pin and secure with a thread spool cap.
2.While holding the thread with your right hand, use your left hand to take the thread and
take the thread and follow the thread path by bringing the thread down into the tension
channel around the bottom and up the other side.Continue to thread the machine, but do
not thread the needle.
Before threading the needle, perform this easy test to make sure the upper thread is
threaded correctly. Making sure the presser foot is raised, pull the thread. It should pull
easily. Now lower the presser foot, the thread should now resist when you pull it. There
should be a significant increase in the tension of the thread. If there is no increased
tension, the machine is not threaded correctly.
Why is my machine skipping stitches?
Skipped stitches can occur if needles are damaged or dull, or if they are incorrectly
inserted into the machine.
First, your needle may be dull or damaged and need to be replaced. You should also
check that you are using the correct needle for the type of fabric you are sewing. Refer
to the Needle/Fabric/Thread/Guide on page 11 of this manual.
Next, check that the needle is installed correctly. The needle needs to be pushed as far up
the needle shaft as possible. (It's easy to insert the needle halfway, clamp it down and think
it is installed correctly.) Also, the flat part of the needle should be positioned towards the
back. If the needle is not installed correctly, it will not be able to pull up the bobbin thread
and will cause skipped stitches.
VivoTM - 1004
INSTRUCTION MANUAL
Model 1004 VIVO
INSTRUCTION MANUAL
INTRODUCTION
We recommend that before you start to use your create & repair machine, you take time to
review this instruction book, seated at the machine. You will discover that this machine is
not only easy to use, but it offers many features designed to make your sewing experience
enjoyable.
23. This machine is not intended for use by persons (including children) with reduced
physical, sensory or mental capabilities or lack of experience and knowledge, unless
they have been given supervision or instruction concerning the use of the appliance
by a person responsible for their safety. Children should be supervised to ensure that
they do not play with the appliance.
IMPORTANT SAFETY INSTRUCTIONS
This machine is intended for household use only. Read all instructions before using this
create & repair machine.
When using an electrical appliance, basic safety should always be followed in order to
reduce the risk of burns, fire, electric shock or injury to persons, including the following:
1. The machine should never be left unattended when plugged in.
2. Always unplug the machine from the electrical outlet immediately after using and
before cleaning.
3. Always unplug before re-lamping. Replace bulb with the same type rated
4. Do not allow to be used as a toy. Close supervision is necessary when the machine
is used by or near children.
5. Use this machine only for its intended use, as described in this manual. Use only
attachments recommended by the manufacturer as contained in this manual.
6. Never operate this machine if it has a damaged cord or plug, if it is not working
properly, if it has been dropped or damaged, or dropped into water. Return the
machine to the nearest authorized retailer or service center for examination, repair,
or electrical or mechanical adjustment.
7. Never operate the machine with any air openings blocked. Keep ventilation
openings of the sewing machine and foot controller free from accumulation of lint,
dust and loose fabrics.
8. Keep fingers away from all moving parts. Special care is required around the
sewing machine needle.
9. Always use the proper needle plate. The wrong plate can cause the needle to break.
10. Do not use bent needles.
11. Do not pull or push the fabric while stitching, as this may deflect the needle,
causing it to break.
12. Switch the sewing machine off when making any adjustments in the needle area,
such as threading the needle, changing the needle, threading the bobbin, changing
the presser foot, etc.
13. Always unplug the sewing machine from the electrical outlet when removing covers,
lubrication, or when making any other user servicing adjustments mentioned in the
instruction manual.
14. Never drop or insert any object into any opening.
15. Do not use outdoors.
16. Do not operate where aerosol spray products are being used or where oxygen is
being administered.
17. To disconnect, turn all controls to the off position, then remove the plug from the
electrical outlet.
18. Do not unplug by pulling on the cord. To unplug, grasp the plug, not the cord.
19. The sound pressure level under normal operation conditions is 72db .
20. Turn off or unplug the machine when it is not operating properly.
21. Never place anything on the foot controller.
22. If the power supply cord is damaged, it must be replaced by the manufacturer or its
service agent or similarly qualified person in order to avoid a hazard.
1
SINGER and VIVO are exclusive trademarks of The Singer
Company Limited S.à.r.l. or its Affiliates.
©2013 The Singer Company Limited S.à.r.l. or its Affiliates.
All rights reserved.
2
TABLE OF CONTENTS
Principal Parts of the Machine ........................................................................................ 4
NAME OF PARTS
PRINCIPAL PARTS OF THE MACHINE (Machine Front View)
Principal Parts and What They Do…………………………………........................................ 6
Accessories……………………………………………………………....................................... 8
1. Thread tension dial
Removing / Installing Extension Bed………………………………........................................ 9
2. Thread take-up lever
Connecting Machine to Power Source……………………………......................................... 10
Needle / Fabric / Thread Guide………………………………………...................................... 11
Inserting / Changing Needles………………………………………........................................ 12
Presser Foot Lifter……………………………………………………........................................ 12
Removing / Attaching the Presser Foot.........…………………………................................ 13
Winding the Bobbin……………………………………………………....................................... 14
Inserting the Bobbin…………………………………………………......................................... 15
Threading the Upper Thread…………………………………………....................................... 15
Raising the Bobbin Thread……………………………………………...................................... 17
Choosing a Stitch Pattern…………………………………………………................................. 18
Straight Stitching….…..……………………………………………………................................ 18
3. Thread cutter
5. Presser foot
6. Needle plate
3
7. Removable extension bed
10
8. Bobbin winding stopper
9. Power on/off & speed control
switch
10. Pattern selector dial
Zig-Zag Stitching….………………………………………………………................................... 21
11. Presser foot release lever
Changing the Bulb…….……………………………………………………….............................. 25
8
2
4. Reverse lever
Thread Tension.…...…………………………………………………………............................... 19
Reverse Sewing/Cutting the Thread………………………………………............................... 20
Blind Hem Stitching….………………………………………………………............................... 22
Multi Zig-Zag Stitching……….……………………………………………….............................. 23
Darning Plate………….……………………………………………………….............................. 24
1
12. Needle
4
9
7
13. Needle clamp & screw
14. Presser bar
Maintenance…………………………………………………………………................................ 25
Troubleshooting…………………………………………………………….................................. 26
15. Presser foot holder
16. Presser foot screw
14
17. Feed dogs
18. Bobbin cover plate
19. Bobbin cover release button
15
16
13
12
17
11
6
18
5
19
3
4
PRINCIPAL PARTS AND WHAT THEY DO
NAME OF PARTS
1. Thread Tension Dial lets you select just the right tension for your stitch, thread and
fabric. Tension discs, inside the machine, regulate the amount of tension on the needle
thread. The thread tension dial is numbered from 1 through 9. The lower the number,
the looser the tension is on the needle thread. The higher the number, the tighter the
tension is on the needle thread. The settings of 3, 4 and 5 are marked with a box around
the number, indicating the settings at the range at which most of your sewing will be
done.
PRINCIPAL PARTS OF THE MACHINE (Machine Back View)
20. Spool pin
21. Bobbin winder
22. Carry handle
23. Hand wheel
30
21
20
22
23
31
24. Foot controller input
25. Power cord socket
29
26. Power cord
27. Foot controller
2. Thread Take-Up Lever controls the flow of the needle thread. The self threading
eyelet simplifies the threading of the take up lever.
3. Thread Cutter is built-in at the side of the machine for convenience. Use this to trim
thread tails quickly and easily when completing a seam.
4. Reverse Lever instantly reverses the stitching direction. Simply press the lever all
the way down and hold in place. Release it to resume sewing forward.
28
24
28. Presser foot lifter
25
29. Light switch & built-in
sewing light
26
30. Faceplate
27
32
5. Presser Foot holds the fabric against the feed dogs. Use the presser foot lifter to lower
the presser foot to sew or to raise the presser foot to remove fabric.
6. Needle Plate is located under the presser foot area, around the feed dogs. It provides
a flat surface for the fabric while sewing.
7. Removable Extension Bed provides a larger surface around the arm of the machine
to support fabric while sewing. It can be removed to access the free arm, making it
possible to sew smaller, more hard-to-reach areas such as pant or sleeve hems. It has
a storage compartment for the machine's accessories, keeping them at your fingertips.
31. Thread spool
8. Bobbin Winding Stopper is used in the process of winding the bobbin.
32. Bobbin
9. Power On/Off & Speed Control Switch is used to turn the machine on and off.
There is an “L” setting for lower speed, and an “H” setting for higher speed.
10. Pattern Selector Dial is used to set the machine for the stitch you want to sew. It is
numbered from 1 through 12, and the numbers correspond to the display near the top of
the machine. Just turn the dial to the stitch you want and sew.
11. Presser Foot Release Lever is located at the back of the presser foot holder. Use
this lever to remove the presser foot from the presser foot holder.
12. Needle is placed into the needle bar, and is required in order for the machine to
sew. Use only SINGER brand needles for best stitch results.
13. Needle Clamp & Screw work together to hold the needle in place for sewing.
14. Presser Bar holds the presser foot and presser foot holder. It is raised and lowered
using the presser foot lifter.
15. Presser Foot Holder is attached to the presser bar. It holds the presser foot in
place for sewing.
16. Presser Foot Screw is located to the left of the presser foot holder. The screw is
used to secure the presser foot holder in position on the presser bar.
5
6
ACCESSORIES
PRINCIPAL PARTS AND WHAT THEY DO
17. Feed Dogs move the fabric under the presser foot.
Standard Accessories
18. Bobbin Cover Plate sits over the bobbin and bobbin case. It is transparent, making it
easier to monitor the thread supply.
1.All Purpose Foot
19. Bobbin Cover Release Button is located to the right of the bobbin cover plate. Press it
to the right to release the cover when replacing the bobbin.
20. Spool Pin holds the thread spool. The spool pin holder fits onto the spool pin to allow
thread to unwind without tug or drag. The spool pin can be used in either of two ways
(horizontally or vertically), depending on the size of the thread spool being used.
2.Satin Stitch Foot
3.Blind Hem Foot
4.Spool Base
5.Spool Cap
21. Bobbin Winder is used for smoothly and evenly winding thread onto the bobbin.
6.Metal Bobbins (2 + 1 in machine)*
22. Carry Handle is built-in, making it easy and convenient for transporting the machine.
7.Darning Plate
23. Hand Wheel controls the movement of the take-up lever and the needle. Always turn
the hand wheel toward you.
24. Foot Controller Input is located at the back of the machine. The foot controller cord
must be plugged into this input before starting to sew.
8.Package of Needles
(Style 2020/Size 14/90)
9.Instruction Book
8
9
25. Foot Controller is used to start the machine sewing. Step on the controller to begin
sewing and remove your foot from the controller to stop sewing.
26. Power Cord Socket at the back of the machine is where the power cord is inserted in
order to provide power to the machine.
27. Power Cord has one end that connects into the power cord socket and another end that
is connected to a main power supply.
28. Presser Foot Lifter is located inside the “C” area of the machine. Use the lever to raise
and lower the presser foot. The foot is raised before threading the machine and to
remove work from the machine. Lower the presser foot lifter before beginning to sew.
*IMPORTANT!
Use only SINGER ® brand metal Class 15 bobbins in this sewing machine. The tension on
the bobbin thread is operated magnetically. Therefore, the metal bobbin is required.
Using transparent or plastic bobbins, though they may seem to fit in the machine, will not
allow the machine to function properly, and the stitch result will be unsatisfactory.
Using metal bobbins will provide correct stitch results.
29. Light Switch & Built-in Sewing Light are used to illuminate the sewing area.
30. Faceplate houses the take-up lever, sewing light, tension mechanism and more.
31. Thread spool is used to hold and direct the thread into the tension disks.
There is a diagram at the top of the machine indicating where the thread slips into
the guide.
32. Bobbin case holds the bobbin thread securely, providing adequate tension on the
thread while sewing.
7
8
CONNECTING MACHINE TO POWER SOURCE
REMOVING / INSTALLING EXTENSION BED
To remove the extension bed from the machine, hold it firmly and pull it toward the left.
Once removed, you will have access to the free arm. This allows you to sew pants or
sleeve hems, as well as other hard-to-reach areas.
Connect the machine to a power source, as illustrated.
This machine is equipped with an electric plug that must be used with the appropriate
power outlet.
Unplug the power cord when the machine is not in use.
The inside of the removable extension bed can be used to store the machine's accessories.
To open the accessory storage compartment, flip the cover down, as shown.
Important!
OPEN
To install the removable extension bed, hold it in your left hand and push it firmly toward
the right. It is helpful to place your right hand at the right side of the machine to stabilize it
as you push the extension bed in place.
9
For machines with a polarized plug (one blade is wider than the other), the plug is
intended to fit in a polarized outlet only one way. If it does not fit fully into the outlet,
reverse the plug. If it still does not fit, contact a qualified electrician to install the proper
outlet. Do not modify the plug in any way.
To turn the machine on to sew, use the Power On/Off & Speed Control Switch.
Set it in the “L” position in order to sew at slower speeds, or set it at the “H” position in
order to sew at higher speeds.
When the machine is threaded and ready to sew, lower the presser foot and step on the
foot controller. The machine will sew according to where you have set the Power On/Off
& Speed Control Switch.
10
NEEDLE / FABRIC / THREAD GUIDE
INSERTING / CHANGING NEEDLES
There are various styles of needles available for your machine, depending on the type of
fabric you are sewing. Be sure to use the correct style and size of needle to achieve the
best results for your sewing projects.
The most common needle styles are regular point and ball point. The most commonly
used sizes are: 11/80, 14/90 and 16/100. The smaller the number is, the smaller the
needle size is. The larger the number is, the larger the needle is. Use smaller size
needles for lighter weight fabrics and larger size needle for heavier weight fabrics. The
chart below offers some suggestions for matching thread type and needle type with
various fabrics, for best results.
Change the needle regularly, especially if it is showing signs or wear or causing problems.
For best sewing results, always use SINGER® brand needles.
To insert a new needle, first turn the Power On/Off & Speed Control Switch to the “off” position.
Loosen the needle clamp screw.
Remove the old needle and discard it.
Insert the new needle, with the flat side toward the back, as far up as it will go.
Tighten the needle clamp screw securely.
Needles must be in perfect condition.
Problems can occur with: A. Bent needles B. Damaged points C. Blunt needles
Regular point needles are designed for use with fabrics that are woven, such as cotton,
linen, silk, denim or twill. The style number for this needle is 2020.
Ball point needles are designed for use with fabrics that are stretch knit, such as spandex,
t-shirt knit or tricot. The style number for this needle is 2045.
11
Fabric
Thread
Needle Style
Needle Size
Lightweight: taffeta,
organdy, batiste
All purpose thread;
Silk thread
2020
11
Medium weight: linen,
challis, chintz, cotton
All purpose thread;
Silk thread
2020
14
Medium heavy: tweed,
denim, corduroy
All purpose thread;
Heavy duty cotton
Knit: stretch woven,
spandex, tricot
All purpose thread;
Silk thread
PRESSER FOOT LIFTER
2020
2045
14 or 16
14
The Presser Foot Lifter is located inside the “C” area of the machine. Use this to raise and
lower the presser foot.
Raise the Presser Foot Lifter before beginning to thread the machine, to ensure that the
machine is properly threaded. Raise it also to remove work from the machine when sewing
is finished. Lower the Presser Foot Lifter after setting fabric under the presser foot,
to begin sewing.
12
REMOVING / ATTACHING THE PRESSER FOOT
Turn the Power On/Off & Speed Control Switch to the “off” position and make sure the needle
is in its highest position.
Removing the Presser Foot
Raise the Presser Bar by lifting the Presser Foot Lifter. Press the Presser Foot Lever, located
in back of the Presser Foot Holder and the foot will disengage.
WINDING THE BOBBIN
The Vivo create & repair machine by SINGER® uses metal bobbins. The bobbin case is
magnetized. When the metal bobbin is used, correct tension for the bobbin thread can be
achieved. Therefore, do not use transparent or plastic bobbins – using transparent or plastic
bobbins will result in poor stitch quality due to lack of tension on the bobbin thread.
Always use metal bobbins. Contact your Authorized SINGER® retailer for more
information, or visit www.singer.com.
Attaching the Presser Foot
Raise the presser foot using the Presser Foot Lifter. Place the foot under the presser foot holder,
then lower the presserfoot holder until the cut-out is directly above the pin.
The presser foot will engage automatically.
Place the spool base, thread and spool cap onto the spool pin. Pull the thread out from the
spool. Slip it into the thread guide, then wind it around the bobbin tension guide, as illustrated.
Put the end of the thread through the hole in the bobbin, as shown. Place the bobbin onto
the bobbin winder as far as it will go.
Holding onto the end of the thread, push the bobbin winder firmly to the right, up against the
bobbin winding stopper. Step on the foot controller to begin winding the bobbin, stop to trim
the thread tail. Step on the foot controller again to resume winding the bobbin. When the bobbin
is full, push the spindle to the left, clip the thread and remove the bobbin from the winder.
13
14
INSERTING THE BOBBIN
THRE ADING THE UPPE R THRE AD
To insert the bobbin, first remove the bobbin cover plate.
Place the bobbin into the bobbin case.
Pull the thread tail to check that the bobbin turns in a counter-clockwise direction. If it turns
in a clockwise direction, remove it from the bobbin case, turn it over and replace it into the
bobbin case. Pull the thread tail again to ensure that it moves in a counter-clockwise direction.
Place the spool base, thread and spool cap onto the spool pin.
If the thread spool is smaller in size, the spool pin can remain in a horizontal position.
Note: If the thread spool has a slit on the end of it, put that end toward the right so that the
thread doesn't get caught on it while sewing.
If the thread spool is larger in size, and therefore does not feed properly when it is placed
onto the spool pin horizontally, move the spool pin to the vertical position. If the vertical
position is used, loosen the spool cap slightly or completely remove it, so that it doesn't
prevent the spool from turning while sewing.
or
Thread the machine with your left hand while firmly gripping the thread with your right
hand in the order shown:
1.Guide the thread through the thread guide at the top of the machine.
THREADING THE UPPER THREAD
Threading the upper thread is a simple process, but it must be done correctly in order to
achieve the correct sewing results.
Turn the Power On/Off & Speed Control Switch to the “off” position before threading the machine.
Start by raising the needle to its highest position by turning the handwheel toward you
(counter-clockwise), and continue turning until the needle just starts to descend.
Raise the presser foot lifter, which will release the tension of the machine.
Note: This step is very important. If the presser foot is not raised so that the tension is released,
the result will be a large thread jam on the underside of the fabric when you start to sew.
2.Pull the thread into the tension discs by pulling the thread down into the channel,
as shown.
3.Do a U-turn around the inside of the tab.
4.Pass the thread through the thread take-up lever from right to left.
5.Place the thread into the thread guide.
6.Pass the thread through the eye of the needle from front to back.
Turn the handwheel toward you until the needle and take-up lever are in their highest positions.
1
2
4
presser foot lifter
handwheel
OFF L H
5
3
6
15
16
CHOOSING A STITCH PATTERN
THRE ADING THE UPPE R THRE AD
The Pattern Selector Dial is used to select the stitch you want to sew. The numbers on the
dial directly correspond to the display on the front of the machine. Simply turn the dial until
the number of the stitch that you want to sew lines up with the red dot marking above the
dial.
(1)(2)
(3)
(5)(6)
(4)
RAISING THE BOBBIN THREAD
Before you start to sew, it will be necessary to draw up the bobbin thread.
Raise the presser foot lifter.
Holding the needle thread loosely with your left hand, turn the hand wheel toward you
(counter-clockwise) with your right hand, first lowering the needle and continuing until
the needle comes to its highest position.
Lightly pull up the top thread, and pick up the bobbin thread, which will appear through
the needle plate slot.
Pull both the top and bobbin thread together toward the back of the machine, under the
presser foot, leaving about 6” clear.
Replace the bobbin cover plate.
(1)
(2)
(3)
STRAIGHT STITCHING
(4)
The straight stitch is the most frequently used stitch for all types of sewing.
1.To begin sewing, first raise the presser foot lifter.
2.Pull both the upper thread and the bobbin thread under the presser foot toward the
back of the machine, leaving about 6” of thread.
3.Place the fabric under the presser foot, then lower the presser foot lifter.
(5)
(6)
(7)
(8)
4.Turn the hand wheel counter-clockwise (toward you) until the needle enters the fabric.
5.Start the machine by stepping on the foot controller. Guide the fabric with your hands.
When reaching the edge of the fabric, stop the sewing machine.
6.Turn the hand wheel counter-clockwise (toward you) until the needle is in its highest
position, then raise the presser foot lifter.
7.Draw the fabric to the rear and cut off excess thread with the thread cutter, located on
the side of the machine, as shown.
17
18
THREAD TENSION
REVERSE SEWING / CUTTING THE THREAD
Having selected the correct needle and thread combination for the fabric being used, it
may be necessary to adjust the tension of the sewing machine to ensure a well balanced
stitch.
A well-balanced stitch is produced when the top and under thread appear the same on the
fabric.
Your machine has an adjustable top tension dial. This control exerts tension on the top
and under thread as they pass through the machine to form a stitch.
Too much tension will produce a tight stitch which will cause puckered seams.
Too little tension will produce a loose stitch.
When an even amount of tension is exerted on both threads, a smooth even stitch, known
as a well-balanced stitch, is produced.
Notice the machine tension dial is marked from 1 through 9, and that the settings of 3, 4
and 5 are further distinguished by a small square. The settings of 3, 4 and 5 represent
the general range at which most of your sewing will be done.
Reverse sewing is usually done at the beginning and end of a seam. The purpose is to lock
the threads at both ends of the seam so that the seam does not unravel.
Set the machine for straight stitch sewing, depending on the fabric you are sewing.
Place the fabric under the presser foot, just inside the top raw edges of the fabric.
Lower the presser foot and sew about 3 stitches.
NOTE: The length of the stitch when sewing in reverse is pre-set, regardless of the
selected stitch.
Stop sewing, then press and hold the Reverse Lever, located on the front of the machine.
Hold it while you sew 3 stitches in reverse.
Release the lever and sew forward again, until you come to the opposite end of the fabric.
Press and hold the Reverse Lever to sew in reverse again for about 3 stitches.
Release the lever to sew forward again to the end of the fabric.
Lift the presser foot lifter, then remove the work from the machine.
How Does Tension Work?
To help understand the effect of tension on fabric and thread, try this simple test.
Take 2 pieces of a medium weight woven fabric in a solid, light color about 6” long.
Place a 2020 size 14 needle in the machine.
Thread the top of the machine with an all-purpose thread (darker color), and place the
same type of thread (lighter color) in the bobbin.
Set the machine for Stitch #3, one of the Straight Stitch selections.
Seam the two pieces of fabric together starting with the top tension control at 1. As you
continue to sew, slowly turn the tension dial from 1 through 9.
Sew another row, turning the dial back to 1. You should see a balanced stitch on each row
about midway between the start and finish.
The different colored threads will help you see the effect that tension has on the top and
bottom threads.
Too Much Tension
Too Little Tension
Well Balanced Stitching
Tension Test
To verify that the machine is threaded properly in the tension discs, do this simple
check:
1.With the presser foot raised and the needle unthreaded, pull the thread. You should
detect only a slight resistance and little or no deflection of the needle.
2.Now lower the presser foot and again pull the thread toward the back of the
machine. This time you should detect a considerable amount of resistance and much
more deflection of the needle. If you do not detect the resistance, this means you have
not threaded the upper machine tension correctly and need to rethread it.
19
To cut the thread tails, hold the fabric in your left hand. Bring it up from behind the
machine, then place the thread tails into the thread trimmer on the side of the machine.
Pull down until the threads are trimmed.
fabric
20
ZIG-ZAG STITCHING
ZIG-ZAG STITCHING
The Zig-Zag stitch can be used for seam finishing, appliqué work or decorative sewing.
Seam Finishing
Seam edges support the garment and should be given a durable finishing, particularly if
the fabric is likely to ravel.
There are two different ways to finish seams: Trimming after stitching the seam edge or
overedging. Try the techniques on a scrap fabric first to determine which is right for your
project.
1.Overedged Seam Finish
Set the machine for Stitch #7 or #8 and attach the Satin Foot. Sew, with the right side of the
stitch at the edge of the seam. Trim the seam edges evenly.
Appliqué
Appliqué is done by stitching shaped pieces of fabric onto a foundation fabric to form a
design or pattern. This technique offers unlimited creative possibilities.
1.Prepare the Appliqué
Apply paper-backed fusible web to the wrong side of the Appliqué fabric, following the
manufacturer's recommendations. Draw the Appliqué shape, then cut out the shape from
the fabric that has been fused to the fusible web. Remove the paper backing. Position the
applique on the foundation fabric, then fuse in place.
2.Stitch the Appliqué
Set the machine for stitch #6,the Zig-Zag Satin Stitch
To stitch the appliqué sew so that the right swing of the stitch falls off the outer edge of the
appliqué, enclosing the raw edge of the fabric. The left swing of the stitch goes into the
appliqué fabric.
BLIND HEM STITCHING
The Blind Hem stitch is primarily used for creating nearly invisible hems on various types of
projects such as curtains, trousers, skirts, etc. There are two different blind hem stitch
selections on the machine: the standard blind hem stitch (for hems on woven fabrics) and
the stretch blind hem stitch (for hems on stretch knit fabrics).
2.Decorative Stitching
Add a personal touch to your projects by embellishing with decorative threads. Mix
different types and colors of thread to create border-like finishes on garments, home
décor, crafts and more.
Set the machine for Stitch #7, #8 or #9, depending on the look you want.
Attach the Satin Foot.
If a heavier weight thread (such as top stitching thread) will be used, be sure to change
the needle to a larger size as well.
21
Set the machine to Stitch #10 for the standard blind hem stitch, or set the machine to Stitch
#11 for the stretch blind hem stitch. Insert the appropriate needle for the fabric to be
hemmed (see the Needle, Fabric & Thread Chart for recommendations).
Thread the top of the machine and bobbin with a thread color that matches or blends as
closely as possible to the color of the item to be hemmed.
1.Fold and pin the fabric, as shown.
2.Place the fabric under the blind hem presser foot with the fold of the fabric positioned
so that the needle just pierces the fold when the needle swings to the left. Be sure to
remove pins as you sew.
3.When finished, fold the hem down and press.
22
DARNING PLATE
MULTI ZIG-ZAG STITCHING
The multi-stitch zig-zag is a very versatile stitch. Use it to mend, insert elastic or simply
as a decorative embellishment.
Mending a Tear
Set the machine for Stitch 12 and attach the Satin Foot.
Trim any loose threads from the torn area.
For reinforcement of the torn area, place an underlay of interfacing or small fabric scrap
(similar fabric type and color) behind the tear.
Working from the right side, bring the edges of the tear together and then sew.
Use a hand sewing needle to pull the threads to the wrong side, then tie and clip.
Trim away the excess underlay.
For some sewing techniques such as sewing on buttons, the Darning Plate must be used.
The Darning Plate prevents the feed dogs from coming in contact with the fabric, so that
the fabric doesn't feed through.
To attach the Darning Plate, line it up with the holes on the needle plate, then push down to
snap it in place. Be sure it is positioned so that the hole in the Darning Plate lines up with
the opening for the needle on the needle plate.
Turn the hand wheel toward you slowly, to ensure that the needle clears the hole in the
Darning Plate.
Remove the Darning Plate to return to normal sewing.
Elastic Insertion
Elastic is easily applied with the multi-stitch zig-zag. The elasticity of this stitch prevents
the stitches from breaking when the elastic is stretched.
Set the machine for Stitch 12 and attach the Satin Foot.
If repairing a garment with broken elastic, first remove the old elastic from the garment,
then press.Divide both the elastic and the area of the garment where the elastic will be
sewn, into quarters. Place a pin at the quarter markings on both the elastic and the garment.
Gently pull the elastic to cove the fabric evenly as you sew.
Sewing on a Button
Set the machine for Stitch #8 or #9, depending on the distance between the holes of the button.
Position the fabric and button under the presser foot.
Lower the presser foot.
Turn the handwheel to make sure the needle clears both left and right holes of the button.
Note: It may be necessary to change to a different zig-zag stitch selection until you find
the one that is appropriate for the button. To do so, raise the needle out of the fabric,
select the new stitch. Lower the presser foot and then turn the handwheel to see if it clears
the holes of the button.
Once you have determined the correct zig-zag stitch setting for the button, sew 10 stitches.
If a button shank is required, place a needle on top of the button and sew over the top of it,
as shown.
When finished, pull both threads to the backside of the fabric using a hand needle, then tie
together to secure.
23
24
CHANGING THE BULB
TROUBLESHOOTING
DARNING PLATE
How to solve common problems
Disconnect the machine from the power supply be removing the plug from the main socket.
Replace the bulb with the same type rated
Solution
++
1-(2)
1-(1)
-
2
3
LED Φ5MM DC3V 0.6W
+
+-
4
MAINTENANCE
1.Wipe the machine with clean cloth.
2.Remove bobbin cover and take out the bobbin, place the bobbin cover back after cleaning
with a small brush.
3.Keep the machine away from high temperatures.
4.Do not drop.
5.Please turn to the instruction manual when changing the accessories, and make sure
these are installed correctly.
Rethread the upper thread
and bobbin
25
26