1
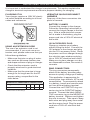
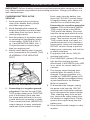
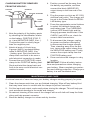
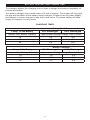
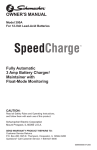
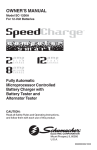
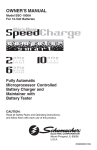
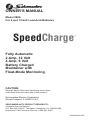
OWNER’S MANUAL
Model 200A
For 6 and 12-Volt Lead-Acid Batteries
SpeedCharge
™
Fully Automatic
2 Amp, 12 Volt
4 Amp, 6 Volt
Battery Charger/
Maintainer with
Float-Mode Monitoring
CAUTION:
Read all Safety Rules and Operating Instructions,
and follow them with each use of this product.
Schumacher Electric Corporation
Mount Prospect, IL 60056 U.S.A.
Send Warranty Product Repairs to:
Customer Service Returns
P.O. Box 280,1025 E. Thompson, Hoopeston, IL 60942-0280
Questions? Call Customer Service: 1-800-621-5485
0099000532/1205
TABLE OF CONTENTS
IMPORTANT SAFETY INSTRUCTIONS .................................................................... 3
PERSONAL SAFETY PRECAUTIONS ...................................................................... 4
BEFORE USING YOUR BATTERY CHARGER ......................................................... 5
Plugging It In.......................................................................................................... 5
Using An Extension Cord....................................................................................... 5
Battery Clamps....................................................................................................... 5
12v Accessory Plug................................................................................................ 5
Ring Connectors.................................................................................................... 5
USING YOUR BATTERY CHARGER.......................................................................... 6
PREPARING YOUR BATTERY TO BE CHARGED ................................................... 6
OPERATING INSTRUCTIONS ................................................................................... 7
Charging Battery In The Vehicle............................................................................. 7
Charging Battery Removed From The Vehicle....................................................... 8
MAINTENANCE AND CARE ...................................................................................... 8
BATTERY PERCENT AND CHARGE TIME................................................................ 9
LIMITED WARRANTY .............................................................................................. 10
SAVE THIS OWNER’S MANUAL AND READ BEFORE EACH USE.
Model 200A, Fully Automatic Battery Charger offers features to accommodate the
needs for home or light commercial use. This manual will explain how to use the charger safely and effectively. Please read and follow these instructions and precautions
carefully.
NOTE: This equipment has been tested and found to comply with the limits for a
Class B digital device, pursuant to Part 15 of the FCC Rules. These limits are designed to provide reasonable protection against harmful interference in a residential
installation. This equipment generates, uses and can radiate radio frequency energy
and, if not installed and used in accordance with the instructions, may cause harmful
interference to radio communications. However, there is no guarantee that interference will not occur in a particular installation. If this equipment does cause harmful
interference to radio or television reception, which can be determined by turning the
equipment on and off, the user is encouraged to try to correct the interference by one
or more of the following measures:
• Reorient or relocate the receiving antenna.
• Increase the separation between the equipment and receiver.
• Connect the equipment into an outlet on a circuit different from that to which the receiver
is connected.
• Consult the dealer or an experienced radio technician for help.
Important Safety Instructions
WARNING – RISK OF EXPLOSIVE GASES
WORKING IN VICINITY OF A LEAD-ACID BATTERY IS DANGEROUS. BATTERIES GENERATE EXPLOSIVE GASES DURING NORMAL BATTERY OPERATION. FOR THIS REASON, IT IS OF UTMOST IMPORTANCE THAT EACH
TIME BEFORE USING YOUR CHARGER, YOU READ THIS MANUAL AND
FOLLOW THE INSTRUCTIONS EXACTLY.
To reduce risk of battery explosion, follow these instructions and those published by
battery manufacturer and manufacturer of any equipment you intend to use in vicinity
of battery. Review cautionary markings on these products and on engine.
save these Instructions
• To reduce risk of electrical shock,
unplug the charger from the 120V AC
electrical wall outlet before attempting
any maintenance or cleaning.
This manual contains important safety
and operating instructions for battery
charger Model 200A.
• Always charge battery in a well-ventilated area.
• WARNING: Handling the cord on this
product or cords associated with accessories sold with this product, will
expose you to lead, a chemical known
to the State of California to cause
cancer and birth defects or other
reproductive harm. Wash hands after
handling.
• WARNING: Battery chargers get hot
during operation and must have proper ventilation. Air needs to flow around
entire charger. Do not set charger on
flammable materials like carpeting,
upholstery, paper, cardboard, etc.
Charger may damage leather, plastic
and rubber.
• Read all instructions and cautions
printed on the battery charger, battery,
and vehicle or equipment using battery.
Help us help you ——
Remember:
• Use charger only on lead-acid type
rechargeable batteries, such as those
used in cars, trucks, tractors, airplanes, vans, RVs, trolling motors, etc.
This charger is not intended to supply
power to a low voltage electrical
system other than in a starter-motor
application.
Place charger as far away from the
battery being charged as the charger
cables will permit.
Do not expose charger to rain or snow.
Never charge a frozen battery. If battery
fluid (electrolyte) becomes frozen, bring
battery into a warm area to allow battery
to thaw before you begin charging.
• Never use charger for charging dry
cell batteries that are commonly used
with home appliances like radios, stereos, remote controls, etc. These batteries may burst and cause personal
injury.
• Do not disassemble charger. Take it
to a qualified service professional if
service or repair is required. Incorrect
assembly may result in fire or electrical shock.
Never allow battery acid to drip on
charger when reading specific gravity or
filling battery.
Never set a battery on top of charger.
Never place charger directly above
battery being charged. The gases from
the battery will corrode and damage the
charger.
Never touch the battery clamps together
when the charger is on. You could cause
a spark.
Never pull out the plug by the cord when
unplugging the charger. Pulling on the
cord may cause damage to the cord or
the plug.
Never operate charger if it has received
a hard blow, been dropped, or otherwise
damaged. Take it to a qualified professional for inspection and repair.
Do not operate the charger if it has a
damaged power cord or plug. Have the
cord replaced.
Be sure to position the charger power
cord to prevent it from being stepped on,
tripped over, or damaged.
Connect and disconnect DC clamps
only after removing charger AC power
cord from the wall outlet. Do not permit
clamps to touch each other.
Personal Safety Precautions
• Wear complete eye and clothing
protection when working with leadacid batteries.
appliances. These batteries may burst
and cause injury to persons or damage to property.
• Make sure that someone is within
range of your voice to come to your
aid if needed while you work with or
are near a lead-acid battery.
• Remove all personal metal items
from your body such as rings, bracelets, necklaces and watches, while
working with a lead-acid battery. A
battery can produce a short circuit
current high enough to weld a ring (or
the like) to metal, causing a severe
burn.
• Have plenty of fresh water and
soap nearby for use in case battery
acid contacts your eyes, skin, or clothing. If this happens, wash immediately
with soap and water. Then get medical
attention.
• Take care not to drop any metal tool
or metal object onto the battery. This
may result in a spark or short circuit
across the battery or another electrical device that may cause an explosion.
• Avoid touching your eyes while
working with a battery. Wear safety
glasses. Acid particles (corrosion)
may get into your eyes. If this occurs,
flush eyes immediately with running
cold water for at least 15 minutes. Then
immediately get medical attention.
• Always operate the battery charger in
an open, well-ventilated area.
• Never smoke or allow a spark or
flame in the vicinity of the battery or
engine. Batteries generate explosive
gases.
• Never charge a frozen battery.
• Remove personal metal items such
as rings, bracelets, necklaces and
watches when working near a lead
acid battery.
• Neutralize any acid spills thoroughly
with baking soda before attempting to
clean up.
• Use the charger for charging a leadacid battery only. It is not intended to
supply power to a low-voltage electrical system other than in an automotive application. Do not use battery
charger for charging dry cell batteries
that are commonly used with home
• If necessary to remove battery from
vehicle to charge, always remove
grounded terminal from the battery
first. Make sure all accessories in the
vehicle are off, so as not to cause an
arc.
BEFORE USING YOUR BATTERY CHARGER
It is important to understand the charger’s requirements. This section explains the
charger’s electrical requirements and how to prepare a battery for charging.
PLUGGING IT IN
Your charger requires a 120V AC electrical outlet installed according to all local
codes and ordinances.
Versatile Quick-Disconnect
Harness
Snap any of the three connectors into
place in seconds:
Battery Clamps
Connect the clamps to the charger.
Follow the Operating Instructions to
connect the output clamps to the battery. After a solid electrical connection is made to the battery, plug the
power cord into a 120V AC electrical
wall outlet.
12V Accessory Plug
Charge or maintain your battery
without lifting the hood. Connect the
12V adapter to the charger and plug
into the 12V accessory outlet. Route
the power cord from charger through
the vehicle’s open window and plug
into a 120V AC electrical wall outlet.
Make sure to place charger on a dry,
non-flammable surface, like metal or
concrete.
USING AN EXTENSION CORD
The use of an extension cord is not
recommended. If you must use an extension cord, please make sure that you
follow these guidelines:
• Make sure that pins on plug of extension cord are the same number, size,
and shape as those of plug on charger.
• Check that the extension cord is
properly wired and in good electrical
condition.
• Make sure that the wire size is large
enough for its length and for the AC
ampere rating, as specified in the
chart below.
Ring Connectors
The ring connectors permanently
attach to the battery providing easy
access to quickly charge your battery.
This application is appropriate for
motorcycles, lawn tractors, ATVs and
snowmobiles. To permanently attach
to a battery, loosen and remove each
nut from bolts at battery terminal.
Connect the red POSITIVE ring connector ring to the POSITIVE battery
terminal. Connect the black NEGATIVE connector ring to the NEGATIVE
battery terminal. Replace and tighten
the nuts to secure. Take care to keep
both wires and plug away from metal
and the engine hood. Plug the power
cord into a 120V AC electrical wall
outlet.
MINIMUM RECOMMENDED EXTENSION CORD
Length of Cord, in Feet
25
50
100
150
AWG* Size of Cord
18
18
16
14
*AWG=American Wire Gauge
Using Your Battery Charger
The 200A does not have an ON/OFF switch. The On and Off commands are controlled by plugging the 200A into a 120V AC electrical wall outlet only after battery
connections have been made.
*Indicates an overload condition caused
by shorting of the battery clamps, reverse polarity (hookup) connection to a
battery, or charging a problem battery.
LED Indicators
Charging
Charged/
Maintain
Check Battery*
Amber
Green
Red
Preparing your battery to be charged
It is important that you read and follow these guidelines while you are preparing to
charge the battery.
• Make sure that you have a 6 volt or 12
volt lead-acid battery. Determine voltage of battery by referring to vehicle
owner’s manual. Charge battery initially
at charger’s lowest rate.
• Clean the battery terminals. Be careful to
keep corrosion from getting in or around
your eyes.
• Wear safety glasses. See additional
“Personal Safety Precautions” on
page 4.
• For batteries with removable vent caps, if
required, add distilled water to each cell
until the battery acid reaches the level
recommended by the manufacturer. This
will help purge excessive gases from the
cells. Be careful not to overfill. If you have
a sealed battery with non-removable
vent caps, no action is necessary.
• Take time to read all of the battery
manufacturer’s specific precautions,
such as removing or not removing vent
caps while charging, and recommended
rates of charge.
• Be sure that the area around the battery
is well ventilated while it is being charged.
Gases emitted from the battery can be
forcefully blown away by using a piece of
cardboard or other nonmetallic material
as a fan.
• If it is necessary to remove the battery
from the vehicle to charge it, always
remove the grounded terminal from the
battery first. Turn off all vehicle accessories to avoid sparks from occurring.
DANGER - Never alter the AC plug provided. If it will not fit the outlet, have a proper
outlet installed by a qualified electrician.
Improper connection can result in the risk
of electrical shock.
WARNING ‑ Connect and disconnect
the battery clamps only when the AC
power cord is disconnected or arcing
may result.
• NOTE: A marine (boat) battery installed
in a boat must be removed and charged
on shore.
operating instructions
IMPORTANT: Follow all safety instructions and precautions when charging your battery. Wear complete eye protection and clothing protection. Charge your battery in a
well-ventilated area.
Charging Battery In The
Vehicle:
block, away from the battery (see
figure left). DO NOT connect clamp
to negative battery post, carburetor,
and fuel line or sheet metal part.
1. Avoid personal injury by keeping
clear of fan blades, belts, pulleys
and other engine parts.
2. Avoid damaging the charger by
keeping the power cord and output
cords away from the hood, door or
moving engine parts.
3. Note the polarity of the battery posts
by checking the identification marks
on the battery: POSITIVE (POS, P
or +) and NEGATIVE (NEG, N or -).
The positive post is usually larger
than the negative post.
4. Identify which battery post is grounded or connected to the chassis. THIS
IS NORMALLY THE NEGATIVE
POST.
Connecting to a positive-grounded
system: Connect the black (NEGATIVE) output clamp to the NEGATIVE post of the battery. Rock and
twist the clamp back and forth to be
sure a solid electrical connection is
made. Then connect the red (POSITIVE) output clamp to a heavy, unpainted metal part of the chassis or
engine block, away from the battery.
DO NOT connect clamp to positive
battery post, carburetor, and fuel line
or sheet metal part.
6. Plug power cord into an 120V AC
electrical wall outlet.
7. The CHARGING (yellow) LED should
light and the charging process
should start. If the CHECK (red) LED
is on, check for correct cable connections.
8. The charger stops charging automatically after the battery is fully
charged. Charge completion is indicated by CHARGED (green) LED
and the charger has stopped charging and switched to the Maintain
Mode of operation.
NEGATIVE GROUNDED SYSTEM
9. To disconnect the charger, unplug
the power cord from the 120V AC
electrical wall outlet before attempting to disconnect the output clamps.
Then, standing away from the battery, remove the output clamp from
the chassis or engine block. Finally,
remove the output clamp from the
battery post.
5. Connecting to a negative-grounded system: Connect the red (POSITIVE) output clamp to the POSITIVE
post of the battery. Rock and twist
the clamp back and forth to be sure
a solid electrical connection is made.
Then connect the black (NEGATIVE)
output clamp to a heavy, unpainted
metal part of the chassis or engine
10.Clean and store the charger in a dry
location.
Charging Battery Removed
From The Vehicle:
POSITIVE
4. Position yourself as far away from
the battery as possible, and then
connect the black (NEGATIVE)
output clamp to the free end of the
cable.
NEGATIVE
BATTERY CHARGER
BATTERY
24", 6 GAUGE
CABLE
5. Plug the power cord into an AC 120V
electrical wall outlet. The charger will
be set to the Tester Mode for Regular battery type.
POWER
CORD
6. Press the appropriate control buttons
to select the desired charge rate
and battery type. The CHARGING
(yellow) LED should light and the
charging process should start. If the
CHECK (red) LED is on, check for
correct cable connections.
TO
GROUNDED
POWER
OUTLET
1. Note the polarity of the battery posts
by checking the identification marks
on the battery: POSITIVE (POS, P
or +) and NEGATIVE (NEG, N or -).
The positive post is usually larger
than the negative post.
7. To disconnect the charger, unplug
its power cord before attempting
to disconnect the charger clamps.
Then, standing away from the battery, remove the output clamp from
the NEGATIVE battery post. Finally,
remove the output clamp from the
POSITIVE battery post.
2. Attach at least a 24-inch-long,
6-gauge (AWG), insulated battery
cable to NEGATIVE (NEG, N or
-) battery post. Rock and twist the
clamp back and forth to be sure a
solid electrical connection is made.
8. Clean and store the charger in a dry
location.
3. Connect the red (POSITIVE) output
clamp to the POSITIVE battery post.
Rock and twist the clamp back and
forth to be sure a solid electrical connection is made.
IMPORTANT: Follow all safety instructions and precautions when charging
your battery. Wear complete eye protection and clothing protection. Charge your
battery in a well-ventilated area.
MAINTENANCE AND CARE
A minimal amount of care can keep your battery charger working properly for years.
1. Clean the clamps each time you are finished charging. Wipe off any battery fluid
that may have come in contact with the clamps to prevent corrosion.
2. Coil the input and output cords neatly when storing the charger. This will help prevent accidental damage to the cords and charger.
3. Occasional cleaning of the case of the charger with a soft cloth will keep the finish
shiny and help prevent corrosion.
4. Store the battery charger in a clean and dry location.
battery percent and charge time
This charger adjusts the charging time in order to charge the battery completely, efficiently and safely.
This battery charger has a rated output of 2 and 4 ampere. This output will vary with
the age and condition of the battery being charged. If battery has only been slightly
discharged, it can be charged in less than a few hours. The same battery will take
longer to charge if it is very weak.
charging times
Battery Condition
2 Amp, 12 Volt Battery
Ampere Hour Battery Capacity
50% Discharged
100% Discharged
Approximate Average Charge Time In Hours
10
12
20
3.2
4.0
6.4
6.2
7.5
12.4
Battery Condition
4 Amp, 6 Volt Battery
Ampere Hour Battery Capacity
50% Discharged
100% Discharged
Approximate Average Charge Time In Hours
10
12
20
1.6
2.0
3.2
3.2
4.0
6.4
limited warranty
SCHUMACHER ELECTRIC CORPORATION,
801 BUSINESS CENTER DRIVE,
MOUNT PROSPECT, ILLINOIS 60056-2179
MAKES THIS LIMITED WARRANTY TO THE ORIGINAL PURCHASER AT RETAIL
OF THIS PRODUCT. THIS LIMITED WARRANTY IS NOT TRANSFERABLE.
Schumacher Electric Corporation warrants this battery charger for five years from
date of purchase at retail against defective material or workmanship. If such should
occur, the unit will be repaired or replaced at the option of the manufacturer. It is the
obligation of the purchaser to forward the unit together with the original sales receipt,
transportation and/or mailing charges prepaid to the manufacturer or its authorized
representative.
This limited warranty is void if the product is misused, subjected to careless handling,
or repaired by anyone other than the manufacturer or its authorized representative.
The manufacturer makes no warranty other than this limited warranty and expressly
excludes any implied warranty including any warranty for consequential damages.
THIS IS THE ONLY EXPRESS LIMITED WARRANTY AND THE MANUFACTURER
NEITHER ASSUMES NOR AUTHORIZES ANYONE TO ASSUME OR MAKE ANY
OTHER OBLIGATION TOWARDS THE PRODUCT OTHER THAN THIS EXPRESS
LIMITED WARRANTY. THE MANUFACTURER MAKES NO WARRANTY OF
MERCHANTABILITY OR FITNESS FOR PURPOSE OF THIS PRODUCT AND EXPRESSLY EXCLUDES SUCH FROM THIS LIMITED WARRANTY.
SOME STATES DO NOT ALLOW THE EXCLUSION OR LIMITATION OF INCIDENTAL OR CONSEQUENTIAL DAMAGES OR LENGTH OF IMPLIED WARRANTY SO
THE ABOVE LIMITATIONS OR EXCLUSIONS MAY NOT APPLY TO YOU.
THIS WARRANTY GIVES YOU SPECIFIC LEGAL RIGHTS AND YOU MAY ALSO
HAVE OTHER RIGHTS THAT VARY FROM STATE TO STATE.
WARRANTY VALIDATION: The enclosed “Warranty Validation Card” must be completed and mailed within 10 days of product purchase to activate this limited warranty.
10
MANUAL DEL DUEÑO
Modelo 200A
Para Baterías de Plomo-Ácido de 6 y 12 Voltios
SpeedCharge
™
Cargador de Baterías Totalmente
Automático (de mantenimiento)
de 2 amperios, 12 voltios y
4 amperios, 6 voltios, con
Monitoreo de Modo flotante
PRECAUCIÓN:
Lee todas las Reglas de Seguridad e Instrucciones de Operación y sígalas con cada
uso de este producto.
Schumacher Electric Corporation
Mount Prospect, IL 60056 U.S.A.
Envíe Producto para Reparación bajo Garantía a:
Customer Service Returns
P.O. Box 280,1025 E. Thompson, Hoopeston, IL 60942-0280
¿Preguntas? Llame al Customer Service 1-800-621-5485
0099000532/1205
ÍNDICE DE MATERIAS
IINSTRUCCIONES IMPORTANTES DE SEGURIDAD............................................... 3
PRECAUCIONES PARA SEGURIDAD PERSONAl................................................... 4
ANTES DE USAR EL CARGADOR DE BATERÍAS................................................... 5
Para Enchufarlo..................................................................................................... 5
Uso de Cordón de Extensión................................................................................. 5
Pinzas de la Batería............................................................................................... 5
Enchufe para Accesorios de 12 voltios.................................................................. 5
Conectores de Anillo.............................................................................................. 5
EL USO DEL CARGADOR DE BATERÍAS................................................................. 6
PREPARACIÓN DE LA BATERÍA PARA CARGARSE.............................................. 6
INSTRUCCIONES DE OPERACIÓN........................................................................... 7
Para Cargar la Batería Dentro del Vehículo........................................................... 7
Para Cargar la Batería Fuera del Vehículo............................................................ 8
MANTENIMIENTO Y CUIDADO.................................................................................. 8
PORCENTAJE DE BATERÍA Y TIEMPO DE CARGA................................................ 9
GARANTÍA LIMITADA................................................................................................. 9
GUARDE ESTE MANUAL DEL DUEÑO Y LÉELO ANTES DE CADA USO.
El Cargador de Baterías Totalmente Automático Modelo 200A incluye características
para llenar las necesidades de uso liviano comercial o en el hogar. El manual explica
la manera de usar el cargador con seguridad y eficacia. Sírvase leer y seguir estas
instrucciones y precauciones meticulosamente.
NOTA: Se ha probado este equipo y confirmado que cumple con los límites para un
dispositivo digital Clase B, de acuerdo con la Parte 15 de los Reglamentos de la FCC.
Estos límites tienen el fin de proveer protección razonable contra la interferencia dañina en una instalación residencial. El equipo genera, usa y puede radiar energía de
radiofrecuencia y, si no se instala ni se usa de acuerdo con las instrucciones, podrá
causar interferencia dañina a las comunicaciones de radio. Sin embargo, no hay garantía que la interferencia no se ocurra en una instalación específica. Si este equipo
causa interferencia dañina a la recepción de radio o televisión, lo cual se puede
determinar al encender y apagar el equipo, se le aconseja al usuario tratar de corregir
la interferencia por una o más de las siguientes medidas:
• Reoriente o cambie la antena de recepción a otro sitio.
• Aumente la separación entre el equipo y el receptor.
• Conecte el equipo a un tomacorriente en un circuito diferente de aquel en el cual el
receptor esta conectado.
• Consulte el distribuidor o un radiotécnico experimentado para recibir ayuda.
INSTRUCCIONES IMPORTANTES DE SEGURIDAD
ADVERTENCIA – RIESGO DE GASES EXPLOSIVOS
EL TRABAJAR CERCA DE BATERÍAS DE PLOMO-ÁCIDO ES PELIGROSO.
LAS BATERÍAS GENERAN GASES EXPLOSIVOS DURANTE SU OPERACIÓN NORMAL. POR ESTA RAZÓN, ES DE SUMA IMPORTANCIA QUE,
CADA VEZ QUE UTILICE SU CARGADOR, USTED LEA ESTE MANUAL Y
SIGA SUS INSTRUCCIONES EXACTAMENTE.
Para reducir el riesgo de explosión de la batería, siga estas instrucciones y aquellas
publicadas por el fabricante de la batería y el de cualquier equipo que piensa usar en
la vecindad de la batería. Examine las marcas de precaución en tales productos y en
el motor.
GUARDE ESTAS INSTRUCCIONES
Este manual contiene importantes
instrucciones de seguridad y operación
del cargador de baterías Modelo 200A.
en forma incorrecta puede causar
incendio o choque eléctrico.
• Para reducir el riesgo de choque
eléctrico, desenchufe el cargador del
tomacorriente eléctrico de pared de
120 voltios antes de intentar darle
mantenimiento o limpieza.
• Siempre cargue la batería en un área
bien ventilada.
• ADVERTENCIA: Los cargadores de
baterías se calientan mientras funcionan y necesitan ventilación adecuada.
El aire tiene que fluir alrededor del
cargador entero. No coloque el cargador sobre materiales inflamables tales
como alfombras, tapizado, papel,
cartón, etc. El cargador puede causar
daño al cuero, plástico y caucho.
• ADVERTENCIA: El manejo del
cordón de este producto, o de cordones asociados con los accesorios
vendidos con el mismo, le expone a
usted al plomo, un producto químico
conocido en el Estado de California de causar cáncer y defectos de
nacimiento u otro daño reproductivo.
Lávese las manos después del
manejo.
• Lea todas las instrucciones y precauciones impresas en el cargador de
baterías, en la batería y en el vehículo
o equipo utilizando la batería.
• Use el cargador de baterías solamente en baterías recargables de
plomo-ácido tales como las usadas
en automóviles, camiones, tractores,
aviones, furgonetas, RVs, motores de
marcha lenta, etc. Este cargador no
es para alimentar un sistema eléctrico
de bajo voltaje salvo para arranque de
motor.
• Nunca use el cargador para cargar
pilas secas usadas en artefactos
domésticos tales como radios, estéreos, controles remotos, etc. Dichas
baterías pueden explotar y causar
lesiones personales.
• No desarme el cargador. Llévelo a un
profesional calificado cuando necesite
servicios o reparación. Si se rearma
Ayúdenos a ayudarle ——
Acuérdese:
Coloque el cargador a la mayor distancia que los cables del cargador permitan
de la batería que se está cargando.
No exponga el cargador a lluvia o nieve.
Nunca cargue una batería congelada.
Si el líquido de la batería (electrolito)
está congelado, lleve la batería a un
lugar templado parea descongelarla
antes de comenzar la carga.
Nunca deje caer ácido de la batería
sobre el cargador mientras verifique la
gravedad específica o llene la batería.
Nunca asiente la batería sobre el cargador.
Nunca coloque el cargador directamente encima de la batería que se está
cargando. Los gases de la batería corroen y dañan al cargador.
Nunca tire del cordón para desenchufar
el cargador. Esto puede causar daños al
cordón o al enchufe.
No opere el cargador si tiene cordón
de potencia o enchufe dañado. Hace
reemplazar el cordón.
Nunca junte las pinzas de la batería
cuando el cargador está activado. Se
puede causar chispa.
Conecte y desconecte las pinzas CC
solo después de quitar el cordón de
potencia CA del cargador del tomacorriente de la pared. No deje que una pinza
toque a la otra.
Nunca opere el cargador si ha recibido
golpe fuerte, ha caído o sufrido algún
otro daño. Llévelo a un profesional calificado para inspección y reparación.
Asegúrese de colocar el cable del
cargador en forma que no se le pueda
pisar, tropezarse con el o sufrir daños.
PRECAUCIONES PARA SEGURIDAD PERSONAL
• Use protección total para los ojos y
para la ropa al trabajar con baterías
de plomo-ácido.
• Asegúrese de que haya alguien que
lo pueda oír o esté suficientemente
cerca para venir en su ayuda cuando
trabaja con o cerca de una batería de
plomo-ácido.
• Tenga cerca abundante agua fresca y
jabón para usar si si ácido de la batería entra en contacto con los ojos, la
piel o la ropa. Si esto sucede, lávese
inmediatamente con agua y jabón.
Luego obtenga atención médica.
• Evite tocarse los ojos al trabajar con
una batería. Use gafas de seguridad. ¡Partículas de ácido (corrosión)
pueden entrar en los ojos! Si esto
sucede, lávelos inmediatamente con
abundante agua corriente fría por 15
minutos al menos. Luego obtenga
atención médica en seguida.
• Nunca cargue una batería congelada.
• Quítese todo objeto de metal tales
como anillos, brazaletes, collares y relojes al trabajar cerca de una batería
de plomo-ácido.
• Use el cargador para cargar una
batería de plomo-ácido solamente. No
es su propósito proveer energía a un
sistema eléctrico de bajo voltaje, con
excepción de una aplicación automovilística. No use el cargador para
•
•
•
•
•
•
cargar pilas secas usadas en artefactos domésticos. Pueden explotar y
causar lesiones personales o daño a
la propiedad.
Quítese del cuerpo todo artículo personal metálico como anillos, brazaletes, collares y relojes, al trabajar
con una batería de plomo-ácido. La
batería puede causar un cortocircuito
de suficiente poder para hacer soldar
un anillo (o algo similar) a metal, produciendo una quemadura grave.
Cuide de no dejar caer una herramienta u otro objeto de metal sobre la
batería. Esto puede causar chispas o
cortocircuito por la batería o en otro
dispositivo eléctrico y producir una
explosión.
Siempre opere la batería en un área
abierta y bien ventilada.
Nunca fume ni permita que haya chispas o llamas cerca de la batería o del
motor; las baterías producen gases
explosivos.
Neutralice cualquier derrame de ácido
completamente con bicarbonato de
soda antes de intentr la limpieza.
Al ser necesario quitar la batería
del vehículo para cargarla, siempre
quite primero el terminal a tierra de
la batería. Asegúrese que todos los
accesorios en el vehículo queden
apagados, para no causar arco.
ANTES DE USAR EL CARGADOR DE BATERÍAS
Es importante comprender los requisitos del cargador. Esta sección explica sus requisitos eléctricos y la manera de preparar una batería para cargarla.
PARA ENCHUFARLO
El cargador requiere un tomacorriente
eléctrico de 120V CA instalado de acuerdo con todos los códigos y ordenanzas locales.
conectar las pinzas de salida a la
batería. Después de completar una
sólida conexión eléctrica a la batería,
enchufe el cordón de potencia en un
tomacorriente eléctrico de pared de
120V CA.
TOMACORRIENTE A TIERRA
Enchufe de Accesorio de 12
Voltios
Cargue o mantenga la batería sin alzar el capó. Conecte el adaptador de
12 voltios al cargador y enchúfelo en
el tomacorriente de accesorio de 12
voltios. Encamine el cordón de potencia desde el cargador y por la ventana
abierta del vehículo y enchúfelo en un
tomacorriente eléctrico de pared de
120 voltios CA. Asegúrese de colocar
el cargador sobre una superficie
seca, no inflamable, como metal u
hormigón.
TERMINAL DE TIERRA
USO DE CORDÓN DE EXTENSIÓN
No se recomienda usar cordón de
extensión. Si hay que usar cordón de
extensión, asegúrese de seguir estas
pautas:
• Que las clavijas del enchufe del
cordón de extensión sean del mismo
número, tamaño y forma que las del
enchufe del cargador.
Conectores de Anillo
Los conectores de anillo se acoplan
permanentemente a la batería y así
proveen acceso fácil para cargar la
batería rápidamente. Esta aplicación
es apropiada para motocicletas,
tractores de césped, ATVs y nievemóviles. Para acoplar una batería en
forma permanente, afloje y quite cada
tuerca de los pernos en el terminal
de la batería. Conecte el conector
de anillito rojo POSITIVO al terminal
POSITIVO de la batería. Conecte el
conector de anillo negro NEGATIVO
al terminal NEGATIVO de la batería.
Vuelva a colocar las tuercas, apretándolas para asegurarlas. Cuide de
mantener tanto los alambres como
el enchufe alejados de metal y del
capó del motor. Enchufe el cordón de
potencia en un tomacorriente eléctrico
de pared de 120 voltios CA.
• Que el cordón de extensión esté
correctamente cableado y en buenas
condiciones eléctricas.
• Que el calibre del alambre es suficientemente grande para el amperaje
CA (corriente alterna) del cargador, tal
como se especifica a continuación:
CORDÓN DE EXTENSIÓN MÍNIMO RECOMENDADO
Largo del cordón (píes)
25
50 100 150
Tamaño AWG del cordón
18
18
16
14
*AWG=American Wire Gauge
Versátil Arnés de Conexión
Rápida
En solo segundos, se puede nsertar
cualquier de los tres conectores en sitio:
Pinzas de la Batería
Conecte las pinzas al cargador. Siga
las Instrucciones de operación para
EL USO DEL CARGADOR DE BATERÍAS
El 200A no tiene interruptor de encender y apagar. Estas acciones se controlan al
enchufar el 200A en un tomacorriente eléctrico de pared de 120 voltios CA solamente
después de hacer las conexiones de la batería.
*Indica condición de sobrecarga
causada por cortocircuito de las pinzas
de la batería, conexión de polaridad
invertida a una batería, o estar cargando
una batería con poblemas.
Indicadores LED
Cargando
Cargada/
Manpener
Examine
Batería*
Ámbar
Verde
Rojo
PREPARACIÓN DE LA BATERÍA PARA CARGARSE
Es importante leer y seguir estas pautas al prepararse para cargar la batería:
• Asegúrese de tener batería de plomoácido de 6 voltios o 12 voltios, al
consultar el manual de dueño del vehículo. Cargue la batería inicialmente
a la tasa más baja del cargador.
sar los gases usando como abanico
una pieza de cartón u otro material no
metálico.
• Si es necesario sacar la batería del
vehículo para cargarla, siempre quite
de la batería primero el terminal
puesto a tierra. Apague todos los accesorios del vehículo para que no se
produzcan chispas.
• Limpie los terminales de la batería.
Tenga cuidado de evitar que la corrosión entre cerca de o dentro de los
ojos.
PELIGRO - Nunca altere el enchufe
CA suministrado. Si no entra bien en el
tomacorriente, haga que un electricista
calificado instale el tomacorriente correcto. Una conexión incorrecta puede
producir riesgo de choque eléctrico.
• Use gafas de seguridad. Véase “Precauciones de Seguridad Personal” en
la página 4.
• Para baterías con tapas de venteo
removibles, si se requiere añade agua
destilada a cada elemento hasta que
el ácido de la batería llegue al nivel
recomendado por el fabricante. Esto
ayuda a purgar gases excesivos de
los elementos. Tenga cuidado de
no sobrellenar. Si tiene una batería
sellada con tapas de venteo no removibles, no se necesita tomar ninguna
acción.
ADVERTENCIA – Conecte y desconecte las pinzas de la batería solamente
cuando el cordón de potencia CA está
desconectado, de otro modo puede
haber arco.
• NOTA: Una batería marina (de bote)
instalada en un bote tiene que quitarse y cargarse en tierra.
• Lea todas las precauciones específicas del fabricante, tales como quitar
o no quitar las tapas de los elementos
mientras se carga, y las tasas de
carga recomendadas.
• Asegúrese que el área alrededor de
la batería esté bien ventilada mientras
se carga la batería. Se puede expul
INSTRUCCIONES DE OPERACIÓN
IMPORTANTE: Siga todas las instrucciones de seguridad al cargar la batería. Use
protección total para los ojos y la ropa. Cargue la batería en un área bien ventilada.
Para Cargar la Batería Dentro del Vehículo
alejada de la batería (véase la figura
a la izquierda). NO conecte la pinza
al poste negativo de la batería, al
carburador, línea de combustible o
pieza de plancha. Para conectar
a un sistema positivo a tierra:
Conecte la pinza de salida negra
(NEGATIVO) al poste NEGATIVO de
la batería. Mueva y tuerza la pinza
adelante y atrás para asegurar una
sólida conexión eléctrica. Luego conecte la pinza de salida roja (POSITIVO) a una parte de metal gruesa
y sin pintura del chasis o bloque
del motor, alejada de la batería NO
conecte la pinza al poste positivo de
la batería, al carburador, línea de
combustible o pieza de plancha.
1. Evite lesiones personales al mantenerse alejado de las hojas del
ventilador, las correas, poleas y
otras piezas del motor.
2. Para evitar daño al cargador,
mantenga el cordón de potencia y
los cordones de salida alejados del
capó, de la puerta, o de las piezas
móviles del motor.
3. Note la polaridad de los postes de la
batería viendo las marcas de identificación en la batería: POSITIVO
(POS. P o +) y NEGATIVO (NEG.
N o -). El poste positivo es por lo
general más grande que el negativo.
4. Identifique cual poste de la batería
va a tierra y está conectado al chasis. ESTO NORMALMENTE ES EL
POSTE NEGATIVO.
6. Enchufe el cordón de potencia en un
tomacorriente eléctrico de pared de
120V CA.
7. La luz LED CARGANDO (amarillo)
debe encenderse y el proceso de
cargar comenzar. Si la luz EXAMINE
(roja) esta encendida, asegúrese
que las conexiones de los cables
sean correctas.
8. El cargador deja de cargar automáticamente después de que batería
esté a plena carga. Esto se indica
por el LED CARGADO (verde) y el
cargador ha dejado de cargar y ha
cambiado a Modo de Mantenimiento
de operación.
SISTEMA NEGATIVO A TIERRA
9. Para desconectar el cargador,
desenchufe el cordón de potencia
del tomacorriente de pared de 120
voltios CA antes de tratar de desconectar las pinzas de salida. Luego,
alejado de la batería, quite la pinza
de salida del chasis o del bloque del
motor. Finalmente, quite la pinza de
salida del poste de la batería.
5. Para conectar a un sistema
negativo a tierra: Conecte la pinza
de salida roja (POSITIVO) al poste
POSITIVO de la batería. Mueva
y tuerza la pinza adelante y atrás
para asegurar una sólida conexión
eléctrica. Luego conecte la pinza
de salida negra (NEGATIVO) a una
parte de metal gruesa y sin pintura del chasis o bloque del motor,
10.Limpie y guarde el cargador en un
sitio seco.
Para Cargar La Batería Fuera del
Vehículo:
POSITIV0
5. Enchufe el cordón de potencia en un
tomacorriente eléctrico de pared de
120 voltios CA. El cargador estará
puesto en Tester Mode (Modo de
Probar) para el tipo Regular de batería.
NEGATIV0
CARGADOR DE
BATERÍAS
BATERÍA
CABLE DE 24”
CALIBRE 6
6. Oprima los botones de control
apropiados para escoger la tasa
de carga y tipo de batería que se
desea. La luz LED CARGANDO
(amarillo) debe encenderse y el
proceso de cargar comenzar. Si se
enciende la luz LED EXAMINE (roja)
asegúrese de tener conexiones de
cable correctas.
CORDÓN
DE
POTENCIA
AL
TOMACORRIENTE DE
POTENCIA
A TIERRA
1. Verifique la polaridad de los postes
de la batería al ver las marcas de
identificación en la batería: POSITIVO (POS, P o +) y NEGATIVO
(NEG. N o -). El poste positivo
generalmente es más grande que el
negativo.
7. Para desconectar el cargador,
desenchufe el cordón de potencia
antes de tratar de desconectar las
pinzas del cargador. Luego, alejado
de la batería, quite la pinza de salida
del poste NEGATIVO de la batería.
Finalmente, quite la pinza de salida
del poste POSITIVO de la batería.
2. Conecte un cable de batería aislado
de por lo menos 24” de largo y
calibre 6 (AWG) al poste NEGATIVO
(NEG, N o -) de la batería. Mueva
y tuerza la pinza adelante y atrás
para asegurar una sólida conexión
eléctrica.
8. Limpie y guarde el cargador en un
sitio seco.
IMPORTANTE: Siga todas las instrucciones de seguridad y precauciones al
cargar la batería. Use protección total
para los ojos y la ropa. Cargue la batería
en un área bien ventilada.
3. Conecte la pinza de salida roja
(POSITIVO) al poste POSITIVO de
la batería. Mueva y tuerza la pinza
adelante y atrás para asegurar una
sólida conexión eléctrica.
4. Quédese lo más lejos posible de la
batería y luego conecte la pinza de
salida negra (NEGATIVO) al extremo
libre del cable.
MANTENIMIENTO Y CUIDADO
Un mínimo de cuidado puede mantener el cargador de baterías funcionando bien por
años.
1. Limpie las pinzas cada vez que complete la carga. Quite cualquier fluido de la
batería que haya hecho contacto con las pinzas, para evitar la corrosión.
2. Enrolle nítidamente los cordones de entrada y salida al guardar el cargador. Esto
ayuda a evitar daño accidental a los cordones y al cargador.
3. La limpieza de la caja del cargador de vez en cuando con un paño suave mantiene
al acabado brilloso y ayuda a evitar la corrosión.
4. Guarde el cargador de baterías en un sitio limpio y seco.
PORCENTAJE DE BATERÍA Y TIEMPO DE CARGA
Este cargador ajusta el tiempo de carga para poder cargar la batería de modo
completo, eficaz y seguro.
Este cargador de baterías tiene régimen de salida de 2 amperios y de 4 amperios.
Esta salida varía con la edad y la condición de la batería que se carga. Si la batería
está con solo poco de descarga, puede cargarse en pocas horas. La misma batería
llevará más tiempo para cargarse si está muy débil.
TIEMPOS DE CARGA
Condición de la Batería
Batería de 2 amperios,
12 voltios
Capacidad de Batería
en Amperio-horas
El 50% Descargada
El 100% Descargada
Promedio Aproximado de Tiempo
de Carga en Horas
10
12
20
3.2
4.0
6.4
6.2
7.5
12.4
Condición de la Batería
Batería de 4 amperios, 6 voltios
El 50% Descargada
Capacidad de Batería
en Amperio-horas
El 100% Descargada
Promedio Aproximado de Tiempo
de Carga en Horas
10
12
20
1.6
2.0
3.2
3.2
4.0
6.4
GARANTÍA LIMITADA
SCHUMACHER ELECTRIC CORPORATION,
801 BUSINESS CENTER DRIVE,
MOUNT PROSPECT, ILLINOIS 60056-2179
HACE ESTA GARANTÍA LIMITADA AL COMPRADOR ORIGINAL AL POR MENOR
DE ESTE PRODUCTO. ESTA GARANTÍA LIMITADA NO ES TRANSFERIBLE.
Schumacher Electric Corporation garantiza este cargador de batería por cinco años
contados a partir de la fecha de compra, contra defectos de material o fabricación. Si
tal cosa ocurre, la unidad será reparada o reemplazada, según opción del fabricante.
Es obligación del comprador enviar la unidad, acompañada de un comprobante de
compra, al fabricante o a su representante autorizado, con el costo del transporte y /
o del envío por correo ya pagado.
Esta garantía limitada no es válida si el producto ha sido maltratado, sometido a
manejo negligente, o reparado por cualquier persona o entidad que no sea el fabricante o su representante autorizado.
El fabricante no hace ninguna otra garantía aparte de la presente garantía limitada,
y expresamente excluye cualquier garantía implícita, inclusive garantía por daños
indirectos.
LA PRESENTE ES LA ÚNICA GARANTÍA EXPRESA Y LIMITADA Y EL FABRICANTE NI ASUME NI AUTORIZA A NADIE A ASUMIR NI ENTRAR EN NINGÚN
OTRO COMPROMISO CON RELACIÓN A ESTE PRODUCTO QUE NO SEA ESTA
GARANTÍA EXPRESA Y LIMITADA. EL FABRICANTE NO HACE NINGUNA GARANTÍA DE COMERCIABILIDAD NI DE APTITUD PARA EL PROPÓSITO DE ESTE
PRODUCTO Y EXPRESAMENTE LAS EXCLUYE DE ESTA GARANTÍA LIMITADA.
ALGUNOS ESTADOS NO PERMITEN LA EXCLUSIÓN O LIMITACIÓN DE DAÑOS
INCIDENTALES O INDIRECTOS O DEL PERÍODO DE LA GARANTÍA IMPLÍCITA,
DE MODO QUE LAS LIMITACIONES O EXCLUSIONES CITADAS ARRIBA QUIZÁS
NO SEAN APLICABLES A USTED.
ESTA GARANTÍA LE CONCEDE A USTED DERECHOS LEGALES ESPECÍFICOS,
Y ES POSIBLE QUE TENGA TAMBIÉN OTROS DERECHOS QUE VARÍAN DE
ESTADO EN ESTADO.
VALIDACIÓN DE LA GARANTÍA: La “Warranty Validation Card” (Tarjeta de Validación de la Garantía) adjunta, tiene que completarse y enviarse por correo dentro de
10 días de la compra del producto para activar esta garantía limitada.
10