1
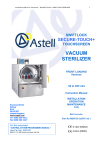
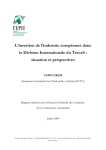
INSTRUCTION MANUAL
EM-S1000
Commercial Microwave Oven
Power Source
Max. Output Power
Cavity Size
Overall Dimensions
(WxDxH)
Net Weight
230V AC, 50Hz
1000 Watts
0.8 cu-ft
520mm x 412mm x 296mm
Approx. 17 kgs
Read these instructions carefully before use.
If you follow these instructions, your Microwave Oven will serve you long and well.
EUK/ECO
English
TABLE OF CONTENTS
Description Of Oven Parts
2
Installation
3
How To Use Your Microwave Oven Safely
4-5
Care of Your Microwave Oven
5
Oven Control Panel
6
Microwave Oven Cooking Know-How
7
Operating Instructions
7-10
Power Level List
11
Program (2 Stage) Cooking
12-13
Precautions While Heating
14
Usable Cooking Utensils And Materials
14
Checking Accumulative Cooking Time, Number Of Door Operations And
Control Of The Buzzer Sound
15
How To Confirm The Frequency Of Each Course Used
16
Care And Cleaning
17
What To Do If Repairs Are Needed
17
DESCRIPTION OF OVEN PARTS
5
EM-S1000
3
2
4
1.
2.
3.
4.
5.
1
CERAMIC TRAY
CONTROL PANEL
VENTS
SAFETY INTERLOCK SYSTEM
CAVITY COVER
2
INSTALLATION
CONNECTING TO THE MAINS
Before you use your oven, check that the voltage shown
on the data label located on the face of the oven confirms with your mains supply. The mains lead is fitted
with a non-removable moulded-on 13 amp plug containing a 13 amp fuse. If the fuse requires replacing at any
time, the fuse cover should be removed using a small
screwdriver to lever it out. The old fuse should be
replaced by a 13 amp ASTA approved BS1362 fuse and
the fuse cover must be refitted before the plug is used
again.
The wire which is coloured green-and-yellow must be
connected to the terminal in the plug which is marked
with the letter E or by the earth symbol
or coloured
green or green-and-yellow.
The wire which is coloured blue must be connected to
the terminalwhich is marked with the letter N or coloured
black.
The wire which is coloured brown must be connected to
the terminal which marked with the letter L or coloured
red.
If the plug supplied on the mains lead is not suitable for
the socket in your home, it should be cut off and disposed of safety, or destroyed, to avoid any possible
shock hazard resulting from the plug being inserted into a
13 ampsocket elsewhere in hte house. A suitable
replacement plug should then be fittd as given below. (If
a 13 amp plug and socket are not used, the circuit supplying the ovenshould contain a 13 amp fuse.)
FUSE The appliance must be protected by a 13-amp
fuse, fitted to the 13-amp mains plug (BS1363).
POSITIONING THE OVEN
1. Install the oven on a flat, level surface sttong enough
to safely bear the weight of the oven.
If the fuse cover is lost or damaged, the plug must not be
used until a replacement is obtained. Replacement fuse
covers are available from Sanyo Service Centres. It is
important that the colour of the replacement fuse cover
corresponds with the coloured insert or as embossed in
words on the base of the plug.
2. Do not locate the oven near areas where heat and
moisture are generated as this may lower oven efficiency.
WARNING - THIS APPLIANCE MUST BE EARTHED
4. This oven conforms to EEC Radio interference
Directive 87/308/EEC, however some interference may
occur if it is placed too close to a radio or TV, so keep
them as far apart as possible.
3. Covering the air vents may lead to the malfunctioning, therefore a minimum of 5 cm is required above, to
each side and to the rear of the oven.
IMPORTANT The wires in this mains lead are coloured
in accordance with the following code:
5. A minimum free space of 17 cm above the oven
should be present.
Green-and-yellow: Earth. Blue: Neutral. Brown: Live
As the colours of the wires in the mains lead of this appliance may not correspond with the coloured markings
identifying the terminals in your plug, proceed as follows:
WARNING
(a) Do not adjust or repair microwave oven yourself. Do not operate the oven if it is dam aged,
until it has been repaired by a service enginer trained by the manufacturer.
(b) It is dangerous for anyone other than a properly qualified engineer trained by the manufacturer to carry out adjustments or repairs.
(c) If the power supply cord is damaged, it must be relaced by the manufacturer, as a specially
prepared cord is required.
(d) On no account remove or interfere with any parts or screws.
THIS COULD PROVE VERY DANGEROUS.
SAVE THESE INSTRUCTIONS
3
HOW TO USE YOUR MICROWAVE OVEN SAFELY (Important)
Although your oven is provided with safety
features, it is important to observe the following:
6. It is important to keep the oven interior clean. Food
particles left on the oven walls reduce the efficiency
of the microwaves.
1. Do not tamper with safety interlocks.
7. Never completely seal containers in the microwave
oven. Coverings are necessary but containers must
not be airtight.
2. Do not place any object between the oven and the
door or allow any food residue to accumulate on
sealing surfaces. Wipe the door sealing area
frequently with a mild detergent rinse and wipe dry.
Never use abrasive powders or pads.
8. Do not cook eggs in their shells or reheat hard boiled
eggs in their shells because they will explode.
Puncture the membrane around the yolk
before cooking eggs.This prevents the yolk swelling
faster than the membrane and the egg exploding
when heated quickly.
3. When opened, the door must not be subjected to
strain, for example, a child hanging on an opened
door may cause the oven to fall forward resulting in
injury.
9. Small quantities of food with low moisture content or
high fat or sugar content can burn, dry out or catch
fire if cooked or re-heated too long.
Please note that the heating/cooking period required
is extremely short: for example it only takes
approximately 15 seconds to heat one mince pie or
similar.
In the unlikely event of a fire occurring, turn off the
oven and its electrical supply, pull out the plug, but
KEEP THE OVEN DOOR CLOSED.
4. If any damage is apparent, do not operate the oven.
Contact your nearest SANYO SERVICE CENTER.
5.Utensils should be checked to ensure that they are
suitable for use in microwave oven.
6.If smoked is observed, switch off or unplug the appliance and keep door closed in order to stifle any flames.
NOTE
It is quite normal for steam to be emitted around
the door, for misting to occur on the door, or even for
water droplets to appear below the door during the
cooking cycle. This is merely condensation from the
heat of the food and does not affect the safety of your
oven.The door is not intended to seal the oven cavity
completely but its special SANYO design contributes
to the complete safety of the appliance.
10.Always pierce food which has a skin or membrane ,
for example, potatoes, tomatoes, apples, sausages
etc. If you don't pierce them steam will build up inside
and they may explode.
11. When disposable containers of plastic, paper or other
combustible materials are used to reheat food, it is
advisable to check from time to time during the
cooking cycle.
WARNING
1. Do not heat foods or liquids in bottles or jars with lids
on. Air must be allowed to escape from the container.
12.If the door or door seals are damaged, the oven must
not be operated until it has been repaired by a competent person.
2. Milk or food for babies should be heated on POWER
LEVEL 4. It should then be stirred thoroughly and
tested to ensure that it is at the correct temperature
before giving it to the baby.
13.It has hazardous for anyone other than a competent
person to carryout any service or repair operation
wihch involves the removal of a cover which gives
protection agaisnt exposure to microwave energy.
3. When boiling water or other liquids, be sure to use a
wide mouthed container, this will allow air bubbles to
escape freely and prevent boiling over. Overheating
the liquid beyond boiling point can occur without the
evidence of boiling. This could result in a sudden boil
over of the hot liquid.
14.Microwave heating of beverages can result in delayed
eruptive boiling therefore care has to be taken when
handling the container.
15.Feeding bottles and baby food jars shall be open
when heted and the contents are to be sitrred or
shaken, and the temperature is to be checked before
consumption, in order to avoid burns.
4. Do not attempt to operate the oven while empty as
this will cause damage.
5. Do not deep fry in the microwave oven as the
temperature of the oil cannot be controlled and it may
over heat.
16.Liauid and other foods must not be heated in sealed
containers since they are liable to explode.
4
HOW TO USE YOUR MICROWAVE OVEN SAFELY (cont.)
Although your oven is provided with safety features, it is important to observe the following:
a) It is important not to defeat or tamper with safety interlocks.
b) Do not place any object between the oven face and the door or allow residue to accumulate on sealing surfaces. Wipe
the sealing area frequently with a mild detergent, rinse and wipe dry. Never use abrasive powders or pads.
c) When opened, the door must not be subjected to strain, for example, a child hanging on an open door or any load
which could cause the oven to fall forward and cause injury and damage the door. Do not operate the oven if it is
damaged, until it has been repaired by a qualified person. It is particularly important that the oven door close properly and that there is no damage to the:
i) Door (bent), ii) Hinges and Latches (broken or loosened), iii) Door seals and sealing surfaces.
d) The oven should not be adjusted or repaired by anyone except properly qualified service personnel.
CARE OF YOUR MICROWAVE OVEN
1. Disconnect the AC plug from the outlet before cleaning.
2. Keep the inside of the oven clean. When food spatters
or spilled liquids adhere to oven walls, wipe with a
damp cloth. Mild detergent may be used if the oven
gets very dirty. The use of harsh detergent or abrasives
is not recommended.
4. If the Control Panel becomes wet, clean with a soft, dry
cloth. Do not use harsh detergents or abrasives on
Control Panel.
5. If steam accumulates on both sides of the oven door,
wipe with a soft cloth. This may occur when the microwave oven is operated under high humidity conditions
and this is not an indication of a malfunction in the unit.
3. The outside oven surface should be cleaned with soap
and water, rinsed and dried with a soft cloth. To prevent damage to the operating parts inside the oven,
water should not be allowed to seep into the ventilation
slots.
How to clean the exhaust opening
Duct Cover
1. Remove the two plastic pins and take off the duct cover.
2. Wipe any spills and splashes on the surface of the exhaust opening
with a mild detergent solution, rinse and wipe dry. Wash the duct
cover in mild sudsy water, rinse and wipe dry.
3. To reassemble, place the duct cover in position and push in the pins
firmly.
5
Plastic
Pins
OVEN CONTROL PANEL
1
3
2
4
5
6
7
DISPLAY:
1. LED Display - Cooking time, power level, function
indicators are displayed.
3. Power Key - For entering the desired power output
into the unit memory.
4. Timer Key - For entering the desired cooking time
into the units memory.
5. Memory Key - For entering the desired power output
and cooking time.
6. Clear Key - For cancelling setting, interrupting the
setting process when a mistake has been made, or
stopping cooking before completion of the cooking
process.
7. Start key - For timer cooking. For start of programmed cooking.
KEYS:
2. Program Selection Keys - The unit is ready to
begin operation as soon as the heating time has
been programmed, using these ten keys (numbered
1 to 0). The time selected will be displayed, and
“counts down” after the process has begun.
For determining power output and cooking time during programming.
6
MICROWAVE OVEN COOKING KNOW-HOW
1. Cooking times with quantity
Input the cooking time that is appropriate to
the quantity of foods being prepared.
When heating double or triple quantity, use
the appropriate multiple-quantity key.
2. Hints for even cooking
Turn bulky foods over (180 degrees) halfway
through the cooking.
When cooking two or more items, rotate
them halfway through the cooking.
When cooking foods with parts of different
thicknesses, protect the thinner, faster-cooking
part with aluminum foil halfway through the
cooking to protect them from overcooking.
When cooking soups or sauces, stir them
(once or twice) halfway through the cooking.
Note: Before use, the user should check that
utensils are suitable for use in microwave
oven. (Please refer to pg.14)
OPERATING INSTRUCTIONS (1)
TIMER (MANUAL) COOKING
1) Connect AC cord to power outlet.
2) Open the door. The oven lamp will turn on.
Operational flow
1.
Display Window
Put food in suitable containers on the ceramic
or glass tray in the oven cavity and close the
door. The oven lamp will go out.
“0” will appear on the display
2.
Touch “Power” Key
“PL 10” and a bar under Stage 1
will appear on the display.
3.
Input POWER level 8 with the
PROGRAM keys
Touch: number “8”.
“PL 8“ will be displayed.
Touch “Time” key
“
Input the desired time with the
PROGRAM keys.
Touch number “1” of the desired
1 minute 30 seconds.
“1” will appear on the display.
Touch number “3”
“3” will appear on the right of “1”,
“13” shows in the display window.
Touch number “0”
“1.30” then shows in the display
window.
4.
5.
6.
7.
8.
9.
. 0” will appear on the dislpay.
Touch Start Key
Cooking starts and the bar under
Stage 1 blinks.
Cooking time ends.
Remove the food from oven.
The “beep” tone sounds, “0” will
show. The oven lamp will go out.
Note: When you operate Max Power, it is not necessary to touch “Power” key. Max power operation will
automatically be selected so you can omit operations 2 and 3. Max input time is ten minutes.
7
OPERATING INSTRUCTIONS (2)
USING THE PROGRAM KEY FOR MEMORY STORAGE
1.
Programmed (1-Stage) Cooking at maximum power.
(Example) To program the following on program No. 3: ( Power Level ...max power for 30 seconds.)
Operational flow
1.
2.
Display Window
Touch “Memory” Key (1st time)
“0” will appear on the display
Touch “Memory” key (2nd time)
No change
Touch PROGRAM key number
“3”
No change
3.
4.
5.
The bar under Stage 1 and
lower colon will appear on the
display.
Touch “Time” key
Input the operating time with
PROGRAM keys
First, touch number “3”
The “3” will appear on the
display
Then touch number “0”
The “0” will appear behind the
“3”
Then, touch “Memory” key.
“0” will appear on the display
6.
7.
Note: The oven will automatically select max. power first. To select a lower power for memory stage,
see next page.
8
OPERATING INSTRUCTIONS (3)
USING THE PROGRAM KEY FOR MEMORY STORAGE
1.
Programmed (1-Stage) Cooking at lower power level.
(Example) To program the following on program No. 4: ( Power Level 5 for 45 seconds.)
Operational flow
1.
Display Window
Touch “Memory” Key (1st time)
“0” will appear on the display
Touch “Memory” key (2nd time)
No change
Touch PROGRAM key
number “4”
No change
4.
Touch “Power” Key
The bar under Stage 1 and “ PL
10” will appear on the display.
5.
Input “power level 5” with
PROGRAM key Touch
number “5”
“PL 5” will appear on the display.
Touch “Time” key
Lower colon and “0” will appear on
the display.
2.
3.
6.
7.
8.
9.
Input the operating time with
the PROGRAM keys.
Touch number “4”
The “4” will appear on the display
The “5” will appear behind the “4”.
“45” then shows in the display
window
Then, touch number “5”
Then, touch “Memory” key
‘0” will appear on the display.
9
OPERATING INSTRUCTIONS (4)
HEATING METHOD
1.
Ordinary Use
(Example) When program No. 3 is programmed as:
First stage ( Max power for 30 seconds.) and Second stage (Power Level 2 for 1 min.)
Operational flow
1.
2.
Display Window
Place food in oven
“0” will appear on the display
Touch PROGRAM key
number “3” (Heating Starts).
Stage 1 bar blinks. Stage 2 bar &
lower colon lights. Heating time
“30” will show and count down.
After 1st stage is completed,
Stage 2 bar binks. Heating time
“1.00” will show and count down.
3.
The “beep” tone sounds, “0” will
show.
Cooking time ends
Remove the food from oven.
10
POWER LEVEL LIST
POWER LEVEL
(Input figure)
max power (no input)
9
8
7
6
5
4
3
2
1
0
Max. Input time
Manual Set
10 min. 00 sec.
“
“
“
“
30 min. 00 sec.
“
“
“
“
“
POWER (W)
EM-S1000
1000
900
800
700
600
500
400
300
200
100
0
One Touch Course
6 min. 00 sec.
“
“
“
“
30 min. 00 sec
“
“
“
“
“
NOTE:
1. A “beep” tone sounds whenever any key is touched.
2. If the desired numeral is not displayed, touch “Clear” and restart (procedures) from the beginning.
3. If an operating time over the Max, input time is selected, subsequent key operation is impossible.
4. To enter 1 minute (60 seconds) input “100”.
5. The storing process is completed by touching “Memory” key.
If “Memory” key is not touched, the new settings will not be stored and the previous memory information
will be retained.
11
PROGRAM (2-STAGE) COOKING
1.
Programmed (2 Stage) Cooking
(Example) To program the following on program No. 3:
First stage (Max power for 30 seconds.)
Second stage (Power Level 2 for 10 minutes.)
Operating flow 1-6 of 1-stage cooking, then: (see page 8)
Operational flow
7.
8.
9.
10.
Display Window
Stage 2 bar lights and “PL10” will
appear in the display.
Touch “Power” Key
Input POWER level 2 with the
PROGRAM keys
Touch : number “2”
“PL 2” will appear in the display.
Lower colon lights and “0” will
appear in the display.
Touch “Time” key
Input the desired time with the
PROGRAM keys
Touch number “1” of the
desired 10 minutes
“1” will appear on the display
11.
12.
13.
14.
Touch number “0”
“0” will appear on the right of “1”,
“10” shows in the display window
Touch another “0”
“100” then shows in the display
window
Touch another “0”
“1000” then shows in the display
window
Touch “Memory” key
(ending input)
“0” will appear on the display.
12
PROGRAM (2-STAGE) COOKING (cont.)
2.
Confirmation of Memory
(Example) When program No.3 is programmed as:
First stage (Max power for 30 seconds.)
Second stage (Power Level 2 for 10 minutes.)
Operational flow
1.
Display Window
Open door
“0” will appear on the display
2.
Touch number “3”
Stage 1 bar lights. Programmed
No. 3 Input Time 30 sec. (“ .30”)
will appear on the display. After 2
sec., Input Power Level “PL 10”
will appear for 2 sec. and then
return to input time.
3.
Touch another “3”
Stage 2 bar lights. Programmed
No. 3 Input Time 10 min. (“10.00”)
will appear on the display. After 2
sec., Input Power Level “PL 2” will
appear for in 2 sec. and then
return to input time.
Touch “Clear” key
The “0” will appear on the display.
4.
NOTE:
1. Touch “Clear” key after confirming the contents of the units memory.
2. If you wish to change a program memory, touch the “Memory” key twice and then input again as shown in
pages 10 - 14.
13
PRECAUTIONS WHILE HEATING
1. Checking foods during cooking
When it is necessary to open the door while
food is cooking, the cooking program is automatically suspended, the display remains lit and
remaining time is displayed.
5. Cooking time for triple quantity
The cooking time for triple quantity is 2.3 times the
cooking time for one quantity.
6. Limitations on multiple-quantity cooking
When more than “Power Level 6” is being used,
the maximum heating time is 12 minutes. When
2. Resuming cooking after checking
To resume cooking after opening the door to check
less than “Power Level 5” is being used, the
maximum heating time is 60 minutes.
food, close the door and touch “Start” key.
3. Stopping cooking time
The cooking time may be stopped at any time by
touching the “Clear”key.
Power
Level
4. Cooking time for double quantity
The cooking time for double quantity is 1.7 times
the cooking time for one quantity.
6- 10
1 -5
Max. input time
Double quantity
Triple quantity
Max
Heating
input time
time
6 min. 00 sec.
Heating
Max
time
input time
10 min. 12 sec. 5 min. 13 sec. 12 min. 00 sec.
30 min. 00 sec. 51 min. 00 sec. 26 min. 05 sec. 60 min. 00 sec.
USABLE COOKING UTENSILS AND MATERIALS
OVENPROOF GLASS
Ovenware (treated for high intensity heat), such as
mixing bowls, bread dishes, pie plates, cake plates,
liquid measuring cups, casseroles and bowls without
metallic decoration.
CHINA
Bowls, cups, serving pieces, plates and platters without metallic decoration.
POTTERY
Dishes, cups, mugs and bowls.
PLASTIC
Plastic wrap (cling film) may be used as a cover. Lay
the plastic wrap loosely over the dish and press it to
the sides. The dish should be deep enough so that
plastic wrap will not touch the food, also the film
should be pierced to allow steam to escape. As the
food heats, it may cause the wrap to melt wherever it
touches the food. Plastic dishes, cups, semi-rigid
freezer containers, and plastic bags are usable for
short cooking operations. Use with care as some
softening of the plastic can occur due to heat from
the food.
Not suitable for microwave cooking
METAL UTENSILS
Metal utensils are not recommended because the
metal shields the food from microwave energy on the
bottom and sides, causing uneven cooking result.
Metal utensils will also cause arcing and damage to
the appliance.
METAL DECORATION
Metal-trimmed or banded dinnerware, casseroles,
etc., should not be used, the metal trim may cause
arcing.
ALUMINIUM FOIL
Large sheets or pieces of aluminium foil should be
avoided because they will disrupt cooking and may
cause harmful arcing. However, smaller pieces may
be used to cover areas such as poultry legs and
wings. Any aluminum foil use should never be closer
than 1 inch from side walls of oven.
WOOD
Wooden bowls and boards will become dried out
when used in the microwave oven and may split or
crack.
OTHER
Avoid using cracked, flawed, or defective utensils,
including ovenproof glassware.
CAUTION:
DO NOT USE METAL TIES ON ANY PAPER OR
PLASTIC BAGS; THE TIES BECOME HOT AND
COULD CAUSE A FIRE.
14
CHECKING ACCUMULATIVE COOKING TIME, NUMBER OF DOOR OPERATIONS
AND CONTROL OF THE BUZZER SOUND (DOOR MUST BE CLOSED)
Display shows accumulative cooking time or the number of door operations by key operation. Also, you can
change any remaining cooking time, buzzer sound or buzzer volume.
Operational flow
1.
2.
3.
*
Display Window
Touch “Clear” key
“0” will appear on the display
Touch “Time” key
Stage 1 bar & lower colon lights.
The “8.88” will appear on the
display.
Touch number
“8” three times
Stages 1 to 3 are the same for all options. Input the 4th digit as follows to check or change the modes.
4.
5.
Input one of the following options
(1.0) using the course key.
EG Input “1”
(accumulative cooking time)
Touch “Start” key
All 4 digits will be flashing.
6.
The number “2:15” shows total
cooking hours OR
Touch “Start” key again
In case where options other than 1 or
2 were selected in stage 4, “0”
appears on display confirming that
the new setting has been accepted.
7.
In case of option 1 or 2, the “C”
key must be pressed to clear the
display. (Not necessary for
options 3 to 0)
Touch “Clear” key
The following modes can be selected by inputting one of the numbers below at the operation stage “4”
INPUT OPTIONS
1... Accumulative cooking time
2... The number of door operations. (100 times)
3... Indication of remaining cooking time (when
cooking is interrupted by door opening).
4... To cancel remaining cooking time.
5... Tone of the buzzer on cooking completion (Pip,
Pip, Pip)
6...
7...
8...
9...
0...
15
The
The
The
The
The
tone of the buzzer. (Peep)
volume of the buzzer. (None)
volume of the buzzer. (medium)
volume of the buzzer. (None)
volume of the buzzer. (None)
HOW TO CONFIRM THE FREQUENCY OF EACH COURSE USED
Operational flow
1.
2.
3.
Display Window
Touch “Clear” Key
“0” will appear on the display.
Touch “Time” key
Stage 1 bar & lower colon lights.
The “99.99” will appear on the
display.
Touch number
“9” four times
4.
Touch “Start” key
5.
Touch “Start” key again
Display shows number of times
course 1 has been used,
ie 428 times used.
Touch “Start” key again
Display shows number of times
course 2 has been used,
ie 1125 times used.
6.
*
7.
The “99.99” will start flashing.
By touching Start key it is possible to check all 10 course memory functions.
Touch “Clear” key
The “0” will appear on the display.
NOTE:
The cancellation for the used No. can be done by inputting “0” when the display shows the number of times
used. When display shows “0000” flashing touch “Memory” key to finish the cancellation procedure.
16
CARE AND CLEANING
Wipe any spills and splashes inside and outside the oven with a mild detergent solution, rinse, and wipe dry. Do not
use the alkaline detergent. Any food left in the oven could possibly cause arcing due to carbonisation.Never use abrasive powders or pads.
WHAT TO DO IF REPAIRS ARE NEEDED
1. Get in contact with your nearest SANYO SERVICE
CENTER. It is dangerous for anyone other than a
properly qualified service engineer trained by SANYO
to carry out adjustments or repairs.
• If the interior lamp does not light when the oven
timer is set:
a. Make sure that the mains lead is securely plugged
in.
b. Make sure that the door is properly closed.
2. If the supply cord is damaged, it must be replaced by a
SANYO SERVICE CENTER, as a special prepared
cord is required.
• If the lamp inside lights but the food is not heated:
a. Make sure that the food is not completely covered
with a metal container or aluminium foil.
3. On no account remove or interfere with any parts or
screws. “THIS COULD PROVE VERY DANGEROUS”.
Make the following simple check before contacting a
SANYO SERVICE CENTER.
• Noisy operation:
a. Make sure that sparks are not being produced due
to the use of metal utensils.
b. Make absolutely sure that the contents of the oven
are not touching the oven roof.
17
03-03
CODE NO. MO- P xxxx
SANYO Electric Co., Ltd.
18
Printed in Thailand