1
the P6_i_l::it
g Use this camera in the following order.
Before connecting the camera to a PC, via
the USB cable, you will need to set upthe
camera driver, tnstall the camera driver
that is contained in Application software
CD-ROM. (p.74)
Thank you for buying a Samsung Digital Camera.
• Prior to using this camera, please read the user manual thoroughly.
• When you require After Sales service, please bhng the camera and the cause of
the camera malfunction (such as battery, Memory card etc.) to the A/S centre.
• Please check that the camera is operating properly prior to when you intend to
use it (e.g for a trip or an important event) to avoid disappointment. Samsung
camera takes no responsibilityfor any lossor damages that may resultfrom
camera malfunction.
® Keep this manual in a safe place.
• The contents and illustrations of this manual are subject to change without prior
notice for upgradingthe camera functions.
>_Microsoft, Windows and Windows logo are registered trademarks of Microsoft
Corporation incorporated in the United States and/or other countries
>t A{Ibrand and product names appearing in this manual are registered trademarks
of their respective companies.
Open Window's EXPLORER and search
for [Removable Disk]. (p.79)
{1}
DANGER indicates an imminently hazardo_tssituation which, if not avoided, wilt
result indeath or serious injury.
• Do net attempt to modify this camei:a jB_an_,ay. To de so may result in fire,
injury, electric shock or severe _ma_ i_iyo_r your camera. Internal
inspection, maintenance and [8_airs _ld
oniy be carried out by your dealeror
Samsung Camera Self/ice _ntre.
_
'_"_
• P ease do not use th s pr_uct n c ce _rox m y to_mmab e or expos ve
gases, as this could inq'[_se the ris_plceion.
• Shou d any form of qu _.or afore, i_n bie_ enter h_ pamera do not use t
Switch off the camera, and then disconnect the
_tcontinue to use the
camera as this may
• Do not insert or drop metallic or inflammable foreign objects into the camera
through access points e.g. the memory card slot and battery chamber. This may
cause a fire or electric shock.
• Do not operate this camera with wet hands. This could pose a risk of electric
shock.
{2}
WARNING indicates a potentially hazardous situation which, if not avoided, could
result indeath or serious injury.
• Do not use the flash inclose proximity to people or animals. Positioning the flash
too close to your subject's eyes may,ca_
eyesight damage.
animals to prevent accidents e.gt
'C_
• Swallowing battery or smat!_me
ess_ies. If an accident should occur,
please consult a doctor i_ediatei_
'_,
i For safety reasons keep this prod_ and _essories out of reach of children or
• There is the possibilityq_i_jury fret4 _e camer_ moving parts.
Battery and camera ma_;becemehoisting prolon_ use and it may result in
camera malfunction. S_uld this be if_e_case,allowth_camera to sit idle for a
few minutes to allow it
• Do not leave this camer#_#_l_J_c_it_
e_,_[#_ _ high temperatures, such
as a sealed vehicle, dir_ sunfi_oi_eth_ pl#c_ _f,_treme variances in
temperature. Exposure to extremetemperatures may adversely affect the
camera's internal components and could cause a fire.
• When in use, do not coverthe camera or Charger. This may cause heat to build
up and distort the camera body or cause a fire. Nways use the camera and its
accessories in a well-ventilated area.
CAUTION indicates a potentially hazardous situation which, if not avoided, may
result in a minor or moderate injury.
• Leaking, overheating, or damaged battery could resultin fire or injury.
• Use battery with the correct specification for the camera.
• Donot short circuit, heat or dispose of battery in fire.
• How to use the ASR (Advanced
Shake Reduction) mode ............ 15
• System chart ...........................
• identification of features ............... 6
• Donot insertthe battery with the #,3larChes
reversed.
• Remove the battery when not pla_'iing to_Li_ethe camera for a long periodof
time. Othe_,ise the battery may !eak
SiR electrolyte and permanently
damage the camera's compo_l_ts. _!?_:
• De not fire the flash while it i_in cont_ith
ha_s or objects. Do not touch the
flesh after using it continu_sly. It ma_use burn_.
• De not move the camera_hile it is s_.t@hedon, if y_are using the AC Charger.
After use, always swit_off the camera_l_eforeunplugging the cable from the
wall socket. Then makd_sure_et any _necte'," _d
Sr cables to other devices
are disconnected befor_pvir_g _e _a,_
_aitg[et_ do so may damage the
cords or cables and cadse a_ _;e/ec_ic _:i
• Take care not to touch the lens or lens cover to avoid taking an unclear image
and possibly causing camera malfunction.
• Avoid obstructing the lens or the flash when you capture an image.
• Before inserting any cables or AC adapter, checkthe directions and do not insert
by force, tt may cause breakage of cable or camera.
• Credit cards may be demagnetized if left near case. Avoid leaving magnetic strip
cards near the case.
5
• Front & Top ..............................
6
• Back & Bottom ........................
7
• Bottom / 5-function button ............ 8
• Self-timer lamp ........................
8
• Camera Status Lamp ..................
• Mode icon ..............................
8
9
• Connecting to a Power Source ...... 9
• insertingthe memory card ......... 10
• Instructionson how to use the
memory card ...........................
11
• Wise Shot ..............................
16
• How to use the SCENE mode ..-16
• Row to use the MOVIE CLtP
mode ....................................
17
• Recording the movie clip without
voice ....................................
17
• Pausing while recording a movie clip
(Successive Recording) ............ 17
• Using Successive Recording ...... 17
• How to use the VOICE
RECORDING mode .................. 18
• Things to Watch Out for When
Taking Pictures ...........................
18
• Using the camera buttons to set the
camera .................................
19
i
• LCD monitor indicator ............... 13
• POWER button ........................
19
• Starting the recording mode ......... 14
• Shutter button ........................
19
• How to use the AUTO mode ...... 14
• ZOOM W / T button .................. 20
• How to use the PROGRAM
• Voice recording /Voice memo UP
button....................................
21
mode ....................................
14
• How to use the APERTURE
PRIORITY mode .....................
• Macro / Down button ............... 22
14
• Rowto usethe SHUTTER PRIORITY
mode ....................................
• Focus lock..............................
23
• Flash / Left button .....................
24
15
• Self-timer/ Right button ............ 26
• How to use the MANUAL mode ...15
• MENU / OK button .................. 26
•E(Effect)
button
.....................
27 • On camera movie trimming ......... 4t
•Special
Effect
:Colour
...............
27 • Playing back a recorded voice .,,42
• LCD monitor indicator ............... 42
•Special
Effect
:
Preset
focus
frames
..................
28 • Using the camera buttonsto set the
camera .................................
43
•Special
Effect
:
Composite
shooting
..................
29 • Thumbnail / Enlargement button.,,43
•Special
Effect
:Photo
Frame
......
30 • Voice memo/Up button ............ 44
•Movie
Clip
flame
stabiliser
.........
31 • Play & Pause / Down button ...... 45
•+/-button
..............................
31 • E (Effect) button ..................... 45
• Delete button ........................ 46
•Using
the
LCD
monitor
toset
the
camera
settings
........................
34 • Printer button ........................ 47
•How
touse
the
menu
...............
35 • Left/Right/Menu/OK button ...... 47
•Size
....................................
36 • Setting upthe ptay back function
•Quality/Frame
rate
..................
36 using the LCD monitor ............... 48
•Metering
..............................
37 • Starting the slide show ............... 50
•Auto
Focus
type
.....................
37 • On Screen Display information .,,51
•Continuous
shot
.....................
38 • Rotating an image .................. 51
•Sharpness
..............................
39 • Resize ................................. 52
•OSD
(On
Screen
Display)
• Protecting images .................. 53
information
...........................
39 • Deleting images ..................... 53
• Shutter sound ........................
67
• PictBridge : Printing .................. 59
• Important notes ........................
68
• PictBridge : DPOF Printing ......... 60
• Warning indicator .....................
69
• PictBridge : Reset.....................
• Before contacting a service
60
centre ....................................
• Language ..............................
62
• Formattinga memory ............... 63
• Setting up the Date/Time/
Datetype ..............................
• World Time ...........................
63
64
70
• System Requirements ............... 74
• Aboutthe software .................. 74
• Setting up the application
software .................................
75
• Starting PC mode .....................
77
• imprintingthe recording date ...... 64
• Removing the removable disk ..-,..79
• Auto Focus lamp .....................
• Sound .................................
• Setting up the USB Driver
for MAC .................................
80
• Using the USB Driver for MAC
,..80
64
64
• Connecting an External Device
(USB) ....................................
65
• Copy To Card ........................
• DPOF .................................
54
55
• LCD brightness........................
65
• Removing the USB Driver for
Windows 98SE ........................
86
• Selecting Video out type ............ 65
• Digimax Master ........................
81
• DPOF : Standard .....................
55
• Quick view ..............................
66
• FAQ ....................................
83
• tnitialisation ...........................
66
•Starting
ptay
mode
..................
40 • DPOF : Index ........................ 56
•Playing
back
astill
image
.........
40 • DPOF : Print size ..................... 56
•Playing
back
amovie
clip.........
40 • PictBridge .............................. 57
•How
tocapture
themovie
clip..-,..41
• PictBridge : Picture Selection ...... 57
{4/
• PictBridge : Print Setting ............ 58
• Setting up the Mycam menu ...... 67
• Start up image ........................
67
• Start up sound ........................
67
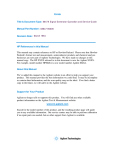
Please check that you have the correct contents
nearest Samsung
dealer or Samsung
before using this product. The contents
< Included
Camera case
can vary depending
on the sales region. To buy the optional
equipment,
contact your
service centre.
User manual
Product warranty
items >
Camera strap
Software CD
Computer
PictBridge compatible printer
(see p74)
(see p77)
(see p.57)
i
i
i
i
DPOF compatible
SD memory card/MMC
printer (see p.55)
(see p 10)
USB cable
AV cable
Rechargeable battery
(SNB-2512)
AA AIkafine
t
Batteries
or
External monitor
(see p 65)
ACcord
Charger(SBC-N1)
Charger(SBC-N2)
{5}
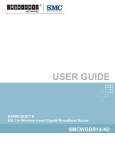
Mode dial
Power button
Shutter button
Speaker
p/
Auto focus lamp
m--
USB / AV connection terminal
Lens / Lens cover
,--
DC input connection port
Microphone
_6_
Camera
status
lamp
Zoom
Tbutton
(Digital
zoom)
LCD
monitor
Zoom
Wbutton
(Thumbnail)
E(Effects)
button
Strap
eyelet
+/button,
Delete
button
5function
button
Tripod
socket
Play
mode
/
Printer button
{7}
iiiilililililililili i!! ! ii ! ! ii i: i!
• Self-timer lamp
icon
Status
Description
For the first 7 seconds, the lamp blinks at 1 second
intervals.
Battery chamber cover
Blinking
Memory card slot
Batterychamber
®,s
Blinking
_,,_
Blinking
For the final 3 seconds, the lamp blinks quickly at 0.25second intervals.
For the 2 seconds, the lamp blinks quickly at 0.25-second
intervals before taking a picture
A picture will be taken after about 10 seconds and 2
seconds later a second picture wilt be taken.
• Camera Status Lamp
Status
Power on
Description
The lamp turns on and off when the camera is ready to
take a picture
Voice memo / Voice Recording / Up button
The lamp blinks while saving the image data and turns
Aftertaking a picture
off when the camera is ready to take a picture
Whilevoicememorecording The lamp blinks
While voice recording
Flash /
Left button
Serf-timer/
Right button
The lamp blinks
TransmRting
Datawitha PC The lamp turns on (LCD monitor turns off)
When the USB cable is
The lamp is off
inserted to a printer
Whenthe printeris printing The lamp blinks
When the AF activates
Macro/ Down button
Play & Pause button
{8/
The lamp turns on (Thecamera focus onthe subject)
The Amp blinks(The cameradoesn'tfocus on the subject)
• Mode
icon:
Refer
topage
15-,18
formore
information
about
the
camera
mode
setting.
MODEAUTOPROGRAM
A
S
M
_con
MODE
_con
ral
ra
ASR
IB!
MOVIE
_
[]
[]
V01CE
RE00RDING PLAY
Q
I_1
Mode]
I_1
SCENE
MODE
NIGHT
Icon
MODE
m
SUNSET
,con I_1
PORTRAIT CHILDREN LANDSCAPETEXT
[]
DAWN
I_1
• We recommend using batteriesfor a digitalcamera (Within a year from the date
of manufacture).The batteries are listed below.
- Non rechargeable batteries
: 2 X AA Alkaline (High Capacity)
- Rechargeable batteries (Optional) : SNB-2512 (Ni-MH)
[]
I_1
a
CLOSEUP
[]
BACKUGHTFIREWORKS
BEACH&SNO_fi
[]
m
[]
SNB-2512
Type
Ni-MH
Capacity
2500mAh
VoYage
Chargingtime
1.2Vx2
Approximately 300 Minutes(Use for SBC-N2)
Approximately 240 Minutes(Use for SBC-N1)
÷ Included battery may vary depending on sales region.
{(9}
• There
are
4indicators
for
battery
condition that are displayed on the LCD
monitor.
Battery
indicator
_
_
Lowbattery
Battery
status
• insert tbe battery as shown
- if the camera does not turn on after you
have inserted battery, please check
whether the battery is inserted with the
correct polarity (+/-).
- When the battery chamber cover is
opened, do not press the battery
chamber cover by force. This may cause
damage to the battery chamber cover.
(lO}
The battery is
fully charged
I_
Low battery
Low battery
capacity(Prepare
capacity
capacity
to recharge
(Prepare to
(Prepare to
or usespare recharge or use recharge or use
battery)
spare battery) spare battery)
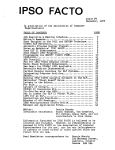
• Insertthe memory card as shown.
- Turn off the camera's power before
insertingthe memory card.
- Have the front of the memory card facing
toward the front of the camera (lens) and
the card pins toward the back of the
camera (LCD monitor).
- Do not insert the memory card the wrong
way round. Doing so may damage the
memory card slot.
• Be sureto format the memory card (see p.63) ff you are using a newly
purchased memory for the first time, if it contains data that the camera cannot
recognise,or if it contains images captured with a different camera.
• Turn off the camera power whenever the memory card is being inserted or
removed.
• Repeated use of the memory card will eventually reduce the memory cards
performance. Should this be the case, you will need to purchase a new memory
card. Wear and tear on the memory card is not covered by the Samsung
warranty.
• The memory card is an electronic precision device.
Do not bend, drop or subject the memory card to any heavy impact.
• Do not store the memory card in an environment with strong electronic or
magnetic fields, e.g. near loud speakers or TV receivers.
• Please do not use or store in an environment where there are extremes in
• tf the memory card is subjectedto any of the following, the recorded data may
become corrupted :
- When the memory card is used incorrectly.
- If the power is switched off or the memory card is removed while recording,
deleting (formatting)or reading.
• Samsung cannot be held responsible for lost data.
• It is advisable to copy important data onto other media as back-up e.g. floppy
disks, hard disks, CD etc.
• tf tbere is insufficient memory available
: A [Memory Full!] message wilt appear and the camera will not operate. To
optimise the amount of memory inthe camera, replace the memory card or
delete unnecessary images stored on the memory card.
temperature.
• Do not allow the memory card to become dirty or to come into contact with any
liquid. Shouldthis happen, clean the memory card with a soft cloth.
• Please keep the memory card in its case when not in use.
• During and after periodsof extended use, you may notice that the memory card
is warm. This is perfectly normal.
• Do not use a memory card that is used in another digital camera.
To use the memorycard in this camera, format the memory card using this
camera.
• Do not use a memory card formatted by another digital camera or memory card
reader.
{I1}
• When using a 256MB MMC (Multi Media Card),the specified shooting capacity
will be as follows. These figures are approximate as image capacities can be
affected by variables such as sub .=ctmatter and memory card type.
Recorded image size
Fine
57
103
180
5M
93
158
271
3M
172
265
425
1M
558
663
742
Print
7M(P)
68
115
206
Wide
6M(W)
84
134
233
• The camera can use SD/SDHC Memory Cards and MMC (Multi Media Cards).
Please consult the enclosed manual for using the MMC Cards.
Stillimage
Write
switch
Recorded image size
30FPS
80O
[ SD (Secure Digital) memory card]
720
* Movie clip
The SD/SDHC memory card has a write protect switchthat prevents image files
from being deleted or formatted. By slidingthe switchto the bottom of the
SD/SDHC memory card, the data will be protected.By sliding the switchto the top
of the SD/SDHC memory card, the data protection will be cancelled.
Slide the switch to the top of the SD/SDHC memory card before taking a picture.
_[12_
Normal
Super Fine
8M
20FPS
15FPS
About 10' 56"
About 11' 53"
About 11' 44"
About 15' 12"
640
About 11' 10"
About 15' 48"
About 18' 20"
320
About 39' 03"
About 48' 08"
About 67' 52"
÷ The recording times can be changed by the zoom operation.
The zoom button doesn't use during the movie recording.
g The LCD monitor displays informationabout the shooting functions and
selections.
d}
@
No.
Description
4
Continuous shot
5
@
@
@
@ @
Recording mode
_
AEB _
2
Battery
3
Aperture
Value/ ShutterSpeed
r'_lO_ IBI IDI I1/] _
OQDD_BI_Dm
_
_
C]]
F2.8,1/30
[_1Q
CZ]
Q
6
Self-timer
7
Macro
_
@
_
_
_s (_/(_)
_s
_
_
8
Metering
[]
9
Card insertedindicator
_
_
_
p.22~23
r.'l
p.37
[]
p.37
Auto focus frame
_("_
p.18
@
@
12
Date/Time
2007/01/01 01:00 PM
p.63
13
Exposure compensation
@
14
White Balance
_5
iso
16
RGB
17
Sharpness
18
[magequality/ Framerate
Page
19
Image size
p.14~18
20
p.lO
21
p 1,€-,15
22
,_,_
p.26
MF
Camera shake warning
@
Icons
Flash/WithoutSound
p.38
p.24~25
/p.17
11
[image & FullStatus]
1
_
10
@
Description
[]
Page
@
@
No.
Icons
[]
AWB"_
_
p.34
,_i,_ _
_-" _1.
_'e°,so,so,so_ _ _
RGB
[]
iiii
[;[
_
[]
p.32
p.32
[]
_"_ I1_ I_
t_ _
p.33
p.39
I_
I_ '/_
p.36
p.36
Number
ofavailable
shots
remaining
7
p.12
Remail/ing
time
(Mov
ecip/Voice
recor_isg)
00:01:30/01:00:00
p.12
Voice memo
Dpticd
Dig_al
Zoom
bar/Diglta
_Z00mrate
p.21
_
I
!1XS,0
p.20
(iS}
• How
touse
the
AUTO
mode
(_
)
Please
select
this
mode
for
quick
and
easy
picture
taking
with
minimal
user
interaction.
1.insert
the
batteries
(p.10).
Insert
thebatteries
taking
note
ofthe
poladty
(+/ -).
2. Insert the memory card (p.10). As this camera has
a 20MB internal memory, you do not need to insert
the memory card. if the memory card is not
inserted, an image wilt be stored in the internal
memory. If the memory card is inserted, an image
wilt be stored on the memory card.
3. Close the battery chamber cover.
4. Press the power button to turn on the camera.
(if the date/time that is displayed on the LCD
[ AUTOmode]
monitor is incorrect, reset the date / time before
taking a picture.)
5. Select the AUTO mode by rotatingthe mode dial.
6. Point the camera towards the subject and compose the image by using the
LCD monitor.
7. Press the shutter button to capture an image.
• How to usethe PROGRAM mode ( PROG )
Selectingthe automatic mode will configurethe
camera with optimal settings. You can still manually
configure all functions except the aperture value and
shutter speed.
1. Select the PROGRAM mode by rotating the mode
dial.
2. Press the menu button to configure advanced
functions such as image size (p.36), quality (p.36),
metering (p.37), auto focus type (p.37), continuous
shooting (p.38), sharpness(p.39) and OSD
[ PROGRAM mode ]
information(p.39).
• How to usethe APERTURE PRiORiTY mode ( A )
1. Select the APERTURE PRiORiTY Mode by
rotating the mode dial.
2. Set the aperture value by using the +/-, up/down
button.
3. Press the +/- button twice and take an image.
[APERTUREPRIORITYmode]
* Smaller Aperture values make the object sharp but blur the background.
Larger Aperture values make both the object and background sharp.
(14}
• How to use the SHUTi-ER PRIORITY mode ( S )
1. Selectthe SHUlq-ER PRIORITY Mode by rotating
the mode dial.
• How to use the ASR (Advanced Shake Reduction) mode (_]}) ASR )
Advanced Shake Reduction (ASR) mode.
This mode will reduce the effectof camera shake and
/f"/_ c,__'_
2. Set the shutter speed by using the +/-, up/down
button.
help you get a well-exposed image in dim conditions.
Press the ASR button.
3. Press the +/- button twice and take an image.
* High Shutter speeds can capture a moving object in a
still image as if the object is not moving. Low Shutter
speeds can capture a moving object with an 'active'
effect.
• Things to watch out for using the ASR mode
1.The digital zoom will not operate in the ASR
mode.
[£HUTfER PRIORITYmode]
2. If the lighting conditions are brighter than
fluorescent lighting condition, the ASR doesn't
activate.
3. If the lighting condition is darker than in
fluorescent lighting condition, camera shake
warning indicator ( _' ) will display. For best
[ASRmode]
resultsonly take pictures in situations where
the camera shake warning indicator ( _O
_ ) is not displayed.
4. If the subject is moving the final image captured may be blurred.
• How to use the MANUAL mode ( _V_)
You can manually senfigure all functions with the
aperture value and shutter speed.
1. Selectthe MANUAL mode by rotating the mode
dial.
2. Press the + / - button and menu for the shutter
5. Avoid moving the camera while the [Capturing!] message is displayed to
achieve a better result.
6. As the ASR uses the camera's digital processor, images taken using the ASR
may take a little longer for the camera to process.
speed and aperture value wilt display.
Up / Down button
:changes aperture value
Left / Right button
: changes shutter speed.
3. Press the +/- button twice and take an image.
[MANUAL mode]
(15)
• Wise Shot
• How to usethe SCENE mode ( SCENE
2 images are taken at a time. One is taken inthe FiiFInFlash mode and the other
is taken in the ASR mode. You can select and save only one of the images.
• How to use the Wise Shot
)
Use the menu to easily configure optimal settings
for a variety of shooting situations.
1. Select the SCENE mode by rotating the mode
dial.
2. Press the menu button and select a desired
scene menu.
1. Select the ASR mode by rotating the mode dial.
2. Press the E button and the Wise Shot function is
activated.
3. Press the Shutter button to capture images.
4. Captured images are displaying.
- To select image, press the Left/Rightbutton.
Imag_
[SCENE mode]
÷ The scene modes are listed below.
) with Flash
mode
[Nightscene]
(1_1)
:Usethisforshootingstillimagesatnightorinotber
dark conditions.
[Portrait]
[Children]
(I_)
(D)
[Landscape]
[Text]
[Close up]
( I_1 )
(O )
(D )
: To take a picture of a person.
:To take a picture of fast moving objects, for
example, children.
: To take pictures of distant scenery.
: Usethis mode to shoot a document.
: Close-up shootingfor small objects such as plants
and insects.
[Sunset]
[Dawn]
[Backlight]
[Flirework]
[Beach&Snow]
(IQ)
(a
( []
( I_1
( I_]
5. Press the OK / Shutter button and the setected image will be saved.
(16}
)
)
)
)
:
:
:
:
:
Fortaking pictures of sunsets.
Daybreakscenes..
Portraitwithout shadows caused by backiight.
Fireworkscenes.
For ocean, lake, beach and snowscape scenes.
• How
touse
the
MOVIE
CLIP
mode
(p_l_
)
Amovie
dip
can
berecorded
foraslong
asthe
available
recording
time
ofthe
memory
capacity
allows.
1.Select
the
MOVIE
CLIP
mode
byrotating
the
mode
dial.
2.The
MOVIE
CLIP
mode
icon
and
available
recording
time
will
display
onthe
LCD
monitor.
3.Point
the
camera
towards
the
subject
and
compose
the
image
byusing
the
LCD
monitor.
Press
the
shutter
button
and
movie
clips
are
[ MOVE CLIP mode
recorded
foraslong
asthe
available
recording
time.
Movie
clips
will
still
berecorded
ifthe
shutter
button
isreleased.
Ifyou
wish
tostop
recording,
press
the
shutter
button
again.
*image
size
and
type
are
listed
below.
- Image size :800X592, 720X480, 640x480, 320x240 (SelectabIe)
- File type
: *.avi (MPEG-4)
• Pausing while recording a movie clip (Successive Recording)
This camera allows you to temporarily stop during unwanted scenes, white
recording a movie clip. Using this function, you can record your favoufite scenes
into a movie clip without having to create multiplemovie clips.
• Using Successive Recording
1. Press the shutter button and movie clips are
recordedfor as long as the available recording
time. Movie clips wiltstill be recorded if the shutter
button is released.
2. Press the Pause button (CIZ])) to pause
recording. Press the Pause button (tOll}) again to
resume the recording.
3. If you wish to stop recording, press the shutter
button again.
!successive
[ec0rding
ofa mowclip]
• Recording the movie clip without voice
You can record the movie clip without voice.
1. Press the Up button and the ( I_ ) icon will
display on the LCD monitor.
2. Press the shutter button and movie clip is
recordedfor as tongas the available recording
time without voice.
3. To stop the recording,press the shutter button
again.
[ MOVIE CLIP mode
(17}
• Pressing the shutter button down half way.
Ughfly press the shutter buttonto confirm focus and flash battery charge.
Press the shutter button all way down to take the picture.
• How to use the VOICE RECORDING mode ( _
)
A voice can be recorded for as longas the availab}e
recordingtime (max:lhour) allows.
1. tn any mode with the exception of Movie c{ipmode,
select the VOICE RECORDING mode by pressing
the Voice recording button twice.
2. Press the shutter button to record a voice.
- Press the shutter button once and voice is
recorded for as long as the avai]abterecording
time (max:lhour) aibws. The recording time wi}I
be displayed on the LCD monitor. Voice will still
be recorded if the shutter button is released.
- If you wish to stop recording,press the shutter
button again.
- File type : *.way
[ Lghtlypresstheshutterbutton]
[ VObCERECORDINGmode]
* A distance of 40cm between you and the camera (microphone) is the best
distance to record sound.
[ Press the shutter btZton ]
• The avai}able recording time may vary depending on shooting conditions and
camera settings.
• When the F{ashOff or Slow synchro mode is selected in a low lighting condition,
the camera shake warning indicator ( _O_ ) may appear on the LCD monitor.
_nthis case, use a tripod, support the camera on a solid surface or change to
flashshot mode.
• Shooting against the light:
PEeasedo not take pictures to the sunlight direction. Taking a picture against the
sun may make the picture dark. To take a picture against the sun, please use the
[8aoklight] in the scene shooting mode (see page 16), fiINn flash (see page 25),
spot metering (see page 37), or exposure compensation (see page 34).
• Avoid obstructing the lens or the flash when you capture an image.
• Compose the image by using the LCD monitor.
(18}
• Under
certain
conditions
the
auto
focus
system
may
not
perform
asexpected. • The
recording
mode
function
can
beset
upbyusing
the
camera
buttons.
-When
photographing
asubject
that
has
little
contrast.
-Ifthe
subject
ishighly
reflective
orshiny.
-Ifthe
subject
ismoving
athigh
speed.
-When
there
isstrong
reflected
light,
orwhen
the
background
isvery
bright.
-When
thesubject
matter
has
only
horizontal
lines
orthe
subject
isvery
narrow • Used
forturning
the
camera's
power
on/ off.
(such
asastick
orflagpole).
• tf there is no operation during the specifiedtime,
-When
thesurroundings
are
dark.
the camera's power will be turned off automatically
to save battery life.
Refer to page 62 for more information about the
auto power off function.
• Used for taking an image or recording voice inthe
RECORDING mode.
• tn MOVIE CLIP mode
Pressing the shutter button down fully startsthe
process for recording a movie clip. Press the
shutter button once and the movie clip is recorded
for as long as the available recording time in the
memory allows. If you wish to stop recording, press the shutter buttonagain.
• In STILL IMAGE mode
Pressing the shutter button down haIM,ay activatesthe autofocus and checks
the condition of the flash. Pressing the shutter button down fully takes and stores
the image. If you select voice memo recording, the recording will start after the
camera has finished storing the image data.
(19}
• Ifthe
menu
isnot
displayed,
this
button
works
as
the
OPTICAL
ZOOM
orDIGITAL
ZOOM
button.
• This
camera
has
a5Xoptical
zoom
and
a5Xdigital
zoom
function.
Using
both
will
offer
atotal
zoom
ratio
of25X.
• TELE
Zoom
Optical
zoom
TELE:Pressing
the
ZOOM
Tbutton.
This
witl
zoom
into
the
subject
i.e.
the
subject
will
appear
nearer.
Digital
zoom
TELE:When
the
maximum
(5X)
optical
zoom
isselected,
pressing
the
ZOOM
Tbutton
activates
the
digital
zoom
software.
Releasing
ZOOM
Tbutton
stops
the
digital
zooming
atthe
required
setting.
Once
the
maximum
digital
zoom
(5X)
isachieved,
pressing
the
ZOOM
T
button
will
have
noeffect.
[ WIDE zoom ]
[ TELE zoom ]
• WIDE
Zoom
Optical
zoom
WIDE:Pressing
the
ZOOM
Wbutton.
This
will
zoom
out
from
T O, thesubject
i.e.
the
subject
will
appear
farther
away.
Pressing
the
ZOOM
Wbutton
continuously
will
set
the
camera
toitsminimum
zoom
setting
i.e.
the
subject
W
appears
atitsfarthest
from
the
camera.
[ TELE zoom ]
[ WIDE zoom ]
Digitalzoom WIDE
: When the digital zoom is in operation, pressingthe
ZOOM W button witlreduce the digital zooming in
Opticalzoom
steps. Releasing ZOOM W button stops digital
r
i
zooming. Pressing the ZOOM W button will reduce the
I
I
mlX5,0
digitalzoom and then it will continue to reduce the
Digitalzoom
optical zoom until the minimum setting is reached.
[ Digital zoom 5X ]
[ Digital zoom 5X ]
(20}
[ Optica_zoom 2X ]
[ TELE zoom ]
[ WIDE zoom ]
• While the menu is showing, pressthe UP button to move up the sub menu.
When the menu is not displayed on the LCD monitor the UP button operates as
the voice recording or voice memo ( _ ) button. You can add your voice-overto
a stored still image. Refer to page 18for more information about the voice
recording.
• Recording a voice memo
1. Rotatethe MODE DIAL to select a RECORDING mode with the exception of
MOVIE CLiP mode.
2. Press the VOICE MEMO ( _ ) button. If the voice memo indicator is
displayed on the LCD monitor,the setting is completed.
[Preparing for Voice Memo]
[Recording Voice Memo]
3. Press the shatter button and take a picture.The picture is storedon the
memory card.
4. Voice memo wilt be recorded for ten seconds from the momentthe picture is
stored. Inthe middleof the sound recording, pressing the shutter buttonwilt
stop the voice memo.
(21}
• While the menu is showing, pressthe DOWN button to move from the main
menu to a sub menu, or to move down the sub menu. When the menu is not
showing, you can usethe MACRO / DOWN buttonto take macro pictures.The
distance ranges are shown below. Press the Macro button until the desired
macro mode indicator displayson the LCD monitor.
• In the Program,A,S, M modes,youcan changethe aperturevalue and shutterspeed
by pressingthis button
[Auto macro ( _
)]
[Macro ( _
)]
[Super Macro ( _
• Types d focus modes and focus ranges (W: Wide, T: Tele)
Mode
FocusType
Auto
Auto
macro
(22}
Mode
FocusType
Macro
T:80-1nfinity
Auto
Drograrr
Focusrange
W:80-lnfinity
W:I 0-infinity
T:50-1nfinity
)]
(Unit :cm)
using the manualfocus as the picture
can be blurred easily
Focusrange
W:10~80
T:50~80
Prograrr
• Manual Focus : Where the automatic focusing is not
available, for example, in very dark
conditions, you can set the focus
manually. Please be careful when
Super
Macro
W:1~10
(Wide only)
W:80-lnfinity
Manual
W:l-infinity
T:80-1nfinity
focus
T:50dnfinity
Normal
• How to use the Manual Focus
1. In the M mode, press the ASM buttontwice and
Manual Focus bar will display.
2. Set the focal length by using the Up/Down button.
Press the shutter button to capture an image.
Up button : moves the point of focus further away
Down button : moves the point of focus nearer
• Available focusing method, by recording mode
(O: Selectable, X: Not selectable, oo:Infinityfocus range)
[]
B
_
• To focus on a subject not positioned in the centre of the picture, use the focus
lock function.
Mode
I";1
Normal
O
O
O
O
rill
O
_
X
D
O
Macro
X
O
O
O
O
X
O
Auto Macro
O
X
X
X
X
O
X
SuperMacro
X
O
O
O
O
X
O
Manualfocus
X
O
O
O
O
X
X
SCENE
Mode
0
_
0
a
Q
Normal
O
O
O
_
X
X
Macro
X
X
X
X
X
O
Auto Macro
X
X
X
X
O
X
SuperMacro
X
X
X
X
X
X
Manualfocus
x
x
x
x
x
x
Mode
I_1
Q
Normal
_
_
O
_
O
Macro
X
X
X
X
X
Auto Macro
X
X
X
X
X
SuperMacro
X
X
X
X
X
Manualfocus
X
X
X
X
X
_
I_m
[]
• Using the Focus Lock
1. Ensure the subject is in the centre of the autofocus frame.
2. Press the SHU]q-ER button halfway. When the green auto focus flame tights
up, it means the camera is focused on the subject. Be careful not to press the
SHUqq-ERbutton all the way down to avoid tak)ngan unwanted picture.
3. With the SHU]q-ER button sti(Ipressed down only halfway, move the camera
to recompose your picture as des)red, and then press the SHU]qER button
completely to take the picture, if you release your finger from the SHU]q-ER
button, the focus {ockfunction will be cancelled.
t The image to be
captured
2 PresstheSHUq_ER
buttonhalfwayandfocus
onthe subject
3. Recompose
thepicture
andfullypressthe
SHU_ER button
(23}
• When the menu is displayed on the LCD monitor,
pressing the LEFT button makes the cursor shift to
the left tab.
• When the menu is not displayed on the LCD monitor,
the LEFT button operates as the FLASH
[Selecting the Auto flash]
( _. )button.
• Selecting the flash mode
1. Rotate the MODE DIAL to select a RECORDING mode withthe exceptionof
MOVIE CLIP mode.
2. Press the Flashbutton until the desired flash mode indicator displays on the
LCD monitor.
3. A flash mode indicator wiltbe displayed on the LCD monitor.
Use the correct flash to suit the environment.
• Flash range
SO
AUTO
{24}
(Unit : m)
Normal
WIDE
0_
TELE
Macro
WIDE
0.2_0.8
TELE
0.5,-,0.8
Auto macro
WIDE
0.2,-3.0
TELE I
0.5~2.5 I
• Flash mode indicator
Menu tab
(_)
3 : Selectable X : Not selectable)
Available flash mode, by recording mode
Flash mode
Description
Auto flash
If the subject or background is dark, the camera flash
will operate automatically.
Auto &
Red eye
reduction
If a subject or background is dark, the camera flash
will work automatically and wilt reduce the red-eye
effectby using the red-eye reduction function.
I_
D
x
X
0
X
X
X
X
@
X
0
0
X
X
X
X
x
x
o
X
0
0
0
0
X
_s
@
X
0
X
X
X
X
0
0
0
0
0
0
€
[]
Scene modes
Fill in flash
The flashfires regardlessof availablelight.
The intensityof the flash will be controlled,accordingto
the prevailingconditions.The brighterthe background
or subject is,the lessintensethe flashwill be.
_s
Slow synchro
The flash will operate in conjunction with a slow
shutter speed in order to obtain the correct exposure.
When you take an image in a condition with poor
light,the camera shake warning indicator
"_.
®
I_1 O
[]
I_I
IBI
I0
_
U
I_
X
X
X
X
X
I01 n
X
X
X
X
X
0
X
0
0
X
X
X
X
X
X
X
X
X
X
X
X
X
X
X
X
0
X
X
_s
0
X
X
X
X
X
X
X
X
X
X
_")
0
0
0
0
0
0
0
0
X
0
X
( _ ) will display on the LCD monitor.
We recommend using a tripod for this function.
The flashdoes not fire Selectthis mode when
_,_'_
Flash off
capturingimages in a place or situationwhere flash
photographyis prohibited.Whenyou capturean image
ina poorly lit condition,the camerashake warning
indicator( _ ) willdisplayon the LOD monitor.We
recommendusing a tripodfor this function.
{25}
• Whenthe menuis displayedon the LCD monitor,pressingthe Rightbuttonmakesthe
curasrsh_tothe righttab.
• Whenthe menuis notdisplayedon the LCDmonitor,the RIGHTbuttonoperatesas
the Self-timer(_ ) button.This functionis used when the photographerwouktalso
liketo be inthe image.
• Selecting the self-timer
1. Rotate the MODE D_ALto select a RECORDING
mode withthe exception of VOICE RECORDING
mode.
2. Press the SELF-TIMER button untit the desired
mode indicatordisplays on the LCD monitor.
A 10 second, 2 second or double self-timer icon
appears on the LCD monitor. In Movie Clip mode,
only the 10-secondself-timer wilIwork.
• 10SEC self-timer( _ )
: Pressing the shutter button witlallow an interval i
of 10 seconds before the image is taken.
• 2SEC self-timer ( _2s )
: Pressing tbe shutter button will albw an interval [Selecting
the10SECselfltimel]
of 2 seconds before the image is taken.
• Double self-timer ( _3_)
: A picture will be taken after about 10seconds and 2 seconds later a
second picture will be taken. When using the flash the 2-second self-timer
may be delayed for longer than 2 seconds depending on the flash charge
time.
3. When you press the SHUTrER button, the picture will be taken after the
specified time haselapsed.
(26}
• MENU button
- When you pressthe MENU button, a menu related to each camera mode will
be displayed on the LCD monitor. Pressing it again will return the LCD to the
initial display.
- A menu option can be displayed for MOVIE CLtP and STILL IMAGE.
There is no menu availablewhen the VOICE RECORDING mode is selected.
Pressing the MENU button
_.[Menu oft]
[Menu on]
• OK button
- When the menu is displayed on the LCD monitor,this button is used for shifting
the cursorto the sub menu or for confirming data.
• It is possible to add spedal effectsto your images by using this button.
• Still image mode : You can select the coIour, outfocus, composite and frame
menus.
• By using the camera's digital processor, it is possible to add special effectsto
your images
1. Press the E button in any recording mode.
• Movie clip mode : You can select the colour and stabitiser menus.
• Available Effects, by recording mode (0 : SelectabIe X : Not selectable)
"--
E!
r_
D
0
D
Q
Q
O
O
O
O
O
O
O
O
O
O
X
X
O
O
O
O
X
X
X
X
X
X
0
0
0
0
X
X
X
X
I_
X
X
0
0
0
0
X
X
X
X
IJl
0
X
X
X
X
X
X
X
X
X
[]
0
2. Selectthe _
menu tab by pressing the Left/Right button.
I_1 0
[Still image mode]
[Movie clip mode]
3. Select a desired sub menu by pressing the Up/Down button and press the
OK button.
I_
:No effect is added to the image
:Captured images will be stored in black and white.
Ob
:Captured images will be stored in a sepia tone
(a gradient of yellowish brown coleurs).
:Captured images will be stored in a blue tone.
I_,
:Captured images will be stored in a red tone.
t_
:Captured images will be stored in a green tone.
:Save the image in negative mode.
4. Press the shutter button to capture an image.
{27}
• You can make the subject stand out from its
surroundings. The subject will be sharp and infocus
while making the rest out of focus.
1. Press the E button in the available camera
• Moving and changing the focus frame
You can change the focus frame after selecting a Range menu.
1. Point the camera towards the subject and compose the image by using the
LCD monitor.
2. Press the +/- button.
modes(Not available: Movie clip, Voice, Auto,
Manual, ASR, Scene).
2. Select the []
menu tab by pressing the Left / Right button.
3. Select a desired sub menu by pressingthe Up / Down button and press the
OK button.
3. The colour of focus frame turns white. Press the Up/Down/Left/Right button
to movethe focus frame position.
4. To selectthe focus frame position, press the +/- button again and you can
take a picture.
Pressing the +/- button
[Range 1]
[Range 2]
[Range 3]
[Range 3]
[The frame is activated]
4. The presetfocus frame will appear.
Press the shutter button to capture an image
Pressing
the Up/Down/
Left/Rightbutton
Pressing the +/- button
[After changing the frame
position]
(28}
• You can combine 2 - 4 different shots in a still image
1. Press the E button in the availabIe camera
modes(Not available: Movie dip, Voice, Auto,
Manual, ASR, Scene).
2. Selectthe _
button.
menu by pressing the Left/Right
3. Selecta desired sub menu by pressing the Up/Down buttonand press the
OK button.
_!!!!!!!!!!!!!!!!!!!!!!!!!!!!!!!!!!!!!!!!!!!!!!!!!!!!!!!!!!!!!!!!!!!!!!!!!!!!!!!!!!!!!!!!!!!!!!!!!!!!!!!!!!!!!!!!!!!!!!!!!!
¸ili
-
I_
: cancels the composite shcoting
-
_
: 2 different shots are combined in a stilt image.
-
I"1 : 3 different shots are combined in a stilt image.
-
E_ : 4 different shots are combined in a still image.
-
G
: 2 different panorama shots are combined in a stiltimage.
4. The number of frames you selected in step 3 is displayed on the LCD monitor.
Press the shutter buttonto start the composite shooting
÷ Selecting 2 composite shooting
[Readyfortaking]
[Firstshot]
[Second
shot]
• Changing a part of composite shot before taking the last shot
Before taking the last composite shot, you can change a part of composite shot.
1. Duringthe composite shots, pressthe +/- button.
2. A previous image will be deleted and new frame will display.
If there is an image taken before, press the +/- button again and a previous
image will be deleted again.
Pressing the +/- button
[The final picture]
5. To save the composite shots, press the OK button after taking the last shot.
[Beforetakingthe3rdshot[
[Moving
backward
to the2rid
shot]
3. Press the shutter button to capture a new image.
{29}
• Changing a part of composite shot after taking the last shot
1. Aftertaking the last shot, a cursor to select a frame wilt display. Press the Up/
Down/Left/Right button to select the frame.
2. Press the +/- button and an image will be deleted. Composite frame will be
activated.
3. Press the Shutter button You can take other images again by using the Up/
Down/Left/Right button and +/- button.
4. Press the OK button againto save the captured image.
Pressing the
Up button
[After taking the 4th shot]
[Movingbackwardtothe 2ndshot]
[° ho%Oottt"o
e
Pressing
the
+/- button
41,--
J
[Deleting the 2nd shot]
Pressing the OK
button
[Aftertakingthe 2nd shot again1
(3O}
[The fina_picture]
• You can add 9 types of frame-like borders to a stilt image you want to capture.
• Date & Time information wilt not be printed on the stored image taken with Photo
Frame menu.
1. Press the E button in the available camera
modes(Not available: Movie clip,Voice, Auto,
Manual, ASR, Scene).
2. Select the _
menu by pressingthe Left/Right
button.
3. Select a desired sub menu by pressing the Up/
Down button and pressthe OK button.
- _ : The photo frame will not be added.
4.The
photo
frame
wilt
appear.
Press
the
shutter
button
tocapture
animage
• This
function
helps
stabiiise
images
captured
during
movie
recording.
You
can
select
this
menu
only
inthe
MOVIE
CLIP
mode.
1.Press
the
Ebutton
inthe
Movie
clip
mode.
2.Press
the
Left/Right
buttons
toselect
the
stabilizer
menu
tab.
3.Select
adesired
sub
menu
bypressing
the
UP/
DOWN
button
and
press
the
OK
button.
- t_
:Movie clip frame stabiliserfunction
becomes disabled.
- 1_
: Reducescamera shake during movie recording.
The recording frame range wilt become narrowerthan when you
select the 1_ menu. Pre-view frames may not display smoothly on
the LOD monitor.
• You can use the +/- buttonto adjust the values for the RGB, ISO, white balance
end exposure compensation.
Main menu
Sub menu
RGB
R (Red),G (Green), B (Blue)
ISO
AUTO, 50,100, 200, 400, 800, 1600
WHITE
AUTO, DAYLIGHT, CLOUDY,
FLUORESCENT H,
BALANCE
FLUORESCENT L TUNGSTEN,
CUSTOM.
Exposure
compensation
-2.0-0.0-+2.0 (0.5EV steps)
Available
camera
mode
B r',a B
DQ
ralBI
DD
D
[]
O
D[]D
O
÷ tf the memory card is not inserted, this function will not operate.
_,31}
• RGB
:Allows
theuser
toadjust
the
R(Red),
G(Green),
and
B(Blue)
values
of
the
images
tobecaptured.
• Setting
RGB
Values
1.Press
the
+/-button,
and
then
use
the
UP
and
DOWN
buttons
toselect
the
RGB
icon
(RGB
).
The
RGB
menu
bar
will
appear
asshown.
2.Use
the
UP/DOWN/LEFT
and
RtGHT
buttons
toselect
the
desired
RGB
value.
-Up/Down
Button
:Navigates
between
R,G,
and
Bicons.
-Left/Right
Button
:Changes
value
ofeach
icon.
3.When
you
press
the
+/-button
again,
the
value
you
set
will
besaved
and
RGB
setup
mode
will
end.
÷When
special
effect
(colour)
from
the
icon
other
than
ft_ is selected, it will
not be able to select the RGB.
• ISO :You can selectthe tSO sensitivitywhen taking pictures.
The speed or specific light-sensifivityof a camera is rated by ISO numbers.
• Selecting an ISO Sensitivity
1. Press the +/- button, and then use the UP and
DOWN buttonsto select the tSO icon( _ ).
The tSO menu bar will appear as shown.
2. Use the LEFT and RIGHT buttons to selectthe
desired ISO sensifivity value.
- AUTO
:The camerds sensitivityis automatically
changed by variables such as lighting value or subject brightness.
- 50, 100, 200, 400, 800, 1600
:You can increasethe shutter speed while the same amount of light is
present, by increasing the ISO sensitivity. However, the image may be
saturated in high luminance. The higher the tSO value, the higher the
camera's sensitivity to light is and therefore the greater its capacity to take
pictures in dark conditions. However, the noise level in the image wilI
increase as the ISO value increases, making the image appear coarse.
3. When you press the +/- button again, the value you set will be saved and ISO
setup mode will end.
(32}
• White
balance
:The
white
balance
control
allows
you
toadjust
the
colours
to
appear
more
natural.
• Selecting a White Balance
1. Press the +/- button, and then use the UP and
DOWN buttons to selectthe white balance icon
(AWB). The white balance menu bar will appear
as shown.
2. Use the LEFT and RIGHTbuttons to set the white
balance to the desired value. The value you set wi]
be displayed on the LCD monitor.
AUTO
AWB :The camera automatically selectsthe appropriate white
balance settings, depending on the prevailing lighting
conditions.
DAYLIGHT
CLOUDY
FluorescentH
:,b,': :For taking images outside.
_
:For taking images under a cloudy and overcast sky.
_
:Forshootingunderdaylightfluorescenttypesofthreeway fluorescent lighting.
Fluorescent L _
:Shooting under white fluorescent lighting.
TUNGSTEN
_
:For shooting under tungsten (standard light bulb)
lighting.
CUSTOM
_m_ :Allows the user to set the white balance according to
the shooting condition.
Different lighting conditions may cause a colour cast on your images.
3. Press the +/- button again. The value you set will be saved and White
Balance setup mode will end.
• Using the Custom White Balance
White balance settings may vary slightly depending on the shooting
environment. You can select the most appropriate white balance settingfor a
given shooting environment by setting up the custom white balance.
1. Selectthe CUSTOM ( _m_ ) menu of the White
Balance.
2. Place a sheet of white paper infront of the
camera so that the LCD monitor shows only
white, and then press the SHU]q-ER button.
3. Your custom white balance value is stored.
- The custom white balance value will be applied,
startingwith the next picture you take.
- The userconfigured white balance will be
remain effective until it is overwritten.
t
[Whitepaper]
(33}
• Exposure
compensation
:This
camera
automatisaliy
adjusts
the
exposure
according
tothe
ambient
lighting
conditions.
You
can
also
select
the
exposure
value
byusing
the
+/ - button.
• You can use the menu on the LCD monitor to set up recording functions. In any
mode with the exceptionof VOICE RECORDING mode, pressing the MENU
button displays the menu on the LCD monitor.
• Compensating Exposure
1. Press the +/- button, and then use the UP and
÷ The menu will net be displayed on the LCD monitorin the following circumstances:
- When another button is being operated.
- While image data is being processed.
- When there is no battery capacity.
DOWN buttons to select the exposure
compensation icon ( [] ).
The exposure compensation menu bar will appear
as shown.
2. Use the LEFT and RIGHT buttons to set the desired exposure compensation
factor.
3. Press the +/- button again. The value you set will be saved and the Exposure
Compensation setup mode will close.
tf you change the exposure value, the exposure indicator ( []
displayed on the bottom of the LCD monitor.
• The followingfunctions areavailable, depending on tile mode you have selected.
The items indicated by
are default settings.
Menutab Main menu
Sub menu
Cameraworkingmode
Page
3264X2176
SIZE
........................................................
(Stillimage) 3264x1824 2592X1944 rl_BBaQ_meararelelB_l_a_lD
p.36
2048X1536 1024X768
) will be
÷ A negative exposure compensation value reduces the exposure.
Notethat a positive exposure compensation value increasesthe exposure
SIZE
and the LCD monitor will appear white or you may not get good pictures.
720x480
(Movie)
640X480
QUALITY
SuperFine
Normal
320X240
r'l
[]_ll_llalor:_lB
n_mlB_l[]_mea
p.36
p.36
FRAME
*80FPS
I_
m
63
RATE
n
p.36
T,ME
METERING
AUTOFOCUS
(34}
15 FPS
_,_
_:1
Spot
Center AF
_.DQD_.Ea_""_]_O_DI_]
p.37
r,_ 1811BI
rz'll_
p.37
Menu_b
Main menu
Sub menu
Camera workingmode
Page
B_UUO_U_mD
p.38
Continuous
r'l
SHOOTING M0fl0nOaptdre AEB
1.Turn on the camera and press the MENU button. A menu for each camera
mode appears. However, there is no menu for Voice Recording mode ( _ ).
2. Use the LEFT and RIGHT buttonsto navigate through the menus.
Interval
SHARPNESS
OSD
INFORMATION
so_
Vivid
_ua,',_n_oo
............................................................
DaBQQE_m_a
p.3g
Basic
IOlolOIDaQaal_
3. Use the UP and DOWN buttons to selecta sub menu.
÷ * 30 FPS cannot be used in 800X592, 720X480 size.
÷ Menus are subjectto change without prior notice.
4. Select a sub menu, and then the value you set witl be saved.
Press the MENU button and the menu will disappear.
(35}
• You
can
select
theimage
size
appropriate
for
your
application.
Mode
Normal
Print
angle
Wide
angle
Stilt Icon []
!_
[]
[]
_
image
mode
Size
%vieclip
r_0de
Icon
Size
3264X
2448
2592X
1944
[]
800X592
2048X
1536
_
720X480
1024X
768
3264X
2176
I"_
640X480
3264X
1824
• You can select the compression ratio appropriate for your applicationof the
captured images. The higher the compression ratio, the lower the picture quality.
Mode
loon
STILL IMAGE mode
!!!
:':
Q
Q
Q
Sub menu
Super Fine
Fine
Normal
30FPS
20FPS
15FPS
File Format
jpeg
jpeg
jpeg
avi
avi
avi
320X240
[ STILL IMAGE mode [
[STILL IMAGE mode]
[MOVIE CLIP mode]
_!!!!!!!!!!!!!!!!ll!lllllll!lllllll!lllllll!lllllll!lllllll!lllllll!lllllll!lllllll!lllllll!lllllll!lllllll!lllllll!lllllll!lllllll!lllllll!lllllll!lllllll!lllllll!lllllll!lllllll!lllllll!lllllll!lllllll!lllllll!lllllll!lllllll!lllllll!lllllll!ll!!!l_ii
(36}
MOVIE CLIP mode
iiii
[ MOVIE CLIP mode ]
• If youcannot obtain suitableexposure conditions, you can change the metering
method to take brighter pictures.
[Multi] : Exposure wilt be calculated based on an
average of the available light in the image
area. However, the calculation will be biased
towards the centre of the image area.
This is suitable for general use.
[Spot] : Only the rectangular area in the centre of
[PROGRAM mode
the LCD monitor will be metered for light.
This is suitable when the subject in the
centre is exposedcorrectly, regardless of the back lighting.
_:ttf the subject is not the centre of the focus area, do not use the spot metering
as this may result in an exposure error. In this circumstance, it is better to use
exposure compensation.
• You can selectyour preferred Auto Focustype accordingto the shooting condition.
- [Multi AF]
:This camera selectsa AF point from
the 5 AF points.
- [Center AF] :The rectangular area inthe centerof
the LCD monitor will befocused
[PROGRAM mode]
[Multi AF]
[Center AF]
_:tWhen the camera focuses on the subject, the auto focus frame turns too green.
When the camera doesn't focus on the subject,the auto focus frame turns to
red.
(37}
• You can select continuous shot, and AEB (Auto Exposure Bracketing).
-[Singie]
- [Continuous]
:Take one picture only
:Images will be taken
continuously untit the shutter
button is released. Tile shooting
capacity depends on the
memory.
[PROGRAM mode]
- [Motion Capture] :This takes 30 sbets per second,
when the shutter is pressed and
held down. After completing the continuous shooting,
images are saved and the images play back on the Rear
LCD. The maximum number of shots is 30 and the image
size is fixed as 640X480.
- [AEB]
- [Interval]
:Take three pictures in a series in differentexposures: short
exposure (-0.5EV), standard exposure (0.0EV) and over
exposure (+0.5EV). Use the mode if it is hard to decide
exposure of the object.
:You can take images with interval and number of images
set before.
Up / Down button : Selectingthe interval menu or Number
of image menu.
Left / Right button : Changing the numbers
(01 rain-60 min / 02 pics-99 pics).
* After taking the first image, the LCD monitor turns off.
After taking the last image the camera turns off.
* Before using the interval shot, charge the battery fully.
If the battery is out duringthe shots, the last taken before
the camera was turned off.
(38}
• You can adjust the sharpness of the picture you
want to take. You cannot check the sharpness effect
on the LCD monitor before you take a picture,
because this function is applied only when the
captured image is stored on the memory.
• in any mode with the exception of VOICE
RECORDING mode, youcan check the recording
status in the LCD monitor.
[PROGRAM mode]
Sub menu
Soft
Description
Icon
The edges of the image are softened.
This effect is suitable for editing images on your PC.
The edges of the image aresharp.
Normal
[Full information]
[Basic information]
This is suitable for printing.
The edges of the image are emphasized. The edges
Vivid
will appear sharp, but noise may occur in the
recorded image.
(39}
g If the memory card is inserted in the camera, all the camera functions apply only
to the memory card.
g If the memory card is not inserted inthe camera all the camera functions apply
only to the internal memory.
g If you have turned on the camera by pressingthe POWER button, you can press
the PLAY MODE button once to switch to Play mode and press it again to switch
to Recording mode.
g You can tum the power on with the play mode button. The camera is turned on in
play mode. Press the play mode button again and the camera will be turned off.
g You can set up the PLAY mode function by using the camera buttons and LOD
monitor.
• Playingback a stiff image
1. Select the PLAY mode by pressing the
play mode button ( _ )
2. The last image stored on the memory is
displayed on the LCD monitor.
3. Select an image that you want to play
back by pressing the LEFT/RIGHT
button.
÷ Press and hold the Le_tor Right buttonto
fast forward the images played.
(40}
® Playingback a movie clip
Steps from 1-2 are the same as those to play back
a still image.
3. Select the recorded movie clip and press the
Play & Pause button to play back.
- To pause a movie clip fite while playing it back,
press the play & pause button again.
- Pressing the play & pause button again will
cause the movie clip file restart.
- To rewind the movie clip while it is playing,
press the LEFT button. To fast fo_ard the
movie clip press the RIGHT button.
- To stop playback of the movie clip, press the
play & pause button, and then press the LEFT
or RIGHT button.
•Movie
clip
capture
function
:capture
still
images
from
the
movie
clip.
• How
tocapture
the
movie
clip
Steps
1-3
are
the
same
asthose
forplaying
back
amovie
clip.
4.Press
the
Play
/ Pause button while playing the
movie clip. Then press the E button.
5. The paused movie clip is saved in a new file
name.
÷ The captured movie clip file has same size as
[Paused]
the original movie clip (800X592, 720X480,
640X480, 320X240)
[Pressing the E button]
• On camera movie trimming : You can extract desiredframes of movie clip during
the movie clip play back.
• If the running time is under 10 seconds, the movie
clip can't be trimmed.
1. Press the Pause button at the point of the movie
clip that you want to start extracting.
2. Press the OK button. (The start point doesn't
displayon the status bar, but the start point will be
marked.)
3. The movie plays back againand the extracted
range will be displayed on the status bar.
4. Press the Play & Pause buttononce more at the
point where you wish the extracted file to stop.
5. Press the OK button and a confirmationwindow
will display.
6. Select a desired sub menu by pressing the Left/
Right button and pressthe OK button.
[Yes] : The extractedframes are saved as a new
file name.
[No] : The movie trimming wilt canseL
{41_
• Playingback a recorded voice
Steps from f -2 are the same as those to play
back a stiffimage.
3. Select the recorded voice fite and press the
Play & Pause button to play back a recorded
voice file.
• The LCD monitor displays shooting information about the displayed image.
_m
®--
- To pause a recorded voice file, while playing
it back, press the play & pause button again.
- To resume playback of the voice file, press the play & pause button.
- To rewind the voice file while it is playing, pressthe LEFT button.
To fast forward the voice file pressthe RtGHTbutton.
- To stop playback of the voice file, press the play & pause button, and then
press the LEFT or RIGHT button.
@
®--
@
iiiiiiiiilii:_iililililiill
¸iiiiiiiiiiiiiiiiiiiiiiiiiiiiiiiiiiiiii_iii_!iiiiiiiiiiiiiiiiiiiiiiiiiiiiiiiiiiiI_!J_i_i
______________________________
l¸l¸l¸l¸l¸l¸l¸l¸l¸l¸l¸l¸l¸l¸l¸l¸l¸l¸l¸
iiiilililiiii_!iiiiiiii
1
(42}
Play mode icon
2
Battery
3
Voice Memo
_3_ C_
.,,,b
C_] CC]
p.10
p.21
4
Protect
o-,,
p.53
5
DPOF
..[3.
p.55
6
Recording date
2007/01/01
p.63
7
Image size
3264X2448 - 256Xl 92
p.36
8
Flash
ON/OFF
p.24
9
ISO
50 - 1600
p.32
10
Shutter speed
15-1/2000
p.15
11
Aperture value
F2.8 - F4.4
p.14
12
Foldername& File name
100-0007
p.62
•InPlay
mode,
you
can
use
the
buttons
onthe
camera
toconveniently
set
upthe
Play
mode
functions.
•You
can
view
multiple
pictures,
enlarge
aselected
picture,
and
crop
and
save
a
selected
area
ofanimage.
•Thumbnail
display
1.While
animage
isdisplayed
onfull
screen,
press
the
T o,
thumbnail
button.
2.The
thumbnail
display
will
highlight
the
image
that
had
been
showing
atthe
time
the
thumbnail
mode
was
selected.
3.Press
the
5function
button
tomove
toadesired
image.
4.Toview
animage
separately,
press
the
enlargement
button.
• Image enlargement
1. Select an image that you want to enlarge and
pressthe enlargement button.
2. Differentparts of the image can be viewed by
pressingthe 5 function button,
w
x
3. Pressing the thumbnail button will zoom back to
the original fult sized image.
- You can tel] whether the image displayed is an
enlarged view by checking the image
enlargement indicator shown at the top left of
the LCD monitor. (If the image is not an
enlarged view, the indicator will not be displayed.) You can also check the
area of enlargement.
- Movie clips and WAV files can't be enlarged.
- If an image is enlarged, a loss of quality may occur.
Pressing the thumbnail
button( [] )
Pressing the enlargement
button ( O, )
Highlighted image
[ Normal display mode ]
[ Thumbnail display mode ]
_43}
• The maximum enlargement rate inproportion to the image size.
Image size
8M
Max,mumenargemenrae
X 2.0
7MP
6MW
5M
3M
1M
Xl .3
X9.5
X9.0
X8.0
X4.0
• Trimming : You can extract part of the image that you
want and save it separately.
1. Select an image that you want to enlarge and
press the enlargement button. Press the Menu
button and a message will be displayed.
2. Select a desired sub menu by pressing the
Left/Right button and press the OK button.
[Yes] : The trimmed image will save as a new filename, and display on the
LCD monitor.
[No] : The trimming menu wiltdisappear.
÷ If there is little memory space to savethe trimmed image, the image can't be
trimmed.
÷ To delete the enlarged image during the trimming function, press the delete
button.
• When the menu is displayed on the LCD monitor,pressing the UP button makes
the menu cursor move up.
• When the menu is not displayed on the LCD monitor, the UP button operates as
the voice memo button. You can add your voice to a stored stillimage.
• Adding a Voice Memo to a Still Image
1. Press the LEFT/RIGHT button to select an
image that you wish to add sound to.
2. Press the voice memo button ( ,_ ) and the voice
memo indicatorwill display. The camera is now
ready to record a voice memo.
3. Press the shutter button to start recording and
voice will be recorded to the still image for 10
seconds. While the voice is recording,the
recording status window will be displayed as
shown alongside.
4. The recording can be stopped by pressing the
shutter button again.
5. The ( _ ) icon will be displayed on the LCD
monitor after voice memo recording has finished.
- Voice memos can't be recorded onto movie clip
and voice recording files.
- A distance of 40cm between you and the
camera (microphone) is the best distance to
record sound.
- The voice memowill be saved in *.wav format, but has the same file name
as the still image to which it corresponds.
- If you add a new voice memo to the stilt image that already has a voice
memo, the existing voice memo will be erased.
_,44}
• In Play mode, the play & pause/down button works as follows:
- If the menu is displayed
Press the DOWN button to movefrom the main menu to a sub menu,or to
move down the sub menu cursor.
- If a still image with a voice memo, a voice file, or a movie clip is playing
In Stop mode
: Plays a still image with a voice memo a voice file, or a
movie clip.
During playback : Temporarilystops playback.
In Pause mode : Resumes playback
[Voice recording is stopped]
[Voice recording is playing]
• It is possible to add specialeffects to your images by using this button.
1. Select a stillimage or movie clip and press
the E button.
2. Select a desired sub menu and press the
OK button.
_.
:Captured images will be stored in
black and white.
:Captured images will be stored in a sepia tone
(a gradient of yellowish brown coloars).
q_, :Captured images wilt be stored in a blue tone.
t_ :Captured images wilt be stored in a red tone.
_, :Captured images will be stored in a green tone.
:Save the image in negative mode.
[Voice recording ts paused]
÷ The changed image is saved in a new file name.
{45)
• This deletes images stored on the memory.
• Deleting Images in Play Mode
1. Select an image that yea want to delete by
pressing the LEFT/RIGHT button and press the
DELETE( t_ ) button,
2. A message will display as shown alongsideon
the LCD monitor.
3. Select the sub menu values by pressing the LEFT/
RIGHT button and then press the OK button.
If [Yes] is selected : deletes the selected images.
If [No] is selected : cancels "Delete Image".
_,46}
• Deleting Images in Thumbnail Display Mode
1. Use the UP, DOWN, LEFT, and RIGHT buttonsto select the image youwant
to delete, and then press the DELETE ( t_ ) button.
2. A message will display on the LCD monitor as shown below.
3. Select the sub menu values by pressing the LEFT/RIGHT button and then
press the OK button.
If [Yes] is selected :deletes the selected images.
If [No] is selected :cancels "Delete image".
Press the
delete button
• Ifyou
select
[Computer]
sub
menu
inthe
[USB]
setup
menu,
[Connecting
Computer]
message
will
display
when
you
connect
the
camera
toyour
printer
and
the
connection
will
not
beestablished.
Inthis
case,
press
thePrinter
button.
[Connecting
Printer[
message
will
display
and
the
Easy
printing
mode
will
beselected.
*tnsome
instances
the
camera
may
not
connect
tothe
printer,
this
will
depend
on
the
manufacturer
oftheprinter.
-After
the
connection,
the
Easy
printing
menu
wilt
display
ontheLCD
monitor.
Todisplay
the
PictBridge
menu,
press
the
Menu
button.
For
more
information
about
the
PictBridge
menu,
refer
topage
57.
• LEFT/RIGHT/MENU/OK
buttons
activate
the
following.
-LEFT
button
:While
the
menu
isshowing,
press
the
LEFT
button
toselect
themenu
tab
tothe
left
ofthe
cursor.
While
the
menu
isnot
showing,
press
the
LEFT
button
toselect
the
previous
image.
-RIGHT
button
:While
the
menu
isshowing
press
the
RIGHT
button
toselect
themenu
tab
tothe
right
ofthe
cursor,
ortomove
toa
secondary
menu.
While
the
menu
isnot
showing,
press
the
RIGHT
button
toselect
the
next
image.
-MENU
button
:When
you
press
the
MENU
button,
the
play
mode
menu
will
bedisplayed
ontheLCD
monitor.
Pressing
itagain
will
return
theLCD
totheinitial
display.
-OK
button:When
the
menu
isdisplayed
onthe
LCD
monitor,
the
OK
button
isused
for
confirming
data
that
ischanged
byusing
the
5function
button.
_47_
• PLAY mode functions can be changed by using the LCD monitor. _nthe PLAY
mode, pressing the MENU button displays the menu on the LCD monitor.The
menus you can set up in Play mode are as follows. To capture an image after
setting up the play menu, press the PLAY mode button or shutter button.
Menu tab
Main menu
Sub menu
Secondary menu
Page
2592 X 1944
2048 X 1536
1024 X 788
Menutab
Main menu
Submenu
Secondary menu
Show
Play/Repeat Play
InteHai
3M P (2018X 1344)
RESIZE
1,& 5, 10sec
2M W (1920X 1080)
p.50
Effect
Music
p.52
1MP(1032 X 688)
Off
SLIDE
Page
1MW(t280X720)
User Image 1,2
Off / Music 1,2,3
Select
Full
OSD
INFORMATION
PROTECT
Unlock/Lock
p.53
All Pics
Basic
p.51
Select
OSD Off
m
DELETE
p.53
All Pics
Right 90
COPYTO
CARD
Left 90°
ROTATE
180°
No
p.51
Standard
Select/All Pics/Cancel
Index
No/Yes
Size
Select! AllPics/Cance
Horizontal
Vertical
{48}
p.54
Yes
[]
DPOF
p.55
p.58
• This menu is availablewhile the camera is connectedto a PictBridge supporting
printer (direct connection to the camera, sold separately)with a USB cable.
Menu tab
Main menu
Sub menu
Secondarymenu
Menu tab
Main menu
Type
AUTO SET
Auto
p.58
Yes
Draft
Auto
[]
PostCard
CUSTOM
SET
Quality
Date
On
2L
Auto
File Name
A4
Auto
Standard
p.58
PRINT
Furl
1
Index
p.59
No
DPOF PRINT
2
4
Off
On
A3
Layout
Off
L
Letter
[]
p.58
Auto
4X6
CUSTOM
SET
Normal
Fine
Card
Size
Photo
FastPhoto
No
_1
Page
Plain
Page
p.57
All Pics
Secondary menu
Auto
One Pic
IMAGES
Sub menu
Yes
p.60
No
RESET
Yes
p.60
8
÷ Menus are subjectto change without prior notice.
9
16
Index
{49)
• Images can be displayed continuously at pre-set intervals.
You can view the slide show by connecting the camera to an external monitor.
f. Press the play mode button and press the menu button.
2. Press the LEFT / RIGHT button and selectthe [SLIDE] menu tab.
• Start the slide show :The slide show can startonly in the [Show] menu.
1. Use the Up/Down buttons to select the [Show]
menu and press the Right button.
2. Select a desired sub menu by pressing the
Up/Down button.
[Play] :The slide show is closed after one cycle.
[Repeat Play] : The slide show is repeated until
cancelled.
3. Press the OK button and the slideshow will be
started.
• Setting play interval : Set the slide show play interval.
1. Select the [Interval] sub menu by pressing the
UP/DOWN button and press the RIGHT button.
2. Use the Up/Down buttons to select the desired
interval
3. Press the OK button to save the configuration.
• Configure slide show effects : Unique screen effects can be used for the slide
show.
1. Select the [Effect]sub menu by pressing the
UP/DOWN button and press the RIGHT button.
2. Use the Up/Down button to select the type of
effect.
Off
[3J
: Normal display.
: Image is displayed slowly.
: Image is displayed slowly from the centre
outwards.
: Image moves from the top left.
: The image slides diagonally from top left to bottom right.
: The image slides irregularly.
3. Press the OK button to confirm the setting.
• Setting B.G.M: Set the slide show music.
1. Select the [Music] sub menu by pressingthe UP/
DOWN button and press the RIGHT button.
2. Use the Up/Down buttons to select the desired
Music.
3. Press the OK button to save the configuration.
iiiiiiiiiiiii
{50}
• You can check shooting informationabout the displayed image.
• Hew to select the type of information you want to see
1. Press the play mode button and pressthe menu
button.
1. Press the play mode button and press the menu
button.
2. Press the LEFT/RIGHT button and selectthe
2. Selectthe [OSD INFORMATION] menu tab by
pressingthe LEFT/RIGHT button.
3. Select a desired sub menu by pressing the UP/
DOWN button and press the OK button.
[Full]
[Basq
• You can rotate the stored images by various degrees. Once the playback of the
rotated picture is finished, it will switch back to the original state.
[ROTATE] menu tab.
3. Select a desired sub menu by pressing the UP/
DOWN button.
[Right 90'] :
[Left 90 ]:
Rotate picture in a
dock-wbe direction
Rotate picture in a counter-
[180_]:
Rotate picture t80
dock-wbe direction
degrees
[OSDOff]
[Horizontal] :
[Vertical] :
Rotate picture horizontally
Rotate picture vertically
4. Press the OK button. The rotated image will be saved with a new file name
and the menu will disappear, tf you display the rotated image on the LCD
monitor,empty spaces may appearto the left and right of the image.
(51}
• Change
the
resolution
(size)
ofpictures
taken.
Select
the[User
Image]
tosave
animage
tobethe
start-up
image.
The
resized
image
will
have
anew
file
name.
f.Press
the
play
mode
button
and
press
the
menu
button.
2.Press
theLEFT/RIGHT
button
and
select
the
[RESlZE]
menu
tab.
3.Select
adesired
sub
menu
bypressing
the
UP/
DOWN
button
and
press
the
OK
button.
• Image
Resize
Types
...............
8M
2592X1944
0
1024X768
User Image 1,2
0
0
0
5M
X
0
0
0
gM
X
X
0
0
1M
X
X
X
2016X1344
7MP
6MW
{52}
2048X1536 ;;
i
1032X688
0
User Image 12
O
O
O
1920X1080
1280X720
User Image 1,2
O
O
O
• A large sized image can be resized to a smaller sized image, but not vice versa.
• Only JPEG images can be resized. Movie clip (AVI), Voice recording (WAV) files
can't be resized.
• You can change the resolution of only those files compressed inthe JPEG 4:2:2
format.
• The resized image will have a new file name. The [User Image] image is stored
not on the memory card but on the internal memory.
• Only two [User Image] images can be saved.
• If the memorycapacity is insufficient to store the resized image, a [Memory Full!]
message will display on the LCD monitor and the resized image will not be stored.
• This is used to protect specific shots from being accidentally erased (Lock).
It also unprotects images that have been previously protected (Unlock).
• Protecting Images
1. Press the play mode button and pressthe menu
button.
2. Press the LEFT/RIGHT button and selectthe
[PROTEC]] menu tab.
3. Select a desired sub menu by pressing the UP/
DOWN button and press the OK button.
[Select ] : Selection window for an image to be
protected/released is displayed.
- Up/Down/Left/Right :Select an image
- Zoom W/T Button :Protect/release the image
- OK button
:Your changes will be
saved and the menu will
disappear.
rAil Pics]: Protect/release all saved images
- Zoom W/T Button :Protect/release the images
- OK button
:Your changes will be saved
and the menu will
disappear.
- If you protect an image, the protect icon will be
displayed on the LCD monitor. (An unprotected
image has no indicator)
- An image in LOCK mode wilt be protected from
the delete function or [Delete]functions, but will
NOT be protected from the [Format] function.
Of all the files stored in the memory card, the unprotected flies in the DCIM
subfolder will be deleted. Remember that this wilt permanentIy delete
unprotected images. Important shots should be stored on a computer before
deletion takes place. The startup image is stored in the camera's internal
memory (i.e., not on the memory card) and it will not be deleted even if you
delete all files on the memory card.
Deleting images
1. Press the play mode button and press the menu
button.
2. Press the LEFT/RIGHT button and selectthe
[Delete]menu tab.
3. Select a desired sub menu by pressing the UP/
DOWN buttonand press the OK button.
[Select] : Selectionwindow for an image to delete
is displayed.
- Up/Down/Left/Right : Select an image
- Zoom T Button : Select the image for deletion.
( ,z mark)
- OK Button : Press the OK button to display the
confirmation message. Select the
[Yes] menu and press the OK button
to delete ,z marked images.
rAil Pics] : Displaysconfirmation window. Select
the [Yes] menu and press the OK
button to delete all unprotected images.
tf there aren'_protected images, all the
images are deleted and a [No Image!] message will display.
4. After deletion,the screen will be changed to the play mode screen.
(53}
• This enables you to copy image files, movie clips and voice recording files to the
memory card.
• Copying to the Memory Card
1. Press the play mode buttonand press the menu
button.
2. Select the [COPY TO CARD] menu tab by
pressing the LEFT/RIGHT button.
3. Select a desired sub menu by pressing the UP/
DOWN button and press the OK button.
-[No] : Cancets "Copy to Card".
- [Yes] :Alt images, movie clips and voice recording files saved in the internal
memory are copied to the memory card after the [Processing!]
message is displayed. After copying has been completed, the
screen will returnto play mode.
(54}
DPOF(Digital Print Order Format) allows you to embed printing informationon
your memory cards MISC folder. Select the pbtures to be printed and how many
prints to make.
BThe DPOF indicatorwill display on the LCD monitor when an image that has
DPOF information plays back. Imagescan then be printed on DPOF printers, or
at an increasing number of photo labs.
This function is not availablefor Movie clips and Voice recording files.
When the wide angle image is printed as a wide angle print, 8% of the left and
right side of the image may not be printed. Check that your printer can support
the wide angle image when you printthe image. When you print the image at a
photo lab, request that the image is printed as a wide angle image. (Some photo
labs may not support the wide angle size print.)
• This function allows you to embed printing quantity information on a stored
image.
1. Press the play mode button and press the menu
button.
2. Press the LEFT/RIGHT button and selectthe
[DPOF] menu tab.
3. Selectthe [Standard]menu by pressingthe UP/
DOWN button and press the RIGHT button.
4. Select a desired sub menu by pressing the UP/
DOWN buttonand press the OK button.
[Select] : Selectionwindow for an image to print is
displayed.
- Up/Down/Left/Right : Select an image to print.
- Zoom W/T Button
: Select the number of
prints.
rAil Pics] :Configure number d printsfor all
pictures except movie and voice files.
- W/T button : Select a number of prints
[Dance}] : Cancel the printsetup.
5. Press the OK button to confirm the setting.
tf an image carries DPOF instructions, the DPOF
indicator( ..13.) wilt show.
<,55_
• Images (except for movie clips and voice file) are printed as indextype.
1. Press the play mode buttonand press the menu
button.
2. Press the LEFT/RIGHT button and select the
[DPOF] menu tab.
3. Select the [Index] menu by pressing the UP/
DOWN button and press the RIGHT button.
4. Select a desired sub menu by pressing the UP/
DOWN button.
If [No] is selected : Cancel the index print setting.
If [Yes] is selected : The image will be printed in index format.
5. Press the OK button to confirm the setting.
• You can specifythe printsize when printing images stored on the memory card.
The [Size] menu is availableonly for DPOF 1.1 compatible printers.
• Settingthe Print Size
2.
the
button
select
1. Press
button.Press
the LEFT/RIGHT
play mode button
andand
press
the the
menu
[DPOF] menu tab.
3. Select the [Size] menu by pressing the UP/
DOWN button and press the RIGHT button.
4. Select a desired sub menu by pressingthe UP/
DOWN button and press the OK button.
[Select] : Selection window for an image to be
changed printed size is displayed.
- Up/Down/Left/Right : Select an image.
- Zoom W/T Button
: Change the print size.
- OK button
: Your changes wilt be
saved and the menu will
disappear.
[A{I Pics] : Change print size of all saved images.
- W/T button : Select a print size
- OK button : Confirm the changed setting.
[Cancel] : Cancel all of the print size settings.
÷ DPOF [Size] secondary menu : Cancel, 3X5, 4)(6, 5X7, 8X10
(56}
• You
can
use
the
USB
cable
toconnect
this
camera
toaprinter
that
supports
PictBridge
(sold
separately)
and
print
the
stored
images
directly.
Movie
clips
and
voice
files
cannot
beprinted.
• Setting
upthe
camera
for
connection
with
the
printer
1.Inany
mode
with
theexceptionof Voice Recording
mode, press the MENU button.
2. Press the LEFT/RIGHT button and select
[SETUP] menu tab.
3. Select [USB] menu by pressing the UP/DOWN
button and press the RIGHT button.
4. Select [Printer]menu by pressing the UP/DOWN
button and press the OK button.
If you selected [Computer] in Step 4, when you connected the camera to your
printer,the [Connecting Computer] message will disptay and the connection wilt
not be established. In this case, disconnectthe USB cable, and then follow the
procedure from Step 2 and onward. Or, press the Printer button and the camera
is connected to the printer displayingthe [Connecting Printer] message. But, the
camera may not connect to the printer,depending on the manufacturer and
modet of the printer.
Easy printing
When you connect the camera to printer in the Play
back mode, you can print a picture easily.
- Pressing the printer( ,.E),.) button :
Currently displayed image will be printed withthe
printer's default setting.
- Pressing the Left / Right button :
Selects a previous / next image.
Select pictures to print
1. Press the Menu button.
2. The [IMAGES] menu will appear.
3. Use the UP and DOWN buttons to select the
desired sub menu value, and then press the OK
button.
When [One Pic] is selected
:The PictBfidge function will be applied only to the
picture currently displayed.
When JAilPics] is selected
:The PictBridge function will be appiied to all pictures, excluding movie clips
and voice files.
{57)
• Setting the Number of Copies to Print
- Select [One Pic] or [All Pics]. A screen where you can set the number of copies
to print will appear as shown below.
• AUTO SET
1. Use the LEFT and RIGHT buttons to select the
[AUTO SET] menu tab.
2. Use the UP and DOWN buttons to selectthe
desired sub menu value, and then press the OK
button.
[No] : [CUSTOM SE]7 values are kept.
[Yes] : All values in the [CUSTOM SET] are
automatically changed.
[When [One Pic] isselected]
[When [All Pics] is selected[
- Press the Up/Down buttonto select the number of prints.
- When [One Pic] is selected : Use the Left/Right button to select another
picture. After selectinganother picture, select the number of prints for another
picture.
- After setting the number of prints, pressthe OK buttonto save.
- Press the Shutter button to returnto the menu without settingthe number of
prints.
• Custom Set : You can selectthe Paper Size, Print Format, Paper Type, Print
Quality, Date Print, and File Name Print menus for printed pictures.
1. Use the LEFT and RIGHT buttons to select the
[CUSTOM SET menu tab.
2. Use the UP and DOWN buttons to selectthe
desired sub menu value, and then press the
RIGHT button.
3. Use the UP and DOWN buttons to selectthe
desired sub menu value, and then press the OK
button.
_58:_
Menu
Size
Layout
Function
Settingthe size of the printing
paper
Sub menu
Auto, PostCard,Card 4x6, L. 2L,
Letter, A4, A3
Settingthe number of pictures to
be printed on a sheet of paper
Auto, Full 1, 2. 4, 8. 9 16 Index
Type
Settingthe quality of the printing
paper
Auto, Plain, Photo, FastPhoto
Quality
Settingthe quality of the picture
to be printed
Auto, Draft,Normal, Fine
Date
Settingwhether to print the date
Auto, Off,On
File Name Setting whether to print the file
name
Auto, Off,On
÷ Some menu options are not supported in all manufacturer and printer models.
If not supported, the menus are stilt displayed inthe LCD, but are not selectable.
÷ If the setting values are not changed in the automatic / manual setting, the
settingvalues are automaticallykept.
• Printing Pictures
1. Use the LEFT and RIGHT buttonsto select the [PRINT] menu tab.
2. Use the UP and DOWN buttons to select the desired sub menu value, and
then press the OK button.
[Standard] :Print the pictures stored in the
memory card in set numbers.
One picture is printed on one piece of
paper.
[Index]
:Print multiple images on one sheet of
paper.
3. The screen shown on the right will appear and
the picture wilt be printed. If no picture is
selected the [No Image!] message wilt be
displayed. Press the LEFT button while printing
to cancel the printing and the [PRINT] menu is
displayed.
÷ Number of pictures in an index print varies
depending on the printer used.
_59_
• DPOF
Print
:This
allows
you
todirectly
print
the
files
with
DPOF
information.• Initialises
user-changed
configurations.
f.Use
the
LEFT
and
RIGHT
buttons
toselect
the
1.Use
the
LEFT
and
RIGHT
buttons
toselect
the
[DPOF
PRIN'[]
menu
tab.
[RESEll
menu
tab.
2.Use
the
UP
and
DOWN
buttons
toselect
the
2.Use
the
UP
and
DOWN
buttons
toselect
the
desired
sub
menu
value
and
then
press
the
desired
sub
menu
value,
and
then
press
the
ON
OK
button.
button.
[No]:Cance_the
printing
If[No]
isselected
:Settings
wilt
not
bereset.
[Yes]
:Directly
print
the
file
with
theDPOF
If[Yes]
isselected
:Allprint
and
image
settings
information.
will
bereset.
÷Depending
onthe
manufacturer
and
pnntermodel,
some
menusmay
not
be
÷Default
print
setting
varies
depending
onthe
printer
manufacturer.
available.
For
your
phnter
sdefault
setting,
refer
tothe
user's
guide
that
came
with
your
When
aprinter
does
nctsuppo_DPOF,
the
menu
isstil]
displayed
but
not
printer.
available.
{60}
gInthis
mode,
you
can
set
upbasic
settings.
You
can
use
the
setup
menu
inall
camera
modes
except
Voice
Recording
mode.
The
items
indicated
by
are
default
settings.
Menu tab
Main menu
File
Power Off
Language
Format
Sub menu
Secondary menu
Reset
Page
Menu tab
Main menu
World Time
p.62
Off, 1_3;5,10rain
p.62
ENGLISH
DEUTSCH
_o-f
ESPANOL
FRANQAIS
ITALIANO
_¢¢€_
_:_€_
PYCCKH_
POBTUGUES
DUTCH
SVENSKA
SUOMI
DANSK
BAHASA
_ ,,_
C:e_tina
POLSKI
Magyar
Tt_rkge
Secondary menu
New York, Miami
Beijing, Hong Kong
Seoul, Tokyo
Caracas, La Paz
Buenos Aires
Guam Sydney
Mid-Atlantic
Imprint
Date
AF Lamp
p.62
Off
Low
USB
p.63
dd/mm_iy
Off
World Time
p.64
p.64
High
LCD
Cape Verde
London
p.64
Off
Sound
Printer
Dark
mm/dd_/y
p.64
i
07/01/01 13:00
Date&Time
Page
Date&Time
p.63
Yes
Sub menu
Bangkok, Jakarta
p.65
Bright
Video Out
Okhotsk
p.65
Quick View
PAL
p.65
Off/0.5, 1,3sec
p.66
Yes
p.66
Wellington, Auckland
Rome, Paris, Berlin
Athens, Helsinki
Moscow
Samoa, Midway
Honolulu, Hawaii
Alaska
Abu Dhabi
Tashkent
LA, San Francisco
Denver, Phoenix
Aimaty
Chicago, Dallas
Reset
p.64
÷ Menus are subject to change without prior notice.
{61}
[ File name ]
[ Autopower off ]
• This function allows the user to selectthe file naming format.
• This function switches the camera off after a set amount of time in order to
prevent unnecessary battery drainage.
• Assigning File Names
1. tn any mode with the exception of Voice
Recording mode, press the MENU button.
2. Press the LEFT/RIGHT buttonand select the
[SETUP] menu tab.
3. Select the [File ] menu by pressingthe UP/
DOWN button and press the RIGHT button.
4. Select a desired sub menu by pressingthe UP/
DOWN button and press the OK button.
[Series] : New files are named using numbers that follow the previous
sequence, even when a new memory card is used, or after
formatting, or after deleting all pictures.
[Reset] : After using the reset function,the next file name wilt be set from
000t even after formatting, deleting all or inserting a new memory
card.
5. Press the menu button twice and the menu will disappear.
- The first storedfolder name is 100SSCAM, and the first file name is
SS850001.
- File names are assigned sequentiallyfrom SS850001 _ SS850002 _ ~
SS859999.
- The folder number is assigned sequentiallyfrom 100 to 999 as follows:
100SSCAM _ 101SSCAM _ ~ _ 999SSCAM.
- The files used with the memory card conform to the DCF (Design rule for
Camera File systems) format. If you change the image file name, the image
may not play back.
{62}
• Sub menus
[Off]
: The power off function will not
operate.
[1,3, 5,10 mini : The power will turn off
automatically if not used for the
period of time specified.
- After replacing the battery, the power off setting win
be preserved.
- Note that the automatic power off function will not operate if the camera is in
PC mode, slide show, playing back a voice recording, playing back a movie clip
and taking a composite shot.
[ Language]
• There is a choice of languages that can be displayed on the LCD monitor.
Even if the battery is removed and inserted again, the language setting will be
preserved.
- LANGUAGE sub menu :
English, Korean, French, German, Spanish,
Italian, S.Ohinese,T.Ohinese, Russian,
Portuguese, Dutch, Danish, Swedish, Finnish,
Thai, BAHASA(MALAY/INDONESIAN), Arabic,
Czech, Polish, Hungarianand Turkish.
[ Formattinga memory ]
• This is used for formatting the memory. If you run [Format] on the memory, all
images, including the protected images, will be deleted. Be sure to download
important images to your PC before formatting the memory.
• Sub menus
[No] : The memory will not be formatted. Press the
menu button three times and the menu
display wiltdisappear.
[Yes] : A [ProceseingE]message appears and the
memory will be formatted. If you run
FORMAT in Play mode, a [No Image!]
message will appear.
Be sure to run [Format] on the following types of memory card.
- A new memory card, or an unformatted memory card
[ Settingup the Date/Time/Date type ]
• You can change the date and time that will be displayed on the captured images
and set up the date type.
• Setting Date/Time & Selecting Date Format
RIGHT button :Selects the year/month/day/
hour/minute date type.
LEFT button
: Movesthe cursorto the
[Date&Time] main menu if the
cursor is at the first item of the
date and time setup. In all other
cases, the cursor wilt be shiftedto
the left of its current position.
UP and DOWN buttons : Changes the setting value
- Date type : [yy/mm/dd], [mm/dd/yy], [dd/mm/yy], [Off]
- A memory card that has a filethis camera can't recognise or one that has been
taken from another camera.
- Always format the memory card using this camera. If you insert a memory card
that has been formatted using other cameras, memory card readers, or POs,
you will get a [Card Error!] message.
{63}
[World Time ]
[ Auto Focus lamp]
R This menu enables you to displaythe local date and time on the LCD monitor.
• You can turn on and off the Auto Focus lamp.
• Sub menus
[Off] :The AF lamp will not light up in a low light
condition.
[On] :The AF lamp will light up in a low light
condition.
[ Imprintingthe recordingdate ]
[ Sound ]
• There is an option to include DATE / TIME on still images.
• If you set sound to ON, various sounds will be activated for camera startup,
when buttons are pressed, so that you can be aware of the camera operation
status.
• Sub menus
[Off]
:The DATE & TIME will not be
imprinted on the image file.
:Only the DATE will be imprinted on
the image file.
[Date&Time] :The DATE & TIME will be imprinted
[Date]
on the image file.
{64)
• [Sound] sub menu : Off/Low/Medium/High
[ Connectingan ExternalDevice(USB)]
• You can select an external device to which you want to connect the camera
using the USB cable.
• Sub menus
- [Computer] : Selectthis if you want to connect the
camera to your PC. Refer to page 77
for instructions on how to connect the
camera to your PC.
- [Printer]
: Selectthis if you want to connect the
camera to your printer.
Referto page 57 for instructions on
how to connect the camera to your
[ SelectingVideo out type ]
• The Movie output signal from the camera can be NTSC or PAL.
Your choice of output will be governed by the type of device (monitor or TV, etc.)
to which the camera is connected. PAL mode can support onty BDGHI.
• Connecting to an external monitor
In RECORDING/PLAY mode, you can view the
stored still images or movie clips by connecting the
camera to an external monitor via the AV cable.
When the camera is connected to an external
monitor,the LCD monitor wilt be turned off
automatically.
printer.
[ LCD brightness]
• You can adjust the LCD brightness.
• [LCD] sub menu : Dark, Normal, Bright
{65}
- NTSC
: U.S.A, Canada, Japan, South Korea, Taiwan, Mexico.
[ Quickview ]
- PAL
: Australia, Austria Belgium, China, Denmark, Finland Germany,
U.K. Holland, Italy, Kuwait,Malaysia, New Zealand, Singapore,
• If you enable Quick View before capturing an image, you can view the image
you just captured on the LCD monitor for the duration set in the [Quick View]
setup. Quick view is possible only with still images.
Spain, Sweden Switzerland Thailand, No_,ay.
- When using a TV as an external monitor, you will need to select the external or
AV channel of the TV.
• Sub menus
[Off]
- There will be a digital noise on the external monitor,but it is not a malfunction.
- If the image is not in the centre of the screen, use the TV controls to centre it.
:The quick view function can't be
activated.
[0.5, 1 3 sec] : The captured image is briefly
displayed duringthe selected time.
- When the camera is connected to an external monitor, the menu will be visible
on the external monitor and the menu functions are the same as those
indicated on the LCD monitor.
[ Initialisation]
• All camera menu and function settings will be restored to their default values.
However, values for DATE/TIME, LANGUAGE, and VIDEO OUT will not be
changed.
• Sub menus
[No] : Settingswill not be restored to their
defaults.
[Yes] :All settingswill be restored to their
defaults.
{66}
• You
can
set
upastart
upimage,
start
upsound
and
shutter
sound.
Every
camera
working
mode
(with
the
exception
ofVoice
recording
mode)
has
the
MyCAM
menu.
The
items
indicated
by
are
default
settings.
Menu
tab Main
menu
Sub
menu
Page
LOGO
Start
Image User
p.67
Image
I
User Image 2
• You can select the sound that is activated whenever the camera is turned on.
• Start up sound : [Oft], [Sound 1], [Sound 2],
[Sound 3]
- If the start up image is set to [Off], the start up
sound will not activate, even though you may
have set these to on.
Sound 1
Start Sound
Shutter Sound
Sound 2
Sound 3
off
Sound 2
Sound 3
p.67
p.67
÷ Menus are subject to change without prior notice.
• You can select the image that is first displayed on the LCD monitor whenever
the camera is turned on.
• You can select the shutter sound.
• Shutter sound : [Off], [Sound 1],[Sound 2],
[Sound 3]
or [Format]menu.
-The Userimageswillbedeletedby[Reset]menu.
{67}
Be sure to observe the following precautions!
• This unit contains precision electronic components. Do not use or store this unit
in the following locations.
- Areas exposed to severe changes in temperature and humidity.
- Areas exposed to dust and dirt.
- Areas exposed to direct sunlightor the inside of a vehicle in hot weather.
- Environments where there is high magnetism or excessive vibration.
- Areas with high explosives or highly flammable materials.
• Do not leave this camera in places subject to dust, chemicals(like naphthalene
and mothball), high temperature and high humidity.
Keep this camera with silica gel ina hermetically sealed box when not planning
to use the camera for a long periodof time
• Sand can be particularlytroublesome to cameras.
- Do not let sand get inside the camera when using it on beaches, coastal
dunes, or other areas where there is lots of sand.
- Doing so may result in failure or may permanently render the camera unusable.
• Handling the camera
- Never drop the camera or subject it to severe shocks or vibrations.
- Protect the large size LCD monitor from an impact. When this camera is not
used, keep it in the camera case.
- Avoid obstructing the lens or the flash when you capture an image.
- This camera is not waterproof.
To avoid dangerous electrical shocks, never hotdor operate the camera with
wet hands.
- If you use this camera in wet places, such as beach or pool, do not let water or
sand get inside the camera. Doing so may result in failure or may permanently
damage the unit.
(68}
Extremes in temperature may cause problems.
- If the camera is transferred from a cold to a warm and humid environment,
condensation can form on the delicateelectronic circuitry, if this occurs, turn
the camera off and wait for at least 1 hour until all moisture is dispersed.
Moisture built up can also occur on the memory card. If this happens, turn off
the camera and remove the memory card. Wait untilthe moisture has
dispersed.
Caution on Using the Lens
- If the lens is subjectedto direct sunlight, it could result in the discoloration and
deterioration of the image sensor.
- Pay attention not to get fingerprints or foreign substances on the surface of the
lens.
If the digitalcamera is not used for a long period, an electric discharge can
occur.
It is a good idea to remove the battery and the memory card if you do not intend
using the camera for an extended period of time.
If the camera is exposed to an electronic interference, it will turn itself off to
protect the memory card.
• Camera
Maintenance
-Use
asoft
brush
(available
from
photo
stores)
togently
clean
thelensand LCD
assemblies• If this does not work, lens-cleaningpaper with lens cleaning fluid
can be used.
Cleanthe camera body with a soft cloth• Do not allow this camera to come into
contact with solvent materials such as benzol, insecticide,thinners etc. This
may damage the body sbeltof the camera and also affect its performance.
Rough handling can damage the LCD monitor. Take care to avoid damage
and keep the camera in its protective carry case at all times when not in use.
• Do not attempt to disassemble or modify the camera.
• Under certain conditions,static electricitycan cause the flash unit to fire• This is
not harmful to the camera and is not a malfunction.
• When images are uploaded or downloaded, the data transfer may be affected by
static electricity. In this case, disconnect and re-connect the USB cable before
tryingthe transfer again•
• Before an important event or going on a trip, you shouldcheck the camera
condition.
- Take a picture for testingthe camera condition and prepare extra battery.
- Samsung cannot be held responsiblefor camera malfunctions•
• There are several warnings that may appear on the LCD display
Memory Error!
• Memory card error
Turn offthe camera power and turn it on again
Insert the memory card again
tnsert and format the memory card (p.63)
Card Locked!
• The memory card is locked
SD/SDHC memory card :Slide the write protect switch to the top of the
memory card
No Card!
• A memory card is not inserted
tnsert the memory card again
Turn offthe camera power and turn it on again
No Image!
• There are no images stored on the memory
Take images
Insert a memory card that is holding some images
File Erro!!
• Fileerror
Format the memory card
• Memory card error
Contact a camera service centre
{69}
Low Battery!
- There is low battery capacity
Insett fresh batteries.
Low Light!
- When taking pictures in dark places
Take pictures in Flash Photography mode.
Battery power quickly drains
• The Camera is being used in low temperatures
Keep the camera in warm conditions (i.e. inside a coat or jacket) and only
remove it in order to take images
Camera does not take images when pressing the Shutter button
• There is insufficient memory capacity
Delete unnecessary image files
• The memory card has not been formatted
Formatthe memory card (p.63)
• The memory card is exhausted
Inserta new memory card
• Please cbeckthe following
The camera doesn't switch on
- There is tow battery capacity
Insert fiesh batteries. (p.10)
. Battery is inserted incorrectlywith the polaritiesreversed•
tnsert the battery according to the polarity marks (+, -)
- Battery is not inserted
tnsert the battery and turn on the camera
The camera power ceases while in use
- The battery is exhausted
tnsert fresh batteries
- The Camera is turned off automatically
Turn on the camera power again.
(70}
• The memory card is locked
Referto [Card Locked!] error message (p.69)
• The camera' s power is off
Turn the camera power on
• The battery is exhausted
Insertfresh batteries. (p.10).
• Battery is inserted incorrectly with the polarities reversed•
Insertthe battery according to the polarity marks (+, -)
The camera suddenly stops working while in use
• The camera stopped due to a malfunction
Remove/re-insert battery and switch the camera on
The images are unclear
• A picture was taken the subject without setting an appropriate macro mode
Select an appropriate macro mode to take a clear image.
• Taking a picture beyond the flash range
Take a picture within the flash range
• The lens is smudged or dirty
Clean the lens
Colour of image is different to the original scene
• White balance or effect setting is incorrect
Select appropriate White balance and effect
The flash does not fire
• Flash off mode has been selected
No image on externaJmonitor
• The externaJmonitor has not been connected propedywith the camera
Check the connection cables
Dis-engage flash off mode
• The camera mode can t use the flash
Refer to the FLASH instruction (p.24)
Incorrect date and time is displayed
• The date and time have been set incorrectly or the camera has adopted the
default settings
_Reset the date and time correctly
The camera buttonsdo not operate
• Camera malfunction
Remove/re-insert battery and switch the camera on
A card error has occurred while the memory card is in the camera.
• incorrect memory card format
Re-format the memory card
Images are too bright
• Exposure is excessive
Reset exposure compensation
• There are incorrectfiles inthe memory card
tnsert a memory card that has correct files
When using the PO's explorer, the [Removable Disk] file does not show
• Cable connection is incorrect
Check the connection
• The camera is off
Turn the camera on
• The operating system is not Windows 98, 98SE, 2000, ME, XP/Mac OS 10.0 10.3. Alternativelythe PC does not support USB
InstallWindows 98, 98SE, 2000, ME, XP/Mac OS 10.0 - 10.3to PC that
supports USB
• The camera driver is not installed
Installa [USB Storage Driver]
The images don't piay back
• incorrect file name (Violation of DCF format)
Do not change the image file name
{71}
• Image Sensor
- Type : 1/1.8" CCD
• Exposure
- Control : Program AE, Shutter Priority AE, Aperture PriorityAE or Manual
- Effective Pixel :Approx. 8.1Mega-pixel
- Total Pixel :Approx. 8.3Mega-pixel
Exposure
- Metering : Multi, Spot
- Compensation : +2EV (1/2EV steps)
- ISO Equivalent :Auto, 50, 100,200, 400, 800, 1600
• Lens
- Focal Length : SliD f = 7.8 N 39mm (35mm film equivalent :38 ~ 190mm)
- F No. : F2.8_4.4
- Digital Zoom :, Still Image mode : 1.OX~ 5.0X
• Play mode : 1.0X _ 12.0X (depends on image size)
• Focusing
- Type : 7L auto focus, AF Assist Lamp, Manualfocus, Multi Point AF
- Range
Wide
Tele
Wide
Tele
Macro
80cm -infinity
10~ 80cm
50~ 80cm
SuperMacro
1_10cm
- Modes : Auto, Auto & Red-eye reduction, Flit-inflash, Slow sync, Flash off
- Range : Wide :0.2m ~3.0m
Tete :O.5m _2.5m (ISO AUTO)
- Recharging Time : Approx. 5 sec.
• LCD Monitor :2.5" color TFT LCD (230,000 dots)
Normal
• Flash
Auto Mode
• Sharpness : Soft, Normal, Vivid
• Effect : Color(Normal, B/W, Sepia, Negative, Red, Green, Blue)
Composite, Highlight, Frame
10cm~ infinity
50cm~ infinity
ManualFocus
• White Balance :Auto, Daylight, Cbudy, FluorescentH, FluorescentL,
lcm ~ infinity
50cm ~ infinity
• Voice Recording : Voice Recording (max. 1hour)
Voice Memo in Still Image (max. 10 sec.)
Tungsten, Custom
• Date Imprinting : Date, Date&Time, Off (user selectable)
• Shutter
- Speed : Auto : 1 ~ 1/2,000 sec.
M, S Mode : 15 _ 1/2,000 sec.
Night : 15 ~ 1/2,000 sec.
Fireworks :4 sec.
• Shooting
-StilI Image: , Modes : Auto, Program, A, S, M, ASR, Scene
• Scene : Night, Portrait, Children, Landscape, Close-up, Text,
Sunset, Dawn, BacHight, Fireworks, Beach & Snow
• Continuous :Single, Continuous, Motion Capture, AEB,
IntervalShooting
• Self-timer : 10 sec., 2 sec., Doubie(10sec., 2sec.)
(72}
-Movie
Clip
:. With
Audio
(recording
time
:memory
capacity
dependent)
• Size: 800x592 720x480, 640x480 320x240
g Image Play
- Type : Single image, Thumbnails, Slide show, Movie Clip
• Frame rate :30 fps, 20 fps, 15 fps
(15/20 fps for 800x592, 720x480)
- Editing :Trimming, Resizing Rotate, Color Effect
g Interface
• Stabifizer
. Optical Zoom :up to 5.0X
- Digitaloutput connector : USB 2.0(High Speed)
- Audio : Mono
g Storage
- Media :. Internalabout 20MB
- Video output : NTSO, PAL (user selectable)
- DO power input connector : 3.3V
• Externalmemory : SD / MMO/SDRO (up to 4GB guaranteed)
- File Format : . Still Image : JPEG (DCF), EXlF 2.2, DPOF 1.1, PictBridge 10
• Movie Clip : AVl (MPEG-4)
• Audio : WAV
- Primary Battery : 2x AA Alkaline
- Rechargeabie battery(Optional) : SNB-2512 KIT or SNB-2512B KtT
- Image Size
, Normal Shooting Mode
(2xAA Ni-MH Battery & Charger)
÷ lnc]aded battery may vary depending on sales region.
8M
5M
3M
1M
3264X2448
2592X1944
2048X1536
1024X788
8M
Wide angle
g Power Source
g Dimensions (WxRxD) : 104 x 83.6 x 24.8 mm (excluding protrusion)
g Weight :172g (without batteries and card)
7M
Print angle
3264X1824
3264X2176
g Operating Temperature :0 ~ 40° O
g Operating Humidity : 5 _85%
- Internal Capacity (258MB MMC(Multi Media Card))
g Software
8M
i
7MP
SuperFine
57
68
Fine
103
115
Normal
180
206
6MW
84
134
233
5M
3M
ii
1M
93
172
iI
558
265
11 663
425
ii
i
158
i
271
ii
742
- Camera Driver : Storage Driver (98/98SE/2000/ME/XP, Mac OS 10.0 _ 10.3)
- Application : Digimax Master
Specifications are subject to change without prior notice.
_, All trademarks are the property of their respective owners.
These figures are measured under Samsung' s standard conditions and may
vary depending on shooting conditions and camera settings.
{73}
Please
ensure
that
you
read
the
instruction
manual
carefully
before
use.
•The
attached
software
isacamera
driver
and
image
editing
software
tool
for
Windows.
•Under
nocircumstances
should
altorpart
ofeither
the
software
orthe
user
manual
bereproduced.
•Copyrights
forsoftware
are
licensed
only
foruse
with
acamera.
•Inthe
unlikely
event
ofamanufacturing
fault,
we
will
repair
orexchange
your
camera.
We cannot, however, be held responsible in any way for damage caused by
inappropriate use.
• Using a Hand-made PC or a PC and OS that has not been guaranteed by the
manufacturer is not covered by the Samsung warranty.
• Before reading this manuel, you should have a basic knowledge of computers
and O/S (Operating Systems).
After insertingthe CD-ROM provided with this camera into the CD-ROM drive, the
following window should automatically run.
Beforeconnecting the camera to the PC, you
should first install the camera driver.
÷ Screen Captures illustrated on this manual is
based on English Edition of Windows.
• Camera driver :This enables images to transfer betweenthe camera and PC.
This camera uses the USB Storage Driver as the camera driver.You can use the
camera as a USB card reader. After installing the driver and connecting this
camera to the PC, you can find [Removable Disk] in [Windows Explorer] or [My
computer]. A USB Storage Driver is provided only for Windows. A USB Driverfor
MAC is not included with the Application CD. You can use the camera with Mac
OS 10.0 ~ 10.3.
For Windows
For Macintosh
Pow_thprocessor
betlerthanPsntium
I1450MHz Power Mec G3 or later
(Pentium 700MHz recommended)
Wiedows 98 / 98SE / 2000 / ME / XP
Mac OS 10.0 ~ 10.3
Minimum 64MB RAM
Minimum 64MB RAM
20OMBof availablehard diskspace
1t 0MB of available hard-diskspace
USB port
USB port
CD-ROM drive
DD-ROM drive
1024x768 pixels, 16bit color display
compatible monitor
(24bit color display recommended)
For playing back a movie clip
Mac OS 10.1or later
MPleyer
(74}
• Digimax Maeter : Thie is the all-in-one multi media software solution.
You can download, view, edit and save your digital images and movie clips clip
withthis software. This software is only compatible with Windows.
• To use this camera with a PC, install the application software first.
Afterthis has been done, the stored images in the camera can be moved to the
PC and can be edited by an image editing program.
• You can visit the Samsung web-site through the internet.
http://www.samsungcamera.com :English
http://www.samsungcamera.co.kr: Korean
1. The auto runframe will display.
Click the [install] menu in the Auto run
frame.
2. Installthe camera driver, DirectX, Xvid and Digimax Master by selecting a
buttonshown on the monitor. If an upper version of DirectX was installed on
yourcomputer, DirectXmay net be installed.
e The XviD codec is distributed according to and under the terms and conditions of
the GNU General Public License and everyonecan copy, modifiy and distribute
this codec freely, but WITHOUT ANY WARRANTY, IMPLIED OR
EXPRESSED, OF MERCHANTABILITY OR FITNESS FOR A PARTICULAR
PURPOSE provide& however, that you have to follow the GNU General Public
License whenever you are distributingthis codec or modification thereof.
For more informationsee the GNU General Publice License documents
(http://www.gnu.org/copyleft/gpl.html).
(75}
3.After
restarting
the
computer,
connect
the
PC
tothe
camera
with
theUSB
cable.
4.Turn
the
camera
power
on.
The
[Found
New
Hardware
Wizard]
will
open
and
the
computer
will
recognise
the
camera.
÷Ifyour
OS
isWindows
XP,
animage
viewer
program
will
open.
Ifthe
download
window
ofDigmax
Master
opens
after
starting
Digimax
Master,
the
camera
driver
was
set
upsuccessfully.
ll!lllllll!lllllll!lllllll!lllllll!lllllll!lllllll!lllllll!lllllll!lllllll!lllllll!lllllll!lllllll!lllllll!lllllll!lllllll!lllllll!lllllll!lllllll!lllllll!lllllll!lllllll!lllllll!lllllll!lllllll!lllllll!llllll
(76}
• _fyou connect the USB cable to a USB port on your PC and then turn on the
power, the camera will automaticallysw4tchto "computer connection mode".
• _nthis mode, you can download stored images to your PC through the USB
cable.
• Connecting the camera to a PC
• The LCD monitor is always turned off in PC mode.
• Connecting the camera to a PC
1. In any mode with the exception of Voice Recording
mode, press the Menu button.
2. Press the LEFT/RIGHT button and selectthe
[SETUP] menu tab.
3. Selectthe [USB] menu by pressing the UP/DOWN
buttonand press the RIGHT button.
4. Use the UP and DOWN buttonsto select
[Computer], and then pressthe OK button.
5. Press the menu button twice and the menu will
disappear.
6. Connect the PC to the camera with the USB cabIe.
÷ If you selected [Printer] in Step 4, when you connect the camera to your
phnter, the [Connecting Printer] message wilt display and the connection will
not be established.
In this case, disconnect the USB cable, and then fotbw the procedure from
Step 2 and onward.
• Disconnectingthe camera and PC : Refer to page 79
(Removing the removable disk).
(77}
• Downloading stored images
You can download the still images stored on the camera to your PC'shard disk
and print them or use a photo editing software to edit them.
6. Press the rightmouse button and a pop-up
menu will open. Click [Paste].
1. Connect the camera to your PC with the USB cable.
2. On your computer's desktop display, select
[My computer] and double click [Removable
Disk _ DCtM _ 100SSCAM].
The image files will then be displayed.
7. An image file is transferred from the camera
to your PC.
/
3. Select an image and press the fight
mouse button.
- By using [Digimax Master], you can see the stored images in the memory
directly on the PC monitor and you can copy or move the image files.
4. A pop-up menu will open.
Click the [Cut] or [Copy] menu.
- [Cut]
: cuts a selected file.
-[Copy] : sepies files.
5. Clicka folderwhereyouwantto pastethefile.
(78}
• %ndows 98/98SE
1. Check whether the camera and PC are transferring a file.
If the camera status lamp blinks, please wait until the lamp has finished
blinking and is constantly on.
2. Unplug the USB cable.
• Windows 2000/ME/XP
5. A [Safe to Remove Hardware] window will
open. Click the [OK] button.
6. A [Unplug or Eject Hardware[window will
open. Click the [Close] button and the
removable disk wilt be removed safely.
(The illustrationsmay differ from those shown depending on the Windows O/S.)
1. Check whether the camera and PC are transferring a file.
If the camera status lamp blinks, please wait until the lamp has finished
blinking and is constantly on.
7. Unplug the USB cable.
2. Double-clickthe [Unplug or Eject Hardware]
icon on the task bar.
[Double-clicH]
3. The [Unplug or Eject Hardware] window wilt
open. Select the [USB Mass Storage Device]
and click the ]Stop] button.
4. The ]Stop a Hardware device] window will open.
Selectthe [USB Mass Storage Device] and click
the [OK] button.
{79}
1. A USB Driver for MAC is not included with the software CD as MAC OS
supports the camera driver.
2. Check the MAC OS version during start-up.
This camera is compatible with MAC OS 10.0~ 10.3.
3. Connect the camera to the Macintosh and turn the camera power on.
4. A new icon witl be displayed on the desktop after connectingthe camera to
the MAC.
• To remove the USB driver, refer to the process shown below.
1. Connect the camera to your PC and turn them on.
2. Check whether the Removable Disk is on the [My Computer].
3. Remove the [Samsung Digital Camera] on the Device manager.
1. Double click a new icon on the desktop and the folder in the memory wilt be
displayed.
2. Select an image file and copy or move it to MAC.
4. Disconnect the USB cable.
5. Remove the [Samsung USB Driver]on the Add/Remove Programs
Properties.
6. Uninstallationis complete.
{80}
• You
can
download,
view,
edit
and
save
your
images
and
movies
with
this
software.
This
software
isonly
compatible
with
Windows
except
for
the
Windows
98.
• To
start
the
program,
click
[Start
_ Programs
_ Samsung
_ Digimax
Master
Digimax
Master].
• Downloading
images
1.Connect
the
camera
toyour
PC.
2.Awindow
fordownloading
images
wilt
display
after
connecting
the
camera
toyour
PC.
- To download the captured images, select
the [Select All] button.
- Selectdesired folder in the window and
clickthe [Select All] button. You can save
captured images and selected folder.
- If you click the [Cancel] button, downloading will be
cancelled.
4. Select a destination and make a folder to
save downloaded images and folders.
- Folder names can be made in order of date
and images will be downloaded.
- Folder name will be made as you want and
images will be downloaded.
- After selectinga folder that was made
before, images will be downloaded.
5. Click [Next >] button.
6. A window will open as shown alongside.
The destinationof the selected folder will be
displayed on the upper side of the window.
Click the [Start] button to downbad the
images.
3. Click [Next >] button.
7. Downloaded images will be displayed.
{81}
• Image viewer :You can view the stored images.
• image edit : You can edit the still image.
- Image viewer functions are listed below.
G?Menu bar : You can select menus.
File, Edit, View, Tools, Change functions, Auto download, help, etc.
- Image edit functions are listed below.
(i) Edit menu : You can select the following menus.
[Tools]
: You can resize or crop the selected image. See the [Help] menu.
[Adjust] : You can modify image quality. See the [Help] menu.
[Retouch] : You can change image or insert effects on the image. See the
[Help] menu.
Drawingtools : Tools for editing an image.
(_ Image displaywindow : A selected image displays in this window.
_) Preview window : You can preview the changed image.
(2) Imageselection window : You can select the desired images in this window.
_3)Media type selection menu :You can select image viewer, image edit and
movie edit functions in this menu.
(4) Preview window : You can preview an image or a movie clip and check the
multi media information.
(5) Zoom bar :You can change preview size.
(6) Folder displaywindow : You can see the folder location of the selected
image.
(7) Imagedisplay window : Images of the selected folder are displayed.
÷ Refer to the [Help] menu in Digimax Master for further information.
(82}
÷ A still image edited with Digimax Master can't be played back on the camera.
÷ Referto the [Help] menu in Digimax Master for further information.
• Movie edit : You can get the still image movie dip. narration, music files together
in a movie clip.
• Please check the following if the USB connection malfunctions.
USB cable is not connected or it is not the supplied USB cabIe.
Connect the supplied USB cabIe.
The camera is not recognised by your PC.
Sometimes, the camera may appear under [Unknown Devices] in
Device Manager.
Installthe camera driver correctly.
Turn off the camera, remove the USB cabIe, plug in the USB cable
again, and then turn on the camera.
There is an unexpected errorduring file transfer.
Turn the camera power off and on again. Transfer the file again.
- Movie dip edit functions are listed below.
(i) Edit menu : You can select the following menus.
[Add Media] : You can add other media elements to a movie.
[Edit Clip] : You can change the brightness, contrast, colour and saturation.
[Effects]
: You can insert an effect.
[Set Text] : You can insert texts.
[Narrate]
: You can insert a narration.
[Produce] : You can save the edited muki media as a new rite name.
You can select AVt, Windows media (wmv), Windows media
(asf) and movie clip for this camera (avi, MPEG-4) ritetypes.
¢2)Frame display window : You can insertmulti media in this window.
When using the USB hub.
There may be a problem in connecting the camera to the PC through
the USB hub if the PC and the hub are not competible. Wherever
possible, connect the camera to the PC directly.
.....
Are other USB cables connected to the PC?
_ The camera may malfunctionwhen it is connected to the PC at the
same time as another USB cable. In this case, disconnect the other
USB cable, and connect only one USB cabIe to the camera.
÷ Some movie clips that were compressed with a codec that is not compatible with
the Digimax Master can't play back in the Digimax Master.
÷ Refer to the [Help] menu in Digimax Master for further information.
(83}
When I open the Device Manager (by clicking Start _ (Settings)
Control Panel _ (Performance and Maintenance) _ System
(Hardware) _ Device Manager), there are Unknown Devices or Other
Devices entries with a yellow question mark(?) beside them or devices
with an exclamation mark(!) beside them.
Right-clickon the entry with the question (?) or exclamation d) mark
and select "Remove". Restart the PC and connect the camera again.
For Windows 98 PC, remove the camera driver also, restart the PC,
and then reinstall the camera driver.
In come security programs (Norton Anti Virus, V3, etc.), the computer
may not recegnise the camera as a removable disk.
Stop the security programs and connect the camera to the computer.
Refer to the security program instructions about how to temporarily
disable the program.
• When the movie clip doesn't play back on the PC
÷ When the movie clip recorded by the camera doesn't play back on the PC,
the causes are mostly due to the codec installedon the PC.
• When codec for play back the movie clip isn't installed
Installthe codec as listed below.
[ Installingcodec for Windows ]
1) tnsertthe CD provided with the camera.
2) Run the windows explorer and select [OD-ROM dfive:_XviD]folder and
click the XviD-1.1.0-30122005.exe file.
÷ The XviD codec is distributed according to the GNU General Public License
and everyone can copy, distribute and change this codec. This License
applies to any program or other work which contains a notice placed by the
copyright holder saying it may be distributed under the terms of this General
Public License.
For more information, see the License documents
(http://www.gnu.org/copyleft/gpLhtmt).
The camera is connectedto the USB port located on the front of the
computer.
When the camera is connected to the USB port located on the front of
the computer, the computer may not recognise the camera. Connect
the camera to the USB port locatedon the back of the computer.
[ Installingcodec for Mac OS ]
1) Visit the following site for downloading the codec.
(http://www.divx.cem/divx/mac)
2) Click the [Free Download] button locatedat the upper right side of the page
and a window for downloadingthe DivX codec will display.
3) Select Mac OS you use and click the [Download] button. Save it on a folder
you want to.
4) Run the downloaded file and the codec for playing back the movie clip wilt
be installed.
÷ If a movie clip can't play back on the Mac OS, use a media player that
supports XviD codec (Mplayer).
(84}
• When
the
DirectX
9.0
orlater
isnot
installed
Install
theDirectX
9.0
orlater
Equipment)
Correct
Dieposal
ofThis Product (Waste Electrical & Electronic
(Applicable in the European Unionand other European countries with
1)Insert
the
CD
provided
with
the
camera
separate collection systems) This marking shown on the product or its
2)Run
the
windows
explorer
and
select
the
[CD-ROM
drive:\
USB
Driver\DirectX
9.0]
folder
and
click
the
DXSETUP.exe
file.
literature, indicates that it should not be disposed with other household
wastes at the end of its working life.
The
DirectX
will
beinstalled.
Visit
the
folewing
site
fordownloading
the
DirectX.http://www.micresoff.com/directx To prevent possible harm to the environment or human health from uncontrolled
waste disposal, please separate this from other types of wastes and recycle it
responsibly to promote the sustainable reuse of material resources. Household
• IfaPC
(Windows
98)
stops
responding
while
the
camera
and
PC
are
connected
users should contact either the retailer where they purchased this product, or their
repeatedly
local government office, for details of where and how they can take this item for
tfaPC(Windows
98)
isturned
onforalong
time
and
the
camera
is
connected
repeatedly,
thePC
may
not
resegnise
the
camera.
Inthis
case,
re- environmentally safe recycling. Business users shouid contact their supplier and
start
thePC.
check the terms and conditions of the purchasecontract.
This product should not be mixed with other commercial wastes for disposal.
• tfaPC
connected
with
the
camera
stops
responding
while
Windows
isstarting.
tnthis
case,
disconnect
thePC
and
the
camera
and
Windows
will
start.
tfthe
problem
happens
continuously,
set
the
Legacy
USB
Support
todisable
and
re-start
the
PC.
The
Legacy
USB
Support
isinthe
BIOS
setup
menu.
(The
BtOS
setup
menu
differs
from
the
PC
manufacturers
and
some
BIOS
menus
don't
have
Legacy
USB
Support)
tfyou
can't
change
the
menu
by
yourself,
contact
tothe
PCmanufacturer
orBIOS
manufacturer.
• Ifthe
movie
clip
can't
bedeleted,
removable
disk
can't
beextracted
oranerror
message
displays
during
the
file
transfer.
tfyou
install
only
the
Digimax
Master,
theproblems
mentioned
above
occasionally
happen.
-Close
the
Digimax
Master
program
byclicking
the
Digimax
Master
icon
on
the
Taskbar.
-Install
allthe
application
programs
included
inthe
software
CD.
(You
must
install
the
Movie
clip
codec)
Samsung Techwin cares for the environment at all product
manufacturing stages to preserve the environment, and is
taking a number of steps to providecustomers with more
environment-friendly products. The Eco mark represents
Samsung Techwin'swilI to createenvironment-friendly
R_,_s_
_,_t
products and indicates that the product satisfiesthe EU
....................................................
Rolls Directive.
(85)
M Declaration of Conformity
Trade Name
:SAMSUNG TECHWIN
Mode_No.
: DigimaxS850
Responsible Party :Samsung Opto-Electronics America tNO.
Address
:40 Seaview Dr. Secaucus,NJ 07094
Telephone No.
:201-902-0347
This device complies with Part 15of the FCC Rules. Operation is subject to
the following two conditions: (1) This device may not cause harmful
interference, and (2) this device must accept any interference received
including interference that may cause undesired operation.
(86}
(87}
{88}
SAMSUNGTEOHWlNOO, LTD.
SAMSUNGFRANCESAS
SAMSUNGOPTO_ELEOTRONIOS
UK LIMITED
OPTICS& DIGITALIMAGINGDIVISION
BP51TOURMAINEMONTPARNASSE
33,
145-3,SANGDAEWONI-DONG, JUNGWONGU,
AV .DUMAINE75755,PARISOEDEX15,FRANCE
HOTLINEPHOTONUMERIQUE:
SAMSUNGHOUSE1000HILLSWOODDRIVE
HLSWOOD BUSINESSPARK
SUNGNAM-OITY,
KYUNGKI-DO,KOREA
462-121
CHERTSEYKT16 OPSU.K
TEL :8080012263727
TEL :(82)31-740-8088,8088,8090,8092,8099
0O8002226 3727(NumeroVert-AppelGratuit)
TEL :(33) 1-4279-2200
FAX: (82)31-740-8398
FAX:(33) 1-4320-4510
(freeforcab fromUK only)
UK Serv_ee
Hotline:01932455,320
wt,Nw.samsungcee
leraeem
wvtwsamsungphoto
fr
vcwwsamsulxjcamera.ee.uk
SAMSUNGOPTO-ELECTRONICS
AMERICA,INC.
SAMSUNGOPTO-ELECTRONICS
GMBH
HEADQUARTERS
AMKRONBERGERHANG6
RUSSIAINFORMATIONCENTER
SAMSUNGELECTRONICS
40SEAVIEWDRIVE,SEOAUOUS,
D-85824SOHWALBAORfFS._
GERMANY
117545ST. DOROZHNAYABUILDING3,
NJ07094_
USA.
TEL :(1)201-902-0347
TEL :49 (0}619686 5303
FAX:49 (0) 61966653 66
KORPUS6,ENTRANCE2,MOSCOW,RUSSIA
TEL :(7)495-363-1700
FAX: (1)201-902-9342
wvtwsamsungcamera
de
CALLFREE: (8)800200 0 400(fromRussiaonly)
WESTERNREGIONALOFFICE
18800BROADWIOK
ST._
RANCHODOMINGUEZ,
6A 90228,U.S.A
TEL :(1)310-900-5284/5285
FAX: (1)318-537-1566
v'tww.samsungca_erausa
eem
vc,,vw
samsungcamera.ru
I TIANJINSAMSUNGOPTO-ELEOTRONIOS
CO., LTD
No.9zhanghengStreet Micro-Electronic
IndustriaJ
ParkJingangRoadTieejinChina
POSTCODE: 300385
TEL :(86)22-2761-4599
FAX:(86)22-2789-7558
wwwsamsungcamera
com.cn
Internetaddress - http://www eemsungcameraeem
a
-_
conformity
The OE
Mark
is Directive
mark
of the
EuropeanCommunity(EC)
_-............................................
6806-3601
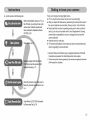


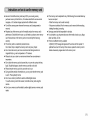
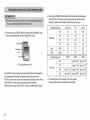
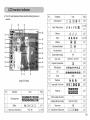
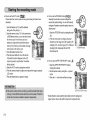
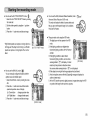

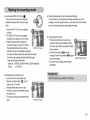
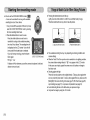

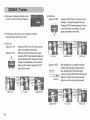

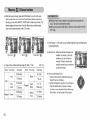

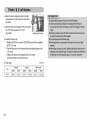

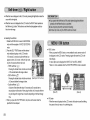
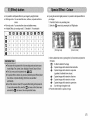

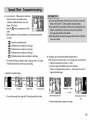
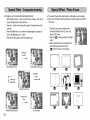


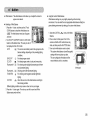
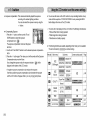
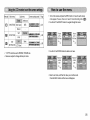

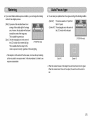

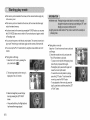
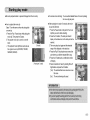
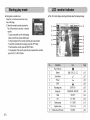

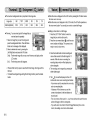
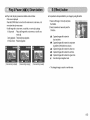

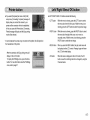
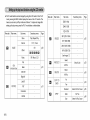
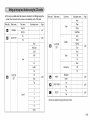


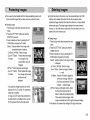
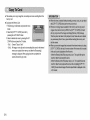


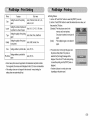
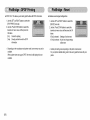
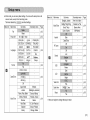
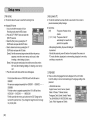


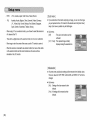
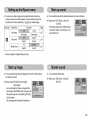
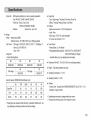
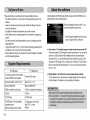


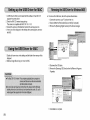
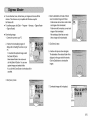
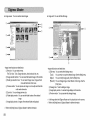
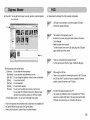
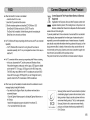


![hank yo_fo buyil_gaSamsung (}a_Te_a ]hs](http://vs1.manualzilla.com/store/data/005691502_1-2e8e29ffb67d0c8f7d0d701e3cb644b7-150x150.png)