1
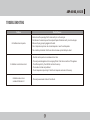
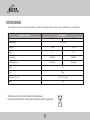
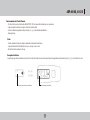
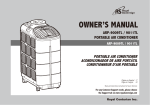
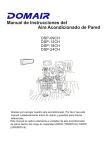
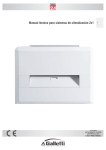
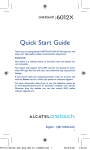
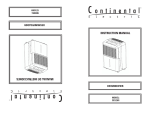
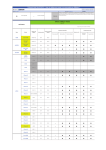
Owner’s Manual
ARP-6010X, 6012X
PORTABLE AIR CONDITIONER
ARP- 6010X, 6012X
portable air conditioner
ACONDICIONADOR DE AIRE PORTÁTIL
Read and retain these instructions for future reference
For any Customer Support needs, please choose
the Support tab on www.royalsovereign.com
Royal Centurian Inc.
portable air conditioner
Model ARP-6010X, 6012X
INTRODUCTION
Thank you for choosing Royal Sovereign to provide you and your family with all of the “Home Comfort” requirements for your home, apartment,
or office. This Portable Air Conditioner can be set-up in just minutes and can be easily moved from room to room. It is a multi-functional room
air comfort system that offers you Air Conditioning, Dehumidification and Air Circulation modes. This manual will provide you with valuable
information necessary for the proper care and maintenance for your new appliance. Please take a few moments and read the instructions
thoroughly. If properly maintained, your appliance will give you many years of troublefree operation.
CONTENTS
Page
Precautions for use∙∙∙∙∙∙∙∙∙∙∙∙∙∙∙∙∙∙∙∙∙∙∙∙∙∙∙∙∙∙∙∙∙∙∙∙∙∙∙∙∙∙∙∙∙∙∙∙∙∙∙∙∙∙∙∙∙∙∙∙∙∙∙∙∙∙∙∙∙∙∙∙∙∙∙∙∙∙∙∙∙∙∙∙∙∙∙∙∙∙∙∙∙∙∙∙∙∙∙∙∙∙∙∙∙∙∙∙∙∙∙∙∙∙∙∙∙∙∙∙∙∙∙∙∙∙∙∙∙∙∙∙∙∙∙∙∙ 4
Notes on operation and identification of parts∙∙∙∙∙∙∙∙∙∙∙∙∙∙∙∙∙∙∙∙∙∙∙∙∙∙∙∙∙∙∙∙∙∙∙∙∙∙∙∙∙∙∙∙∙∙∙∙∙∙∙∙∙∙∙∙∙∙∙∙∙∙∙∙∙∙∙∙∙∙∙∙∙∙∙∙∙∙∙∙∙∙∙∙∙∙∙∙∙∙∙∙∙∙∙∙∙∙ 5
Installation instructions∙∙∙∙∙∙∙∙∙∙∙∙∙∙∙∙∙∙∙∙∙∙∙∙∙∙∙∙∙∙∙∙∙∙∙∙∙∙∙∙∙∙∙∙∙∙∙∙∙∙∙∙∙∙∙∙∙∙∙∙∙∙∙∙∙∙∙∙∙∙∙∙∙∙∙∙∙∙∙∙∙∙∙∙∙∙∙∙∙∙∙∙∙∙∙∙∙∙∙∙∙∙∙∙∙∙∙∙∙∙∙∙∙∙∙∙∙∙∙∙∙∙∙∙∙∙∙∙ 6~7
Operation∙∙∙∙∙∙∙∙∙∙∙∙∙∙∙∙∙∙∙∙∙∙∙∙∙∙∙∙∙∙∙∙∙∙∙∙∙∙∙∙∙∙∙∙∙∙∙∙∙∙∙∙∙∙∙∙∙∙∙∙∙∙∙∙∙∙∙∙∙∙∙∙∙∙∙∙∙∙∙∙∙∙∙∙∙∙∙∙∙∙∙∙∙∙∙∙∙∙∙∙∙∙∙∙∙∙∙∙∙∙∙∙∙∙∙∙∙∙∙∙∙∙∙∙∙∙∙∙∙∙∙∙∙∙∙∙∙∙∙∙∙∙∙∙∙∙∙ 8~9
Remote control∙∙∙∙∙∙∙∙∙∙∙∙∙∙∙∙∙∙∙∙∙∙∙∙∙∙∙∙∙∙∙∙∙∙∙∙∙∙∙∙∙∙∙∙∙∙∙∙∙∙∙∙∙∙∙∙∙∙∙∙∙∙∙∙∙∙∙∙∙∙∙∙∙∙∙∙∙∙∙∙∙∙∙∙∙∙∙∙∙∙∙∙∙∙∙∙∙∙∙∙∙∙∙∙∙∙∙∙∙∙∙∙∙∙∙∙∙∙∙∙∙∙∙∙∙∙∙∙∙∙∙∙∙∙∙ 10~11
Maintenance∙∙∙∙∙∙∙∙∙∙∙∙∙∙∙∙∙∙∙∙∙∙∙∙∙∙∙∙∙∙∙∙∙∙∙∙∙∙∙∙∙∙∙∙∙∙∙∙∙∙∙∙∙∙∙∙∙∙∙∙∙∙∙∙∙∙∙∙∙∙∙∙∙∙∙∙∙∙∙∙∙∙∙∙∙∙∙∙∙∙∙∙∙∙∙∙∙∙∙∙∙∙∙∙∙∙∙∙∙∙∙∙∙∙∙∙∙∙∙∙∙∙∙∙∙∙∙∙∙∙∙∙∙∙∙∙∙∙∙∙∙∙∙∙∙ 12
Troubleshooting∙∙∙∙∙∙∙∙∙∙∙∙∙∙∙∙∙∙∙∙∙∙∙∙∙∙∙∙∙∙∙∙∙∙∙∙∙∙∙∙∙∙∙∙∙∙∙∙∙∙∙∙∙∙∙∙∙∙∙∙∙∙∙∙∙∙∙∙∙∙∙∙∙∙∙∙∙∙∙∙∙∙∙∙∙∙∙∙∙∙∙∙∙∙∙∙∙∙∙∙∙∙∙∙∙∙∙∙∙∙∙∙∙∙∙∙∙∙∙∙∙∙∙∙∙∙∙∙∙∙∙∙∙∙∙∙∙∙∙∙ 13
Specifications∙∙∙∙∙∙∙∙∙∙∙∙∙∙∙∙∙∙∙∙∙∙∙∙∙∙∙∙∙∙∙∙∙∙∙∙∙∙∙∙∙∙∙∙∙∙∙∙∙∙∙∙∙∙∙∙∙∙∙∙∙∙∙∙∙∙∙∙∙∙∙∙∙∙∙∙∙∙∙∙∙∙∙∙∙∙∙∙∙∙∙∙∙∙∙∙∙∙∙∙∙∙∙∙∙∙∙∙∙∙∙∙∙∙∙∙∙∙∙∙∙∙∙∙∙∙∙∙∙∙∙∙∙∙∙∙∙∙∙∙∙∙∙∙ 14
Warranty∙∙∙∙∙∙∙∙∙∙∙∙∙∙∙∙∙∙∙∙∙∙∙∙∙∙∙∙∙∙∙∙∙∙∙∙∙∙∙∙∙∙∙∙∙∙∙∙∙∙∙∙∙∙∙∙∙∙∙∙∙∙∙∙∙∙∙∙∙∙∙∙∙∙∙∙∙∙∙∙∙∙∙∙∙∙∙∙∙∙∙∙∙∙∙∙∙∙∙∙∙∙∙∙∙∙∙∙∙∙∙∙∙∙∙∙∙∙∙∙∙∙∙∙∙∙∙∙∙∙∙∙∙∙∙∙∙∙∙∙∙∙∙∙∙∙∙∙∙∙∙ 15
Contact information∙∙∙∙∙∙∙∙∙∙∙∙∙∙∙∙∙∙∙∙∙∙∙∙∙∙∙∙∙∙∙∙∙∙∙∙∙∙∙∙∙∙∙∙∙∙∙∙∙∙∙∙∙∙∙∙∙∙∙∙∙∙∙∙∙∙∙∙∙∙∙∙∙∙∙∙∙∙∙∙∙∙∙∙∙∙∙∙∙∙∙∙∙∙∙∙∙∙∙∙∙∙∙∙∙∙∙∙∙∙∙∙∙∙∙∙∙∙∙∙∙∙∙∙∙∙∙∙∙∙∙∙∙∙∙ 16
Página en Español∙∙∙∙∙∙∙∙∙∙∙∙∙∙∙∙∙∙∙∙∙∙∙∙∙∙∙∙∙∙∙∙∙∙∙∙∙∙∙∙∙∙∙∙∙∙∙∙∙∙∙∙∙∙∙∙∙∙∙∙∙∙∙∙∙∙∙∙∙∙∙∙∙∙∙∙∙∙∙∙∙∙∙∙∙∙∙∙∙∙∙∙∙∙∙∙∙∙∙∙∙∙∙∙∙∙∙∙∙∙∙∙∙∙∙∙∙∙∙∙∙∙∙∙∙∙∙∙∙∙∙∙∙∙∙∙ 17
Precautions for use
Electrical Specifications and Power Cord
Check to ensure that the electrical service being used is adequate for the model you’ve chosen. The electrical rating of your new air conditioner is
defined on the serial plate of the unit. Please refer to the rating when checking electrical requirements to ensure they meet the electrical codes of
your location.
• Install the air conditioner according to the installation instructions supplied.
• Do not modify any part of this product.
• Do not insert any objects into the product or block the airflow in any way.
• Ensure that the power supply you use has an appropriate voltage rating.
• Only use a properly installed 3 pin, grounded AC socket that is rated 115V, 60Hz, 15 amps or more.
• If the electrical outlet you intend to use is not adequately grounded or protected by a time delay fuse or circuit breaker, you should have a
qualified electrician install the proper outlet.
• This unit uses a plug with a built-in fuse. Conduct a Power Plug Check (see page 9) before use to confirm normal operation.
• Do not use this unit with any extension cords or adapter plugs.
• If the cord or plug is damaged in any way, please call the Royal Sovereign Service Department ( see page 16.)
• Do not plug this cord into a loose electrical outlet.
• Turn the unit off and unplug, when cleaning the air conditioner, removing the filter or when the air conditioner will not be used for an extended time period.
General Use
• Do not block air outlets or intake with obstacles.
• Do not insert any objects into the air conditioner.
• Do not splash or pour water on the housing or control panel.
• Do not place heavy items or sit on unit.
• Make sure the drainage plug is installed on bottom of machine.
• Drain the unit when moving the air conditioner or when storing the unit.
4
ARP-6010X, 6012X
Notes on operation
If you turn the air conditioner off and immediately restart it, allow 3 minutes for the compressor to restart cooling. In the event of a power failure, wait 3 minutes before restarting
unit.
Identification of parts
1. Air outlet
2. Display panel
3. Air intake (evaporator)
4. Air inlet hose
5. Air filter
6. Air outlet hose(heat exchange)
7. Water outlet drain
8. Caster
9. Power supply cord
➀
➄
➁
➂
➃
➅
➆
➈
➇
5
Installation
Unpack your New Portable Air Conditioner and let the machine stand upright for 2 hours before starting.
Unpack all parts listed below. If any parts are missing do not return this product to the place of purchase.
Please visit our website www.royalsovereign.com and click on the “Customer Support” tab and
“Make a Request” to request missing parts or call 1-800-397-1025 and press option #4 to order these parts.
Accessories Include
1. Window slider kit∙∙∙∙∙∙∙∙∙∙∙∙∙∙∙∙∙∙∙∙∙∙∙∙∙∙∙∙∙3 Set
2. Fixture∙∙∙∙∙∙∙∙∙∙∙∙∙∙∙∙∙∙∙∙∙∙∙∙∙∙∙∙∙∙∙∙∙∙∙∙∙∙∙∙∙∙∙2 Piece
3. Screws∙∙∙∙∙∙∙∙∙∙∙∙∙∙∙∙∙∙∙∙∙∙∙∙∙∙∙∙∙∙∙∙∙∙∙∙∙∙∙∙∙∙∙8 Pieces
4. Exhaust hose connector∙∙∙∙∙∙∙∙∙∙∙∙∙∙∙∙∙4 Pieces
5. Exhaust hose∙∙∙∙∙∙∙∙∙∙∙∙∙∙∙∙∙∙∙∙∙∙∙∙∙∙∙∙∙∙∙∙∙2 Piece
6. Cover∙∙∙∙∙∙∙∙∙∙∙∙∙∙∙∙∙∙∙∙∙∙∙∙∙∙∙∙∙∙∙∙∙∙∙∙∙∙∙∙∙∙∙∙∙2 Piece
➃
➃
➄
➂
A. Exhaust Hose and Connector : Fig 1.
1. Attach the threaded nozzles of exhaust hose connector to the end of the exhaust hose by turning clockwise.
2. Repeat for other end.
B. Attach Hose Fixture : Fig 2.
1. Line up the screw holes on the hose fixture to the front of the window slider kit.
2. Using the 8 screws provided, attach the hose fixtures to the window panel of the slider kit.
Fig 1.
Fig 2.
6
➁
➅
➀
ARP-6010X, 6012X
C. Install the Window Slider Kit : Fig 3.
1. Open the window and place the window slider kit on the inside edge of the window.
2. Adjust the window slider by adjusting it to the width of the window.
3. Close the window to secure.
4. Tighten the four screws to lock the window slider in place.
Fig 3.
D. Connecting the Exhaust Hose to the PAC : Fig 4.
1. Connect the hose connector to the air outlet by aligning the tabs on the hose to the PAC and snap it into place.
2. Repeat for other hose.
E. Connect the Exhaust Hose to Window Slider Kit : Fig 5.
1. Move the Portable Air Conditioner within 4 feet of the window.
2. Extend hose to desired length by pulling open.
3. Align the tabs on the hose and the window panel fixture and snap them into place.
Fig 4.
Fig 5.
7
Operation
Display
Control Panel
Power
Timer/ Temperature set control
Timer set control
Swing mode
Fan speed control
Warning Light
Mode control
Sleep mode
Power Control
The power control turns the unit on and off. When you press the control, the unit begins to operate.
Warning Light
Condensed water may accumulate in the unit. If the internal tank fills, the Warning Light will shine and the unit will not operate until the unit has been drained.
Mode Control
The Mode Control has 3 settings:
Cool
Dehumidify
Fan
The settings are adjusted with the Mode Control button. The green light will indicate which setting is currently being used.
Fan Mode
When the fan mode is selected, the indicator light will shine green. The Air is circulated throughout the room with no cooling.
Swing Mode
The oscillation feature moves the air louvers from left to right to allow the air to reach more areas in the room. Press the SWING button to start this feature.
Sleep Mode
By pressing sleep button, the set temperature will increase 2°F/1°C in the first hour, anther 2°F/1°C in the second hour and then remains at that temperature.
Dehumidify / Dry Mode
Press the Mode button to select dehumidify mode. When the dehumidify mode is on, the temperature buttons and fan speed buttons do not function and the fan will operate on
medium speed. The dehumidify indicator light will illuminate and stay solid while unit is dehumidifying.
8
ARP-6010X, 6012X
Cool Mode
When in Cool mode the indicator light will shine green.
1. During operating, the unit displays “present room temperature.”
2. When setting the temperature, the unit will display the temperature set. Temperature range is 61°F to 89°F
3. In C ool mode, use the “+” or “-“button to adjust and set the desired temperature for the room. After 5 seconds the display will revert back to the current room temperature.
Temperature can only be adjusted in Cool mode. The time is adjustable between 1~24 hours.
Fan Speed Control
The Fan speed has 3 settings: High, Medium, and Low
Changing Temperature Reading from Celsius to Fahrenheit
Press the Timer and Temperature set buttons at the same time to display the temperature reading you would like to use.
Timer
There are 2 different timer programs. You can set the number of hours before the air conditioner automatically turns OFF or you can set the number of hours that will elapse
before the unit turns ON.
When the air conditioner is turned off, you can choose to turn it on in one hour intervals.
1. Press the
button on the remote to turn on the timer function
2. Press the + or - button on the remote to set the desired hour.
3. The unit will turn on when the set time elapses.
When the air conditioner is turned on, you can choose to turn it off in one hour intervals.
1. Press the
button on the remote to turn on the timer function
2. Press the + or - button on the remote to set the desired hour.
3. The unit will turn off when the set time elapses.
Automatic Restart:
In the event of a power failure: The settings will return to the previously set operating modes once the power is restored.
Power Plug Check
1. Press the RESET button.
2. Insert the power plug into the electrical outlet.
3. Press the TEST button. If the circuit breaker is working you’ll hear a click.
4. Press the RESET button until you hear another click. The circuit breaker in the plug is now activated.
5. Do not use the air conditioner if the above procedure cannot be successfully performed.
After switching the air conditioner off, wait 3 minutes before switching it back on again.
9
Remote Control
The functions of the remote work the same as your air conditioner’s touch controls.
Timer Program
There are 2 different timer programs. You can set the number of hours before the
air conditioner automatically turns OFF or you can set the number of hours that will
elapse before the unit turns ON.
LCD Screen
When the air conditioner is turned off, you can choose to turn it on in one hour
intervals.
1. Press the
button on the remote to turn on the timer function.
2. Press the
or
button on the remote to set the desired hour.
3. The unit will turn on when the set time elapses.
Power On/Off
A/C Fan speed button (high, medium, or low)
Mode button (cool, fan, or dehumidify)
Timer / Temperature
control set button
When the air conditioner is turned on, you can choose to turn it off in one hour
intervals.
1. Press the
button on the remote to turn on the timer function.
2. Press the
or
button on the remote to set the desired hour.
3. The unit will turn off when the set time elapses.
Oscillating Mode
Press the (SWING) button on the remote control to oscillate air movement from left
to right and right to left.
Sleep mode button
Dehumidification Mode
Press the Mode button to select dehumidify mode. When the dehumidify mode is on,
the temperature buttons and fan speed buttons do not function and the fan will
operate on medium speed. The dehumidify indicator light will illuminate and stay solid
while unit is dehumidifying.
Timer / Temperature mode selection button
Oscillation (Swing)button
Fahrenheit/ Celsius selector
10
Fahrenheit/ Celsius selector
Press the Fahrenheit/ Celsius selector button to display temperature reading you
would like to use.
ARP-6010X, 6012X
Remote Control Operation
- The remote control uses two AAA (IEC RO# 1.5V) batteries which have been included for your convenience.
- Remove the battery cover on back of the remote.
- Insert the batteries, making sure the (+) and (-) polarity is aligned correctly.
- Replace the battery cover.
Notes:
-When replacing batteries, always change both batteries at the same time.
-Remove the batteries if the remote control is not used for a month or longer.
-Do not dispose of batteries in a fire.
Battery replacement
Remove the cover on the back of the remote control and insert the batteries with (+) and (-) poles pointing in the proper direction.
Battery compartment lid
Battery compartment
11
Maintenance
Drainage
Occasionally, you may need to drain the unit.
1. Drain the unit if the Warning Light on the display panel of the air conditioner is on.
2. Turn off the power to the unit and unplug.
3. Place a shallow dish under the drainage plug to collect water.
4. Remove the drainage plug.
5. Replace the plug, when drainage water stops flowing.
Cleaning the filter
The filter should be cleaned every 2 weeks or 100 hours of use in order to maintain proper airflow.
1. Remove the filter. Gently pull the filter assembly from the back of the unit and then remove the filter from the assembly.
2. Clean the filter by vacuuming or a soft cloth. If the filter is very dirty, it can be easily washed with a mild detergent and rinsed thoroughly with clean water. Dry the filter before
replacement.
3. Reinstall the filter in the filter assembly.
4. Replace the filter assembly on the back of the machine.
Note : Never operate the air conditioner without the filter in place. This may damage the unit.
Cleaning and maintaining the air conditioner
Turn the air conditioner off and remove the electrical plug. Wipe with a soft, dry, or damp cloth. A mild detergent can be used. Be sure to remove any residue and dry completely.
Do not use harsh chemicals, abrasive cleaners or volatile substance (such as gasoline). Avoid splashing water on the air conditioner as this can seriously damage the unit.
Storing the air conditioner
If the unit will not be used for a long time, be sure to drain the air conditioner, clean the air filter, pull out the power supply plug, and remove the batteries from the remote control
before storage. After draining, keep the air conditioner running on FAN mode for at least 8 hours to dry the unit completely to prevent mold.
12
ARP-6010X, 6012X
Troubleshooting
Problem
Possible Reasons
Air Conditioner does not operate
- Check and reset the power plug. Wait 3 minutes and try to run the unit again.
- The batteries in the remote may need to be replaced. Replace the batteries and try to run the unit again.
- Make sure the plug is properly plugged into the outlet.
- The set temperature may be too close to room temperature. Lower the set temperature.
- The air outlet may be blocked. Check the air outlet and remove any items that may be found.
Air Conditioner runs but does not cool
- Check the room for open doors or windows and close them.
- There may be another appliance in the room giving off heat. Check the room and turn off the appliance.
- The air filter may be dirty. Check the filter and clean if necessary.
- The air exhaust or intake may be blocked. - The set temperature may be too high. Check the set temperature and reduce it if necessary.
Air Conditioner does not run
and water full indicator is lit
- There may be excess water in the unit. Drain the unit.
13
SPECIFICATIONS
- Figures noted in the contents are for reference only; variation may result due to the application in different countries or regions, and shall be based on practical operation.
Description of product
Air Conditioner
Model
ARP-6010X
Voltage/Frequency
ARP-6 012X
AC 115V~60Hz
Input power
1300W
1500W
12A
13.1A
Cooling Capacity
10,000BTU/hr
12,000BTU/hr
Dehumidifying Capacity
91.2 pints/day
100.8 pints/day
Current
Coolant
R-22
Timer
24 hour
Dimension (w) X (h) x (d)
18.8 x 33.4 x 17.1 inches
Weight
77lbs
“Electrical waste products should not be disposed of with household waste.
Please recycle where facilities exist. Check with your local authority or retailer for recycling advice."
14
ARP-6010X, 6012X
FULL ONE YEAR WARRANTY
Royal Sovereign warrants each Portable Air Conditioner to be free from defects in material and workmanship. Our obligation under this warranty is limited to the repair or
replacement, free of charge, when delivered to an authorized Royal Sovereign service center, of any defective part(s) thereof, other than parts damaged in transit. This warranty is
in effect to the original purchaser, for a period of one year from the date of purchase and is not transferable. This warranty shall apply only if the air conditioner is used on
Alternating Current (AC) circuit, in accordance with the factory provided instructions which accompany it.
LIMITED FIVE YEAR WARRANTY (COMPRESSOR)
For a period of five years from the date of purchase, when this Royal Sovereign Portable Air Conditioner is operated and maintained according to the instruction manual provided
with the product, Royal Sovereign will supply a replacement compressor (parts only), free of charge, if the original compressor is determined to be defective in workmanship or
material. If repair becomes necessary, please contact our customer service center. You will be responsible for all freight, insurance, and any other transportation charges to get the
unit to our factory or service center. If shipping is required, be sure to pack the unit properly to avoid shipping damages, as we will not be responsible for such damages.
EXCLUSIONS
This warranty excludes and does not cover defects, malfunctions or failures of your Royal Sovereign Portable Air Conditioner, caused by repairs by unauthorized persons or service
centers, mishandling, improper installation, modification or unreasonable use including incorrect voltage, acts of God, or failure to provide reasonable and necessary maintenance.
This warranty is in lieu of any and all expressed warranties. In no event shall Royal Sovereign be liable for consequential or incidental damages. This limitation would not apply if you
live in a location thas does not permit the exclusion of limitation of incidental or consequential damages. This warranty gives you specific legal rights and you may also have other
rights which vary from state to state.
15
ROYAL SOVEREIGN INTERNATIONAL, INC.
2 Volvo Drive Rockleigh, NJ 07647 USA
TEL : +1) 800-397-1025 FAX : +1) 201-750-1022
RS INTERNATIONAL AUSTRALIA PTY. LTD.
30 Prime Drive, Seven Hills, NSW 2147, AUSTRALIA
TEL : +61) 2-9674-2127
FAX : +61) 2-9674-2027
RS Holland B.V.
Industrieweg 6K, 4104AR, Culemborg, The Netherlands
Tel: +31 (0)345 473 097 Fax: 31 (0)345 519 811
ROYAL SOVEREIGN INC.
1001, World Meridian II, 426-5, Gasan-dong, Geumcheon-gu, Seoul, 153-759, KOREA
TEL : +82)2-2025-8800 FAX : +82)2-2025-8830
RS CANADA INC.
164 Oakdale Road, Toronto, Ontario M3N 2S5 CANADA
TEL : +1) 416-741-8400
FAX : +1) 416-741-8185
Royal Sovereign Mexico, S.A. de C.V.
24 de Abril de 1860 No. 8 Col. Leyes de Reforma Mexico D.F. C.P. 09310
Tel.: +52) 55-5600-0757, 55-5600-7848 Fax: +52) 55-5600-0748
Español
Manual del Propietario
ARP-6010X, 6012X
Acondicionador de Aire Portátil
ARP- 6010X, 6012X
ACONDICIONADOR DE AIRE PORTÁTIL
Lea y guarde estas instrucciones para referencia en el futuro.
Para Servicio al Cliente por favor diríjase a nuestra página web
www.royalsovereign.com y seleccione “Support Tab”
Royal Centurian Inc.
Acondicionador de Aire Portátil
Modelo ARP-6010X, 6012X
Introducción
Gracias por escoger Royal Sovereign para proveerle a usted y a su familia lo requerido para tener esa “Comodidad de Hogar” en su casa,
departamento u oficina. Este acondicionador de aire portátil puede ser instalado en sólo minutos y fácilmente transportado de habitación a
habitación. Es un sistema de cómoda ventilación multi-funcional que le ofrece modos de Aire Acondicionado, Deshumedecedor y Circulación de
Aire. Este manual le proveerá con la información valuable y necesaria para el cuidado apropiado y mantenimiento de su nuevo electrodoméstico.
Por favor, tome un momento y lea las instrucciones por completo. Si se mantiene apropiadamente, su electrodoméstico le dará muchos años de
operación libre de problemas.
Contenido
Página
Precauciones de Uso ∙ ∙∙∙∙∙∙∙∙∙∙∙∙∙∙∙∙∙∙∙∙∙∙∙∙∙∙∙∙∙∙∙∙∙∙∙∙∙∙∙∙∙∙∙∙∙∙∙∙∙∙∙∙∙∙∙∙∙∙∙∙∙∙∙∙∙∙∙∙∙∙∙∙∙∙∙∙∙∙∙∙∙∙∙∙∙∙∙∙∙∙∙∙∙∙∙∙∙∙∙∙∙∙∙∙∙∙∙∙∙∙∙∙∙∙∙∙∙∙∙∙∙∙∙∙∙∙∙∙∙∙ 20
Notas Sobre el Funcionamiento e Identificación de las Partes∙∙∙∙∙∙∙∙∙∙∙∙∙∙∙∙∙∙∙∙∙∙∙∙∙∙∙∙∙∙∙∙∙∙∙∙∙∙∙∙∙∙∙∙∙∙∙∙∙∙∙∙∙∙∙∙∙∙∙∙∙∙∙∙∙∙∙∙∙∙∙∙∙∙∙ 21
Instrucciones para la Instalación∙∙∙∙∙∙∙∙∙∙∙∙∙∙∙∙∙∙∙∙∙∙∙∙∙∙∙∙∙∙∙∙∙∙∙∙∙∙∙∙∙∙∙∙∙∙∙∙∙∙∙∙∙∙∙∙∙∙∙∙∙∙∙∙∙∙∙∙∙∙∙∙∙∙∙∙∙∙∙∙∙∙∙∙∙∙∙∙∙∙∙∙∙∙∙∙∙∙∙∙∙∙∙∙∙∙∙∙∙∙ 22~23
Funcionamiento∙∙∙∙∙∙∙∙∙∙∙∙∙∙∙∙∙∙∙∙∙∙∙∙∙∙∙∙∙∙∙∙∙∙∙∙∙∙∙∙∙∙∙∙∙∙∙∙∙∙∙∙∙∙∙∙∙∙∙∙∙∙∙∙∙∙∙∙∙∙∙∙∙∙∙∙∙∙∙∙∙∙∙∙∙∙∙∙∙∙∙∙∙∙∙∙∙∙∙∙∙∙∙∙∙∙∙∙∙∙∙∙∙∙∙∙∙∙∙∙∙∙∙∙∙∙∙∙∙∙∙∙∙∙ 24~25
Control Remoto ∙∙∙∙∙∙∙∙∙∙∙∙∙∙∙∙∙∙∙∙∙∙∙∙∙∙∙∙∙∙∙∙∙∙∙∙∙∙∙∙∙∙∙∙∙∙∙∙∙∙∙∙∙∙∙∙∙∙∙∙∙∙∙∙∙∙∙∙∙∙∙∙∙∙∙∙∙∙∙∙∙∙∙∙∙∙∙∙∙∙∙∙∙∙∙∙∙∙∙∙∙∙∙∙∙∙∙∙∙∙∙∙∙∙∙∙∙∙∙∙∙∙∙∙∙∙∙∙∙∙∙∙∙∙ 26~27
Mantenimiento ∙∙∙∙∙∙∙∙∙∙∙∙∙∙∙∙∙∙∙∙∙∙∙∙∙∙∙∙∙∙∙∙∙∙∙∙∙∙∙∙∙∙∙∙∙∙∙∙∙∙∙∙∙∙∙∙∙∙∙∙∙∙∙∙∙∙∙∙∙∙∙∙∙∙∙∙∙∙∙∙∙∙∙∙∙∙∙∙∙∙∙∙∙∙∙∙∙∙∙∙∙∙∙∙∙∙∙∙∙∙∙∙∙∙∙∙∙∙∙∙∙∙∙∙∙∙∙∙∙∙∙∙∙∙∙∙∙∙∙∙∙ 28
Identificación y Solución de Problemas ∙∙∙∙∙∙∙∙∙∙∙∙∙∙∙∙∙∙∙∙∙∙∙∙∙∙∙∙∙∙∙∙∙∙∙∙∙∙∙∙∙∙∙∙∙∙∙∙∙∙∙∙∙∙∙∙∙∙∙∙∙∙∙∙∙∙∙∙∙∙∙∙∙∙∙∙∙∙∙∙∙∙∙∙∙∙∙∙∙∙∙∙∙∙∙∙∙∙∙∙∙∙∙∙∙∙ 29
Especificaciones∙∙∙∙∙∙∙∙∙∙∙∙∙∙∙∙∙∙∙∙∙∙∙∙∙∙∙∙∙∙∙∙∙∙∙∙∙∙∙∙∙∙∙∙∙∙∙∙∙∙∙∙∙∙∙∙∙∙∙∙∙∙∙∙∙∙∙∙∙∙∙∙∙∙∙∙∙∙∙∙∙∙∙∙∙∙∙∙∙∙∙∙∙∙∙∙∙∙∙∙∙∙∙∙∙∙∙∙∙∙∙∙∙∙∙∙∙∙∙∙∙∙∙∙∙∙∙∙∙∙∙∙∙∙∙∙∙∙∙∙ 30
Garantía∙∙∙∙∙∙∙∙∙∙∙∙∙∙∙∙∙∙∙∙∙∙∙∙∙∙∙∙∙∙∙∙∙∙∙∙∙∙∙∙∙∙∙∙∙∙∙∙∙∙∙∙∙∙∙∙∙∙∙∙∙∙∙∙∙∙∙∙∙∙∙∙∙∙∙∙∙∙∙∙∙∙∙∙∙∙∙∙∙∙∙∙∙∙∙∙∙∙∙∙∙∙∙∙∙∙∙∙∙∙∙∙∙∙∙∙∙∙∙∙∙∙∙∙∙∙∙∙∙∙∙∙∙∙∙∙∙∙∙∙∙∙∙∙∙∙∙∙∙∙∙ 31
Contactos∙∙∙∙∙∙∙∙∙∙∙∙∙∙∙∙∙∙∙∙∙∙∙∙∙∙∙∙∙∙∙∙∙∙∙∙∙∙∙∙∙∙∙∙∙∙∙∙∙∙∙∙∙∙∙∙∙∙∙∙∙∙∙∙∙∙∙∙∙∙∙∙∙∙∙∙∙∙∙∙∙∙∙∙∙∙∙∙∙∙∙∙∙∙∙∙∙∙∙∙∙∙∙∙∙∙∙∙∙∙∙∙∙∙∙∙∙∙∙∙∙∙∙∙∙∙∙∙∙∙∙∙∙∙∙∙∙∙∙∙∙∙∙∙∙∙∙∙∙ 32
Precauciones de Uso
Especificaciones Eléctricas y Cable de Electricidad
Verifique que el servicio eléctrico en uso es el adecuado para el modelo que ha elegido. El voltaje eléctrico de su nuevo acondicionador de aire está
descrito en la placa de serie de la unidad. Por favor, revise el voltaje eléctrico cuando verifique los requerimientos eléctricos para asegurarse de
que correspondan a los códigos de electricidad de su localidad.
• Instale el acondicionador de aire de acuerdo a las instrucciones de instalación provistas.
• No modifique ninguna parte de este producto.
• No inserte ningún objeto dentro del producto o bloquee el flujo de aire de ninguna manera.
• Asegúrese de que el tomacorriente en uso tiene el voltaje correcto.
• Use solamente un tomacorriente de 3 tomas con conexión a tierra, de 115 voltios, 60Hz con índice de 15 amperios o más.
• Si el tomacorriente que va a usar no tiene conexión a tierra o está protegido por un circuito de fusibles con tiempo retardado, usted debe
contactar a un electricista calificado para instalar el tomacorriente correcto.
• Esta unidad usa un enchufe con fusible incluido. Compruebe el enchufe (ver Pág. 9) antes de usar para confirmar el funcionamiento normal.
• No use esta unidad con ningún cable de extensión o enchufes adaptadores.
• Si el cable o el enchufe están dañados de cualquier forma, por favor llame al Departamento de Servicio de Royal Sovereign (ver Pág. 16).
• No enchufe este producto en un tomacorriente que esté suelto.
• Cuando vaya a limpiar el acondicionador de aire, remover el filtro o el acondicionador de aire no vaya a ser usado por un largo tiempo, apague la unidad y desenchúfela.
Uso General
• No bloquee la entrada o salida de aire.
• No inserte objetos dentro del acondicionador de aire.
• No derrame o salpique agua en el panel de control o el exterior de la unidad.
• No ponga objetos pesados ni se siente en la unidad.
• Asegúrese de que el tapón de drenaje esté instalado debajo de la máquina.
• Drene la unidad antes de transportar o guardar el acondicionador de aire.
20
ARP-6010X, 6012X
Notas Sobre el Funcionamiento
Si usted apaga el acondicionador de aire y lo enciende de nuevo de inmediato, deje pasar 3 minutos para que el compresor reinicie el enfriado. En la eventualidad de que haya un
corte de energía eléctrica, espere tres minutos antes de reiniciar la unidad.
Identificación de las Partes
1. Salida de Aire
2. Pantalla
➀
3. Entrada de Aire (Evaporador)
➁
4. Manguera de Entrada de Aire
5. Filtro de Aire
6. Manguera de Salida de Aire (Intercambio de Calor)
7. Salida Para el Drenaje de Agua
8. Ruedas
9. Cable de Electricidad
➄
➂
➃
➅
➆
➈
➇
21
Instalación
Desempaque su nuevo Acondicionador de Aire Portátil y deje que la máquina descanse en posición vertical por dos horas antes de prenderla. Desempaque todas las partes que
se muestran en la lista a continuación. Si faltara alguna parte, no devuelva este producto al lugar de compra.
Por favor, visite nuestra página web www.royalsovereign.com y seleccione “Consumer Support” y “Make a Request”
➁
➅
para ordenar las partes que falten, o llame al 1-800-397-1025 y presione la opción #4 para ordenar las partes.
Accesorios Incluidos
1. Juego Corredizo para Ventana∙∙∙∙∙∙∙∙∙∙∙∙∙∙∙∙∙∙∙∙3 juegos
2. Accesorio para Manguera∙∙∙∙∙∙∙∙∙∙∙∙∙∙∙∙∙∙∙∙∙∙∙∙∙∙∙2 piezas
3. Tornillos∙∙∙∙∙∙∙∙∙∙∙∙∙∙∙∙∙∙∙∙∙∙∙∙∙∙∙∙∙∙∙∙∙∙∙∙∙∙∙∙∙∙∙∙∙∙∙∙∙∙∙∙∙8 piezas
4. Conector de Manguera de Escape∙∙∙∙∙∙∙∙∙∙∙∙∙∙∙4 piezas
5. Manguera de Escape∙∙∙∙∙∙∙∙∙∙∙∙∙∙∙∙∙∙∙∙∙∙∙∙∙∙∙∙∙∙∙∙∙∙2 piezas
6. Cubierta∙∙∙∙∙∙∙∙∙∙∙∙∙∙∙∙∙∙∙∙∙∙∙∙∙∙∙∙∙∙∙∙∙∙∙∙∙∙∙∙∙∙∙∙∙∙∙∙∙∙∙∙2 piezas
➃
➄
➃
➂
A. Manguera de Escape y Conector: Fig. 1.
1. Adjuntar la parte roscada de uno de los Conectores de Manguera (4) a uno de los extremos de la Manguera de
Escape (5), girándolo hacia la derecha.
2. Repetir en el otro extremo.
Fig 1.
B. Adjuntar el Accesorio para Manguera: Fig. 2.
1. Alinee los orificios de los tornillos del Accesorio para Manguera (2) con el frente del Juego
Corredizo para Ventana (1).
2. Usando los 4 tornillos provistos, adjunte el Accesorio Para Manguera (2) al Juego Corredizo para Ventana (1).
Fig 2.
22
➀
ARP-6010X, 6012X
C. Instalar el Juego Corredizo para ventana: Fig. 3.
1. Abra la ventana y ponga el Juego Corredizo para Ventana (1) dentro de la orilla de la ventana.
2. Ajuste el Juego Corredizo ajustándolo al ancho de la ventana.
3. Cierre la ventana para asegurarlo.
4. Ajuste los dos tornillos para asegurar el Juego Corredizo en su lugar.
Fig 3.
D. Conectando la Manguera de Escape al Acondicionador de Aire Portátil (AAP): Fig. 4.
1. Conecte el conector de la manguera alineando las uñetas de la manguera al AAP y presione hasta que quede en su lugar.
E. Conectar la Manguera de Escape al Juego Corredizo para Ventana: Fig. 5.
1. Acerque el Acondicionador de Aire Portátil a 4 pies de la ventana o menos.
2. Abra la manguera y estírela hasta la longitud necesaria.
3. Alinee las uñetas de la manguera con las del panel de ventana y presione hasta que quede en su lugar.
Fig 4.
Fig 5.
23
Funcionamiento
Panel de Control
Pantalla
Botón de Encendido/Apagado
Control de Tiempo/Temperatura
Control de Tiempo
Swing mode
Control de Velocidad del Ventilador
Luz de Advertencia
Control de Modo
Modo Durmiendo
Botón de Encendido/Apagado
Este botón enciende y apaga la unidad. Cuando usted presiona este botón la unidad comienza a funcionar.
Luz de Advertencia
Puede acumularse agua en la unidad debido a condensación. Si el tanque interno se llena, la luz de advertencia se prenderá y la unidad no funcionará hasta que el tanque haya
sido vaciado.
Control de Modo
Enfriar
Deshumedecer
El control de modo tiene 3 funciones:
Ventilador
La función se determina presionando el botón de Control de Modo. La luz verde indicará qué función esta en uso.
Modo de Ventilador (“Fan”)
Cuando el modo de ventilador es seleccionado, la luz indicará “Fan” en color verde. El aire de la habitación es circulado sin enfriarse.
Modo Oscilador
El modo oscilador mueve las persianas de aire de izquierda a derecha para permitir que el aire alcance más area en la habitación. Presione el botón SWING para iniciar el oscilador.
Modo Durmiendo
El modo Durmiendo (Sleep) es usado para mantener la habitación a una temperatura cómoda y a la vez ahorrar energía. Cuando el botón del modo Durmiendo (Sleep) es presionado, la
temperatura subirá 2 °F en la primera hora y subirá otros 2 °F en la segunda hora. La habitación se mantendrá a esta temperatura por el resto de la noche.
Deshumedecer/Modo Seco (“Dry”)
Presione el botón de control de modo para seleccionar el modo Deshumedecer (“Dry”). Cuando el modo deshumedecedor está operando, los botones de temperatura y los
botones de velocidad del ventilador dejan de funcionar y el ventilador funciona a velocidad media. La luz indicadora se iluminará en “Dry” y se mantendrá prendida mientras la
unidad está deshumedeciendo.
24
ARP-6010X, 6012X
Modo Enfriar(“Cool”)
Cuando la unidad esta en modo Enfriar la luz indicadora estará verde indicando “Cool”.
1. Mientras la unidad está en funcionamiento, la pantalla mostrará la temperatura actual de la habitación.
2. Mientras usted esté ajustando la temperatura, la unidad muestra la temperatura siendo establecida. El rango de la temperatura es de 61 °F a 89 °F.
3. En modo Enfriar (“Cool”), use los botones “+” o “-“ para establecer la temperatura deseada en la habitación. 5 segundos después el indicador regresará a mostrar la temperatura actual de la habitación. La temperatura solamente puede ser ajustada en modo Enfriar. El tiempo es ajustable entre 1 y 24 horas.
Control de Velocidad del Ventilador
El ventilador tiene 3 velocidades: Alta, Media y Baja.
Cambiar la Lectura de la Temperatura de Celsius a Fahrenheit
Presione el los botones de “Timer” (Sincronizador) y “Temperature” (Temperatura) al mismo tiempo para mostrar y cambiar la clase de lectura.
Sincronizador
Hay dos formas de programar el sincronizador. Usted puede programar el número de horas hasta que el acondicionador de aire se apague automáticamente o el número de horas
hasta que el acondicionador de aire se prenda automáticamente.
Cuando el acondicionador de aire está apagado, usted puede programarlo para que se prenda en intervalos de 1 hora.
1. Presione el botón
en el control remoto para activar la función de sincronizador.
2. Presione los botones de + o - hasta que se muestre el número de horas deseado.
3. El acondicionador de aire se prenderá cuando el número de horas indicado haya transcurrido.
Cuando el acondicionador de aire está prendido, usted puede programarlo para que se apague en intervalos de 1 hora.
1. Presione el botón
en el control remoto para activar la función de sincronizador.
2. Presione los botones de + o - hasta que se muestre el número de horas deseado.
3. El acondicionador de aire se apagará cuando el número de horas indicado haya transcurrido.
Encendido Automático
En la eventualidad de un corte de energía eléctrica: la programación regresará a los modos establecidos previamente cuando la energía sea reestablecida.
Comprobación del Enchufe
1. Presione el botón “RESET”
2. Inserte el enchufe en el tomacorriente.
3. Presione el botón “TEST”. Si el circuito está funcionando usted oirá un sonido de “clic.”
4. Presione el botón de “RESET” hasta que escuche otro “clic”. El circuito del enchufe ha sido activado.
5. No use el acondicionador de aire si este proceso no puede ser llevado a cabo.
Después de apagar el acondicionador de aire, espere 3 minutos para encenderlo de nuevo.
25
Control Remoto
Las funciones en el control remoto funcionan igual que las de los controles del
acondicionador de aire.
Programación del Sincronizador
Hay dos formas de programar el sincronizador. Usted puede programar el numero de
horas hasta que el acondicionador de aire se apague automáticamente o el numero de
horas hasta que el acondicionador de aire se prenda automáticamente.
Pantalla LCD
Cuando el acondicionador de aire está apagado, usted puede programarlo para que se
prenda en intervalos de 1 hora.
en el control remoto para activar la función de sincronizador.
1. Presione el botón
2. Presione los botones de
o
hasta que se muestre el número de horas deseado.
3. El acondicionador de aire se prenderá cuando el número de horas indicado haya
transcurrido.
Encendido/Apagado
Cuando el acondicionador de aire está prendido, usted puede programarlo para que se
apague en intervalos de 1 hora.
en el control remoto para activar la función de sincronizador.
1. Presione el botón
2. Presione los botones de
o
hasta que se muestre el numero de horas deseado.
3. El acondicionador de aire se apagará cuando el número de horas indicado haya
transcurrido.
Botón de velocidad del ventilador
Botón de Modo
(Enfriar, Ventilador o Deshumedecer)
Botón de Encendido/
Apagado del
Sincronizador
Oscilador
Presione el botón “Swing” en el control remoto para hacer que el flujo de aire oscile de
izquierda a derecha y de derecha a izquierda.
Modo Durmiendo
Modo Deshumedecedor (“Dry”)
Presione el botón de Modo “Mode” para seleccionar el modo deshumedecedor (“Dry”).
Cuando el modo deshumedecedor está operando, los botones de temperatura y los
botones de velocidad del ventilador dejan de funcionar y el ventilador funcionará a
velocidad media. La luz indicadora de modo deshumedecedor (“Dry”) se mantendrá
iluminada mientras la unidad está deshumedeciendo.
Botón de Control de Tiempo y Termostato
Oscilador
Seleccionador de grados Celsius o Fahrenheit
26
ARP-6010X, 6012X
Funcionamiento del Control Remoto
- El control remoto usa dos baterías tipo AAA (IEC RO# 1.5V) las cuales están incluidas para su conveniencia.
- Saque la tapa de las baterías en la parte de atrás del control remoto.
- Inserte las baterías asegurándose de que los polos (+) y (-) están alineados debidamente.
- Reponga la tapa.
Notas:
- Cuando reemplace las baterías, siempre cambie ambas baterías al mismo tiempo.
- Saque las baterías del Control Remoto si no lo va a usar por un mes o más.
- No bote las baterías usadas en el fuego.
Reemplazo de Baterías
Saque la tapa que cubre las baterías en la parte de atrás del control remoto e inserte las nuevas baterías asegurándose de mantener los polos (+) y (-) en la dirección correcta.
Tapa del compartimiento para baterías
Compartimiento para baterías
27
Mantenimiento
Drenaje
Ocasionalmente, usted puede necesitar drenar la unidad.
1. Drene la unidad si la luz de advertencia de la pantalla del acondicionador de aire está prendida.
2. Apague la unidad y desenchúfela.
3. Ponga una bandeja debajo de la tapa de drenaje para recibir el agua.
4. Remueva la tapa de drenaje.
5. Cuando el agua drenada pare de fluir, reponga la tapa de drenaje.
Limpieza del Filtro
El filtro debe limpiarse cada dos semanas o 100 horas para mantener el flujo de aire apropiado.
1.Remueva el filtro. Cuidadosamente jale el ensamblaje del filtro desde la parte posterior de la unidad, y luego remueva el filtro del ensamblaje.
2.Limpie el filtro con una aspiradora o con un trapo suave. Si el filtro esta muy sucio, puede lavarlo fácilmente con detergente y enjuagarlo completamente con agua. Déjelo secar
antes de reponerlo.
3.Reinstale el filtro en el ensamblaje.
4.Reponga el ensamblaje del filtro en la parte posterior de la maquina.
Nota: Nunca haga funcionar el acondicionador de aire sin el filtro en su lugar. Podría dañarlo.
Limpiando y Manteniendo el Acondicionador de Aire
Apague el acondicionador de aire y desenchúfelo. Límpielo con un trapo suave, seco o mojado. Puede usar un detergente ligero. Asegúrese de limpiar cualquier residuo y secar la
unidad completamente. No use químicos fuertes, limpiadores abrasivos o substancias volátiles (como gasolina). Evite salpicar agua en el acondicionador de aire porque esto
puede dañar la unidad seriamente.
Guardando el Acondicionador de Aire
Si no va a usar la unidad por un largo periodo de tiempo, asegúrese de drenarla, limpiar el filtro, desenchufarla y sacarle las baterías al control remoto antes de guardar el
acondicionador de aire. Después de drenar, haga funcionar el acondicionador de aire en modo Ventilador por lo menos por 8 horas para secar la unidad completamente y prevenir
la formación de moho.
28
ARP-6010X, 6012X
Identificación y Solución de Problemas
Problema
Posible Solución
El acondicionador de aire no funciona
- Chequee y presione el botón “RESET” del enchufe. Espere 3 minutos y trate de encender la unidad nuevamente.
- Las baterías del control remoto pueden necesitar ser reemplazadas. Reemplace las baterías e intente encender la
unidad de nuevo.
- Asegúrese de que el enchufe está conectado debidamente al tomacorriente.
- La temperatura establecida puede estar casi a la misma temperatura de la habitación. Baje la temperatura establecida.
- La salida de aire puede estar bloqueada. Chequee la salida de aire y remueva cualquier objeto.
El acondicionador de aire prende pero no enfría
El acondicionador de aire no funciona y
la luz indica que el tanque de agua está lleno.
- Verifique que todas las ventanas y puertas de la habitación estén cerradas.
- Puede haber otro electrodoméstico en la habitación que está produciendo calor. Chequee la habitación y apague el
otro electrodoméstico.
- El filtro de aire puede estar sucio. Chequee el filtro y límpielo si es necesario.
- La entrada o salida de aire puede estar bloqueada.
- La temperatura establecida puede ser muy alta. Verifique la temperatura establecida y redúzcala si es necesario.
Puede haber demasiada agua en la unidad. Drene la unidad.
29
Especificaciones
- Las medidas que aparecen son solo para referencia, pueden haber variaciones debido a las diferencias entre países y regiones, y deben ser basadas en funcionamiento práctico.
Descripción del Producto
Acondicionador de Aire
Modelo
ARP-6010X
Voltaje/Frecuencia
ARP-6012X
AC 115V~60Hz
Entrada de Electricidad
1300W
1500W
12A
13.1A
Capacidad de Enfriamiento
10,000BTU/hr
12,000BTU/hr
Capacidad de Deshumedecimiento
91.2 pints/día
100.8 pints/día
Corriente
Enfriador
R-22
Control de Tiempo
24 horas
Dimensiones (ancho) x (altura) x (profundidad)
17.1 × 18.8 × 33.4 pulgadas
Peso
77libras
“Los desperdicios eléctricos no deben botarse juntamente con la basura doméstica.
Por favor, recicle cuando sea posible. Contacte a las autoridades locales por consejos referentes al
reciclaje.”
30
ARP-6010X, 6012X
Garantía Completa por un Año
Royal Sovereign garantiza que cada Acondicionador de Aire Portátil está libre de defectos en cuanto a materiales y fabricación. Nuestra obligación bajo esta garantía está limitada
a la reparación o sustitución, sin costo, de cualquier parte(s) defectuosa(s) que no se haya dañado en el transporte, cuando el producto sea entregado a un Centro de Servicio de
Royal Sovereign. Esta garantía cubre al comprador original por un año desde la fecha de compra y no es transferible. Esta garantía se aplica solo si el acondicionador de aire se
usa en un circuito de Corriente Alterna, de acuerdo a las instrucciones de fábrica que acompañan al producto.
Garantía Limitada por Cinco Años (Compresor)
Por un periodo de cinco años desde la fecha de compra, siempre y cuando este Acondicionador de Aire Portátil Royal Sovereign sea operado y mantenido de acuerdo al manual de
instrucciones provisto con el producto, Royal Sovereign suplirá un compresor de reemplazo (solamente la parte), sin costo, si se determina que el compresor original tiene una
falla en cuanto a mano de obra o materiales. Si es necesaria la reparación, por favor contacte a nuestro centro de servicio al cliente. Usted será responsable por el envío, seguro y
cualquier otro gasto de transporte para hacer llegar la unidad a nuestra fabrica o centro de servicio. Si es necesario el envío, asegúrese de empacar la unidad correctamente para
evitar daños en el transporte, pues nosotros no seremos responsables por aquellos daños.
Exclusiones
Esta garantía excluye y no cubre defectos, malfuncionamiento o fallas de su Acondicionador de Aire Portátil Royal Sovereign causadas por reparaciones hechas por personas o
centros de servicio desautorizados, manejo inadecuado, instalación inapropiada, modificación o uso irrazonable de voltaje incorrecto, fuerzas de la naturaleza, o dejar de hacer el
mantenimiento razonable y necesario. Esta garantía es en lugar de todas y cada una de las garantías expresas. En ninguna eventualidad Royal Sovereign será responsable por
daños incidentales o consecuentes. Esta limitación no se aplica si usted vive en un lugar en donde no es permitida la limitación de daños incidentales o consecuentes. Esta garantía
le da derechos legales específicos y usted puede tener otros derechos los cuales varían de estado a estado.
31
ROYAL SOVEREIGN INTERNATIONAL, INC.
2 Volvo Drive Rockleigh, NJ 07647 USA
TEL : +1) 800-397-1025 FAX : +1) 201-750-1022
RS INTERNATIONAL AUSTRALIA PTY. LTD.
30 Prime Drive, Seven Hills, NSW 2147, AUSTRALIA
TEL : +61) 2-9674-2127
FAX : +61) 2-9674-2027
RS Holland B.V.
Industrieweg 6K, 4104AR, Culemborg, The Netherlands
Tel: +31 (0)345 473 097 Fax: 31 (0)345 519 811
ROYAL SOVEREIGN INC.
1001, World Meridian II, 426-5, Gasan-dong, Geumcheon-gu, Seoul, 153-759, KOREA
TEL : +82)2-2025-8800 FAX : +82)2-2025-8830
RS CANADA INC.
164 Oakdale Road, Toronto, Ontario M3N 2S5 CANADA
TEL : +1) 416-741-8400
FAX : +1) 416-741-8185
Royal Sovereign Mexico, S.A. de C.V.
24 de Abril de 1860 No. 8 Col. Leyes de Reforma Mexico D.F. C.P. 09310
Tel.: +52) 55-5600-0757, 55-5600-7848 Fax: +52) 55-5600-0748