1
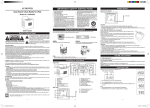
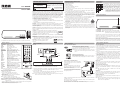
IMPORTANT SAFETY INSTRUCTION
IMPORTANT SAFETY INSTRUCTION
user manual
WARNING
RISK OF ELECTRIC SHOCK.
DO NOT OPEN
To reduce risk of electrical shock, do not
remove cover or back (no user serviceable
parts inside). Refer servicing to qualified
personnel.
This symbol indicates “dangerous voltage”
inside the product that presents a risk of
electric shock or personal injury.
DRC279BK
This symbol indicates
important instructions accompanying the product.
FCC INFORMATION
NOTE: This equipment has been tested and found to comply with the limits for a Class B
digital device, pursuant to Part 15 of the FCC Rules. These limits are designed to provide
reasonable protection against harmful interference in a residential installation. This equipment
generates, uses and can radiate radio frequency energy and, if not installed and used in
accordance with the instructions, may cause harmful interference to radio communications.
However, there is no guarantee that interference will not occur in a particular installation.
If this equipment does cause harmful interference to radio or television reception, which can
be determined by turning the equipment off and on, the user is encouraged to try to correct
the interference by one or more of the following measures:
• Reorient or relocate the receiving antenna.
• Increase the separation between the equipment and receiver.
• Connect this equipment into an outlet on a circuit different from that to which the receiver
is connected.
• Consult the dealer or an experienced radio/TV technician for help.
WARNING: Changes or modifications to this unit not expressly approved by the party
responsible for compliance could void the user's authority to operate the equipment.
This class B digital apparatus meets all requirements of the Canadian Interference–Causing
Equipment Regulations.
The Shock Hazard Marking and Associated Graphical Symbol is provided on the bottom panel
of unit.
Playing Discs
Compatible Discs
1. Read these Instructions.
3. Heed all Warnings.
4. Follow all instructions.
5. Do not use this apparatus near water.
6. Clean only with a dry cloth.
7. Do not block any of the ventilation openings. Install in accordance with the manufacturer’s instructions.
8. Do not install near any heat sources such as radiators, heat registers, stoves, or
other apparatus (including amplifiers) that produce heat.
9. Do not defeat the safety purpose of the polarized or grounding – type plug. A polarized
plug has two blades with one wider than the other. A grounding type plug has two
blades and a third grounding prong. The wide blade or the third prong are provided
for your safety. If the provided plug does not fit into your outlet, consult an
electrician for replacement of the obsolete outlet.
Remote Control
ON/STANDBY
HDMI
DISPLAY
MUTE
0–9
REPEAT/A-B
PAUSE/STEP
OPEN/CLOSE
REV
FWD
STOP
ANGLE
ZOOM
ENTER/
PLAY 4
3,4,5,6
9,:
SEARCH
SETUP
13. Unplug this apparatus during lightning stoms or when unused for long
periods of time.
14. Refer all servicing to qualified service personnel. Servicing is required when the
apparatus has been damaged in anyway, such as power-supply cord or plug is
damaged, liquid has been spilled or objects have fallen into the apparatus, the
apparatus has been exposed to rain or moisture, does not operate nonnally, or has
been dropped.
1. OPEN/CLOSE – Opens and closes the disc tray.
2. PLAY/PAUSE – Starts playing a disc, freezes or unfreezes playback.
3. ON/STANDBY / STOP – Press the button to turn on the unit / Press and hold 3 seconds to
go to standby mode / Press the button to stop disc playback.
This DVD player is designed and manufactured to respond to the Region Management
Information. If the Region number of a DVD disc does not correspond to the Region
number of this DVD player, this DVD player cannot play the disc. The Region number
for this DVD player is Region No 1.
This product incorporates copyright protected by U.S. patents and other intellectual
property rights. Use of this copyright protection technology must be authorized by Macrovision Corporation, and is intended for home and other limited consumer uses only unless
otherwise authorized by Macrovision. Reverse engineering or disassembly is prohibited.
Basic Playback Operations
Basic Connection
DVD + TV
Battery installation (Remote Control)
2. Connect the video Cable.
1 . Remove the battery cover.
2 . Insert one battery (CR2025) making sure the
polarity (+/–) matches the marks inside the unit.
3 . Replace the cover.
• Do not attempt to recharge, short-circuit, disassemble,
heat or throw the battery into the fire.
Note: A battery is included in the remote control,
remove the protective film before the first time use.
WARNING: Batteries shall not be exposed to excessive heat such as
sunshine, fire or the like. Batteries may leak and/or explode.
CAUTION: Danger of explosion if battery is incorrectly replaced. Replace only with the same
or equivalent type.
• Dispose of batteries in the proper manner, according to federal, states, and local regulations.
• Dispose of used battery promptly. Keep away from children.
• Do not disassemble and do not dispose of in fire.
Basic connection – Connect the video cable to the VIDEO OUT jack (yellow) on the back
of the your DVD player, and to the VIDEO INPUT jack on your TV.
Note: If your TV doesn’t have Audio and Video Input Jacks and only has an RF jack, you
need to connect an RF modulator (not provided).
Turn on the DVD Player
Other Connection Options
1. Plug the power cord into the outlet once the DVD player is connected to your TV.
HDMI (High-Definition Multimedia Interface)
DVD Player
HDMI
HDMI Cable
The HDMI jack provides optimum picture quality. This jack gives
you an uncompressed digital interface that carries both video and
audio data by way of an integrated mini-plug cable.
Note: Make sure you set the HDMI Setup option in the menu
system to the resolution setting that most closely matches
your TV.
Red
COAXIAL
Yellow
White
Coaxial Digital Out
DIGITAL OUT COAXIAL (Audio)
Use the Coaxial Output jack to connect your DVD player to
Dolby Digital receiver or decoder.
Use the Coaxial cable (not supplied) for the above connection.
Coaxial Cable
TV
INPUT
VIDEO
L
AUDIO
R
Note: Whenever you are connecting your system cables, turn off the power and make
certain that the power cord has been removed from the wall outlet.
1. Connect the audio cables to the AUDIO L and R jacks (red and white) on the back of
your DVD player and to the corresponding AUDIO INPUT jacks on your TV.
3
Portable Cart
Warning
IMPORTANT: The power cord can be unplugged to turn off the main power to the unit. It
should also be easily accessible in an emergency.
• Leave sufficient space around the appliance to allow adequate ventilation: 10cm on either
side and at the back, as well as 7cm above it are ideal.
This DVD player
WARNING: To reduce the risk of fire or electric
has earned the
shock, do not expose this apparatus to rain or
ENERGY STAR.
moisture.
ON/OFF function.
Select HDMI output.
Shows playback status.
Cuts and restores the volume.
Number entry.
Selects the repeat playback mode.
Freezes frame, performs frame advance.
Opens and closes the disc tray.
Searches back through the disc.
Searches forward through the disc.
Stops playback.
Selects the camera angle. (if available)
Accesses the zoom feature. (if available)
Selects item highlighted in menu.
Starts playing a disc.
Navigates through the menus.
Goes to the next/previous chapter or track.
Goes to a specific play time or track.
Accesses and exits the General setup
main menu.
SUBTITLE
Selects the subtitle language. (if available)
TITLE
Accesses the title menu of the disc.
RETURN
Returns to the PBC menu in VCD V.2.0
when PBC is switched on.
AUDIO
Selects the audio language. (if available)
DVD MENU
Accesses the disc’s menu. (if available)
PBC
Selects PBC mode for VCD discs.
Note: Point remote control unit no more than 6m from the remote sensor and within about
45° of the front of the unit.
2
12. Use only with a cart, stand, tripod, bracket, or table specified by the
manufacturer, or sold with the apparatus. When a cart is used, use
caution when moving the cart/apparatus combination to avoid injury
from tip-over.
CLASS 1
LASER
PRODUCT
Basic Connection
1
11. Only use attachments/accessories specified by the manufacturer.
This product complies with DHHS Rules 21 CFR Subchapter J. Applicable at the date of
manufacture.
It is important to read this instruction prior to using your new product for the first time.
Front panel Controls
10. Protect the power cord from being walked on or pinched particularly at plugs,
convenience receptacles. and the point where they exit from the apparatus.
Refer to the identification/rating label located on the back panel of your product for its proper
operating voltage.
CAUTION: This product utilizes a laser. Use of controls or adjustments or
performance of procedures other than those specified herein may result
in hazardous radiation exposure. Do not open covers and do not repair
yourself. Refer servicing to qualified personnel.
This DVD Player is capable of playing the following types of discs:
DVDs, Audio CDs, Video CDs, CDs and JPEG files on them. Before
you put a disc in the player, make sure it is compatible.
You can’t play the following types of discs: Laserdiscs, CD-I,
CD-ROM (computer-only discs), DVD-ROM, or discs recorded using
other broadcast standards (i.e., PAL or SECAM); CD-G discs.
Note: Some discs may not be compatible due to laser pickup,
recording formats, and software used. Some technologies and
methods used for JPEG file recording on CD-Rs can prevent
optimal playback of these files on your DVD player by degrading
the quality and/or the ability of the player to read the file.
2. Keep these Instructions.
Connecting TV with DVI input
Please get a HDMI to DVI cable (not supplied) to
connect your DVD player to a TV or monitor with
a DVI input jack.
2. Turn on the TV and tune to its Video Input Channel, if necessary.
3. Press the ON/STANDBY button on the DVD player or the ON/STANDBY button on the
remote control to turn it on.
4. Press the OPEN/CLOSE button on the front of the player or remote control to open the
disc tray.
5. Place a disc gently into the tray with the disc’s label facing up (double-sided discs have
content on both sides, so you can place the disc with either side up.)
6. Press OPEN/CLOSE again to close the disc tray. Play starts automatically. If a menu
appears, one of its options can be selected to start playing the disc. Highlight it and
press ENTER/PLAY4.
7. Press STOP to stop playback. The player remembers the point where disc was stopped.
If you press PLAY again, playback resumes from this point. To stop playback
completely or to start again from the beginning, press STOP twice. If the player is left
in STOP mode for more than five minutes without any user interaction, the screen
saver is activated.
Picture Scan
TV
DVI INPUT
While a disc is playing, press FWD or REV repeatedly to scan the disc faster until you
reach the fastest scan speed. To resume normal playback, press ENTER/PLAY4 or
continue to press FWD or REV.
IMPORTANT:
Since DVI connections do not carry audio, you
will need to connect the DVD Player’s AUDIO
jacks to your TV’s audio input jacks to hear the
audio from the DVD Player.
Freeze Frame and Frame Advance
While a disc is playing, press PAUSE/STEP to freeze the picture. To advance one frame
at a time, press PAUSE/STEP repeatedly. To resume normal playback, press ENTER/
PLAY4 .
Note: After approximately five minutes in PAUSE with no user interaction, the player
goes into screen saver mode.
You can also use the digital coaxial output jack
to connect the DVD player to an audio receiver
with digital input jack.
Slow Motion
DVD
While a disc is playing, press PAUSE/STEP. Then press REV or FWD repeatedly to start
the slow motion playback and select the slow motion speed until you reach the slowest
speed. To resume normal playback, press ENTER/PLAY4.
Chapter/Track Advance
HDMI to DVI cable
HDMI and High-Definition Multimedia Interlace are trademarks or registered trademarks
of HDMI Licensing LLC.
Manufactured under license from Dolby Laboratories. “Dolby” and the double-D symbol
are trademarks of Dolby Laboratories.
Windows Media and the Windows logo are trademarks or registered trademarks of
Microsoft Corporation in the United States and/or other countries.
While a disc is playing, you can skip forward or backward a chapter or track at a time by
pressing 9 and :.
Note: Use the numeric buttons to directly access a specific track or chapter number. For
single digit tracks or chapters, enter a 0 before single digit numbers; for example,
enter 0, then 3 for chapter/track 3.
Advanced Playback Operations
Advanced Playback Operations
Menu System
Menu System
Title/Chapter/Time Search
Playback Control (PBC)
To access the DVD player menus:
OSD Lang
1.
–
–
–
The Playback Control feature is available only on Video CDs. Press the DVD MENU/PBC
button to turn the PBC feature on and off. The Playback Control feature supports the menus
of the VCD format similar to a DVD menu.
• Press the SETUP button to display the main menu.
The OSD Lang feature enables you to set the preferred on-screen menu language: English,
Spanish, or French.
HDMI
• Press the 4 button to access the submenu.
Press the HDMI button repeatedly to select the HDMI output resolution that best matches
your TV.
• Use the 5 and 6 buttons select one of the options in the submenu.
• Press ENTER/PLAY4 to confirm your selection. Return to a previous menu using the
3 button.
Press
Press
Press
Press
the SEARCH button repeatedly to display a search option:
once: Title and chapter search
twice: Title and time search
three times: Chapter and time search
2. Press the 3 or 4 button to select a search option and then use the number buttons to
enter the desired title, chapter (for title or chapter 5, press "0", "5") or time (hour/minutes/
seconds) values. Playback will start immediately from the title, chapter or time you have
entered.
• Select a menu icon using the 3 and 4 buttons.
• Use the 5 and 6 buttons to select one of the options in the menu.
While a disc is playing, press ZOOM (the player zooms in on the image). Each time you
press ZOOM, the picture is magnified even more (until you get to the maximum zoom
level). To see other parts of the picture when you’ve zoomed in on the image, try pressing
the 3,4,5 and 6 buttons to go in corresponding directions. This feature is called pan and
scan.
Note: Under Zoom function for JPEG file, press ZOOM button once to go to Zoom 1x
mode, then press REV or FWD button repeatedly to select the zoom levels. Press
ZOOM to quit the zoom mode.
JPEG Files
Before inserting a disc, check that it is compatible with the player:
While the disc is playing, press the REPEAT/A-B button repeatedly to select a play mode:
DVD repeat modes: Title repeat, Chapter repeat, A-B repeat and repeat off.
CD repeat modes: current track repeat, all tracks repeat, A-B repeat and repeat off.
1. Open the tray by pressing the OPEN/CLOSE button. Place a disc with the printed side
facing up and close the tray. The disc’s contents are displayed.
To repeat a segment between two points (A and B), press the REPEAT/A-B button three
times at the beginning of the segment you want to repeat. Allow the disc to play to the
end of the segment or use FWD to advance to the end point (B). Press the REPEAT/A-B
button again at the end of the segment. The segment plays repeatedly until you press
REPEAT/A-B to resume normal playback.
Audio (Only for DVD, VCD)
Some discs have several audio tracks used for different languages or different audio
formats. To change the language or audio format during play, press the AUDIO button one
or more times to select one of the available audio formats or languages.
Note: This option is only available if the disc offers a number of languages or formats.
Subtitle
Press the SUBTITLE button to select a subtitle language and to turn the subtitle menu
on/off if your subtitle feature is available on the disc.
General Setup
General
JPEG files are image files (make sure they have a resolution of less than 5 megapixels.)
Note: The time taken for the contents of the disc to be displayed varies according to the
size and number of JPEG files actually on the disc. If nothing is displayed after a
few minutes, it is likely that certain files are too large. In this case, reduce the files’
resolution to less than 5 megapixels and write another disc.
Repeat Playback
A-B Repeat
Dolby Digital Setup
Playback of JPEG file
Preference Setup
Dolby
To change the HDMI Audio mode. Select “AUTO” to select Audio mode automatically to fit
your TV system accordingly or “PCM” if your TV supports 2 channel digital audio output.
Select “OFF” to stop HDMI Audio mode function.
Preference
- - General Setup Page - TV Display
Angle Mark
OSD Lang
HDMI Setup
HDMI Audio
If you are using the DVD player’s HDMI output to connect to your TV, set the HDMI Setup
option to the resolution that matches your TV. See the user manual that came with your TV
for information on the highest resolution your TV supports.
HDMI Audio
• To exit from the player menus, press the SETUP button.
Zoom
HDMI Setup
PS
ON
ENG
Dolby Digital Setup Menu
General
Dolby
Dynamic
AUTO
FULL
3/4
1/2
2. Select a folder using the 5 and 6 buttons, then press ENTER/PLAY4 to see the folder’s
contents.
Go To General Setup Page
1/4
OFF
3. Select a file using the 5 and 6 buttons, then press ENTER/PLAY4 to start playback.
4. Press the STOP button to stop playback. To go back to the folder list, press the 3
button in stop mode.
Note: During playback you can use the 9 or : button to go back to the previous file or go
on to the next one.
During playback, press 5 to flip image horizontally and press 6 to flip image
vertically.
General Setup Menu (shown above)
Repeat Play Modes
• Wide Screen (16:9 Widescreen): reproduces 16:9 format films in full, on a 16:9 screen.
1. Press the REPEAT/A-B button repeatedly to select a play mode:
Repeat one: repeats the current file until STOP button is pressed.
Repeat all: repeats all files in the current folder until STOP is pressed.
Angle Mark
2. To cancel the repeat playback mode, press the REPEAT/A-B button until “Off” appears
on the TV screen.
Preference
- - Dolby Digital Setup - -
Set DRC To Full Compression
TV Display
You can choose a display option that affects how a disc’s content appears on your TV screen.
• Normal/PS (4:3 Standard): reproduces a 4:3 picture with some distortion.
• Normal/LB (4:3 Letterbox): gives best reproduction of pictures recorded in this format
(i.e., with horizontal bands at the top and bottom of the screen).
Dynamic
This feature monitors the audio track and controls the different sound levels via dynamic
compression. It minimizes sudden volume increases such as when a commercial starts.
Select a range using the 5 and 6 buttons and press ENTER/PLAY4.
This only works when the disc you use contains scenes simultaneously shot from multiple
angles.
• Select “ON” and the angle mark will appear on the screen when player reaches a scene
available in multiple angles.
• Select “OFF” and the angle mark will not appear on the screen when the player reaches a
scene shot from multiples.
Display
The Display appears across the top of the screen when you press the DISPLAY button on
the remote while playing a disc. Press the DISPLAY button repeatedly to scroll through the
playback information.
Menu System
Troubleshooting
Preferences Setup Menu
The menu gives you options to change some aspects of your DVD player to fit your
personal preferences. Preference menu can only be accessed when no disc is played in
the disc tray or when the STOP button is pressed twice to enter complete stop mode for
this menu access. Press the STOP Button once does not allow this menu access.
General
Dolby
Preference
- - Preference Page - Audio
Subtitle
Disc Menu
Rating
Password
ENG
ENG
ENG
Go To Preference Page
Audio:
Selects the dialogue language: English,
French, Spanish, German, Italian,
Swedish or Portuguese.
Subtitle:
Selects the subtitle language: English,
French, Spanish, German, Italian,
Swedish, Portuguese or Off.
Disc Menu:
Selects the disc’s menu language:
English, French, Spanish, German,
Italian, Swedish or Portuguese.
Note: Discs are created differently. The DVD player cannot override some language
preferences. If a disc’s software was created to play the movie (title) in a perferred
language, the preference you set might be ignored. Also, if the language is not
available on the disc you are playing the disc’s default language will be chosen. If the
disc was not created with subtitles, you won’t be able to use the Subtitle feature.
Ratings (Parental Control)
You determine the types of discs played and what types require a password to override the
rating limit. Ratings are ranked from Level 1 to 8. Level 1 is least offensive material and
Level 8 is the most offensive. When adjusting Ratings for the first time:
1. Press SETUP on the remote control to display the main menu.
2. Select the Preferences menu and highlight Ratings. When asked to enter an old password,
enter any number.
3. Enter your new password; it is saved.
4. Select Ratings and select a level.
Note: To enforce Rating Limits, the disc you’re playing must contain a rated movie (or
title).
Password
Password is not defined until you set it. Should you select a password and then forget it, go
to the Troubleshooting section for instructions on resetting.
Note: There is a lock feature on your DVD player if you want to prevent your child from
watching DVDs (don’t forget to remove the remote control). Follow the directions for
locking and unlocking in the Troubleshooting section.
You can correct most problems you have with your product by consulting the Troubleshooting
list that follows.
Player won’t work or no power
• Try unplugging the AC power cord, wait two minutes, and plug it back in.
The remote control does not work
• Remember to point the remote control at the front of your player (towards the infrared
remote sensor). Make sure there are no objects between the remote and the player.
• Maybe the batteries in the remote are weak, dead, or installed incorrectly. Replace the
batteries and make sure the polarity of the terminals (+ and –) is correct.
• Operate the remote control at a distance of no more than 20 feet.
Disc won’t play
• Insert a disc with the label side facing up.
• Check the type of disc you put into the disc tray. Refer to Compatible Disc section.
• Make sure the regional code of the disc is Region No. 1.
Forgot password
• Open the tray and press DISPLAY, 0,0,0,0,1. Turn off DVD player and then turn it on by
pressing the ON/OFF key, or you can unplug the unit, wait a few seconds and plug it in
again.
Lock/Unlock DVD player
• To lock player, press SETUP, 0, 0, 0, 8, 3 (an on-screen message, “Key Lock On” is
displayed).
• To unlock, press SETUP, 0, 0, 0, 8, 3.
Play starts, but then stops immediately
• The disc is dirty. Clean it.
• Condensation has formed. Allow player to dry out.
Picture format does not match the screen format
• The picture format is adjustable, refer to GENERAL SETUP menu section. Some discs
dictate the format, in which case no adjustment is possible.
Picture is distorted
• The disc might be damaged. Try another disc.
• When using FWD or REV buttons, it is normal for some distortion while scanning.
• Make sure you’ve selected the correct option for VIDEO OUT feature.
Sound problems
• If a TV is used, check whether the sound is muted or turned down low.
• You may need to read just the settings in the AUDIO menu.
• Sound is muted during still, frame advance, or slow-motion play.
Troubleshooting
Menu problems
• With a DVD: the disc menus are not displayed in your language. Read the disc jacket to
see what languages are available on that disc. Choose one that suits you, if possible.
• With a DVD: there are no subtitles. Read the disc jacket to see if subtitles are available
on that disc. Choose subtitles in a language that suits you if possible.
• If the player’s setup menus are not displayed in the language you want, check that your
language is among those listed in the MENU LANG menu. If necessary, choose another
language.
• To clear a menu from the screen, press 3 button or repeatedly press SETUP.
The invalid icon (
) appears on screen
• The action cannot be completed at this time for one of the following reasons: the disc’s
software restricts it; the disc’s software doesn’t support that feature (e.g.,angles); the
feature is not available at the moment; you’ve requested a title or chapter number that is
out of range.
Ratings problems
• If you forget your password, go to “Forget Password” information in this section.
• The default language for dialogues and subtitles may be preset by the DVD.
Limited Warranty (US)
AVC MULTIMEDIA (“AVC”) makes the following limited warranty. This limited warranty extend
to the original consumer purchaser and is limited to non-commercial use of the product.
Limited Warranty
Your Responsibility
1) You must retain the original sale receipt to provide proof of purchase.
2) These warranties are effective only if the product is purchased and operated in the U.S.A.
or Canada.
3) Warranties extend only to defects in material or workmanship, and do not extend to any
product or parts which have been lost or discarded, or damage to product or parts caused
by misuse, accident, improper operation or maintenance, or use in violation of instructions
provided with the product, or to product which has been altered or modified without
authorization of AVC, or to products or parts thereof which have had the serial number
removed or changed.
Out of Warranty
In the event your product requires repair after the limited warranty period has expired,
please contact our Customer Support Center at 1-800-506-5746, 1-877-252-6873 or
www.1800customersupport.com/RCA
Hours: Monday–Thursday: 9am–7pm, Friday: 9am–5pm,
Saturday: 9am–NOON Eastern time.
Important: You are responsible for any transportation, shipping or insurance relative to
the return of product to our Product Returns Center.
All warranties implied by state law, including the implied warranties of merchantability and
fitness for a particular purpose, are expressly limited to the duration of the limited warranties
set forth above. With the exception of any warranties implied by state law as hereby limited, the
foregoing warranty is exclusive and in lieu of all other warranties, guarantees, agreements and
similar obligations of manufacturer or seller with respect to the repair or replacement of any
parts. In no event shall AVC be liable for consequential or incidental damages.
One Year Parts & Labor Warranty
AVC products purchased in the United States are warranted to be free from defects in materials
or workmanship for a period of one year from the date of their original retail purchase. If the
unit fails to conform to this warranty, we will service the product using new or refurbished parts
and products, at AVC’s sole discretion.
No person, agent, distributor, dealer or company is authorized to change, modify or extend
the terms of these warranties in any manner whatsoever. The time within action must be
commenced to enforce any obligation of AVC arising under the warranty or under any statute,
or law of the United States or any state thereof, is hereby limited to one year from the date of
purchase. This limitation does not apply to implied warranties arising under state law.
During a period of one year from the effective warranty date, AVC will provide, when needed,
service labor to repair a manufacturing defect at its designated Service Center. To obtain
warranty service in the Untied States, you must first call our Customer Support Center
at 1-800-506-5746 or 1-877-252-6873, during the hours listed in the box on the right.
The determination of service will be made by AVC Customer Support. PLEASE DO NOT
RETURN YOUR UNIT TO AVC WITHOUT PRIOR AUTHORIZATION. New or remanufactured
replacements for defective parts or products will be used for repairs by AVC at its designated
Service Center for one year from the effective warranty date. Such replacement parts or
products are warranted for an additional one year from the date of repair or replacement. The
Customer will be required to ship the unit to the Service Center indicated at the time Customer
Support is contacted to make the necessary repairs. The customer is responsible for all
transportation charges to the service facility.
This warranty gives you specific legal rights and you may also have other rights, which may
vary, from state to state. Some states do not allow limitation on how long an implied warranty
lasts, when an action may be brought, or the exclusion or limitation of incidental or consequential
damages, so the above provisions may not apply to you.
Packaging and Shipping Instruction
When you send the product to the AVC service facility you must use the original carton box
and packing material or an equivalent as designated by AVC.
For more information on other products and services, please visit our web site at
www.1800customersupport.com/RCA
Important: Also keep your “Bill of Sale” as proof of purchase.
Model no. ................................................ Product name ...........................................
Type o f set ..............................................................................................................
Serial no. ................................................ Invoice no. ................................................
Date purchased ....................................... Dealer name .............................................
FOR SERVICE AND REPAIR, PLEASE VISIT www.1800customersupport.com/RCA
Specifications and external appearance are subject to change without notice.
152-02790-0285-101