1
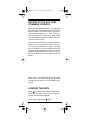
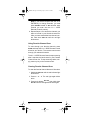
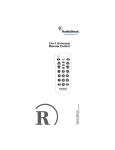
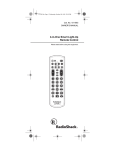
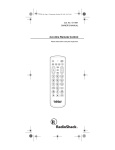
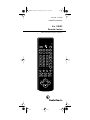
15-1925.fm Page 1 Monday, July 19, 1999 12:59 PM
Cat. No. 15-1925
OWNER’S MANUAL
6 in 1 IR/RF
Remote Control
Please read before using this equipment.
All Lts
On
SET UP
CD
PWR
VCR
AUX 1
AUX 2
CBL
TV
TV/VCR
Plug'n
Power
On
CH
1
2
3
4
5
6
CH
Off
SCAN
7
9
8
Brt
VOL
0
ENTER
LAST
VOL
Dim
PROG
SLEEP
MUTE
DISPLAY
All
Off
AUDIO SEQ
RECORD
VIDEO SEQ
SURROUND
PAUSE
SHIFT
FRONT
LEFT
PLAY
REW
RIGHT
FF
STOP
REAR
15-1925.fm Page 2 Monday, July 19, 1999 12:59 PM
FEATURES
Your RadioShack 6 in 1 IR/RF Remote Control
comes with an RF command console that allows
you to send commands to most IR (infrared)-controlled devices from any room in your home, up to
100 feet away. You can use it to control your TV,
VCR, cable box, and even lights and appliances
with Plug ’n Power modules (not supplied).
The 6 in 1 IR/RF Remote Control is preprogrammed. All you have to do is tell it which TV,
VCR, or other component’s remote controls you
want to replace (by entering 3-digit codes), and it
is automatically ready to operate most of the
same functions as the original remotes.
This manual includes a list of 3-digit manufacturer’s codes for TVs, VCRs, cable converters, compact disc players, satellites, and other popular remote-controlled devices.
The 6 in 1 IR/RF Remote Control’s features include:
IR (Infrared) and RF (Radio-Frequency) Commands — use the remote control with the system’s RF command console to control your IR remote-controlled devices from up to 100 feet
away, even through walls.
Reassignable Device Keys — so you can control more than one of the same type of device (two
VCRs, for example).
Fast Search — when you control more than one
of the same type of device, lets you quickly
search all programmed manufacturers’ codes for
that type of device until you find the code for the
specific device you want to use.
© 1997 Tandy Corporation.
All Rights Reserved.
RadioShack is a registered trademark used by
Tandy Corporation.
X-10 is a registered trademark of X-10 (USA) Inc.
Need help? Call 1-800-950-7044
2
15-1925.fm Page 3 Monday, July 19, 1999 12:59 PM
Channel Scan — lets you scan through all the
available channels on your TV, VCR, or cable
box, stopping at each one for about 3 seconds.
Favorite Channel Scan — lets you set up the remote to scan through a list of up to 10 channels
you select.
Programmable Sequence Command — lets
you press a single key to send a set of commands.
Lighted Keypad — lets you use the 6 in 1 even
in a dark or dimly lit room.
Plug ’n Power Functions — allow you to operate your Plug ’n Power modules with your remote
and an optional IR controller (RadioShack Unlimited No. 10037703).
Powerful Infrared Beam — uses UHF radio frequencies to go through walls, so you can operate
your remote-controlled devices from a greater
distance than many original remote controls — up
to 100 feet!
Convenient Keypad Design — each key is in
the perfect position for easy operation.
Handy Reference Label — provides a convenient place for you to write down the manufacturers’ codes for your remote-controlled devices.
Toll Free Support and Telephone Programming — you can get expert help for your 6 in 1 IR/
RF Remote Control by calling 1-800-950-7044.
You can even have the manufacturer’s codes for
your remote-controlled devices pro- grammed
into your remote control by phone!
Note: You need four AAA batteries (not supplied)
to power your 6 in 1 IR/RF Remote Control.
Need help? Call 1-800-950-7044
3
15-1925.fm Page 4 Monday, July 19, 1999 12:59 PM
CONTENTS
How the System Works .......................................... 5
Preparation ............................................................. 7
Installing Batteries .............................................. 7
Setting Up the 6 In 1’s RF Command Console .. 8
Lighting the Keys ............................................... 8
Setting Up Your Remote Control ........................ 9
Using Two or More Similar Devices ................. 10
Operation ..............................................................
Using the 6 In 1’s RF Command Console ........
Channel Scan ..................................................
Favorite Channel Scan ....................................
Setting Favorite Channel Scan ................
Using Favorite Channel Scan ..................
Clearing Favorite Channel Scan ..............
Command Sequences .....................................
Setting a Sequence .................................
Erasing a Sequence ................................
Punch-Through ...............................................
Using Punch-Through ..............................
Turning Punch-Through On and Off .........
Using the Sleep Timer ......................................
Controlling Lights and Appliances ....................
12
12
12
13
13
14
14
15
15
15
16
16
16
17
17
If You Have Problems ..........................................
Manual Code Search .......................................
Determining the 3-Digit Code ...................
Troubleshooting ...............................................
Downloading Updated Code Information .........
Fast Search ............................................
20
20
21
22
22
24
Manufacturers’ Codes ..........................................
Audio Amplifiers ...............................................
Audio Amp/Tuners ............................................
Audio Cassette .................................................
Cable Converters .............................................
CD Players .......................................................
Home Automation ............................................
Laser Disc Players ...........................................
Miscellaneous Audio ........................................
Satellite Receivers ...........................................
Televisions .......................................................
TV/VCR Combinations .....................................
VCRs ................................................................
Video Accessories ...........................................
26
26
27
29
31
32
36
36
37
37
38
43
43
49
FCC Caution .......................................................... 50
Care and Maintenance ......................................... 51
Specifications ....................................................... 52
Need help? Call 1-800-950-7044
4
15-1925.fm Page 5 Monday, July 19, 1999 12:59 PM
HOW THE SYSTEM WORKS
Your RadioShack 6 in 1 IR/RF Remote Control
was designed with the functions used most often
to operate TV, VCR, cable converter, CD player,
satellite receiver, and audio equipment.
The 6 in 1 IR/RF Remote Control comes with an
RF command console, which receives radio frequency signals from the 6 in 1 and converts them
into infrared signals to control your devices. The
console is set up in the same room as the devices
you want to control, but you can take the remote
farther away, even into another room.
When you set up the 6 in 1 IR/RF Remote Control, its command keys work like the keys on your
original remote controls. For example, the 6 in 1
IR/RF Remote Control’s PWR key works like a key
on your original remote control which might be labeled POWER ON/OFF.
Key
Function
SET UP
Used in setting up your
devices.
Lights your keypad for use in
dark or dimly lit rooms.
PWR, digit keys, CH, Operate the same as the keys
VOL, ENTER, LAST, on your original remote conPROG, SLEEP, DIS- trol.
PLAY, MUTE
CD, VCR, CBL, TV,
AUX1, AUX2,
Plug’n Power
Use these device keys when
you set up the 6 in 1 to
replace your original remote
controls. You also use the
device keys during normal
operation to tell the 6 in 1
which device you want to control.
TV/VCR
Operates the same as the TV/
VCR key on your original
remote control.
SCAN
Allows you to easily browse
through channels on your TV,
VCR, or cable box.
Need help? Call 1-800-950-7044
5
15-1925.fm Page 6 Monday, July 19, 1999 12:59 PM
Key
Function
AUDIO SEQ, VIDEO These keys are for special
SEQ
sequences that you set up.
SURROUND, SHIFT These keys are for controlling
your Surround Sound system
and other similar devices.
RECORD, PAUSE,
PLAY , REW
,
FF
, STOP n
These keys control VCR functions. In addition, these keys
are used to select options and
navigate in your Surround
Sound system, satellite system, or other similar devices.
Notes:
• The remote control’s red light turns on when
you press a key, and blinks when you have
entered a feature or manufacturer’s code.
• Whenever you use RECORD on the remote
control, you must press it twice. This safety
feature helps you avoid accidentally recording over tapes.
• If you use the 6 in 1 IR/RF Remote Control to
replace extremely complex remote controls,
the 6 in 1 might not be able to duplicate
some of your original remote control’s seldom-used functions, but it can duplicate all
of the original’s most commonly used functions.
Need help? Call 1-800-950-7044
6
15-1925.fm Page 7 Monday, July 19, 1999 12:59 PM
PREPARATION
INSTALLING BATTERIES
You need four AAA batteries to power your remote control. We recommend alkaline batteries,
such as RadioShack Cat. No. 23-555.
1.Press the battery
compartment cover
tab and lift off the
cover.
2.Install four AAA alkaline batteries as indicated by the polarity
symbols marked inside the compartment.
3.Replace the cover.
Note: Do not place objects on top of the remote
control after you have installed the batteries. This
can press keys for an extended period of time and
reduce battery life.
When the 6 in 1 IR/RF Remote Control’s range
decreases or it operates erratically, replace the
batteries.
Note: Although the 6 in 1 has a built-in memory
backup, we recommend you have fresh batteries
ready to install as soon as you remove the old
ones.
Need help? Call 1-800-950-7044
7
15-1925.fm Page 8 Monday, July 19, 1999 12:59 PM
SETTING UP THE 6 IN 1’S RF
COMMAND CONSOLE
After you install batteries in the 6 in 1, just plug the
RF command console’s power cord into any standard AC outlet in the same room as your IR remote-controlled devices (TV, VCR, cable box,
and so on) and fully extended its antenna. Be
sure the command console is pointed at the devices you want to control.
The command console has a 4-foot IR signal extension cord for use with devices that are not in
the command console’s line of sight. If you have
such a component, plug the extension cord into
the back of the command console and use the
supplied double-sided tape to attach the extension cord’s LED over or next to the device’s IR
sensor.
Note: The 6 in 1 transmits both IR and RF signals
at the same time. When testing the command
console, be sure the 6 in 1 is not pointed at your
devices.
LIGHTING THE KEYS
Press
to light the keys on the remote. Now,
every time you press a key, the 6 in 1 lights up
and stays lit for about 5 seconds.
To turn off the light, press
again.
Need help? Call 1-800-950-7044
8
15-1925.fm Page 9 Monday, July 19, 1999 12:59 PM
SETTING UP YOUR REMOTE
CONTROL
1. Refer to “Manufacturers’ Codes” on Page 26
and write down the codes for your original
remote controls.
Note: Some manufacturers have several
possible codes listed. Try each until you find
the correct code. See “If You Have Problems” on Page 20 if you need help.
2. Press the device key for the type of remote
you are replacing (CD, VCR, CBL, TV, AUX1
or AUX2).
Hold down SET UP until the red light blinks
twice, then release it. Enter the 3-digit code.
For example, to replace a TV’s remote control (manufacturer’s setup code 154), press:
TV – SET UP – 1– 5 – 4
3. When the red light blinks twice again, the 6
in 1 has accepted the code.
4. Point the 6 in 1 IR/RF Remote Control at
your device and press PWR (or CH s for
some cable boxes). Your device should turn
off (or on, if it was off).
If the remote does not operate your device,
try the other codes listed in the “Manufacturer’s Codes” section for your brand of TV,
VCR, cable converter, or other device.
Repeat Steps 2–5 for additional devices.
Need help? Call 1-800-950-7044
9
15-1925.fm Page 10 Monday, July 19, 1999 12:59 PM
Note: The punch-through feature (see “PunchThrough” on Page 16) is automatically turned on
for the TV’s volume and mute controls. This
means that when you select cable, for example,
and press one of the volume keys or the mute
key, the remote sends that function to the television instead of the cable converter. If you want to
use your cable converter’s volume and mute controls, disable the punch-through feature for these
keys.
USING TWO OR MORE SIMILAR
DEVICES
Each of the 6 in 1 IR/RF Remote Control’s device
keys are preset to control a particular type of device:
TV — TVs only
CBL — Cable converters, satellite receivers and
video accessories
VCR — VCRs, TV/VCR combinations, laser disc
players, cassette decks and digital audio tape
decks
CD — CD players, amplifiers, tuners, receivers,
and miscellaneous audio products
AUX1 — VCRs, laser disc players, cassette
decks, and digital audio tape decks
AUX2 — Cable converters, satellite receivers, and
video accessories
Plug ’n Power — Plug ’n Power or X-10 home automation devices
Need help? Call 1-800-950-7044
10
15-1925.fm Page 11 Monday, July 19, 1999 12:59 PM
Normally, you program each key for one of its listed devices. However, if you have two or more of
the same type of device (two TVs, two VCRs, and
so on) you can convert any unused key (TV, CBL,
CD, VCR, AUX1, or AUX2) to control another type
of device by following these steps.
1. Press SET UP until the red light blinks twice.
2. Press 9 – 9 – 2. The red light blinks twice.
Press the key for the type of device you have
two of, then the unused device key you want
to convert. The red light blinks twice again.
For example, to convert an unused CBL key
into a second VCR key:
SET UP – 9 – 9 – 2 – VCR – CBL
To change the CBL key back to its original
function:
SET UP – 9 – 9 – 2 – CBL – CBL
Need help? Call 1-800-950-7044
11
15-1925.fm Page 12 Monday, July 19, 1999 12:59 PM
OPERATION
1. Press the device key for the device you want
to operate, then point the 6 in 1 at the device
and press PWR (or CH s for some cable converters) to turn the device on.
2. Repeat Step 1 for all other devices you want
to operate.
3. Point the 6 in 1 IR/RF Remote Control
toward the device you want to control, then
press the appropriate device key and the
desired command keys.
Note: The command keys on the 6 in 1 IR/
RF Remote Control work the same as the
keys on the original remote control; however,
the labeling might differ slightly.
4. To turn off the last device you selected, press
PWR . To turn off other devices, press the
device key for the device you wish to turn off,
then press PWR .
USING THE 6 IN 1’S RF
COMMAND CONSOLE
To operate your IR remote-controlled devices
from anywhere in your house, make sure the front
of the RF command console points toward the device(s) that you want to control, and fully extend
the console’s antenna. Press the appropriate device key on your 6 in 1, then the desired function
keys.
CHANNEL SCAN
Channel Scan lets you scan through all available
channels on your TV, VCR, or cable converter,
stopping at each for about 3 seconds.
1. Press the device key (TV, VCR, or CBL).
Need help? Call 1-800-950-7044
12
15-1925.fm Page 13 Monday, July 19, 1999 12:59 PM
2. Aim the 6 in 1 IR/RF Remote Control at the
device and press SCAN. The 6 in 1 scans
through the channels.
Note: The 6 in 1 must be pointed at the
device the entire time you are using the
Channel Scan feature.
3. To stop scanning, simply press any key
(other than SCAN) on the remote control.
FAVORITE CHANNEL SCAN
The Favorite Channel Scan feature lets you set
up your 6 in 1 IR/RF Remote Control to scan
through a list of up to 10 pre-selected channels,
stopping at each for about 3 seconds.
Setting Favorite Channel Scan
Note: Favorite Channel Scan can only be set up
for one device. Once the Favorite Channel Scan
feature has been set up for one device, you must
clear it before you can set it up for another device.
1. Press the desired device key (TV, VCR, or
CBL).
2. Hold down SET UP until the red light blinks
twice, then release it.
3. Press 9 – 9 – 6. The red light again blinks
twice.
4. Enter the 2-digit number of the first channel.
(Enter a 0 before a single-digit channel number.)
5. After you have entered a channel number,
press and release SET UP. The red light
blinks twice.
For example:
0 – 9 – SET UP (for channel 9)
Need help? Call 1-800-950-7044
13
15-1925.fm Page 14 Monday, July 19, 1999 12:59 PM
Note: If your device requires the use of an
ENTER key to change channels, you must
press ENTER instead of SET UP after each
channel you enter into the 6 in 1 IR/RF
Remote Control’s memory.
6. Repeat Steps 4–5 to enter the channels you
want to include in your favorite channel list.
After you have entered the last channel number, hold down SET UP until the red light
blinks twice.
Using Favorite Channel Scan
To scan through your favorite channels, press
SCAN and keep the 6 in 1 IR/RF Remote Control
aimed at your device. The remote control scans
through your selected channels.
The 6 in 1 IR/RF Remote Control stops scanning
after it reaches the last channel in your Favorite
Channel Scan list. To stop scanning earlier, simply press any key on the remote control.
Clearing Favorite Channel Scan
To clear the favorite channel feature of all entries:
1. Hold down SET UP until the red indicator light
blinks twice.
2. Press 9 – 9 – 6. The red light again blinks
twice.
3. Press and release SET UP, then hold down
SET UP until the red light blinks twice again.
Need help? Call 1-800-950-7044
14
15-1925.fm Page 15 Monday, July 19, 1999 12:59 PM
COMMAND SEQUENCES
You can set up your 6 in 1 IR/RF Remote Control
to issue a set of up to 15 commands at the press
of a key. Any sequence of commands you regularly perform can be reduced to a single key
press.
Setting a Sequence
Here is an example of how to set up a sequence
of commands that turns on your cable box and
your TV and puts the TV on Channel 3, and how
this sequence works when you press VIDEO SEQ.
Note: The 6 in 1 must be pointed at the device.
1. Hold down SET UP until the red light blinks
twice, then release it.
2. Press 9 – 9 – 5. The red light blinks twice
again. Then press VIDEO SEQ.
3. Press CBL – PWR – TV – PWR – TV – 0 – 3 –
CBL.
Note: If your device requires the use of an
ENTER key to select a channel, you must
also use ENTER in your sequence.
4. To end the sequence, hold down SET UP
until the red light blinks twice.
Whenever you press the selected sequence key,
your 6 in 1 IR/RF Remote Control issues the sequence of commands you entered.
Erasing a Sequence
1. Hold down SET UP until the red light blinks
twice.
2. Press 9 – 9 – 5. The red light blinks twice.
Press the sequence key you want to erase.
Need help? Call 1-800-950-7044
15
15-1925.fm Page 16 Monday, July 19, 1999 12:59 PM
3. Press and release SET UP, then hold down
SET UP until the red light blinks twice. This
means that your sequence is erased.
PUNCH-THROUGH
Using Punch-Through
The punch-through feature lets you alternately
control two different devices without pressing the
device selection keys for each one. Here’s how it
works.
Not all of the 6 in 1 IR/RF Remote Control’s keys
are used by every device. For example, a TV is
often the only device that uses the volume keys.
After you press TV, then press VCR, the volume
control not used by the VCR retains its TV function.
Note: The punch-through feature does not work if
the last two devices you selected have the same
(or similar) features. For example, most TVs and
some cable converters have PWR keys on their
remote controls. In this case, you must press the
desired device key before you use the remote
control’s PWR key.
Turning Punch-Through On and Off
If your cable converter or VCR has a volume control, you can turn off the punch-through feature to
allow the 6 in 1 to control the volume of those devices. This allows your cable converter or VCR to
control the volume of your TV set (if it can already
do so). Once you turn off punch-through, you
must press the device key for the device (cable
converter or VCR) you want to use to control the
volume.
Need help? Call 1-800-950-7044
16
15-1925.fm Page 17 Monday, July 19, 1999 12:59 PM
Follow these steps to turn off punch-through.
1. Press the device key (CBL or VCR) for the
device you want to use to control the volume,
for example. Then press SET UP until the red
light blinks twice.
2. Press 9 – 9 – 3. The red light blinks twice.
Press the device key (CBL or VCR) for the
device you want to use to control the volume.
The red light blinks twice to indicate punchthrough is turned off.
To turn on the punch-through feature, press SET
UP – 9 – 9 – 3 – TV. The red light blinks twice to
indicate that punch-through is on.
USING THE SLEEP TIMER
If your original remote control had a sleep timer
function, your 6 in 1 IR/RF Remote Control’s
SLEEP key operates the same as on your original
remote.
Follow the instructions for the sleep timer function
in the owner’s manual from your original remote
control. Press SLEEP in the exact same manner
as the original remote control’s SLEEP key was
pressed.
CONTROLLING LIGHTS AND
APPLIANCES
The Plug ’n Power feature allows you to control
lights and appliances, using the supplied RF command console along with an optional IR command console (RadioShack Unlimited No.
10037703). You also need Plug ’n Power light
modules and appliance modules (available
through your local RadioShack store) to use this
feature.
Need help? Call 1-800-950-7044
17
15-1925.fm Page 18 Monday, July 19, 1999 12:59 PM
Follow these steps to control Plug ’n Power modules.
1. Position the IR command console within the
RF command console’s line of sight.
Note: For the best operation, position the
controllers at least 2 feet apart.
2. Plug the IR command console’s power cord
into any standard AC outlet.
3. Set the house code dial on top of the IR command console to the same letter as your
Plug ’n Power modules.
4. Set the selector switch on the IR command
console for the group of modules you want to
control (1–4 or 5–8).
5. Press Plug ’n Power on the 6 in 1 IR/RF
Remote Control.
6. To turn on all light and appliance modules set
to the same code as the IR command console, press All Lts On (PWR) on the 6 in 1 IR/
RF Remote Control, or ALL LIGHTS ON on
the IR command console.
To turn off all light and appliance modules set
to the same house code as the IR command
console, press All Off (MUTE ) on the 6 in 1
IR/RF Remote Control, or ALL UNITS OFF
on the IR command console.
7. To turn on or off specific lights and appliances using the 6 in 1 IR/RF Remote Control, press the digit key (1, 2, 3, 4, 5, 6, 7, or 8)
for the module you want to control. Then
press ON or OFF (CH s or CH t).
To control specific lights and appliances
directly from the IR command console, press
the button on the console that corresponds
to the number of the module you want to
control (1/5, 2/6, 3/7, 4/8). Then use the
function keys on the IR command console to
control the device.
Need help? Call 1-800-950-7044
18
15-1925.fm Page 19 Monday, July 19, 1999 12:59 PM
8. To brighten or dim lights connected to lamp
and appliance modules, press the digit key
for the module you want to control. Then
hold down Brt or Dim on the remote control
(or BRIGHT or DIM on the IR command console). Release the key when the desired
brightness is reached.
Note: You must select the individual light to
brighten or dim even if you used All Lts On or
ALL LIGHTS ON to turn on all the lights at
the same time.
Need help? Call 1-800-950-7044
19
15-1925.fm Page 20 Monday, July 19, 1999 12:59 PM
IF YOU HAVE PROBLEMS
MANUAL CODE SEARCH
If the 6 in 1 IR/RF Remote Control does not operate your remote-controlled devices when you first
set it up, you might have to find the correct code
for your devices. You can try all the codes listed
in the “Manufacturer’s Codes” section on Page 26
for the brand of your device, or you can follow
these steps to search the 6 in 1 IR/RF Remote
Control’s entire library.
1. Manually turn on the device you want to set
up and press the corresponding device key
on your 6 in 1 IR/RF Remote Control ( TV,
VCR, CBL, CD, and so on).
2. Aim the 6 in 1 IR/RF Remote Control at the
device you want to operate.
3. Hold down SET UP until the red light blinks
twice. Release SET UP and press 9 – 9 – 1.
The red light blinks twice again.
4. Slowly alternate between PWR and the
device key.
For example, if you are searching for a code
to operate your TV, use the following
sequence.
SET UP – 9 – 9 – 1 – PWR – TV – PWR – TV –
PWR ...
Each time you press the TV key, the remote
control advances to the next manufacturer’s
code in the library.
5. When your device responds by turning off (or
on, if it was off), immediately press SET UP to
lock in the manufacturer’s code.
Note: Because of the large number of codes in
the 6 in 1 IR/RF Remote Control’s library, this procedure can take several minutes. If your device
turns off during the search, but does not operate
after you lock in the code, begin the search again,
pausing longer between key presses.
Need help? Call 1-800-950-7044
20
15-1925.fm Page 21 Monday, July 19, 1999 12:59 PM
If necessary, repeat these steps for each device.
Determining the 3-Digit Code
After you set up your 6 in 1 IR/RF Remote Control
using the manual code search, you can find which
3-digit code the 6 in 1 IR/RF Remote Control is
set to by following these steps.
1. Press the device key you want to get the
manufacturer’s code from.
2. Hold down SET UP until the red light blinks
twice, then release it.
3. Press 9 – 9 – 0. The red light again blinks
twice.
4. Press 1, and count the number of times the
red light blinks. This is the first number of
your 3-digit manufacturer’s code.
Note: If the red light does not blink, the digit
is a zero.
5. Press 2 and count the number of times the
red light blinks. This is the second number of
your 3-digit manufacturer’s code.
Note: The red light does not blink if the second digit of your 3-digit manufacturer’s code
is a zero.
6. Press 3 and count the number of times the
red light blinks. This is the third digit of your
3-digit manufacturer’s code.
Note: The red indicator does not blink if the
third digit of your 3-digit manufacturer’s code
is a zero.
Need help? Call 1-800-950-7044
21
15-1925.fm Page 22 Monday, July 19, 1999 12:59 PM
TROUBLESHOOTING
If the 6 in 1 IR/RF Remote Control stops working
after you have successfully tested the control for
each device, or if you are unable to get the remote
control to work at all, check these things:
• Confirm that your remote control devices are
working properly by using the original remote
control or the manual controls.
• Be sure you press the device key for the
device you want to control before you press
any other key.
• Replace the batteries.
• If some of the keys do not function for your
device, you might be able to search for a better device code.
DOWNLOADING UPDATED
CODE INFORMATION
If you are still experiencing difficulties getting your
equipment programmed with the 6 in 1 IR/RF Remote Control, you might want to upgrade your remote control with new codes. This can be done by
simply calling our toll-free RadioShack Customer
Service Hotline at 1-800-950-7044.
Important: If you have already set up your 6 in 1
for other equipment, downloading updated information erases those codes from the 6 in 1’s memory.
Note: Your remote control’s telephone upgrade
feature is designed to work with any telephone
that meets current FCC specifications for hearing
aid compatibility. Please do not use cordless or
cellular phones when calling for a telephone upgrade.
Need help? Call 1-800-950-7044
22
15-1925.fm Page 23 Monday, July 19, 1999 12:59 PM
To upgrade your 6 in 1 IR/RF Remote Control,
simply follow these steps:
1. Write down the brand names, model numbers, RadioShack Cat. No. (if applicable)
and manufacture dates for each type of
device (TV, VCR, cable box, etc.) that you
want to load into your 6 in 1 IR/RF Remote
Control. Have this information with you when
you call the RadioShack customer service
representative.
2. Call the RadioShack Customer Service Hotline at 1-800-950-7044.
3. Tell the customer service representative the
brand name, model number (or RadioShack
Cat. No.), and manufacture date for each
infrared device you want to load into your 6
in 1 IR/RF Remote Control.
4. After providing the brand, model, and manufacture date information to the Customer
Service Representative, hold down SET UP
until the red light blinks twice. Then press
PWR so the red light stays on continuously.
5. Hold the 6 in 1 IR/
RF Remote Control up to your
telephone’s earpiece as shown.
Need help? Call 1-800-950-7044
23
15-1925.fm Page 24 Monday, July 19, 1999 12:59 PM
Notes:
• You must hold the earpiece of your telephone over the receiver of your remote
control as shown above. If you do not, the
6 in 1 IR/RF Remote Control might not be
able to properly receive the information
coming through the telephone.
• While the 6 in 1 IR/RF Remote Control is
receiving information, the red light blinks
occasionally to confirm the information
transfer.
• When the 6 in 1 IR/RF Remote Control
has successfully received the information
for your infrared devices and downloading
is completed, the red light blinks twice.
6. Press SETUP again after the red light blinks
twice. The light blinks twice again.
Fast Search
If you have downloaded more than one device
code, the remote control has a Fast Search feature that allows you to quickly search all loaded
device codes, one at a time, until you find the right
one.
As soon as the upgrade operation is complete,
the 6 in 1 IR/RF Remote Control is ready for you
to fast search the downloaded codes. For example, to search the codes downloaded into the remote control’s TV memory:
1. Turn on your TV. Point the remote control at
your TV and press TV then PWR. The remote
control sends the power signal for the first
TV code loaded.
2. If your TV does not turn off, press 1. Your
remote control sends the power signal for
the second TV code loaded.
Need help? Call 1-800-950-7044
24
15-1925.fm Page 25 Monday, July 19, 1999 12:59 PM
3. Continue pressing the number keys (2, 3, 4,
and so on) until your TV responds.
Note: You can search up to 11 codes for
each device (TV, VCR, and so on) if 11
codes were loaded.
Once your TV responds, if you downloaded
codes for more than one device, press the
key for the next device and repeat Steps 1–3
to repeat the search for that device.
4. To end Fast Search and lock in the codes,
press SET UP.
Need help? Call 1-800-950-7044
25
15-1925.fm Page 26 Monday, July 19, 1999 12:59 PM
MANUFACTURERS’ CODES
The following list tells you which 3-digit codes to
enter to set up the 6 in 1 IR/RF Remote Control.
Notes:
• The 6 in 1 IR/RF Remote Control will not
always be able to reproduce every command
of your original remote control.
• A key on the 6 in 1 IR/RF Remote Control
that has the same name as a key on your
original remote control might have a slightly
different function.
Manufacturer
Code(s)
RadioShack
Cat. No.
AUDIO AMPLIFIERS
Aiwa
406
Denon Unified
160
GE
078
Goldstar
031
Harman Kardon
106
Kenwood
297, 356
Luxman
165
Marantz
321
NEC
092, 116, 131, 264
Optimus
395
31-2105
395
31-2107
395
31-2120
300
31-3014
395
31-3018
395
31-3019
395
31-3021
300
31-3023
013
31-3027
013
31-3028
300
31-3029
300
31-3030
300
31-3031
300
31-3032
300
31-3033
013
31-3034
Need help? Call 1-800-950-7044
26
15-1925.fm Page 27 Monday, July 19, 1999 12:59 PM
Manufacturer
Code(s)
RadioShack
Cat. No.
AUDIO AMPLIFIERS (Continued)
Optimus
300
31-3035
300
31-3036
300
31-3037
300
31-3038
Philips
269
Pioneer
300, 257
Pioneer Unified
013
Realistic
395
Sansui
321
Shure
264
Sony
220
Soundesign
078, 211
Technics
308, 372, 374
Yamaha
143, 354
31-3013
AUDIO AMP/TUNERS
Adcom
002, 304, 319
Aiwa
121, 158, 064, 301,
405, 361
Akai
076, 450
Carver
008, 042, 270, 189,
360
Casio
195
Denon Unified
004
Fisher
042, 360
GE
260
Garrard
146, 286, 407
Goldstar
057
Harman Kardon
110, 107
Inkel
066, 062
JVC
074
Kenwood Unified
313, 027, 314, 186
LXI
181
Luxman
166, 329
Magnavox
189, 195, 128
Marantz
006, 189, 128, 039
MCS
044, 039
Memorex
335
Need help? Call 1-800-950-7044
27
15-1925.fm Page 28 Monday, July 19, 1999 12:59 PM
Manufacturer
Code(s)
RadioShack
Cat. No.
AUDIO AMP/TUNERS (Continued)
Modulaire
195
13-1242
182
13-1246
NAD
320
Nakamichi
075, 347
Nikko
215, 322, 407
Onkyo
100, 119, 135, 144,
380
Optimus
360
13-1248
181
13-1249
181
13-1250
042
13-1267
670
13-1271
622
13-1272
121
13-1273
121
13-1274
286
13-1279
219
13-1281
219
13-1282
219
13-1283
531
13-1291
080
31-3014
025
31-3016
177
31-3017
177
31-3020
080
31-3023
080
31-3027
080
31-3028
080
31-3029
080
31-3030
080
31-3031
080
31-3032
080
31-3033
080
31-3034
080
31-3035
080
31-3036
080
31-3037
080
31-3038
Need help? Call 1-800-950-7044
28
15-1925.fm Page 29 Monday, July 19, 1999 12:59 PM
Manufacturer
Code(s)
RadioShack
Cat. No.
AUDIO AMP/TUNERS (Continued)
Panasonic
039, 389
Penney
195, 449
Philips
189
Pioneer Unified
014, 080, 150
Proton
026, 047
Quasar
039
RCA Unified
054, 360
Realistic
181
13-1233
181
13-1234
181
13-1235
182
13-1236
182
13-1238
195
13-1241
181
13-1243
181
13-1244
178
16-1285
001
31-1130
025
31-3016
Scott
105, 163, 322, 418,
396, 390, 449
Sharp
117, 186
Sherwood
062, 066, 324
Sony (Unified)
158, 168, 415, 474
STS
217, 189, 193, 323
Symphonic
182
TEAC
163, 298, 463, 387
Technics
039, 208, 309, 518
Techwood
364
Vector Research
218
Yamaha
176, 081, 186
Yorx
195
AUDIO CASSETTE
ADC
171
Aiwa
029
Akai
188, 189
Carver
029
Denon Unified
076
Need help? Call 1-800-950-7044
29
15-1925.fm Page 30 Monday, July 19, 1999 12:59 PM
Manufacturer
Code(s)
RadioShack
Cat. No.
AUDIO CASSETTE (Continued)
Fisher
074
Garrard
300, 439
Harman Kardon
182
JVC
244
Kenwood
070, 071, 092
Kyocera
171
Luxman Unified
091, 095
Magnavox
029
Marantz
029
NAD
144
NEC
165
Nakamichi
147
Onkyo Unified
100, 136
Optimus
188, 189
13-1253
027, 220
31-3014
027, 220
31-3023
027, 220
31-3027
027, 220
31-3028
027, 220
31-3029
027, 220
31-3030
027, 220
31-3031
027, 220
31-3032
027, 220
31-3033
027, 220
31-3034
027, 220
31-3035
027, 220
31-3036
027, 220
31-3037
027, 220
31-3038
Panasonic
250, 272
Philips
029
Pioneer
027, 099, 220
Proton
028
Sansui
029
Sony
170, 243
Wards
027
Yamaha
094
Need help? Call 1-800-950-7044
30
15-1925.fm Page 31 Monday, July 19, 1999 12:59 PM
Manufacturer
Code(s)
RadioShack
Cat. No.
CABLE CONVERTERS
ABC
011, 014, 007, 013,
017, 003, 001
Antronix
207
Archer
022
15-1285
207
15-1285A
153
15-1287
Cable Star
056
Century
153
Citizen
153, 315
Comtronics Eagle
060, 040
Contec
019
Eastern
002
GC Electronics
056, 207
GE
233, 232
Gemini
057, 070, 015, 242
General Instruments
011, 003, 476
Hamlin
020, 034, 259, 009
Hitachi
011
Jasco
153, 315
Jerrold
003, 014, 011, 026,
024, 015, 047, 098,
276, 012, 476
Macom
033
Magnavox
027, 032
Memorex
000
Movie Time
078, 203, 063
NSC
063, 070, 203
Oak
007, 019, 248
Optimus
021
16-548
021
16-631
Panasonic
021, 107
Paragon
000
Philips
060, 153, 027, 028,
029, 030, 031, 290,
025, 242
Pioneer
144, 023, 260
Popular Mechanics
400
Pulsar
000
Need help? Call 1-800-950-7044
31
15-1925.fm Page 32 Monday, July 19, 1999 12:59 PM
Manufacturer
Code(s)
RadioShack
Cat. No.
CABLE CONVERTERS (Continued)
RCA
021
Realistic
207
Regal
279, 020, 059, 273
Regency
002
Rembrandt
070
SL Marx
040
Samsung
144, 040
Scientific Atlanta
008, 277, 017, 006,
327
Signal
040
Signature
011
SL Marx
040
Sprucer
021, 307
Starcom
015, 047, 003, 098
Stargate
040, 015
Sylvania
001
Telecaption
211
Texscan
001, 096
Tocom
013, 059, 012
Toshiba
000
Unika
207, 153, 022
United Artists
007
United Cable
003
Universal
078, 056, 077, 207,
022, 039, 191, 153
Viewstar
027, 060, 063, 111,
211
Zenith
000, 054
16-1283
CD PLAYERS
ADC
018
ADS
243
Adcom
192, 155, 234
Aiwa
012, 124, 249
Akai
156
Audio Alchemy
194
Audio-Technica
170
BSR
194
California Audio Lab
029
Need help? Call 1-800-950-7044
32
15-1925.fm Page 33 Monday, July 19, 1999 12:59 PM
Manufacturer
Code(s)
RadioShack
Cat. No.
CD PLAYERS (Continued)
Capetronic
237
Carrera
194, 394
Carver
157, 179, 437
Casio
201
Clarinette
195
Crown
122
Curtis Mathes
201
Denon
003, 034, 358
Emerson
155, 305, 164, 469
Fisher
048, 342, 174, 179,
088
GE
009, 334
Garrard
280, 425
Genexxa
032, 305, 164
Goldstar
030, 417, 383, 394
Harman Kardon
109, 108, 173
Hitachi
032, 155, 386
Inkel
065, 061
JVC
072
Kenwood
028, 037, 048, 190,
340
Kodak
287
Krell
157
Kyocera
018
Luxman Unified
149, 035, 093
LXI
305
Luxman
093, 149, 266, 432,
483
Magnavox
157, 225, 129
Marantz
005, 157, 180, 029
MCS
043, 029, 201, 454
MGA
083
McIntosh
290
Mission
157
Mitsubishi
098, 083
Modulaire
195
NAD
019
NEC
043, 234
Need help? Call 1-800-950-7044
33
15-1925.fm Page 34 Monday, July 19, 1999 12:59 PM
Manufacturer
Code(s)
RadioShack
Cat. No.
CD PLAYERS (Continued)
Nakamichi
097, 147
Nikko
170, 174, 164
Onkyo
102, 101, 138
Optimus
179
13-1248
037
13-1251
145
13-1258
145
13-1259
536
13-1261
280
13-1268
671
13-1270
179
14-545
032
31-3014
114
31-3017
032
31-3023
032
31-3027
032
31-3028
468
31-3029
468
31-3030
032
31-3031
468
31-3032
468
31-3033
032
31-3034
468
31-3035
468
31-3036
468
31-3037
468
31-3038
175
42-5013
179
42-5015
194
42-5016
196
42-5019
420
42-5022
437
42-5023
437
42-5024
420
42-5025
426
42-5031
196
42-5032
426
42-5036
Need help? Call 1-800-950-7044
34
15-1925.fm Page 35 Monday, July 19, 1999 12:59 PM
Manufacturer
Code(s)
RadioShack
Cat. No.
CD PLAYERS (Continued)
Optimus
342
42-5037
426
42-5038
032
42-5040
032
42-5041
032
42-5044
468
42-5045
305
42-5048
179
42-5049
468
42-5060
305
42-5061
468
42-5062
468
42-5063
Panasonic
029, 388
Penney
043
Philips
157, 274
Pioneer
096, 244, 032, 468
Proton
157, 152
Quasar
029
RCA
053, 179, 155, 305
Realistic
155
42-5004
155
42-5007
175
42-5010
179
42-5014
180
42-5020
Rotel
157, 420
SAE
157
Sansui
157, 305, 202
Sanyo
179, 087
Scott
164, 305, 155
Sears
201, 261, 037,180,
265, 305
Sharp
037, 180
Sherwood
180, 065,114, 061,
196
Signature
108
Sony
000, 185, 490
Soundesign
145
Need help? Call 1-800-950-7044
35
15-1925.fm Page 36 Monday, July 19, 1999 12:59 PM
Manufacturer
Code(s)
RadioShack
Cat. No.
CD PLAYERS (Continued)
STS
018
Sylvania
157, 225
Symphonic
183
TEAC
016, 045, 153, 174,
420, 393,180, 183
Technics
029
Techwood
363
Toshiba
019
Vector Research
394, 417, 194,109
Victor
072
Wards
108
Yamaha
036, 170, 187
Yorx
461
HOME AUTOMATION
GE
240
One-For-All
167
RadioShack Security
System
240
Universal
167
One for All Security
System
167
61-2677
LASER DISC PLAYERS
Aiwa
203
Carver
203
Denon
172
Disco Vision
023
Funai
203
Hitachi
023
Kenwood
258
Magnavox
241, 064
Marantz
064
Mitsubishi
059
NAD
059
Panasonic
204
Philips
064
Pioneer Unified
023, 059
Realistic
203, 001
16-302
Need help? Call 1-800-950-7044
36
15-1925.fm Page 37 Monday, July 19, 1999 12:59 PM
Manufacturer
Code(s)
RadioShack
Cat. No.
LASER DISC PLAYERS (Continued)
Sharp
001
Sony
193, 201
Yamaha
217
MISCELLANEOUS AUDIO
ADC
086
Aiwa
010, 159, 404
AudioSource
351
BSR
086
Carver
351
Denon
359
Fisher
052
Harman Kardon
477
JVC
073
Jerrold
459
KLH
351
Luxman
326
Mitsubishi
132
NEC
236
Pioneer
089, 248
Proton
046
RCA
056, 248
Schneider
376
Scientific Atlanta
460
Sony Unified
010, 159
SounDesign
376
Technics
517
Yorx
376
SATELLITE RECEIVERS
Amplica
072
BSR
095
Birdview
045, 079
Capetronics
095
Channel Master
018, 212, 257
Chaparral
053, 209
DX Antenna
065, 041
Drake
018, 062, 064, 066,
149, 150, 245
Need help? Call 1-800-950-7044
37
15-1925.fm Page 38 Monday, July 19, 1999 12:59 PM
Manufacturer
Code(s)
RadioShack
Cat. No.
SATELLITE RECEIVERS (Continued)
Echostar
148, 159, 269
Fujitsu
186, 236
General Instruments
071, 038, 050
Hytek
095
Janeil
152
Jerrold
036
Kenwood
264
Luxor
083
Macom
050, 018, 061
Memorex
218, 269
NEC
102
Norsat
004, 165
Panasonic
152
16-2511
PRIMESTAR
361
RCA
566
16-2530
566
16-2531
Realistic
STS
566
16-2539
051
16-2501
052
16-2502
052
16-2507
041, 065,190, 210
Scientific Atlanta
234
Star Trak
180
Super Guide
311
Toshiba
061, 082
Uniden
076, 052
Video Cypher II
050
TELEVISIONS
Admiral
093, 016
Aiko
092
Akai
030, 098
Anam
180, 068, 004
Anam National
161, 055
AOC
019, 030, 185, 137,
052, 003
Audiovox
003, 180
Bell & Howell
016, 154
Need help? Call 1-800-950-7044
38
15-1925.fm Page 39 Monday, July 19, 1999 12:59 PM
Manufacturer
Code(s)
RadioShack
Cat. No.
TELEVISIONS (Continued)
Candle
046, 186, 030, 056
Capehart
052
Carver
054
Citizen
030, 046, 060, 056,
092, 039, 280, 186
Concerto
056
Contec
158, 157, 185, 180
Craig
180, 161
Crown
039, 180
Curtis Mathes
060, 030, 039, 054
Daewoo
092, 019, 039, 067
066, 091
Daytron
039
Dynatech
049
Electrohome
039
Emerson
236, 158, 180, 177,
185, 039, 183, 178,
182, 179, 181, 282,
280, 270
Envision
030
Fisher
154, 159
Funai
179, 180, 171
Futuretech
180
GE
047, 051, 055, 021,
027, 178, 174, 279,
251, 282
Goldstar
060, 056, 178, 030,
019, 002, 001, 106
Hallmark
178
Harman Kardon
078
Hitachi
151, 145, 227, 056,
038, 095, 097, 173,
279
Infinity
054
Kenwood
030
JVC
053, 182, 069, 169
Jensen
050
Kamp
216
Kawasho
216, 308
Kenwood
030
Need help? Call 1-800-950-7044
39
15-1925.fm Page 40 Monday, July 19, 1999 12:59 PM
Manufacturer
Code(s)
RadioShack
Cat. No.
TELEVISIONS (Continued)
Kloss
078, 046, 024
KTV
185, 039, 180, 217,
280
Logik
016
Luxman
056
LXI
047, 154, 156, 148,
159
Magnavox
054, 096, 187, 186,
030, 028, 024, 020,
230
Marantz
054, 030
Matsui
217
Memorex
030
16-254
019
16-263
178
16-280
MGA
150, 155, 030, 178,
019
Mitsubishi
150, 178, 155, 019,
098, 014
MTC
019, 060, 056, 049,
030
Multitech
217, 049
NAD
156
NEC
019, 170, 036, 056,
030
Nikko
030, 092, 317
Onwa
180
Optimus
154
13-1282
250
16-422
250
16-548
250
16-631
166
31-3031
166
31-3033
166
31-3038
Optonica
093, 165
Panasonic
051, 055, 054, 338,
162, 250
Penneys
030, 021, 060, 135,
047, 149, 039, 019,
018
Need help? Call 1-800-950-7044
40
15-1925.fm Page 41 Monday, July 19, 1999 12:59 PM
Manufacturer
Code(s)
RadioShack
Cat. No.
TELEVISIONS (Continued)
Philco
054, 030, 019, 020,
024, 028, 186, 187,
096
Philips
054
Pioneer
166, 038
Portland
019, 039, 092
Proscan
047
Proton
052, 031, 178
Pulsar
017
Quasar
055, 051, 219
RadioShack
180
16-246A
165
16-250
030
16-255
030, 178
16-256
165
16-260
030
16-265
030,178
16-268
156
16-288
178
16-289
180
16-292
RCA
047, 018, 135, 029,
019, 254, 174, 038
Realistic
032
16-230
165
16-232
165
16-233
039
16-234
165
16-235
165
16-235A
165
16-236
165
16-251
180
16-252
180
16-253
180
16-262
154
16-299
Sampo
030, 052, 100, 110
Samsung
060, 039, 019, 030,
032, 056
Sanyo
154, 159, 146, 232
Need help? Call 1-800-950-7044
41
15-1925.fm Page 42 Monday, July 19, 1999 12:59 PM
Manufacturer
Code(s)
RadioShack
Cat. No.
TELEVISIONS (Continued)
Scott
236, 179, 180
Sears
148, 047, 154, 158,
178, 146, 159, 056,
179, 149
Sharp
093, 165, 153, 039,
220
Signature
016
Sony
000, 011, 111, 080,
273
Soundesign
178, 180, 186
SSS
019, 180
Supre-Macy
046
Sylvania
054, 096, 065, 020,
024, 028, 030, 186,
187
Symphonic
171
Tatung
055, 049, 003
Technics
051
Techwood
056
Teknika
092, 056, 039, 060,
186, 175, 312, 019,
150, 016, 180, 179,
322
Tera
031
TMK
056, 178
Toshiba
154, 156, 060, 036,
149
Tosonic
185
Totevision
039
Universal
021, 027
Vector Research
030
Victor
053
Video Concepts
098
Vidtech
178, 019
Wards
054, 187, 174, 030,
029, 165, 179, 016,
178, 021, 027, 020,
096, 028, 019
Yamaha
019, 030
Zenith
017, 016
Zonda
003
Need help? Call 1-800-950-7044
42
15-1925.fm Page 43 Monday, July 19, 1999 12:59 PM
Manufacturer
Code(s)
RadioShack
Cat. No.
TV/VCR Combinations
Note: These codes are accessed through the
VCR device key. You might also need to use a
TV code to control volume.
Daewoo
278
Emerson
002, 294, 479
Funai
000
Goldstar
037
Harley-Davidson
000
Hitachi
000, 035, 042
Magnavox
000, 035
Magnin
037
Memorex
000
16-410
000
16-411
037
16-412
240 (TV: 060)
16-655
MGN
240
Optimus
000, 325
16-420
162, 454
(TV: 250)
16-421
162, 454
(TV: 250)
16-422
Orion
002, 479
Panasonic
035, 162
Quasar
035, 162
RadioShack
037
16-415
000, 325
16-417
RCA
035, 048
Samsung
240
Shintom
000, 002, 479
Symphonic
000
Totevision
037
Zenith
000
Action
317
VCRs
Aiwa
000
Akai
041, 049,106, 242,
156, 053, 061
Bell & Howell
104
Broksonic
211, 184, 121, 361
Need help? Call 1-800-950-7044
43
15-1925.fm Page 44 Monday, July 19, 1999 12:59 PM
Manufacturer
Code(s)
RadioShack
Cat. No.
VCRs (Continued)
Canon
035, 167
Capehart
020
Carver
081, 110
Craig
240, 047, 271
Curtis Mathes
035, 060
Daewoo
020, 278, 017, 087,
045
Daytron
020
Dynatech
000
Emerson
184, 278, 068, 211,
121, 061, 209, 208,
212, 000, 088, 037,
036, 294, 002
Fisher
104, 046, 047, 054,
066
Funai
000
GE
060, 202, 035, 065
Garrard
000
Go Video
232, 279
Goldstar
037, 038, 018
Harman Kardon
038, 075
Hitachi
000, 041, 042, 105,
166, 065, 235
JVC
008, 067, 041, 206,
207, 384
Jensen
041
Kenwood
067, 008, 041, 046
Lloyd
000
LXI
037, 000
Logik
072
Magnavox
035, 081, 110, 103,
149, 039
Marantz
035, 081, 038, 146
Marta
037
MEI
035
Memorex
000
16-406
000
16-410
000
16-411
037
16-412
Need help? Call 1-800-950-7044
44
15-1925.fm Page 45 Monday, July 19, 1999 12:59 PM
Manufacturer
Code(s)
RadioShack
Cat. No.
VCRs (Continued)
Memorex
MGA
037
16-413
037
16-414
000
16-517
104
16-523
037
16-524
104
16-525
104
16-526
046, 104
16-529
046, 104
16-530
048
16-531
240
16-533
037
16-534
104
16-536
048
16-618
104
16-619
104
16-620
048
16-622
104
16-623
299
16-654
035
16-705
043, 242, 061, 075,
214
MTC
000, 240
Minolta
042, 105
Mitsubishi
043, 242, 061, 075,
214
MTC
000, 240
Multitech
000, 072
NAD
058
NEC
038, 041, 067, 008,
050, 040, 082
Nikko
037
Optimus
104
13-1283
037
16-419
000, 325
16-420
162, 454
16-421
162, 454
16-422
037
16-535
Need help? Call 1-800-950-7044
45
15-1925.fm Page 46 Monday, July 19, 1999 12:59 PM
Manufacturer
Code(s)
RadioShack
Cat. No.
VCRs (Continued)
Optimus
104
16-537
048
16-538
048
16-539
048
16-540
240
16-541
048
16-542
048
16-543
048
16-544
048
16-546
162, 454
16-547
162, 454
16-548
037
16-624
104
16-625
048
16-627
048
16-628
162, 454
16-630
162, 454
16-631
058
31-3023
058
31-3029
058
31-3030
058
31-3031
058
31-3032
058
31-3033
058
31-3037
058
31-3038
Optonica
048, 062
Panasonic
081, 110, 035, 077,
225
Penney
240, 038, 035, 040,
042, 037
Pentax
042, 105, 065
Philco
035, 081, 110, 062
Philips
035, 081, 110, 062
Pilot
037
Portland
020
Pulsar
039
Pulsar
051
Need help? Call 1-800-950-7044
46
15-1925.fm Page 47 Monday, July 19, 1999 12:59 PM
Manufacturer
Code(s)
RadioShack
Cat. No.
VCRs (Continued)
Quartz
046, 155
Quasar
035, 077, 081, 110
RCA
060, 202, 035, 077,
065, 042,105, 149
RadioShack
Realistic
037
16-415
000, 325
16-417
000
16-404
037
16-408
035
16-472
000
16-505
047
16-506
037
16-507
000
16-508
000
16-510
047
16-511
047
16-512
047
16-513
240
16-514
047
16-515
047
16-516
047
16-518
000
16-519
104
16-520
104
16-521
000
16-522
104
16-563
062
16-610
048
16-611
048
16-612
047
16-613
047
16-614
047
16-615
048
16-616
104
16-617
035
16-651
047
16-652
048
16-653
Need help? Call 1-800-950-7044
47
15-1925.fm Page 48 Monday, July 19, 1999 12:59 PM
Manufacturer
Code(s)
RadioShack
Cat. No.
VCRs (Continued)
Realistic
Richo
062
16-700
048
16-701
048
16-702
000
16-703
000
16-704
034, 253
Samsung
240, 051, 053, 045
Sansui
041, 105, 082, 067,
008, 241
Sanyo
104, 046, 054, 066,
268, 240, 047
Scott
121, 184, 212, 210,
045
Sears
054, 066, 104, 047,
046, 037,042, 057,
105, 000
Sharp
048, 062
Shintom
072
Sony
034, 033, 032, 011,
253, 275
STS
042
Sylvania
035, 043, 000, 103,
081, 110
Symphonic
000
Tatung
041
TEAC
000, 041
Technics
035, 081, 110
Teknika
037, 035, 052, 000
Toshiba
043, 045, 210, 066,
057, 212
Totevision
240, 037
Unitech
240
Vector Research
040, 038
Victor
067, 008
Video Concepts
040, 061
Videosonic
240
Wards
240, 000, 035, 048,
072, 042, 062, 212,
149, 047
Yamaha
041, 038
Need help? Call 1-800-950-7044
48
15-1925.fm Page 49 Monday, July 19, 1999 12:59 PM
Manufacturer
Code(s)
RadioShack
Cat. No.
VCRs (Continued)
Zenith
039, 033, 034, 032
VIDEO ACCESSORIES
Channel Master
094
Jebsee
160
Rabbit
081
RadioShack
160
Superguide
169
Telecaption
171
15-1957
Need help? Call 1-800-950-7044
49
15-1925.fm Page 50 Monday, July 19, 1999 12:59 PM
FCC CAUTION
This equipment generates and uses radio frequency energy, and if not installed and used
properly, that is, in strict accordance with the
manufacturer’s instructions, may cause interference to radio and television reception. It has been
type tested and found to comply with the limits for
remote control devices in accordance with the
specifications in sub-part B and C of Part 15 of
FCC Rules , which are designed to provide reasonable protection against such interference in a
residential installation. However, there is no guarantee that interference will not occur in a particular installation. If this equipment does cause interference to radio or television reception, which can
be determined by unplugging the equipment, try
to correct the interference by one or more of the
following measures.
• Reorient the antenna of the radio/TV experiencing interference.
• Relocate the RF command console with
respect to the radio/TV.
• Move the RF command console away from
the radio/TV.
• Plug the RF command console into an outlet
on a different electrical circuit from the radio/
TV experiencing the interference.
Contact your local RadioShack store if the problem continues.
Need help? Call 1-800-950-7044
50
15-1925.fm Page 51 Monday, July 19, 1999 12:59 PM
CARE AND MAINTENANCE
Your RadioShack 6 in 1 IR/RF Remote Control
system is an example of superior design and
craftsmanship. The following suggestions will
help you care for your system so you can enjoy it
for years.
• Keep the 6 in 1 and RF command console
dry. If they get wet, wipe them dry immediately. Liquids can contain minerals that corrode electronic circuits.
• Use and store the system only in normal
temperature environments. Temperature
extremes can shorten the life of electronic
devices, damage batteries, and distort or
melt plastic parts.
• Handle the 6 in 1 and RF command console
gently and carefully. Dropping them can
damage circuit boards and cases and can
cause the system to work improperly.
• Keep the system away from dust and dirt,
which can cause premature wear of parts.
• Wipe the 6 in 1 and RF command console
with a damp cloth occa- sionally to keep
them looking new. Do not use harsh chemicals, cleaning solvents, or strong detergents
to clean your system.
Modifying or tampering with the system’s internal
components can cause a malfunction and invalidate your system’s warranty. If your system is not
performing as it should, take it to your local RadioShack store for assistance.
Need help? Call 1-800-950-7044
51
15-1925.fm Page 52 Monday, July 19, 1999 12:59 PM
SPECIFICATIONS
Remote Power.....................................4 AAA Batteries
RF Command Console Power................. 120 Volts AC
Remote to RF Command Console
Range.............................................100 Feet (304.8 m)
RF Command Console to Device
Range..........................................25 Feet (7.62 m) ±30
Remote Dimensions (HWD) ....... 27/16 ¥ 8 ¥ 11/4 Inches
RF Command Console
Dimensions (HWD)..............313/16 ¥ 51/16 ¥ 11/16 Inches
Remote Weight (Without Batteries)............ 3 oz. (85 g)
RF Command Console Weight............ 10.6 oz. (300 g)
Specifications are typical; individual units might
vary. Specifications are subject to change and improvement without notice.
Need help? Call 1-800-950-7044
52
15-1925.fm Page 53 Monday, July 19, 1999 12:59 PM
NOTES
Need help? Call 1-800-950-7044
53
15-1925.fm Page 54 Monday, July 19, 1999 12:59 PM
Need help? Call 1-800-950-7044
54
15-1925.fm Page 55 Monday, July 19, 1999 12:59 PM
Need help? Call 1-800-950-7044
55
15-1925.fm Page 56 Monday, July 19, 1999 12:59 PM
Limited Ninety-Day Warranty
This product is warranted by RadioShack against manufacturing
defects in material and workmanship under normal use for ninety
(90) days from the date of purchase from RadioShack companyowned stores and authorized RadioShack franchisees and dealers. EXCEPT AS PROVIDED HEREIN, RadioShack MAKES NO
EXPRESS WARRANTIES AND ANY IMPLIED WARRANTIES, INCLUDING THOSE OF MERCHANTABILITY AND FITNESS FOR
A PARTICULAR PURPOSE, ARE LIMITED IN DURATION TO
THE DURATION OF THE WRITTEN LIMITED WARRANTIES
CONTAINED HEREIN. EXCEPT AS PROVIDED HEREIN, RadioShack SHALL HAVE NO LIABILITY OR RESPONSIBILITY TO
CUSTOMER OR ANY OTHER PERSON OR ENTITY WITH RESPECT TO ANY LIABILITY, LOSS OR DAMAGE CAUSED DIRECTLY OR INDIRECTLY BY USE OR PERFORMANCE OF THE
PRODUCT OR ARISING OUT OF ANY BREACH OF THIS WARRANTY, INCLUDING, BUT NOT LIMITED TO, ANY DAMAGES
RESULTING FROM INCONVENIENCE, LOSS OF TIME, DATA,
PROPERTY, REVENUE, OR PROFIT OR ANY INDIRECT, SPECIAL, INCIDENTAL, OR CONSEQUENTIAL DAMAGES, EVEN IF
RadioShack HAS BEEN ADVISED OF THE POSSIBILITY OF
SUCH DAMAGES.
Some states do not allow the limitations on how long an implied
warranty lasts or the exclusion of incidental or consequential damages, so the above limitations or exclusions may not apply to you.
In the event of a product defect during the warranty period, take
the product and the RadioShack sales receipt as proof of purchase
date to any RadioShack store. RadioShack will, at its option, unless otherwise provided by law: (a) correct the defect by product
repair without charge for parts and labor; (b) replace the product
with one of the same or similar design; or (c) refund the purchase
price. All replaced parts and products, and products on which a refund is made, become the property of RadioShack. New or reconditioned parts and products may be used in the performance of
warranty service. Repaired or replaced parts and products are
warranted for the remainder of the original warranty period. You
will be charged for repair or replacement of the product made after
the expiration of the warranty period.
This warranty does not cover: (a) damage or failure caused by or
attributable to acts of God, abuse, accident, misuse, improper or
abnormal usage, failure to follow instructions, improper installation
or maintenance, alteration, lightning or other incidence of excess
voltage or current; (b) any repairs other than those provided by a
RadioShack Authorized Service Facility; (c) consumables such as
fuses or batteries; (d) cosmetic damage; (e) transportation, shipping or insurance costs; or (f) costs of product removal, installation, set-up service adjustment or reinstallation.
This warranty gives you specific legal rights, and you may also
have other rights which vary from state to state.
RadioShack Customer Relations, Dept. W, 100 Throckmorton St.,
Suite 600, Fort Worth, TX 76102
We Service What We Sell
3/97
RadioShack
A Division of Tandy Corporation
Fort Worth, Texas 76102
5/97
Printed in Korea