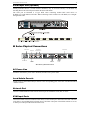
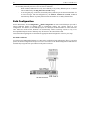
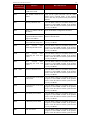
1
User Manual IPR-TR361 IPR-TR362 IPR-TR364 ver 3.2 C UL US 1F61 I.T.E. LISTED Copyright ©2004 Raritan Computer, Inc. IPR-0I-E June 2004 255-80-3100 IPR-M1 IPR-M2 Raritan Computer Inc. 400 Cottontail Lane Somerset, NJ 08873 USA Tel. 1-732-764-8886 Fax. 1-732-764-8887 E-mail: [email protected] http://www.raritan.com/ Raritan Computer Europe, B.V. Eglantierbaan 16 2908 LV Capelle aan den IJssel The Netherlands Tel. 31-10-284-4040 Fax. 31-10-284-4049 E-mail: [email protected] http://www.raritan.com/ Raritan Computer Japan, Inc. 4th Flr. Shinkawa NS Building 1-26-2 Shin-kawa, Chuo-ku Tokyo 104-0033 Japan Tel. 81-03-3523-5991 Fax. 81-03-3523-5992 E-mail: [email protected] http://www.raritan.co.jp Raritan Computer Taiwan, Inc. 5F, 121, Lane 235, Pao-Chiao Rd., Hsin Tien Taipei Hsien Taiwan, ROC Tel. 886-2-8919-1333 Fax. 886-2-8919-1338 E-mail: [email protected] http://www.raritan.com.tw Raritan Computer France 120 Rue Jean Jaures 93200 Levallois-Perret France Tel. 33-14-756-2039 Fax. 33-14-756-2061 E-mail: [email protected] http://www.raritan.fr Raritan Computer Deutschland GmbH Lichstraße 2 D-45127 Essen Germany Tel. 49-201-747-9820 Fax. 49-201-747-9850 E-mail: [email protected] http://www.raritan.de Raritan Computer U.K. Ltd. 36 Great St. Helen's London EC3A 6AP United Kingdom Tel. 44 20 7614 7700 Fax. 44 20 7614 7701 E-mail: [email protected] http://www.raritan.com Shanghai Representative Office of Raritan Computer, Inc. RM 19C-1 Shanghai Shiye Building 18 Caoxi North Road Shanghai China 2000030 Tel. 86-21-64680475 Fax. 86-21-64627964 E-mail: [email protected] http://www.raritan.com.tw/ FCC Information This equipment has been tested and found to comply with the limits for a Class A digital device, pursuant to Part 15 of the FCC Rules. These limits are designed to provide reasonable protection against harmful interference in a commercial installation. This equipment generates, uses, and can radiate radio frequency energy and if not installed and used in accordance with the instructions, may cause harmful interference to radio communications. Operation of this equipment in a residential environment may cause harmful interference. Trademark Information Product names mentioned in this document are trademarks or registered trademarks of their respective companies. IP-Reach, Paragon, MasterConsole MX4, MasterConsole II, MasterConsole, and their respective logos are trademarks or registered trademarks of Raritan Computer, Inc. PS/2, RS/6000, and PC/AT are registered trademarks of International Business Machines Corporation. Sun is a registered trademark of Sun Microsystems. Microsoft and Windows are registered trademarks of Microsoft Corporation. All other marks are the property of their respective owners. Japanese Approvals For assistance in the U.S., please contact the Raritan Technical Support Team by telephone (732) 764-8886 or by fax (732) 764-8887, or e-mail us at [email protected]. Ask for Technical Support – Monday through Friday, 8:00am to 8:00pm, EST. For assistance outside the U.S., please contact your regional Raritan office. This page intentionally left blank. CONTENTS i Contents Chapter 1: Introduction .................................................................. 1 IP-Reach Overview ....................................................................................................................1 Access via Internet, LAN/WAN, or dial-up Modem..............................................................1 Product Photos...........................................................................................................................2 Package Contents......................................................................................................................2 Product Features........................................................................................................................3 Terminology ...............................................................................................................................4 Model Differentiation ..................................................................................................................4 Chapter 2: Installation.................................................................... 5 Configuring Target Servers ........................................................................................................5 Server Video Resolution......................................................................................................5 Windows XP Settings ..........................................................................................................5 Windows 2000 / ME Settings...............................................................................................5 Windows 95 / 98 / NT Settings ............................................................................................5 Linux Settings ......................................................................................................................6 Sun Solaris Settings ............................................................................................................6 Apple Macintosh Settings ....................................................................................................6 Apple Macintosh Settings ....................................................................................................7 Configuring Network Firewall Settings .......................................................................................7 Configuring Paragon KVM Switches..........................................................................................7 TR Series Physical Connections................................................................................................8 AC Power Line.....................................................................................................................8 Local Admin Console...........................................................................................................8 Primary Network Port ..........................................................................................................8 Secondary Network Port (optional) .....................................................................................8 KVM Input Ports ..................................................................................................................8 KVM Output / Local Access Console Ports (optional) .........................................................8 Telephone Line Port (optional) ............................................................................................8 Serial Input Port (optional)...................................................................................................9 M Series Physical Connections .................................................................................................9 AC Power Line.....................................................................................................................9 Local Admin Console...........................................................................................................9 Network Port ........................................................................................................................9 KVM Input Ports ..................................................................................................................9 KVM Output / Local Access Console Ports (optional) .......................................................10 Dedicated Modem Port (optional)......................................................................................10 Serial Input Port (optional).................................................................................................10 Initial Configuration ..................................................................................................................11 Connect to IP-Reach Remotely ...............................................................................................13 Launch Raritan Remote Client (RRC) ...............................................................................13 Establish a Connection......................................................................................................14 Note to CommandCenter Users...............................................................................................14 Chapter 3: Raritan Remote Client ................................................ 15 Invoking Raritan Remote Client (RRC) via Web Browser........................................................15 Security Settings................................................................................................................15 Launching Raritan Remote Client .....................................................................................15 Removing RRC from Browser Cache................................................................................16 Optional: Installing Raritan Remote Client Software................................................................17 RRC Window Layout................................................................................................................18 RRC Navigator .........................................................................................................................19 Navigator Options..............................................................................................................20 Creating New Profiles........................................................................................................20 Establishing a New Connection.........................................................................................22 Closing a Remote Connection...........................................................................................22 RRC Toolbar and Shortcuts.....................................................................................................23 RRC Status Bar........................................................................................................................24 Remote KVM Console Control.................................................................................................25 Single Mouse Mode / Dual Mouse Mode ..........................................................................26 Full Screen Mode ..............................................................................................................26 Selecting Servers with a KVM Switch ...............................................................................27 Keyboard Macros ..............................................................................................................28 Connection and Video Properties......................................................................................31 Color Calibration................................................................................................................34 ii CONTENTS Remote Serial Control..............................................................................................................35 Physical Connection ..........................................................................................................35 Remote Connection...........................................................................................................35 Changing Serial Settings ...................................................................................................36 Remote Device Administration.................................................................................................36 Configuration Menus .........................................................................................................36 Firmware Upgrade.............................................................................................................36 Device Restart ...................................................................................................................36 Device Configuration Backup and Restore .......................................................................36 Log Files ............................................................................................................................36 Chapter 4: Administrative Functions ........................................... 39 Accessing the Administrative Functions ..................................................................................39 Local Admin Console.........................................................................................................39 Remote Admin Console.....................................................................................................40 Navigating the Administrative Menus.......................................................................................40 Network Configuration..............................................................................................................41 Path Configuration ...................................................................................................................42 Security Configuration..............................................................................................................45 Performance Settings...............................................................................................................47 Remote Authentication: Users, Groups, and Access Permissions..........................................48 Overview............................................................................................................................48 Relationship between Users and Group Entries ...............................................................48 Create or Change Group Accounts ...................................................................................49 Assign Port Access Permissions .......................................................................................50 Delete Group Accounts .....................................................................................................51 Create or Change User Accounts .....................................................................................52 Delete User Accounts........................................................................................................53 Remote Authentication Implementation ...................................................................................54 Introduction ........................................................................................................................54 Remote Authentication Implementation ............................................................................54 General Settings for Remote Authentication .....................................................................56 Time and Date..........................................................................................................................60 Log Off Users.....................................................................................................................60 View IP-Reach Status ..............................................................................................................61 Restart or Shutdown the IP-Reach ..........................................................................................61 Diagnostics...............................................................................................................................62 Appendix A: Specifications .......................................................... 63 Remote Connection .................................................................................................................63 Raritan Remote Client (RRC) Software ...................................................................................63 KVM Input ................................................................................................................................63 Cable Specifications.................................................................................................................64 KVM Switch Specifications ......................................................................................................64 Output Specifications ...............................................................................................................64 Appendix B: SNMP Features......................................................... 65 Appendix C: Frequently Asked Questions.................................... 67 Appendix D: Troubleshooting ....................................................... 69 Problems and Suggested Solutions.........................................................................................69 Event Log File and On-Screen Error Codes ............................................................................74 Important Information Login • • • • The default IP-Reach login user name is <admin>, with the password <raritan>. This user has administrative privileges. Passwords are case sensitive and must be entered in the exact case combination in which they were created. The default password <raritan> must be entered entirely in lowercase letters. To ensure security, change the default password as soon as possible. Default IP Address • IP-Reach ships with the default IP address of 192.168.0.192. Firmware • This manual applies to IP-Reach Firmware v3.2 and above. TeleReach • Prior to 31 January 2003, the IP-Reach product line was known as “TeleReach.” This page intentionally left blank. CHAPTER 1: INTRODUCTION 1 Chapter 1: Introduction IP-Reach Overview Congratulations on your purchase of IP-Reach, the industry-leading solution for multi-platform, highperformance, network-based, remote KVM console access. IP-Reach enables highly-secure, multi-user, bandwidth-efficient, and software-independent access to your servers’ KVM consoles via a web browser. IP-Reach connects to the keyboard, video, and mouse ports of up to four servers or KVM switches. Using Raritan's powerful frame-grabber and Video Compression Algorithm, it captures, digitizes, and compresses the video signal before transmitting to a remote PC. The remote user has direct access and total control of target servers for maintenance, administration, and trouble-shooting, from running GUI applications to BIOS-level troubleshooting, and even rebooting. Use IP-Reach for convenient access to servers anytime, from anywhere: • Control servers from within the building or across a campus • Manage servers at branch offices from a central site • Provide remote support for worldwide data centers • Troubleshoot, reconfigure, and reboot servers from home • Provide convenient and secure lights-out server management Access via Internet, LAN/WAN, or dial-up Modem IP-Reach provides a broad array of remote access methods to control any server connected to a Raritan KVM Switch. Since servers can also be accessed out-of-band with IP-Reach, remote access to missioncritical target servers is always available - even if the network is down. 2 IP-REACH USER MANUAL Product Photos IP-Reach M Series IP-Reach TR Series Package Contents IP-Reach ships as a fully configured stand-alone product in a standard 2U 19” rackmount chassis, along with the following contents: TR Series (1) IP-Reach unit (1) IP-Reach TR Series Quick Installation and Setup Guide (1) IP-Reach User Manual (1) Raritan Remote Client software CD-ROM (1) Rackmount Kit (1) Power Cord (1) RJ11 telephone cord (N) CCP20 coaxial cables (N) CCP20F coaxial cables (N = number of ports) M Series (1) IP-Reach unit (1) IP-Reach M Series Quick Installation and Setup Guide (1) IP-Reach User Manual (1) Raritan Remote Client software CD-ROM (1) Rackmount Kit (1) Power Cord (N) CCP20 coaxial cables CHAPTER 1: INTRODUCTION 3 Product Features Access • • • • • Remote KVM access via the Internet, LAN/WAN, or dial-up modem Up to four simultaneous user throughput to switch(es) or server(s) Up to 16 simultaneous users (using PC-share mode) Web browser accessible Remote access to serial devices (VT100) connected to IP-Reach serial port Performance • • • • Superior compression algorithm for exceptional performance No impact on target server performance Automatic sensing of video resolution for optimum display High-performance mouse tracking and synchronization Reliability • • • Dual failover power supplies* Dual failover Ethernet* Integrated modem* / Dedicated Modem Port** allows servers to be accessible even if network is unavailable Security • • • SSL 128-bit RSA public key, 128-bit RC4 private key encryption Single, configurable TCP port for firewall protection Supports RADIUS and LDAP authentication protocols Administration • • • • • • • • Remote Administration via Web Browser interface Tight integration with CommandCenter management appliance SNMP Support Firmware upgradeable over Ethernet Simplified installation and user interface User console for direct analog access to KVM switch Extensive downloadable user event log DHCP or fixed IP addressing * IP-Reach TR Series only ** IP-Reach M Series only 4 IP-REACH USER MANUAL Terminology This manual makes use of the following terms to indicate components of a typical IP-Reach configuration. While reading the manual, please refer to the diagram below for clarification when necessary. LAN/WAN Target Server(s) Remote PC Local Access Console Local Admin Console Servers to be accessed remotely via IP-Reach and its connected KVM configuration. A Windows-based computer used to access and control target servers connected to IP-Reach. An optional user console, consisting of a PS/2 keyboard, PS/2 mouse, and VGA monitor, directly attached to IP-Reach to control target servers locally (not through the network). Single-port IP-Reach models (IPR-TR361 and IPR-M1) allow connection of one local access console. Dual-port IP-Reach models (IPR-TR362 and IPR-M2) allow connection of two local access consoles, three-port IP-Reach models allow connection on three consoles, and so on. A PS/2 keyboard and VGA monitor directly attached to IP-Reach, used for administration and setup. From this console, you can access IP-Reach administration menus directly. You cannot view Target Servers of the connected KVM configuration using this screen. Although IP-Reach also allows remote administration via the network, the local admin console provides the most convenient means to perform initial setup. Model Differentiation Raritan offers two IP-Reach model lines: the TR Series and the M Series. Both model lines offer the same feature set and high performance. However, the TR Series offers the following hardware benefits demanded by carrier-grade class applications: • Dual Redundant Power Supply • Dual Failover Ethernet Controllers • Upgradeable Port Density (up to four ports) • Integrated Modem • 2U Rack Height CHAPTER 2: INSTALLATION 5 Chapter 2: Installation Configuring Target Servers Before installing IP-Reach, first configure any target servers that you wish to access via IP-Reach, in order to ensure optimum performance, as outlined below. Note that the following configuration requirements apply only to target servers, not to the computers that you will be using to access IP-Reach remotely (see Chapter 1: Introduction, Terminology). Server Video Resolution For optimal bandwidth efficiency and video performance, target servers running graphical user interfaces such as Windows, X-Windows, Solaris, and KDE should be configured with desktop backgrounds set to a predominantly solid, light-colored graphic. Backgrounds featuring photos or complex gradients should be avoided. Ensure that the server’s video resolution and refresh rate are supported by IP-Reach, and that the signal is non-interlaced. IP-Reach supports the following video resolutions: Text Modes 640x480 @ 60Hz 640x480 @ 72Hz 640x480 @ 75Hz 640x480 @ 85Hz 800x600 @ 56Hz 800x600 @ 60Hz 800x600 @ 72Hz 800x600 @ 75Hz 800x600 @ 85Hz 1024x768 @ 60Hz 1024x768 @ 70Hz 1024x768 @ 75Hz 1024x768 @ 85Hz 1152x864 @ 60Hz 1152x864 @ 75Hz 1280x1024 @ 60Hz Windows XP Settings On target servers running Microsoft Windows XP, disable the “Enhanced Pointer Precision” option, and set the mouse motion speed exactly to the middle speed setting. These parameters are found in Control Panel → Mouse → Mouse Pointers. Note: For Target Servers running Windows NT, 2000, or XP, you may wish to create a username to be used only for remote connections through IP-Reach. This allows you to keep the Target Server’s slow mouse pointer motion/acceleration settings exclusive to the IP-Reach connection only, as other users may desire faster mouse speeds. Note: Windows XP and 2000 login screens revert to pre-set mouse parameters that differ from those suggested for optimal IP-Reach performance; therefore, mouse sync will not be optimal at these screens. If you are comfortable adjusting the registry on Windows target servers, you can obtain better IP-Reach mouse synchronization at login screens by using the Windows registry editor to change the following settings: Default user mouse motion speed = 0; mouse threshold 1= 0; mouse threshold 2 = 0. Windows 2000 / ME Settings On target servers running Microsoft Windows 2000 / ME, set the mouse pointer acceleration to “none” and the mouse motion speed exactly to the middle speed setting. These parameters are found in Control Panel → Mouse. Windows 95 / 98 / NT Settings On target servers running Microsoft Windows 95 / 98 / NT, set the mouse motion speed to the slowest setting in Control Panel → Mouse → Motion. 6 IP-REACH USER MANUAL Linux Settings On target servers running Linux graphical interfaces, set the mouse acceleration to exactly 1 and set threshold to exactly 1. As mentioned above, please ensure that each target server running Linux is using a resolution supported by IP-Reach at a standard VESA resolution and refresh rate. Each Linux target server should also be set so the blanking times are within +/- 40% of VESA standard values. To check for these parameters: • • • • • Go to the Xfree86 Configuration file XF86Config Using a text editor, disable all non-IP-Reach supported resolutions Disable the virtual desktop feature, which is not supported by IP-Reach Check blanking times (+/- 40% of VESA standard). Restart computer Note: In many Linux graphical environments, the command <Ctrl+Alt+Plus> will change the video resolution, scrolling through all available resolutions that remain enabled in the XF86Config file. Sun Solaris Settings All target servers must be configured to one of the display resolutions supported by IP-Reach. The most popular supported resolutions for Sun machines are: • • • • • • • 1024x768@60Hz 1024x768@70Hz 1024x768@75Hz 1024x768@85Hz 1152x900@66Hz 1152x900@76Hz 1280x1024@60Hz Target servers running the Solaris operating system must output VGA video (H-and-V sync, not composite sync). To change your Sun video card output from composite sync to the non-default VGA output, first issue the Stop+A command to drop to bootprom mode. Then, issue the command: setenv output-device screen:r1024x768x70 to change the output resolution. Issue the “boot” command to reboot the server. Alternatively, you may contact your Raritan representative to purchase a video output adapter. 13W3 Suns with composite sync output require APSSUN II Raritan guardian for use with IP-Reach. HD15 Suns with composite sync output require 1396C Raritan converter to convert from HD15 to 13W3 and an APSSUN II Raritan guardian converter to support composite sync. HD15 Suns with separate sync output require an APKMSUN Raritan guardian for use with IP-Reach. Note that KVM switch brands other than Raritan’s may or may not properly handle PS/2-to-Sun signals. On target servers running the Solaris operating system, set the mouse acceleration value to exactly 1 and threshold to exactly 1. Set this at the graphical user interface (shown below), or with the command line “xset mouse a t” where “a” is the acceleration and “t” is the threshold. CHAPTER 2: INSTALLATION 7 Apple Macintosh Settings For target servers running an Apple Macintosh operating system, while using IP-Reach to access and control your target server, you must set the IP-Reach client (Raritan Remote Client) to “single cursor” mode. Dual cursor mode is not supported, and the two mouse pointers will not appear in sync if you attempt to control a Macintosh server via IP-Reach in dual cursor mode. Configuring Network Firewall Settings If you wish to access IP-Reach through a network firewall, your firewall must allow communication on TCP Port 5000. Alternatively, IP-Reach can be configured to use a different TCP port of your own designation (see Chapter 4: Administrative Functions, Network Configuration). In order to take advantage of IP-Reach's web-access capabilities, the firewall must allow inbound communication on TCP Port 443 – the standard TCP port for HTTPS communication. In order to take advantage of IP-Reach's redirection of HTTP requests to HTTPS (so that users may type the more common, "http://xxx.xx.xxxx", instead of "https://xxx.xx.xxxx"), then the firewall must allow inbound communication on TCP Port 80 – the standard TCP port for HTTP communication. Configuring Paragon KVM Switches If you will be using IP-Reach to access Raritan’s Paragon enterprise-class KVM switch, first perform the following optimization before connecting IP-Reach: One by one, view each target server accessible from the Paragon user station and adjust the “video gain setting” to –15 (negative 15). Adjust Paragon video gain by pressing the + or – keys on your the numerical keypad while viewing the On-Screen User Interface (OSUI). During adjustment, the bottom line of the OSUI menu will show the gain setting parameter changing as the + or – keys are pressed. Gain settings of negative 15 result in the clearest image when each Target Server is viewed through IP-Reach from a Remote PC. Perform this setting for each target server and each user station that will be connected to IP-Reach. 8 IP-REACH USER MANUAL TR Series Physical Connections Back Panel of IP-Reach TR Series AC Power Line Attach the included AC power cord to IP-Reach and into an AC Power Outlet. Local Admin Console Attach a PS/2 keyboard and multisync monitor to the indicated ports (see diagram above) in the back of IPReach. Primary Network Port Connect a standard Ethernet cable from the network port to an Ethernet switch, hub, or router. Secondary Network Port (optional) Connect a standard Ethernet cable from the network port to an Ethernet switch, hub, or router. IP-Reach automatically fails over to the secondary Network Port when the Primary Network Port is unavailable. See Chapter 4: Administrative Functions, Network Configuration for instructions on enabling failover Ethernet support. KVM Input Ports Connect the included CCP20 cable(s) from “KVM In” port to the KVM console of server or KVM switch to be accessed remotely. KVM Output / Local Access Console Ports (optional) User ports “KVM Out” allow direct analog access to the server or KVM switch attached to corresponding “KVM Input” ports. Connect the included CCP20F cable(s) from the ports labeled “User Port” to a PS/2 keyboard, PS/2 mouse, and multisync VGA monitor. Note: Local Access Consoles can be attached to User Ports 1 through 4. Each Local Access Console will view the KVM switch or server attached to the corresponding KVM Port. For example, the User Console attached to User Port 1 will view the KVM switch or server attached to KVM Port 1. The User Console attached to User Port 2 will view the KVM switch or server attached to KVM Port 2, and so on. Telephone Line Port (optional) IP-Reach TR Series models feature an integrated modem for remote access when the LAN/WAN is unavailable. Use the included telephone cable to connect the port labeled “Tel Line” to an analog telephone jack. CHAPTER 2: INSTALLATION 9 Serial Input Port (optional) Serially-controlled devices (VT100 terminal emulation) may be accessed remotely via IP-Reach by attaching them to the Serial IN port found on the back of IP-Reach. The serial port on IP-Reach is of type DTE; when connecting another DTE serial device to IP-Reach, use a null modem serial cable. When connecting a DCE serial device to IP-Reach, use a straightthrough serial cable. M Series Physical Connections Power Switch AC Power Line Serial Input Dedicated Modem Network Port Local Access Console Ports 1-2 KVM Input Ports 1-2 Local Admin Console Back Panel of IP-Reach M Series AC Power Line Attach the included AC power cord to IP-Reach, and into an AC power outlet. Local Admin Console Attach a PS/2 keyboard and multisync monitor to the corresponding ports in the back of IP-Reach marked “Admin Console.” Network Port Connect a standard Ethernet cable from the network port to an Ethernet switch, hub, or router. KVM Input Ports Connect the DB25 end of an included CCP20 cable(s) to the “KVM” ports and connect the other end of the CCP cable to corresponding PS/2 keyboard, mouse, and VGA video ports of the KVM switches or servers to which you wish to provide remote network access. 10 IP-REACH USER MANUAL KVM Output / Local Access Console Ports (optional) Connect a PS/2 keyboard, mouse, and multisync monitor to these ports if you want local direct analog access to the servers or KVM switches connected to the corresponding “KVM In” ports. Note: For IP-Reach Model M2, the Local Access Console attached to a KVM Out Port will view the KVM switch or server attached to the corresponding KVM In Port number. For example, the User Console attached to KVM Out Port 1 will view the KVM switch or server attached to KVM In Port 1. Dedicated Modem Port (optional) IP-Reach M Series models feature a dedicated modem port. By attaching a standard external serial modem to this port, users may retain remote access to IP-Reach when the LAN/WAN is unavailable. Use a standard, straight-thru serial cable to connect IP-Reach to your external serial modem. Then connect the “Tel Line” port of your modem to an analog phone line (see your external serial modem’s documentation for more details). Serial Input Port (optional) Serially-controlled devices (VT100 terminal emulation) may be accessed remotely via IP-Reach by attaching them to the Serial IN port found on the back of IP-Reach. The serial port on IP-Reach is of type DTE, when connecting another DTE serial device to IP-Reach, use a null modem serial cable. When connecting a DCE serial device to IP-Reach, use a straight-through serial cable. CHAPTER 2: INSTALLATION 11 Initial Configuration During initial configuration, the IP-Reach Setup Wizard helps you quickly set up IP-Reach for the first time. The IP-Reach Setup Wizard appears only when accessing the Administrative Menus on an unconfigured IP-Reach, and guides you through initial configuration parameters. The easiest way to perform this initial configuration is by using the Local Admin Console (see ‘Physical Connection’ instructions in the previous sections). 1. Power ON IP-Reach via the power switch on the back of the IP-Reach unit. 2. The Welcome to IP-Reach Setup Wizard Screen will appear on the Local Admin Console. 3. Press the letter <B> on the Local Admin Console keyboard to begin the IP-Reach Setup Wizard. 4. The Network Configuration Screen appears. 5. Use the <Tab>, <↑> or <↓> keys to select each line on the Network Configuration screen and the <space bar>, or the <←> or <→> keys to toggle between available entries. Press the <Enter>, <Tab> or <↓> keys when your entry on each line is complete. Below are descriptions of each field, and the appropriate values to assign. • Name: Designate a unique name for this IP-Reach unit, for example, “Miami Data Center.” The default name is IP-Reach. • Enable Ethernet Interface: Designates whether IP-Reach should enable its Ethernet adapter as active (default: YES). Note: Network connections must be 10BASE-T or 100BASE-TX Ethernet 12 IP-REACH USER MANUAL - Line Speed & Duplex: Enter the visual efficiency for the monitor: Auto detect 10 Mbps/Full Duplex, 10 Mbps/Half Duplex, 100 Mbps/Full Duplex, or 100 Mbps/Half Duplex Obtain IP address automatically (DHCP): ♦ YES: Enables dynamic IP addressing for IP-Reach. Each time IP-Reach boots, it requests an IP address from the local DHCP server. Note that this setting can make remote access to IP-Reach from outside the LAN difficult, since the dynamically assigned IP address must be known in order to initiate a connection. ♦ NO (default): Assigns a fixed IP address to the IP-Reach unit (recommended). IP Address: Enter the IP address for IP-Reach given by your Network Administrator. Subnet Mask: Enter a Subnet Mask provided by your Network Administrator. Default Gateway: Enter the Default Gateway if your Network Administrator specifies one. • Enable Modem Interface: Enables Dial-up Modem access (default: YES). For IP-Reach M Series, an external serial modem must be connected in order for this function to work properly (see Chapter 2: Installation, M Series Physical Connections, Dedicated Modem Port. • Enable Web Browser Interface: Enables web browser access to IP-Reach (default: YES). • Use Default TCP Port 5000: - YES (default): Utilizes the default port 5000. - NO: Enter an alternate port number. Note: In order to access IP-Reach from beyond a firewall, your firewall settings must enable two-way communication through the default port 5000 or the non-default port configured above. • Enable IP Failover (TR Series only): This setting (appears only for TR Series models), enables activation of the secondary Ethernet port in case of failover. - When enabled, IP-Reach will verify the availability of its primary Ethernet port at a constant interval indicated by the Ping Interval in seconds setting. - At each regular ping verification, if the primary Ethernet port is unavailable for an interval longer than that designated by the Failover Timeout in seconds, IP-Reach automatically disables its primary Ethernet Port and enables its secondary Ethernet Port. 6. 7. 8. 9. Press <Ctrl+S> to save entries. The Main Menu will appear. On the Main Menu, select [R] Restart or shutdown the IP-Reach, and press the <Enter> key. When prompted, press the letter <R> on your keyboard to restart IP-Reach. IP-Reach will restart and the IP-Reach Initialization screen appears upon boot up. 10. Congratulations! IP-Reach is now ready for initial connection. Proceed to the next section to initiate your first remote connection to IP-Reach. After you have become familiar with the remote operation of IP-Reach, consult Chapter 4: Administrative Menus to review the complete administrative functions provided by IP-Reach. CHAPTER 2: INSTALLATION 13 Connect to IP-Reach Remotely Having completed the physical installation of IP-Reach, you are now ready to establish an initial network connection. Below are basic instructions for doing so. Please see Chapter 3: Raritan Remote Client for detailed instructions, being sure to review the “KVM Session Properties” and “Color Calibration” sections to optimize your IP-Reach performance. Launch Raritan Remote Client (RRC) 1. Log into any Windows-based computer with network access to IP-Reach. 2. If you are using Windows NT, 2000, or XP, ensure that you are not a “restricted” user. 3. Launch Microsoft Internet Explorer. Ensure that your Internet Explorer security settings allow the download and execution of ActiveX controls. Note: The Windows default security setting of “Medium” is sufficient. 4. In the URL Address field, type the IP address you assigned to IP-Reach in Step II-6. Press [ENTER] to load and launch the web access client. 14 IP-REACH USER MANUAL Establish a Connection Upon launching the Raritan Remote Client (RRC), IP-Reach will request your user credentials. Log on with the default username and password (<admin> and <raritan>). You will connect to your IP-Reach unit. Use the RRC Navigator, found on the left-hand side of the RRC window, to select and connect to a port. Click on “Synchronize Mouse” to converge the mouse pointers displayed. The RRC Navigator displays any known Raritan networked appliances. The RRC Toolbar provides single-click access to RRC’s most frequently-used features. Double-click on a port to establish control over the server or KVM switch attached to that port. Users with Administrator privileges may modify IP-Reach configuration settings Remotely access VT100 serial consoles connected to the “Serial IN” port of IP-Reach. Once connected to a port, keystrokes and video signals are transmitted in real-time, as if you were situated locally. The RRC Status Bar provides real-time information on connection parameters. Note to CommandCenter Users If you are using IP-Reach in a CommandCenter configuration, perform the installation steps as outlined above. After completing the steps in this chapter, please consult the CommandCenter user guide to proceed with your installation. The rest of this user guide applies primarily to users deploying IP-Reach unit(s) without the integration functionality of CommandCenter. CHAPTER 3: RARITAN REMOTE CLIENT (RRC) 15 Chapter 3: Raritan Remote Client Invoking Raritan Remote Client (RRC) via Web Browser IP-Reach features Web Browser access, providing a connection from any Windows-based Remote PC running Microsoft Internet Explorer 4.0+, Mozilla 1.1+, and Netscape 7+. Security Settings Accessing IP-Reach via web browser requires appropriate settings in the Internet Explorer security settings tab: • “Download Signed ActiveX controls” should be set to either “Enable” or “Prompt” • “Run ActiveX controls and plug-ins” should be set to either “Enable” or “Prompt” Please consult your Microsoft Internet Explorer documentation for details regarding these settings. Note: Microsoft Windows 2000 and Microsoft Windows XP restricts certain types of users from downloading and running ActiveX controls and plug-ins, regardless of the above settings in Internet Explorer. Please consult your Microsoft Windows documentation for more information. Launching Raritan Remote Client 1. After confirming that your browser security settings are configured appropriately, type the IP address assigned to your IP-Reach unit (see Chapter 2: Installation, Initial Configuration) in the URL Address field of your web browser. Note: IP-Reach ships with the default IP address of 192.168.0.192 2. IP-Reach redirects you to an HTTPS (128-bit) secure web page for launching RRC. 16 IP-REACH USER MANUAL 3. Depending on your browser’s security configuration, you may see any or all of the following dialog boxes, confirming the access and launch of an externally-provided program. Click [Yes] to advance through any of these prompts. Note: Microsoft Windows 2000 and Microsoft Windows XP restrict certain types of users from downloading and running ActiveX controls and plug-ins, regardless of the settings in Internet Explorer and regardless of your approval of the above warnings. Please review the previous section, "Security Settings" and consult your Microsoft Windows documentation for more information. Removing RRC from Browser Cache To remove RRC from your browser cache, whether to perform an upgrade, save disk space, or remove evidence of RRC being executed on a PC, follow the standard procedure according to your web browser software. Directions for Internet Explorer v6.0: 1. If you have used RRC recently, exit and restart Internet Explorer. 2. On the Internet Explorer menu bar, select Tools → Internet Options. 3. 4. 5. When the "Internet Options" dialog box appears, click on "Settings." When the "Settings" dialog box appears, click on "View Objects." Internet Explorer will display a list of cached program objects. Select any entries named "TeleControl Class" and delete them. CHAPTER 3: RARITAN REMOTE CLIENT (RRC) 17 Optional: Installing Raritan Remote Client Software Note: This step is optional. IP-Reach can be accessed from a Remote PC either by installing RRC software, or by launching RRC via web browser (see previous section). Accessing IP-Reach via web browser does not require any software installation on the Remote PC. 1. 2. 3. Insert the provided RRC CD-ROM into the CD-ROM drive of your PC. The RRC setup program will run automatically. If it does not, right-click on your PC’s CD-ROM drive in Windows Explorer and choose Auto Play. Follow the on-screen instructions in the InstallShield Wizard to complete RRC installation on your Remote PC. Under “Select Components,” you must select either the US version for a US Remote PC keyboard, or the Japanese version for a Japanese Remote PC keyboard. Note: The Japanese version of RRC enables a Japanese keyboard at the Remote PC and also requires a Japanese keyboard to be set at the Target Server. The interface information remains in English. 4. 5. Depending on the configuration of your PC, the RRC installation program may automatically install Direct X and Microsoft Foundation Class libraries if required. If this occurs, you will be directed to restart your PC upon completing installation. A Raritan Remote Client icon will be added to your desktop. Click on this icon to launch RRC. 18 IP-REACH USER MANUAL RRC Window Layout Raritan Remote Client functions are grouped into five general sections on the screen. Each section will be discussed in detail further in this chapter. Menu Bar Navigator Remote Desktop Toolbar Status Bar CHAPTER 3: RARITAN REMOTE CLIENT (RRC) 19 RRC Navigator The RRC Navigator provides a single view to every known Raritan device, allowing convenient access to multiple Raritan networked appliances. The RRC Navigator displays: • All Raritan devices for which a connection profile exists • All Raritan devices that are automatically identified on the network Note: Automatic Raritan device identification uses UDP protocol, and will usually identify all Raritan devices on your subnet. Network administrators rarely allow UDP to function outside of a subnet. Note: Automatic Raritan device identification will find only Raritan devices configured to use the default TCP Port (5000). Each device entry in the RRC Navigator provides two icons to communicate network status and connection profile information. Left Icon (Connection Profile) Profiled – A network connection profile exists for this device. Modem Profile – A modem connection profile exists for this device. Not Profiled – RRC found this device on the network, but a connection profile does not exist for it. Right Icon (Network Status) Connected (green) – You are currently authenticated and connected to this device. Available (black) – This device is currently available on the network, but you are not currently connected to it. Unavailable – A profile exists for this device, but it is not currently available on the network. (Note that all devices with modem profiles to which you are not currently connected will display this icon.) For each Raritan device to which you are connected, the RRC Navigator expands its display tree to show each port for which you have access. • • Ports displayed with a green icon indicate that you are connected to that port. Bold type indicates which port is currently displayed (active) in the remote desktop area of the client. 20 IP-REACH USER MANUAL Navigator Options Certain RRC Navigator attributes may be customized to your preferences. Display / Hide Navigator – Toggle whether the RRC Navigator is shown. This option can also be toggled by choosing View → Navigator from the Menu Bar. Refresh Navigator – Update the device status information shown in the RRC Navigator. Show Browsed Devices – Toggle whether RRC Navigator should display "Not Profiled" devices automatically found on the network or show only devices for which profiles exist. This option can also be toggled by choosing View → All Devices from the Menu Bar. Note: The Browse connection method is the only method of connecting to a Raritan Device configured to use DHCP IP addressing. Creating New Profiles Connection profiles store important information about your Raritan device such as IP Address, custom TCP ports, preferred compression settings, and custom security keys. Note: If your Raritan device is configured to use a custom TCP port (see Chapter 4: Administrative Functions, Network Configuration), or a group security key (see Chapter 4: Administrative Functions, Security Configuration), you must first create a connection profile in order to access the device. To Create a Connection Profile: 1. Select Connection → New Profile from the Menu Bar, or click on the leftmost icon in the Toolbar. The Connection Profile dialog box appears, displaying all connection profiles which currently exist. 2. 3. Click [Add]. The Add Connection dialog appears. Options are grouped into three tabs: Connect, Compression, and Security. Connect Tab • Description: Enter a text name to easily identify the Raritan device that you are configuring, such as "Atlanta_Datacenter." • Connection Type: Select TCP/IP Connection for a LAN/WAN connection; select Dial-Up Connection for a direct analog modem connection to the Raritan device. CHAPTER 3: RARITAN REMOTE CLIENT (RRC) 21 For a TCP/IP Connection, select how RRC should locate your Raritan device: • IP Address: The IP address assigned to your Raritan device (see Chapter 4: Administrative Functions, Network Configuration). • Name: The name assigned to your Raritan device during initial setup (see Chapter 4: Administrative Functions, Network Configuration). Note: If dynamic DHCP addressing is used for IP-Reach, use “Find IP-Reach by Name.” Note: The factory default unit name for each IP-Reach is <IP-Reach>. To change the default name on an IP-Reach unit and institute a unique name, see Chapter 4. • DNS Name: If you have configured your DNS server to resolve a DNS name to the IP address that you have assigned to your Raritan device, use this DNS name to access your Raritan device. For a Dial-Up Connection, enter the dialing parameters that RRC should use to establish a connection: • Phone Number: Be sure to include any additional codes that RRC should dial to establish a connection (country codes, area codes, outside line access codes, etc.) • Modem: Select the modem, as configured in Windows, which RRC should use to dial and connect to your Raritan device. Select a TCP Port to use: • Use Default Port Number: IP-Reach is configured by default to use TCP Port 5000 for communicating with RRC. IP-Reach can be configured to use a different TCP Port (see Chapter 4: Administrative Functions, Network Configuration); if so, uncheck the Use Default Port Number option, and enter the configured TCP Port to be used. Compression Tab Settings in the Compression Tab are adjustable via the RRC client, and therefore are not necessary for preconfiguration in the Connection Profile. Should you wish to pre-configure these settings, however, refer to the section in this chapter labeled, Connection and Video Properties. Security Tab If you have configured your IP-Reach unit to use a private group key, you must enter it here in order to be authorized to initiate a connection with that IP-Reach unit. Click [OK] when you have completed the fields. When you have completed the Connect and Security screens, click [OK] to finish creating the connection. 22 IP-REACH USER MANUAL Establishing a New Connection To connect to a Raritan networked device, simply double-click on its entry in the RRC Navigator. You will be asked to authenticate the device. Note: The default IP-Reach login user name is <admin>, with the password <raritan>. This user has administrative privileges. Passwords are case sensitive and must be entered in the exact case combination in which they were created. The default password <raritan> must be entered entirely in lowercase letters. To ensure security, change the default username password as soon as possible. If you do not see an entry for your IP-Reach in the RRC Navigator, follow the instructions in the Creating New Profiles section in this chapter to create a new connection profile for your IP-Reach. If you are having problems connecting to a Raritan device, be sure to check the following: • Username / Password: Raritan usernames and passwords are case-sensitive. • TCP Port: If you have configured your Raritan Device to use a non-default TCP Port, this information must be entered into its connection profile. • Firewall Settings: If you are accessing a Raritan Device through a firewall, that firewall must be configured to allow two-way communication on TCP Port 5000 (or the custom TCP Port to which your Raritan Device has been configured). • Security Key: If you have configured your Raritan Device to require a group security key, that key must be entered into the device's connection profile. Closing a Remote Connection When you would like to terminate your connection to an IP-Reach unit, simply right-click on the device entry in the RRC Navigator, and select Disconnect. CHAPTER 3: RARITAN REMOTE CLIENT (RRC) 23 RRC Toolbar and Shortcuts Raritan Remote Client Toolbar The RRC Toolbar provides convenient, one-click access to the most commonly used features and parameters of Raritan Remote Client: BUTTON BUTTON NAME HOTKEY FUNCTION New Profile <Ctrl+Alt+C> Launches the Connection Profile screen so you can create a new user profile. Connection Properties <Ctrl+Alt+P> Opens Modify Connection Properties dialog box to manually adjust bandwidth-correlated options (Connection Speed, Color Depth, etc.). Video Settings N/A Opens the Video Settings dialog box to manually adjust video conversion parameters. Synchronize Mouse <Ctrl+Alt+S> In dual-mouse mode, forces realignment of Target Server mouse pointer with Raritan Remote Client mouse pointer. Refresh Screen <Ctrl+Alt+R> Forces refresh of video screen. Auto-sense Video Settings <Ctrl+Alt+A> Forces refresh of video settings (resolution, refresh rate). Enter On-Screen Menu N/A Accesses On-Screen User Interface of connected KVM switch. Exit On-Screen Menu ESC Deactivates On-Screen User Interface of connected KVM switch. Send Ctrl+Alt+Del <Ctrl+Alt+D> Sends a Ctrl+Alt+Delete macro to the Target Server. Single Cursor Mode <Ctrl+Alt+X> Enters Single Cursor Mode, in which the local PC's mouse pointer no longer appears on-screen. Press <Ctrl+Alt+X> to exit this mode. Full Screen Mode <Ctrl+Alt+F> Maximizes the screen real estate to view the Target Server desktop. Show / Hide Navigator N/A Toggles whether or not the RRC Navigator is displayed. Refresh Navigator N/A Forces a refresh of the data displayed by the RRC Navigator. Show / Hide "Browsed" Devices N/A Toggles whether or not the RRC Navigator displays Raritan Devices automatically identified on the network (that do not have pre-configured profiles associated with them). About N/A Displays version information about Raritan Remote Client. 24 IP-REACH USER MANUAL RRC Status Bar The Status Bar at the bottom of the Raritan Remote Client window conveys information about the status of your remote connection session to IP-Reach. Video Sensing Status / Path Indicator Indicates the occurrence of video sensing. Bandwidth Usage Indicator Indicates how much of your total available bandwidth is currently being used. The Connection Speed setting, found under the Compression tab of the Connection Properties screen, determines total available bandwidth. Security Indicator Indicates whether the current remote connection is protected by encryption. Encryption requirements are set during IP-Reach configuration (see Chapter 4). When an IP-Reach device is configured for No encryption or SSL Authentication, NO data encryption, the Security Indicator is represented on the Status Bar as an open lock. When SSL authentication, data encryption or SSL authentication, SSL encryption is selected, the Security Indicator is represented on the Status Bar as a closed lock. Concurrent Connections Indicator Indicates if multiple remote users are currently connected to the same IP-Reach path, showing one icon for a single connected user, and two icons if two or more users are connected. Concurrent connection ability can be set globally under PC Share Mode on the Security Configuration screen (see Chapter 4), or set per individual user in the Concurrent Access Mode setting on the User Account Settings screen (see Chapter 4). Lock Key Indicators Indicates the status of the current Target Server, with respect to the activation of the Caps-Lock, Num-Lock, and Scroll-Lock keys. If these keys are enabled on the Target Server being viewed, this affirmative status will be reflected on the Status Bar as indicated. CHAPTER 3: RARITAN REMOTE CLIENT (RRC) 25 Remote KVM Console Control After using the RRC Navigator to establish a connection with an IP-Reach unit (see the previous section: Establishing a Connection), the Navigator entry corresponding to the IP-Reach unit will expand to show all ports on the IP-Reach enabled for remote access. To establish a remote KVM console connection, simply double-click on the KVM path that you would like to control. Upon connection, IP-Reach displays the real-time video output by the KVM switch or server that is connected to your IP-Reach KVM port. This video is compressed and encrypted according to the configuration settings specified by the administrator (see Chapter 4). Once connected to a KVM switch or a server, you obtain complete, low-level control of the KVM console as if you were physically located next to the KVM switch or server. When your mouse pointer lies within the Remote Desktop area of RRC, mouse movements and clicks are transmitted to the KVM switch or remote server connected. Remote Desktop Area 26 IP-REACH USER MANUAL Single Mouse Mode / Dual Mouse Mode When remotely viewing a Target Server that uses a pointing device, by default you will see two mouse pointers within the Remote Desktop area of the Raritan Remote Client window. The Raritan Remote Client mouse pointer, generated by the operating system on which RRC is running, slightly leads the Target Server's mouse pointer during movement, a necessary result of digital delay. On fast LAN connections, however, some users prefer to disable the Raritan Remote Client mouse pointer, opting to view only the Target Server's mouse pointer during operation. To toggle between these two modes, use the <Ctrl+Alt+X> hotkey, or press the Single Mouse Pointer mode icon in the RRC Toolbar. Note: For better alignment between the two mouse pointers in dual-mouse mode, click on the [Synchronize Mouse] button on the RRC Toolbar, or simultaneously press the keys <Ctrl+Alt+S>. This will force a realignment of the two mouse pointers. If you have carefully followed the "Configuring Target Servers" directions found in Chapter 2, and the mouse pointers still remain out of sync, click on the [AutoSense Video] button on the RRC Toolbar. Full Screen Mode Raritan Remote Client's full screen mode maximizes the screen real estate available to RRC for displaying the remote desktop by removing window borders, toolbars, status bars, and the RRC Navigator. This option is particularly useful for viewing a Target Server whose video resolution is equal to or greater than the video resolution setting of the PC on which RRC is running, for example, viewing a 1024x768 server on a 1024x768 PC. Standard View Full Screen Mode View To toggle full screen mode, click on the full screen mode icon in the RRC Toolbar (or press the hotkey combination Ctrl+Alt+F). To exit full screen mode, press the hotkey combination Ctrl+Alt+F. CHAPTER 3: RARITAN REMOTE CLIENT (RRC) 27 Selecting Servers with a KVM Switch Two buttons allow users single-click access to the On Screen User Interface (OSUI) provided by your KVM Switch. The [Enter OSUI] and [Exit OSUI] buttons on the RRC toolbar have been provided to simplify the use of IP-Reach in conjunction with KVM Switches. Enter OSUI Exit OSUI The steps below configure RRC to properly interoperate with your KVM switches to enter and exit their user interfaces. Once IP-Reach has been configured to match the hotkey of your KVM switch, selecting between Target Servers can be performed with the two RRC Toolbar buttons aforementioned. Note: To access the KVM OSUI, remote users can also simply enter the KVM switch hotkey at the Remote PC keyboard. This is true of both Raritan and non-Raritan KVM products. To utilize the RRC's switching icons, IP-Reach must be set to trigger the On-Screen User Interface (OSUI) Hotkey of the connected KVM switch. This is a one-time installation procedure that does not need to be repeated, unless the KVM switch’s hotkey designation is changed sometime in the future. 1. You can configure the OSUI hotkey to be the <Scroll Lock>, <Num Lock>, or <Caps Lock> key. Determine which of these hotkeys activates your KVM switch’s OSUI. If none, you may also create a keyboard macro (see next section) to accomplish the same purpose 2. In the RRC Menu Bar, select Tools → Options. 3. 4. Select the appropriate Hotkey that activates the connected KVM switch’s OSUI. Click [OK] to continue. 28 IP-REACH USER MANUAL Keyboard Macros RRC allows users to create custom keyboard macros in order to send given key sequences to the remote server or KVM switch connected to IP-Reach. This feature allows customers to send keystrokes to remote servers that may be otherwise unintentionally interpreted by the computer on which RRC is running. IP-Reach’s Keyboard Macro feature can be used to ensure that keystroke combinations intended for the Target Server are sent to, and interpreted only by, the Target Server. Ctrl+Alt+Delete Macro Due to its frequent use, a Ctrl+Alt+Delete macro has been pre-programmed into Raritan Remote Client, and is useful in illustrating the power of keyboard macros. Send Ctrl+Alt+Del <Ctrl+Alt+D> Sends a Ctrl+Alt+Delete macro to the Target Server. Clicking on the Ctrl+Alt+Delete icon in the RRC Toolbar sends this key sequence to the server or KVM switch to which you are currently connected. In contrast, if you were to physically press the Ctrl+Alt+Delete keys while using RRC, the command would first be intercepted by your own PC due to the structure of the Windows operating system, instead of sending the key sequence to the target server as intended. Building a Keyboard Macro To illustrate the creation of a keyboard macro, the following directions detail the steps necessary to create a keyboard macro for the Windows command, "Minimize All Windows / Show Desktop". In Windows, pressing the <Windows+D> key combination minimizes all program windows. However, when connected to a target server with RRC, a keyboard macro is the only means to accomplish this task on the target server – because, again, pressing the key combination <Windows+D> would result in your own client PC intercepting the command and performing it – instead of sending the command to the target server as intended. 1. On the RRC Menu Bar, select Keyboard → Keyboard Macros. 2. When the Keyboard Macros dialog box opens, click [Add]. CHAPTER 3: RARITAN REMOTE CLIENT (RRC) 29 3. The Add Keyboard Macro dialog box opens. 4. Build the Keyboard Macro by editing all the fields in the Add Keyboard Macro window, in the order described below. Click [OK] when finished. a. Enter a name into the Keyboard Macro Name field, which will appear on the RRC Menu Bar, after successful creation of the keyboard macro. For our example, "Minimize All Windows". b. Optional: Designate a keystroke combination in the Hot-Key Combination field, which allows easy macro execution from your keyboard when RRC is running. For our example "Minimize All Windows," we selected <Ctrl+Alt+1>. c. In the Keys to Press selection box, select each key for which you would like to emulate key presses – in the order by which they are to be pressed – clicking [Press Key] after each selection. As each key is selected, it will appear in the Keys to Release selection box in the middle of the dialog box. - In our "Minimize All Windows" example, we require the transmission of two keys: the <Windows> key and the letter <D> key. d. In the Keys to Release selection box, select each key for which you would like to emulate key releases – in the order by which they are to be released – clicking [Release Key] after each selection. - In our "Minimize All Windows" example, we require both keys pressed to also be released. e. Review the Macro Sequence text box, whose contents are automatically generated, to ensure that the contents accurately reflect the exact key sequence you desire. Use the [Remove] and the arrow buttons to adjust the contents and order of your macro if necessary. 30 IP-REACH USER MANUAL 5. After clicking [OK], the Keyboard Macros dialog box will appear, listing your new keyboard macro. 6. Click [Close] to complete the keyboard macro editing procedure. Running a Keyboard Macro Once a macro is created, it can be run via the RRC Menu Bar or with the hotkey combination if one had been designated during the macro creation. Menu Bar Activation After a macro has been created, it appears in the Keyboard menu on the RRC Menu Bar. You can simply click on the entry to execute your new keyboard macro. Hot-Key Activation Alternatively, once a macro has been created, it can be executed while using RRC by pressing the hotkey you (optionally) assigned to the macro. In the “Minimize All Windows” example described above, a user can press the keys <Ctrl+Alt+1> simultaneously while using RRC to send the <Windows+D> key combination to the target server. CHAPTER 3: RARITAN REMOTE CLIENT (RRC) 31 Connection and Video Properties IP-Reach's dynamic video compression algorithms maintain KVM console usability under varying bandwidth constraints. Unlike competitive solutions, IP-Reach optimizes its KVM output for not only LAN utilization, but also via the WAN and dial-up. By dynamically adjusting color depth and limiting video output, IP-Reach offers the optimal balance between video quality and system responsiveness in any bandwidth constraint. Power users of RRC should understand the following adjustable parameters in the Connection Properties and Video Settings dialog boxes, and familiarize themselves with the effects of each setting – in different operating environments, they can be optimized to your requirements. Connection Properties Connection Properties <Ctrl+Alt+P> Opens Modify Connection Properties dialog box to manually adjust bandwidth-correlated options (Connection Speed, Color Depth, etc.). To access the Connection Properties dialog box, either select Connection → Connection Properties from the RRC Menu Bar, or click [Connection Properties] in the RRC Toolbar. Connection Speed The Connection Speed selection box allows users to manually constrain IP-Reach from using more than a designated amount of network bandwidth. While IP-Reach normally automatically detects available bandwidth, users can use the Connection Speed setting to manually inform IP-Reach of a bandwidth constraint – whereby IP-Reach adapts its behavior and simply refrains from even attempting to consume more than the available bandwidth. Color Depth For most administrative tasks (server monitoring, reconfiguring, etc.), server administrators do not require the full 24-bit or 32-bit color spectrum made available by most modern video graphics cards. Attempting to transmit such high color depths, then, would waste an enormous amount of precious network bandwidth. Instead, IP-Reach can dynamically adapt the color depth transmitted to remote users, in order to maximize usability in all bandwidth constraints. • Progressive Update option: The extremely innovative IP-Reach feature of Progressive Update can enormously increase usability in constrained bandwidth environments. When Progressive Update is enabled, IP-Reach first sends an image of the remote desktop at lower color depths, and then provides higher color depth images as bandwidth allows. This option is very similar in philosophy as the common World Wide Web notion of "interlaced GIF" files. Note: When Color Depth is set to Auto Select Color (default), Progressive Update is automated. IP-Reach will enable/disable Progressive Update as needed, disabling it for fast connections and enabling it for slow connections. 32 IP-REACH USER MANUAL Internet Flow Control Many public WAN links are by their very nature unpredictable. Packets sent over the public Internet do not necessarily arrive at their destination in the order they were sent. When using IP-Reach over an unpredictable public WAN (particularly in international scenarios), the Internet Flow Control toggle ensures that packets transmitted by IP-Reach are received and reconstructed by RRC in the correct order. Smoothing The video smoothing level instructs IP-Reach to what degree color gradation shifts are relevant for transmission. Video pixels that stray from the majority color are assigned approximated color values to reduce bandwidth used and video noise transmitted. Overly high smoothing levels can result in color inaccuracies; whereas lower smoothing levels require greater bandwidth and processing power. Video Settings Video Settings N/A Opens the Video Settings dialog box to manually adjust video conversion parameters. To access the Video Settings dialog box, either select Video → Video Settings from the RRC Menu Bar, or click on the [Connection Properties] button in the RRC Toolbar. Most of the settings in this dialog box can be refreshed by performing Color Calibration, as described in the next section, or by manually forcing IP-Reach to auto-detect the video settings (on the RRC Menu Bar, select Video → Auto-sense Video Settings). However, it is useful for power users to understand the meanings and ramifications of each setting. Noise Filter The video output of graphics cards are transmitted in analog form, and are susceptible to electrical and interference noise. IP-Reach's advanced circuitry can filter out these small, false, and unintended signal variations, thereby optimizing picture quality and bandwidth consumed. Higher: Noise Filter settings instruct IP-Reach to transmit a variant pixel of video only if a large color variation exists in comparison to its neighbors. However, setting the threshold too high can result in the unintentional filtering of desired screen changes. Lower: Noise Filter settings instruct IP-Reach to transmit most pixel changes. Setting this threshold too low results in higher bandwidth utilization. Note: Lower Noise Filter settings (approximately 1 to 4) are recommended. Although higher settings will stop the needless transmission of false color variations, true and intentional small changes to a video image may not be transmitted. CHAPTER 3: RARITAN REMOTE CLIENT (RRC) 33 Analog-to-Digital Settings The following parameters are best left to IP-Reach to automatically detect (on the RRC Menu Bar, select Video > Auto-sense Video Settings), but a brief description of each is included here. • PLL Settings: If the video image looks extremely blurry or unfocused, the PLL Settings for clock and phase can be adjusted until a better image appears on the active Target Server. - Clock: Horizontal sync divider to produce pixel clock. Controls how quickly video pixels are displayed across the video screen. Changes made to clock settings cause the video image to stretch or shrink horizontally. Odd number settings are recommended. - Phase: Phase values range from 0 to 31 and will wrap around. Stop at the phase value that results in the best video image for the active Target Server. • Color Settings: Gain control can be thought of as contrast adjustment. Offset control can be thought of as brightness adjustment. - Red Gain: Controls the amplification of the red signal. - Red Offset: Controls the bias of the red signal. - Green Gain: Controls the amplification of the green signal. - Green Offset: Controls the bias of the green signal. - Blue Gain: Controls the amplification of the blue signal. - Blue Offset: Controls the bias of the blue signal. - Link Color Controls: Makes all gain slide adjusters move in unison when any one color’s gain slide is moved and all the offset slide adjusters move in unison when any one color’s offset slide is moved. • Sense video mode changes automatically: Determines whether IP-Reach will automatically update the video image being sent RRC each time it detects a change in video resolution or refresh rates at the Target Server. 34 IP-REACH USER MANUAL Color Calibration Automatic Color Calibration adjusts the color settings on IP-Reach to reduce excess color noise and data during digitization of video images. This data streamlining will increase the operational performance of IPReach, particular color accuracy. A very simple procedure to execute, Color Calibration should be performed if the color levels (hue, brightness, saturation) of transmitted video images do not seem accurate. Because IP-Reach color settings remain static and do not change when switching from one Target Computer to another, performing this Color Calibration routine once on a single representational Target Server will benefit all connected Target Servers. To Perform Color Calibration: 1. Open a remote KVM connection to any server running a graphical user interface. 2. Ensure that a solid white color covers approximately 15% or more of the target server's desktop. One simple way to accomplish this is to open the Notepad application and maximize its window size. 3. On the RRC Menu Bar, select Video → Calibrate Color to perform the color calibration. CHAPTER 3: RARITAN REMOTE CLIENT (RRC) 35 Remote Serial Control In addition to remote KVM console access, IP-Reach also offers users the convenience of accessing a serial console via web browser as well. Any serial console supporting VT100 emulation may be connected to the SERIAL IN port found on the back panel of IP-Reach, and accessed using the Raritan Remote Client. Physical Connection The SERIAL IN port found on the back panel of IP-Reach is a DB9 Male connector, with a standard RS232 DTE pin-out. M Series SERIAL IN Port TR Series SERIAL IN Port In order to connect your serial device to the IP-Reach SERIAL IN port, be sure to use: • A straight-through serial cable for connecting DCE consoles • A null modem serial cable for connecting DTE consoles Remote Connection To open a remote connection to the serial console connected to your IP-Reach SERIAL IN port, doubleclick on the serial path entry displayed on the RRC Navigator. Privileges to allow or disallow access to the serial port can be set in the Administrative Menus (see Chapter 4). Serial Port Entry A terminal window displaying the console output of the serial device connected to IP-Reach will appear, and the icon found next to the serial port entry on the RRC Navigator will turn green. Note: IP-Reach Serial Console access supports only VT100 terminal emulation; be sure your serial device is appropriately configured before connecting to IP-Reach. 36 IP-REACH USER MANUAL Changing Serial Settings You may change the serial terminal settings such as baud rate, parity, and stop bits used by IP-Reach to communicate with your serial device, by right-clicking on the serial port entry in the RRC Navigator, and selecting Serial Parameters in the menu. Click [OK] when finished. Remote Device Administration When logged into an IP-Reach unit as a user with administrative privileges, IP-Reach allows you to perform many powerful device administration tasks remotely. Configuration Menus An Administrative user can access IP-Reach's lowest level configuration menus (explained in detail in Chapter 4), by double-clicking the "Admin" port entry of an IP-Reach device shown in the RRC Navigator. Firmware Upgrade Remote firmware upgrades may be performed by selecting Tools → Update Device on the RRC Menu Bar. RRC will prompt you to locate a Raritan firmware distribution file (*.RFP format), which can be found on the Raritan web site (www.raritan.com) when available. Be sure to read all instructions included in firmware distributions before performing an upgrade. Device Restart Administrative users may restart IP-Reach units by selecting Tools → Restart Device on the RRC Menu Bar. Device Configuration Backup and Restore By selecting Tools → Save Device Configuration and Tools → Restore Device Configuration on the RRC Menu Bar, Administrative users may download and upload complete IP-Reach configurations to their local computers for archiving. Log Files IP-Reach provides detailed activity logs for troubleshooting purposes, which may be downloaded to your local computer for viewing, reporting, and analysis. On the RRC Menu Bar, select Tools → Save Activity Log, or Tools → Save Diagnostic Log. CHAPTER 3: RARITAN REMOTE CLIENT (RRC) 37 38 IP-REACH USER MANUAL CHAPTER 4: ADMINISTRATIVE FUNCTIONS 39 Chapter 4: Administrative Functions Accessing the Administrative Functions Access and execute Administrative functions via local admin console, or via remote administration. Only administrators (users with administrative privileges) can access the IP-Reach Administrative Menus. Local Admin Console Power ON the IP-Reach unit via the power switch on the back of the unit. Note: The default IP-Reach login user name is <admin>, with the password <raritan>. This user has administrative privileges. Passwords are case sensitive and must be entered in the exact case combination in which they were created. The default password <raritan> must be entered entirely in lowercase letters. To ensure security, change the default username password as soon as possible. 40 IP-REACH USER MANUAL Remote Admin Console An alternative way to access IP-Reach’s administrative functions is to do so remotely, using the Raritan Remote Client. Any administrative user logged on to IP-Reach at a Remote PC can perform administrative functions remotely to make changes to the system, as long as IP-Reach is set to allow remote administration privileges – see Allow Remote Administration on the Security Configuration screen. Note: Only users with administrator privileges can access the Remote Admin feature. To access the Administrative menus from Raritan Remote Client, double click on the Admin path entry displayed on the RRC Navigator for the IP-Reach unit you wish to configure. Admin Path entry Navigating the Administrative Menus • Use the <Tab>, <↑>, <↓>, or <C> keys to highlight the Configure IP-Reach selection, then press the <Enter> key. You may need to reboot. • Press <Ctrl+S> to save changes. • Use the <Tab>, <↑>, <↓> or <N> keys to highlight the Network Configuration selection, then press the <Enter> key. CHAPTER 4: ADMINISTRATIVE FUNCTIONS 41 Network Configuration After making changes to the Network Configuration, press <Ctrl+S> to save. You must reboot when all changes are complete in order to apply them. • Name: Designate a unique name for this IP-Reach unit, for example, “Miami Data Center.” The default name is IP-Reach. • Enable Ethernet Interface: Designates whether IP-Reach should enable its Ethernet adapter as active (default: YES). Note: Network connections must be 10BASE-T or 100BASE-TX Ethernet - Line Speed & Duplex: Auto detect 10 Mbps/Full Duplex, 10 Mbps/Half Duplex, 100 Mbps/Full Duplex, or 100 Mbps/Half Duplex Obtain IP address automatically (DHCP): ♦ YES: Enables dynamic IP addressing for IP-Reach. Each time IP-Reach boots, it will request an IP address from the local DHCP server. Note that this setting can make remote access to IP-Reach from outside the LAN difficult, since the dynamically assigned IP address must be known in order to initiate a connection. ♦ NO (default): Assigns a fixed IP address to the IP-Reach unit (recommended). IP Address: Enter the IP address for IP-Reach given by your Network Administrator. Subnet Mask: Enter a Subnet Mask provided by your Network Administrator. Default Gateway: Enter the Default Gateway if your Network Administrator specifies one. • Enable Modem Interface: Enables Dial-up Modem access (default: YES). For IP-Reach M Series, an external serial modem must be connected in order for this function to work properly (see Chapter 2: Installation, M Series Physical Connections, Dedicated Modem Port). • Enable Web Browser Interface: Enables web browser access to IP-Reach (default: YES). • Use Default TCP Port 5000: - YES (default): Utilizes the default port 5000. - NO Enter an alternate port number. Note: In order to access IP-Reach from beyond a firewall, your firewall settings must enable two-way communication through the default port 5000, or the non-default port configured above. 42 • IP-REACH USER MANUAL Enable IP Failover (TR Series only): This setting, which appears only for TR Series models, enables the secondary Ethernet port to be active for failover utilization. - When enabled, IP-Reach will verify the availability of its primary Ethernet port at a constant interval indicated by the Ping Interval in seconds setting. - At each regular ping verification, should the primary Ethernet port be deemed unavailable for an interval longer than that designated by the Failover Timeout in seconds, IP-Reach automatically disables its primary Ethernet Port and enables its secondary Ethernet Port. Path Configuration On the Main Menu, select Configuration → Path Configuration to name each KVM Input port and to instruct IP-Reach models of multiple ports to intelligently redirect new sessions based on your configuration. For instance, if all KVM Input ports on a multi-port IP-Reach model are connected to the same multi-user KVM switch, IP-Reach can automatically redirect incoming sessions to any of its unoccupied KVM ports because ultimately they all connect to the same KVM switch. Consult the following diagrams to determine the appropriate Path Configuration value for your setup. One Path to All Ports: Used when ALL IP-Reach KVM Ports are connected to one KVM switch configuration. There is one main path to one KVM configuration and up to four users can connect to the KVM configuration. IP-Reach will automatically assign the next open channel on the path to each user. One Path to All Ports CHAPTER 4: ADMINISTRATIVE FUNCTIONS 43 Two Paths – Two Ports Each: Used when IP-Reach is connected to two KVM switch configurations. There are two main paths, one to each KVM configuration. Users must select the Path (or KVM configuration) they wish to access upon IPReach login. Up to two users can connected to each KVM configuration. IP-Reach will automatically assign the next open channel on the selected path to each user. Two Paths, Two Ports Each Two Paths – Three Ports, One Port (3,1): Users must select the Path (or KVM configuration) they wish to access upon IP-Reach login. Up to three users can connect to the first Path (KVM configuration) and IP-Reach will automatically assign the next open channel on the selected path to each user. Only one user can connect to the second Path (KVM configuration). Two Paths, Three Ports and One Port 44 IP-REACH USER MANUAL Three Paths – Two Ports, One Port, One Port (2, 1, 1) : Used when IP-Reach is connected to three KVM switch configurations. There are three main paths, one to each KVM configuration. Users must select the Path (or KVM configuration) they wish to access upon IPReach login. Up to two users can connect to the first Path (KVM configuration) and IP-Reach will automatically assign the next open channel on the selected path to each user. Only one user can connect to each of the remaining Paths (KVM configurations). Three Paths, Two Ports, One Port, and One Port Four Paths: Used when IP-Reach is connected to four KVM configurations or four individual servers. There are four main paths, one to each KVM configuration or server. Users must select the Path (or KVM configuration) they wish to access upon IP-Reach login. Only one user can connect to each Path (KVM configuration). Four Paths – One Port for Each Path CHAPTER 4: ADMINISTRATIVE FUNCTIONS 45 Security Configuration • Encryption mode: Toggle through the choices and select the desired level of encryption for initial connection authentication and remote session video data transfer. - No encryption: No encryption or security. Neither the initial connection authentication nor remote video data transfer is encrypted. - SSL authentication, NO data encryption: This mode secures user names and passwords, but not KVM data. 128-bit Secure Socket Layer (SSL) protocol provides a private communications channel between IP-Reach and the Remote PC during initial connection authentication. No encryption security in place during remote KVM data transfer. - SSL authentication, data encryption (default): This mode secures user names, passwords, and KVM data. 128-bit Secure Sockets Layer (SSL) protocol provides a private communications channel between IP-Reach and the Remote PC during initial connection authentication. After authentication, KVM data is also transferred with 128-bit encryption, but using a proprietary protocol more efficient than SSL. - SSL authentication, SSL data encryption: This mode secures user names and passwords, and provides high-level security for KVM data. 128-bit Secure Sockets Layer (SSL) protocol provides a private communications channel between IP-Reach and the Remote PC during initial connection authentication. 128-bit SSL encryption is also in place during remote KVM data transfer. Note: SSL data encryption increases the amount of data that must be sent over the remote connection, and is, therefore, not recommended for modem or very slow Internet connections. The default setting “SSL authentication, data encryption” offers exactly the same level of security with a higher level of efficiency. • Remote link blanks user port: Determines whether Direct Analog User port will be blanked out locally when a remote user is accessing the corresponding KVM port. This keeps a local user from seeing what the remote user is doing. - NO (default): User port can be viewed locally during remote user access. - YES: User port cannot be viewed locally during remote user access. The local or Direct Analog user console will stop displaying video. Note: User Consoles can be attached to User Ports 1 through 4. Each User Console will view the path of the matching KVM Port. For example, the User Console attached to User Port 1 will view the KVM path attached to KVM Port 1. Similarly, the User Console attached to User Port 2 will view the KVM path attached to KVM Port 2, and so on. • Allow remote administration: - NO: To keep access to all Administrative Functions available only from the IP-Reach Admin Console, and not from a Remote PC. - YES (default): Allows remote access to all Administrative IP-Reach Functions by administrators logged on at a Remote PC. See 9. Remote Administration. 46 • IP-REACH USER MANUAL PC Share Mode: Determines global concurrent remote access. Enables up to eight remote users to simultaneously log on to one IP-Reach unit and concurrently view and control a Target Server through IP-Reach. Control is based on first active/keyboard mouse input, so multiple remote users attempting keyboard input or mouse movement at exactly the same moment may experience uneven control. - Private Mode (default): No PC Share. Each IP-Reach path can be accessed exclusively by only one user at a time. - PC Share Mode: IP-Reach can be accessed by more than one user (administrator or nonadministrator) at a time. Control is based on first active keyboard/mouse input, so multiple remote users attempting keyboard input or mouse movement at exactly the same moment may experience uneven control. - PC Share Admins Only: IP-Reach can be accessed by more than one user (administrative users only) at a time. Control is based on first active keyboard/mouse input, so multiple remote users attempting keyboard input or mouse movement at exactly the same moment may experience uneven control. Note: PC Share Mode is a global setting. For individual user access settings see Keyboard and Mouse Control and Concurrent Access Mode on the User Account Settings screen. Each user profile can be set individually to enable/disable keyboard and mouse control, and concurrent access. • Logout idle users: Offers an option for IP-Reach to automatically disconnect remote users after certain selected time intervals of inactivity have passed. - Never (default): Idle remote users will never be disconnected. - After 5, 15, 30, 60, or 120 minutes: Idle remote users will be automatically disconnected from IP-Reach after the selected time period has passed with no active input from the Remote PC. • Log out of KVM on disconnect: Sets automatic log out from the connected KVM’s OSD. - NO (default): No special commands will be given to effect to the OSD of the connected KVM switch upon user remote disconnection from IP-Reach. When a remote user disconnects from IP-Reach the OSD of the connected KVM switch will remain in the state last seen by the user. - YES: When a remote user disconnects from IP-Reach, then IP-Reach will automatically send a log out command (<F9>) to the connected KVM switch. Note: For concurrent connections, the Log out command, if set, will be sent when the last connected user logs off from IP-Reach. Note: For the “ log out of KVM” option to function properly, IP-Reach must be configured to match the base KVM switch’s hot key (see Chapter 3: Raritan Remote Client, Remote Device Administration). • Restrict remote IP address: Determines which remote IP address locations will be granted access to IP-Reach. - NO (default): Remote access to IP-Reach is unrestricted. - YES: IP-Reach will grant remote access to up to four designated IP addresses or address levels. Administrators can set IP-Reach to accept requests only from the company’s intranet and/or from just a few outside IP addresses. The IP Mask fields determine what remote IP addresses IP-Reach will grant remote access to. ♦ A specific IP Mask instructs IP-Reach to grant remote access only to this specific remote IP address. For example, a mask of 10.0.0.1 instructs IP-Reach to grant remote access from the remote IP address location 10.0.0.1 only. ♦ The value 255 acts as a wildcard in any location of the IP mask address. For example, a mask of 10.0.0.255 instructs IP-Reach to grant remote access from any remote IP address location within the range 10.0.0.0 to 10.0.0.255. Similarly, a mask of 192.255.255.255 instructs IP-Reach to grant remote access from any remote IP address location beginning with 192. Note: Once Restrict remote IP address has been enabled, an entry must be made in at least one of the IP Mask fields, since 0.0.0.0 is an invalid IP address. CHAPTER 4: ADMINISTRATIVE FUNCTIONS • 47 Private key: Enter a private key password. This private key acts as a second level of password protection. Only remote users who know the private key password, in addition to their user name and password, can log in and connect to IP-Reach. - Confirm private key: Enter private key password again for re-confirmation. Note: Private key passwords are case sensitive. For remote user login, they must be entered by the user in the exact case combination in which they were created here. Note: Private key passwords must be alphanumeric. Special characters cannot be used. • Enable SNMP: Toggles whether IP-Reach responds to SNMP GET REQUESTS • Require strong password: Requires user passwords to have a minimum of 6 characters with at least one alphabetical character and one non-alphabetical character (punctuation or number). The first four characters of the password and the username cannot match. • Password validity period: Type a number of days in this field to force users to change their passwords after a set duration. • Enable multiple user login: When this rule is selected, a given username/password combination can be connected into IP-Reach from multiple client workstations at a time. Performance Settings The Performance Settings screen is used to set up IP-Reach’s video data transfer and bandwidth parameters. • Pause video stream for idle users: Pausing the flow of video data during periods of prolonged inactivity will prevent an inactive user from needlessly consuming bandwidth. - Never (default): Video data will continually be sent to Remote PC, constantly updating the screen, even if the remote user is Idle, sending no active input to IP-Reach. - After 5, 15, 30, 60, or 120 minutes: Video data flow to the Remote PC will pause after the selected time period has passed with no active input from the Remote PC. • Maximum total Bandwidth usage: Sets an upper limit to the amount of bandwidth that can be consumed by this one IP-Reach unit. - No Limit (default): IP-Reach can consume as much bandwidth as needed. - 10, 5, 2, or 1 megabit or 512, 256, 128 kilobit: Total bandwidth available to be consumed by this IP-Reach unit is limited to the selected quantity. The lower the bandwidth allowed, the slower the performance that may result. • Maximum Bandwidth per user: Sets an upper limit to the amount of bandwidth that can be consumed by each user logged onto this one IP-Reach unit. Note: The availability of concurrent remote access is determined by the global setting PC Share Mode on the Security Configuration screen, or individually by user profile through the Keyboard and Mouse Control and Concurrent Access Mode settings on the User Account Settings screen. Control of IP-Reach and a connected Target Server is based on first active keyboard/mouse input, so multiple remote users attempting keyboard input or mouse movement at exactly the same moment may experience uneven control. 48 IP-REACH USER MANUAL - No Limit (default): Each active user can consume as much bandwidth as needed. 10, 5, 2, or 1 megabit or 512, 256, 128 kilobit: Bandwidth consumed by each active user during the operation of this IP-Reach unit is limited to the selected quantity. The lower the bandwidth allowed, the slower the performance that may result. Press <Ctrl+S> to save changes or <Esc> to cancel changes, and return to Configuration Menu. Saved Performance Settings changes will not take effect until IP-Reach is restarted. Important: The details of the next two sections: Remote Authentication: Users, Groups, and Access Permissions and Remote Authentication Implementation have changed drastically from version 3.1. Please read these sections carefully. Remote Authentication: Permissions Users, Groups, and Access Overview IP-Reach keeps an internal list of user and group names to determine access authorization and permissions. This information is stored internally in a hashed / encrypted format. Note to CommandCenter Users If you plan to configure IP-Reach to be integrated with and controlled by Raritan’s CommandCenter management appliance, this section of the User Manual does not apply to you. When an IP-Reach unit is controlled by CommandCenter, CommandCenter determines the allowed users and groups. Please refer to your CommandCenter User Guide. Note to Raritan Customers Upgrading from Previous Firmware Versions If you previously configured Raritan products such as Dominion KSX and IP-Reach running legacy firmware versions earlier than v3.2, read this entire section carefully. Beginning with firmware version v3.2 and above, the implementation of users and groups has changed significantly to provide more flexible and powerful configurations. Relationship between Users and Group Entries IP-Reach organizes all users into groups. Assigning users to groups allows you to manage permissions for all users in a given group at once, instead of managing permissions on a user-by-user basis. • User information is used to determine user authentication (i.e., is a given user allowed to access IPReach at all?) • Group information is used to determine authorization for all users in a given group (i.e., to which ports on IP-Reach do the users in a group have access rights?) You may choose not to associate specific users with groups. In this case, IP-Reach classifies the user as “Individual.” Mandatory User Groups Every IP-Reach has three default user groups. These groups cannot be deleted: ADMIN NONE UNKNOWN User group for original, factory-default administrative user. Permissions defined for this group are employed for a user when your IP-Reach is configured for remote authentication via LDAP or RADIUS (see next section), and a login attempt is successful but no user group is returned by the remote authentication server. Permissions defined for this group are employed for a user when your IP-Reach is configured for remote authentication via LDAP or RADIUS (see next section), and a login attempt is successful but the user group returned by the remote authentication server is not found in IP-Reach. CHAPTER 4: ADMINISTRATIVE FUNCTIONS 49 Create or Change Group Accounts 1. At the Main Menu, type <G> to add or change a Group Account. 2. The Group Account screen appears. a. To add a new group account, type the letter <A>. b. To change group account properties, use the <TAB> key to move through the list and press <ENTER> to select a group to change. 50 IP-REACH USER MANUAL 3. The Group Account Settings screen appears. a. Type the Group Account name in the Group Name field. The name can consist of alpha-numeric characters, up to 23 characters long, and the first character cannot be a number. b. Use the <Ç> and <È> arrow keys or the <TAB> key to move through the line items, and press the <SPACE BAR> to toggle choices from YES to NO. When finished, press <CTRL> + <S> to save your data, press <ESC> to exit the screen without saving. 4. Press <CTRL> + <S> to save changes. Assign Port Access Permissions By default, all new User Groups have no access rights to any of IP-Reach’s KVM and serial ports. Access permissions must be assigned for each user group. 1. 2. 3. While in the Group Account Settings screen for a user group – whether creating a new group, or editing an existing group – press <CTRL>+<T> to select Node Settings. The Node Settings Menu appears, listing each KVM and Serial Port configured on your IP-Reach. Use the <Ç> and <È> arrow keys to scroll through each KVM and Serial Port configured on your IPReach, and press the <SPACE> key to toggle between: a. b. c. 4. NONE – Users in this group do not have permissions to access this KVM or Serial Port at all. The port will not even be displayed as an option for users in this group. READ ONLY – Users in this group have permission to view this KVM or Serial console port, but do not have the ability to control it (type, move the mouse, etc.). READ WRITE – Users in this group have permission to view this KVM or Serial console port, and have the ability to control it. Press <CTRL>+<S> to Save. CHAPTER 4: ADMINISTRATIVE FUNCTIONS 51 5. Your changes are not yet saved. You will be returned to the Group Account Settings screen for the user group you are editing or creating. 6. You must press <CTRL>+<S> once more while in this screen to save the permissions settings to your given user group. Delete Group Accounts To delete an existing group account, type <G> at the Main Menu, and when the Group Account screen appears, press <TAB> to select the group account to delete, and then press <D>. Before deleting a group, ensure that there are no users assigned to it, or those users will also be deleted. Please note that you cannot delete the default group, ADMIN. 52 IP-REACH USER MANUAL Create or Change User Accounts 1. At the Main Menu, type <U> to add or change a user account. 2. The User Account window appears. a. To add a new user account, type the letter <A>. b. To change a user account properties, use the <TAB> key to move through the list and press <ENTER> to select a user to change. 3. The User Account Settings screen appears. a. Type the user’s name in the User Name field. The name can consist of alpha-numeric characters, up to 23 characters long, and the first character cannot be a number. b. Type the user’s password in the Password field. The password can consist of alpha-numeric characters, up to 23 characters long. c. Retype the password to confirm it in the Confirm password field. d. In the Account Enabled field, press the <SPACE BAR> to toggle from YES to NO to enable this user’s account (default: NO) e. Type the group name this user will belong to in the Group Name field. f. When finished, press <CTRL> + <S> to save your data, press <ESC> to exit the screen without saving. CHAPTER 4: ADMINISTRATIVE FUNCTIONS 4. 53 Press <CTRL> + <M> to return to the Main Menu. Delete User Accounts To delete an existing user account, type <U> at the Main Menu, and when the User Account screen appears, press <TAB> to select the user account to delete, and then press <D>. Please note that you cannot delete the default user, ADMIN. 54 IP-REACH USER MANUAL Remote Authentication Implementation Introduction Note to CommandCenter Users If you plan to configure IP-Reach to be integrated with and controlled by Raritan’s CommandCenter management appliance, this section of the User Manual does not apply to you. When an IP-Reach unit is controlled by CommandCenter, CommandCenter determines the allowed users and groups. Please refer to your CommandCenter User Guide. Note to Raritan Customers Upgrading from Previous Firmware Versions If you have previously implemented RADIUS authentication on Raritan products such as Dominion KSX and IP-Reach running legacy firmware versions earlier than v3.2, read this entire section carefully. Beginning with firmware version v3.2 and above, the implementation of external authentication has changed significantly to provide more flexible and powerful configurations. Supported Protocols To simplify management of usernames and passwords, IP-Reach is able to forward authentication requests to an external authentication server. IP-Reach supports two external authentication protocols: LDAP and RADIUS. Note on Microsoft Active Directory Microsoft Active Directory uses the LDAP protocol natively, and can function as an LDAP server and authentication source for IP-Reach. If it has the IAS (Internet Authorization Server) component, a Microsoft Active Directory server can also serve as a RADIUS authentication source. Remote Authentication Implementation Priority When a user tries to authenticate to an IP-Reach unit that is configured for external authentication, IPReach first checks its own internal user database for that username. If the username is not found in the IPReach internal database, the request is forwarded to the external authentication server. • • • If Username is not found in IP-Reach internal database: Request is forwarded to external authentication server to determine whether the login is allowed or denied. If Username is found in IP-Reach internal database and Password is correct: Login is allowed. If Username is not found in IP-Reach internal database and Password is incorrect: Login is denied; the request does NOT get forwarded to the external authentication server. CHAPTER 4: ADMINISTRATIVE FUNCTIONS 55 Authentication vs. Authorization When your IP-Reach unit is configured for remote authentication, the external authentication server is used primarily for the purposes of authentication, not authorization. Authorization is determined by IP-Reach on the basis of user groups. That is, once a given user is allowed to access the IP-Reach system in general (authenticated), that user’s specific permission (authorization) is determined by IP-Reach based upon the user’s group. The external authentication server can assist in authorization by informing IP-Reach about the user group to which a user belongs whenever the authentication server approves a given user’s login request. The sections Implementing LDAP Remote Authentication and Implementing RADIUS Remote Authentication that follow explain this in more detail. The flow diagram below illustrates the steps taken: User login with username / password Login denied password correct? NO YES username in internal database? External authentication server configured? NO Login denied YES YES External authentication query Login allowed Permissions determined by internal user group NO Internal lookup of user group Valid username / password? NO Login denied YES Login allowed Permissions determined by internal user group YES User group found in internal database? YES User group name provided by authentication server? NO NO Permissions determined by internal user group, “UNKNOWN” Permissions determined by internal user group, “NONE” External authentication reply Note the importance of the group to which a given user belongs, as well as the need to configure the groups named, “UNKNOWN” and “NONE.” If the external authentication server returns a group name that is not recognized by IP-Reach, that user’s permissions are determined by the permanent group named “UNKNOWN.” If the external authentication server does not return a group name, that user’s permissions are determined by the permanent group named “NONE.” Please see the sections involving LDAP or RADIUS in this chapter to determine how to configure your authentication server to return user group information to IP-Reach as part of its reply to an authentication query. 56 IP-REACH USER MANUAL General Settings for Remote Authentication You must log on to IP-Reach as default Administrator (user name <admin>, password <raritan>) to set Remote Authentication properties. 1. At the Main Menu, press the letter <C> to Configure IP-Reach. 2. When the Configuration Menu appears, press <R> to configure Remote Authentication. The Authentication and Accounting screen appears. 3. Press the <SPACE BAR> to toggle the options of the remote authentication protocol you wish to use, and select RADIUS, LDAP, or LDAPS. 4. The Authentication and Accounting screen for the protocol you select appears. Use the <TAB> key to move through the fields. a. Press the <SPACE BAR> to toggle the Authentication Type field. CHAPTER 4: ADMINISTRATIVE FUNCTIONS b. 57 Type the server secret needed to authenticate against your remote authentication servers in the Server Secret field. Re-type the server secret in the Confirm Secret field. c. Type the time of inactivity (in seconds) that should pass before the server times out in the Server Timeout (seconds) field. d. Type the IP addresses of your primary and secondary remote authentication servers in the Primary Server IP and Secondary Server IP fields. 5. If you selected LDAP as your remote authentication protocol, please read the next section Implementing LDAP Remote Authentication to complete the fields in the LDAP panel of the Remote Authentication window. If you selected RADIUS, please skip to Implementing RADIUS Remote Authentication to complete the fields in the RADIUS panel of the window. 58 IP-REACH USER MANUAL 6. If you are appointing Remote Accounting, in the Authentication and Accounting screen, <TAB> to the Enable Remote Accounting field, and press <SPACE BAR> to toggle to RADIUS. 7. When finished, press <ENTER> to save your changes, or press <ESC> to exit without saving Remote Authentication configurations. Implementing LDAP Remote Authentication Reminder: Microsoft Active Directory functions natively as an LDAP authentication server. If you choose LDAP authentication protocol, complete the LDAP fields as follows: − − − Use Secure LDAP: Apply this rule to enables LDAP-S, which ensures that all authentication requests and replies transmitted over the network are encrypted. Default Port / User Defined Port: Select an option button to choose whether you would like to use the standard LDAP TCP ports, or specify your own user defined port. Base DN, Base Search, and Certificate File: Consult your authentication server administrator for the appropriate values to type into these fields in order to process LDAP authentication queries from IP-Reach. Returning User Group Information via LDAP When an LDAP authentication attempt succeeds, IP-Reach determines the permissions for a given user based on the permissions of the user’s group. Your remote LDAP server can provide these user group names by returning an attribute named as follows: rciusergroup attribute type: string This may require a schema extension on your LDAP server. Please consult your authentication server administrator to enable this attribute. Implementing RADIUS Remote Authentication Microsoft Active Directory can be used as source information for RADIUS authentication by installing the Windows server component Internet Authentication Server. If you choose RADIUS authentication protocol, complete the RADIS fields as follows: − − − Authentication Type: Click on the drop-down arrow to select either CHAP or PAP protocol. Server UDP Port / Custom UDP Port: Click on the drop-down arrow to select whether you would prefer using standard RADIUS TCP port 1812, the legacy RADIUS TCP port 1645, or type in your own user defined port in the Custom UDP Port field. Remote Accounting / Custom Accounting Port: Click on the check box to send authentication events to a RADIUS accounting server; if so, type the TCP port should be used for transmitting events in the Custom Accounting Port. CHAPTER 4: ADMINISTRATIVE FUNCTIONS 59 Returning User Group Information via RADIUS When a RADIUS authentication attempt succeeds, IP-Reach determines the permissions for a given user based on the permissions of the user’s group. Your remote RADIUS server can provide these user group names by returning an attribute, implemented as a RADIUS FILTER-ID. The FILTER-ID should be formatted as follows: Raritan:G{GROUP_NAME} where GROUP_NAME is a string, denoting the name of the group to which the user belongs. RADIUS Communication Exchange Specifications IP-Reach sends the following information to RADIUS server in an authentication query: ATTRIBUTE USER-NAME USER-PASSWORD CHAP-PASSWORD NAS-IP-ADDRESS NAS-IDENTIFIER NAS-PORT-TYPE NAS-PORT STATE PROXY-STATE DATA The user name entered at the login screen. In PAP mode, the encrypted password entered at the login screen. In CHAP mode, the CHAP protocol response computed from the password and the CHAP challenge data. IP-Reach’s IP Address The IP-Reach unit name as configured in “Network Configuration” (see previous section). The value ASYNC (0) for modem connections and ETHERNET (15) for network connections. Always 0. If this request is in response to an ACCESS-CHALLENGE, the state data from the ACCESS-CHALLENGE packet will be returned. If this request is in response to an ACCESS-CHALLENGE, the proxy state data from the ACCESS-CHALLENGE packet will be returned. IP-Reach sends the following RADIUS attributes to the RADIUS server with each accounting request: ATTRIBUTE SESSION-TYPE SESSION-ID USER-NAME NAS-IP-ADDRESS NAS-IDENTIFIER NAS-PORT-TYPE NAS-PORT FILTER-ID CLASS ACCTAUTHENTIC TERMINATECAUSE DATA Either START (1) for log in or STOP (2) for log out. A string containing a unique session name. The name is in the format of “<NASIDENTIFIER>:<user IP address>:<unique session number>” Example: “IP-Reach:192.168.1.100:122” As above. As above. As above. As above. As above. Any FILTER-ID attributes returned by the RADIUS server during authentication will be sent in each accounting request. Any CLASS attributes returned by the RADIUS server during authentication will be sent in each accounting request. How the user was authenticated. Either RADIUS (1) if the user was authenticated by the RADIUS server or LOCAL (2) if the user was authenticated by IP-Reach’s builtin user name database. If this is a STOP request, the reason the user was terminated. Either USER_REQUEST (1), LOST_SERVICE (3), SESSION_TIMEOUT (5), or ADMIN_RESET (6). 60 IP-REACH USER MANUAL Time and Date Current Date and Time on the IP-Reach unit are listed on this screen. Once saved, Time and Date changes will not take effect until IP-Reach is restarted. • New Date / New Time: To manually input changes to current date and time values. • Adjust for daylight savings time: Toggle between YES and NO to reflect whether your country or state follows the daylight savings time procedure. • Get Time From SNTP Server: Indicates whether IP-Reach time/date should be automatically synchronized with the time/date of an external SNTP server. - Primary Server IP Address: IP address of first SNTP server to attempt time synchronization. - Secondary Server IP Address: IP address of second SNTP server to query, if primary server is unavailable. - User standard UDP port 123: Allows user to modify UDP port used for SNTP time synchronization. Consult your SNTP server administrator to determine if this value should be adjusted. • Time Zone: Select the time zone in which your IP-Reach unit is physically located. Press <Ctrl+S> to save changes or <Esc> to cancel changes, and return to the Configuration Menu. Saved Radius Configuration changes will not take effect until IP-Reach is restarted. Log Off Users Use the <Tab>, <↑>, or <↓> keys to select a user from the Add, Change, or Delete User Accounts screen who is currently remotely logged in to IP-Reach (Logged in – YES) and press the letter <L> to log off the selected user. IP-Reach will ask you if you are sure that you want to log off this user. • Y: Yes. The selected user will be logged off of IP-Reach and the remote session will end. IP-Reach will return you to the Add, Change, or Delete User Accounts screen, showing all user profiles, with the selected user no longer listed as logged in. • N: No. IP-Reach will return you to the Add, Change, or Delete User Accounts screen, showing all user profiles, with the selected user still listed as being logged in. CHAPTER 4: ADMINISTRATIVE FUNCTIONS 61 View IP-Reach Status The IP-Reach Event Log screen shows a log file containing information about IP-Reach log in and connection activities. This Event Log stores IP-Reach events, such as user login or logout, bad login attempts, Admin login, and logout at the IP-Reach Admin console, Admin changes to the system configuration, Admin user profile additions, changes, or deletions, modem activity, system startup and shutdown, and all errors that occur, with the date and time of each event. Please see Appendix D: Troubleshooting for a listing of error codes with their meaning and suggested solution. Up to 2,048 events can be stored in one log file. IP-Reach also auto-recovers from fatal errors. If a fatal error occurs, it is recorded and IP-Reach automatically reboots. If a non-fatal error occurs, it is recorded and IP-Reach waits until all users are logged off the system, and then it reboots to make sure the previous non-fatal error does not escalate to a fatal error. Restart or Shutdown the IP-Reach Offers options to Restart <R>, Shutdown <S>, or Cancel <Esc> the restart or shutdown command. <R> Restarts the IP-Reach unit and brings the IP-Reach Admin Console back to the IP-Reach Initialization screen. 62 IP-REACH USER MANUAL Diagnostics While navigating the Main Menu of the Administrative Console, pressing <D> and <Enter> will invoke the IP-Reach Diagnostic functions. These functions are meant to enable Raritan Technical Support to assist you in the case of a problem with your IP-Reach unit. Do not invoke these functions unless you are fully aware of their meanings and intended use. Please contact Raritan Technical Support should you require more information. APPENDIX A: SPECIFICATIONS 63 Appendix A: Specifications ITEM DIMENSIONS (WXDXH) WEIGHT POWER IPR-TR361 2U 19” Rackmount Case: 19” (W) x 21.25” (D) x 3.5” (H) 482 mm (W) x 540 mm (D) x 89 mm (H) 28.2lbs. (12.79kg.) 110/220V auto-switching (50/60 Hz European) IPR-TR362 2U 19” Rackmount Case: 19” (W) x 21.25” (D) x 3.5” (H) 482 mm (W) x 540 mm (D) x 89 mm (H) 28.6lbs. (12.97kg.) 110/220V auto-switching (50/60 Hz European) IPR-TR364 2U 19” Rackmount Case: 19” (W) x 21.25” (D) x 3.5” (H) 482 mm (W) x 540 mm (D) x 89 mm (H) 29.4lbs. (13.34kg.) 110/220V auto-switching (50/60 Hz European) IPR-M1 1U 19” Rackmount Case: 17” (W) x 10.4” (D) x 1.75” (H) 431 mm (W) x 264 mm (D) x 44 mm (H) 8.4lbs. (3.8kg) 110/220V auto-switching (50/60 Hz European) IPR-M2 1U 19” Rackmount Case: 17” (W) x 10.4” (D) x 1.75” (H) 431 mm (W) x 264 mm (D) x 44 mm (H) 8.6lbs. (3.9kg) 110/220V auto-switching (50/60 Hz European) Remote Connection Network: 10BASE-T, 100BASE-TX Ethernet Modem: 56K modem included (TR Series); Dedicated Modem Port (M Series) Protocols: TCP/IP, UDP, SNMP Raritan Remote Client (RRC) Software Operating System Requirements: Windows XP / NT / ME / 2000 KVM Input Keyboard: PS/2 Mouse: PS/2 Video: VGA Supported Resolutions: Text Modes 1024x768 @ 60Hz 640x480 @ 60Hz 1024x768 @ 70Hz 640x480 @ 72Hz 1024x768 @ 75Hz 640x480 @ 75Hz 1024x768 @ 85Hz 640x480 @ 85Hz 1152x864 @ 60Hz 800x600 @ 56Hz 1152x864 @ 75Hz 800x600 @ 60Hz 1280x1024 @ 60Hz 800x600 @ 72Hz 800x600 @ 75Hz 800x600 @ 85Hz 64 IP-REACH USER MANUAL Cable Specifications Standard RJ11 based phone cord to connect modem to a phone line (provided)** Category 5e UTP cable to connect to network **TR Series only KVM Switch Specifications Supports KVM switches utilizing an On-Screen User Interface, including Raritan’s Paragon, Z-Series, MasterConsole MX4, and MasterConsole II product lines. Output Specifications Local Access Console: Local Admin Console: PS/2 Keyboard, PS/2 Mouse, HD15 Video PS/2 Keyboard, HD15 Video APPENDIX B: SNMP FEATURES 65 Appendix B: SNMP Features For convenient monitoring with standard network management systems such as HP OpenView or IBM Tivoli software solutions, IP-Reach features an SNMP agent with standard MIB2 support. IP-Reach responds to SNMP GET requests with standard MIB2 variables, although for security reasons only a subset of the variables are provided. 66 IP-REACH USER MANUAL APPENDIX C: FREQUENTLY ASKED QUESTIONS 67 Appendix C: Frequently Asked Questions QUESTION: ANSWER: What is IP-Reach? IP-Reach is the easiest, fastest, most reliable way to remotely access and manage multiple servers connected to a Raritan KVM Switch - no matter where you are or where your servers are located. How does IP-Reach work? IP-Reach connects to the keyboard, video, and mouse ports of a server or KVM switch. Using Raritan’s powerful frame-grabber and compression technology, it captures, digitizes, and compresses the video signal before transmitting to a remote PC. What level of control does a IP-Reach remote user have over attached Target Servers? The remote user has direct access and total control of target servers for maintenance, administration, and troubleshooting, from running GUI applications to BIOS-level troubleshooting, and even rebooting. Remote Access Software has been available for a long time. What makes IP-Reach different? With IP-Reach, the IP-Reach software runs only on the IP-Reach unit itself, not on each individual Target Server. Traditional Remote Access Software solutions require software to be loaded and running on each Target Server, which must offer a supporting Operating System. This can create compatibility, performance, and reliability issues on mission critical Target Servers. What remote access connection methods can IP-Reach accommodate? IP-Reach provides network administrators with a choice of remote access via Internet, LAN/WAN, or dial-up modem. That means servers can be accessed both in and out of band, so remote access to mission-critical target servers is always available - even if the network is down. What types of computers can IP-Reach remotely control? IP-Reach works independently of a Target Server’s hardware, operating system, or application software, accessing a Target Server’s main input/output devices - keyboard, video, and mouse. Consequently, any hardware that supports standard PC keyboard interfaces, standard PC mouse interfaces, and standard PC video (VGA) can be used with IPReach. Is special software required for the Remote PC? Each IP-Reach ships with one copy of IP-Reach Control software (TRC). This remote access software runs on any Remote PC with a Windows 98+ operating systems and communicates over Internet, LAN/WAN, or dial-up modem with IP-Reach software on the IP-Reach unit. With TRC installed, the Remote PC is like any other user console in your KVM configuration, but it can be located anywhere - around the corner, or around the world. Which Raritan KVM Switches will work with IP-Reach? Currently Raritan supports the use of IP-Reach with all Raritan KVM Switches that feature an On-Screen Display: Paragon, MasterConsole MX4, and MasterConsole II. Will other KVM switch brands work with IPReach? Nothing complements IP-Reach better than a Raritan KVM Switch especially Paragon. In theory, however, IP-Reach can be used with any KVM switch that features an On-Screen User Interface menu for access to switching functions. Can I continue to access my KVM configuration locally? Yes. IP-Reach features a special Direct Analog User port for direct access to the KVM configuration. This pass through port provides an additional local access point, which is especially important for single user switches or for providing critical access to servers if the network is down. Can IP-Reach be used without a KVM switch? Yes. IP-Reach can be used to directly access individual Computers, connecting to the keyboard, video, and mouse ports of an independent Computer. However, its convenience and value are leveraged through the use of a KVM switch. Is IP-Reach easy to install? IP-Reach is very easy to install. Just connect it to a user port on an existing KVM configuration and assign an IP address and/or telephone number for modem access. 68 IP-REACH USER MANUAL QUESTION: ANSWER: How Is IP-Reach administration carried out? Administrators access IP-Reach through a connected IP-Reach Admin Console. A simple keyboard driven interface of menus offers straightforward access to IP-Reach setup and control. User profiles, security settings, configuration and diagnostics are just a few of the options available. The IP-Reach Admin Console can be removed from the server room once initial IP-Reach setup is complete, after which all configuration may be performed remotely via web browser. Are there security features to protect my Target Servers from an unauthorized remote connection? Yes. IP-Reach provides many layers of security. IP-Reach can be configured to provide high-level connection authentication and video data transfer security during a remote session. User names, passwords, privatekeys, and Secure Socket Layer (SSL) 128-bit encryption are all available. IP-Reach can also function as a RADIUS client. In addition, all Raritan KVM Switches that feature an On-Screen User Interface (OSUI) come with a complete security scheme, requiring user name and password access to Servers as designated by the network administrator. Can I customize IP-Reach to enhance performance relative to my specific KVM configuration? Yes. A variety of fine-tuning procedures are available. Automatic Color calibration, KVM On-Screen Display tuning, and Target Mouse Pointer adjustments all serve to enhance IP-Reach performance. Can I customize IP-Reach to enhance performance with regard to different remote access methods and situations? Yes. IP-Reach offers a variety of performance enhancements to optimize a chosen connection method. Color Depth, Progressive Update, and Internet Flow Control are just a few of the adjustment options available to speed response time. Color Depth, for example, can be adjusted all the way down to black and white to decrease the data load during an emergency midnight modem connection to mission-critical servers over low-bandwidth. Can I use IP-Reach in a VPN? Yes. IP-Reach fits into most any network configuration utilizing standard TCP/IP. The network administrator simply adds IP-Reach as a node on the network via the IP-Reach Admin Console. What is the slowest connection IP-Reach can handle? IP-Reach offers scalable performance based on bandwidth available, down to 20kbps. Can I perform a Dial-up modem connection to IPReach over a PBX line? No. Modems require an analog telephone line. Can I use IP-Reach within my local network? IP-Reach can be used in any computer network that supports TCP/IP. When does IP-Reach use TCP? UDP? Both TCP and UDP are used by IP-Reach. However, TCP is essential, whereas UDP is optional. UDP is used only for one IP-Reach feature, automatic detection (“browse”) of IP-Reach units in a subnet (see Chapter 3: Raritan Remote Client, RRC Navigator). If you do not employ the browse feature (and by extension, are not using DHCP), then IP-Reach will only communicate using TCP. APPENDIX D: TROUBLESHOOTING 69 Appendix D: Troubleshooting Problems and Suggested Solutions REMOTE CONNECTION PROBLEMS SOLUTION I cannot connect to IP-Reach via dial up modem. Ensure that you have specified the modem device for your Remote PC in the Add Connection Window (Dial-up type connection) modem field. Although concurrent connections may be enabled (either globally or individually), the modem in IP-Reach will only accommodate one remote connection at a time – ensure that someone else is not already connected via modem. Ensure that your user profile has modem access enabled and that IPReach is configured to enable a modem interface on the Network Configuration Screen. Ensure that the communication port chosen by the network administrator on the Network Configuration screen matches the port set in your connection profile. I cannot connect to IP-Reach via LAN/WAN or Internet. Re-check the IP settings for IP-Reach from the IP-Reach Admin Console or remote Admin Console window. Accessing the Network Configuration screen, ensure that the IP addresses set for “IP Address, Subnet Mask, and Default Gateway” are still set correctly, per your Network Administrator’s instructions. Ensure that your user profile has network access enabled and that IPReach is configured to enable a network interface. Ensure that the communication port chosen by the network administrator on the Network Configuration screen matches the port set in your connection profile. Ensure that the network configuration is correct by sending a PING from the Remote PC to IP-Reach. I cannot connect to IP-Reach via Web Browser. Re-check the IP settings for IP-Reach from the IP-Reach Admin Console or remote Admin Console window. Accessing the Network Configuration screen, ensure that the IP addresses set for “IP Address, Subnet Mask, and Default Gateway” are still set correctly, per your Network Administrator’s instructions. Ensure that your user profile has Web Browser access enabled and that IP-Reach is configured to enable Web Browser. I cannot connect to IP-Reach and seem to be stuck at the Login window. Ensure that you are using a valid and correct user name and password. Ensure that you are typing user name and password in the exact upper and lowercase combinations in which they were created. Drag the Login window to the side and view Connection Status window behind it. The Connection Status window will show details on your connection attempts, and may offer specifics on the problem. DIRECT ANALOG USER CONSOLE PROBLEMS SOLUTION The Direct Analog User Console does not function. Make sure the KVM switch is functioning properly. Make sure that IPReach is turned on. IP-Reach must be powered on for the Direct Analog User Console to function. The cable located inside IP-Reach that connect the Direct Analog User Console port(s) may have disconnected – Contact Raritan Technical Support for assistance. I cannot seem to gain steady keyboard/mouse control of the active Target Server Keyboard/mouse control of a Target Server from a Direct Analog User Console is shared on a first active keyboard/mouse input basis with any remote users who may be currently connected. Ensure that no remote 70 IP-REACH USER MANUAL DIRECT ANALOG USER CONSOLE PROBLEMS from a Direct Analog User Console. SOLUTION users are currently attempting to control the active Target Server. I cannot view the Target Server that I am looking for from a Direct Analog User Console. Ensure that you are looking at the Direct Analog User Console connected to the correct User Port. Remember, Direct Analog User Consoles can be attached to User Ports 1 through 4. Each User Console will view the path of the matching KVM Port. For example, the User Console attached to User Port 1 will view the KVM path attached to KVM Port 1. Similarly, the User Console attached to User Port 2 will view the KVM path attached to KVM Port 2, and so on. KEYBOARD PROBLEMS SOLUTION IP-Reach is not accepting keyboard commands from the Remote PC. The IP-Reach window of TRC must be the active window for proper keyboard control. Ensure the window in which you are typing is active. Try clearing the keyboard signals to ensure that the release or breakcode signal has been received − alternately press the <Ctrl>, <Shift> and <Tab> keys rapidly a few times on your keyboard. Ensure the remote user has keyboard and mouse privileges. Exit the IP-Reach software and then restart it again. I pressed the Caps Lock key on my Remote PC. The CAPS indicator on the IPReach Status Bar appeared, but the Caps Lock indicator light is not lit on my Remote PC keyboard. This is normal. Use the indicators on the Status Bar to determine CAPS key status for the Target Server. If a local user at the Direct Analog User Console’s keyboard has changed a Lock key status (Caps-Lock, NumLock, or Scroll-Lock) on the Target Server, then server status may not match the state of the Remote PC’s keyboard. The Keyboard is not functioning and the green LED on the back of IPReach for at least one of the KVM ports is not blinking, but rather constantly lit. Reset the keyboard chips within IP-Reach by recycling power to it. Make sure you power down both IP-Reach and all attached KVM switches at the same time. Otherwise the KVM chips in IP-Reach will draw power from the KVM switches and fail to reset. I am accessing IP-Reach via the Web Browser and the keyboard does not function. I type, but nothing happens. Click the window title bar under the IP-Reach toolbar to activate the viewing window. If the viewing window is not the active window, the keyboard will not function. APPENDIX D: TROUBLESHOOTING 71 KVM ON-SCREEN USER INTERFACE (OSUI) PROBLEMS SOLUTION Clicking on the Enter On-Screen Menu button does not bring up the connected KVM switch’s On-Screen User Interface (OSUI). Nothing happens. IP-Reach may not be set to the correct KVM switch Hotkey activator. The default Hotkey setting is <Scroll Lock> or Scroll Lock+Scroll Lock in the IP-Reach Options window. Make sure that the Hotkey set in the Options window is the same Hotkey that commands the OSUI of the base KVM switch attached to IP-Reach. On the IP-Reach window’s menu, select Tools > Options. The Options window will appear. Select the appropriate Hotkey, which activates the connected KVM switch’s OSUI. Scroll Lock+Scroll Lock = <Scroll Lock>, Num Lock+Num Lock = <Num Lock>, and Caps Lock+Caps Lock = <Caps Lock>. Click [OK] to continue. A KVM switch is connected to my Remote PC. Entering <ScrollLock> <ScrollLock> (or any other designated KVM switch OSUI Hotkey) from the Remote PC’s keyboard activates two OSUIs – one for the KVM switch attached to my Remote PC and one for the base KVM switch attached to IPReach. At the Remote PC user console, exit the OSUI for the Remote PC’s KVM switch by pressing the <Esc> key once. Wait a few seconds and the OSUI for the Remote PC’s KVM switch will disappear. To avoid this problem either reset the Remote PC’s attached KVM switch to a Hotkey that differs from the Hotkey for the base KVM switch attached to IP-Reach. Or use only IPReach commands to activate the OSUI for the base KVM switch attached to IP-Reach – press the Enter On-Screen Menu button. Log out of KVM on disconnect is set to YES in the Security Configuration screen, but IP-Reach is not logging out of the KVM upon remote user disconnection. Make sure that the Hotkey set in the Options window is the same Hotkey that commands the OSUI of the base KVM switch attached to IP-Reach. MOUSE PROBLEMS SOLUTIONS Target Server Mouse Pointer tracks too slowly after IP-Reach Mouse Pointer. When working from a Remote PC, a slight delay between the larger IP-Reach Mouse Pointer and the smaller Target Server Mouse Pointer is normal due to uncontrollable lags in the speed of the remote connection – Internet, direct dial modem, or network. With each new video image viewed, IPReach automatically re-syncs and aligns the mouse pointers. Wait a few seconds after switching to each new video image for automatic re-calibration to take place and the two mouse pointers will line up with each other. If you do not wish to wait for this auto calibration, or you find the two mouse pointers out of sync at any time; click Synchronize Mouse, or simultaneously press the keys <Ctrl-Alt-S>. This will manually re-align the two pointers. Immediately after switching to a new Target Server channel the mouse stops and/or is out of sync. Adjust the motion of the Target Server Mouse Pointer. For Windows 2000 based Target Servers, set the mouse motion speed on each Target Server to the middle speed setting between slow and fast and the mouse motion acceleration speed on each Target Server to <off> or <none>. For Windows ’95, ’98, and NT based Target Servers, set the mouse motion speed on each Target Server to the slowest setting. Color Settings are not optimally calibrated. Run the Automatic Color Calibration Routine in Chapter 3: Raritan Remote Client, Color Calibration. 72 IP-REACH USER MANUAL MOUSE PROBLEMS SOLUTIONS The larger IP-Reach Mouse Pointer does not track or is not in sync (not aligned) with the smaller Target Server Mouse Pointer. Click Synchronize Mouse, or press <Ctrl-Alt-S>. Ensure each Target Server uses a standard Windows mouse driver. For Windows 2000 based Target Servers, set the mouse motion speed on each Target Server to the middle speed setting between Slow and Fast and the mouse motion acceleration speed on each Target Server to <None>. For Windows ’95, ’98, and NT based Target Servers, set mouse motion speed on each Target Server to slowest setting possible. Click Auto-sense Video or simultaneously press <Ctrl-Alt-A>. IP-Reach is not accepting my mouse. IP-Reach will not support a serial type mouse or non-standard mouse drivers. It does support a PS/2 style mouse and standard Windows mouse drivers. Other mouse drivers may function with IP-Reach, but will require extensive changes to the mouse settings until a functioning mix of motion settings is found. If you must use a mouse driver on a Target Server that is not currently supported by IP-Reach, try setting the mouse acceleration to <none> and the mouse speed to <slow>. IP-Reach Mouse Pointer and the Target Server Mouse Pointer do not sync up in certain Windows NT Administration screens, like the NT log on screen. Windows NT Administration or Log On screens may revert to default mouse pointer motion/acceleration speeds. As a result, mouse sync may not be optimal at these screens. If you are comfortable adjusting the registry on the Windows NT Target Server, you can obtain better IP-Reach mouse sync at NT Administration screens by entering the Target Server’s registry editor and changing the following settings: default user mouse motion speed = 0; mouse threshold 1 = 0; mouse threshold 2 = 0. TARGET SERVER PROBLEMS SOLUTION When I reboot a Target Server through IP-Reach, from a Remote PC, I cannot access the Target Server’s BIOS. It seems IP-Reach is not accepting the BIOS entry command keystroke. To access a Target Server’s BIOS first temporarily de-select the Sense video mode changes automatically checkbox in the Video Settings window, accessed with Video Settings on the IP-Reach toolbar. Video auto-sensing slows remote viewing of the reboot process and makes it difficult to send BIOS access keystrokes to the Target Server from a Remote PC, because auto-sensing tells IP-Reach to work constantly to keep up with the Target Server’s feverishly changing video screens during reboot. De-selecting the auto-sense checkbox frees IP-Reach to accept and convey BIOS access keystrokes. It also aides in the quick interpretation of rapidly changing video screens. Be sure to re-select the checkbox when finished with BIOS access. APPENDIX D: TROUBLESHOOTING 73 IP-REACH PROBLEMS SOLUTION There is no control and no frame grabbing activity occurring. IP-Reach seems to have locked-up. An internal serial data cable, which connects the frame grabber card to the motherboard of IP-Reach, may have become disconnected. Contact Raritan Technical Support for assistance. I cannot power down IP-Reach. The main power switch for IP-Reach is on the back of the unit. To turn off IP-Reach hold the power key down for a few seconds. To turn IP-Reach back on, press the power button again. After loss of power IP-Reach does not automatically power-ON again when power is regained. Enter the BIOS of IP-Reach and ensure that the “Power Lost Resume State” is set to “Last State.” IP-Reach will then turn ON when power is applied only if it was already ON when power was lost. VIDEO PROBLEMS SOLUTION After switching to a different Target Server channel the video is not clear. Sometimes there is a black edge at the boundary of the Target Server’s screen. Click Auto-sense Video or simultaneously press the keys <CtrlAlt-A>. IP-Reach will adjust the video settings. If the video does not become clear, additional manual video setting adjustments may be necessary. Contact Raritan Technical Support to discuss changes to the Video Settings window. Ensure all Target Servers have standard blanking times. Horizontal and vertical blanking times should closely approximate VESA standard values. When viewing a Target Server remotely, the video image is filled with moving block of incorrect color that seem to track next to the movement of the mouse pointer. The Color Settings on the Video Settings tab in the Video window are not set correctly. Attempt manual adjustment until the color blocking ceases or run the Automatic Color Calibration Routine (see Chapter 3: Raritan Remote Client, Color Calibration). The screen is filled with small visual errors, or grains of missing color, which need to be cleaned up. Click Refresh Screen on the IP-Reach toolbar or simultaneously press the keys <Ctrl-Alt-R>. The video seems to be stuck in Auto Sense mode and the auto sensing message in the middle of the screen keeps counting higher and higher. Pressing Auto-sense Video while auto sensing is occurring will stop the auto sense process. Check your Target Server resolution to ensure IP-Reach supports it. WEB BROWSER PROBLEMS SOLUTION I cannot connect to IP-Reach via Web Browser. Re-check the IP settings for IP-Reach from the IP-Reach Admin Console or remote Admin Console window. Accessing the Network Configuration screen, ensure that the IP addresses set for “IP Address, Subnet Mask, and Default Gateway” are still set correctly, per your Network Administrator’s instructions. Ensure that your user profile has Web Browser access enabled and that IP-Reach is configured to enable Web Browser. 74 IP-REACH USER MANUAL Event Log File and On-Screen Error Codes IP-Reach will display or log an error code in the IP-Reach Event Log Screen in the event of a problem occurring. Error codes are eight-digit hexadecimal numbers, containing two parts: the first four denote error type; and the second four digits denote a location code. These last four digits of the IP-Reach error code are the most useful in determining what has caused a system failure. Below is a list of location codes (the last four digits of an error code), and their meanings. ERROR CODE (LAST 4 DIGITS) MEANING RECOMMENDATION 0001 – 0003 Memory allocation error Reboot IP-Reach. Make sure the BIOS memory test recognizes at least 64MB of RAM. If the problem persists, restore the software and file system from the Recovery CD-ROM. 0004 Could not read the configuration file on startup. The file may be corrupt, the file system may be damaged, or the config file might be from an older version of IP-Reach. Reenter the configuration information and reboot. If the problem continues, restore the software and file system from the Recovery CD-ROM. 0005 The config file was missing. This may be the first time you have started IP-Reach or the file system has become corrupt. Reenter the configuration information and reboot. If the problem continues, restore the software and file system from the Recovery CD-ROM. 0006 The config file could not be saved. The file system may be corrupt or the hard drive may not be responding. Retry, but if the problem persists, restore the software and file system from the Recovery CDROM. 0007 – 0008 Memory allocation error. Reboot IP-Reach. Make sure the BIOS memory test recognizes at least 64MB of RAM. If the problem persists, restore the software and file system from the Recovery CD-ROM. Delete Memory allocation error. Reboot IP-Reach. Make sure the BIOS memory test recognizes at least 64MB of RAM. If the problem persists, restore the software and file system from the recovery CD-ROM. 0009 Could not find the frame grabber card. Power off the system and make sure the frame grabber card is inserted firmly. If the problem persists, there may be a problem with your IP-Reach hardware. 000A Frame grabber card is not responding correctly. Power off the system and make sure the frame grabber card is inserted firmly. If the problem persists, there may be a problem with your IP-Reach hardware. 000B Memory allocation error. Reboot IP-Reach. Make sure the BIOS memory test recognizes at least 64MB of RAM. If the problem persists, restore the software and file system from the Recovery CD-ROM. 000C – 000F Memory allocation error. Reboot IP-Reach. Make sure the BIOS memory test recognizes at least 64MB of RAM. If the problem persists, restore the software and file system from the Recovery CD-ROM. APPENDIX D: TROUBLESHOOTING ERROR CODE (LAST 4 DIGITS) 75 MEANING RECOMMENDATION 0011 The Ethernet controller could not be found. There is a problem with the IP-Reach hardware. 0012 The modem could not be found. Power off the system and make sure the frame grabber card is inserted firmly. If the problem persists, there may be a problem with your IP-Reach hardware. 0013 Memory allocation error. Reboot IP-Reach. Make sure the BIOS memory test recognizes at least 64MB of RAM. If the problem persists, restore the software and file system from the Recovery CD-ROM. 0014 There is a problem with the IP address. Check the IP address configuration and reboot. 0015 The DHCP server did not respond. IP-Reach could not acquire an IP address. Make sure your DHCP server is operating correctly and then reboot IP-Reach. 0016 – 0019 There is a problem with one of the IP-Reach startup files. Restore the software and file system from the Recovery CD-ROM. 001A Error occurred while initializing the UDP socket. Reboot IP-Reach. Make sure the BIOS memory test recognizes at least 64MB of RAM. If the problem persists, restore the software and file system from the Recovery CD-ROM. 001B Error occurred while initializing the TCP write socket. Reboot IP-Reach. Make sure the BIOS memory test recognizes at least 64MB of RAM. If the problem persists, restore the software and file system from the Recovery CD-ROM. 001C Error occurred while initializing the TCP read socket. Reboot IP-Reach. Make sure the BIOS memory test recognizes at least 64MB of RAM. If the problem persists, restore the software and file system from the Recovery CD-ROM. 001D – 001E Resource allocation error. Reboot IP-Reach. Make sure the BIOS memory test recognizes at least 64MB of RAM. If the problem persists, restore the software and file system from the Recovery CD-ROM. 001F Could not listen to the TCP write socket. Reboot IP-Reach. Make sure the BIOS memory test recognizes at least 64MB of RAM. If the problem persists, restore the software and file system from the Recovery CD-ROM. 0020 Could not listen to the TCP read socket. Reboot IP-Reach. Make sure the BIOS memory test recognizes at least 64MB of RAM. If the problem persists, restore the software and file system from the Recovery CD-ROM. 0021 TCP listen process failed. Reboot IP-Reach. Make sure the BIOS memory test recognizes at least 64MB of RAM. If the problem persists, restore the software and file system from the Recovery CD-ROM. 0022 UDP listen process failed. Reboot IP-Reach. Make sure the BIOS memory test recognizes at least 64MB of RAM. If the problem persists, restore the software and file system from the Recovery CD-ROM. 0023 SSL write failed. Reboot IP-Reach. Make sure the BIOS memory test recognizes at least 64MB of RAM. If the problem persists, restore the software and file system from the 76 ERROR CODE (LAST 4 DIGITS) IP-REACH USER MANUAL MEANING RECOMMENDATION Recovery CD-ROM. 0024 SSL read failed. Reboot IP-Reach. Make sure the BIOS memory test recognizes at least 64MB of RAM. If the problem persists, restore the software and file system from the Recovery CD-ROM. 0025 Memory allocation error. Reboot IP-Reach. Make sure the BIOS memory test recognizes at least 64MB of RAM. If the problem persists, restore the software and file system from the Recovery CD-ROM. 0026 – 0029 Resource allocation error. Reboot IP-Reach. Make sure the BIOS memory test recognizes at least 64MB of RAM. If the problem persists, restore the software and file system from the Recovery CD-ROM. 002A – 002F Resource allocation error. Reboot IP-Reach. Make sure the BIOS memory test recognizes at least 64MB of RAM. If the problem persists, restore the software and file system from the Recovery CD-ROM. 0030-0039 Resource allocation error. Reboot IP-Reach. Make sure the BIOS memory test recognizes at least 64MB of RAM. If the problem persists, restore the software and file system from the Recovery CD-ROM. 003A – 003F Resource allocation error. Reboot IP-Reach. Make sure the BIOS memory test recognizes at least 64MB of RAM. If the problem persists, restore the software and file system from the Recovery CD-ROM. 0040 Resource allocation error. Reboot IP-Reach. Make sure the BIOS memory test recognizes at least 64MB of RAM. If the problem persists, restore the software and file system from the Recovery CD-ROM. 255-80-3100