1
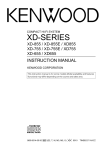
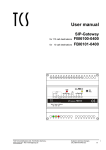
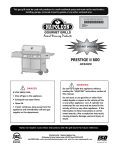
User Manual
ADVANCED INSTRUCTIONS
HDTV
51PP9910
55PP9910
Thank you for choosing Philips.
Need help fast?
Read your User Manual first for quick tips that
make using your Philips product more enjoyable.
If you have read your instructions and still need
assistance you may access our online help at
www.p4c.philips.com
or
call 1-800-531-0039
3/24/04
while with your product.
3135 035 22232
PANEL INDEX
PANEL PANEL PANEL PANEL PANEL
1
PANEL
5
PANEL PANEL
6
7
10
PANEL PANEL
PANEL
13
34
PANEL PANEL PANEL
PANEL
PANEL
8
14
15
Panel
Sequence
and
Panel Index
3
PANEL
16
18
9
PANEL PANEL PANEL
17
PANEL PANEL
19
22
23
PANEL PANEL
24
25
PANEL PANEL PANEL PANEL
20
SUBJECT
11
12
2
Side 2
4
COVER
Side 1
21
26
Panel #
Advanced Remote Features
Using the Guide . . . . . . . . . . . . . . .1
Surf . . . . . . . . . . . . . . . . . . . . . . . .2
DSURF . . . . . . . . . . . . . . . . . . . . .3
PIP . . . . . . . . . . . . . . . . . . . . . . . . .4
Picture Format . . . . . . . . . . . . . . .5
Advanced Menu Features
Picture Controls . . . . . . . . . . . . . .6
Convergance . . . . . . . . . . . . . . .7-8
Sound Controls . . . . . . . . . . . . . . .9
Bass Bosst . . . . . . . . . . . . . . . . . .10
AVL . . . . . . . . . . . . . . . . . . . . . . .11
Surround Sound . . . . . . . . . . . . . .12
SAP, Alt Audio . . . . . . . . . . . . . .13
27
SUBJECT
PANEL PANEL
28
29
PANEL
PANEL
30
31
PANEL PANEL
32
33
Panel #
Audio Out,
Speakers Dig Out . . . . . . . . . . . .14
Intellitune, Smart Picture . . . . . . .15
Sleep . . . . . . . . . . . . . . . . . . . . . .16
Timer . . . . . . . . . . . . . . . . . . .17-19
AutoLock . . . . . . . . . . . . . . . .20-23
PIP . . . . . . . . . . . . . . . . . . . . . . . .24
Closed Caption . . . . . . . . . . .25-26
Picture Format . . . . . . . . . . . . . . .27
Channel Edit . . . . . . . . . . . . . . . .28
AutoChron . . . . . . . . . . . . . . .29-30
Weak Digital Signal . . . . . . . . . . .31
Channel and Volume Display . . . .32
Emergency Alert . . . . . . . . . . . . .33
Factory Channel Reset . . . . . . . . .34
1
ADVANCED REMOTE FEATURES
USING THE GUIDE
he guide can provide you with information about the current program
as well as upcoming programs. The
content and accuracy of the guide is
entirely dependent on the broadcaster
or cable company.
T
1
Press the GUIDE button to
open the Guide window. If the
broadcaster or cable company
is providing it, information
about the current program and
programs throughout the day
are displayed.
2
Use the CURSOR LEFT or
RIGHT button to select a time.
The program name, time,
inforamtion, as well as signal
type are displayed.
SURF
SURF
12 > add?
80 - 1 PBS1DTV
ADD?
Mon 17 Oct 10:15am
Program name
HDTV
10:00 am - 11:00am
Here's the Space for the program
info which can run to four lines
Here's the Space for the program
info which can run to four lines 10:00
80-1
80-2
80-3
80-4
80-5
1:00
1
Mon 17 Oct
80 - 1 PBS1DTV
Program name
HDTV
10:00 am - 11:00am
Here's the Space for the program
info which can run to four lines
Here's the Space for the program
10:00
info which can run to four lines
Guide
Current date and time
Channel and Name
Program
name
Program
time
Signal Type
80 - 1 PBS1DTV
Available
Subchannels
Mon 17 Oct 10:15am
Program name
HDTV
10:00 am - 11:00am
Here's the Space for the program
info which can run to four lines
Here's the Space for the program
10:00
info which can run to four lines
Program information
TIme Selector
1:00
80-1
80-2
80-3
80-4
80-5
2
ADVANCED REMOTE FEATURES
USING SURF
fter you set up a list of your
favorite signal sources in the SURF
Channel is added.
list, you can press the SURF button to
SURF
see the list and quickly tune to a
12 > delete?
ADD?
favorite signal source. Place up to 10
signal sources in the SURF list.
A
1
2
Once you are viewing the
channel you want to add to
the surf list, press the SURF
button. The Surf list box
appears. The number of the
current channel is shown with
ADD? to the right. Press the
CURSOR RIGHT button to
add the channel to the Surf
list. The text should switch
from “add?” to “delete?” The
text gives the next available
action, therefore, when it says
“delete?” the channel has been
added.
Press the NUMBER buttons, CH(annel) +/– buttons to select another signal
source to add to the Surf list.
Press the SURF button and
then the CURSOR RIGHT
button to add the channel to
the list.
Repeat this step, filling the list
with up to 10 favorite signal
sources. NOTE: If you exceed
10 channels a warning message
will inform you to delete a
channel before adding another.
3
To tune to a favorite signal
source from the list, press
the SURF button. The Surf
list box appears. Press the
SURF button or the CURSOR
DOWN button or UP as many
times as necessary to tune to
the channel.
SURF
12 > add?
1,
2,
3
2
ADD?
Channel is deleted.
1,
2
HELPFUL HINTS
• To delete a signal source
from the list, press the
SURF button. The Surf list
box appears. Press the
SURF button or the
CURSOR DOWN button
or UP as many times as
necessary to select the
signal source to be deleted. Then press the CURSOR RIGHT button to
delete the signal source.
The screen will say
“add?” when the channel
has been deleted.
3
ADVANCED REMOTE FEATURES
USING DSURF
SURF locks the tuner into a “digital only” mode. Like a “Caps
Lock” button on a computer keyboard,
DSURF limits channel selection to digital channels only.
D
EVENING WORLD NEWS
TONIGHT'S HEADLINES
5.1
WXYZ
EVENING WORLD NEWS
5.1
(Digital)
TONIGHT'S HEADLINES
1
2
Press DSURF.
Use Channel + or - to select a
channel. Only digital channels
are available. A small icon,
appears next to the channel to
indicate DSURF is activated.
1,
3
3
Press DSURF again to return
to normal channel selection
and the DSURF icon disappears
2
EVENING WORLD NEWS
TONIGHT'S HEADLINES
EVENING WORLD NEWS
TONIGHT'S HEADLINES
5.1
WXYZ
(Digital)
5.1
4
ADVANCED REMOTE FEATURES
USING PICTURE-IN-PICTURE (PIP)
he Picture-In-Picture (PIP) feature
allows you to display a subscreen
within your main screen and watch two
video sources at once. Because your set
has one tuner, you need to use a VCR
as a second tuner for your PIP picture.
Tune to your favorite show on the main
screen while scanning other AV inputs in
the PIP window. See panel 24 to select
the PIP source.
T
Press the PIP button to
turn PIP on.
1
2
3
4
SWAP
Button
POSITION
Button
FREEZE
Button
1
2
4
Press the PIP button a second time to make the PIP window smaller.
To select a video source to
watch in the PIP window, see
“Selecting a PIP Source” on
panel 24.
POSITION
Ski Vacations
P.O. Box 55512
Anytown, USA 87654
1-800-555-1212
Press the PIP button a third
time to turn PIP off.
FREEZE
MOVING THE PIP SCREEN
Press the POS button. Each time
you press this button, the PIP screen
moves to another corner of the main
screen.
FREEZING THE PIP SCREEN
Press the FREEZE button. The
picture in the PIP screen stands still.
Stopping motion allows you to write
down onscreen phone numbers or
addresses.
SWITCHING THE MAIN AND PIP
SCREENS
Press the SWAP button. The main
screen and PIP screen change places.
SWAP
5
ADVANCED REMOTE FEATURES
USING PICTURE FORMAT CONTROL
our TV’s wide screen (16:9 aspect ratio)
delivers a home-cinema experience not
possible with a conventional (4:3 aspect
ratio) set. High-definition (HD) programs
originating in 16:9 format and other
widescreen-format video sources appear
more lifelike, dramatic, and theatrical.
Border bars are diminished or eliminated.
Most anamorphic-DVD programs will fill the
wide screen without border bars.
Y
Selecting a Picture Format
Using the Remote Control
Use your TV’s picture-format modes
with video sources you connect to the
ANTENNA, CABLE AV1, AV2, AV3,
AV4, AV5, SIDE inputs on the TV. While
watching a video source—with no
onscreen menu or display present—
press the FORMAT button once to see
the currect mode. Press it again to
change to the next mode.
Picture-format Modes
NATIVE (16:9) is the default for your
DTV because HD programs are broadcast in this format. Analog channels are
expanded horizontally.
4:3 shows an analog the picture in its
original, conventional (4:3 aspect ratio)
format.
ZOOM expands, or zooms, the picture
both vertically and horizontally, eliminating or reducing the size of border bars.
PANORAMIC stretches the outer portions of the picture horizontally.
FORMAT
Button
NATIVE (16:9)
4:3
ZOOM
WARNING
To prevent uneven picture-tube aging,
do not leave border bars or other stationary images on screen for extended
periods of time.
PANORAMIC
6
ADVANCED MENU FEATURES
ADJUSTING PICTURE CONTROLS
o adjust your TV picture controls,
select a channel and follow these
steps. See descriptions of the pictureadjustment options below.
T
1
2
Press the MENU button on
the remote control to show the
onscreen menu.
3
Press the CURSOR RIGHT
button or LEFT to adjust the
BRIGHTNESS level of the picture. Or press the CURSOR
DOWN button to select another picture control to adjust.
4
Press the INFO/EXIT button
to exit the menu.
PICTURE
SOUND
FEATURES
INSTALL
PICTURE
BRIGHTNESS
PICTURE
SHARPNESS
COLOR
TINT
BRIGHTNESS
PICTURE
SHARPNESS
COLOR
TINT
PICTURE
Press the CURSOR RIGHT
button. BRIGHTNESS will be
highlighted and an adjustment bar
will be shown to the right.
1
4
Picture-adjustment Options
Remember, when the bar scale is centered
, the control settings
are at mid-range levels. Picture adjustments are described as follows:
BRIGHTNESS raises and lowers the
black level of the picture.
PICTURE raises or lowers the intensity
of the picture (also called contrast).
SHARPNESS improves the detail in the
picture.
COLOR adds or eliminates color.
TINT adjusts the picture to obtain natural skin tones.
COLOR TEMP offers NORMAL,
COOL, or WARM picture preferences.
NORMAL keeps whites white.
WARM makes whites less blue.
COOL makes whites more blue.
BRIGHTNESS
PICTURE
SHARPNESS
COLOR
TINT
PICTURE
2,3
BRIGHTNESS
PICTURE
SHARPNESS
COLOR
TINT
PICTURE
BRIGHTNESS
PICTURE
SHARPNESS
COLOR
TINT
PICTURE
BRIGHTNESS
PICTURE
SHARPNESS
COLOR
TINT
PICTURE
PICTURE
SHARPNESS
COLOR
TINT
COLOR TEMP
NORMAL
7
ADVANCED MENU FEATURES
ADJUSTING CONVERGENCE: CONVERGE RED/BLUE
our projection TV has three color projection tubes: one for red, one for
green, and one for blue. When mixed in
proper proportion, the beams of light
coming from the tubes can produce any
color. To create a clear picture, however,
these color beams must be precisely
aligned. This alignment is called convergence.
NOTE: Allow the TV to warm up for 20
minutes before adjusting convergence.
Press the MENU button to
show the onscreen menu. Press
the CURSOR RIGHT button to
enter the PICTURE submenu.
Then press the CURSOR
DOWN button repeatedly until
MANUAL CONVERGE is highlighted.
Press the CURSOR RIGHT
button to enter the MANUAL
CONVERGE submenu. If you
want to adjust the Red
Convergence, press the CURSOR RIGHT button to enter the
adjust mode. To adjust the Blue
Convergence, press the CURSOR DOWN button to highlight CONVERGE BLUE, then
press the CURSOR RIGHT button to enter adjust mode.
In adjust mode, press the
CURSOR RIGHT, LEFT,
UP, or DOWN button to
adjust the cross hair until the
color outline around it is gone.
(The adjustment is automatically
saved in the TV’s memory.) To
return to the MANUAL CONVERGE menu, press the MENU
button. To exit the onscreen
display, press the INFO/EXIT
button.
Y
1
PICTURE
MANUAL CONVERGE
CONVERGE RED
CONVERGE BLUE
MULTIPOINT RED
MULTIPOINT BLUE
SAVE MULTIPOINT
Converge Red
1
Converge Red
2,3
2
3
Determining Which
Manual Converge
Control to Use
Screen
appearance
Action
Various
images
throughout
the entire
picture have
red outlines.
Adjust the
CONVERGE
RED control.
Then if any red
outlines remain,
adjust the
MULTIPOINT
RED control.
Various
images
throughout
the entire
picture have
blue outlines .
Adjust the
CONVERGE
BLUE control.
Then if any blue
outlines remain,
adjust the
MULTIPOINT
BLUE control.
8
ADVANCED MENU FEATURES
ADJUSTING CONVERGENCE: MULTIPOINT RED/BLUE
he Multipoint Red/Blue Convergence
controls allow you to adjust picture con- PICTURE
PICTURE
MANUAL CONVERGE
vergence at specific points on the TV
MANUAL CONVERGE
CONVERGE RED
CONVERGE RED
CONVERGE BLUE
screen.
CONVERGE BLUE
MULTIPOINT RED
MULTIPOINT RED
MULTIPOINT
BLUE
Press the MENU button to
MULTIPOINT BLUE
SAVE MULTIPOINT
SAVE MULTIPOINT
show the onscreen menu. Press
the CURSOR RIGHT button to
enter the PICTURE submenu.
Then press the CURSOR
DOWN button repeatedly until
MANUAL CONVERGE is highlighted.
to Navigate Exit to Adjust
Press the CURSOR RIGHT
button to enter the MANUAL
PICTURE
CONVERGE submenu. Press
MANUAL CONVERGE
the CURSOR DOWN button
MULTIPOINT RED
MULTIPOINT BLUE
repeatedly until MULTIPOINT
SAVE MULTIPOINT
UNDO MULTIPOINT
RED or MULTIPOINT BLUE is
RESTORE FACTORY
highlighted. Then press the
CURSOR LEFT or RIGHT button to enter Navigate mode.
Press the CURSOR LEFT,
RIGHT, UP, or DOWN button to move to a cross hair
that has a color outline. Then
CURSOR DOWN button repeatpress the INFO/EXIT button to
edly until SAVE MULTIPOINT is
enter adjust mode.
highlighted. Then press the CURSOR LEFT or RIGHT button to
Press the CURSOR LEFT,
store your adjustments in the TV’s
RIGHT, UP, or DOWN butmemory.
ton to adjust the cross hair
until the color outline is
To undo the multipoint adjustgone.Then press the INFO/EXIT
ments you just made, highlight
button to return to NAVIGATE
UNDO MULTIPOINT and press
mode. Repeat steps 3 and 4
the CURSOR LEFT or RIGHT butuntil all misaligned cross hairs
ton.
have been adjusted.
To restore the TV’s converFor your adjustments to be
gence to factory settings, highstored in the TV’s memory,
light RESTORE FACTORY and
you must activate SAVE
press the CURSOR LEFT or
MULTIPOINT.
RIGHT button.
To save your multipoint
Press the INFO/EXIT button
adjustments, press the MENU
to exit the menu.
button to return to the MANUAL CONVERGE menu. Press the
T
1
▲
▲
6
2
3,4
1,5
2,3
▲
3
4
5
6
É
9
ADVANCED MENU FEATURES
ADJUSTING THE SOUND CONTROLS, SMART SOUND
Sound allows you to choose
Smart
preset sound settings.
1
2
3
4
5
6
Press the MENU button on
the remote control to show
the onscreen menu.
Press the CURSOR
DOWN button once to
highlight SOUND.
Press the CURSOR RIGHT
button to enter the SOUND
submenu.
Press the CURSOR RIGHT
button to highlight SMART
SOUND.
Press the CURSOR RIGHT
button to choose personal
(based on the Settings below),
voice, music, theater.
Press the INFO/EXIT button to exit the menu.
PICTURE
SOUND
FEATURES
INSTALL
SMART SOUND
TREBLE
BASS
BALANCE
AVL
6
5
1,1
2,2
4
3,3
4,4
5
SOUND
SMART SOUND
TREBLE
BASS
BALANCE
AVL
PERSONAL
30
SOUND
TREBLE
BASS
BALANCE
AVL
INCR . SURROUND
30
SOUND
TREBLE
BASS
BALANCE
AVL
INCR . SURROUND
30
SOUND
TREBLE
BASS
BALANCE
AVL
INCR . SURROUND
0
esides the normal volume level conB
trol, your TV also has individual
sound-adjustment controls. You can
use TREBLE (high frequency), BASS
(low frequency), and Speaker BALANCE to further adjust the sound playback of TV programs.
Press the MENU button on
the remote control to show
the onscreen menu.
Press the CURSOR
DOWN button once to
highlight SOUND.
Press the CURSOR RIGHT
button to enter the SOUND
submenu.
1
2
3
4
5
To adjust the TREBLE level
of the television’s sound,
press the CURSOR RIGHT
button or LEFT. To adjust
another sound control,
press the CURSOR
DOWN button until the control (BASS or BALANCE) is
highlighted. Then press the
CURSOR RIGHT button or
LEFT to adjust the selected
control.
Press the INFO/EXIT button to exit the menu.
10
ADVANCED MENU FEATURES
USING BASS BOOST CONTROL
he BASS BOOST control allows you
to increase the low-frequency range
of the TV’s sound. This creates a deeper, fuller sound. Follow these steps to
turn BASS BOOST ON.
T
1
2
3
4
Press MENU button on the
remote control to show the
onscreen menu.
5
6
Press the CURSOR RIGHT
or LEFT button to turn
BASS BOOST ON or OFF.
Press the CURSOR
DOWN button once to highlight SOUND.
PICTURE
SOUND
FEATURES
INSTALL
Press the INFO/EXIT button to exit the menu.
SOUND
TREBLE
BASS
BALANCE
AVL
INCR . SURROUND
30
SOUND
6
Press the CURSOR RIGHT
button to enter the SOUND
submenu.
Press the CURSOR
DOWN button repeatedly
until BASS BOOST is highlighted.
TREBLE
BASS
BALANCE
AVL
INCR . SURROUND
1
STEREO
SAP
AUDIO OUT
SPEAKERS
BASS BOOST
ON
OR
BASS BOOST
2,4
3,5
OFF
11
ADVANCED MENU FEATURES
USING THE AVL (AUDIO VOLUME LEVELER) CONTROL
ou may have noticed the peaks and
valleys of sound that occur between
program changes or at commercial
breaks. The volume levels often vary
considerably. By turning on the AVL
(Audio Volume Leveler) control, you can
make your TV produce a more consistent volume level. Follow these steps to
turn the AVL control on.
Press the MENU button on
the remote control to show
the onscreen menu.
Press the CURSOR
DOWN button once to highlight SOUND.
Press the CURSOR RIGHT
button to enter the SOUND
submenu.
Press the CURSOR
DOWN button repeatedly
until AVL is highlighted. Then
press the CURSOR RIGHT
button or LEFT to turn AVL
ON or OFF.
Y
1
2
3
4
5
PICTURE
SOUND
FEATURES
INSTALL
TREBLE
BASS
BALANCE
AVL
INCR . SURROUND
SOUND
TREBLE
BASS
BALANCE
AVL
INCR . SURROUND
30
SOUND
5
1
TREBLE
BASS
BALANCE
AVL
INCR . SURROUND
OFF
OR
AVL
2,4
ON
3
Press the INFO/EXIT button to exit the menu.
HELPFUL HINT
• You may notice a difference
between the volume for analog and digital channels. This
is normal, but is not something the AVL control can fully
address
12
ADVANCED MENU FEATURES
SELECTING THE SURROUND SOUND MODE
ased on the signal being received,
you can select various surroundsound modes: MONO, SPATIAL,
STEREO, INCR. SURROUND, or
DOLBY* VIRTUAL (Virtual Dolby
Surround). See descriptions below.
Press the MENU button on
the remote control to show
the onscreen menu.
Press the CURSOR
DOWN button once to highlight SOUND.
Press the CURSOR RIGHT
button to enter the SOUND
submenu.
Press the CURSOR
DOWN button repeatedly
until INCR. SURROUND is
highlighted. Then press the
CURSOR RIGHT or LEFT button to select the Surround
mode. (See the box to the left
for details.)
Press the INFO/EXIT button to exit the menu.
B
1
2
3
4
PICTURE
SOUND
FEATURES
INSTALL
5
2,4
TREBLE
BASS
BALANCE
AVL
INCR . SURROUND
SOUND
TREBLE
BASS
BALANCE
AVL
INCR . SURROUND
30
SOUND
1
3
TREBLE
BASS
BALANCE
AVL
INCR . SURROUND
OFF
STEREO
OR
FORMAT
INCR . SURROUND
. SURROUND
EXPAND
4:3
INCR
OR
INCR . SURROUND
DOLBY VIRTUAL
When signals are being broadcast in mono (nonstereo):
INCR . SURROUND
MONO
OR
INCR . SURROUND
SPATIAL
5
Surround-sound Modes
In stereo: select STEREO,
INCR. SURROUND, or DOLBY
VIRTUAL.
INCR. (Incredible) SURROUND
enhances stereo programs by making the sound broader and fuller.
DOLBY VIRTUAL (with Dolby
Surround encoded signals) creates a virtualized surround-sound
experience from two speakers.
In mono: select MONO or SPATIAL.
SPATIAL enables you to add a
surround effect to mono programs.
Manufactured under license
from Dolby Laboratories.
“Dolby” and the double-D
symbol are trademarks of
Dolby Laboratories.
13
ADVANCED MENU FEATURES
USING SAP, ALT
AP, or Second Audio Program, is an
additional part of the stereo broadcast system. Sent as a third audio channel, SAP can be heard apart from the
current TV program sound. TV stations
are free to use SAP for any number of
purposes, such as the broadcast of a
second language or other audio information.
AUDIO PROGRAM
S
If an SAP signal is not present with a
selected program, the SAP option cannot be selected.
PICTURE
SOUND
FEATURES
INSTALL
TREBLE
BASS
BALANCE
AVL
INCR . SURROUND
Press the MENU button on
the remote control to show
the onscreen menu.
5
Press the CURSOR RIGHT
or LEFT button to select
ON or OFF. When ON has
been selected, the television
will Immediately begin reproducing the secondary audio.
6
Press the INFO/EXIT button to exit the menu.
Press the CURSOR
DOWN button once to highlight SOUND.
Press the CURSOR RIGHT
button to enter the SOUND
submenu.
Press the CURSOR
DOWN button repeatedly
until the SAP control is highlighted.
TREBLE
BASS
BALANCE
AVL
INCR . SURROUND
30
SAP
6
SOUND
1
Alt Audio Program is the digital equivalent of SAP. It functions in nearly the
same way.
1
2
3
4
SOUND
2,4
3,5
BLANCE
AVL
INCR . SURROUND
STEREO
SAP
OFF
Digital Audio
Audio Program
English
Spanish
14
ADVANCED MENU FEATURES
ADJUSTING AUDIO OUT, DIG OUT, SPEAKERS
f you have connected the TV’s
AUDIO OUTPUT jacks to the AUDIO
SOUND
TREBLE
PICTURE
INPUT jacks on an external audio sysBASS
SOUND
TREBLE
30
BALANCE
FEATURES
BASS
tem, you can turn off the TV Speakers.
AVL
INSTALL
BALANCE
. SURROUND
INCR
Once the TV Speakers are off, you can
AVL
INCR . SURROUND
adjust the Audio Out to either constant
or variable output.
Press the MENU button on
SOUND
the remote control to show
TREBLE
the onscreen menu.
BASS
BALANCE
Press the CURSOR
AVL
OFF
INCR . SURROUND
DOWN button once to highlight SOUND.
OR
Press the CURSOR RIGHT
AVL
ON
button to enter the SOUND
submenu.
Press the CURSOR
DOWN button repeatedly
until AUDIO OUT is highlighted. Then press CURSOR
RIGHT or LEFT Button to
select Fixed or Variable.
Press the MENU button to
go back and CURSOR
DOWN button to select
SPEAKERS. Then press CURSOR RIGHT or LEFTbutton to
select ON or OFF.
Press the INFO/EXIT button to exit the menu.
HELPFUL HINT
f you have digital audio equipment
connected to the TV, select the type
• DOLBY DIGITAL can only be
of digital output appropriate for your
selected as a DIG AUDIO
device.
OUT when digital signals are
From the Sound submenu
broadcasting in Dolby Digital.
press the CURSOR
DOWN button to select DIG
AUDIO OUT.
Press the CURSOR RIGHT
Manufactured under license from
or LEFT button to select
Dolby Laboratories. “Dolby” and
PCM or DOLBY DIGITAL.
the double-D symbol are tradePress the INFO/EXIT butmarks of Dolby Laboratories.
ton to exit the menu.
I
1
2
3
4
5
6
I
1
2
3
5
2,4
1
3
15
ADVANCED MENU FEATURES
USING INTELLITUNE, SMART PICTURE
ecause broadcasters and cable companies are transitioning to Digital TV they
may broadcast digital channels at certain
times or they may reorganize channels
without notice. To make sure you do not
miss a channel, Philips has developed
Intellitune. When the TV is OFF (standby
mode) it will search for previously unprogrammed channels and add them to the
channel list. It does this every three hours.
Press the MENU button on
the remote control to show
the onscreen menu.
Press the CURSOR
DOWN button twice to
highlight FEATURES.
Press the CURSOR RIGHT
button to enter the FEATURES submenu.
Press the CURSOR RIGHT
button to turn Intellitune ON
or OFF.
Press the INFO/EXIT button
to exit the menu.
B
1
2
3
4
5
mart Picture allows you to choose a
preset picture setting for each
Antenna, Cable and AV input.
Press the MENU button on
the remote control to show
the onscreen menu.
Press the CURSOR BUTTONS to navigate to
FEATURES then SMART
PICTURE.
Press the CURSOR RIGHT
button to select Personal
(based on your Picture menu
settings), Day Time,
Games/Sports, Noisy Signal, or
Night Time.
Press the INFO/EXIT button
to exit the menu.
PICTURE
SOUND
FEATURES
INSTALL
FEATURES
INTELLITUNE
SMART PICTURE
SLEEP
TIMER
Auto Lock
5
4
2
2
INTELLITUNE
SMART PICTURE
SLEEP
TIMER
Auto Lock
1
1
ON
FEATURES
INTELLITUNE
SMART PICTURE
SLEEP
TIMER
Auto Lock
DAY TIME
3,4
2,3
S
1
2
3
4
SETTING
PRIMARY DIFFERENCE
Personal
Based on Picture settings
Day Time
Increased brightness
Games/Sports
Saturated Colors
Noisy Signal
Reduced sharpness
Night Time
Decreased brightness
16
ADVANCED MENU FEATURES
SLEEP TIMER
he Sleeptimer feature allows you to
set a timer to automatically switch
the TV off after a period of time that
you choose—15, 30, 45, 60, 90, 120,
180, or 240 minutes.
Press the MENU button on
the remote control to show
the onscreen menu.
Press the CURSOR
BUTTONS to navigate to
FEATURES then SLEEP.
Press the CURSOR RIGHT
button to set the sleep timer.
Press the INFO/EXIT button
to exit the menu.
T
1
2
3
4
HELPFUL HINT
• Press the INFO BUTTON
twice to see the status of the
Sleep timer.
PICTURE
SOUND
FEATURES
INSTALL
4
2
INTELLITUNE
SMART PICTURE
SLEEP
TIMER
Auto Lock
1
3
FEATURES
INTELLITUNE
SMART PICTURE
SLEEP
TIMER
Auto Lock
15
17
ADVANCED MENU FEATURES
SETTING THE TIMER START/STOP TIME
ou can set the Timer to switch to a
selected channel at a specific time
while you are watching another channel,
or when the TV is in standby mode. You
can also set the TV to turn off at some
time after the TV switches channels.
Press the MENU button on
the remote control to show
the onscreen menu.
Press the CURSOR
DOWN button twice to
highlight FEATURES.
Press the CURSOR RIGHT
button to enter the FEATURES submenu. Then press
the CUROSR DOWN button
until TIMER is highlighted.
Press the CURSOR
RIGHT button again. Then
press the CURSOR DOWN
button once to highlight the
START TIME control.
Press the CURSOR RIGHT
button to highlight the time
indicator area.
Press the NUMBER buttons to enter the correct
time. If you make a mistake
entering the time, use the
CURSOR LEFT or RIGHT button to move among the time
input slots to make corrections.
NOTE: You can also use
the CURSOR BUTTON UP
or DOWN to cycle through
digits to input the time.
Press the CURSOR UP or
DOWN button to select AM
or PM.
Y
1
2
3
PICTURE
SOUND
FEATURES
INSTALL
9
7
8
1
3,4,
5
6
2
4
5
6
7
INTELLITUNE
SMART PICTURE
SLEEP
TIMER
Auto Lock
FEATURES
INTELLITUNE
SMART PICTURE
SLEEP
TIMER
Auto Lock
FEATURES
TIMER
TIME
START TIME
STOP TIME
CHANNEL
ACTIVATE
FEATURES
TIMER
TIME
START TIME
STOP TIME
CHANNEL
ACTIVATE
FEATURES
TIMER
TIME
START TIME
STOP TIME
CHANNEL
ACTIVATE
8
9
TIME
START TIME
STOP TIME
CHANNEL
ACTIVATE
8:06 PM
_ _:_ _
_ _:_ _
Press the CURSOR LEFT
button repeatedly until START
TIME is highlighted. Then press
the CURSOR DOWN button
to highlight STOP TIME. If you
want the TV to switch off at
some time after the changing of
channels, follow steps 5–7 above
to set the STOP TIME.
Press the INFO/EXIT button to exit the menu.
See the next two panels for instructions on selecting the Timer’s channel
and activating the timer.
18
ADVANCED MENU FEATURES
SELECTING THE TIMER CHANNEL
ollow these steps to select the channel to which the Timer will switch
the TV.
F
1
2
3
4
PICTURE
SOUND
FEATURES
INSTALL
Press the MENU button on
the remote control to show
the onscreen menu.
Press the CURSOR
DOWN button twice to
highlight FEATURES.
6
Press the CURSOR RIGHT
button to enter the FEATURES submenu. Then press
the CUROSR DOWN button
until TIMER is highlighted.
Press the CURSOR RIGHT
button. Then press the CURSOR DOWN button repeatedly
until the CHANNEL control is
highlighted.
5
Press the NUMBER buttons to enter the desired startup channel. Or press the CURSOR RIGHT button repeatedly
to enter the start-up channel
you want.
6
Press the INFO/EXIT button to exit the menu.
NOTE: Before the Timer will
work, you must activate it. See the
next panel.
2
5
FEATURES
TIMER
AutoLock
PIP
CLOSED CAP
FORMAT
TIMER
AutoLock
PIP
CLOSED CAP
FORMAT
1
3,4
TIME
START TIME
STOP TIME
CHANNEL
ACTIVATE
FEATURES
TIMER
TIME
START TIME
STOP TIME
CHANNEL
ACTIVATE
FEATURES
TIMER
TIME
START TIME
STOP TIME
CHANNEL
ACTIVATE
8:06 PM
5
19
ADVANCED MENU FEATURES
SETTING THE TIMER ACTIVATE CONTROL
fter you have set the TIME, START
TIME, STOP TIME, and CHANNEL, you must activate the Timer for it
to operate. Your options are to set the
Timer to work ONCE or DAILY. Set
ACTIVATE to OFF if you don’t want to
use the Timer.
A
1
2
3
4
Press the MENU button on
the remote control to show
the onscreen menu.
PICTURE
SOUND
FEATURES
INSTALL
6
Press the CURSOR
DOWN button twice to
highlight FEATURES.
Press the CURSOR RIGHT
button to enter the FEATURES submenu.
Press the CURSOR RIGHT
button again. Then press the
CURSOR DOWN button
repeatedly until the ACTIVATE
control is highlighted.
5
Press the CURSOR RIGHT
button to cycle through the
options and make your selection. The options are ONCE,
DAILY, or OFF.
6
Press the INFO/EXIT button to exit the menu.
2
FEATURES
TIMER
AutoLock
PIP
CLOSED CAP
FORMAT
1
3,4,
5
FEATURES
TIMER
TIME
START TIME
STOP TIME
CHANNEL
ACTIVATE
changes to the channel you
set, an announcement appears
on screen.
ONCE
OR
ACTIVATE
DAILY
OR
ACTIVATE
• Changing the channel or
• Thirty seconds before the set
8:06 PM
FEATURES
TIMER
TIME
START TIME
STOP TIME
CHANNEL
ACTIVATE
HELPFUL HINT
adjusting the volume during
the last minute of a Timer setting will cancel it and the TV
will not shut off..
TIME
START TIME
STOP TIME
CHANNEL
ACTIVATE
TIMER
AutoLock
PIP
CLOSED CAP
FORMAT
CHANGING TO
CHANNEL 5
IN 29 SEC
OFF
20
ADVANCED MENU FEATURES
UNDERSTANDING AUTOLOCK CONTROLS
he AutoLock™ feature is an integrated
circuit that receives and processes data
sent by broadcasters, or other program
providers, that contain program content advisories. When programmed by the viewer, a
TV with AutoLock™ can respond to the content advisories and block program content
that may be found objectionable (such as
offensive language, violence, sexual situations,
etc.). This is a great feature to censor the
type of viewing children may watch.
AutoLock™ offers various BLOCKING controls from which to
choose:
Access Code - An Access Code must
be set to prevent children from
unblocking questionable or censored
programming set by their parents.
Channel Block - After an access code
has been programmed, you can block
individual channels.
Block All - Allows you to block ALL
channels at one time.
Movie Ratings - Certain blocking
options exist which will block programming based on ratings patterned by the
Motion Pictures Association of America.
TV Ratings - Just like the Movie
Ratings, programs can be blocked from
viewing using standard TV ratings set by
TV broadcasters.
MOVIE RATINGS
G: General Audience - All ages
admitted. Most parents would find this
program suitable for all ages.
PG: Parental Guidance Suggested This programming contains material that
parents may find unsuitable for younger
children.
PG-13: Parents Strongly Cautioned This programming contains material that
parents may find unsuitable for children
under the age of 13.
T
MOVIE RATINGS Continued
R: Restricted - This is programming
specifically designed for adults. Anyone
under the age of 17 should only view this
programming with an accompanying parent or adult guardian.
NC-17: No one under the age of 17
will be admitted. - This type of programming should be viewed by adults only.
X: Adults Only - This type of programming contains one or more of the following: very graphic violence, very graphic and
explicit or indecent sexual acts, very
coarse and intensely suggestive language.
TV RATINGS
TV-Y -- Designed for a very young audience, including children ages 2-6.
TV-Y7 -- It may be appropriate for children age 7 and above who have acquired
the development skills needed to distinguish between make-believe and reality.
TV-G -- Suitable for most audiences, this
type of programming contains little or no
violence, no strong language, and little or
no sexual dialogue or situations.
TV-PG -- This program contains material
that parents may find unsuitable for
younger children. Could contain Moderate
violence (V), some sexual situations (S),
infrequent coarse language (L), or some
suggestive dialogue (D).
TV-14 -- This program contains some
material that many parents would find
unsuitable for children under 14 years of
age. This type of programming contains
one or more of the following: intense violence (V), intense sexual situations (S),
strong coarse language (L), or intensely
suggestive dialogue (D).
TV-MA -- This program is specifically
designed to be viewed by adults and
therefore may be unsuitable for children
under 17. This type of programming contains one or more of the following: graphic
violence (V), explicit sexual situations (S),
or crude indecent language (L).
ADVANCED MENU FEATURES
21
SETTING
UP THE
AUTOLOCK™ ACCESS CODE
our AutoLock™ access code allows
you to enter the AutoLock™ submenus to set up or turn off blocking.
Your access code is also the “key” that
unlocks programs or channels that are
being blocked by AutoLock™.
Y
1
2
3
Press the MENU button on
the remote control to show
the onscreen menu.
4
5
6
Press the CURSOR RIGHT
button to activate the
AutoLock menu.
7
8
9
PICTURE
SOUND
FEATURES
INSTALL
Press 0,0,0,0 on the remote
control. The AutoLock menu
will appear.
TIMER
AutoLock
PIP SOURCE
CLOSED CAP
CAP OPTIONS
TIME
START TIME
STOP TIME
CHANNEL
ACTIVATE
FEATURES
8
Press the CURSOR
DOWN button twice to
highlight FEATURES.
Press the CURSOR RIGHT
button. Then press the CURSOR DOWN button once to
highlight the AutoLock control.
FEATURES
TIMER
AutoLock
PIP
CLOSED CAP
FORMAT
2,
6
1
3,4
5,
7
TIMER
AutoLock
PIP
CLOSED CAP
CAP OPTIONS
Autolock
Enter access code:
Autolock
Set blocking
Block channel
Block by rating
Setup Code ˙
¸
Press the CURSOR
DOWN button three
times, then the CURSOR
RIGHT button to open the
New Code screen.
Autolock
Enter new access code:
* * * *
Please re-enter new access code:
* * *
Enter your new four-digit
code twice.
Press the INFO/EXIT button exit the menu.
Use these steps to reset
your code if you lose it.
Instead of 0000 in step 5,
use 0711. This is the reset
code.
Record your
personal code below:
HELPFUL HINTS
• If you discover that your access
code has been changed, you can
assume that blocked channels may
have been viewed.
• For the AutoLock to work with digital
channels, the AutoChron must be set.
See panel 29.
22
ADVANCED MENU FEATURES
USING THE AUTOLOCK TO BLOCK PROGRAMS
ou can use AutoLock to block proYratings,
grams based on TV ratings, movie
as well as programs which
have no rating or are unrated.
Press the MENU button on
the remote control to show
the onscreen menu. Then use
the cursor buttons to navigate
to AUTOLOCK in the
FEATURES menu.
1
2
3
Enter your four-digit
ACCESS CODE.
4
Block Channel
Press the CURSOR
DOWN button to select
Block Channel or Block by rating,
a)Press the CURSOR
RIGHT button to enter the
BLOCK CHANNEL submenu.
b)Press the CURSOR UP
or DOWN button to select
a channel to block. Press OK
to change unlocked to locked,
or locked to unlocked.
5
Block by Rating
a)Press the CURSOR
DOWN button, then the
CURSOR RIGHT button
to enter the BLOCK BY RATING submenu.
b)Press the CURSOR
6
Buttons to select a rating or
subrating to block. Press OK
to change unlocked to locked,
or locked to unlocked.
Press the INFO/EXIT button to exit the menu.
PICTURE
SOUND
FEATURES
INSTALL
FEATURES
TIMER
AutoLock
PIP
CLOSED CAP
FORMAT
TIMER
AutoLock
PIP
CLOSED CAP
FORMAT
ACCESS CODE
----
FEATURES
6
TIMER
AutoLock
PIP
CLOSED CAP
FORMAT
1
ACCESS CODE
XXXX
Autolock
3,
4,
5
Set blocking
Block channel ˙ Select
Block by rating
Setup Code
¸
2
Block Channel
Channel Blocking
˚
15
16
17
18
19
20
21
DTV
DTV
DTV
DTV
DTV
DTV
DTV
¸
Block by Rating
Movie Ratings
G
PG
PG-13
R
NC-17
X
TV Ratings
All FV D L S V
TV-Y ˝
TV-Y7
TV-G
TV-PG
TV-14
TV-MA
NOT RATED
MISSING RATING
¸
23
ADVANCED MENU FEATURES
TURNING THE AUTOLOCK BLOCKING ON OR OFF
he SET BLOCKING control can be
thought of as the “master switch”
for AutoLock™. Use it to turn ON or
OFF all of the settings (based on ratings). This control does not affect channel blocks.
T
1
2
3
Press the MENU button on
the remote control to show
the onscreen menu.
4
5
6
7
Press the CURSOR RIGHT
button again to highlight
ACCESS CODE.
PICTURE
SOUND
FEATURES
INSTALL
Enter your four-digit
ACCESS CODE.
Press the CURSOR RIGHT
button to turn BLOCKING
ON or OFF.
Press the INFO/EXIT button to exit the menu.
TIMER
AutoLock
PIP
CLOSED CAP
FORMAT
ACCESS CODE
----
FEATURES
7
Press the CURSOR
DOWN button twice to
highlight FEATURES.
Press the CURSOR RIGHT
button. Then press the CURSOR DOWN button until the
AutoLock control highlighted.
FEATURES
TIMER
AutoLock
PIP
CLOSED CAP
FORMAT
2
TIMER
AutoLock
PIP
CLOSED CAP
FORMAT
1
3,
4,
6
5
Autolock
˙ Off
Set blocking
Block channel
Block by rating
Setup Code
¸
ACCESS CODE
XXXX
24
ADVANCED MENU FEATURES
ADJUSTING PIP SOURCE
using the PIP you need to
Before
select a source for it to display.
1
2
3
4
Press the MENU button
on the remote control to
show the onscreen menu.
5
Press the CURSOR
RIGHT button to enter the
PIP SOURCE submenu. Then
press the CURSOR UP or
DOWN button to select the
PIP SOURCE.
6
Press the INFO/EXIT button to exit the menu.
PICTURE
SOUND
FEATURES
INSTALL
INTELLITUNE
SMART PICTURE
SLEEP
TIMER
Auto Lock
Press the CURSOR
DOWN button twice to
highlight FEATURES.
Press the CURSOR
RIGHT button to enter the
FEATURES submenu.
Press the CURSOR
DOWN button repeatedly
until the PIP SOURCE control
is highlighted.
FEATURES
SMART PICTURE
SLEEP
TIMER
Auto Lock
PIP SOURCE
FEATURES
6
2
1
3,
5
SMART PICTURE
SLEEP
TIMER
Auto Lock
PIP SOURCE
AV
AV
av
AV
AV
5
4
3
2
1
25
ADVANCED MENU FEATURES
USING CLOSED CAPTIONING
C
losed Captioning (CC) allows you to
read the voice content of television
programs on the TV screen. Closed
Captioning is only available when the
broadcaster supplies it. Even when
the broadcaster supports Closed
Captioning, it will not be available during all programs (most commercials
are not closed captioned).
1
2
3
4
Press the MENU button on
the remote control to show
the onscreen menu.
5
6
Press the CURSOR RIGHT
button. The CLOSED CAPTION menu appears.
Press the CURSOR
DOWN button twice to
highlight FEATURES.
PICTURE
SOUND
FEATURES
INSTALL
FEATURES
TIMER
AutoLock
PIP
CLOSED CAP
FORMAT
TIMER
AutoLock
PIP
CLOSED CAP
FORMAT
TIME
START TIME
STOP TIME
CHANNEL
ACTIVATE
MUTE
Button
FEATURES
1
6
3,5
2,4
Press the CURSOR RIGHT
button to enter the FEATURES submenu.
TIMER
AutoLock
PIP
CLOSED CAP
FORMAT
Closed caption services-Analog
Display
Services
˚
Off
Always On ˙
On when muted
CC1
CC2
CC3
CC4
TXT1
TXT2
¸
Press the CURSOR
DOWN button repeatedly
until the Closed Caption control is highlighted.
Press the CURSOR UP or
DOWN button to select a
CAPTION MODE.
Select the Closed Caption setting:
• Off
• Always On
• On when muted
NOTE: The “On When
Muted” option turns the
Closed Captioning on whenever the MUTE button on the
remote control is pushed.
7
8
Press the CURSOR
BUTTONS to select the
Closed Caption service.
Press the INFO/EXIT
button to exit the menu.
26
ADVANCED MENU FEATURES
USING DIGITAL CAPTIONING
C
losed Captioning (CC) allows you to
read the voice content of television
programs on the TV screen. Closed
Captioning is only available when the
broadcaster supplies it. Even when the
broadcaster supports Closed
Captioning, it will not be available during all programs (most commercials
are not closed captioned).
Press the MENU button on
the remote control to show
the onscreen menu.
Press the CURSOR BUTTONS to navigate to
FEATURES, then CLOSED
CAPTION.
Press the CURSOR RIGHT
button. The CLOSED CAPTION menu appears. Select
the caption mode and caption
service you would like.
Press the MENU Button to
back up and select CAPTION
OPTIONS. To personalize
your captions Press the Cursor
Right button to turn the
options on.
In the FEATURES MENU,
the Caption options are
listed below CAPTION
OPTIONS after it has been
turned on.
The options are CAPTION
SIZE, CAPTION STYLE, CAPTION COLOR, and CC
BACKGROUND. Use the
Cursor Buttons to make your
selections and follow the onscreen instructions.
Press the INFO/EXIT button to exit the menu.
1
2
3
4
5
6
PICTURE
SOUND
FEATURES
INSTALL
6
2
TIMER
AutoLock
PIP
CLOSED CAP
FORMAT
1,
4
3,5
FEATURES
TIMER
AutoLock
PIP
CLOSED CAP
FORMAT
TIME
START TIME
STOP TIME
CHANNEL
ACTIVATE
FEATURES
TIMER
AutoLock
PIP SOURCE
CLOSED CAP
CAPTION OPTIONS
Closed caption services-DIGITAL
Display
Services
˚
Off
Always On ˙
On when muted
CC1
CC2
CC3
CC4
TXT1
TXT2
¸
FEATURES
TIMER
AutoLock
PIP SOURCE
CLOSED CAP
CAPTION OPTIONS
FEATURES
CAPTION
CAPTION
CAPTION
CAPTION
CAPTION
OPTIONS
SIZE
STYLE
COLOR
BACKGROUND
HELPFUL HINTS
• The Digital Captioning
options are only available
on a digital channel carrying the captioning information.
27
ADVANCED MENU FEATURES
USING THE PICTURE-FORMAT CONTROL
ou can also use the onscreen menu
to access the Picture Format control.
Y
1
2
3
4
Press the MENU button
on the remote control to
show the onscreen menu.
Press the CURSOR
BUTTONS to navigate to
FEATURES, then SCREEN
FORMAT.
Press the CURSOR
RIGHT button. Then
press the CURSOR RIGHT
or LEFT buttons to select
the PICTURE FORMAT.
Press the INFO/EXIT
button to exit the menu.
PICTURE
SOUND
FEATURES
INSTALL
TIMER
AutoLock
PIP
CLOSED CAP
FORMAT
FEATURES
TIMER
AutoLock
PIP
CLOSED CAP
FORMAT
4:3
OR
FORMAT
4
1
ZOOM
OR
FORMAT
PANORAMA
OR
FORMAT
2
NATIVE
3
HELPFUL HINTS
• See panel 5 “USING
PICTURE FORMAT CONTROL”
for more information of
Screen Formats.
28
ADVANCED MENU FEATURES
CHANNEL EDIT
his feature allows you to edit or skip
T
channels from the channel list that
have bad or weak signals or channels
you do not want to watch.
Press the MENU button.
The onscreen menu appears.
Then press the CURSOR
DOWN button repeatedly
until INSTALL is highlighted.
Press the CURSOR RIGHT
button to enter the INSTALL
submenu.
Press the CURSOR
DOWN BUTTON repeatedly until CHANNEL EDIT is
highlighted. Then press the
CURSOR RIGHT or LEFT
button to access the CHANNEL EDIT list.
Press the CURSOR UP or
DOWN BUTTON to scroll
through the list of channels.
With the channel you
want to edit selected,
press the CURSOR RIGHT
button to mark the channel
as SKIPPED. (Channels you
mark SKIPPED will not appear
when you use the CH[annel]
+/– buttons to change channels while watching TV.)
Press the INFO/EXIT button to exit the menu.
1
2
INSTALL
Channel edit
LANGUAGE
TUNER MODE
AUTO PROGRAM
CHANNEL EDIT
AutoChron
5
3
2
15 DTV
16 DTV
17 DTV
18 DTV
19 DTV
20 DTV
21 DTV
> Skipped
> Added
> Added
> Skipped
> Skipped
> Skipped
> Added
1
4
3
4
5
HELPFUL HINTS
• When you want to add a
channel that has been
marked SKIPPED, press the
CURSOR BUTTON UP or
DOWN to highlight the
channel. Then press the
CURSOR RIGHT button to
change SKIPPED to
ADDED.
29
ADVANCED MENU FEATURES
USING AUTOCHRON
ollow the steps below to set
AutoChron™ to download the time
from your PBS station to your TV.
After successful setup, AutoChron™
will automatically maintain the correct
time using your PBS station until you
set the time using the AutoChron™
MANUAL option (see panel 30).
Press the MENU button.
The onscreen menu appears.
Then press the CURSOR
DOWN button repeatedly
until INSTALL is highlighted.
Press the CURSOR
RIGHT button to enter
the INSTALL submenu.
Then press the CURSOR
DOWN button repeatedly
until AutoChron is highlighted.
Press the CURSOR
RIGHT button to enter the
AutoChron SET TIME area.
Press the CURSOR
RIGHT button again to
select AUTO. Within a few
seconds, a menu containing
the time-zone options appears.
Press the CURSOR BUTTON UP or DOWN to
highlight your correct time
zone and Daylight Savings
Time option.
Press the number buttons
on your remote to enter the
channel number for your PBS
station (02, 15, or 121, for
example). Wait until the TV
completes its search.
Press the INFO/EXIT button to exit the menu.
F
1
2
3
4
INSTALL
AUTO PROGRAM
CHANNEL EDIT
LANGUAGE
TUNER MODE
AutoChron
INSTALL
SET TIME
AUTO PROGRAM
CHANNEL EDIT
LANGUAGE
TUNER MODE
AutoChron
AUTO
MANUAL
SET TIME
AUTO
MANUAL
TIME ZONE?
7
1
CENTRAL
MOUNTAIN
PACIFIC
DAYLIGHT
SAVING TIME?
YES
NO
5
2,3,
4
6
SEARCH FOR
TIME
ENTER CHANNEL
-PBS
PLEASE WAIT
15
TIME FOUND
END: PRESS STATUS
11:15 AM
5
6
7
HELPFUL HINTS
• If the time was not found,
you will need to locate the
correct channel number
for your PBS station and
input that number.
• AutoChron must be set for
the AutoLock to work on
digital channels.
30
ADVANCED MENU FEATURES
SETTING TIME MANUALLY
n addition to using the AUTOCHRON
setting, you can set the time manually.
I
1
2
Follow steps 1–3 in the section “Setting Time
Automatically” above,
then press the CURSOR
DOWN button to highlight
MANUAL and CURSOR
RIGHT button to enter the
MANUAL time input area.
Use the number buttons
on your remote control to
input the first digit for the
time. You can also press the
CURSOR BUTTON UP or
DOWN to select a digit. Press
the CURSOR RIGHT button
to move to the next digit input
slot and input the time.
If you should need to change a
number you have input, you
can press the CURSOR LEFT
or RIGHT button to the digit
input slot to make the correction.
3
After you have input the
time, press the CURSOR
RIGHT button to enter the
AM/PM area. Then press the
CURSOR UP or DOWN button to select AM or PM.
4
Press the INFO/EXIT button to exit the menu.
INSTALL
INSTALL
AUTO PROGRAM
CHANNEL EDIT
LANGUAGE
TUNER MODE
AutoChron
AUTO PROGRAM
CHANNEL EDIT
LANGUAGE
TUNER MODE
AutoChron
SET TIME
ENTER TIME
AUTO
11:00
AM
MANUAL
INSTALL
3
4
1
2
AUTO PROGRAM
CHANNEL EDIT
LANGUAGE
TUNER MODE
AutoChron
ENTER TIME
ENTER TIME
11:35
11:00 AM ON
31
ADVANCED MENU FEATURES
USING WEAK DIG SIGNAL
ecause Digital broadcasting is still
new it is not uncommon for a
broadcaster to only send out a digital
signal for part of a day. You could also
be on the limit of the signal strength
and the reception comes and goes. If
you program your channels when the
signal is not being sent or is weak it will
not be saved in your channel set up.
However, using the WEAK DIG SIGNAL
feature you can add those channels
with weak signals to your channel list.
B
1
Press the MENU button.
The onscreen menu appears.
Then press the CURSOR
DOWN button repeatedly
until INSTALL is highlighted.
2
Press the CURSOR
RIGHT button to enter
the INSTALL submenu.
Then press the CURSOR
DOWN button repeatedly
until WEAK DIG SIG is selected. Press CURSOR RIGHT
button to enter the weak digital signal menu.
3
Press the CURSOR LEFT,
RIGHT, UP, or DOWN
button to select a channel
to add or skip.
4
Press the INFO/EXIT button to exit the menu.
INSTALL
Weak digital Signal
CHANNEL EDIT
LANGUAGE
TUNER MODE
AutoChron
WEAK DIG SIG
˚
15
16
17
18
19
20
21
SET TIME
AUTO
MANUAL
DTV
DTV
DTV
DTV
DTV
DTV
DTV
skipped
skipped
skipped
skipped
skipped
skipped
skipped
¸
1
4
2-3
HELPFUL HINTS
• For the purposes of tuning, your DTV treats
scrambled digital channels
like weak signals regardless
of actual signal strength.
32
ADVANCED MENU FEATURES
CHANNEL AND VOLUME DISPLAY OPTIONS
se CH BANNER SIZE and VOLUME DISPLAY to set the size of
these displays on the screen.
U
1
2
Press the MENU button.
The onscreen menu appears.
Then press the CURSOR
DOWN button repeatedly
until INSTALL is highlighted.
Press the CURSOR
RIGHT button to enter
the INSTALL submenu.
Then press the CURSOR
DOWN button repeatedly
until CH BANNER SIZE or
VOLUME DISPLAY are selected.
3
Press the CURSOR RIGHT
BUTTON to choose a
BANNER SIZE or turn the
VOLUME DISPLAY on or off.
4
Press the INFO/EXIT button to exit the menu.
INSTALL
INSTALL
TUNER MODE
AUTOCHRON
WEAK DIG SIG
CH BANNER SIZE
VOLUME DISPLAY
TUNER MODE
AUTOCHRON
WEAK DIG SIG
CH BANNER SIZE
VOLUME DISPLAY
SET TIME
ENTER TIME
AUTO SMALL
11:00
AM
MANUAL
INSTALL
1
4
2
3
TUNER MODE
AUTOCHRON
WEAK DIG SIG
CH BANNER SIZE
VOLUME DISPLAY
SET TIME
ENTER TIME
AUTO
11:00
AM ON
MANUAL
33
ADVANCED MENU FEATURES
EMERGENCY ALERT SETTING (DIGITAL ONLY)
ou can select the level of Emergency
Alert you would like to see.
Y
1
2
Press the MENU button.
The onscreen menu appears.
Then press the CURSOR
DOWN button repeatedly
until INSTALL is highlighted.
Press the CURSOR
RIGHT button to enter
the INSTALL submenu.
Then press the CURSOR
DOWN button repeatedly
until EMERG ALERT is highlighted.
3
Press the CURSOR
RIGHT button to enter the
EMERG ALERT submenu.
Then press the CURSOR
RIGHT button again to enter
the menu. Press the
CURSOR UP or DOWN button to select the level of alert
you want to have presented
or discarded. Then press the
CURSOR RIGHT button to
select PRESENT or DISCARD.
4
Press the INFO/EXIT button to exit the menu.
INSTALL
INSTALL
EMERG ALERT
LOW
MEDIUM
AUTOCHRON
WEAK DIG SIG
CH BANNER SIZE
VOLUME DISPLAY
EMERG ALERT
PRESENT
ENTER TIME
AUTO
11:00
AM
MANUAL
OR
LOW
1
DISCARD
INSTALL
EMERG ALERT
LOW
MEDIUM
PRESENT
AUTO
11:00
AM
MANUAL
4
2
3
OR
MEDIUM
DISCARD
HELPFUL HINTS
• High Alert levels are
always presented.
34
ADVANCED MENU FEATURES
FACT CH RESET
he Factory Channel reset option is
available in case you move or
change cable providers and need to
start your channel list all over from
scratch. Only use it if you
absolutely must because you will
lose all of your channel programming.
T
1
Press the MENU button.
The onscreen menu appears.
Then press the CURSOR
DOWN button repeatedly
until INSTALL is highlighted.
2
Press the CURSOR
RIGHT button to enter
the INSTALL submenu.
Then press the CURSOR
DOWN button repeatedly
until FACT CH RESET is highlighted.
3
Press the CURSOR
RIGHT button to enter the
FACT CH RESET Submenu.
Follow the onscreen menu.
Press 1 to continue and 0 to
reset.
INSTALL
WEAK DIG SIG
CH BANNER SIZE
VOLUME DISPLAY
EMERG ALERT
FACT CH RESET
1
2,3
HELPFUL HINTS
• After you have reset the
channels you will need to
re-autoprogram the TV
before you can watch it.
See page 12 in the Set-up
and Basic Guideto start
autoprogramming.