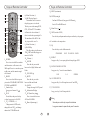
1
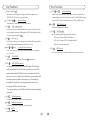
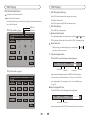
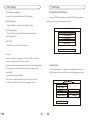
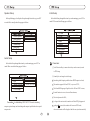
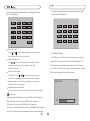
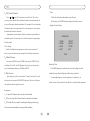
An American Ingenuity OPERATING INSTRUCTIONS BEFORE OPREATING THE UNIT PLEASE READ THIS MANUAL THOROUGHLY AND RETAIN FOR FUTURE REFEENCE OWENER S RECORD THE MODE AND SERIAL NUMBERS ARE LOCATED ON THE BOTTON. SPACE RECORD THE SERIAL NUMBER IN THE PROVIDED BELOW. WARNING HAZARD DO NOT OPERATE THIS UNIT UNLESS VEHICLE IS PARKED IN SAFE AND LEGAL AREA. ICBM-1-TOUCH Contents Table of Contents Matters to Note Connection Instructions 1 5 Touch Key Functions 7 Key Functions 11 Basic Operations Functional Operations 15 Other Functions 28 Supplementary Information 29 Attachment Information 35 Touch Screen Information 35 17 Other Functions Connection Instructions Connection instructions 5 Clock 28 Connection of Separate Power Amplifier 6 Clock Setting 28 Supplementary Information Touch Key Functions Touch Key Function Introduction 7 Malfunction Eliminating 29 Attachment Information Touch Key Function Instructions Host Keys 9 DVD Player 31 Remote Controller Keys 11 DVD Disk 31 Basic Operations CD-R/CD-RW Disk 32 SRC Function 15 MP3 33 Volume Adjusting 15 Product Specifications 35 Adjusting the Angel of LCD Panel 16 DVD Playing 16 Functional Operations Tuner 17 DVD Playing 19 DVD Setup 22 CD Playing 25 TV Playing 26 Touch Screen Information Matters to Note 36 Touch Menu 36 Matters to Note: Matters to Note Matters to note: Installation Technicians install To avoid injury please Ê × Ï È ¸ or Ð any Ð »accident, Ä ú ¹ º  ò read ³ ¤ carefully Õ ÷ Ê ýthe  following ë ³ µ Ô remindings Ø ¶ à à ½ Ì å Ó é À Ö Ï µQualified Í ³ ¡ £ Ô Ú ² Ùor×Repairmen ÷ ± ¾ »are ú expected Ç ° £ ¬to Ç ë the DVD. before installing and operating this machine. Improper Installation may lead to creepage or short circuit. Ï È Ô Ä ¶ Á ± ¾ Ê Ö ² á ² ¢ Í × É Æ ¡± ££ ´ æ Ò Ô ± ¸ ½ « À ´ ² Î ¿ ¼ Please check connections first when it does not work well. Ifconnections are all right, check the fuse then. Replace the fuse Fuses in the same specification (current)are required to replace the original one. It is very dangerous to use fuses in different specifications or wires, which may damage the machine severely. Prevent the Surface from Destroying Keep the machine surface away from chemicals like pesticide,fixature,or insectifuge, which may distorting the surface.. On Safety Please comply with the traffic rules in your country. Don't watch or operate the monitor while driving, which may distract you and result in accident. Park your car in a safe place before watching the monitor and operate this machine. Don't put your hands, fingers or other things in this machine while operating, which may hurt you or destroy the machine. Put small hardware in places where children cannot reach. Don't put rubber or plastic items together with the machine for a long time, otherwise the surface lacquer will be destroyed; it may also lead to fire or other accidents. Turn the power switch to OFF while installing the machine, otherwise it may lead to creepage or short circuit. Don't let the aiguille destroy any car parts, like pipes, oil box or other circuitries. On thunder-storm days, don't touch TV antenna and monitor at the same time, which may bring you an electric shock. Set in sunshine, the car's interior temperature will rise quickly, cool it before operating this machine. TV/AV pictures will not show until the car has been stopped and braked. Don't watch it while driving, otherwise traffic accident may occur due to your distraction. Dew condensation If the temperature changes too quickly, there may appear dewfall in the display screen.It will be all right soon when the humidity vaporizes. If you have any doubts or questions, please consult the dealer nearest to you. Remember to fasten your safety belt while driving, otherwise the probable hurt will be much worse if there is an accident. About the Machine Applicable Disks All DVD, VCD and CD bearing the following symbols can be played in this machine. Installing Location Do not install this in machine where The drivers' view mey be obstructed. The operation of the car or the airbag system will be obstructed. It will obstruct the operation of the car, especially the steerwheel, shift lever and brake pedal. DVD Region Code DVD Disks with incompatible region code cannot be played (this machine is for all code.) 1 2 Matters to Note Matters to Note Reset the micro-processor The Use and Maintenance of Remote Control Press RESET to initialize the micro-processor. Replacing the Lithium Battery The reset operation is needed only when: Normally, the battery can last for about 1 year. (Its lifespan may be The machine is used for the first time after installation. shortened due to different working conditions.When the battery power This machine does not work well. becomes weak, its function will be narrowed.Replace it with a new Cr2025. Abnormal or incorrect information appears in the monitor. Precautions 1 Turn the power switch to OFF. Keep the battery out of the reach of children. Should the battery be swallowed, consult doctors immediately. 2 Press RESET with penpoint or other pointed objects. Wipe the battery with dry cloth to assure a good contact. Please insert the battery with correct polarity Do not hold the battery with metallic tweezers, otherwise a short-circuit may occur. Precautions: The battery may explode if mistreated. Do not recharge, disassemble the battery or put it in fire. Installing Steps Take out the projecting slice at the bottom of the card batterywhen it is used for the first time. Precautions Please turn the power switch to OFF before you press RESET when completing Take out the battery buckle Press the battery buckle and pull it out. the connection or all the memories have been lost and need a reset. Replace the battery Put the battery in the buckle with its anode upward Insert the battery buckle Push the buckle to its original position. Back of the remote Battery tank Battery Transparent slice 3 4 Connection Instructions AV Output Connection Instructions Red White Yellow FL + FR Backing Radar TV Antenna Radio Antenna VIDEO White Grey Front + Y R W Optical Output Front Left Purple Green FR RR SWR VIDEO FL RL SWL Right Back Back AUX Input Lens Blue&Whitel Hand Brake Blue Backing Brown Orange RL CDCÊä Èë RR Power Amplfier Control Power Antenna Black Ground Wire Red ACC Yellow BATT SWL 5 6 SWR Touch Key Functions Touch Key Functions 2 Touch Key 2 Sound Menu Function Key Touch this key, and the sound menu will appear.Any item inthis 15 14 4 3 5 MUTE 19 EJECT + SOUND MENU 9 2 10 6 13 12 ANG 11 SRC 20 MENU 21 22 DISP 23 menu can be touched and selected freely.BASS, TREBLE, BALANCE and FADER can all be adjusted. While adjusting BALANCE or FADER,one can use the demonstrated arrowhead; when the cursor changes from pink to green,it means the sound field is located in central position. 7 8 1 < 16 EQ 18 < 17 MODE BASS TREBLE BALANCE FADER 24 ICBM-1-TOUCH Touch Key Functions: Notes: Touch Keys 1 2 3 5 6 7 are used to activate menus, they will not be valid until there is no menu display.Keys 4 9 1 EXIT 8 NEXT 10 are valid as soon as the machine is on. Touch Key 1 + SRC(Vedio source)Function Key - +3 + This key is valid only when the machine is on. Touch it, and the following menu will appear. Touch and select one, the machine 3 Touch Key 3 will change to that play source. The machine will enter the Sound Pattern Touch this key and Sound Pattern Menu will appear.Touch and select highlighted item 2 seconds later if there is no further operations. wanted sound pattern. Patterns like ROCK STANDARD, CLASSICL JAZZ have been preset. AUX CDC TUNER TV DVD EXIT LAST EQUALIZER ROCK STANDARD CLASSICAL JAZZ EXIT 7 8 Touch Key Functions 4 Keys 4 8 Touch Key Functions Monitor Angel Adjusting System Menu Page 1 Press 4 and 8 to adjust the monitor angels within its variation scope. 5 Key 5 Picture Mode Menu BRIGHT CONTRAST COLOR RESET Touch this key to activate picture mode menu.Touch and select wanted picture mode. Four modes are preset here: PIC SETUP MODE LAST STANDARD,NIGHT,CUSTOM,and BRIGHTNESS. NEXT EXIT LAST PIC MODE CUSTOM NIGHT STANDARD BRIGHT - + 15 EXIT System Menu Page 2 6 Key 6 System Menu Touch this key to activate System Menu, which has 3 pages, each item of MIRROR BLUE CLOCK TUNE the menu can be touched and selected freely. Among them are PIC item on page 1: BRIGHT CONTRAST PIC SETUP MODE LAST COLOR RESET EXIT and SETUP item on page 2: MIRROR BLUE CLOCK TUNE and MODEitem on page 3: Picture Modes 9 10 NEXT Key Functions Key Functions 9 7 Funciton Touch Key 7 Touch this key, different menus will appear in different program sources (DVD,CDC,TV .Please refer to related chapter. Touch Keys 9 10 menu display, they will change between TV and RADIO,change music in CDC mode,and function as Fast Play in DVD mode. Touch these keys to increase or decrease the volume. Ò1 ÔKey Ï Â11 Ê Ç Ã SRC æ°å ° ´ sources ¼ü¹¦ÄÜ˵Ã÷ (video On idle state, this key will display SRC menu (power on).In practice, this key is long-pressed to turn off the machine (OFF). Other functions of this key is the same as Touch Key SRC. Key 21 11 Key 23 DVD state: Turn on/off DVD OSD display CDC state: Turn on/off CDC information display Idle state: Check and adjust time Volume and Sound Adjusting 12 Key 24 4 Key 14 SOUND MENU The function of this key is the same as Touch Key 2 (sound menu). EJECT (DVD eject key) In standby state, press the key to enter DVD mode. The DVD disc shall eject automatically. In other state, press the key to enter DVD mode automatically the DVD disc shall eject automatically. During the process of eject, if the display block the disc eject, the display shall descend to a proper position to ensure the eject. (If the display has descended, it will go back to the original position before eject by pressing the ANG key for the first time.) Precaution: Don't press the ANG key until the disc enters the machine completely. Key 17 EQ(sound patterns) Its function is the same as Touch Key 3 (sound pattern) Key 18 MODE(picture modes) Its function is the same as Touch Key 5 (picture modes) 8 IRRX Window Never cover this window, avoiding the malfunction of remote operations. key is let loose.. 6 DISP(Display This key functions differently under different states: Press Left to decrease, press Right to increase when power is on until the Key 16 MENU(Main Menu) Same as the Main Menu Touch Key 2 Key 12 ANG(angel Press this key on power-on state, the angel of the monitor will change within the scope of Minimum and Maximum angel until the key is let go. 5 Menu Adjusting Adjust relevant menu item when there is a menu display. If no Volume Adjusting Keys 13 and 15 (VOL) Keys 20 and 22 Key 19 MUTE Turn on and off the sound 11 12 Keys on Remote Controller Keys on Remote Controller 19 MENU (main menu) POWER ANGLE MODE DISP 10+ PAUSE PLAY SRC AUX MENU ENTER AS SET SOUND MONO 13 Lp2508 1 POWER Press it to switch off the machine and the monitor will retract to the MIN angel.Press it to start the system on idle state, and the monitor angel will rebound. 2 MODE Press it to select different preset pic modes:STANDARD, SOFTNESS CUSTOM, and BRIGHT. 3 Number Keys long-press 0 means 10 4 PLAY Put in disks, and press this key to play; long-press it to PAUSE. 5 16 CHANNEL(+/-) Change music in DVD mode, change disks in CDC and change channels in TV/RADIO mode. 6 7 Menu Selection(+) SRC(Playing Source) The machine will be on once the playing source is selected. This key can switch among DVD, CDC, AUX and TV.The machine will enter the selected item if there is no further operating for 2s The machine will be OFF if this key is pressed for over 2s. 8 Menu Selection(-) 9 BAND Key This Key canbe switch between FM1 FM2 and AM,a long press means AS of FM. 10 Volume(+) 11 SOUND Press this key can switch between Low,High, Balance and Fader. 12 VOLUME(13 MUTE Press this key to switch between Mute and Sound 14 ANGLE Change the angel of LCD panel 15 Information Display 17 AUX(auxiliary input Press it to swithc between AUX and CAMERA 18 Menu Adjustmeng(+) 20 ENTER(setting Confirm in DVD mode,(long-press it DVD menu) Save in TV and RADIO mode. 21 Menu Select 22 GOTO(switch to DVD) Press this key and input number and press confirm key, the program will switched to relevant position. 23 EQ Press this key to select different modes: STANDARD 24 JAZZ CLASSICAL ROCK REPEAT Long-press Key 5, can repeat playback when playing a DVD. 25 SOUND CHANNEL SWITCH Long-press key 7 to switch sound channels: R+R 26 L+L STEREO AC3/DTS SWITCH Long-press Key 8, it will change between Ac3 and DTS 27 TITLE SWTICH Long -press key 9,it will change the title. Notes Some keys are valid only in specific situations Long-press means to press the key over 2 seconds 13 14 Basic Operations: Basic Operations Adjust the Monitor Angel: Press ANG key on the monitor panel, the monitor will move within the minimum and maximum angels, until the key is let off. If it is a short press, the monitor will be slightly adjusted following its original direction. Touch the angel adjusting area on the monitor panel, area (4) is to increase the angel, and area (8) is to decrease. SRC Functions The machine is on once the playing source has been selected Press this key to switch between the following playing sources: 1.AUX Select Auxiliary Input 2.CDC Select Disk Input 3.TUNER Select Radio, and radio menu will be displayed 4.TV Select TV Input 5.DVD Select DVD Input 6.EXIT Exit, Close the System The playing sources can be selected through touching directly, and the system will enter the highlighted item if there is no selection after 2 seconds. Precautions: While adjusting the angel of the monitor panel, press ANG key or touch the angel adjusting area. Do not move or press the monitor by hand, or serious damage may occur. Playing DVD: Turn Off the Machine: Press SRC to select DVD, insert valid disk in the disk box. Long-press SRC key,OFF will appear and the system closed. Insert valid disk in the disk box directly. When the DVD playing Press SRC, touch menu will appear, select EXIT. menu appear, press PLAY (or SET) key, the system will play the disk Switch off ACC power source. automatically. If you want to exit, press EJECT. Precautions The monitor will retract automatically to the minimum angel. Precautions: The machine will retract automatically and close 5 seconds later if the power switch is turned from ON to OFF. The system can play one 12cm or 8cm DVD disk (single-sided) When the power switch is turned to ON or ACC again, the system Please do not use adapters while playing 8cm disks. will reset automatically and rebound to its previous status. When the system is turned off, pls make sure all the panels are Do not insert anything except disks in the disk box. closed. If the closing of the monitor stops for some obstacle and If you can't insert a while disk, or it cannot be played, please check whether the label side is upward. Press EJECT to take out the disk to see nothing is done to change it, damage may occur. whether there is any damage before inserting it again. Volume Adjusting 1.Use the Volume key on the host panel. 2.Touch the volume adjusting area 3.Use the Volume key on the remote controller If DVD indicator displays RED, it means there is no disk in the box. If it is blue, it means there is a disk. Do not insert diskforcefully in this situation, so as not to harm the interior devices.. 15 16 Tuner Tuner Listen to the Radio: Advanced Function Operations 1 Basic Operations: Semi-automatic Seeking Press menu adjusting keys on remote controller for 2 seconds or touch Change Bands the semi-automatic seeking area on the screen, the system will begin to Press BAND repeatedly until you find needed band. seek proper frequency. Current frequency will be displayed. Touch current band area to change the band. 2 The following bands will be displayed in turn: FM1--FM2---AM Automatic Seeking Press BAND button for about 2 seconds or touch the Automatic Seek Use the Preset Radio Stations -ing area on the screen(ASM),the system will seek channels automatically Select with number keys on the remote controller starting from 87Mhz until the memorizer is full(20 channels)or reaches Directly touch the memory radio stations the highest frequency of 108MHz. 3 Fine Frequency Adjustment Manual Storage Press SET(or ENTER on the remote)when the best frequency is found Use menu adjusting keys on the remote controller and current frequency display will glitter.Select storage location with Directly touch fine adjustment area on the screen CH+,CH- and then press SET(or ENTER) to store it. Touch current frequency, it will glitter and the color turns to RED. Touch Current Band Fine Adjustment- Fine Adjustment+ and select storage location, then touch current frequency, it will stop glittering Current Frequency and be stored. Precautions: TUNER BAND FM1 0: 1: 2: 3: 4: 87.00MHz 88.00MHz 89.00MHz 90.00MHz 92.00MHz 08 08 ASM 1 Press any key to stop auto seeking. 89.30MHz 2 This machine can preset 30 chnnels,10 for Fm1 and Fm2 respectively. 5: 94.00MHz 6: 96.00MHz 7: 98.00MHz 8:100.00MHz 9:108.00MHz 3 Automatic seeking is valid only for FM. 4 During manual storage, no other key operation is permitted when the display content is glittering. Automatic Seeking Preset channels Semi-automatic Seeking Preset channels 17 18 DVD Playing DVD Playing DVD Function Operations 1 To Operate with remote controller Press PLAY on the remote to play,long-press it to pause. To use Touch Key Functions: Touch PLAY to play disks. Press the function keys area, the following 2 pages information about touch Press PLAY again to stop PAUSE and continue to play. keys will be displayed. 2 OSD Info DVD Info DVD Function Keys page 1 DVD 01:08:08 DVD Playing and Pausing T:08 DVD Stop Playing Touch STOP key to stop playing. 3 01:08:08 Backward and Forward Press menu adjusting keys on the remote or touch keys and when DVD is playing to Backward or Forward. Press PLAY to resume playing. EXIT Music Selection OK PLAY While playing, press menu adjusting keys or touch keys to play the previous or next item. STOP 5 NEXT and DISP SET Skip to designated item Press GOTO once,the following will be displayed: INFO Title 01 / 02 Current title DVD Function Keys page 2 Chapter Total titles 008 / 020 Current item Total items Input wanted skip number and press OK,DVD will switch to play DVD 01:08:08 T:08 1:08:08 EXIT GOTO 0 10 + MENU 1 2 3 TITLE 4 5 6 7 8 9 relevant music item. If the number is over 10, press 10+first, then press other numbers. For example, press 10+ twice, and then press 8 to get 28. .Skip to Designated Time Press GOTO twice, the following will be displayed: Title NEXT 01 / 02 Current item OK Time -- : -- : -- Total items Input the time and press OK, DVD will continue to play from relevant time. 19 20 CHN 21 DVD Playing DVD Setup The Main Page of DVD Setup 7 DVD Information Display Touch key INFO can control the way of DVD info display. 8 Long-press ENTER on the remote or touch SET in DVD operation menu to perform general setup, speaker setup, audio setup etc. OSD Info Display Touch key DISP can control the way of OSD info display. 9 Setup Menu---Main Page DVD Playing Menu General setup Speaker setup Audio setup Kara OK setup Initial setup Touch key MENU can activate DVD menu; touch direction keys and OK to play DVD. 9 DVD Title Touch TITLE to come back to DVD title menu. Exit Precautions: 1 Since there is 2 pages of touch menu,LAST and NEXT has to be used to select relevant page, press EXIT to exit the menu. General Setup 2 The above operations and information will vary a little due to different disks. 3 Due to its special saving format, special operations are needed while In the setup mainpage, select General Setup through direction keys, press playing MP3. ENTER on the remote or touch SET to enter General Setup page as follows: To play Mp3 from designated folder: Move cursor to designated folder through direction keys, press OK to enter this folder and select files from it through direction keys. PIC Mode Angel Label Language Hide Caption Screen Savers Mainpage 21 22 English Chinese Russian Initial Setup Speaker Setup Select Initial Setup through direction keys on the mainpage, press SET or On Setup Mainpage, select Speaker Setup through direction keys, press SET touch SET to enter Initial Setup page as follows: or touch OK to enter Speaker Setup page as follows: Center Speaker Rear Speaker Bass Speaker Center Delay Rear Delay Tone Test TV Form TV PAL Vedio Output Sound Caption Disk Menu Language Age Control Password Stereo 5.1 Track AUTO NTSC PAL Audio Setup Precautions: Select Audio Setup through direction keys on the mainpage, press SET or touch OK to enter Audio Setup page as follows: 1 Touch Direction Keys (or menu selection keys on the remote) are used in DVD setup; 2 Normally, do not change the initial setup; SPDIF OUTPUT L R Compression of Dynamic Range Audio Setup LPCM Output OFF SPDIF/source code SPDIF/PCM Simulating Audio Output is prohibited once SPDIF output is selected; This machine supports PAL and NTSC, so try to use NTSC; The default OSD language is English, and the PAL and NTSC tv tuner; Karaoke function is not set, do not set Karaoke menu; The initial password is 8888; As long as disks are inserted, the machine will be in DVD playing mode. Precautions In Audio Setup, SPDIF OUTPUT controls simulating s long as output or optical output, and simulating audio output is prohibited where optical output exists. is pressed, the machine will convert to DVD mode, relevant information will be displayed and disks are ejected automatically. 23 24 TV½Ó ÊÕ Press the Function Touch Area on the monitor, the following TV Press function touch area on the monitor, the following CDC touch keys will be displayed: DISC - 10 DISC 1 2 3 4 5 6 7 8 9 touch keys will be displayed: + 0 CH + TUNE 1 2 3 STORE 4 5 6 + 7 8 9 - EXIT PLAY CH - EXIT Playlist Selection Touch and , or press menu adjusting keys on the remote to 1 select Previous or Next item on the playlist. In TV Mode, select TUNE from the System Setup, or press touch keys Forward and Backward Press Automatic Seeking and touch TUNE, the system will start to seek automatically from VIF. , the system will go forward or backward, relevant information will be given. Press the button again, stop The seeking will not stop until the stored channels reach 100. Press any Forward or Backward. key or touch any valid place on the touch screen will terminate the seeking. Replace the disk by hand Touch DISC or press The first saved channel will be used after the seeking. on the remoter to play previous or next disk. Press the number keys on the remote to play disk with designated number; if the disks have not numbers, the system will SEARCHING 02 just play the next one by sequence. Automatic Replacement of Disks he system will select next disk when the former one has been finished. Precautions: When the multi-disk CD player is ready, READY will be displayed. VLF If the CD player can't work well, ERROR will be displayed. If the disk case is taken out, NO MAG will be displayed. If the case is in the box but there is no disk, NO DISK will be displayed. Press PLAY if it does not play automatically after replacing the disk. 25 26 30 TV½Ó ÊÕ ÆäËü¹¦ÄÜ Clock 2 Play Preset Channels Press Check the clock when the machine is in idle state. or open TV touch menu, touch CH+ and CH- to select previous or next channel. When the channel number is the maximum one, the In idle state, press DISP button on the panel or remote once to system will change to the minimum channel. For example, if there is altogether display clock as follows: 18 channels, and we are using channel 18 now and continue to select upward, the channel will transfer to channel 0. Input numbers to select channel. If the first number is input and there is OPERATION no further input for 2 seconds, the system will seek channel corresponding to 1 2 3 4 the first number. 3. Fine Tuning Touch Left or Right fine tuning button or use the remote controller. If the key is pressed continuously, the tuning effect will change continuously. : MENU : MENU : DISP : SRC SELECT ADJUST STORY EXIT 08:08 4 Manual Storage Use touch key STORE or press ENTER on the remote, STORE XX will Setting the Clock be displayed. Press CH+ and CH- channel selecting keys on the remote) to Press DISP button twice in idle state to enter clock setting, the clock select wanted channel, then press STORE or ENTER. 5 Blue Screen is indicated as red, which will glitter while the time is adjusted. Quite large noises will occur when the TV signal is too weak. To avoid Use menu adjusting keys to select position; use volume keys to this situation, one can start BLUE SCREEN function. The screen will turn to adjust the time. The system will be in idle state 5 seconds after the operation. blue and mute when the signal is too weak. Precautions: 1 At most 100 channels can be stored in this machine. 2 If the receiving effect is bad, check the connection of antenna. 3 If the bad effect is caused by weak signal or high-speed driving, it does not mean something is wrong with this machine. 27 28 Supplementary Information Supplementary Information Malfunction Eliminating Problems Can't be switched on, unable to use the machine. Possible reasons Incorrect connection of downlead and linker. Fuses melted Noises or other factors make interior microprocessor unable to work well Can't use remote controller.The machine refuses to work even the remote is correctly used. Insufficient battery power. Some operations are prohibited in certain circumstances. Make sure all connections are correct Find out the reason, and replace the fuse of the same specifications., Press RESET to restore the machine to its initial setup. Measures (advices) The disk cannot be played Bad turnoff, or the disk has been damaged. Replace it with a better one Display parent locking can't be played Parent locking function is turned on Close this function or degrade its level Can not switch languages or captions Insert new battery Clean the disks Check the disk types The Video system ofthe disk incompatible to the machine. Change another disk which is compatible to your video system. No sound Incorrect linking of cables Link the cables correctly. The volume does not increase The machine is in MUTE state, or slow-motion or playing frame by frame In such kind of situations, no sound output. Certain speaker cannot ouput sound Incorrect setup of sound fields Current DVD disk does not have Unable to display caption You can only switch between items displayed Use disk menu to switch Does not play in the language and caption set in DVD SETUP MENU Current disk does not have the language or caption set in DVD SETUP MENU Unable to play this way Unable to switch the view angel Current disk does not have Unable to switch between different angels because there is no such angels. Setup sound fields correctly The pictures are multi-angel scenes You try to switch between different angels, but there is no recorded multi-angle scenes. extremely obscure, No pictures,or display PIC OFF Hand-brake line not linked hand-brake not opened. Link hand-brake line, and open it. distorted and blurred When the power switch is turned to ON or ACC,the machine boot automatically Automatic Booting Cannot switch languages Use disk menu to switch No caption Disks are dirty Current disk does not have multi-languages You can only switch between items displayed Enter correct circumstances Disks used not suitable to this machine Cannot be played Possible reasons Problems The disk has anti-copy information.(some disks have this function) Use switch when the disk has multi-angel scenes This machine is compatible with anti-copy system,but there may be some parallel lines or other things while playing, this does not mean a problem of this machine. Normal function. No optical output 29 30 The optical output in DVD setup menu is closed Set Optical Output as ON, (note:optical ouput means audio output is prohibited.) Supplementary Information Supplementary Information CD-R/CD-RW Disks Maintenance of DVD While using CD-R/CD-RW disks, only completed ones can be used. Use normal disks only.If irregular, non-round or srtange shape disks are CD-R/CD-RW Disks recorded from CD Recorder or personal computer may inserted, they may be hooked in the machine or can not be played correctly. not be played due to their special nature, scrape, dirtiness; or the dirty lens, dew Check all disks before playing and see whether there are cracks, scrapes or of the machine. crimp. Such disks may not be played correctly. Do n not use them. Disks recorded personally in computer may not be played, which is determined Do not touch the recorded side (no print) while taking disks. When they are not by their formats and adaptable circumstances. Use correct formats to record. used, put them in the box. Do not put disks in places with direct sunshine or high temperature. CD-R/CD-RW disks may not be played in direct sunshine, places with high Do not paste label, draw things or use chemicals on the disk surfaces. temperature or the parking place of the car. Use soft dry cloth to clean the disk from the center to outside. The titles and other text information recorded in CD-R/CD-RW disks may not There may be moisture in DVD devices if you use heating system in winter. be displayed in this machine.(in the case of CD-DA) And the dew may prevent DVD from normal working. Turn off the machine The time of playing CD-RW in this machine will be longer than traditional CD for about an hour to make it dry if there is any dew. Use soft and dry cloth to or CD-R. wipe moist disks. Read the relevant instructions before using CD-R/CD-RW. Serious shaking on road may intermit the playing. DVD Disks For some DVD disks, certain functions may not be performed. Some DVDs cannot be played. While using DVD-R/DVD-RW disks, only video files can be played, normal computer files cannot be played. DVD-R/DVD-RW Disks recorded in video mode may not be played due to their special nature, scrapes, or dirty lens and dew. Disks recorded personally in computer may not be played, which is determined by their formats and adaptable circumstances. Use correct formats to record. 31 32 ¸ ½ ¼ Ó × ÊInformation Ѷ Supplementary Supplementary Information ¸½¼Ó ×Ê Ñ¶ Matters to Note about Remote Controller MP3 Mp3 is the abbreviation of MPEG audio layer3, which is the standard of audio Do not put the remote on panels, steering wheels, or where with direct compression technology. sunshine. The temperature in these places are high in summer and the Mp3 files on CD-ROM CD-R and CD-RW can be played in this machine. Disks remote may be distorted. compatible with ISO9660 level 1 and 2, or with ROMEO and JOLIET system If the car is parked in the sun, put the remote in the tool box or other can also be played. places away from the sunshine. In the sunshine, the signal from the remote Recorded disks with multi sections can be played. may not be received correctly by the host machine, you have to put the remote Mp3 files are incompatible with the transporting of read-in data. near the sensor on the host panel. The max char width of the file name (including the extending name .Mp3) is 32 (counting from the first char). About LCD The max char width of the folder name is 32. Do not press LCD, which may distort the pictures or arouse problems. If the file is recorded through ROMEO and JOLIET system, only the former Pictures become blurred, or even the LCD is harmed. 32 char are displayed. While playing disks with Mp3 and CD-DA, such as CD-EXTRA and MIXED-MODE CD, the system can only switch between Mp3 About Cleaning LCD and CD-DA. Use soft cloth with a little water to clean LCD. The selected folder sequence of playing and other operations will be the Do not use solvents like gas, thinner, detergent in the market or static sequence to write in the software. So the anticipated sequence of playing should not conflict with the actual playing sequence. However, there are indeed some electricity-resisting sprayer. softwares in which playing sequence is allowed to set. Do not use this machine when the temperature is below -15 or over 45. The file is compatible with Id3 Label version 1.0 and 1.1, so as to display the If your car is parked in a very cold or hot place, pictures may not be clear. music titles and authors. The enhancing function is valid only when playing This is not the question of LCD. Pictures will become clear again once Mp3 in 32,44.1 and 48 Khz. Sample frequencies 16,22,05,24,32,44.1,48KHz the temperature comes to normal. can be played. There may appear static blue or red points called bright spots which The tone of Mp3 file can usually be bettered when the bit rate is increased. This can appear on any LCD. LCD is a very fine apparatus, 99.99% of machine can play recordings between 8KBPS and 320KBPS. But in order to which is normal, with only less than 0.01% defect leading to those points. enjoy good tone, we recommend disks over 128KBPS. They will not influence your appreciation of pictures, however. IMPORTANT: While naming an Mp3 file, add relevant extending name .mp3. This machine will play files with .mp3 as Mp3. Do not use this extending name on non-mp3 files so as to avoid noises and other problems. 33 34 Supplementary Information Matters to Note in Using Touching Screen: 13.8V DC(10.8-14.5V) Negative Polar Touching screen is solid and reliable, however, one should still keep the following in mind: Host: max current: 15A size (width*height*depth) Body: 178*100*180mm Weight: 3.5Kg SCREEN: Size/Aspect Ratio: Pels: Type: PAL : Temperature Scope: Storage Temperature: Angel Adjusting: : 6.5 inch wide/16:9(valid area143*79mm) 280,800(1200*234) TFT Active Matrix NTSC/PAL compatible(SECAM is to be customize) -20--+70.C -30--+80.C 0-50 1 Do not scrape the screen hard, slight touching is enough; 2 Touching Screen is not water-proof. In extreme case, water will enter the circuit through panel; 3 Touching Screen includes a plastic unit, do not knock or press it hard. 4 keep the screen from high temperature, dust and humility. Menu locations on the touching screen: EQ ANG+ EQ MODE MODE MUTE EJECT < Product Specification: Power Grounding system:: Information about Touching Screen + AUDIO: Max Power Output: 50W*4 Resistance 4 scope of variation 4-8 Front Output Level/Resistance: 4.0V/200 Encoder: Linear PCM/Dolby Digital/Dolby Professional Editor II/DTS SOUND MENU VOL+ VOL- MENU MENU < SOUND MENU DISP ANG SRC ANG- FUNC SRC ICBM-1-TOUCH DVD Player System: DVD Audio, DVD Vedio, VCD,CD,DTS CD and MP3 Disks: DVD Record, DVD Film,VCD,CD,DTS CD Tracks: 2(stereo), Digital 6 tracks Mp3 Encoding Format: MPEG-1 and 2, Audio Layer3 FM Tuner: Scope of Frequency: Valid Sensibility: AM Tuner: Scope of Frequency: Valid Sensibility: 87-108.0MHz 10 dB(0.7 /v/75 , Single Track,S/N:30 dB) 531-1 602KHz(9KHz) 18 V(S/N 20 dB) 35 36