1
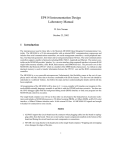
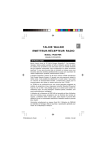
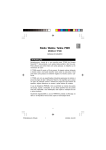
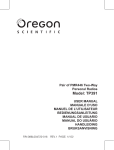
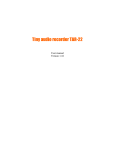
Model: TP380
User Manual
Manuale d’uso
Manuel d’utilisation
Bedienungsanleitung
Manual de uso
Manual do usuário
Gebruikshandleiding
Bruksanvisning
1
EN
PMR RADIO TRANSCEIVER
MODEL: TP380
USER MANUAL
INTRODUCTION
Thank you for selecting the Oregon Scientific™ TP380 as your product
of choice. This product is a portable, easy-to-use two-way radio transceiver
that you can use to contact your family and friends at shopping malls,
amusement parks, or even sports events!
The transceiver has 8 channels and 38 CTCSS (Continuous Tone Coded
Squelch System) codes. If someone else is using the same channel as
you, you can select another channel or use the CTCSS feature. Talk with
another person if you are both tuned to the same channel and/or CTCSS
code.
The TP380 complies with the Japanese Industrial Standard Drip-proof
Type II specification. This means your transceiver offers varies degrees
of protection against water seeping inside the device, against solid
foreign objects, and access to hazardous parts in the unit.
The use of the PMR446 frequency is allowed and free in most countries
in the Europe, subject to applicable regulations. Use of this radio outside
countries where it was intended to be distributed is subject to government
regulations and may be prohibited.
Actually (aug’04) the use of PMR446 in Norway is forbidden, in Italy and
the Czech Republic it is subject at General Authorization.
2
EN
KEY FEATURES
FRONT VIEW
NO.
DESCRIPTION
FUNCTION
1
Antenna
Flexible, bendable antenna receives and
transmits signals, reduces chance of breakage
and fits more easily and comfortably into shirt or
pants pocket
2
LCD
Display screen
3
PTT
1. Push to talk
2. Press PTT twice to enable Call Tone function
3. Confirm selection in MENU mode
4
PWR
Press to turn the unit on and off
5
MIC
Speak into microphone enables communication
6
MIC/Speaker
Allows use of headset for hands free
communication
3
EN
7
MENU
8
1. Scroll through menu options
2. Press and hold MENU to enable monitoring
function
1. Increase Volume
2. Select Channel, CTCSS in MENU mode
1. Decrease Volume
2. Select Channel, CTCSS in MENU mode
9
Speaker
Receives voices / sounds from incoming call
BACK VIEW
NO.
DESCRIPTION
FUNCTION
1
Strap hole
Loop strap through so you can hang unit from
your neck
2
Belt Clip
Clip to your pocket or belt.
3
Back cover
Remove to access battery compartment
4
SYMBOL
EN
LCD DISPLAY SYMBOLS
FUNCTION
Receiving
Transmitting
Volume
Voice Activation System
Key Lock
Auto Power Off
Key Beeps
Roger Beeps
Scan Channel or CTCSS
Battery Indicator
Silent Alert function quietly alerts you of any incoming
calls without beeping noises
Channel Number: Select between 8 channels
(big)
CTCSS code: Adjust to minimize interference problems
(small)
5
EN
SAFETY AND CARE INSTRUCTIONS
SAFETY PRECAUTIONS
Please observe the following safety precautions when setting up and
using this product.
* LCD panel – The LCD panel is made of glass, and may break if the
unit is dropped or impacted.
* Heat sources – Keep the product away from heat sources such as
radiators, stoves, heaters, and other heat-generating products.
* Water and moisture – Do not use the product in or near water or in
high moisture areas such as a bathroom.
CARING FOR THIS PRODUCT
To ensure you receive the maximum benefit from using this product,
please observe the following guidelines.
* Cleaning – Use a damp cloth. Do not use liquid cleaning agents,
benzene, thinner, or aerosols.
* Repair – Do not attempt to repair the product or modify the circuitry
by yourself. Contact the retailer or a qualified repairman if the
product requires servicing. Only use replacement parts that are
recommended by the manufacturer.
* Do not scratch hard objects against the LCD display as this may
cause damage.
CAUTION
* To avoid risk of fire or injury, do not attempt to charge nonrechargeable batteries. Please turn off the unit while charging.
* Replace only batteries with the same or equivalent type
recommended by the manufacturer.
* Please dispose of old, defective batteries in an environmentally
friendly manner in accordance with the relevant legislation.
* No naked flames, such as lighted candles, should be placed near
the apparatus.
6
1. To access the battery compartment, slide the hook at the back of the
transceiver in an upward motion and remove.
2. Slide the back cover of the transceiver in a downward motion to
remove.
3. Insert 3 AAA batteries into the battery compartment, noting polarities.
4. Slide the transceiver back cover and hook back into place.
7
EN
OPERATING THE TRANSCEIVER
EN
5. Press and hold PWR to turn on the device. The unit will beep with the
LCD displaying all symbols for 1 second.
6. Use
or
to increase or decrease volume, respectively. The VOL
number will show on the LCD accordingly.
7. To turn the device off, press and hold
the LCD goes blank.
PWR
until the unit beeps and
BASIC FUNCTIONS
NOTE: The battery indicator will flash to indicate low battery power.
8
2. Reset: At any time if the unit can’t work properly, please take
off the batteries and insert them again.
TALKING INTO TRANSCEIVER
1. Hold down the PTT button and speak into the MIC to transmit
(
appears on the LCD). When finished, release the button.
2. The transceiver will automatically play received transmissions.
NOTE: You can only communicate with another radio that is using the
same channel and/or CTCSS code as your radio.
CALL FUNCTION
You can send a ringer sound to all transceivers tuned to the same channel
and / or the CTCSS code as your transceivers by pressing PTT.
1. Push PTT to talk.
2. Press PTT twice in rapid succession to enable the Call Tone function.
3. Confirm selection in MENU mode.
USING THE KEY LOCK
You can lock the buttons on the transceiver to avoid accidentally enabling
the device. To enable/disable key lock, press PWR + MENU simultaneously.
The lock symbol will show on the LCD.
9
EN
NOTE: 1. Use 3 AAA alkaline or rechargeable batteries when operating
this unit. Before charging, study the user manual section on
“Charging Contacts” for further instructions.
EN
AUTO-SQUELCH FUNCTION
Your transceiver has an Auto-Squelch function for hearing weaker, distant
transmissions. You will not hear anything on a channel unless someone
is transmitting nearby on the same channel.
1. Press and hold MENU for 2 seconds to enable/disable this function.
2. Press MENU to access the Menu Options. The transceiver will then
toggle between the following configurable settings:
SYMBOL
SETTING
DESCRIPTION
Channel
Selects channel for transmission
CTCSS
Selects a CTCSS code for the current
VOX
Enable/disable voice-activated
transmission
(big)
(small)
channel
10
Enable/disable beep heard after the
finish of a received transmission
Key Tone
Enable/disable beep when a key on the
transceiver is pressed
Vibrating
Enable/disable vibration function
Automatic
Enable/disable automatic shut-off after
Power-Off
device is idle for 2 hours
NOTE: Press MENU to confirm and move to the next setting. To confirm
the changes but quit the Menu Options, press PTT.
SELECTING A CHANNEL
Select between 8 channels. The transmitter and receiver must be on the
same channel.
1. Press MENU once until the channel number starts flashing on the
LCD.
2. Press and hold
or
to begin scanning a channel. If a valid signal
is present, the transceiver will pause on the current active channel.
3. Press PTT to stop scanning and exit the menu. Or, press MENU to stop
scanning and go to the next Menu Option.
CTCSS SCANNING
You can activate the channel scan function:
1. Press MENU twice until the CTCSS number starts flashing on the
LCD.
11
EN
Roger Beep
EN
2. Press and hold
or
to begin scanning a CTCSS channel. If a
valid signal is present, the transceiver will pause on the current active
channel.
3. Press PTT to set and store the CTCSS channel, or the transceiver
stores the display setting after 15 seconds. The scan mode will
immediately search for the next CTCSS channel if no button is pressed
after 5 seconds.
4. Press PTT to stop scanning and exit the menu. Or, press MENU to stop
scanning and go to the next Menu Option.
SETTING VOX & BABY MONITOR
This setting automatically detects and transmits your voice through the
selected channel, without needing to push and hold PPT.
1. Press MENU 3 consecutive times until
2. Select between 6 levels of VOX by pressing
appears on the LCD.
or
key.
LCD SYMBOL
DESCRIPTION
0
VOX disabled
1
Low sensitivity – only audibly loud voices are
transmitted(useful for noisy environments)
12
Normal sensitivity – ideal setting for voiceactivated transmission
3
High sensitivity – all detected soun(including
noise) are transmitted
b1
Low sensitivity – only audibly loud baby voices
are transmitted (useful for noisy environments)
b2
Normal sensitivity – ideal setting for voiceactivated transmission
b3
High sensitivity – all detected baby sounds are
transmitted
3) Press PTT to confirm the VOX/b1/b2/b3 setting.
4) Press PTT again to activate VOX/b1/b2/b3 function.
You can now begin voice transmission.
ROGER BEEP MODE
With Roger Beep, the receiving party hears a beep tone when a message
has been transmitted. This avoids situations where messages are
interrupted during transmission.
1. Press MENU 4 consecutive times until
2. Press
or
appears on the LCD.
to activate /deactivate the Roger Beep function.
KEY TONE
The Key Tone function, if enabled, causes the unit to beep when a
button is pressed.
13
EN
2
EN
1. Press MENU 5 consecutive times until
2. Press
or
appears on the LCD.
to activate/deactivate the Key Tone function.
SILENT ALERT
Enabling the Silent Alert function allows you to be aware of any incoming
calls without needing to turn on any beeping sounds.
1. Press MENU 6 consecutive times until
2. Press
or
appears on the LCD.
key to activate/deactivate the Silent Alert function.
NOTE:
1. If the vibration alert feature is activated, the device will vibrate for 20
seconds.
2 The unit will not vibrate if there are continue transmission.
3. The unit will ONLY vibrate again without any transmission after 30
seconds for energy save purpose, thereafter.
APO FUNCTION (AUTOMATIC POWER OFF)
This enables your transceiver to automatically shut itself off if left idle
for 2 hours and save battery power.
14
2. Press
or
appears on the LCD.
key to activate/deactivate the function.
NOTE: Press any button to re-enable the transceiver after automatic
shut-off.
ACCESSORIES
CHARGING CONTACTS
Your TP380 transceiver comes with 2 individual drop-in chargers that
allow you to charge 2 transceivers at the same time using a connector
cable and 1 adaptor, You may also charge each transceiver separately
by an additional charger that come with the package.
The cradle charger LED lights red during charging, and takes 14 to 16
hours to complete.
15
EN
1. Press MENU 7 consecutive times until
EN
CAUTION:
1. Located inside the transceiver’s battery compartment is a charging
switch, which must be set to “ON” while charging. If alkaline batteries
are used, switch the set to “OFF”. To avoid risk of fire or inquiry, do no
switch to ON when using alkaline batteries. Directly charge Ni-MH
rechargeable batteries by using an optional 1-bay cradle charger.
2. DO NOT link the individual chargers together while using separate
adaptors to charge.
WARNING:
1. To maintain the battery life of your 2-way radios we recommend that
you only charge batteries when needed. Overcharging the batteries
will reduce performance.
2. For best results ensure that the handsets are switched OFF before
charging
APPENDIX
CHANNEL FREQUENCIES
CHANNEL
FREQUENCY
(IN MHZ)
CHANNEL
FREQUENCY
(IN MHZ)
01
446.00625
05
446.05625
02
446.01875
06
446.06875
03
446.03125
07
446.08125
04
446.04375
08
446.09375
16
EN
CTCSS PRIVACY CODES
CHANNEL
FREQUENCY
(IN HZ)
CHANNEL
FREQUENCY
(IN HZ)
01
67.0
20
131.8
02
71.9
21
136.5
03
74.4
22
141.3
04
77.0
23
146.2
05
79.7
24
151.4
06
82.5
25
156.7
07
85.4
26
162.2
08
88.5
27
167.9
09
91.5
28
173.8
10
94.8
29
179.9
11
97.4
30
186.2
12
100.0
31
192.8
13
14
103.5
107.2
32
33
203.5
210.7
15
16
110.9
114.8
34
35
218.1
225.7
17
118.8
36
233.6
18
123.0
37
241.8
19
127.3
38
250.3
17
EN
SPECIFICATIONS
RX Frequency
446.00625 – 446.09375 MHz
Channels
8
Modulation type
FM
Antenna impedance
50 Ohm
Microphone
condenser type
Power supply
3 × AAA Alkaline
Sensitivity at 12dB Sinad
0.5µ
µV
Adjacent Channel Rejection
55dB
Audio Squelch
Auto
Audio output power
100mW @ 8 Ohm
Audio Distortion
7%
RF Output Power
500 mW @ 4.5VDC
Harmonic emission
suppression
>= 63dB
Dimensions (HWD)
87×54×36mm
Weight (without batteries)
80g
18
Hereby, Oregon Scientific declares that this PMR446 model TP380 is in
compliance with the essential requirements and other relevant provisions
of Directive 1999/5/EC.
A copy of the signed and dated Declaration of Conformity is available
on requested via our Oregon Scientific Customer Service.
ABOUT OREGON SCIENTIFIC
Visit our website (www.oregonscientific.com) to learn more about Oregon
Scientific products such as digital cameras; MP3 players; children's
electronic learning products and games; projection clocks; health and
fitness gear; weather stations; and digital and conference phones. The
website also includes contact information for our customer care
department in case you need to reach us, as well as frequently asked
questions and customer downloads.
We hope you will find all the information you need on our website,
however if you'd like to contact the Oregon Scientific Customer Care
department directly, please visit www2.oregonscientific.com/service/
support or call 949-608-2848 in the US. For international enquiries,
please visit www2.oregonscientific.com/about/international/default.asp.
19
EN
EN-DECLARTION OF CONFORMITY
20