1
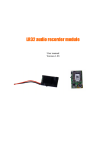
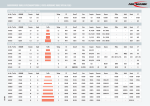
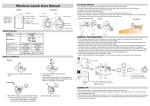
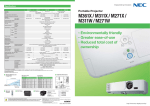
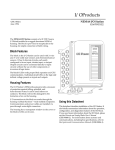
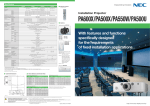
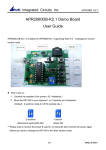
Tiny audio recorder TAR-22
User manual
Version 1.16
Quick guide
To quickly operate TAR-22 recorder, following steps must be done:
1) Insert Zinc Air or alkaline battery according the picture with the positive terminal on
top. After inserting the battery, you must observe one single flash of LED after about
5 seconds, which indicates that the recorder is in stand-by mode (this indicates
completion of start-up cycle). When the battery is partially or fully discharged, the
recorder is not able to complete start-up cycle and this battery can’t be used.
2) To turn on recording mode, press button for a few seconds. Following long flashes
(between 1 to 4) indicates available memory space (4-maximum, 1-minimum) and
recording is started. If LED is enabled during recording, each 2 seconds you should
observe one single flash.
3) To stop recording mode, hold the button for a few seconds. During the time, when this
button is pressed you will observe 3 long LED flashes. After releasing the button,
recorder can continue with start-up cycle (same like when the battery is inserted) and
is ready for next action in about 5 seconds, indicated by one single LED flash.
4) For connecting recorder with PC you need to have record manager downloaded to
your PC. Recorder should be connected to PC only when it is in stand-by mode,
otherwise you will get message „USB device can’t be detected“. Recorder should be
connected to PC even without battery.
Powering TAR-22 via USB during recording
TAR-22 recorder can take a power from USB for recording in case, when it is available. At
any time, when it is recording, you can connect it with USB charger or with PC and it takes
all required power from USB, instead of discharging inserted battery. Battery is used as a
backup, when this power from USB is interrupted. When it’s connected with PC and the
recording is in progress, you will get message „unrecognized USB device“, but at this time
you should ignore it in this step. When using external power for powering TAR-22 you must
ensure continuous recording without any break, which means you can’t use operating button
to stop and start recording again or using any scheduled recording in recorder’s settings.
Voice activated recording for this operation from external power source is still available.
Detailed description
This recorder let‘s you to record any audio or human conversation in high quality and store all
into build-in FLASH memory. The great advantage is in very small size and very long battery
life in recording mode, which allows you to make continuous recording in length of several
days. This recorder is equipped with very high sensitive microphone and wide dynamic range
and is able to record conversation from distance over 30 feet (10 meters). All stored
recordings should be downloaded via USB. All audio processing is done at PC by using
record manager developed for all models of ours audio recorders. This software includes fast
overview of each record and simple editing functions. For protection of stored data is possible
to set password access for all stored recordings. Integrated real time clock should start
recording in any specific period of each day or at any specific date. All recorded data are
stored with time marks, which gives you very good overview in case of long time recording.
Technical data:
Dimensions:
Battery:
Battery life in recording mode:
Memory capacity for recording:
Internal memory size:
Signal to noise ratio:
Compression methods:
Sample rate:
Bit width:
Microphone sensitivity:
Current consumption in stand-by mode:
Voice activated recording:
Data transfer to PC:
Scheduled recording:
46x9x16mm (1,65x0,35x0,63")
one single 1,5V Zinc-Air ZA675 or AG13
85 hours with Zinc-Air battery
848 hours with 5.5kHz sample rate and ADPCM
2 bit compression
4GB
65dB
16bit no compression, uLaw logarithmic, 4bit
ADPCM, or 2bit ADPCM
22kHz, 16kHz, 11.025kHz, 8kHz, 5.5kHz
16bits
10 meters (32 feet)
less than 200uA
user selectable
via USB
available
Memory capacity in hours for all sample rates and compression methods
Sample rate
5,5kHz
8kHz
11kHz
16kHz
22kHz
None
ULaw
106
72
53
36
26
212
145
105
72
52
4bit
ADPCM
424
291
211
145
-
2bit
ADPCM
848
582
422
290
-
Battery life for all sample rates and compression methods (Zinc-Air battery, type ZA675)
Sample rate
None
ULaw
5,5kHz
8kHz
11kHz
16kHz
22kHz
85
70
57
43
26
85
73
67
52
28
4bit
ADPCM
75
60
45
31
-
2bit
ADPCM
82
70
60
36
-
Battery life for all sample rates and compression methods (alkaline battery, type AG13)
Sample rate
None
uLaw
5,5kHz
8kHz
11kHz
16kHz
22kHz
19
12
10
9
7
19
12
10
9
7
4bit
ADPCM
12
12
9
7
-
2bit
ADPCM
12
11
10
9
-
Operating instructions
For controlling all functions is used one operating button and multifunctional LED. This
button works in single click mode, where each click must be at least 3 seconds long. In case
of selecting optional double click mode, it requires one click in length of at least 3 seconds
followed by pause in length of 1 second and second same click again.
When the battery is inserted, one short LED flash must follow after about 5 seconds. If this
single flash is not observed, use fresh battery instead of partly discharged or check battery
contacts.
Start and stop the recording
Using operating button activates those actions. Before the recording starts, the LED flashing
sequence will follow. When it flashes only ones, the memory is full and recording can’t be
started. Flashing 2 to 4 times indicates available memory space. (4 flashes – more than 75%
space available, 3 flashes – more than 50% space available, 2 flashes – less than 25% space
available). The recorder should store up to 255 records. If this count has exceeded, the
memory is considered as full. When the recording is in progress, the LED makes short flash
each 2 seconds. This function should be disabled for discrete recording. When the voiceactivated recording is enabled, the LED flashes only, when the sound level is above selected
threshold and recording is in progress. The recording is stopped when the memory is full or
by pressing the operating button. 3 LED flashes indicate stop sequence. This sequence is
followed after about one second, when you press operating button. To recognize clearly this
state, this sequence of 3 flashes is followed during the time when you hold the button (when
you start recording by using the button LED flash sequence starts after you release the
button).
Battery types
For longest battery life in recording mode the Zinc-air batteries must be used. Recommended
type us ZA675 or PR44. Optionally alkaline 1,5V batteries of the same size should be used,
but the battery life will be shorter.
Using recorder - manager application
This software is used for overview, export and replay of all stored data. When you start this
application you must open the image file, which is stored in internal memory of recorder.
When the recorder is connected to PC, it is detected as USB flash drive, containing file
„rcimage.raw“. When this action is complete, all records will be visible in recordings list. To
load each record, double click on selected record you whish to load. For using the detailed
view you should select only specific area by using mouse left and right button and clicking on
full record’s overview window. When the mouse is moved over this area, the time is visible in
bottom status bar. This time scale should be non-linear, when the voice activated recording
was used.
Recorder’s settings
All configuration is stored in internal memory. The configuration should be changed in main
menu by selecting „Options -> Recorder settings“. This windows is divided into 4 following
sections:
The first general part is used to select recording sample rate and compression method. To
achieve the best quality you should use 16kHz or 22kHz without compression, but this mode
takes the most power from the battery and will use most of the space for storing the data. For
best performance check table showing battery life and memory capacity for each specific
mode. Using ADPCM 2bit compression results in worst audio quality.
Next page is used for voice activated recording. When this option is enabled, recorder is
recording only when it detects sound above selected threshold level. Minimum level means
the highest sensitivity. Delay is specifying the time, for how long recording continues after
this sound level is not detected anymore. Recommended value is 5 seconds or more. When
LED is enabled to flash during recording, it is flashing only when recording is in progress and
not when the recorder is in idle mode waiting for exceeding the selected threshold level. This
mode saves significantly the battery energy resulting much longer time of operation.
Recorder is equipped with internal real time clock and recording scheduler. If you want to use
time activated recording, you can choose from 3 options. Daily timer enables recording
scheduler to start and stop recording at the specified time period, which repeats every day.
Single timer is used to start and stop only once at given time and date. The last is weekly
timer, where you can specify a different time periods for each day of a week. Every time set
to 00:00 is ignored, which enables to schedule recording for example over the midnight.
The last part of a configuration contains various options. Button function should be selected
to double click or single click. Double click operation is described in the section “Start and
stop recording”. LED should be disabled in this window to allow discrete mode of operation.
Only flashes during recording are disabled. Indication of power up, start and stop sequence is
not affected by this option. The real time clock is synchronized with the PC by pressing the
button “Synchronize time and date with computer”. After this action the battery must be
inserted in the recorder all the time. Once it is removed or discharged, the real time is lost and
must be set again. If you want to keep the time running and replace the battery, connect the
recorder to USB to any power source and change the battery. All recordings should be
password protected by using password protection.
Export of records
Each record should be exported and stored to your local hard drive in WAV format. To do
this, select from one exporting options in main menu „Records“. All records are stored to
selected directory, which you can change by menu item „Select directory for export“. Long
records should be split into more files. Use option in menu “Records->Maximum size of
exported file” to specify maximum size of each exported WAV file.
FAQ:
Q: Can’t start recording – LED flashes only once and the card is not full.
A: The card contains 255 records. For next recording you must delete at least last record from
the list.
Q: When the battery is inserted, there is no LED indication and recording can’t be started.
A: Battery is partially discharged or there is no proper contact with the battery. Check battery
contacts, or use new battery. Partially discharged battery should power recorder for such a
long time, but might not be sufficient for start-up cycle.
Q: The beginning time of recording is incorrect.
A: This time is always equivalent to the real time clock, which are synchronized when the
recorder is connected via PC and user press the button “Synchronize time with computer” in
the configuration window. The time is lost, when the recorder is not connected via USB and
the battery is removed.
Q: Recorder was operating until the batteries were empty.
A: For this case the last record will be stored properly without any problems.