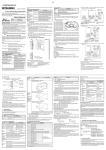
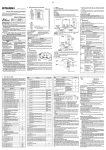
1
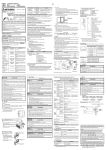
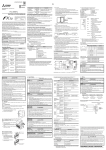
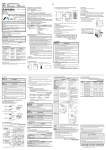
1.
24.2
(0.96")
74(2.92") 4)
V1+
FX2NC-4DA
PW
24V
3)’
V4+
COM3 I3+
V3+ COM2 I2+
D/A
3)
For more details please contact the local Mitsubishi Electric sales site.
- Notes for compliance to EMC regulation.
It is necessary to install the FX2NC-4DA in a shielded metal control panel.
For further information manual concerning the FX Series, refer to the
following table.
List of Further Information Manuals
Manual Name
Manual No.
5)
6)
7)
Dimensions: mm(inch)
Outer facing color: Munsell 0.08GY/7.54/0.81
Weight: Approx. 130g (0.29lbs)
(Includes terminal block)
Accessory:Special function block number label, Power crossover cable
FX2NC-10BPCB1
1) Status indicator LED
2) Terminal connector (European type)
3),3)’Extension port
4) Slide lock for extension block
5) DIN rail clip
6) Power supply connector (24V DC)
7) Power supply connector (Supply for extension block)
The connector 3)' is equipped with a cover.
- Never wire the
This manual contains hardware explanations
JY992D76401 of wiring, installation and specifications for
the FX2NC Series programmable controllers.
FX
Programming
Manual II
This manual contains instruction
JY992D88101 explanations for the FX1S, FX1N, FX2N and
FX2NC Series programmable controllers.
•
terminals.
• Status indicator LED
Indication
PW
Description
FX2NC
Hardware
Manual
COM4 I4+ V4+
● Note concerning the CE marking●
●
CE Marking does not guarantee that an entire mechanical module
produced in accordance with the contents of the notification comply with
the following standards. Compliance to EMC standards of the entire
mechanical module should be checked by the user / manufacturer.
Standards with which this product complies
Type : Programmable Controller (Open Type Equipment)
Models : Products manufactured starting April 1st, 2003.
Electromagnetic Compatibility
Remark
Standards (EMC)
Compliance with all relevant aspects
EN61000-6-4:2001
of the standard. (Radiated Emissions
Electromagnetic compatibility
and Mains Terminal Voltage
-Generic standards - Emission
standard for Industrial environment Emissions)
Compliance with all relevant aspects
EN61000-6-2:2001
of the standard. (RF immunity, Fast
Electromagnetic compatibility
transients, ESD, Conducted, Surges,
-Generic standards Immunity for
Power magnetic fields, Voltage dips
industrial environments.
and Voltage interruptions)
Terminal
arrangement
V2+ COM1 I1+
1)
2)
15
(0.60")
COM3 I3+ V3+ COM2I2+ V2+ COM1I1+ V1+
External Dimensions and Part Name
24- 24- 24+ 24+
2.
COM4 I4+
Guidelines for the Safety of the User and Protection of the FX2NC-4DA
special function block.
This manual should be used by trained and competent personnel. The
definition of such a person or persons is as follows:
a) Any engineer using the product associated with this manual, should be
of a competent nature, trained and qualified to the local and national
standards. These engineers should be fully aware of all aspects of
safety with regards to automated equipment.
b) Any commissioning or service engineer must be of a competent nature,
trained and qualified to the local and national standards.
c) All operators of the completed equipment should be trained to use this
product in a safe and coordinated manner in compliance to established
safety practices.
Note:The term `completed equipment' refers to a third party constructed
device which contains or uses the product associated with this
manual.
90(3.55")
FX2NC-4DA
JY997D07601A
June 2003
24+
User’s Manual
MODEL
MANUAL Number
Date
24+
In order to handle the product properly please read this manual thoroughly
before starting to use the product.
24-
Thank you very much for purchasing this product.
3.
24-
FX2NC-4DA Analog output block
Introduction
The FX 2NC-4DA analog output block (hereafter referred to as "FX 2NC -4DA")
converts 4 digital values (from the PLC main unit) into analog output values
(voltage or current).
The FX2NC-4DA can be connected to the FX2NC Series PLC.
1) Each analog output channel can be configured for voltage output, or current
output. The output mode must be set using the TO instruction and the
appropriate connection method.
A different analog output can be selected for each channel.
2) The voltage output ranges from -10 to 10 V. The current output ranges from
4 to 20 mA and from 0 to 20 mA. The output characteristics can be adjusted
for each channel.
3) The resolution is 5 mV (10 V × 1/2000) when the voltage output is used, 20
µA (20 mA × 1/1000) when the current output is used.
4) Data transfer with the PLC is performed via the buffer memories of the
FX2NC-4DA by FROM/TO instructions.
Description
Lit while 5 V power is normally supplied from PLC.
24 V
Lit while 24 V power is normally supplied to "24+" and "24-"
terminals of the FX2NC-4DA.
D/A
Flashes during D/A conversion.
PLC Connection
Slide
lock
When connecting the FX 2NC 4DA to the FX2NC Series main
u n i t o r e x t e n s i o n b l o ck ,
Hook
Slide lock
remove the extension por t
cover from the right side of the
Hook
main unit or extension block,
keep the slide lock in the main
unit or extension block pulled
upward, then align the hook in
Main unit
FX2NC-4DA
t h e F X 2 N C - 4 DA w i t h t h e
mounting hole in the former step of the main unit or extension block.
Then, push the slide lock downward to fix the FX2NC-4DA. When connecting two
or more FX2NC-4DA units, connect an FX2NC-4DA unit to another FX2NC-4DA
unit in the same way.
Up to four special function blocks or special function units in total can be
connected to the FX2NC Series PLC including those connected to the FX2NCCNV-IF. For each connected special function block or special function unit, the
unit number is assigned starting with 0 for the special function block and special
function unit nearest to the main unit. From the main unit, use the FROM/TO
instructions to read or write data stored in the FX2NC-4DA.
4.
Wiring
4.1 Power supply wiring
Supply power (24V DC) to the FX2NC-4DA to either the power supply connector
or the power supply terminal.
When using the power supply connector, the following power cables are
available.
The general specifications are equivalent to those of the PLC main unit.
(Refer to the FX2NC Handy Manual.)
5.2 Power supply specifications
Item
BFM No.
24 V DC±10%, 130 mA, externally supplied
Digital circuits
5 V DC, 30 mA, supplied from the PLC main unit using an
extension port
#0 *1
5.3 Performance specifications
Voltage output
Current output
Analog
-10V DC to 10V DC (External DC 0mA to 20mA (External
output range load resistance: 2kΩ to 1MΩ). load resistance: 500Ω or less).
Digital input
Effective numeric value
(11 bits) + Sign (1 bit)
Effective numeric value
(10 bits) + Sign (1 bit)
Resolution
5mV (10V × 1/2000)
20µA (20mA × 1/1000)
Total
accuracy
Description
Output mode select. Factory setting H0000
#1
Output data CH1
#2
Output data CH2
#3
Output data CH3
#4
Output data CH4
#5 *1
Data holding mode. Factory setting H0000
#6, #7
Reserved
#8
Offset/gain setting command CH1, CH2 Initial value H0000
#9
Offset/gain setting command CH3, CH4 Initial value H0000
#10
Offset data CH1 *2
25°C ± 5°C; ±0.5%
25°C ± 5°C; ±0.5%
(at full scale of 20V)
(at full scale of 16mA)
0°C to 55°C; ±1.0%
0°C to 55°C; ±1.0%
(at full scale of 20V)
(at full scale of 16mA)
(Excluding load fluctuation)
#11
Gain data CH1 *3
#12
Offset data CH2 *2
Conversion
speed
2.1ms for 4 channels (A change in the number of channels
used will not change the conversion speed.)
#15
Gain data CH3 *3
#16
Offset data CH4 *2
Isolated
method
Analog output and PLC are isolated by photocoupler. Power
supply and analog output are isolated by transformer.
(Channels are not isolated from each other.)
Built-in
memory
#17
#21 *1
EEPROM
2 ,0 4 7
1 0 .2 3 5 V
-2 ,0 0 0
-2 ,0 4 8
2 ,0 0 0
D ig it a l in p u t
-1 0 .2 4 V
Gain data CH4 *3
Reserved
Initialize. initial value = 0
24- 24+
Green
#29
-1 0 V
Mode 1 (Current output: 4mA to 20mA)
At the load resistance of 250Ω
2 0 m A
K3020 identification code
#31
Reserved
*1 The status of BFM #0, #5, and #21, will be written to EEPROM, therefore the
set values will be retained even after turning OFF the power.
*2 Offset data:Actual analog output value when corresponding output data (BFM
#1 to #4) is 0
*3 Gain data: Actual analog output value when corresponding output data (BFM
#1 to #4) is 1,000
*4 When current output mode 1 (4 mA to 20 mA) is set, the offset data will be
automatically set to 4,000 and the gain data to 20,000. When the current output
mode 2 (0 mA to 20 mA) is set, the offset data will be automatically set to 0 and
the gain data to 20,000.
[BFM #0] Output mode select
The value of BFM #0 switches the analog output between voltage and current
for each channel. It takes the form of a 4 digit hexadecimal number. The first
digit will be the command for channel 1 (CH1), and the second digit for channel
2 (CH2) etc. The numeric values of these four digits respectively represent the
following items:
O = 0:Sets the voltage output mode (-10 V to 10 V).
O = 1:Sets the current output mode (4 mA to 20 mA).
C H 4 C H 3 C H 2 C H 1
O = 2:Sets the current output mode (0 mA to 20 mA).
Switching the output mode resets the I/O characteristics to the factory-default
characteristics. Refer to the performance specifications described in section 5.
Example: H2110CH1: Voltage output (-10 V to 10 V)
CH2 and CH3: Current output (4 mA to 20 mA)
CH4: Current output (0 mA to 20 mA)
H
A n a lo g
o u tp u t
4 m A
1 ,0 0 0
0
D ig it a l in p u t
[BFM #1, #2, #3 and #4] Output data channels CH1, CH2, CH3, and CH4
BFM #1: Output data of CH1 (Initial value: 0)
BFM #2: Output data of CH2 (Initial value: 0)
BFM #3: Output data of CH3 (Initial value: 0)
BFM #4: Output data of CH4 (Initial value: 0)
Mode 2 (Current output: 0mA to 20mA)
At the load resistance of 250Ω
2 0 m A
A n a lo g
o u tp u t
1 ,0 0 0
0
D ig it a l in p u t
A command sent from the programmable controller can
change the mode. The voltage/current output mode selected
will determine the output terminals used.
[BFM #5] Data holding mode
While the programmable controller is in the STOP mode, the last output value in
the RUN mode will be held. To reset the value to the offset value, write the
hexadecimal value in BFM #5 as follows:
O = 0: Holds the output.
O = 1: Resets to the offset value.
C H 4 C H 3 C H 2 C H 1
H
Example: H0011 CH1 and CH2 = Offset value CH3 and CH4 = Output holding
Grounding
resistance
100Ω or less
DC24V±10%
• Connect the "
" terminal, and the ground terminal of the PLC main unit
to the ground of the power supply equipped with grounding resistance of
100Ω or less.
• "24+" and "24-" of the power supply connector and the power supply
terminal are connected inside the FX2NC-4DA respectively.
4.2 Output wiring
For terminal arrangement, refer to Chapter 2 of this manual.
FX2NC-4DA
Output terminal block
Voltage output
Shield *1
V1+
I1+
CH1
COM1
CH2
Inverter, etc.*3
*2
Current output
*4
V2+
I2+
Recorder, etc.
*5
24- 24+
*2 Red
Power crossover
cable FX2NC100BPCB
*2 Red
Power crossover
cable FX2NC10BPCB1
Connected to ground of the power
*1:Power supply terminal
Grounding
supply
resistance
*2:Black
100Ω or less DC24V±10%
2) Connection example to the external power supply through the power supply
connector
FX2NC
main unit
24- 24+
Terminal connector handling
The FX 2NC -4DA is equipped with a terminal connector whose from is
equivalent to that of the terminal connector type FX2NC PLC.
For the specifications of the suggested screwdriver, the dimensions of the
cable terminal, the external dimensions of the bar terminal equipped with
insulating sleeve, and applicable wiring, refer to the FX2NC Handy Manual.
24- 24+
Connected to the ground of
power supply
DC24V±10%
BFM #9
O 2
G 1
H
O 1
G 4
O 4
G 3
O 3
1 to 4: Channel number O = 0: No changes done. O = 1: Change data value.
[BFM #10 to #17] Offset/gain data
The offset and gain values are changed by writing new data to BFM #10 to #17.
The units of the data to be written are mV or µA. The data should be written and
then BFM #8 and #9 set. Note that the data value will be rounded down to the
nearest 5mV or 20µA.
[BFM #20] Initialize
When K1 is written in BFM #20, all values will be returned to the factory-default.
(Note that the BFM #20 data will override the BFM #21 data.)
This initialize function is convenient if you have an error in adjustment.
[BFM #21] I/O characteristics adjustment inhibit
Setting BFM #21 to K2 inhibits the user from inadvertent adjustment of I/O
characteristics. The adjustment inhibit function, once set, will be valid until the
Permit command (BFM #21=K1) is set. The initial value is K1 (Permit). The set
value will be retained even after power-OFF.
[BFM #29] Error status
When an error occurs, use the FROM command to read out the details of the
error.
Error status
Status when bit is set to "1"
Status when bit is set
Bit
Name
(turned ON)
to "0" (turned OFF)
b0
Error
Error if any of b1 to b4 is turned
ON
No error
b1
O/G error
Offset/gain data in EEPROM is
abnormal or a data setting error
occurs.
Offset/Gain data normal
b2
Power supply
error
24V DC power failure
Power supplied
normally
b3
Hardware
error
Defective D/A converter or other
hardware
Functioning hardware
b4
FROM/TO instruction is used by
Program error
mistake.
b10 Range error
" terminal.
*1 Red
*1 Red
Power crossover
*1:Black
cable FX2NC100BPCB
BFM #8
G 2
•
• Mixed outputs (voltage output and current output) in the same channel
are not allowed.
[BFM #8 and #9] Offset/gain setting command
Changes offset and gain values of channels CH1 to CH4 by writing 1 to the
corresponding Hex digits of BFM #8 or #9. The current values will be valid until
this command is output. (Refer to Chapter 9)
H
*1 When wiring the analog output cable, use a shielded two-core twisted
cable, and separate it from other power cables and cables easily affected
by induction.
*2 Ground the shielded cable at one point on the signal receiving side.
(Grounding resistance 100Ω or less)
*3 If the output contains noise and ripple, connect a capacitor of
approximately 0.1 to 0.47µF, 25 V.
*4 Do not short-circuit the voltage output terminal. Do not connect a load for
the current output to the voltage output terminal.
*5 Do not wire the "
FX2NC-4DA
Power
-15V AG +15V supply
terminal
24+
Power
24circuit
Power
Power supply supply
connector
connector
Error status
#30
*1:Black
Power
supply
connector
24- 24+ 24- 24+
*2 Red
I/O characteristics adjustment inhibit (Initial value b1=0, b0=1)
#22 to #28 Reserved
Mode 0 (Voltage output: -10V to 10V)
At the load resistance of 10kΩ
I/O
characteristics
(Default:
mode 0)
(I/O
characteristics
can be
adjusted
using the
procedure
described in
Section 9 in
this manual.)
Offset data CH3 *2
#18,#19
FX2NC Series PLC
(Up to four units can be connected including special function
blocks and special function units connected to FX2NC-CNV-IF.)
1 0 V
A n a lo g o u tp u t
Gain data CH2 *3
#14
#20
Number of
occupied I/O 8 points. (Including input and output points)
points
Applicable
PLC
#13
Unit: mV or µA
Initial offset value: 0
Initial gain value: 5,000 *4
24- 24+
*1 Red Connected to the ground
of power supply
COM2
Power
Power
supply
supply
connector connector
Power supply
connector
6.1 Buffer Memories (BFM) lists
Specifications
Analog circuits
Item
Buffer Memory (BFM)
24- 24+
Green
*1
24+
24-
Power
circuit
• DIN rail installation
The FX2NC-4DA can be installed on DIN rail DIN46277 (width: 35mm (1.38")).
When removing the FX2NC-4DA, push downward on the DIN rail attachment
hook.
The FX2NC-4DA exchanges data with the PLC via the buffer memory addresses
(16-bit data) in the FX2NC-4DA.
BFM #0 to #5, #8 to #17, #20 and #21 can be written by the PLC using the TO
instruction. BFM #29 and #30 can be read using the FROM instruction.
Power
supply
connector
Power supply
connector
FX2NC-4DA
-15V AG +15V
FX2NC
input extension block
FX2NC main unit
• Install the FX2NC-4DA on the right side of the main unit, extension block or
special function block of the FX2NC Series PLC.
6.
Power
circuit
1) Connection example with the power supply through the crossover connector
of the FX2NC input extension block
Grounding
resistance
100Ω or less
Specifications
Power
supply
terminal
24+
24-
• For crossover wiring to the next block of the FX2NC-4DA, remove the resin
cover from the power supply connector.
Power cables
FX2NC-10BPCB1:
Power crossover cable (offered as an accessory for the FX2NC-4DA)
FX2NC-100BPCB:
Power cable (offered as an accessory for the FX2NC Series main unit)
Green
5.
FX2NC-4DA
-15V AG +15V
FX2NC
main unit
• Do not use both the power supply connector and the power supply
terminal at the same time.
For further details, refer to the Handy Manual packed together with the PLC
main unit.
5.1 General specifications
3) Connection example to the external power supply through the power
supply terminal
7.
Operation and Program Examples
If the factory-default I/O characteristics are not changed and the status
information is not used, you can operate the FX2NC-4DA using the following
simple program. For the FROM and TO instructions, refer to the FX
Programming Manual (II).
CH1 and CH2 : Voltage output mode (-10 V to 10 V)
CH3
: Current output mode (4 mA to 20 mA)
CH4
: Current output mode (0 mA to 20 mA)
TO
K0
K0
H2100 K1
Write the data for CH1 to
D0, CH2 to D1, CH3 to D2
and CH4 to D3.
Write data in respective data registers while
observing the following ranges:
Data register D0 and D1: -2,000 to 2,000
Data registers D2 and D3: 0 to 1,000
M8000
TO
K0
K1
D0
Data register D0 → BFM #1 (output to CH1)
Data register D1 → BFM #2 (output to CH2)
Data register D2 → BFM #3 (output to CH3)
Data register D3 → BFM #4 (output to CH4)
K4
RUN
monitor
7.1 Operation procedure
1) Turn OFF the power of the PLC, and then connect the FX2NC-4DA. After
wards, wire the I/O lines of the FX2NC-4DA.
2) Set the PLC to STOP, and turn ON the power. Write the above program
then switch the PLC to RUN.
3) Analog values will be sent from D0 (BFM #1), D1 (BFM #2), D2 (BFM
#3), and D3 (BFM #4) to the respective output channels of the FX2NC4DA. When the PLC is in STOP, the analog values set before stopping
the PLC will remain output. (The output will be held.)
4) When the PLC is in STOP, the offset values can also be output. For a
detailed description, refer to Section 6).
7.2 Program example
Program is normal.
In the example shown below, CH1 and CH2 in the FX2NC-4DA, connected
to the special function block No. 0, are handled as the voltage output, CH3
is handled as the current output (4 to 20 mA), CH4 is handled as the
current output (0 to 20 mA), and these outputs are held when the PLC is
stopped. In the example shown below, the status information is utilized.
M8000
RUN
monitor
M1
The input or output
The digital input or analog output
value is in the specified
value is out of the specified range.
range.
G/Ob12 Adjustment
BFM #21 is not set to "K1".
prohibit status
(H2100) → BFM #0
CH1 and CH2: Voltage output
CH3: Current output (4mA to 20 mA)
CH4: Current output (0 mA to 20 mA)
M8002
initial pulse
[BFM #30] Identification code
The identification code for a special function block is read using the FROM
instruction. The identification code for the FX2NC-4DA unit is K3020.The main
unit can use this facility in the program to identify the special function block
before commencing any data transfers from and to the special function block.
Note:
Values of BFM #0, #5, and #21, are stored in the EEPROM memory of the
FX 2NC -4DA. BFM #10 to #17 are copied to EEPROM when the gain/offset
setting command BFM #8, #9 is used. Also, BFM #20 causes the resetting of
the EEPROM memory. The EEPROM has a life of about 10,000 cycles
(changes), so do not use programs which frequently change these BFMs.
A m o d e ch an g e o f B F M #0 a u to m a t ically invo lve s a c ha n g e of t he
corresponding offset and gain values. Because of the time needed to write the
new values to the internal EEPROM memory, a delay of 3 s is required between
instructions changing BFM #0 and instructions writing to the corresponding
BFM #10 through BFM #17.
Therefore, a delay timer should be used before writing to BFM #10 through #17.
(Refer to chapter 9.)
K0
CMP
K3020 D4
M0
TO P
K0
H2100
K1
K30 D4
K0
K1
Writes -2,000 to 2,000 to D0 and D1.
Writes 0 to 1,000 to D2 and D3.
Adjustable status
Bits b4 to b9, b11, b13 to b15 are not defined.
FROM
TO
K0
FROM
K0
K29 K4M10
M20
M10
No error
8.
K1
K4
D0
K1
M3
Normal output range
BFM #30 (model code) of the
block No. 0 → Transferred to D4.
When the code No. is K3020
(FX2NC-4DA), M1 turns ON.
H2100 → BFM #0 (unit No. 0)
CH1 and CH2: Voltage output
CH3: Current output (4 to 20 mA)
CH4: Current output (0 to 20 mA)
D0 → BFM #1 (CH1 output)
D1 → BFM #2 (CH2 output)
D2 → BFM #3 (CH3 output)
D3 → BFM #4 (CH4 output)
BFM #29 (b15 to b0) →
M10 to M25
The status information is read.
The output data is normal.
Caution Regarding Operation
1) Check whether the output wiring and/or the FX2NC-4DA is properly
connected to the FX2NC main unit.
2) The FX2NC-4DA uses 30mA (5V) supplied from the main unit.
Confirm that the total value including the 5V current consumption of
other special function blocks is less than the limit.
3) The FX2NC-4DA starts operation when the 24V DC power is set to ON.
Make such a program that changes over the output of the BFM #0
before writing the output data.
4) After the 24V DC power for the FX2NC-4DA is turned ON or OFF, the
analog output may fluctuate for approximately 1 second. This is due to
time delays in the power supply from the main unit or differences in start
time. For this reason, be sure to take preventive measures so that this
output fluctuation will not affect the external units.
[Example of preventive measure]
P o w e r s w itc h
2 4 V D C p o w e r
s u p p ly
F X 2 N C - 4 D A s p e c ia l
fu n c tio n b lo c k
A n a lo g d a ta
c u t O F F c ir c u it
E x te rn a l
a n a lo g u n it
9.
Adjustment of the I/O Characteristics
9.3 Program Examples
X010
9.1 I/O characteristics
SET
The standard characteristics (factory default) are shown by the solid lines
in the figure below. These characteristics can be adjusted to suit the user's
application.
OPERATION START
M0
(H0010)→BFM#0
Sets the mode of the output
channel.
(K1)→BFM#21
Permits adjustment of I/O
characteristics.
M0
TO P
K0
K0
H0010
TO P
K0
K21
K1
K1
K1
Standard characteristics of voltage output
1 0 .2 3 5 V
T0
1 0 V
A n a lo g
o u tp u t
2 ,0 4 7
5 V
-2 ,0 0 0
1 ,0 0 0
2 ,0 0 0
TO P
K0
K12
K7000
K1
TO P
K0
K13
K20000
K1
TO P
K0
K8
H1100
0
od
e
-2 ,0 4 8
ou
tp
ut
m
(K7000)→BFM#12
Sets the offset data.
(Offset value: 7 mA)
D ig it a l in p u t
(K20000)→BFM#13
Sets the gain data. (Gain value: 20 mA)
(H1100)→BFM#8
CH2 offset/gain setting command
K1
T1
K30
T1
RST
-1 0 .2 4 V
K30
T0
M0
OPERATION END
K1
(K2)RBFM#21
Inhibits adjustment of I/O characteristics
-1 0 V
TO P
K0
K21
K2
Standard characteristics of current output (4mA to 20mA)
Characteristics after the calibrations above.
2 0 m A
2 0 m A
A n a lo g
o u tp u t
A n a lo g
o u tp u t
1
o d e
t m
tp u
u
O
4 m A
0
D ig it a l in p u t
7 m A
1 ,0 0 0
Standard characteristics of current output (0mA to 20mA)
0
D ig it a l in p u t
1 ,0 0 0
10. Troubleshooting
If the FX2NC-4DA does not operate properly, check the following items
2 0 m A
A n a lo g
o u tp u t
e 2
o d
t m
tp u
u
O
0
D ig it a l in p u t
1) Check the external wiring. Refer to section 4 of this manual.
2) Check status of the POWER indicator lamp (LED) of the FX2NC-4DA.
ON
:The special function block is properly connected.
OFF or flash :Check the connection of the special function block. Also check
the 5V power supply capacity.
1 ,0 0 0
! ... Gain value: Analog output value when the digital input is 1,000
▲ ... Offset value: Analog output value when the digital input is 0
Offset and gain can be set independently or together. Possible offset
ranges are -5V to 5V or -20mA to 20mA, and gainvalue-offset value=1V to
15V or 4mA to 32mA. (Actual output can only be a positive value.)
Gain and offset can be adjusted from software in the main unit.
When the slope of the I/O characteristic line is steep:
Slight changes to the digital input will greatly increase or reduce the analog
output.
When the slope of the I/O characteristic line is gentle:
Slight changes to the digital input will not always change the analog output.
Note
That the resolution (minimum possible change of analog output) of the
FX2NC-4DA is fixed.
9.2 Adjustment of I/O Characteristics
An example program for adjustment is shown below. The example shows
that for channel CH2 of FX2NC-4DA block No.1, the offset value is changed
to 7 mA, and the gain value to 20 mA. Note that for CH1, CH3, and CH4,
the standard voltage output characteristics are set.
3) Check status of the 24 V power indicator lamp (LED) of the FX2NC-4DA.
ON :24V DC is supplied.
OFF :Supply 24V DC (±10%) 130mA to the FX2NC-4DA.
4) Check the status of the D/A conversion indicator lamp (LED) of the FX2NC4DA.
Flash
:D/A conversion is normal.
ON or OFF :The ambient conditions are not suitable for the FX2NC-4DA, or
the FX2NC-4DA is defective.
5) Check that the external load resistance connected to each analog output
terminal does not exceed the capacity of the FX 2NC-4DA drive (voltage
output: 2kΩ to 1 MΩ / current output: 500Ω or less).
6) Check the output voltage or current value using a voltmeter or ammeter, and
confirm that the output meets the I/O characteristics. If the output does not
meet the I/O characteristics, adjust the offset and gain again. Refer to
section 9.
Note
To test the withstand voltage of the FX2NC-4DA, connect all the terminals to the
grounding terminal.
HEAD OFFICE
HIMEJI WORKS
: MITSUBISHI DENKI BLDG MARUNOUTI TOKYO 100-8310
: 840, CHIYODA CHO, HIMEJI, JAPAN
When exported from Japan, this manual does not require application to the Ministry of Economy
Trade and Industry for service transaction permission.
Specifications are subject to change without notice
HEAD OFFICE
HIMEJI WORKS
: MITSUBISHI DENKI BLDG MARUNOUTI TOKYO 100-8310
: 840, CHIYODA CHO, HIMEJI, JAPAN
When exported from Japan, this manual does not require application to the Ministry of Economy,
Trade and Industry for service transaction permission.
Specifications are subject to change without notice