1
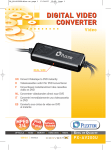
Micro WebCam
User’s Manual
Please carefully read this instructional guide before installing the Micro WebCam on your PC.
FCC Compliance and Advisory Statement
This device complies with part 15 of FCC Rules. Operation is subject to the following two conditions: (1) this device may not cause harmful
interference, and (2) this device must accept any interference received, including interference that may cause undesired operation.
This equipment has been tested and found to comply with the limits for a Class B digital device, pursuant to part 15 of FCC Rules. These limits are
designed to provide reasonable protection against harmful interference when the equipment is operated in a residential installation. This equipment
generates, uses, and can radiate radio frequency energy and, if not installed and used in accordance with the instruction guide, may cause harmful
interference to radio communications. However, there is no guarantee that interference will not occur in a particular installation. If this equipment
does cause harmful interference to radio or television reception, which can be determined by turning the equipment off and on, the user is
encouraged to try to correct the interference by one or more of the following measures:
•
Reorient or relocate the receiving antenna.
•
Increase the separation between the equipment and the receiver.
•
Connect the equipment into an outlet on a circuit different from that to which the receiver is connected.
•
Consult a service representative for help.
Properly shielded and grounded cables and connectors must be used in order to comply with FCC emission limits. Changes or modifications not
expressly approved by the party responsible for compliance could void the user’s authority to operate the equipment.
Table of Contents
Welcome…………………………………………………………....………..………… 1
Introduction………………………………………………………….………..…..……. 2
Installing Your Camera…………………………………………....…………...…..…. 3
•
Software Installation
•
Connecting Your Camera
Troubleshooting …………………………………….…………...…………………..... 4
Using Presto! VideoWorks ……………………………….……………..….………... 5
Helpful Hints ………………………………………..…………..……………………... 6
Camera Maintenance ………………………………………..………….....………… 7
Warranty Information……………………………………….….……………..………. 8
Welcome
Congratulations on the purchase of your new Micro WebCam Internet camera. This manual contains information that will assist
you in installing, operating, and caring for your PC camera.
Minimum System requirements:
•
Available Universal Serial Bus (USB port or hub)
•
Desktop or notebook PC with a Pentium or Equivalent Processor
•
Windows® 98, Windows Me or Windows 2000 operating system
•
50MB available hard disk space
•
16MB RAM minimum
•
CD-ROM Drive
•
Sound Blaster or 100% compatible sound card
•
28.8 kbps or above modem for video conferencing
•
Microphone (optional)
Package contents:
•
Micro WebCam with 3 Designer Faceplates
•
Micro WebCam Quick Installation Guide
•
CD-ROM containing software and on-disk manual
•
Micro WebCam User’s Manual
•
Warranty Information
Software Included:
•
NewSoft® Presto! VideoWorks v.4.2
•
NewSoft Presto! Mr. Photo v.1.5
•
NewSoft Presto! Image Folio v.4.1
•
Ulead® Photo Explorer v.6.0
•
Microsoft® Netmeeting w/ Internet Explorer v.5.0
1
Micro WebCam
Introduction
The Internet video camera is fast becoming a must-have communications tool. With your new camera and fun-to-use application
software, you can now enhance communication with live video, video clips and photos. This user’s manual will explain in detail
how to install and operate your Internet camera.
•
The Installing Your Camera section of this manual will show you how to connect the camera to your PC and install the
software correctly.
•
The second section is Troubleshooting. If you are experiencing a problem, we recommend you look at this section before
contacting technical support.
•
The next two sections, Using Presto! VideoWorks and Helpful Hints sections provide brief instructions on how to use your
camera for recording video e-mail, video-conferencing, and still image capture for documents, presentations, etc.
•
The Camera Maintenance section will explain in detail how to care for your camera.
Note: For instructions on how to use each of the bundled software applications, please refer to the respective Help files
within the software applications.
2
Installing Your Camera
IMPORTANT! To avoid installation problems, please install the software first before connecting the
camera to your PC. You will prompted to Restart your computer during this installation so please
close and save all work before inserting the WebCam software CD.
Software Installation:
1.
2.
3.
Insert the CD into your CD-ROM drive. The Setup Wizard will appear on your computer screen.
Select the language of your choice and click Continue.
Select Typical or Custom installation and click Continue. Note: There are several software applications included on
the CD. You can install any or all of them easily during this phase of the software installation.
4. The final screen in the Setup Wizard will ask you to Restart your computer. Choose yes to Restart your computer and
proceed to the next section, “Connecting Your Camera”.
Note: If the Setup Wizard does not display. Click Start and select Run. Type D:\Setup and press Enter,where D: is the drive
designation of your CD-ROM drive. Follow the instructions above to complete the installation.
Connecting your Camera:
Your camera features intelligent USB interface technology that guarantees a simple installation process. The dynamic “Plug &
Play” function, provides automatic detection of your camera. After installing the WebCam software correctly, you will be able to
unplug and re-connect your USB camera at anytime without having to reinstall the camera device drivers.
1.
2.
Insert the USB connector into an available USB port or hub located on your computer.
Continue to follow the on-screen prompts until your camera installation is finished.
Note: Some PC’s have been shipped without the USB port mode enabled. To enable the USB port, you must run the system CMOS setup
program. The procedure is different for each system so you will need to refer to your PC manual for more details.
3
Troubleshooting
This section provides information on maintaining the camera and helps you solve problems you might encounter when using
the camera. If you continue to experience problems, or the problem you face is not covered in this guide, please contact our
technical support services.
The camera does not work:
•
Make sure you have connected the camera correctly into an available USB port or hub.
“No capture device found” message appears
•
Make sure the camera and PC are connected properly. Locate the camera under the Windows Control Panel: double click
Multimedia, click the Devices tab, and select Video Capture Devices. If the camera is not listed, unplug the camera and
re-connect the camera into your computer’s USB port. Note: If the camera is listed, but other cameras are also installed,
disable all other cameras; make sure your camera is enabled.
”Camera not connected” message appears
Try removing the previous driver and reinstalling the Image Device software.
•
After installing the camera software, the camera is not detected by the software
•
Some PC’s have been shipped without the USB port mode enabled. To enable the USB port, you must run the system
CMOS setup program. This setup program is only available when you power up the computer. The procedure is different for
each system so you will need to refer to your PC manual for more details.
Technical Support
For technical assistance call: 1-877-550-5534 or visit www.mi-products.com
Technical support hours of operation: Mon. – Fri. 8:30am to 5:30pm, Eastern Standard Time
4
Using Presto! VideoWorks
Presto! VideoWorks is a comprehensive video editing program designed to work with Windows operating systems. It enables
you to manage and edit video and sound on your computer screen, or combine video and audio fragments captured from a
video device such as a VCR, a laser disc player, a Camcorder, etc. You can also create new AVI files and write to Digital Video
Camcorder tape using the powerful functions included in the software. Presto! VideoWorks can easily combine several video
sequences, create smooth transition effects, add various video effects, and animate titles to compose a video masterpiece.
With your home PC, you can become a producer and director of business video presentations, advertisements, or home movies.
To Launch the Presto! VideoWorks:
1. Click Start.
2. Select Programs.
3. Choose Presto! VideoWorks.
4. Once the application is successfully launched you will have access to the Ribbon bar.
The Ribbon bar contains several icons for quick and convenient access to menu commands
1. Command Board
2. Open File
3. Save As
4. Hide or Show the Video Viewer
5. Acquire Images
6. Capture Audio
7. Select All
8. Select None
9. Undo
10. Copy
11. Insert
12. Clear
13. Information
14. Save and e-mail the video with specific format and compression options
Note: For a more detailed description on functions and features of this program please refer to the “Help” files within the application program.
5
Helpful Hints
The following hints will help you achieve the best results with your Micro WebCam:
Camera placement
•
Position the camera so that the subject is centered
•
Place the camera on a steady surface
Lighting
•
Use sufficient Lighting
•
Place the light source behind the camera and facing the subject.
•
Maintain a consistent lighting environment, i.e. do not mix fluorescent and other light types.
•
Do not aim the camera directly at the light source.
Focus
For a sharper image, adjust the focus of your Micro WebCam by rotating the focus control located on the front of your camera.
.
6
Camera Maintenance
Maintaining your Micro WebCam will ensure longer life and will minimize the chances of causing damage to your PC
camera and computer. Service and repair may only be done by Micro Innovations.
•
•
•
•
Keep the camera away from moisture and extreme temperature.
Clean the outside of the camera with a clean, dry cloth.
Never use harsh or abrasive cleaners or organic solvents on the camera or on any of its parts.
Never disassemble or touch the inside of the camera.
To Clean Your Camera Lens:
•
•
•
•
•
Blow gently on the lens to remove any dust and/or dirt.
Moisten the lens by breathing lightly on it.
Wipe the lens gently with a soft lint-free cloth or an unthreaded lens-cleaning tissue.
Do not use a cleaning solution unless it is designed specifically for camera lenses.
Do not wipe the camera lens with chemically treated eyeglass lens tissues as it may scratch the lens.
Any questions pertaining to the functions or features of our products call: 1-877-550-5534 or visit www.mi-products.com
Product support hours of operation: Mon. – Fri. 8:30am to 5:30pm, Eastern Standard Time
7
Warranty Information
MICRO INNOVATIONS, INC., warrants to the first consumer purchaser that this Micro Innovations Product (the Product), when shipped in its
original container, will be free from defective workmanship and materials and agrees that it will, at its option, either repair the defect or replace the
defective product or part thereof at no charge to the purchaser for parts or labor for the time periods described below.
This warranty does not apply to any appearance items of the product nor to the additional excluded item(s) set forth below nor to any product the
exterior of which has been damaged or defaced which has been subjected to misuse, abnormal service or handling or which has been altered or
modified in design or construction.
The limited warranty described herein is in addition to law. ALL IMPLIED WARRANTIES INCLUDING THE WARRANTIES OF
MERCHANTABILITY AND FITNESS FOR USE ARE LIMITED TO THE PERIOD (S) FROM THE DATE OF ORIGINAL PURCHASE SET FORTH
BELOW. Some states do not allow limitations on how long an implied warranty last, so the above limitation may not apply to you.
Neither the sales personnel of the seller nor any other person is authorized to make any warranties other than those described herein or to extend
the duration of any warranties beyond the time period described herein on the behalf of Micro Innovations.
The warranties described herein shall be the sole and exclusive warranties granted by Micro Innovations and shall be the sole and exclusive
remedy available to the purchaser corrections of defects, in the manner and for the period of time described herein, shall constitute complete
fulfillment of all liabilities and responsibilities of Micro Innovations to the purchaser with respect to the product and shall constitute full satisfaction
of all claims, whether based on contract negligence, strict liability or otherwise. In no event shall Micro Innovations be liable or in any way
responsible, for any incidental of consequential economic or property damage. Some states do not allow the exclusion of incidental or
consequential damages, so the above exclusion may not apply to you.
This warranty gives you specific legal rights. You may also have other rights, which vary from state to state.
Warranty Period:
Lifetime on parts and labor from date of purchase
Where to ship:
Micro Innovations
15 Mayfield Ave.
Edison NJ 08837
Enclose $5.95 for Shipping and Handling
8