1
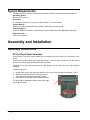
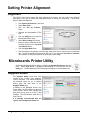
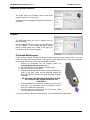
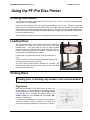
PF-Pro Disc Printer
For Mac OS X
Users Manual
Microboards Technology LLC
Version 1.01
2
• Introduction
MICROBOARDS TECHNOLOGY, LLC
PF-PRO Disc Printer
TABLE OF CONTENTS
INTRODUCTION ..............................................................................................................................................................5
WHAT’S INCLUDED ...........................................................................................................................................................5
SYSTEM REQUIREMENTS ...................................................................................................................................................6
ASSEMBLY AND INSTALLATION ...............................................................................................................................6
ASSEMBLY INSTRUCTIONS ................................................................................................................................................6
PF-Pro Disc Printer Assembly .....................................................................................................................................6
INSTALLING INK CARTRIDGES AND PRINT HEADS .............................................................................................................7
Supported Ink Cartridges .............................................................................................................................................7
Loading / Replacing Ink Cartridges .............................................................................................................................7
Installing / Replacing Printheads .................................................................................................................................7
LOADING DISCS .................................................................................................................................................................8
FRONT PANEL INDICATORS AND BUTTONS ........................................................................................................................8
INSTALLATION OF DRIVERS AND SOFTWARE .....................................................................................................................9
Driver Installation ........................................................................................................................................................9
CONNECTING TO A MAC ....................................................................................................................................................9
Adding the PF-Pro Disc Printer...................................................................................................................................9
SETTING PRINTER ALIGNMENT..............................................................................................................................10
ALIGNMENT.....................................................................................................................................................................10
MICROBOARDS PRINTER UTILITY........................................................................................................................10
SUPPLIES STATUS ............................................................................................................................................................10
DEVICE INFORMATION ....................................................................................................................................................11
CLEAN .............................................................................................................................................................................11
Printhead Maintenance ..............................................................................................................................................11
MANUAL PEN ALIGNMENT ..............................................................................................................................................12
SUPPORT..........................................................................................................................................................................12
DISC PRINTING ................................................................................................................................................................12
USING THE PF-PRO DISC PRINTER .........................................................................................................................13
CREATING DISC LABELS..................................................................................................................................................13
LOADING DISCS ...............................................................................................................................................................13
PRINTING DISCS ..............................................................................................................................................................13
Page Setup ..................................................................................................................................................................13
Changing Print Quality ..............................................................................................................................................14
Changing Print Diameters..........................................................................................................................................14
TROUBLESHOOTING...................................................................................................................................................15
PRINTER NOT PRINTING ...................................................................................................................................................15
LOW INK INDICATION ......................................................................................................................................................15
DISC LOADING ERROR .....................................................................................................................................................15
GAPS OR OVERLAP IN INK COVERAGE.............................................................................................................................15
PRINTING SPECIFICATIONS .....................................................................................................................................16
TECHNICAL SUPPORT ................................................................................................................................................16
3
4
• Introduction
MICROBOARDS TECHNOLOGY, LLC
PF-PRO Disc Printer
Introduction
The PF-Pro Disc Printer is a robust automated inkjet CD and DVD printing solution. The PF-Pro Disc Printer
has a 100-disc capacity, making the task of printing large numbers of discs fast, easy and hands-free.
Fully Integrated Automation
Microboards combined their patented auto-loading system with HP's new inkjet printer engine to give users
the highest output possible, both in image resolution and print speed. Since the PF-Pro Disc Printer is an
autoloading printer, no calibration of robotics or manual feeding of discs is required. The PF-Pro Disc Printer
connects by a single USB 2.0 interface to your computer.
Flexibility and Speed for Any Application
While the PF-Pro Disc Printer was designed to fill a need in the high-volume arena, it also has the ability to
print at 4800 x 1200 dpi on both DVD and CD media. The PF-Pro Disc Printer can be used from any
application, although it is recommended that any artwork you create is 12cm by 12cm in size.
What’s Included
When unpacking your PF-Pro Disc Printer system, the following items should be included:
•
PF-Pro Disc Printer print system
•
PF-Pro Disc Printer Quick Start Guide
•
Unpack Guide
•
Users Manual (This document)
•
Power Cord
•
USB 2.0 Printer Cable
•
Blank Printable CD’s
•
Input Bin rods
•
100 disc output assembly
•
Microboards PF-Pro Disc Printer Install CD
•
1 each: Microboards PFP-HC-CYAN, PFP-HC-MAGENTA, PFP-HC-YELLOW, and PFP-HCBLACK Ink cartridges
•
1 each: CG316A (Yellow and Black) and C9382A (Cyan and Magenta) printheads
If any of these items are missing, please contact your distributor or Microboards Technology
Technical Support department at 952-556-1639.
The PF-Pro Disc Printer installation disc includes
an Installer that will walk you through the process
step by step. Please perform the installation in
order as specified in the Installer before
connecting to a computer.
5
System Requirements
The Microboards PF-Pro Disc Printer has the following minimum requirements and compatibilities:
Operating System
Mac OS 10.4 or above.
Processors
G 4 Power PC Processor, running at 1.2 GHz or faster; -or- Intel Processor
System Memory
Minimum 512 MB of system memory required; 1 GB minimum recommended.
Hard Drive Space
Less than 30MB of free space is required on the system hard drive for the applications and drivers.
USB Connection
USB 2.0 is required.
Assembly and Installation
Assembly Instructions
PF-Pro Disc Printer Assembly
Remove the PF-Pro Disc Printer system from the shipping box and confirm you received all of the
items.
Place the PF-Pro Disc Printer on a stable, flat surface. You will need room both in front and behind
the system, as discs will be accessed from both locations.
Install the 2 long input bin posts above the input hopper, with the wide post to the right (shipped
installed).
Install the output bin:
•
•
•
•
Align the two holes in the output bin with the holes on the Front of the printer (numbers 1 and 2).
Secure the output bin with the two thumb screws.
The output bin should now be securely in place.
Next, slide in the 100 disc output spindle into place.
The Output Bin is designed to hang over the front edge
of your work surface.
1
6
• Assembly and Installation
2
MICROBOARDS TECHNOLOGY, LLC
PF-PRO Disc Printer
Installing Ink Cartridges and Print Heads
Supported Ink Cartridges
The PF-Pro Disc Printer uses 3 color and 1 black ink cartridges. The part numbers for these
cartridges are PFP-HC-CYAN, PFP-HC-MAGENTA, PFP-HC-YELLOW, and PFP-HC-BLACK. If
other cartridges are installed, the PF-Pro Disc Printer will not function. These cartridges are available
from any Microboards reseller.
Refill kits or non-Microboards ink cartridges are not recommended for use in the PF-Pro Disc
Printer system. Use of non-Microboards cartridges will cause the printer to fail. Use of
refilled cartridges may cause the PF-Pro Disc Printer to fail.
Loading / Replacing Ink Cartridges
Cartridges can be changed while the PF-Pro Disc Printer is on, but it should never be turned on
without an ink cartridge in place. An LED will light above any cartridge that is below 25% capacity.
•
Lower the ink door.
•
If replacing an empty ink cartridge, remove the color
that needs changing by pulling straight out.
•
Remove each new print cartridge to be installed from
its packaging.
•
Slide the correct ink cartridge into the correct slot with
the arrows pointing down, as shown to the right.
•
Raise the ink door and latch it back into place. The
printer will be ready after the ink cartridges pressurize
and the Media Feed button LED goes out.
Installing / Replacing Printheads
The 2 Printheads are not installed when you receive the PF-Pro Disc Printer, and must be installed
prior to using the printer. The printhead models are CG316A (yellow and black) and C9382A (cyan
and magenta).
1. Raise the top Printhead Access Door.
2. If you are setting up the PF-Pro Disc Printer for the first time, remove
any packaging materials from around the printhead carriage.
3. If you are replacing printheads and the printhead carriage is not
parked all the way to the left, turn on the PF-Pro Disc Printer. With
the Printhead Access Door opened, press and hold the Media Feed
button until the carriage moves to the left and locks into position.
4. Lift the cradle latch. If you are replacing the currently installed
printheads, remove the printheads by lifting the blue handle of each
and gently pulling up on each handle.
5. Remove the printheads from the packaging.
6. Gently shake each printhead 6 times prior to removing the orange
protective caps. Save the caps! If you remove the printheads from
the PF-Pro Disc Printer, they should be recapped to avoid clogging
the printheads and ink valves.
7. Gently press the printheads into the cradle, installing the correct
printhead in the correct slot. DO NOT FORCE THE PRINTHEADS
INTO PLACE.
8. Lower the cradle latch carefully.
9. Lower the top Printhead door. The printhead carriage will return to
the right and will be primed by the printer if the power is on.
Step 4
Step 7
7
Loading Discs
The next step is to load your PF-Pro Disc Printer with output discs. The system will accept CD or
DVD 120 mm (12 cm) inkjet printable discs. If the disc does not have an inkjet printable surface, the
ink will not adhere to the surface of the disc. The PF-Pro Disc Printer will only accept 12 cm discs.
Business card or 8 cm discs are not supported by this system.
Figure 1
Figure 2
Load the first 5 or 6 discs flat, as seen in figure 1.
Load the rest of the discs at an angle, against the wide input rod, as seen in figure 2.
The PF-Pro Disc Printer will hold a maximum of 100 discs. DO NOT load more than 100 discs in the
system, as this may cause the discs to feed incorrectly.
Front Panel Indicators and Buttons
1. Power
2. Network (unused)
3. Cancel
4. Media Feed
5. Print head
LEDs
1. Power Button and LED – The Power button turns the PF-Pro Disc Printer on and off. It may
take a few seconds for the PF-Pro Disc Printer to turn on after you press the Power button.
The green LED on the Power button flashes when the printer is processing.
NOTE: The AC power switch located on the back of the PF-Pro Disc Printer must
be turned on first in order to supply power to the Front Panel.
2. Network Button - This button is unused.
3. Cancel Button – Pressing the Cancel button cancels the current print job.
4. Media Feed Button – Pressing this button will clear any media feed issues. This button has
an LED that will flash amber when a media feed issue is occurring. It will also show a steady
amber if either the ink or the upper doors are opened.
5. Print Head LEDs – These LEDs will be on if there is an issue with either of the print heads.
8
• Assembly and Installation
MICROBOARDS TECHNOLOGY, LLC
PF-PRO Disc Printer
Installation of Drivers and Software
Driver Installation
Drivers must be installed on a hard disc. Once you have installed the software, store the original
installer disc in a safe place.
1. Insert the Installation CD in your system’s disc drive. Open the disc icon when it appears on
the desktop.
2. Double-click on the PFPro.pkg icon. Follow the on-screen instructions, read and agree to the
end user license agreement.
3. When prompted, enter your administrator password.
4. When prompted, click Install.
5. Once the installation has completed, click Restart.
Connecting to a Mac
DO NOT CONNECT YOUR PF-PRO DISC PRINTER BEFORE RUNNING THE
INSTALLER LOCATED ON THE INSTALLATION DISC!!
The connection between the Mac and the Microboards PF-Pro Disc Printer is done with one USB 2.0
cable.
1. Install all 4 Ink Cartridges (see page 7).
2. Install both Printheads (see page 7).
3. Plug in the AC power cord to the back of the PF-Pro Disc Printer. Do not turn on power to
the PF-Pro Disc Printer until an ink cartridge has been installed.
4. Connect the square shaped end of the USB cable to the back of the PF-Pro Disc Printer.
5. Connect the flat, rectangular end of the USB cable into a USB 2.0 port in
your Mac.
6. Turn on the PF-Pro Disc Printer.
Adding the PF-Pro Disc Printer
Once the drivers and software have been installed and the PF-Pro Disc Printer connected, the PFPro Series Printer needs to be added.
1. Click System Preferences in the Dock.
2. Select Print & Fax, then click the Add or + button to add a printer.
3. Select PF-Pro from the list and click the Add button.
4. Once the PF-Pro Disc Printer Series Printer has been added, it will
appear in the available printers list, as shown below.
9
Setting Printer Alignment
Alignment
The PF-Pro Disc Printer system has been aligned at the factory, but may need to be adjusted
depending on the type of media and media print surface on which you are printing. Follow these
steps to adjust the alignment:
•
Click System Preferences in the Dock.
•
Select Print & Fax.
•
Click the
button.
•
Highlight the Microboards PF-Pro
icon.
•
Click the Utility button to open the
Microboards Printer Utility.
•
Select Disc Printing from the list.
•
Enter the values listed with the PFPro Disc Printer into the Top Side
and Left Side boxes.
•
Click the Apply Now button.
•
Test the alignment by printing a full-coverage image (120 mm by 120 mm) onto an unprinted
disc. The image should print centered on the disc. If not, adjust the Top Side and Left Side
as necessary, verifying the alignment by printing the same image.
Set
Up
Printers…
Microboards Printer Utility
Access the Microboards Printer Utility by selecting the System Preferences from the
Dock. Select Print & Fax. Highlight the Microboards PF-Pro icon and click the
Utility icon. The Microboards Printer Utility pages will appear in the following order.
Supplies Status
The Supplies Status show how much
remains of all 4 colors, Cyan, Magenta,
Yellow, and Black. The values shown will
be refreshed when you go to another
setting page and then back to the
Supplies Status page.
In addition to the displayed levels in the
Printer Utility, an LED indicator on the front
of the PF-Pro above each cartridge will
light when the ink level is at 25% in that
cartridge. The LED will blink when the ink
level is at 0%.
It is strongly recommended that you
replace any cartridge that shows 0%.
10
• Setting Printer Alignment
MICROBOARDS TECHNOLOGY, LLC
PF-PRO Disc Printer
Device Information
This page shows the Firmware version and Serial
Number of the PF-Pro Disc Printer.
Clicking the Print Configuration Page button will print out
a test disc.
Clean
The Clean page allows you to run a cleaning cycle on
the ink cartridge.
Click the Clean button once a disc has been loaded into
the input hopper. If the resulting disc shows streaks
similar to those shown in the image on this page, you
may need to run the Clean utility again.
Printhead Maintenance
If, after several cleaning attempts, the printed images continue to show streaks of color, you may
need to manually clean the printheads. Follow the procedure below exactly to clean the printheads.
Not following these steps could result in damaged printheads.
1. Remove the printheads from the carriage (please see
Installing/Replacing Printheads, page 7).
2. Use ionized water to lightly dampen a lint-free cloth
3. Place the cloth on a level surface
4. Holding the printhead with the bottom of the printhead resting
lightly on the cloth, gently pull the printhead towards you
along the direction of the long axis of the printhead, as shown
to the right.
DO NOT MOVE THE PRINTHEAD FROM SIDE-TO-SIDE,
AS THIS COULD MIX THE INK COLORS IN THE
PRINTHEAD!
5. If the printhead does not leave two solid lines of color, one for
each color in the printhead, move the printhead to a clean
area on the cloth and repeat step 4.
6. Carefully replace the printhead in the PF-Pro Disc Printer
once the heads have been cleaned.
If you do not follow the above procedure exactly, you could damage your printheads!
11
Manual Pen Alignment
Pen Alignment should be performed when a new
printhead is installed. If you experience a decrease in
print quality with an installed printhead, you may need
to perform this service.
• Load 4 pieces of blank, unprinted media into
the input hopper.
• Click the Align button, and 2 discs will load to
the belts and be printed.
• Select the Alignment Speed. 20ips is the recommended
setting.
• Use these discs to select the patterns that are best aligned
in the next window, as shown to the right. All 8 entries
must be made. In the example shown, the first 3 selections
have been made.
• After selecting the patterns with the best alignment, click
Align.
• The pen alignment discs will print again. The best aligned
patterns should have moved closer to the center (they do not need to be in the center, only
closer to the center than the original set of discs). If so, click Cancel. If not, enter the values
from the second set of discs and click OK; you will need to load 2 more blank discs.
Support
Clicking the Support button will open the Microboards Technology Support website in your default
internet browser. This function requires an internet connection.
Disc Printing
The PF-Pro Disc Printer system has been aligned at the factory, but may need to be adjusted
depending on the type of media and media print surface on which you are printing. Follow these
steps to adjust the alignment:
12
•
Click System Preferences in the Dock.
•
Select Print & Fax.
•
Click the Set Up Printers… button.
•
Highlight the Microboards PF-Pro icon.
•
Click the Utility button
Microboards Printer Utility.
•
Select Disc Printing from the list.
•
Enter the values listed with the PF-Pro Disc
Printer into the Top Side and Left Side boxes.
•
Click the Apply Now button.
•
Test the alignment by printing a full-coverage image (120 mm by 120 mm) onto an unprinted
disc. The image should print centered on the disc. If not, adjust the Top Side and Left Side
as necessary, verifying the alignment by printing the same image.
• Microboards Printer Utility
to
open
the
MICROBOARDS TECHNOLOGY, LLC
PF-PRO Disc Printer
Using the PF-Pro Disc Printer
Creating Disc Labels
The first step is to create a disc label of the correct size, 12cm x 12cm. You may use any application
you prefer to create your labels.
Included on the Installation disc are 2 eps-format templates for you to use. These are essentially
blank files of the correct size that show where the outer edge of the disc and the inner hub will the
image when your disc label designs are printed. One is for use with non-hub printable media (36mm
hub), while the other is to be used with hub printable media. Simply copy your artwork into these files
to create an easy disc label.
These files do not need to be used, but are provided for an easy reference when creating labels.
Loading Discs
The next step is to load your PF-Pro Disc Printer with output discs.
The system will accept CD or DVD 120 mm (12 cm) inkjet
printable discs. If the disc does not have an inkjet printable
surface, the ink will not adhere to the surface of the disc. The PFPro Disc Printer will only accept 12 cm discs. Business card or 8
cm discs are not supported by this system.
Load the first 5 or 6 discs flat, as seen in the top image to the
right.
Load the rest of the discs at an angle, against the wide input rod,
as seen in the bottom image to the right.
The PF-Pro Disc Printer will hold a maximum of 100 discs. DO
NOT load more than 100 discs in the system, as this may cause
the discs to feed incorrectly.
Printing Discs
Printing prior to burning any media is not recommended!!
Page Setup
While the Microboards PF-Pro Disc Printer will print from
any application, you should always verify that the correct
printer and paper size are being used. Select Page Setup
from the file menu, choosing the PF-Pro printer and
CD/DVD 120mm in the Format For and Paper Size
selections, respectively.
It is highly recommended that the image you are printing is
120mm by 120mm. Having a different size image may
result in the improper placement of the image on the disc.
13
Changing Print Quality
To change the Print Quality, click the Advanced
button on the Print screen. Select the Media
type/Quality option from the list circled to the right.
The settings to the right will appear.
You can select either Photo or Graphics and Text
as the Media Type. Photo will take longer to print
and will use more ink, but the quality will be higher.
Graphics and Text, on the other hand, has a lower
quality but will print in less time with less ink used.
You can also choose between Draft (Graphics and
Text only), Normal, Best, and Maximum dpi
(Photo only) from the Quality list. The choices are
listed in order of lowest to highest quality and ink
usage.
Color can be selected as ColorSmart/sRGB,
ColorSync, or Grayscale.
Changing Print Diameters
Different media types and brands may vary in the
size of the printable surface. When the print
surface changes, you will need to set the printer to
the correct sizes.
Always make sure the images are printing centered
on the disc before changing the diameter settings.
If the image is not centered, please refer to page
10 for infomration on the alignment process.
To change the diameter of the printed area, click
the Advanced button on the Print screen. Select
the Disc Printing option from the list circled to the
right. The settings to the right will appear.
The Outer setting will change how closely to the
edge of the disc the image will print. Increase the
Outer setting to leave less unprinted area at the
outer edge. Decrease the Outer setting to leave
more unprinted area at the outer edge..
The Inner setting will change how closely to the center of the disc the image will print. Decrease the
Inner setting to leave less unprinted area at the center. Increase the Inner setting to leave more
unprinted area at the center.
You should never have the printer attempting to print off the
printable surface. This will leave unabsorbed ink on the disc.
14
• Using the PF-Pro Disc Printer
MICROBOARDS TECHNOLOGY, LLC
PF-PRO Disc Printer
Troubleshooting
Printer not printing
1. Confirm the PF-Pro Disc Printer is plugged into a power source and is turned on. The
ON/OFF switch is located at the back of the unit, above the power cable connector.
2. Confirm the green LED on the power button is lit on the front panel, as shown below. If AC
power is on and the green LED is off, press the power button and wait for several seconds. If
the LED still does not come on, contact Microboards Technical Support.
Power LED
3. Confirm the PF-Pro Disc Printer is connected to the computer, with a USB cable. This can be
checked by clicking on Start, going to Settings and selecting Printers. Confirm the printer is
listed and is active. If the icon is not active, make sure the Use Printer Offline is not selected
or paused. Also check to make sure the correct printer port is selected.
Low Ink indication
The ink level of each cartridge can be checked in the Microboards Printer Utility (see page 10).
Additionally, the LED above each cartridge will light if that cartridge is at 25% or lower.
When the estimated ink level reaches 0%, the LED above the cartridge will begin to flash, warning
you that the ink cartridge is empty.
It is strongly recommended that you replace the cartridge at this point. Continuing to run the
PF-Pro Disc Printer with an empty cartridge may damage the printer.
If you notice poor ink quality or a missing color in your prints at any time, replace the ink cartridge.
Disc Loading error
1. If a disc is not loaded correctly, an error message will be displayed. Check to see if there are
any discs on the belt. Remove any discs that are left on the belt.
2. Lift the cover and check for any discs on the front deck of the PF-Pro Disc Printer. Remove
any discs found on the belts. Close the cover.
3. Next, reload the input bin and click the OK button on the error message to continue. The
system will load the next disc and continue printing the remaining discs for that job.
Gaps or Overlap in Ink Coverage
There are 2 possible causes:
1. You may be printing in a low-quality mode. Change the Media Type and Print Quality to the
next higher setting and print again. See page 14 for details.
2. The printheads need to be realigned. Please refer to page 12 for details.
15
Printing Specifications
Print Speed: Depends upon percentage
of coverage and print mode selected:
•
Approx. 45 seconds for 100% fullcolor coverage, Photo Normal Mode
•
Approx. 20 seconds for 100% fullcolor coverage, Text & Graphics
Best Mode
•
Approx. 12 seconds for 20%
coverage Text & Graphics Normal
Mode
Ink Cartridges:
Microboards PFP-HC-CYAN, PFP-HCMAGENTA, PFP-HC-YELLOW, and PFPHC-BLACK
Printheads:
Yellow and Black: CG316A
Cyan and Magenta: C9382A
Media Types:
Printable-surface 120mm CD-R or DVD-R
Maximum Print Width:
4.72” (120mm)
Power Supply:
Auto Detect AC Power:
90VAC – 240VAC, 47Hz – 63Hz
Warranty:
One Year Limited Warranty
Print Technology:
HP Inkjet
Print Quality, Black: 600 x 600 dpi
Print Quality, Color: up to 4800 x 1200
optimized dpi
Memory:
32 MB
Connectivity:
USB 2.0 required
Technical Support
For technical questions or support issues, contact Microboards Technology technical support:
United States
PH: 952-556-1639
FAX: 952-556-1628
[email protected]
www.microboards.com
Europe
PH: +44 (0) 845 230 7800
www.microboards.co.uk
Japan
PH: 03-3561-2266
www.microboards.co.jp
Please have the Model and Serial Number of your PF-Pro Disc Printer available when contacting
Technical Support.
Any unauthorized modification to this equipment may result in the revocation by the FCC of the user’s authority to
operate this equipment.
NOTE: This equipment has been tested and found to comply with the limits for a Class B digital device, pursuant to Part 15 of the
FCC Rules. These limits are designed to provide reasonable protection against harmful interference in a residential installation. This
equipment generates, uses, and can radiate radio frequency energy and, if not installed and used in accordance with the instructions,
may cause harmful interference to radio communications. However, there is no guarantee that interference will not occur in a
particular installation. If this equipment does cause harmful interference to radio or television reception, which can be determined by
turning the equipment off and on, the user is encouraged to try to correct the interference by one or more of the following measures:
•
•
•
•
Reorient or relocate the receiving antenna
Increase the separation between the equipment and antenna
Connect the equipment into an outlet on a circuit different than that to which the receiver is connected
Consult the dealer or an experienced radio/TV technician for help
This product is in conformity with the EMC Directive (89/336/EEC) through compliance with the following European standards:
EN 55022, EN 55024. The CE mark has been affixed in accordance with the CE Marking Directive 93/68/EEC.
Canadian Department of Communications (DOC) Statement
This Class B digital apparatus complies with the Canadian ICES-003 Issue 4:2004. Cet appareil numerique de la classe B est conforme a la
norme NMB-003 du Canade.
16
• Technical Support
MICROBOARDS TECHNOLOGY, LLC
PF-PRO Disc Printer
17
18
•