Transcript
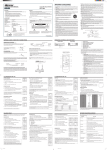
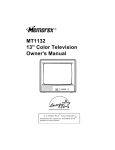
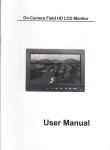
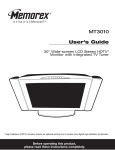
IMPORTANT SAFEGUARDS
INSTRUCTION MANUAL
ENGLISH
COLOR TELEVISION
MT1130C
FEATURES
CAUTION
•
•
•
•
•
•
•
On-Screen graphics guide you through setup features and operations.
Automatic programming of channels allows easy selection of stations available in your
viewing area.
Sleep timer programs the TV to turn itself off at a preset time.
One day timer programs the TV to come on once at a preset time.
Weekly timer programs the TV to come on at a preset time every day.
25 button infrared remote control allows remote operation.
VHF/UHF/CATV tuning allows reception of standard broadcasts or cable TV channels.
Close caption decoder displays captions or half-screen text.
V-BLOCK function.
•
•
•
•
•
•
•
Place your TV in a room with adequate ventilation.
Keep your TV set away from sources of direct heat, such as heat registers or direct sunlight.
Do not place your TV on soft surfaces, such as rugs or blankets.
Leave enough room for air to circulate around the bottom, top and back of the set.
Your TV works on normal household current (120 volts, 60 Hz). For safety purpose, your
TV’s electrical plug has one blade wider than the other. If you cannot insert the plug fully
into the socket, try reversing it.
In the space provided, record the serial and model numbers, located on the rear of the unit.
SERIAL NO.______________
MODEL NO.______________
SPECIFICATIONS
AC Power Input
AC Power
Consumption
Chassis Construction
Picture Tube
(measured diagonally)
Speaker
120 V, 60 Hz
77 Watts
WARNING:
TO REDUCE THE RISK OF FIRE OR ELECTRIC SHOCK, DO NOT EXPOSE THIS APPLIANCE
TO RAIN OR MOISTURE.
IC Solid State
13”
TO PREVENT ELECTRIC SHOCK, MATCH WIDE BLADE OF PLUG TO WIDE SLOT, FULLY
INSERT.
3.5 × 2 in (90 × 50 mm)
Oval, 8 ohm
181 Channel, Freq. Synthesized
Infrared, Direct Access
2 × AA batteries
VHF
2-13
UHF
14-69
CATV:
Mid Band
14-22
Super Band
23-36
Hyper Band
37-65
Ultra Band
66-94, 100-125
Sub Mid Band
1, 95-99
75 ohm (VHF/UHF)
Coaxial Input
Tuner
Remote Control
Receiving Channels
Antenna Input
Impedance
CAUTION
RISK OF ELECTRIC SHOCK
DO NOT OPEN
CAUTION: TO REDUCE THE RISK OF ELECTRIC SHOCK, DO NOT
REMOVE COVER (OR BACK). NO USER SERVICEABLE PARTS INSIDE.
REFER SERVICING TO QUALIFIED SERVICE PERSONNEL.
The lightning flash with the arrowhead symbol within an
equilateral triangle, is intended to alert the user to the
presence of uninsulated “dangerous voltage” within the
product’s enclosure that may be of sufficient magnitude
to constitute a risk of electric shock to someone.
As an ENERGY STAR® Partner, MEMCORP has
determined that this product meets the ENERGY
STAR® guidelines for energy efficiency.
The exclamation point within an equilateral triangle is
intended to alert the user to the presence of important
operating and maintenance (servicing) instructions in the
literature accompanying the appliance.
PRINTED IN MALAYSIA
1111-4030M178 MP0108-1
1. Read instructions - All the safety and operating instructions should be read before the TV is
operated.
2. Retain Instructions - The safety and operating instructions should be retained for future reference
3. Heed Warnings - All warnings on the TV and in the operating instructions should be adhered to.
4. Follow Instructions - All operating and use instructions should be followed.
5. Cleaning - Unplug TV from the wall outlet before cleaning - Do not use liquid cleaners or aerosol
cleaners. Use a damp cloth for cleaning.
6. Attachments - Do not use attachments not recommended by the TV manufacturer as they may
cause hazards.
7. Water and Moisture - Do not use this TV near water - for example, near a bath tub, wash bowl,
kitchen sink, or laundry tub; in a wet basement; or near a swimming pool; and the like.
8. Accessories - Do not place this TV on an unstable cart, stand, tripod,
bracket, or table. The TV may fall, causing serious injury to someone
and serious damage to the TV. Use only with a cart, stand, tripod,
bracket, or table recommended by the manufacturer, or sold with the
TV.
Any mounting of the TV should follow the manufacturer’s instructions,
and should use a mounting accessory recommended by the
manufacturer.
9. The TV and cart combination should be moved with care.
Quick stops, excessive force, and uneven surfaces may cause the TV and cart combination to
overturn.
10 Ventilation - Slots and openings in the cabinet are provided for ventilation and to ensure reliable
operation of the TV and to protect it from overheating, and these openings must not be blocked or
covered. The openings should never be blocked by placing the TV on a bed, sofa, rug, or other
similar surface. This TV should not be placed in a built-in installation such as a bookcase or rack
unless proper ventilation is provided or the manufacturer’s instructions have been adhered to.
11. Power Sources - This TV should be operated only from the type of power source indicated on the
marking label. If you are not sure of the type of power supply to your home, consult your TV dealer
or local power company. For TVs intended to operate from battery power, or other sources, refer to
the operating instructions.
12. Grounding or Polarization - This TV may be equipped with a polarized alternatingcurrent line plug
(a plug having one blade wider than the other). This plug will fit into the power outlet only one way.
This is a safety feature. If you are unable to insert the plug fully into the outlet, try reversing the plug.
If the plug should still fail to fit, contact your electrician to replace your obsolete outlet. Do not defeat
the safety purpose of the polarized plug.
13. Power-Cord Protection - Power-supply cords should be routed so that they are not likely to be
walked on or pinched by items placed upon or against them, paying particular attention to cords at
plugs, convenience receptacles, and the point where they exit from the TV.
14. Outdoor Antenna Grounding - If an outside antenna or cable system is connected to the TV, be
sure the antenna or cable system is grounded so as to provide some protection against voltage
surges and built-up static charges. Article 810 of the National Electrical Code ANSI/NFPA 70,
provides information with regard to proper grounding of the mast and supporting structure, grounding
of the lead-in wire to an antenna-discharge unit, size of grounding conductors, location of antennadischarge unit, connection to grounding electrodes and requirements for the grounding electrode.
See Figure 1.
15. Lightning - For added protection for this TV during a lightning storm, or when it is left unattended
and unused for long periods of time, unplug it from the wall outlet and disconnect the antenna or
cable system. This will prevent damage to the TV due to lighting and power-line surges.
16. Power Lines - An outside antenna system should not be located in the vicinity of overhead power
lines or other electric light or power circuits, or where it can fall into such power lines or circuits.
When installing an outside antenna system, extreme care should be taken to keep from touching
such power lines or circuits as contact with them might be fatal.
17. Overloading - Do not overload wall outlets, extension cords, or integral convenience receptacles
as this can result in a risk of fire or electric shock.
18. Object and Liquid Entry - Never push objects of any kind into this TV through openings as they
may touch dangerous voltage points or short-out parts that could result in a fire or electric shock.
Never spill liquid of any kind on the TV.
19. Servicing - Do not attempt to service this TV yourself as opening and removing covers may expose
you to dangerous voltage or other hazards. Refer all servicing to qualified service personnel.
20. Damage Requiring Service - Unplug this TV from the wall outlet and refer servicing to qualified
service personnel under the following conditions:
a) When the power-supply cord or plug is damaged.
b) If liquid has been spilled, or objects have fallen into the TV.
c) If the TV has been exposed to rain or water.
d) If the TV does not operate normally by following the operating instructions. Adjust only those
controls that are covered by the operating instructions as an improper adjustment of other
controls may result in damage and will often require extensive work by a qualified technician to
restore the TV to its normal operation.
e) If the TV has been dropped or damaged in any way.
f) When the TV exhibits a distinct change in performance - this indicates a need for service.
21. Replacement Parts - When replacement parts are required, be sure the service technician has
used replacement parts specified by the manufacturer or have the same characteristics as the
original part. Unauthorized substitutions may result in fire, electric shock, or other hazards.
22. Safety Check - Upon completion of any service or repairs to this TV, ask the service technician to
perform safety checks to determine that the TV is in proper operating condition.
23. Wall or Ceiling Mounting - The TV should be mounted to a wall or ceiling only as recommended
by the manufacturer.
24. Heat - The TV should be situated away from heat sources such as radiators, heat registers, stoves,
or other products (including amplifiers) that produce heat.
Note to CATV system installer:
This reminder is provided to call the CATV system installer’s attention to Section 820-40 of the NEC
which provides guidelines for proper grounding and, in particular, specifies that the cable ground
shall be connected to the grounding system of the building, as close to the point of cable entry as
practical.
FIGURE 1
EXAMPLE OF ANTENNA GROUNDING AS PER NATIONAL ELECTRICAL CODE, ANSI/NFPA 70
GROUND
CLAMP
NEC - NATIONAL
ELECTRICAL CODE
S2898A
ANTENNA DISCHARGE UNIT
(NEC SECTION 810-20)
GROUNDING CONDUCTORS
(NEC SECTION 810-21)
GROUND CLAMPS
ELECTRIC SERVICE
EQUIPMENT
ANTENNA CONNECTIONS
POWER SERVICE GROUNDING
ELECTRODE SYSTEM (NEC ART 250, PART H)
OPERATING CONTROLS AND FUNCTIONS
FRONT PANEL
REAR PANEL
1. POWER SWITCH
For Subscribers to Scrambled Cable Service:
To allow viewing of all channels through converter/descrambler. TV must be set to the output
channel of the converter/descrambler (usually ch 3 or 4).
COMBINATION VHF/UHF ANTENNA
(Single 75 ohm cable or 300 ohm twin-lead wire)
Connect the 75 ohm cable from combination VHF/UHF antenna to the antenna jack.
If your combination antenna has a 300 ohm twin-lead wire, use the 300-75 ohm
matching transformer (not included).
2. CHANNEL UP/DOWN BUTTON
3. VOLUME UP/DOWN BUTTON
4. REMOTE CONTROL SENSOR
VOLUME
DOWN
∞
75 ohm
UP
CHANNEL POWER
DOWN
UP
5. VHF/UHF EXT. ANT. JACK
REMOTE SENSOR
EXT. ANT.
UHF/VHF
(REAR OF SET)
∞
To 75 ohm Coaxial
Jack on TV
INCOMING
COAXIAL CABLE
To prevent problems it is recommended that you
use only the specified transformer. (Transformer
Part No.: 1398-00301)
(USA only)
ANTENNA
LEAD-IN WIRE
Converter/Descrambler
4
3
2
1
5
ANT
OR
•
Transformer
(not included)
300 ohm
CATV CONNECTIONS
For Subscribers to Basic Cable Service:
For basic cable service without a converter/descrambler box, connect the CATV 75 ohm coaxial
cable directly to the antenna jack on the rear of the TV.
For Subscribers to Unscrambled Basic Cable with Scrambled Premium Channels:
You may need to use a two-set signal splitter (sometimes called a “two-set coupler”) and an A/
B switch box from the cable installer or an electronics supply store. With the A/B switch in “B”
position you can directly tune to any non-scrambled channels using your TV’s tuning system or
remote control. With the switch in “A” position, you can tune your TV to the output channel of the
decoder (usually CH 3 or 4) and use the box to tune scrambled channels. Since cable systems
vary, you may wish to consult your local cable company.
•
REMOTE CONTROL
EXT. ANT.
UHF/VHF
∞
A
A/B Switch
Some cable companies offer “premium pay” channels in which the signal is scrambled. Descrambling
these signals for normal viewing requires the use of a descrambler device which is generally
provided by the cable company. Below are illustrations for connection of these types of converter/
descrambler devices with the TV’s VHF antenna jack.
B
1
2
3
4
5
6
7
8
9
TV/CAP/TEXT
100
0
RECALL
CH 1/2
2
∞
Converter/Descrambler
SPLITTER
SLEEP
1
To 75 ohm Coaxial
Jack on TV
INCOMING
COAXIAL
CABLE
1. POWER BUTTON - Press to turn the TV on or off.
2. NUMBER BUTTONS - Press to select a channel. For channels 1-9, press 0, then
the channel you want to watch. For example, for channel 6, press 0, 6. For channels
100 -125, press the 100 button, then press the last two digits of the channel you
want to watch. For example, for channel 116, press 100, 1, 6. Note: Make sure you
press the second or third digit of a channel within a few seconds of pressing the
first digit. If you don’t, you’ll have to start over.
3. MUTE BUTTON - Press once to eliminate sound. Press again to restore sound.
4. MENU BUTTON - Press to call up the main menu screen. Also, press to enter data
when going to the next step of an operation.
5. – AND + BUTTONS - Press to adjust or select functions listed in on-screen displays.
6. Q. REV. (QUICK REVIEW) BUTTON - Press to return to the previous channel. For
example, if you were watching channel 2, then use the Number buttons to switch to
channel 6, pressing the Q. REV button will return the TV to channel 2.
7. VOLUME (UP/DOWN) BUTTONS - Press to raise or lower the sound.
8. CHANNEL (UP/DOWN) BUTTONS - Press to scroll up or down through the
channels.
9. RECALL BUTTON - Press to display the channel being viewed. Press again to
display the time. Press again to remove the on-screen display. Note: If the RECALL
button is pressed when the TV is in closed caption mode, captions or text will not be
displayed.
10. CH1/CH2 BUTTON - Switches between channel 1 and channel 2 of the closed
caption mode.
11. TV/CAP(tion)/TEXT BUTTON - When you are watching a closed caption program,
press this button to switch between the standard TV screen, closed captioning and
half-screen text.
12. SLEEP BUTTON - Press to start the sleep time or to display the time left in a sleep
timer.
12
POWER
ANT
•
11
10
9
CHANNEL
8
VOLUME
MUTE
3
7
MENU
Q. REV.
6
4
5
TV OPERATIONS SET UP
The remote control unit requires two 1.5 volt “AA” size batteries. The battery compartment is
located on the back of the unit. To open, press down of the lid and slide toward the bottom of
the unit. Install the batteries exactly as shown by the diagram in the compartment.
If one or both of the batteries are reversed, the REMOTE CONTROL will not operate and the
unit may be damaged.
Do not allow strong sunshine to fall on the TV set front panel as this may affect the operation
of the remote control.
TV OPERATIONS SET UP
SETTING LANGUAGE
MENU TUE 1:35 PM
The menu screen can be programmed to appear in English, French or
Spanish as procedure below:
CLOCK SET
PROGRAM TIMER
V-BLOCK SET
PICTURE ADJUST
CH PROGRAM
LANGUAGE
EXIT
[+] / [-] : MENU SELECT
[MENU] : ENTER
1. Press MENU to display main menu.
Manual Programming (Add/Delete Channels)
AIR / CABLE
AUTO SEARCH
CH MEMORY
EXIT
1. Press MENU to display main menu.
2. Select (+) or (-) until WEEKLY, press MENU and the OFF (or ON) beside
WEEKLY will flash.
[+] / [-] : SELECT
[MENU] : AIR/CABLE
3. Select (+) or (-) until CH MEMORY, press MENU.
3. Select (+) or (-) until EXIT, press MENU to exit.
5. Press (+) to add (it will turn white) or (-) to delete (it will turn red) the
channel.
6. Repeat steps 4 and 5 to add or delete other channels.
AIR / CABLE
AUTO SEARCH
CH MEMORY
EXIT
ON TIME
-- : -- AM
CABLE
ON TIME
1 : 00 PM
CH MEMORY
2. Press CH1/CH2 button to select English (CH1) or foreign languages
(CH2) caption or text.
OFF TIME CH
2 : 00 AM 22
SUN MON TUE WED THU FRI SAT
CABLE 10
3. While EXIT is flashing, press (+) or (-) to exit.
EXIT
CABLE TV OPERATION
2. Use (+) or (-) until CH PROGRAM, press MENU.
[+]
: ADD
[-]
: DELETE
[MENU] : EXIT
Sleep Timer
1. Press SLEEP to enter sleep timer screen.
CLOCK SET
CAPTION
CH 1
1. Press MENU.
[MENU] : MOVE
[+] / [-] : ADJUST
If you don’t program channels, you will still receive channels when you press
either the CHANNEL (8/9) or Number buttons. But you will also have to scan
through channel that have no reception or very poor reception when you press
the CHANNEL (8/9) buttons.
[MENU] : MOVE
[+] / [-] : ADJUST
Often, both modes are accessible in more than one languages. Close caption is available only on
programs with closed captioning.
1. Press TV/CAP(tion)/Text button until CAPTION or TEXT (whichever
you want) appears on-screen bottom right corner.
EXIT
[MENU] : MOVE
[+] / [-] : ADJUST
WEEKLY TIMER
6. While EXIT is blinking, press (+) or (-) to exit.
8. Press MENU to exit while EXIT is highlighted.
OFF TIME CH
-- : -- AM
10
SUN MON TUE WED THU FRI SAT
5. Press MENU to select the day(s) of the week you do not want the TV to
come on. Once that day is flashing, use (+) or (-) to disable or enable the
selection. White indicates TV will come on and red is vice versa.
[+] / [-] : SELECT
[MENU] : ENTER
Close caption mode allows user to read the words of a broadcast on-screen while hearing them.
There are two types of closed captioning:
• Captions - Dialogue and description of the action appear in a box at the bottom of the screen.
• Text - Words appear on the screen. This is often used for channel guides.
[+] / [-] : ON/OFF
[MENU] : ENTER
4. Repeat steps 5 and 6 of One Day Timer.
CLOCK SET
2. Set the correct day, hour(s), minute(s) and AM/PM for the CLOCK using
(+) or (-) and press MENU after each entry to go to the next step.
OFF
ON
WEEKLY TIMER
CH PROGRAM
7. Press MENU to return to the CH PROGRAM screen.
SUN -- : -- AM
EXIT
ONE DAY
WEEKLY
EXIT
3. Select (+) or (-) until ON, press MENU to enter the weekly timer screen.
4. Select the desired channels to be added or deleted using either the
NUMBER or CHANNEL (8/9) buttons.
1. Press MENU twice until CLOCK SET screen.
CLOSED CAPTION MODE
PROGRAM TIMER
CABLE
2. Select (+) or (-) until CH PROGRAM, press MENU.
2. Select (+) or (-) until LANGUAGE, press MENU to select the desired
language.
SETTING THE CLOCK
Weekly Timer
1. Repeat steps 1 and 2 of One Day Time.
CH PROGRAM
3. Press MENU until CABLE appears beside AIR/CABLE.
(In CATV mode, the channel number changes color from yellow to green.)
SLEEP 60
You may have to reset the clock it there is a power outage or if you unplug the
TV. To correct day or time, repeat step 1, press MENU repeatedly until the
desired item is flashing, make correction using (+) or (-). Finally press MENU
until EXIT flashing and press (+) or (-) to exit.
TUE 1 : 35 PM
EXIT
PROGRAM TIMER
One Day Timer
[MENU] : MOVE
[+] / [-] : ADJUST
PROGRAMMING CHANNELS
1. Press MENU to display main menu.
ONE DAY
WEEKLY
EXIT
ON
OFF
2. Select (+) or (-) until PROGRAM TIMER, press MENU.
(Clock time must be set before proceeding this step, go to Setting the
Clock)
[+] / [-] : ON/OFF
[MENU] : ENTER
AIR / CABLE
AUTO SEARCH
CH MEMORY
EXIT
CABLE
3. While ONE DAY is highlighted, press MENU, the OFF (or ON) beside
ONE DAY will flash.
OFF TIME CH
-- : -- AM
10
[+] / [-] : SELECT
[MENU] : AIR/CABLE
2. Select (+) or (-) until CH Program, press MENU.
3. Press MENU until the mode (AIR or CABLE) that corresponds to your
TV signal system appears beside AIR/CABLE.
4. Select (+) or (-) until AUTOSEARCH, press MENU to start it.
The TV will automatically cycle through all the TV or CABLE channel
depending on the mode selected, and store active channel in its memory.
When complete, the CH PROGRAM screen will re-appear on-screen.
[MENU] : MOVE
[+] / [-] : ADJUST
ONE DAY TIMER
6. Select the desired channel using either Number, CHANNEL 8/9 or (+)
or (-) buttons then press MENU.
CH PROGRAM
AIR / CABLE
AUTO SEARCH
CH MEMORY
EXIT
CABLE
7. While EXIT is blinking, press (+) or (-) to exit.
ON TIME
1 : 00 AM
OFF TIME CH
2 : 00 AM 22
EXIT
To cancel a timer, follow steps 1 to 3. At step 4, use the (+) or (-) to change the ON to OFF.
The one day timer has priority when the same time value is set for the ON TIME field of both the one day
timer and the weekly timer.
You may have to reprogram the timer if there is a power outage or if the TV is unplugged.
To stop automatic programming while it is in progress, press MENU.
CH Number
on TV
Corresponding
CATV CH
1
2
↓
13
14
15
↓
35
36
37
38
↓
62
63
64
65
5A
2
↓
13
A
B
↓
V
W
AA,W+1
BB,W+2
↓
ZZ,W+26
AAA,W+27
BBB, W+28
CCC,W+29
66
67
68
↓
94
95
96
97
98
99
100
101
102
↓
125
W+30
W+31
W+32
↓
W+58
A5
A4
A3
A2
A1
W+59
W+60
W+61
↓
W+84
PICTURE ADJUST
ADJUST
RESET
EXIT
2. Select (+) or (-) until PICTURE ADJUST, press MENU.
4. Press MENU to select the feature. (CONTRAST, BRIGHTNESS, COLOR,
TINT OR SHARPNESS)
[+] / [-] : SELECT
[MENU] : ENTER
5. Use (+) or (-) to adjust the picture. The bar scale shows the level of
adjustment.
6. Press MENU until PICTURE ADJUST screen appears.
7. Select (+) or (-) until EXIT, press MENU to exit.
CONTRAST
[MENU] : MOVE
[CH 8/9] : ADJUST
[+] / [-] : SELECT
[MENU] : START
5. Select (+) or (-) until CH Program, press MENU to exit.
Corresponding
CATV CH
3. Press MENU while ADJUST is highlighted.
EXIT
5. Set the hour, minute(s) and AM/PM for both ON TIME and OFF TIME
using (+) or (-) and press MENU after each entry to go to the next step.
(The OFF TIMER changes to exactly three hours after the ON TIME).
CH Number
on TV
ADJUSTING THE PICTURE
ONE DAY TIMER
ON TIME
-- : -- AM
4. Select (+) or (-) until ON, press MENU to enter the one day timer screen.
1. Press MENU to display main menu.
To check remaining time, press SLEEP. To cancel sleep timer, set sleep
time to 00.
1. Press MENU to display main menu.
CH PROGRAM
Automatic Programming
On CATV (Cable Television) system, programs are brought into the home on VHF CH 2~13, midband CH A~I, super band CH J~W, hyper band CH AA~CCC, ultra band CH W+30~W+84 and
sub mid-band CH 5A, A5~A1.
2. Press SLEEP repeatedly until the desired sleep time (in steps of 10
minutes from 00 (OFF mode) up to 90 minutes).
TIMERS SET UP
63
Picture Adjustments
FUNCTION
CONTRAST
BRIGHT(ness)
COLOR
TINT
SHARPNESS
(-) Button
Weaker
Darker
Paler
Greenish
Softer
(+) Button
Stronger
Lighter
Deeper
Purplish
Sharper
The actual number of channels received depends upon channel reception in your area or your cable
system. Consult your local Cable TV company to find out which of these channels are receivable and which
type of Cable system is used in your area.
To reset the picture settings to the initial state, repeat steps 1 and 2. Select (+) or (-) until RESET, press
MENU. Then press MENU to exit.
BEFORE REQUESTING SERVICE
V-BLOCK SETUP
V-Block allow users to program their TV to automatically block an incoming program with
certain level of violence, sexual content and strong language based on age, content or
both ratings.
TV RATING SET UP
V-BLOCK SET
MPAA RATING
PG-13
TV RATING
TV-PG-DLSV
ENGLISH RATING OFF
FRENCH RATING OFF
LOADING
OFF
EXIT
1. Go to CHANGE RATING sub-menu screen.
2. Select (+) or (-) until TV RATING, press MENU.
V-BLOCK SET UP
MENU SUN 11:23 AM
1. Press MENU to display main menu.
CLOCK SET
PROGRAM TIMER
V-BLOCK SET
PICTURE ADJUST
CH PROGRAM
LANGUAGES
EXIT
2. Select (+) or (-) until V-BLOCK SET, press MENU.
3. Use the number buttons to input “0000”. (the preset pass number
is 0000), then press MENU.
[+] / [-] : MENU SELECT
[MENU] : ENTER
V-BLOCK SET
4. Press MENU, the OFF (or ON) beside V-BLOCK will flash.
PASS NUMBER
? ? ? ?
5. Select (+) or (-) until ON, press MENU.
[+] / [-] : EXIT
[MENU] : ENTER
6. Select (+) or (-) until EXIT, press MENU to exit.
V-BLOCK SET
To disable block, set V-BLOCK to OFF.
If you turn the TV on for the first time, setting V-BLOCK to ON alone will not
enable the block unless you change the preset state for MPAA and TV Rating
from OFF to any rating. In case you forget the pass number call your nearest
Service Centre for assistance.
V-BLOCK
ON
CHANGE RATING
CHANGE NUMBER 0000
EXIT
V-BLOCK SET
V-BLOCK
ON
CHANGE RATING
CHANGE NUMBER 0000
EXIT
2. Select (+) or (-) until CHANGE RATING, press MENU.
3. Select (+) or (-) until the desired rating appears beside TV RATING,
press MENU.
When user select TV-Y7, TV-PG, TV-14 or TV-MA and press MENU, the sub-ratings (content-based rating)
will appear beside the selected main rating. User can select either only main rating or combine with the
sub-ratings as below:
TV-Y7(FV), TV-PG(DLSV), TV-14(DSLV), TV-MA(LSV)
FV :
D :
L :
S :
V :
4. Select (+) or (-) until the desired rating, press MENU.
5. Select (+) or (-) until ON, press MENU.
4. In case of sub-rating selection:
While the sub-rating is flashing, press (+) or (-) repeatedly to add or delete the sub-ratings
(yellow blank Indicate delete) then press MENU after each entry.
Rating rotates from lower to higher. X is the highest rating.
PG-13
R
NC-17
OFF
TV-Y
TV-Y7
TV-G
TV-PG
TV-14
TV-MA
All programs with a higher rating than the one selected will automatically be blocked.
If you don’t want to block TV RATING, set it OFF.
When user select only main rating without any sub-rating then program will be blocked only for main
rating, ignoring the sub-rating. But if user select in combination then programs with higher rating plus
similar sub-rating than the one selected will automatically be blocked.
X
All programs with a higher rating than the one selected will also be blocked.
If you don’t want to block MPAA RATING, set it to OFF.
V-BLOCK is activated only on programs and tapes that have the rating signal
and if activated “V-BLOCK” message together with the rating level appears
on-screen. The channel blocking will cease if the input source or if the channel
is changed.
1
V-BLOCK SET
MPAA RATING
PG-13
TV RATING
TV-PG-DLSV
ENGLISH RATING OFF
FRENCH RATING OFF
LOADING
OFF
EXIT
[+] / [-] : ON/OFF
[MENU] : ENTER
[+] / [-] : ON/OFF
[MENU] : ENTER
ENGLISH RATING
C
C8+
G
PG
14+
18+
EXIT
OFF
OFF
OFF
OFF
OFF
OFF
[+] / [-] : ON/OFF
[MENU] : ENTER
1. Go to V-BLOCK SET menu screen.
2. Select (+) or (-) until CHANGE NUMBER, press MENU, the numbers
beside it will flash.
3. Input the desire numbers using the Number button, press MENU.
4. Press MENU to re-conform your entry then select exit. To make correction
press (+) or (-) and repeat from step 2.
V-BLOCK SET
PROBLEM
• Make sure the unit is plugged in.
• Unplug the unit from electrical outlet for 60 seconds. Then plug it
in and turn it on again.
No Picture
• Make sure the antenna is properly connected at the back of the
TV.
• Make sure the antenna is not broken.
• Adjust the brightness and contrast controls.
No Sound
• Use the VOLUME (Up/Down) buttons to turn up the volume.
• Make sure the sound is not muted by pressing the MUTE button.
No Color
• Make sure the show is being transmitted in color by checking to
see if another channel is in color.
• Adjust the color control.
Wrong Color
• Adjust the color and tint controls.
Picture Too
Light/Dark
• Adjust the brightness and contrast controls.
Picture Interference
• Check the antenna for shorted or broken wires.
• Reposition the antenna.
• Try another channel to make sure there is no station trouble or
local interference (such as electric motors). If possible, minimize
by adjusting the antenna.
Remote Control
Doesn’t Work
• Make sure batteries are inserted in the remote control.
• Make sure the remote control is aimed directly at the remote sensor
on the TV.
Big black box
on screen
• Press the TV/CAP/TEXT button until the CAP or TEXT box
disappears from the screen
OFF
OFF
OFF
OFF
OFF
EXIT
[+] / [-] : ON/OFF
[MENU] : ENTER
V-BLOCK SET
1. Go to CHANGE RATING sub-menu screen.
MPAA RATING
PG-13
TV RATING
TV-PG-DLSV
ENGLISH RATING OFF
FRENCH RATING ON
LOADING
OFF
EXIT
2. Select (+) or (-) until LOADING, press MENU, the
OFF (or ON) beside it will flash.
[+] / [-] : SELECT
[MENU] : ENTER
[+] / [-] : SELECT
[MENU] : ENTER
SOLUTION
No Power
FRENCH RATING
G
8+
13+
16+
18+
MPAA RATING
PG-13
TV RATING
TV-PG-DLSV
ENGLISH RATING ON
FRENCH RATING OFF
LOADING
OFF
EXIT
3. Select (+) or (-) until ON, press MENU.
V-BLOCK SET
V-BLOCK SET
5. Select (+) or (-) until EXIT, press MENU to exit.
MT1130C(En)
6. Select (+) or (-) until EXIT, press MENU to exit.
LOADING SET UP
V-BLOCK
ON
CHANGE RATING
CHANGE NUMBER 0000
EXIT
V-BLOCK SET
MPAA RATING
PG-13
TV RATING
TV-PG-DLSV
ENGLISH RATING ON
FRENCH RATING OFF
LOADING
ON
EXIT
MPAA RATING
PG-13
TV RATING
TV-PG-DLSV
ENGLISH RATING OFF
FRENCH RATING ON
LOADING
ON
EXIT
[+] / [-] : ON/OFF
[MENU] : ENTER
[+] / [-] : ON/OFF
[MENU] : ENTER
[+] / [-] : SELECT
[MENU] : ENTER
V-BLOCK SET
[+] / [-] : SELECT
[MENU] : ENTER
V-BLOCK SET
MPAA RATING
PG-13
TV RATING
TV-PG-DLSV
ENGLISH RATING OFF
FRENCH RATING OFF
LOADING
OFF
EXIT
5. Select (+) or (-) until EXIT, press MENU to exit.
CHANGING A PASS NUMBER
MPAA RATING
PG-13
TV-PG-DLSV
TV RATING
ENGLISH RATING OFF
FRENCH RATING OFF
LOADING
OFF
EXIT
5. Select (+) or (-) until EXIT, press MENU to exit.
PG
2. Select (+) or (-) until ENGLISH or FRENCH
RATING, press MENU, the OFF (or ON) beside it
will flash.
4. Select (+) or (-) until the desire rating, press MENU,
the OFF (or ON) beside it will flash.
[+] / [-] : SELECT
[MENU] : ENTER
V-BLOCK SET
G
1. Go to CHANGE RATING sub-menu screen.
4. Press MENU to exit.
3. While MPAA RATING is highlighted, press MENU, the OFF
(or any rating) beside MPAA RATING will flash.
OFF
This setting is use to receive data service for Canadian English/French Language Rating System
in according with EIA-744-A Standard.
3. Select (+) or (-) until ON, press MENU.
Fantasy Violence
Suggestive Dialogue
Adult Language
Sexual Situation
Violence
Rating rotates from lower to higher. TV-MA is the highest rating.
[+] / [-] : SELECT
[MENU] : ENTER
MPAA RATING SET UP
1. Go to V-BLOCK SET menu screen.
[+] / [-] : SELECT
[MENU] : ENTER
Before requesting service, check the following list of problems and solutions. You may be able to
solve the problems yourself.
ENGLISH RATING/FRENCH RATING SET UP
V-BLOCK
OFF
CHANGE RATING
CHANGE NUMBER 1234
EXIT
[0] / [9] : NUMBER
[MENU] : ENTER
V-BLOCK SET
PASS NUMBER
1 2 3 4
Set ENGLISH or FRENCH RATING to OFF if you don’t want to block.
Set LOADING to OFF if you don’t want to load any ENGLISH or FRENCH RATING.
For threshold rating system if any rating is set to ON then other higher rating will automatically become
ON.
For individual rating system user can select ON or OFF for each level individually.
With LOADING ON if English or French Rating signal is detected, a “PRCC LOADING” message in red
will appear on-screen.
If there is error in loading, the “PRCC LOADING” message will change color from red to white and data
will not load.
Data will not load if the channel is change during loading.
The current English or French Ratings are automatically overwrite as new data are received.
[+] / [-] : NO
[MENU] : YES
28/08/2001, 9:45 AM