1
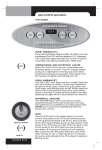
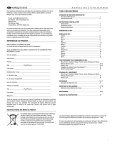
get into it!
owner’s manual
WELCOME TO THE SPA LIFE!
Please enjoy your new Everyday Hot Tub, but think
safety first. Read your Owner’s Manual in its entirety
before installing your spa and encourage all spa
users to do the same. More than just common
sense, this Owner’s Manual provides vital safety and
operational information.
We sincerely hope your spa life is a pleasant experience. If problems should arise, contact your Marquis
Spas dealer. Or contact Marquis Corp. at any of the
following:
Email: [email protected]
Web: www.marquisspas.com
Marquis Corp.
596 Hoffman Road
Independence, OR 97351
1
get into it!
product reference
SERIAL NUMBER LOCATION
You will find the serial number on the silver tag in the
equipment area.
PLEASE FILL OUT AND KEEP FOR FUTURE
REFERENCE
Name of Purchaser__________________________________
Date of Purchase ___________________________________
Address ___________________________________________
City _____________________State ____Zip Code _______
Signature __________________________________________
Telephone _________________________________________
Spa Model/Color ___________________________________
Spa Serial # ________________________________________
Pack Serial # _______________________________________
Dealer’s Name _____________________________________
Dealer’s Address ___________________________________
City _______________________State____Zip Code________
Telephone ___________________________________________
Every effort has been made to ensure the accuracy
of this manual. However, Marquis Corp. reserves the
right to improve its product without notice. This
could create a minor variation between this manual
and the actual product you receive. We apologize
for any inconvenience this may cause.
2
get into it!
owner’s manual index
IMPORTANT SAFETY INSTRUCTIONS
120V, Cord Connected Models ....................................................... 4
240V, Permanently Installed or Converted Models ....................... 5
Safety ................................................................................................. 6-9
INSTALLATION INSTRUCTIONS
Location ............................................................................................. 10-11
Filter Cartridge ...................................................................................12
Electrical Requirements ....................................................................13-14
STARTING YOUR SPA ...................................................................... 15-16
OPERATING YOUR SPA ...................................................................17
SPA SPECIFICATIONS
630 ...................................................................................................................... 18
Ultimate 630.......................................................................................................19-20
530....................................................................................................................... 21
Ultimate 530 ......................................................................................................22-23
418 ...................................................................................................................... 24
Ultimate 418........................................................................................................25-26
315 ........................................................................................................................27
Ultimate 315........................................................................................................28-29
SPA CONTROL OPERATION
630, U630, 530, U530, 418, U418, 315, U315...........................................30-34
Soundsations.....................................................................................................35-37
EQUIPMENT DIAGRAM
630, U630, 530, U530.................................................................................... 38
418, U418, 315, U315........................................................................................ 39
TROUBLESHOOTING ................................................................................... 40-41
LCD Diagnostic Messages ...........................................................................41
MAINTENANCE ................................................................................................42-45
SPA CARE AND ENJOYMENT GUIDE ................................................. 46-55
Water Care Troubleshooting........................................................................ 54-55
SpaBoutique™ Marquis ................................................................................ 56
3
get into it!
safety instructions
The following instructions are required to be printed by Underwriters
Laboratories (UL) as a condition of the listing of this product. They
contain important safety information. We strongly encourage you to
read and apply them.
IMPORTANT SAFETY
INSTRUCTIONS
WHEN INSTALLING AND USING THIS ELECTRICAL
EQUIPMENT, BASIC SAFETY PRECAUTIONS SHOULD
ALWAYS BE FOLLOWED, INCLUDING THE FOLLOWING:
1.
READ AND FOLLOW ALL
INSTRUCTIONS
2. WARNING: To reduce the risk of injury, do not permit children to
use this product unless closely supervised at all times.
3. DANGER: RISK OF CHILD DROWNING. Extreme caution must
be exercised to prevent unauthorized access by children. To avoid
accidents, ensure that children cannot use the spa or hot tub unless
they are supervised at all times.
120 VOLT, CORD CONNECTED MODELS
4. DANGER: RISK OF INJURY. Connect only to a grounded source.
5. Do not bury the power cord.
6. WARNING: To reduce the risk of electric shock, replace a damaged
cord immediately.
7. A ground terminal (pressure wire connector) is provided on the
surface of the control box inside the equipment compartment. This
connector should be bonded with a minimum No. 8 AWG (8.4mm2)
solid copper wire between this unit and any metal ladders, metal
water pipes, metal enclosures of electrical equipment, conduit, or
metal equipment within five feet (1.5m) of the spa. If the spa is
located on a reinforced concrete pad, the reinforced steel should
also be bonded to the ground terminal.
8. WARNING: Your spa is equipped with a ground fault circuit interrupter (GFCI) on the end of the power supply cord. Before each use
of the spa, with the plug connected to the power supply and the
unit operating, press the “test” button. The unit should stop operating and the GFCI power indicator will go out. Wait thirty seconds and
then reset the GFCI by pressing the “Reset” button. The GFCI
power indicator will turn on, restoring power to the spa. If the
interrupter does not perform in this manner, it is an indication of an
electrical malfunction and the possibility of an electric shock. Disconnect the plug from the receptacle until the fault has been identified
and corrected.
4
get into it!
safety instructions
240 VOLT, PERMANENTLY INSTALLED OR CONVERTED MODELS
9. A ground terminal is provided on the terminal block (TB-1, terminal 7)
located inside the control box. To reduce the risk of electric shock,
connect this terminal to the grounding terminal of your electrical
service or supply panel with a continuous green, insulated copper
wire. The wire must be equivalent in size to the circuit conductors
supplying the equipment. In addition, a bonding terminal (pressure
wire connector) is provided on the outside of the control box for
bonding to local ground points. To reduce the risk of electric shock,
this connector should be bonded with a No. 8 AWG (8.42mm2) solid
copper wire to any metal ladders, water pipes, or other metal within
five feet (1.5m) of the spa to comply with local requirements.
10. Your spa uses ground fault circuit interrupters in the electrical subpanel. Before each use of the spa and with the unit operating press
the Test button on each breaker. The switch should click over to the
“Trip” position. Wait thirty seconds and reset each GFCI breaker by
switching it completely off and then completely on. The switch
should then stay on. If either of the interrupters does not perform in
this manner, it is an indication of an electrical malfunction and the
possibility of an electric shock. Disconnect the power until the fault has
been identified and corrected.
ALL SPA MODELS
11. Install the spa so proper drainage is provided.
12.DANGER: RISK OF ELECTRIC SHOCK. Install the spa at least five
feet (1.5m) away from metal surfaces, in accordance with the
National Electric Code ANS/NMFPA70-1993. Each metal surface
must be permanently connected to a minimum No. 8 (8.42mm2)
solid copper conductor attached to the wire bonding connector on
the terminal box provided for this purpose.
13.DANGER: RISK OF ELECTRIC SHOCK. Do not permit any
appliance, such as a light, telephone, radio, or television, etc. within
five feet (1.5m) of the spa or hot tub.
14.WARNING: To reduce the risk of injury:
• The water in the spa should never exceed 104°F (40°C). Water
temperatures between 100°F (38°C) and 104°F (40°C) are considered safe for a healthy adult. Lower water temperatures are recommended for extended use (exceeding 10 minutes) and for young
children.
• Since excessive water temperatures have a high potential for
causing fetal damage during the early months of pregnancy,
pregnant or possibly pregnant women should limit spa water
temperatures to 100°F (38°C).
• Before entering a spa, the user should measure the water temperature with an accurate thermometer since the tolerance of temperature-regulating devices may vary as much as +/- 5°F (3°C).
• The use of drugs, alcohol, or medication before or during spa use
may lead to unconsciousness with the possibility of drowning.
5
get into it!
safety instructions
• Persons suffering from obesity or with a medical history of heart
disease, low or high blood pressure, circulatory system problems, or
diabetes should consult a physician before using the spa.
• Persons using medications should consult a physician before using
a spa since some medication may induce drowsiness while other
medication may affect heart rate, blood pressure, and circulation.
15.DANGER: TO REDUCE THE RISK OF INJURY TO PERSONS.
Do not remove the suction fittings.
16.DANGER: RISK OF INJURY: Never operate a spa if the suction
guard(s) is broken or missing. Never replace a suction guard with
one rated less than the flow rate marked on the original suction
guard. The suction guard(s) in the spa are sized to match the
specific water flow created by the pump. Should the need arise to
replace the suction guard(s) or the pump, be sure that the flow
rates are compatible.
17. DANGER: Children are especially sensitive to hot water. At no time
should children have unsupervised access to the spa. Children must
not be allowed to climb onto the spa cover. All Everyday Hot Tubs
are equipped with a locking cover that meets the ASTM F1346-91
Standard for Safety Covers. Always lock the child resistant locks
after using the spa for your children’s safety.
18.
SAVE THESE INSTRUCTIONS.
WARNING: Children should not use spas or hot tubs without adult
supervision.
WARNING: Do not use spas or hot tubs unless all suction guard(s)
are installed to prevent body and hair entrapment.
WARNING: Do not use drugs or alcohol before or during the use of
a spa or hot tub to avoid unconsciousness and possible drowning.
WARNING: People using medications and/or having an adverse
medical history should consult a physician before using a spa.
WARNING: The use of alcohol, drugs, and medication can greatly
increase the risk of fatal hyperthermia.
WARNING: Before entering the spa or hot tub measure the water
temperature with an accurate thermometer.
WARNING: Water temperature in excess of 104°F (40°C) may be
injurious to your health.
WARNING: Prolonged immersion in a spa or hot tub may be
injurious to your health.
WARNING: People with infectious diseases should not use a spa.
WARNING: Pregnant or possibly pregnant women should consult a
physician before using a spa or hot tub.
WARNING: To avoid injury, exercise care when entering and exiting
the spa or hot tub.
WARNING: Do not use a spa or hot tub immediately following
strenuous exercise.
CAUTION: Maintain water chemistry in accordance with
manufacturer’s instructions.
6
get into it!
safety instructions
SAFETY INSTRUCTIONS FOR FRENCH SPEAKING SPA OWNERS
AVERTISSEMENT: Ne pas placer d’appareil électrique (luminaire,
téléphone,radio, téléviseur, etc.) moins de 1.52 m de cette cuve de
relaxation.
AVERTISSEMENT: Ne pas laisser les enfants utiliser une cuve de
relaxation sans surveillance.
AVERTISSEMENT: Pour éviter que les cheveux ou une partie du
corps puissent être aspirés, ne pas utiliser une cuve de relaxation si les
grilles de prise d’aspiration ne sont pas toutes en place.
AVERTISSEMENT: Pour éviter l’évanouissement et la noyade
éventuelle, ne prendre ni drogue ni alcool avant d’utiliser une cuve de
relaxation ni quand on s’y trouve.
AVERTISSEMENT: Les personnes qui prennent des médicaments ou
ont des problemès de santé devraient consulter un médecin avant
d’utiliser une cuve de relaxation.
AVERTISSEMENT: La consommation d/alcool ou de drogue
augmente considérablement les risques d’hyperthermie motrelle dans
une cuve de relaxation.
AVERTISSEMENT: Avant d’utiliser une cuve de relaxation mesurer la
température de l’eau l’aide d’un thermométre précis.
AVERTISSEMENT: Il peut être dangereux pour la santé de se plonger
dans de l’eau plus de 40°C.
AVERTISSEMENT: L’utilisation prolongée d’une cuve de relaxation
peut être dangereuse pour la santé.
AVERTISSEMENT: Les personnes atteintes de maladies infectieuses
ne devraient pas utiliser une cuve de relaxation.
AVERTISSEMENT: Les femmes enceintes, que leur grossesse soit
confirmée ou non, devraient consulter un médecin avant d’utiliser une
cuve de relaxation.
AVERTISSEMENT: Pour éviter des blessures, user de prudence en
entrant dans une cuve de relaxation et en sortant.
AVERTISSEMENT: Ne pas utiliser une cuve de relaxation
immédiatement aprés un exercice fatigant.
ATTENTION: La tenteur de l’eau en matières dissoutes doit être
conforme aux directives du fabricant.
7
get into it!
safety instructions
PERSONAL SAFETY
Prolonged immersion in hot water can result in HYPERTHERMIA, a
dangerous condition which occurs when the internal temperature of
the body reaches a level above normal (98.6°F, 37°C). The symptoms
of hyperthermia include dizziness, fainting, drowsiness, lethargy, and a
body temperature above 98.6°F (37°C). The physical effects of hyperthermia include unawareness of impending hazard, failure to perceive
heat, failure to recognize the need to exit the spa, physical inability to
exit the spa, fetal damage in pregnant women, and unconsciousness
resulting in a danger of drowning.
WARNING: The use of alcohol, drugs, or medication can greatly
increase the risk of fatal hyperthermia in hot tubs and spas.
Persons taking medications which induce drowsiness such as tranquilizers, antihistamines, or anticoagulants should not use the spa. Pregnant women and persons with a medical history of heart disease,
diabetes, or high blood pressure should consult a physician before
using the spa.
8
get into it!
safety instructions
PERSONAL SAFETY DOs:
• Be sure your spa is connected to the power supply correctly – only
use a licensed electrical contractor.
• Shut off power supply (unplug 120V models) before draining the
spa or servicing the electrical components.
• Test the Ground Fault Circuit Interrupter (GFCI) monthly.
• Always test the water temperature with an accurate thermometer
before entering the spa to be sure that it’s a safe temperature.
• Remember that wet surfaces can be very slippery. Take care when
entering and exiting the spa.
• Lock the spa cover when the spa is not in use, whether it is empty
or full of water.
• Keep the water clean and sanitized with correct chemical care.
• Turn on the jets when adding ANY chemicals to the spa water.
• Clean the filter cartridge monthly to remove debris and mineral
buildup which affects the performance of the hydrotherapy jets,
limits the flow, or trips the high limit thermostat which will turn off
the entire spa.
PERSONAL SAFETY DO NOTs:
• Don’t use the spa with the equipment compartment door
removed.
• Don’t use the spa for more than 10 minutes of time at water
temperatures in excess of 102°F (39°C).
• Don’t allow the jet pump to operate for an extended period of time
with the cover in place. Extended pump operation causes a slow
heat buildup due to water friction. The spa equipment controls are
equipped with a built-in safety timer that automatically shuts off the
jet pump after 15 minutes of continuous operation should it have
been left on inadvertently.
• Don’t operate the spa at any time with the filter cartridges
removed.
• Don’t lift or drag the cover by using the tie-down straps; always lift
and carry by using the external handles.
• Don’t store chemicals in the spa’s equipment compartment.
• Don’t hesitate to call your Marquis Spas dealer with any questions
or maintenance concerns.
9
get into it!
installation instructions
LOCATION
For your portable spa to function properly and
safely, it must be located on a hard, flat, level
surface. Inground spas require special installation
techniques and should be planned in conjunction
with your spa dealer. Improper installation can
result in structural damage to the spa and the
voiding of your spa warranty. Items to discuss with
your dealer include: local construction codes;
electrical service requirements; serviceability of
equipment; present underground obstructions
such as gas, water, and telephone lines; safety
measures such as fences and locks; and visibility
of the spa installation from the home, street, and
neighbors.
• Allow for sufficient water drainage around the
spa to help preserve the equipment and support
structure. This includes indoor installations.
• A filled spa can weigh in excess of 4,000
pounds and the location should support the
weight of the filled spa.
• Locate the equipment compartment where it will
be accessible. Your spa MUST be installed to
permit access for servicing the equipment
above and/or below any decks or floors. Access
is essential and must allow adequate room for
service.
• Leave access to the circuit breakers in the sub
panel (240V models) or to the interrupter switch
(GFCI, 120V models) on the end of the power cord.
• Be sure the spa is level and in the final position
BEFORE filling with water. Check for power
cords, tools, and hoses that may be caught
underneath the spa.
• IMPORTANT: DO NOT LET AN EMPTY SPA
REMAIN EXPOSED TO DIRECT SUNLIGHT.
Spa surface temperatures can reach in excess
of 150°F (65°C) if left exposed to the sun.
Significant damage can occur if this is allowed to
happen, including warping and blistering of the
surface. Damage, that occurs as a result of this
exposure is not covered under the warranty.
• CAUTION: Never try to move a spa that has not
been fully drained. To do so could result in damage to the spa and physical injury to the mover.
10
get into it!
installation instructions
OUTDOOR AND PATIO INSTALLATION
To install the spa outdoors, we recommend a
reinforced concrete pad at least four inches thick.
The reinforcing material should be attached to a
#8 AWG bonding wire per national and local
electrical code.
If you place the spa on the ground, even temporarily, place concrete pavers under the entire
bottom of the spa. The concrete pavers should be
a least two inches thick and level across the entire
surface. The spa will inevitably settle and not
remain level on this surface, thus it’s important to
get it onto a solid foundation as soon as possible.
DECK INSTALLATION
Be sure the deck can support the weight of your
filled spa by checking the deck’s maximum load
capacity. Consult a qualified building contractor or
structural engineer. Minimum requirement is 100
pounds per square foot.
INDOOR INSTALLATION
There are special requirements if you place your
spa indoors. Flooring material must provide
adequate traction when wet. Proper drainage is
essential to prevent water puddling. Proper ventilation to the area is required. The addition of a ventilation system is recommended. Please see your
contractor for details.
11
get into it!
installation instructions
SHUT-OFF VALVES
Your spa is equipped with shut-off valves (see
EQUIPMENT DIAGRAM) that shut off the water
flow to the equipment system for dealer service.
At times, a new spa or one that has recently been
serviced, may have the shut-off valves partially
closed which can restrict the water flow and
hinder jet performance. Be sure the valves are
fully open.
Shut-off valve in
open position
1) Center filter
cartridge over canister
FREEZE PROTECTION
When a freeze condition is detected (which
occurs when the temperature in the heater
housing drops to 55°F (13°C) the jet pump is
automatically activated. In areas with extremely
cold winter conditions, your spa should be fine as
long as it is left running at normal operating temperatures. For extra protection see your dealer for
an optional freeze sensor. If you plan to turn the spa
off, follow the instructions in this manual (see
SUSPENDED USE OR WINTERIZING YOUR SPA).
OVERHEATING
In the case of extended hot weather, the spa
water temperature may reach and maintain 104°F
to 106°F (40°C to 41°C) or higher. This is due to the
ambient temperature and the full insulation in the
spa cabinet. You may have the option of shortening the pump-run time. See SPA CONTROL
OPERATION for available options.
FILTER CARTRIDGE
Your portable spa is equipped with the ConstantClean™ Filtration system.
2) Screw filter
cartridge in place
3) Snap Vortex filter top
in place
12
NOTE: It is very important that the components of
these filtration systems be installed properly in the
proper part of the spa.
1. Hold the Vortex filter cartridge and center it in
the opening of the filter housing.
2. Use the filter handle and turn the filter
cartridge clockwise to screw it in place. (Use
caution not to overtighten as damage may
occur to threads and is not covered under
warranty.)
3. Grasp the edge of the dome-shaped Vortex
filter top. Center it over the ring and gently
snap in place.
get into it!
Safety guard of
suction fitting must
remain in place.
installation instructions
SUCTION GUARDS
The suction guard(s) in the footwell of your spa is
an opening through which the jet pump draws
water. Suction fittings are equipped with a safety
guard. Suction through the fittings can be strong.
The safety guard(s) must remain in place and
undamaged. A fitting with a damaged guard(s) can
be dangerous, especially to small children or people
with long hair. Should any part of the body become
drawn to a fitting, turn the jet pump off immediately.
Long hair should be restrained in a bathing cap,
never allow it to float freely in the spa. Replace any
missing or damaged suction guard(s).
NOTE: It is normal for the flow rates of the suction
fittings to vary from strong to barely noticeable.
ELECTRICAL REQUIREMENTS
It is the responsibility of the spa owner to ensure
that all electrical connections are made in accordance with all electrical codes in effect at the time
of installation.
120 Volt:
120V units must only be connected to
a properly grounded, grounding type
15 amp dedicated receptacle. 120V
equipment is designed to operate on
60Hz alternating current only at a
voltage of 120, 12.5 amp. maximum
load. Only use the cord provided with
the spa, do not use an extension cord.
To Convert 120V to 240V:
All connections must be made by a licensed
electrician.
1. Disconnect power by unplugging from
receptacle and remove cord from terminal
block.
2. Remove white wire connected to J11 and J32
completely and discard.
3. Install 240V power line as indicated on page 14.
4. Set dip switch 10 to off position.
5. For units for use in other than single-family
dwellings, a clearly labeled emergency switch
shall be provided as part of the installation. The
switch shall be readily accessible to the
occupants and shall be installed adjacent to,
within sight of, and at least five feet (1.52 m)
from the spa.
13
get into it!
installation instructions
Ground Fault Circuit Interrupters (GFCI) are available
from your Marquis Spas dealer.
240 Volt:
All connections must be made in accordance with
the wiring diagram found on the inside of the control
box cover. Connections must be made with copper
conductors only – do not use aluminum wiring with
this system. All conductors, circuit
breakers, and/or fuses must be sized in
accordance to the total amperage load
as specified:
•
•
Permanently connected
Rated 240V, 60 Hz, 50A, three wires
(#6 copper) plus ground (#8 AWG
copper)
• Fuse or circuit breaker size: 50 amp
• For units for use in other than singlefamily dwellings, a clearly labeled emergency switch
shall be provided as part of the installation. The
switch shall be readily accessible to the occupants
and shall be installed adjacent to, within sight of,
and at least five feet (1.52 m) from the spa.
This equipment is designed to operate on 60Hz
alternating current only at a voltage of 240 (+ or -).
Units to be operated at 240V must have all connections made by a qualified electrician in accordance
with all electric codes in effect at the time of installation. All 240V units require four wires (line 1, line 2,
neutral, and ground). Refer to the label at the terminal
block.
NOTE: Ensure the GFCI is properly installed. Failure
to do so may result in spa malfunction or damage
which is not warranted.
A pressure wire connector is located on the exterior
of the control box. This pressure wire connector
should be bonded with at least #8 AWG (8.42mm2,
#6 in Canada) copper wire to any metal ladder, metal
water pipe, common bonding grid (reinforced concrete slab, ground plate beneath the spa), or any
other metal within five feet of the spa.
14
get into it!
starting your spa
START-UP PROCEDURE
Your spa is equipped with solid-state Comfort
Controls specific to your spa model. Please see SPA
CONTROL OPERATION for your specific spa model.
To start your spa, you need a spa water test kit and
an underwater thermometer. It is important to follow
each of these steps when starting your spa. Once
you have completed the following steps, refer to the
WATER TREATMENT section for proper start-up
water maintenance.
NOTE: Your spa has been filled and test-run at the
factory. The first time your spa is filled with water,
some discoloration from residual test water may
appear. This will disappear when the spa is completely filled and the filtration system is functioning.
Test the water for the proper chemical balance and
adjust as necessary. PROPER CHEMICAL BALANCE IS IMPORTANT for your safety and the
longevity of your spa.
THERAPY PUMP
Allow the spa to circulate on high-speed (see SPA
CONTROL OPERATION) for four to five minutes to
discharge air from the plumbing system. Do not
expect hot water immediately from the jets; the
heater will take several hours to heat the water.
Start-up procedure for all models
1. Place spa on a hard, flat, level surface. Make
sure the power supply is off.
2. Make sure the suction guard(s) in the footwell
are in place and undamaged.
3. Open the equipment door. (SEE EQUIPMENT
DIAGRAM). Tighten all disconnects and open all
shut-off valves. Close drain valve in equipment
bay.
4. Install filter cartridges. (See INSTALLATION
INSTRUCTIONS, Filter Cartridge(s).)
5. Fill the spa with water to two-thirds of the way
up the Vortex skimmer openings. The use of a
Fill Filter is recommended, especially in areas
with high mineral content in the water.
Fill spa with water to
two-thirds of the way
up the Vortex skimmer
opening.
15
get into it!
Use TEMP+- pad to set
water temperature.
Spa cover helps
maintain a constant
water temperature.
starting your spa
6. Turn the power on.
7. Your spa is now in “pump priming” mode and a
“Pr” message displays in the LCD window of
the control panel. While in this mode the spa
appears idle, which lasts approximately four to
five minutes if not exited manually. To exit
manually, press the TEMP+- pad.
8. At this time the spa should have water flowing
from the jets. If the pump has not primed and
the water is not flowing from the jets after two
minutes TURN OFF POWER TO THE SPA
and vent air from the pumps by slightly opening
the pump unions. After turning the power on
again, the spa initiates a new priming mode.
Repeat steps above.
9. The system requires approximately two minutes
of water flow to determine the water temperature. After two minutes of water flow, the temperature is displayed as actual water temperature. After you have manually exited the priming
mode (or allowed the spa to automatically exit)
the LCD window momentarily displays 102°F
(39°C) and then the display switches to - - °F.
10. The factory default setting for water temperature is 102°F (39°C). Use the TEMP+- pad on the
control panel to set the water temperature to
the desired level. (See SPA CONTROL OPERATION, Temperature Display And Adjustment.)
Your spa heats at the rate of approximately one
degree per hour for 120V systems, and five
degrees per hour for 240V systems.
SPA COVER
When the spa is not in use, the spa cover should be
kept on the spa to retain the water’s heat and to
keep out dirt, leaves, etc. Your heater maintains a
constant water temperature between uses.
For your safety and convenience, the cover is
equipped with adjustable straps, safety locks, and
handles. Use the exterior handles to remove and
replace your cover. We suggest that you use the
safety locks to help keep out unintended users and
prevent the cover from being blown off in windy
conditions. Cover Companion™ and other cover
lifts are also available to assist you in cover removal.
See your Marquis Spas dealer for details.
16
get into it!
operating your spa
MAXIMUM THERAPY JETTING SYSTEM
HKTM12 JETS
This small jet provides a targeted stream of water.
HKTM16 JETS
The direction of water flow can be changed by
redirecting the central nozzle. The water flow can be
adjusted by turning the jet face using the four tabs.
HKTM8 NECK JETS
The neck jets are turned on and off (when the jet
pump is on) using the small teardrop neck jet
control lever.
HK™8 NECK JET CONTROL
Use this control to increase or decrease the air
flow to the neck jets.
Neck Jet Control
17
get into it!
5
Use the Bather’s
panel to set the
temperature,
select the
filtration, and
turn on the jets
and lights.
11
This valve
controls the
water flow of
the neck jets.
the 630
#
1
2
4
5
6
7
8
9
10
11
12
13
14
Component Identification
HKTM12 Jets
HKTM16 Jets
HKTM8 Neck Jets
Bathers Control Panel
IR Sensor
Filter Canisters
Suction Fittings
Floor Drain
Light
Neck Jet Valve
Ozone Injector Fitting
Spa Frog®
Spa Frog® Return Fitting
Physical Specifications
Dimensions
Height
Interior Depth
Seating Positions
Weight Dry/Lbs.
Weight Full/Lbs.
Water Capacity/Gallons
Total Therapy Jets
18
Qty.
24
4
2
1
1
2
4
1
1
1
1
1
1
Size
84" x 84"
34"
32.5"
6/7
780
4032
390
30
get into it!
5
Use the Bather’s
panel to set the
temperature,
select the
filtration, and
turn on the jets
and lights.
11
This valve
controls the
water flow of
the neck jets.
16
Use PowerShift
control to select
jet zones.
the ultimate 630
#
1
2
3
4
5
6
7
8
9
10
11
12
13
14
15
16
17
Component Identification
HKTM12 Jets
HKTM16 Jets
HK™40 Jets
HKTM8 Neck Jets
Bathers Control Panel
IR Sensor
Filter Canisters
Suction Fittings
Floor Drain
Light
Neck Jet Valve
Ozone Injector Fitting
Spa Frog®
Spa Frog® Return Fitting
Waterfall Valve
PowerShift™ Controls
Waterfall Feature
Physical Specifications
Dimensions
Height
Interior Depth
Seating Positions
Weight Dry/Lbs.
Weight Full/Lbs.
Water Capacity/Gallons
Total Therapy Jets
19
Qty.
16
4
8
2
1
1
2
4
1
1
1
1
1
1
1
2
1
Size
84" x 84"
34"
32.5"
6/7
780
4032
390
30
ZONE 2B
Lowerbody jets.*
*Neck jets
operate in
zone 2.
20
ZONE 1A
Mid-, lowerback and
leg jets.*
ZONE 2A
Upper-,
mid- and
lower-back
jets.*
ultimate 630
get into it!
ZONE 1B
Upper- and
mid-back
jets.*
*Waterfall
operates in
zone 1.
get into it!
5
Use the Bather’s
panel to set the
temperature,
select the
filtration, and
turn on the jets
and lights.
11
This valve
controls the
water flow of
the neck jets.
the 530
#
1
2
4
5
6
7
8
9
10
11
12
13
14
Component Identification
HKTM12 Jets
HKTM16 Jets
HKTM8 Neck Jets
Bathers Control Panel
IR Sensor
Filter Canisters
Suction Fittings
Floor Drain
Light
Neck Jet Valve
Ozone Injector Fitting
Spa Frog®
Spa Frog® Return Fitting
Physical Specifications
Dimensions
Height
Interior Depth
Seating Positions
Weight Dry/Lbs.
Weight Full/Lbs.
Water Capacity/Gallons
Total Therapy Jets
21
Qty.
24
4
2
1
1
2
4
1
1
1
1
1
1
Size
84" x 84"
34"
32.5"
5
780
3699
350
30
get into it!
5
Use the Bather’s
panel to set the
temperature,
select the
filtration, and
turn on the jets
and lights.
11
This valve
controls the
water flow of
the neck jets.
16
Use PowerShift
control to select
jet zones.
ultimate 530
#
1
2
3
4
5
6
7
8
9
10
11
12
13
14
15
16
17
Component Identification
HK™12 Jets
HK™16 Jets
HK™40 Jets
HK™8 Neck Jets
Bathers Control Panel
IR Sensor
Filter Canisters
Suction Fittings
Floor Drain
Light
Neck Jet Valve
Ozone Injector Fitting
Spa Frog®
Spa Frog® Return Fitting
Waterfall Valve
PowerShift™ Controls
Waterfall Feature
Physical Specifications
Dimensions
Height
Interior Depth
Seating Positions
Weight Dry/Lbs.
Weight Full/Lbs.
Water Capacity/Gallons
Total Therapy Jets
22
Qty.
16
4
8
2
1
1
2
4
1
1
1
1
1
1
1
2
1
Size
84" x 84"
34"
32.5"
5
780
3699
350
30
ZONE 2A
Upper-,
mid- and
lower-back
jets.*
ultimate 530
get into it!
ZONE 1A
Mid-, lowerback and
leg jets.*
1
2
ZONE 2B
Lowerbody jets.*
ZONE 1B
Upper- and
mid-back
jets.*
1
2
*Neck jets
operate in
zone 2.
23
*Waterfall
operates in
zone 1.
get into it!
5
Use the Bather’s
panel to set the
temperature,
select the
filtration, and
turn on the jets
and lights.
11
This valve
controls the
water flow of
the neck jets.
the 418
#
1
2
4
5
6
7
8
9
10
11
12
13
14
Component Identification
HKTM12 Jets
HKTM16 Jets
HKTM8 Neck Jets
Bathers Control Panel
IR Sensor
Filter Canisters
Suction Fitting
Floor Drain
Light
Neck Jet Valve
Ozone Injector Fitting
Spa Frog®
Spa Frog® Return Fitting
Physical Specifications
Dimensions
Height
Interior Depth
Seating Positions
Weight Dry/Lbs.
Weight Full/Lbs.
Water Capacity/Gallons
Total Therapy Jets
24
Qty.
14
2
2
1
1
2
1
1
1
1
1
1
1
Size
77" x 84"
34"
32.5"
4/7
600
3436
340
18
get into it!
5
Use the Bather’s
panel to set the
temperature,
select the
filtration, and
turn on the jets
and lights.
11
This valve
controls the
water flow of
the neck jets.
16
Use PowerShift
control to select
jet zones.
the ultimate 418
#
1
2
3
4
5
6
7
8
9
10
11
12
13
14
15
16
17
Component Identification
HKTM 12 Jets
HKTM 16 Jets
HK™40 Jets
HKTM 8 Neck Jets
Bathers Control Panel
IR Sensor
Filter Canisters
Suction Fitting
Floor Drain
Light
Neck Jet Valve
Ozone Injector Fitting
Spa Frog®
Spa Frog® Return Fitting
Waterfall Valve
PowerShift™ Control
Waterfall Feature
Physical Specifications
Dimensions
Height
Interior Depth
Seating Positions
Weight Dry/Lbs.
Weight Full/Lbs.
Water Capacity/Gallons
Total Therapy Jets
25
Qty.
10
2
4
2
1
1
2
1
1
1
1
1
1
1
1
1
1
Size
77" x 84"
34"
32.5"
4/7
600
3436
340
18
ultimate 418
get into it!
ZONE 2
Upper-,
mid- and
lower-back
jets.*
ZONE 1
Lowerbody jets.*
*Neck jets
operate in
zone 2.
26
get into it!
5
Use the Bather’s
panel to set the
temperature,
select the
filtration, and
turn on the jets
and lights.
11
This valve
controls the
water flow of
the neck jets.
the 315
#
1
2
4
5
6
7
8
9
10
11
12
13
14
Component Identification
HKTM 12 Jets
HKTM 16 Jets
HKTM 8 Neck Jets
Bathers Control Panel
IR Sensor
Filter Canisters
Suction Fitting
Floor Drain
Light
Neck Jet Valve
Ozone Injector Fitting
Spa Frog®
Spa Frog® Return Fitting
Physical Specifications
Dimensions
Height
Interior Depth
Seating Positions
Weight Dry/Lbs.
Weight Full/Lbs.
Water Capacity/Gallons
Total Therapy Jets
27
Qty.
11
2
2
1
1
2
1
1
1
1
1
1
1
Size
60" x 84"
29.5"
28"
3
400
2026
195
15
get into it!
5
Use the Bather’s
panel to set the
temperature,
select the
filtration, and
turn on the jets
and lights.
11
This valve
controls the
water flow of
the neck jets.
16
Use PowerShift
control to select
jet zones.
the ultimate 315
#
1
2
3
4
5
6
7
8
9
10
11
12
13
14
15
16
17
Component Identification
HKTM 12 Jets
HKTM 16 Jets
HK™40 Jets
HKTM 8 Neck Jets
Bathers Control Panel
IR Sensor
Filter Canisters
Suction Fitting
Floor Drain
Light
Neck Jet Valve
Ozone Injector Fitting
Spa Frog®
Spa Frog® Return Fitting
Waterfall Valve
PowerShift™ Control
Waterfall Feature
Physical Specifications
Dimensions
Height
Interior Depth
Seating Positions
Weight Dry/Lbs.
Weight Full/Lbs.
Water Capacity/Gallons
Total Therapy Jets
28
Qty.
7
2
4
2
1
1
2
1
1
1
1
1
1
1
1
1
1
Size
60" x 84"
29.5"
28"
3
400
2026
195
15
ultimate 315
get into it!
ZONE 2
Upper-,
mid- and
lower-back
jets.*
ZONE 1
Lowerbody jets.*
*Neck jets
operate in
zone 2.
29