1
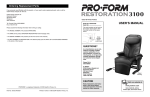
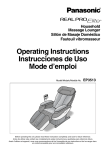
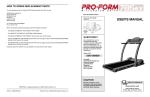
Model No. WLRX10170
Serial No.
Write the serial number in the space
above for reference.
Serial Number Decal (on frame)
QUESTIONS?
As a manufacturer, we are
committed to providing complete
customer satisfaction. If you
have questions, or find that there
are missing parts, we will
guarantee complete satisfaction
through direct assistance from
our factory.
TO AVOID UNNECESSARY
DELAYS, PLEASE CALL DIRECT
TO OUR TOLL-FREE CUSTOMER
HOT LINE. The trained technicians on our customer hot line
will provide immediate assistance, free of charge to you.
CUSTOMER HOT LINE:
1-800-999-3756
Patent Pending
Mon.ÐFri., 6 a.m.Ð6 p.m. MST
CAUTION
Read all precautions and instructions in this manual before using
this equipment. Save this manual
for future reference.
USER'S MANUAL
TABLE OF CONTENTS
IMPORTANT PRECAUTIONS . . . . . . . . . . . . . . . . . . . . . . . . . . . . . . . . . . . . . . . . . . . . . . . . . . . . . . . . . . . . .3
BEFORE YOU BEGIN . . . . . . . . . . . . . . . . . . . . . . . . . . . . . . . . . . . . . . . . . . . . . . . . . . . . . . . . . . . . . . . . . . .4
ASSEMBLY . . . . . . . . . . . . . . . . . . . . . . . . . . . . . . . . . . . . . . . . . . . . . . . . . . . . . . . . . . . . . . . . . . . . . . . . . . .5
HOW TO OPERATE THE MASSAGE CHAIR . . . . . . . . . . . . . . . . . . . . . . . . . . . . . . . . . . . . . . . . . . . . . . . . . .6
MAINTENANCE AND STORAGE . . . . . . . . . . . . . . . . . . . . . . . . . . . . . . . . . . . . . . . . . . . . . . . . . . . . . . . . . . .9
PART LIST . . . . . . . . . . . . . . . . . . . . . . . . . . . . . . . . . . . . . . . . . . . . . . . . . . . . . . . . . . . . . . . . . . . . . . . . . . .10
EXPLODED DRAWING . . . . . . . . . . . . . . . . . . . . . . . . . . . . . . . . . . . . . . . . . . . . . . . . . . . . . . . . . . . . . . . . .11
HOW TO ORDER REPLACEMENT PARTS . . . . . . . . . . . . . . . . . . . . . . . . . . . . . . . . . . . . . . . . . . .Back Cover
LIMITED WARRANTY . . . . . . . . . . . . . . . . . . . . . . . . . . . . . . . . . . . . . . . . . . . . . . . . . . . . . . . . . . .Back Cover
2
IMPORTANT PRECAUTIONS
WARNING: To reduce the risk of burns, fire, electric shock, or serious injury to persons,
read all important precautions before using the massage chair.
READ AND FOLLOW ALL INSTRUCTIONS
these conditions exists, call the toll-free
telephone number on the front of this manual.
1. Read all precautions and instructions in this
manual before using the massage chair.
10. Keep the power cord away from heated
surfaces.
2. It is the responsibility of the owner to ensure
that all users of the massage chair are
adequately informed of all precautions.
11. Use the massage chair indoors. Never use
the massage chair outdoors.
DANGER
To reduce the risk of electric shock:
12. The massage chair is intended for home use
only. Do not use the massage chair in a
commercial, rental, or institutional setting.
3. Always turn off the hand control and unplug
the power cord from the outlet immediately
after using and before cleaning the massage
chair.
DANGER
13. Keep pins and other sharp objects away from
the massage chair.
WARNING
To reduce the risk of burns, fire, electric shock,
or injury to persons:
14. Carefully examine the massage chair before
each use. If there are any signs of deterioration, call the toll-free telephone number on
the front of this manual.
4. Never leave the massage chair unattended
while it is plugged in.
5. Do not use the massage chair under a
blanket or pillow. Excessive heating can
occur and cause fire, electric shock, or injury
to persons.
15. Keep the massage chair dry, away from water
and moisture.
WARNING
6. Close supervision is necessary when the
massage chair is used by, on, or near invalids
or disabled persons.
16. Temperatures sufficiently high to cause
burns may occur. Do not use on an infant
or invalid or on a sleeping or unconscious
person. Do not use on insensitive skin or on
a person with poor blood circulation. Check
the skin in contact with the heated area of
the massage chair frequently to reduce the
risk of blistering.
7. Keep children away from the massage chair.
8. Use the massage chair only for its intended
use as described in this manual.
9. Never operate the massage chair if it is not
working properly, if it is damaged, or if the
power cord or plug is damaged. If any of
17. Do not crush the massage chair. Avoid sharp
folds in the massage pad.
WARNING: Read all instructions before using this product. ICON assumes no responsibility for personal injury or property damage sustained by or through the use of this product.
SAVE THESE INSTRUCTIONS
3
BEFORE YOU BEGIN
Congratulations for selecting the DAYBREAK
multi-zone massage chair by WESLO¨. The innovative
DAYBREAK is designed to melt away stressÑrelaxing
you, stimulating circulation, and reducing muscle
fatigueÑany time you choose. Using the convenient
hand control, you can choose upper-back, lower-back,
or thigh massage, wave or pulse motion, or the built-in
heater. You can even remove the massage pad from
the frame and use it on the floor or a bed. And when
the massage chair is not in use, it can be folded for
compact storage, so you can take it wherever there is
an electrical outlet!
reading this manual, call our Customer Service
Department toll-free at 1-800-999-3756, Monday
through Friday, 6 a.m. until 6 p.m. Mountain Time
(excluding holidays). Before calling, please note the
product model number and serial number. The model
number is WLRX10170. The serial number can be
found on a decal attached to the frame (see the front
cover of this manual).
Before you assemble the DAYBREAK, please look at
the drawing below and familiarize yourself with the
parts that are labeled.
For your benefit, read this manual carefully before
using the DAYBREAK. If you have questions after
Headrest
Massage Pad
Armrest
Frame
Hand Control
Hand Control Holder
Power Cord
4
ASSEMBLY
Place all parts of the DAYBREAK in a cleared area and remove the packing materials; do not dispose of the
packing materials until the DAYBREAK is fully assembled. For your convenience, the DAYBREAK can be
assembled in three simple steps. An adjustable wrench
(not included) is required.
1. Unfold the massage chair to the position shown at the
right. Make sure that the Massage Pad (12) is correctly
positioned on the Seat Frame (10) and the Back Frame
(15).
1
9
9
1
Attach one of the Arms (9) to the Seat Frame (10) with two
5/16Ó x 2Ó Carriage Bolts (1), two 5/16Ó Washers (4), and
two 5/16Ó Nylon Locknuts (5) as shown.
1
10
Attach the other Arm (9) to the Seat Frame (10) in the
same manner.
4
4
2. Connect the wire harness on the Hand Control (14) to the
wire harness on the Massage Pad (12). Refer to the inset
drawing. Make sure that the indicated latch on the wire
harness is engaged. If the wire harnesses do not fit
together easily, turn them. Do not force the wire
harnesses together.
2
12
14
3. Plug the Power Cord (16) into the jack on the Massage
Pad (12).
Latch
3
12
16
4. Make sure that all parts of the massage chair are properly tightened.
5
12
15
5
HOW TO OPERATE THE MASSAGE CHAIR
DIAGRAM OF THE HAND CONTROL
FEATURES OF THE MASSAGE CHAIR
B
The convenient hand control lets you customize the
type of massage you get each time you use the
massage chair. With the manual mode selected, you
can choose any combination of upper-back, lowerback, and thigh massage action. If desired, the built-in
heater can be turned on. The control also offers three
automatic modes: Full Body Wave, Full Body Pulse,
and Upper Body Wave. Whichever mode you choose,
the speed and intensity of the massage action can be
adjusted to the level thatÕs just right for you.
D
HOW TO USE THE HAND CONTROL
A
C
To use the
massage chair,
first plug the transformer on the
power cord into a
120-volt outlet.
Keep the power
cord away from
walkways and
heated
surfaces.
E
G
H
F
I
Next, sit on the massage chair and relax. Follow the
steps below to use the hand control.
A. Power IndicatorÑThis indicator lights when the
power is on.
HOW TO TURN ON THE POWER
B. Power SwitchÑThis switch turns the power on
and off.
Slide the power switch to
the ÒonÓ position; the
power indicator will light.
Note: If there is a thin
sheet of clear plastic on
the face of the hand
control, remove it.
C. Mode IndicatorsÑThese indicators show which
mode is selected.
D. Upper Back, Lower Back, and Thigh ButtonsÑ
When the Manual mode is selected, these buttons
activate the three massage zones.
HOW TO USE THE MANUAL MODE
E. Heater ButtonÑThis button turns the built-in
heater on and off.
1. When the power is
turned on, the Manual
mode will be selected
and the Manual mode
indicator will light.
Note: If a different
mode is selected,
press the Mode
button repeatedly until
the Manual mode
indicator lights.
F. Heater IndicatorÑThis indicator lights when the
built-in heater is on.
G. Mode ButtonÑThis button selects the four modes.
H. Speed ButtonsÑThese buttons control the speed
of the massage action when one of the three
automatic modes is selected.
I.
Transformer
Intensity ButtonsÑThese buttons control the
intensity of the massage action in all modes.
6
Power
Switch
2. The massage chair
features three
separate massage
zones: the upper
back, lower back,
and thigh zones.
The massage zones
are controlled with
the Upper Back,
Lower Back, and
Thigh buttons. Pressing a button once will activate
a massage zone. Pressing the button again will
turn off the massage zone. Press the buttons to
activate the desired massage zones.
2. After you have
selected the desired
mode, press the
Speed and Intensity
buttons to adjust the
speed and intensity of
the vibrating
massage action.
Note: If no buttons on the hand control are
pressed for twenty minutes, the vibrating massage
action will automatically stop. To restart the
massage action, follow steps 1 and 2 above.
HOW TO ACTIVATE THE BUILT-IN HEATER
3. After you have
activated the desired
massage zones,
press the Intensity +
or Ð buttons to
adjust the intensity
of the vibrating
massage action.
Whether the Manual
mode or one of the automatic modes is selected,
you can add soothing
heat to your massage, if
desired. To turn on the
heater, press the Heater
button. The Heater indicator will light. Press the button
again when you want to turn off the heater. Note:
When the heater is on, the maximum intensity setting
of the vibrating massage action will be lower. Therefore,
the intensity may decrease slightly when the heater is
turned on.
Note: If no buttons on the hand control are
pressed for twenty minutes, the vibrating massage
action will automatically stop. To restart the
massage action, follow steps 1 through 3 above.
HOW TO USE THE AUTOMATIC MODES (FULL
BODY WAVE, FULL BODY PULSE, AND UPPER
BODY WAVE)
Note: If no buttons on the hand control are
pressed for twenty minutes, the heater will
automatically turn off. To turn on the heater, follow
the instructions above.
1. Press the Mode
button repeatedly to
select the desired
mode. A mode indicator will light to
show which mode is
selected.
HOW TO TURN OFF THE POWER
To turn off the power, slide the power switch to the
ÒoffÓ position. The power indicator will darken.
HAND CONTROL TROUBLE-SHOOTING
When Full Body
Wave is selected,
the upper body,
lower body, and thigh zones will be activated in
sequence, producing a wave-like massage motion.
When Full Body Pulse is selected, the upper body,
lower body, and thigh zones will be activated
together with a
pulsing motion. The Upper Body Wave is similar to
the Full Body Wave, but only the upper body and
lower body zones will be activated.
If the hand control does not function properly, make
sure that the transformer on the power cord is
plugged into a 120-volt outlet. In addition, make sure
that the hand control is properly connected to the
massage pad (see assembly step 2 on page 5).
7
HOW TO REMOVE THE MASSAGE PAD FROM
THE FRAME
HOW TO USE THE MASSAGE PAD ON A FLOOR
OR BED
If desired, the massage pad can be removed from the
frame and used on the floor or a bed. Follow the steps
below to remove the massage pad.
After the massage pad is removed from the frame,
reconnect the hand control and the power cord to the
massage pad (see the drawings at the left).
1. Unplug the power
cord from the
outlet. It is recommended that you
also disconnect the
power cord from
the jack on the
massage pad.
Next, spread the massage pad flat on the floor or bed.
If desired, pillows can be placed under the massage
pad for added comfort. WARNING: Do not place a
blanket or pillow on top of the massage pad.
Excessive heating can occur and cause fire,
electric shock, or injury to persons.
Massage Pad
Power Cord
2. Next, it is recommended that you
disconnect the wire
harness on the
hand control from
the wire harness
on the massage
pad. To disconnect
the wire harnesses,
first press down the
indicated small
latch.
Latch
Massage Pad
Hand
Control
To operate the massage pad, refer to pages 6 and 7
of this manual.
Massage
Pad
HOW TO ATTACH THE MASSAGE PAD TO THE
FRAME
3. Fold the massage chair into the storage position.
Slide the massage pad off the seat frame and the
back frame. Note: There is a sleeve between the
massage pad and the frame. Be careful not to
remove the sleeve as you remove the massage pad.
To use the massage pad on the frame, it is recommended that you first disconnect the power cord and
the hand control from the massage pad (see the
drawings at upper left).
Next, fold the massage chair into the storage position.
Slide the massage pad onto the frame (see the
drawing at the left). Make sure that the sleeve is
properly positioned between the massage pad and the
frame.
Massage
Pad
Finally, reconnect the hand control and the power cord
to the massage pad.
Back
Frame
Seat
Frame
8
MAINTENANCE AND STORAGE
Check the massage chair periodically to make sure
that all parts are properly tightened.
that the hand control is properly connected to the
massage pad (see assembly step 2 on page 5).
The massage chair can be cleaned with a low-power
hand-held vacuum or a dry cloth. IMPORTANT: Never
use water or solvents to clean the massage chair.
When the massage chair is not in use, it can be
folded for compact storage. IMPORTANT: Avoid
sharp folds in the massage pad when storing the
massage chair. Never place objects on top of the
massage chair during storage.
If the hand control does not function properly, make
sure that the transformer on the power cord is
plugged into a 120-volt outlet. In addition, make sure
9
PART LISTÑModel No. WLRX10170
Key No.
Qty.
1
2
3
4
5
6
7
8
9
10
4
2
2
4
4
4
4
2
2
1
Description
5/16Ó x 2Ó Carriage Bolt
Arm Cap
5/16Ó x 3 3/4Ó Bolt
5/16Ó Washer
5/16Ó Nylon Locknut
Frame Cap
Pivot Cover
Armrest
Arm
Seat Frame
R0597A
Key No.
Qty.
11
12
13
14
15
16
17
18
19
#
4
1
1
1
1
1
1
4
2
1
Description
1/4Ó x 1 3/4Ó Screw
Massage Pad
Headrest
Hand Control
Back Frame
Power Cord w/Transformer
Sleeve
1/4Ó Washer
5/16Ó Nylon Jam Nut
UserÕs Manual
Note: Ò#Ó indicates a non-illustrated part. Specifications are subject to change without notice. To order
replacement parts, see the back cover of this manual.
10
EXPLODED DRAWINGÑModel No. WLRX10170
R0597A
13
12
17
19
8
9
15
1
2
19
7
18
11
8
6
7
9
4
3
6
2
1
18
6
11
5
10
16
6
14
4
17
5
3
11
7
HOW TO ORDER REPLACEMENT PARTS
To order replacement parts, simply call our Customer Service Department toll-free at 1-800-999-3756, Monday
through Friday, 6 a.m. until 6 p.m. Mountain Time (excluding holidays). To help us assist you, please be
prepared to give the following information when calling:
1. The MODEL NUMBER of the product (WLRX10170).
2. The NAME of the product (DAYBREAK multi-zone massage chair by WESLO¨).
3. The SERIAL NUMBER of the product (see the front cover of this manual).
4. The KEY NUMBER and DESCRIPTION of the desired part(s) (see the PART LIST on page 10).
WESLO¨ is a registered trademark of ICON Health & Fitness, Inc.
LIMITED WARRANTY
ICON Health & Fitness, Inc. (ICON), warrants this product to be free from defects in workmanship and
material, under normal use and service conditions, for a period of ninety (90) days from the date of purchase. This warranty extends only to the original purchaser. ICON's obligation under this warranty is limited to replacing or repairing, at ICON's option, the product at one of its authorized service centers. All
products for which warranty claim is made must be received by ICON at one of its authorized service centers with all freight and other transportation charges prepaid, accompanied by sufficient proof of purchase.
All returns must be pre-authorized by ICON. This warranty does not extend to any product or damage to
a product caused by or attributable to freight damage, abuse, misuse, improper or abnormal usage or
repairs not provided by an ICON authorized service center, products used for commercial or rental purposes, or products used as store display models. No other warranty beyond that specifically set forth
above is authorized by ICON.
ICON is not responsible or liable for indirect, special or consequential damages arising out of or in connection with the use or performance of the product or damages with respect to any economic loss, loss
of property, loss of revenues or profits, loss of enjoyment or use, costs of removal, installation or other
consequential damages of whatsoever nature. Some states do not allow the exclusion or limitation of incidental or consequential damages. Accordingly, the above limitation may not apply to you.
The warranty extended hereunder is in lieu of any and all other warranties and any implied warranties of
merchantability or fitness for a particular purpose is limited in its scope and duration to the terms set forth
herein. Some states do not allow limitations on how long an implied warranty lasts. Accordingly, the above
limitation may not apply to you.
This warranty gives you specific legal rights. You may also have other rights which vary from state to state.
ICON HEALTH & FITNESS, INC., 1500 S. 1000 W., LOGAN, UT 84321-9813
Part No. 138039 G01106AC R0597A
Printed in Canada © 1997 ICON Health & Fitness, Inc.