1
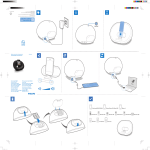
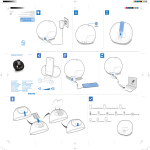
IEEE802.11n Wireless
PCIBus Adapter
GW-DS300N
Foreword
Explanation of the signals
In order to let you set up and use this product correctly, please pay attention when reading or
browsing the manual as you see these signals listed below.
Warning/ Danger
Users should read the explanation carefully and understand it completely, otherwise
users might be in danger or even be injured.
Caution/ Be Careful
Remind users to be careful when setting up the product and to avoid damaging the
product or its system programs.
Seeking for service or searching for an agent or a distributor
Thank you for purchasing products from Planex Communications Inc. If you have any
RSHUDWLRQDOSUREOHPVZKLOHFRQ¿JXULQJRUVHWWLQJXSWKHSURGXFW\RXPD\FRQWDFWZLWKRXU
Customer Service Department or ask the agent or the distributor from which you bought
WKHSURGXFWIRUKHOS0RUHRYHUGXULQJZDUUDQW\LI\RX¿QGDQ\GHIHFWRUEUHDNGRZQRIWKH
product, you may bring the product, assembly, and its warranty card to our company or to
where you bought the product to ask for repair.
ŘEvery product has different warranty period and contract; please refer to our
company for further information or consult the agent or the distributor.
Planex Communications Inc.
Support PhoneĈ+65-6338-1704 (Singapore)
+886-2-8218-7114 or +886-2-2219-7454 (Taiwan)
Customer Service E-MailĈ[email protected]
Contact Us
TelĈ+886-2-2219-1816
FaxĈ+886-2-2219-0655
Agents & DistributorsĈhttp://www.planex.net/where/index.htm
FCC Certifications
This Equipment has been tested and found to comply with the limits for a Class A
digital device, pursuant to part 15 of the FCC Rules. These limits are designed to
provide reasonable protection against harmful interference when the equipment is
operated in a commercial environment. This equipment generates, uses, and can
radiate radio frequency energy and, if not installed and used in accordance with the
instruction manual, may cause harmful interference to radio communications.
Operation of this equipment in a residential area is likely to cause harmful interference
in which case the user will be required to correct the interference at his/her own
expense.
This device complies with Part 15 of the FCC Rules. Operation is subject to the
following two conditions: (1) this device may not cause harmful interference, and (2)
this device must accept any interference received; including interference that may
cause undesired operation.
CE Mark Warning
Trademarks:
All trade names and trademarks are the properties of their respective companies.
Copyright © 2007 All Rights Reserved.
Contents
Foreword
Chapter 1 Introduction to GW-DS300N . . . . . . . . . . . . . .1
1.1 Package Contents . . . . . . . . . . . . . . . . . . . .2
1.2 Features . . . . . . . . . . . . . . . . . . . . . . . . . . . .2
1.3 Product Functions . . . . . . . . . . . . . . . . . . . .3
Chapter 2 Basic Installation & Configuration. . . . . . . . . .5
2.1 How to install the Driver & Utility . . . . . . . . .5
2.2 How to make a wireless connection . . . . . 10
2.3 Site Survey. . . . . . . . . . . . . . . . . . . . . . . . . . 17
2.4 Profile . . . . . . . . . . . . . . . . . . . . . . . . . . . . . 21
2.5 Authentication and Security . . . . . . . . . . . 26
2.6 802.1x Setting . . . . . . . . . . . . . . . . . . . . . . . 32
2.7 Link Status . . . . . . . . . . . . . . . . . . . . . . . . . . 37
2.8 Statistics . . . . . . . . . . . . . . . . . . . . . . . . . . . 39
GW-DS300N Contents
Chapter 3 Advanced Configuration . . . . . . . . . . . . . . . .41
3.1 Advanced. . . . . . . . . . . . . . . . . . . . . . . . . . 41
3.2 QoS . . . . . . . . . . . . . . . . . . . . . . . . . . . . . . . 45
3.3 WPS Configuration . . . . . . . . . . . . . . . . . . . 47
3.4 About . . . . . . . . . . . . . . . . . . . . . . . . . . . . . 52
Chapter 4 Soft AP Mode. . . . . . . . . . . . . . . . . . . . . . . . .55
4.1 How to use AP mode . . . . . . . . . . . . . . . . . 55
4.2 Config . . . . . . . . . . . . . . . . . . . . . . . . . . . . . 56
4.3 Security Setting. . . . . . . . . . . . . . . . . . . . . . 61
4.4 Access Control . . . . . . . . . . . . . . . . . . . . . . 64
4.5 MAC Table . . . . . . . . . . . . . . . . . . . . . . . . . 66
4.6 Event Log . . . . . . . . . . . . . . . . . . . . . . . . . . 68
4.7 Statistics . . . . . . . . . . . . . . . . . . . . . . . . . . . 70
4.8 About . . . . . . . . . . . . . . . . . . . . . . . . . . . . . 72
GW-DS300N Contents
1
1
Introduction to GW-DS300N
Thank you for purchasing IEEE802.11n Wireless PCIBus
Adapter – GW-DS300N. GW-DS300N is backward compatible with
802.11b and 802.11g standards. It uses the powerful MIMO technology
which has further coverage, less dead spots and higher throughput. When
GW-DS300N is connecting to the standard 802.11b or 802.11g APs or
routers, it can perform much better than other standard stations. It also
supports WMM, WMM-PS and WMM-SA (IEEE802.11e QoS standard).
In addition, GW-DS300N supports higher data throughput than the
IEEE802.11g standard (up to 300Mbps). It can compress the data and
decrease the waiting time of sending the data to the next routers or APs, so
it increases the data transmission rate. This function is called Turbo Mode.
When GW-DS300N WLAN adapter connect to the APs or routers by using
this particular function, your wireless network will be more effective.
For the security of WLAN, GW-DS300N supports 64/128-bit WEP data
encryption which protects your wireless network from eavesdropping. It
also supports WPA which combines IEEE802.1x and TKIP technologies.
Client users are required to authorize before accessing to APs or routers,
and the data transmitted on the network is encrypted and decrypted by a
dynamically changed secret key. Besides, GW-DS300N supports WPA2
function which provides a stronger encryption through AES which is the
most advanced WLAN solution for IEEE802.11i.
The best thing is that GW-DS300N has an innovative built-in WPS (Wi-Fi
Protected Setup) function which can build a connection between an AP
and synchronize the encryption settings simply through a click on a button.
GW-DS300N is cost effective and with many versatile features. It must be
the best solution for you to build your wireless network.
1
Chapter 1 Introduction to GW-DS300N
1
1.1 Package Contents
After purchasing GW-DS300N, 802.11n Wireless PCIBus Adapter,
from a reseller or an agency, please open the package and check all the
components listed below are included. If there is any item missing, please
contact with the reseller or the agency at once.
œGW-DS300N Wireless PCIBus Adapter x 1
œCD-ROM(including Driver/Utility) x 1
œUser's Manual x 1
œWarranty Card x 1
1.2 Features
œCompatible with IEEE 802.11n, IEEE 802.11b and IEEE 802.11g
2.4GHz
œData transmission rate is up to 300Mbps
œSupports Turbo Mode which can enhance the data transmission rate
within the specific wireless network
œSupports WMM (Wi-Fi Multimedia) function (IEEE 802.11e QoS
standard) and can meet the requirement of the multi-media data
bandwidth
œSupports 64/128-bit WEP, WPA (TKIP with IEEE802.1x) and WPA2
(AES with IEEE 802.1x) functions for high level security.
œSupports CCX (Cisco Compatible Extensions) for the radio monitoring
and fast roaming
œAutomatic fallback which increases the data security and reliability
œSupports the most popular O.S.ĈWindows 2000/XP/2003/Vista (only
supports Adapter mode)
œSupports PCIBus interface
2
GW-DS300N
1
1.3 Product Functions
3
Chapter 1 Introduction to GW-DS300N
2
2
Basic Installation & Configuration
Before starting to install the utility, please pay attention to the following
statements:
1. If you had installed the wireless PC card driver and utility
before, please uninstall the old version first.
2. The following illustrations of installation procedures are
from Windows XP. And these procedures are all similar
to the operating procedures on Windows 2000/2003 and
Windows Vista OS.
5
Chapter 2 Basic Installation & Configuration
2
2.1 How to install the driver and utility
Please follow the instructions below to install the driver and utility of
GW-DS300N.
1.Insert GW-DS300N into the PCIBus port on your PC. After that, the
computer will automatically detect and open the Found New Hardware
Wizard, please click “Cancel” and then use the driver and utility of
GW-DS300N.
2.Put the installation CD-ROM into the CD-ROM player and then go to
the root directory to start the “Setup.exe” program. After that, the setup
wizard will automatically start the “InstallShield Wizard” to continue
setting up. Click “Install” to start installing the utility.
6
GW-DS300N
2
3.After clicking “Install” on the former page, the installation
wizard starts to install the software of GW-DS300N.
7
Chapter 2 Basic Installation & Configuration
2
4.Soon the InstallShield Wizard finishes the installation and shows
the following page, you can click “Finish” on the page to complete
the installation. After that the driver and utility are all installed to your
computer and the utility window will pop up automatically, you may start
to configure the connection of GW-DS300N.
8
GW-DS300N
5.When you finish installing the driver and utility on the computer,
you can start to use the utility of GW-DS300N to check the connection
2
status of wireless connection. Right lick the icon of the utility
on the task bar, and choose “Launch Config Utilities” to start to
use the utility; or you may double click on the icon to directly enter the
utility. If you closed the utility of GW-DS300N and want to use it again,
please click “StartƖAll ProgramsƖPCI GW-DS300NƖGW-DS300N
” on the desktop. After that, it will open the utility and the icon of the
utility
will show on the task bar.
9
Chapter 2 Basic Installation & Configuration
2
2.2 How to make a wireless connection
If you want to use GW-DS300N to make a wireless network, please follow
the steps below:
1.Enter GW-DS300N UtilityĈRight click on the utility icon
on
the task bar, and then choose “Launch Config Utilities” to enter
GW-DS300N utility; or double left click on the utility icon to enter
the utility directly. You may also click “StartƖAll ProgramsƖPCI
GW-DS300NƖGW-DS300N” to enter the utility right away.
10
GW-DS300N
2.Site SurveyĈAfter opening the utility, it shows the following
window. You can check the information of Access Points which are
2
automatically detected by GW-DS300N and connecting with it.
Automatic connection rulesĈAfter powering on GW-DS300N,
it automatically detects the APs which can be connected with and
firstly connect with the AP (1) with strongest signal strength,
(2) non-encryption and (3) non-authentication. If you want to
change the connection profile, you may just double left click on
the AP you want to modify, then you can enter the configuration
page
3.Add a connection to profileĈIf you want to add the most commonly
used AP to the list, please choose an AP which you want add to the list
and click “Add to Profile” button.
11
Chapter 2 Basic Installation & Configuration
2
4.ConfigurationĈAfter entering the Add Profile page, you can set the
“Profile Name” by your own, and configure the rest of the settings.
12
GW-DS300N
5.Authentication and SecurityĈClick on the “Authentication
and Security” tab on the Add Profile page. According to the AP's
2
requirement, enter the Key value or just leave it blank, and then click
“OK” to save the settings.
6.Activate the settingsĈEnter “Profile List” page, if you really want
to use an AP to make a wireless connection, please click “Activate” to
use this connection to surf the Internet.
13
Chapter 2 Basic Installation & Configuration
2
7.Make a connectionĈAfter click “Activate”, if the profile list shows
a red check, it means the connection has not succeeded; if the profile list
shows a green check, it means the connection has succeed, and you have
already add this connection into the profile list. It means that you do not
need to set again and again before every time you make a connection.
14
GW-DS300N
8. If you are using Windows XP O.S. and want to check the connection
status, you can left click on the “Wireless Network connection”
2
icon on the desktop to check current connection status and packets
transferring status.
15
Chapter 2 Basic Installation & Configuration
2
9.Click “Support” tab on the wireless network connection status
window and then you can see the IP address of the AP in use. If the
connection is abnormal, you can also click “Repair” button to make the
computer do the IP Release and IP Renew action.
16
GW-DS300N
2.3 Site Survey
2
The configuration utility is a powerful application that helps you configure
GW-DS300N and monitor the link status during the communication
process. When you open the utility program, it will scan all the channels
to find all the access points/stations within the accessible range and
automatically connect to one of the wireless devices which has the highest
signal strength. From the utility homepage, you can see the information
about the wireless connections.
To enter the utility program, please follow the instructions below.
1.Right click the mouse on the utility icon
on the taskbar, and you
can click on the “Launch Config Utilities” to enter PCI GW-DS300N
utility; or you can just double click on the utility icon and enter the utility
directly.
17
Chapter 2 Basic Installation & Configuration
2
1. Right click on the icon; there are two items for users to operate
the utility.
œ Launch Config Utilties
Click it to enter the utility program of GW-DS300N
œ Use Zero Configuration as Configuration utility
Click it and the adapter will stop working immediately and
GW-DS300N will not be the default utility anymore. If you
want to use GW-DS300N as the default utility again, just click
“Use PCIConfig as Configuration utility”.
œ Switch to AP Mode
Click it to change the adapter mode of GW-DS300N into AP
mode. If you want to use the adapter function, please click
“Switch to Station Mode”.
œ Exit
Select “Exit” to close the configuration utility tool.
2. The GW-DS300N icon changes from time to time to reflect the
current wireless network connection status. The status indicates
as follows:
ĈThe signal strengh is good..
ĈThe signal strength is normal.
ĈThe signal strength is weak.
ĈGW-DS300N has not connected to any AP yet.
ĈGW-DS300N is unplugged or it is not in use.
18
GW-DS300N
2. Open the configuration utility of GW-DS300N, the“Site Survey”
page displays several settings. The items and the setup instructions
2
are listed below. After opening the utility, the system will scan all the
channels to find all the access points/stations within the accessible range
and automatically connect to one of the wireless APs which has the
highest signal strength. The green icon which shows two hands holding
together means GW-DS300N is connecting with the AP.
Items
SSID
Descriptions
The SSID (up to 32 printable ASCII characters)
is a unique name identified in a WLAN. The SSID
can prevent the unintentional merging of two
co-located WLANs.
You may assign an SSID for GW-DS300N, and only
the device with the same SSID can interconnect to it.
BSSID
It displays the MAC Addresses of the APs which
GW-DS300N has detected.
Signal
The box displays all the SSIDs (Service Set
Identifier) and signal strength of the APs nearby. To
detect the available wireless devices again please
click“Rescan.”
There are two ways to make a connection between
GW-DS300N and one of the APs on the list:
1.Double-click the wireless station on the list
directly.
2.Select the station you intend to connect and then
click“Connect.”
19
Chapter 2 Basic Installation & Configuration
2
Channel
Here it shows the number of the radio channel used
for the wireless connection. The channel setting of
the wireless stations within a network should be the
same.
Encryption
This section shows whether the APs are using
encryption or not. There are four kinds of encryption:
“WEP”, “AES”, “TKIP”, “TKIP; AES (BOTH)
”and“None”. If the AP which you want to connect
needs the encryption (the encryption section shows
WEP, TKIP or AES, etc), double click on the name
of the AP or click“Connect”button and then the
configuration page of encryption will show.
Authentication
This section shows the authentication using by the
AP. There are five kinds of authentication:
“Unknown”,“WPA-PSK”, “WPA2-PSK”,“WPA”
and“WPA2”.
Network Type
There are two types of network type, including
“Ad-hoc”and“Infrastructure”.
Rescan
Rescan and update all the details of every detected
AP.
Connect
Click this button to connect with the selected AP.
Add to Profile
Click this button to add the selected AP to the profile.
OK
Click this button and the utility will save the settings
and close the page.
20
GW-DS300N
2
2.4 ProÀle
Click“Add to Profile”button on the“Site Survey”page, the“Add Profile
”window will pop up; or you can choose“Profile” tab on the homepage
of utility, and click“Add”, the“Add Profile”window will pop up as
well. Users can setup the general settings, encryption and authentication
settings and so on. If you want to look up the advanced setup and more
information, please refer to the next chapter. If you want to do the general
settings, please follow the instructions below.
21
Chapter 2 Basic Installation & Configuration
2
Items
Configuration
Descriptions
Profile Name
You can give each AP a different name to define them.
SSID
Scroll down the list to choose a detected AP as an
SSID.
PSM
CAM (Constantly Awake Mode) – Choose this mode
and GW-DS300N will continuously awake and
operate. If your computer is plugging into the socket
directly instead of using batteries, the PSM mode
will automatically switch to CAM mode.
PSM (Power Saving Mode) – When GW-DS300N
often idles, you can choose PSM mode. This mode
only takes effect under“Infrastructure” network
type.
Network Type
Infrastructure– An 802.11 networking framework
in which devices communicate with each other
by first going through and Access Point (AP).
In infrastructure mode, wireless devices can
communicate with each other or can communicate
with a wired network. If enabling this mode, the
PSM mode will take effect and the Preamble
function will be disabled.
Ad-hoc–An 802.11 networking framework in which
devices or stations communicate directly with each
other, without the use of an Access Point (AP).
Ad-hoc mode is useful for establishing a network
where wireless infrastructure does not exist or where
services are not required. If choose this mode, you
22
GW-DS300N
can select a channel for GW-DS300N. If enabling
this mode, the PSM mode will NOT take effect and
2
the Preamble function will be enabled.
TX Power
Choose the TX (transmission) Power according to
the real environment. If you want to lower the
transmit power of the adapter for saving the
power of the system, you can select the lower
percentages from the list. The lower power
will cause the lower signal strength and the
Preamble
RTS Threshold
coverage range. The default setting is “Auto”.
The preamble defines the length of the CRC (cyclic
redundancy check) block when communicating
among the wireless networks. There are two types
of preamble: Auto and Long Preamble. Intensive
network traffic areas should use the short preamble
type.
Here it defines the minimum packet size required for
RTS (Request to Send). Select a value within a range
of 0 to 2347 bytes. Normally, if there are no hiding
nodes problems, the values no need to be altered.
Fragment Threshold The value defines the maximum size of packets; any
packet size larger than the value will be fragmented.
If you have decreased this value and experience
higher packet error rates, you can increase the value
again, but it will likely decrease the overall network
performance. Select a value within the range of 256
to 2346 bytes. The default value is 2346.
23
Chapter 2 Basic Installation & Configuration
2
OK/Cancel/Apply
Click“OK”and the utility will save the settings
and close the page. Click“Cancel”will exit the page
and won’t save the settings. Click“Apply”to enable
the settings you made on this page.
24
GW-DS300N
2
25
Chapter 2 Basic Installation & Configuration
2
2.5 Authentication and Security
Click“Authentication and Security”tab on the“Add Profile”page and
you can start configuring authentication. Please refer to the following
instructions.
WEP is short for Wired Equivalent Privacy, a security protocol for
WLANs defined in the 802.11b standard. WEP is designed to provide
the same level of security as that of a wired LAN. WEP aims to provide
security by encrypting data over radio waves so that it is protected as it
transmitted from one end point to another.
WPA is short for Wi-Fi Protected Access, a Wi-Fi standard that was
designed to improve upon the security features of WEP. The technology
is designed to work with existing Wi-Fi products that have been enabled
with WEP. It also provides strong data protection by using encryption
as well as strong access controls and user authentication. WPA utilizes
128-bit encryption keys and dynamic session keys to ensure your wireless
network's privacy and enterprise security.
WPA-PSK is short for Wi-Fi Protected Access-Pre-Shared Key. WPAPSK is basically an authentication mechanism in which users provide
some form of credentials to verify that they should be allowed access to a
network. This requires a single password entered into each WLAN node
(Access Points, Wireless Routers, client adapters, bridges). As long as the
passwords match, a client will be granted access to a WLAN. Encryption
mechanisms used for WPA and WPA-PSK are the same. The only
difference between the two is in WPA-PSK, authentication is reduced to a
simple common password, instead of user-specific credentials.
26
GW-DS300N
WPA2 is short for Wi-FI Protected Access 2, the follow on security
method to WPA for wireless networks that provides stronger data
2
protection and network access control. It provides enterprise and consumer
Wi-Fi users with a high level of assurance that only authorized users can
access their wireless networks. There are two versions of WPA2: WPA2Enterprise, and WPA2-Personal. WPA2-Enterprise verifies network users
through a server. WPA2-Personal protects unauthorized network access
by utilizing a set-up password. For environments without a Remote
Authentication Dial-In User Service (RADIUS) infrastructure such as
small office/home office (SOHO) networks, WPA2-Personal supports the
use of a pre-shared key (PSK).
WPA2-PSK is short for Wi-Fi Protected Access 2-Pre-Shared Key. WPA2Personal supports PSK(pre-shared key). WPA-PSK and WPA2-PSK are
special modes designed for small office/home office users who do not have
access to the network authentication servers.
If you want to use WPA as the authentication of GW-DS300N, you can
refer to the following instructions to do the configuration.
27
Chapter 2 Basic Installation & Configuration
2
Items
Authentication and Security
Descriptions
Authentication Type The authentication of GW-DS300N must set the same
as the settings of the destination.
1.There are seven authentication types under
Infrastructure mode:
Open–It does not need authentication when
connecting to the AP.
Shared–Only wireless adapters using a shared key
(WEP Key identified) are allowed to connecting to
the AP.
LEAP–is short for Light Extensible
Authentication Protocol. It is a pre-EAP, Ciscoproprietary protocol, with many of the features of
EAP protocols. Cisco controls the ability of other
vendors to implement this protocol, so it should
be selected for use only when limited vendor
choice for client, access-point, and server products
is not a concern. When you have set up LEAP
authentication, you have to enter the user name and
password of your computer.
WPA–includes WPA, WPA-PSK, WPA2 and
WPA2-PSK. WPA and WPA2 are for enterprise
which requires a RADIUS Server and Certificate
Server for the authentication. WPA-PSK and
WPA2-PSK are special modes designed for small
office/home office users who do not have access to
the network authentication servers.
2.There are three authentication types under Ad-hoc
mode:
Open–It does not need authentication when
connecting to the AP.
28
GW-DS300N
Shared–Only wireless adapters using a shared key
(WEP Key identified) are allowed to connecting to
2
the AP.
WPA NONE–Under this mode, you can only set
encryption and WPA-Preshared Key settings.
Use 802.1x
Encryption
This setting only takes effect when using“Open”,
“Shared”, “WPA”or“WPA2”mode. Click this
button and then click“802.1x Setting”, the“802.1x
Setting”sub-window will pop up.
Under“Open”and“Shared”mode, you can use
“None” and “WEP”encryption types. Under “WPAPSK” and “WPA2-PSK”, you can use “TKIP” and
“AES”.
WEP–Short for Wired Equivalent Privacy, a
security protocol for wireless local area networks
(WLANs) defined in the 802.11b standard. WEP
aims to provide security by encrypting data over
radio waves so that it is protected as it is transmitted
from one end point to another.
AES–Short for Advanced Encryption Standard, a
symmetric 128-bit block data encryption technique.
It works at multiple network layers simultaneously
and has a fixed block size of 128-bits and a key size
of 128, 192, or 256-bits.
TKIP–It is short for Temporal Key Integrity
Protocol. TKIP scrambles the key using a hashing
algorithm and, by adding an integrity-checking
feature, ensures that the keys haven’t been
tampered with.
29
Chapter 2 Basic Installation & Configuration
2
WPA-Preshared Key This setting only takes effect under“WPA-PSK”
or“WPA2-PSK” mode. Besides, the key should be
at least 8 characters and 63 characters at maximum.
This Passphrase (also called a shared secret) that
must be entered in both the wireless access point and
the WPA clients (computers). The WPA pre-shared
key should be a random sequence of either keyboard
characters (upper and lowercase letters, numbers, and
punctuation). You have to enter the same Passphrase
or Hexadecimal key into both your access points and
computers but the length requirement is changed.
The more random your WPA pre-shared key, the
safer it is to use.
WEP Key
Key#1~#4
This setting only takes effect under“Open”or
“Shared”mode. There are four types of WEP key
settings, please set the key depending on the real
environment. According to the type and length, there
are four WEP Key types:
Hexadecimal–Only“A~F,”“a~f,”and“0~9”are
allowed to be set in a WEP key.
ASCII–Numerical values, characters or signs are all
allowed to be arranged into a WEP key. It is more
recognizable for user.
64-bit–Enter 10-digit Hex values or 5-digit ASCII
values as the encryption keys. For example:“
0123456aef”or“Guest.”
128-bit–Enter 26-digit Hex values or 13-digit ASCII
values as the encryption keys. For example:“012345
67890123456789abcdef”or“administrator.”
30
GW-DS300N
Show Password
If you want to let the system shows the password
you set, you can enable this check box. After that,
2
the asterisk(*) will be replaced by the showing the
password.
OK
Click this button and the utility will save the settings
and close the page.
Cancel
Click“Cancel”will exit the page and won't save
the settings.
Apply
Click“Apply”to enable the settings you made on
this page.
31
Chapter 2 Basic Installation & Configuration
2
2.6 802.1x Setting
Click“Authentication and Security”tab on the page of“Add Profile”and
then click“802.1x Setting”, and the following picture will pop up. Please
refer to the following instructions to configure GW-DS300N. The 802.1x
authentication is mainly focus on“WPA”and“WPA2”encryption.
Items
Descriptions
Certification
Authentication Type 1.PEAP–Pronounced“peep”and short for Protected
Extensible Authentication Protocol, a protocol
developed jointly by Microsoft, RSA Security
and Cisco for transmitting authentication data,
including passwords, over 802.11 wireless
networks. And it requires a set of user name and
password in addition. Enter the“User Name”and
“Password”and also select a certificate from the
“Certificate”list. To get the certificate and the
personal user name and password, please contact
with your administrator.
2.TLSƟSmart Card–Short for Transport Layer
Security, a protocol that guarantees privacy and
data integrity between client/server applications
communicating over the Internet.
3.TTLS–Short for Tunneled Transport Layer
Security, and is an advanced TLS protocol.
4.Md5-Challenge–It is the easiest EAP Type. It
requires the wireless station to enter a set of user
name and password as the identity to RADIUS
Server. (Only“Open”and“Shared”encryption
mode can use this function.)
32
GW-DS300N
Session Resumption After reconnecting the signal which broke up, you
can set the session resumption to reduce the
2
transferring packet to accelerate the speed. There
are five types of session resumption:“Disable”,
“Reauthentication”, “Roaming”, “SameSsid”and“
Always”.
ID
These are the Identity and Password for passing
through the server.
Use Client certificate A client certificate is required for TLS, and is
optional for TTLS and PEAP. This forces a client
certificate to be selected from the appropriate
Windows Certificate Store and made available to the
RADIUS server for certification.
Tunneled
Authentication
1.ProtocolĈWhen the authentication type is PEAP
or TTLS, select a protocol to be used to build the
encrypted tunnel. Under PEAP authentication, you
can choose“EAP-MSCHAP v2”, “EAP-TLS/Smart
Card”, and“Generic Token Card”. Under TTLS
authentication, there are“CHAP”, “MS-CHAP”,
“MS-CHAP-V2”, “PAP”and “EAP-MD5”.
2.IdentityĈThis is the protected user EAP
Identity used for authentication. The identity
specified may contain up to 63 ASCII characters,
is case sensitive and takes the form of a Network
Access Identifier, consisting of <name of the
user>@<user’s home realm>. The user’s home
realm is optional and indicates the routing domain.
33
Chapter 2 Basic Installation & Configuration
3.PasswordĈThe password used for
authentication. It may contain up to 63 ASCII
2
characters and is case sensitive.
CA Server
Use certificate chain When the EAP authentication type such as TLS,
TTLS or PEAP is selected and required a
certification to tell the client what server credentials
to accept from the authentication server in order to
verify the server, you have to enable this function.
Certificate issuer
Choose the server from the list to issue the certificate.
If“Any Trusted CA”is selected, any CA included in
the list (provided by the Microsoft Certificate Store)
is permitted.
Allow intermediate
certificate
A server designates an issuer as a trusted root
authority by placing the issuer's self-signed
certificate, which contains the issuer's public
key, into the trusted root certification authority
certificate store of the host computer. Intermediate or
subordinate certification authorities are trusted only
if they have a valid certification path from a trusted
root certification authority.
Server name
Enter the authentication server name.
Server name must
match exactly
When selected, the server name must match exactly
the server name found on the certificate.
34
GW-DS300N
Server name must When selected, the server name field identifies a
end in specified name domain. The certificate must use a server name
belonging to this domain or to one of its sub-domains
(e.g. zeelans.com, where the server is blueberry.
zeelans.com) but it may be any name used in the
certificate name field.
2
OK/ Cancel/ Apply Click this button and the utility will save the settings
and close the page. Click“Cancel”will exit the page
and won't save the settings. Click“Apply”to enable
the settings you made on this page.
35
Chapter 2 Basic Installation & Configuration
2
36
GW-DS300N
2.7 Link Status
2
Click on the“Link Status”tab on the homepage of the utility, the page will
display a lot of parameters.
Items
Status
Descriptions
Here displays the SSID and MAC ID of the network
which GW-DS300N is connecting to.
Extra Info
Here displays the current link status.
Channel
Here shows the current channel in use.
Link Speed
Here display the transmission and reception rate of
the network. The maximum transmission rate is
54Mbps.
Throughput
Here display the speed of data transmitted (Tx) and
received (Rx).
Link Quality
This bar indicates the quality of the connection. The
higher percentage the bar shows, the better quality
the linkage has.
Signal Strength
This bar shows the level of the signal strength. The
higher percentage the bar shows, the more radio
wave has been received by the adapter. This indicator
helps users to find a proper position for the adapter
to have better network connection. You can also
choose dBm mode to show the signal strength.
37
Chapter 2 Basic Installation & Configuration
2
Noise Level
Here display the noise level in the wireless
environment.
OK
Click“OK”button and the utility will save the
settings and close the page.
38
GW-DS300N
2.8 Statistics
2
Click on the“Statistics”tab on the homepage of the utility, the page will
display the transmitted and received results.
Items
Descriptions
Transmit Statistics
Frames Transmitted Frames successfully sent.
Successfully
Frames Fail To
Receive ACK
(ACKnowledge)
After All Retries
Frames failed to transmit after hitting retry limit.
RTS Frames
Successfully
Receive CTS
Successfully receive CTS (Clear To Send) after
sending RTS (Request To Send) frame.
RTS Frames Fail To Failed to receive CTS (Request To Send) after
Receive CTS
sending RTS (Clear To Send).
Frames
Retransmitted
Successfully retransmitted frames numbers.
Successfully
Receive Statistics
Frames Receive
Successfully
Frames Receive
With CRC Error
Frames received successfully.
Frames received with CRC error.
39
Chapter 2 Basic Installation & Configuration
2
Frames Dropped
Frames dropped due to resource problem.
Due To Out-ofResource
Duplicate Frames
Received
Buttons
Reset Counter
OK
40
GW-DS300N
Frames received more than twice.
Click the button to reset counters to zero.
Click “OK” button and the utility will save the
settings and close the page.
3
Advanced Configuration
3
3.1 Advanced
Click on the“Advanced”tab on the homepage of the utility, and you can do
more detailed settings.
Items
Wireless mode
Descriptions
Scroll down the list and you can choose the wireless
mode:“802.11 B/G mix”, “802.11 B only” or “
802.11 B/G/N mix”.
Select Your Country The available channel differs from different countries.
Region Code
For example: USA (FCC) is channel 1-11, Europe
(ETSI) is channel 1-13. The operating frequency
channel will be restricted to the country user located
before importing. If you are in different country,
you have to adjust the channel setting to comply the
regulation of the country.
Wireless Protection If you have a mix of 802.11b and 802.11g/n wireless
stations in the network, it is recommended to enable
the protection mechanism. This mechanism can
decrease the rate of data collision between 802.11b
and 802.11g/n wireless stations. When the protection
mode is enabled, the throughput of the adapter will
be a little lower due to many of frame traffic should
be transmitted.
41
Chapter 3 Advanced Configuration
Auto–Based on the status of the network and
automatically disable/enable protection mode.
On–Always enable the protection mode.
Off–Always disable the protection mode.
3
Tx Rate
There are several options including Auto/1/2/5.5/11/
6/9/12/18/24/36/48/54Mbps for you to select. When
“Auto”is selected, the device will choose the most
suitable transmission rate automatically. The higher
data rate you designated in the network, the shorter
distance is allowed between the adapter and the
wireless stations.
When the wireless mode is“802.11 B only”, the
maximum data rate is 11Mbps (11b) so that there are
only “Auto/1/2/5.5/11Mbps” options you can select.
Tx Burst
Tx Burst enables the adapter to deliver better
throughput during a period of time but the function
only takes effect when connecting with the AP which
also supports Tx Burst.
Enable TCP
Window Site
The TCP Window is the amount of data which a
sender can send on a particular connection before
it gets an acknowledgment back from the receiver
that it has gotten some of it. When the Router or AP
which the adapter is connecting to has set up the TCP
Window, you can enable the parameter to meet the
data size for the Router or AP connection. The larger
TCP Window the better performance.
Fast Roaming at ~
dBm
When you want to fast roaming to the network nearby
without intercepting the wireless connection
42
GW-DS300N
especially the adapter is applied to the multimedia
application or a voice call, you can enable the this
function. GW-DS300N will fast roaming to the
near network when the receive sensitivity (signal
strength) is lower to the value you have set up.
Show Authentication Status Dialog
When connecting to an AP with authentication, if
enabling this function, it will display dialogs about
802.1x authentication during the process.
Enable CCX
(Cisco Compatible
eXtensions)
CCX 2.0 (Cisco Compatible Extensions) is
developed by Cisco for the radio monitoring and fast
roaming.
1.LEAP turn on CCKMĈDuring normal operation,
LEAP-enabled client devices mutually authenticate
with a new access point by performing a
complete LEAP authentication, including
communication with the main RADIUS server.
When you configure your wireless LAN for fast
re-association, however, LEAP-enabled client
devices roam from one access point to another
without involving the main server. Using Cisco
Centralized Key Management (CCKM), an access
point configured to provide Wireless Domain
Services (WDS) takes the place of the RADIUS
server and authenticates the client so quickly that
there is no perceptible delay in voice or other timesensitive applications.
2.Enable Radio MeasurementĈWhen this parameter
is enabled, the Cisco AP can run the radio
monitoring through the associated CCX-compliant
clients to continuously monitor the WLAN radio
3
43
Chapter 3 Advanced Configuration
environment and discover any new APs that are
transmitting beacons.
3
Turn on/Turn off RF Turn radio ON/OFF for FAA requirement.
ĈNow the radio is on, and click to
turn it off.
ĈNow the radio is off, and click to
turn it on.
Apply
Click“Apply”to enable the settings you made on
this page.
OK
Click“OK”button and the utility will save the
settings and close the page.
44
GW-DS300N
3.2 QoS
Click on the“QoS”tab on the homepage of the utility, and you can do more
detailed settings.
Items
WMM Enable
Descriptions
WMM is short for Wi-Fi Multimedia. It is a standard
created to define quality of service (QoS) in Wi-Fi
networks. It is a precursor to the upcoming IEEE
802.11e WLAN QoS draft standard, which is meant
to improve audio, video and voice applications
transmitted over Wi-Fi. WMM adds prioritized
capabilities to Wi-Fi networks and optimizes their
performance when multiple concurring applications,
e a c h w i t h d i ff e r e n t l a t e n c y a n d t h r o u g h p u t
requirements, compete for network resources. Click
the check box and then click“Apply”button to apply
this function to the system.
WMM – Power
Save Enable
Click the check box and then click“Setting...…”
button, the Power Save Setting dialog box will
pop up, there are four types of power saving mode,
including AC_BK(Access Category Background)ă
AC_BE(Access Category Best Effort)ă
AC_VI(Access Category Video)ăAC_VO(Access
Category Voice). Click the check box and then click“
Apply”button to apply this function to the system.
Direct Link Setup
Enable the check box and you may start to set MAC
Address, Timeout Value and check the DLS Status.
Click“Apply”and this setting will be applied to the
system.
Enable
3
45
Chapter 3 Advanced Configuration
MAC Address
Enter the remote system which you want to connect
with. When you want to enable this function, you
have to make sure that your wireless network
supports WMM function and then enter the MAC
address of the adapter which wants to connect with
the remote system.
Timeout Value
The utility performs time-outs so that the program does
not sit idle waiting for input that may never come.
Set a value to apply to the system with WMM.
DLS Status
The system will show you the remote devices which
has already connected and supported WMM.
OK
Click“OK”button and the utility will save the
settings and close the page.
3
46
GW-DS300N
3
3.3 WPS ConÀguration
Use the unique WPS (Wi–Fi Protected Setup) function to cooperate
with PCI wireless AP — MZK-W04N and you may complete the setup of
wireless configuration and encryption within a simple click on a button.
However, this function only works on Windows 2000 and XP OS.
There are two ways to set up WPS.
I. Start PBC
1.Enter the configuration page of MZK-W04N and click “LANƖ
WirelessƖWPS”. Click the “Start PBC” button and then there pops
up a warning dialog box to tell you that you should go to the station side
(GW-DS300N within 2 minutes to click “PBC” button.
ŏ You can also click the button on the rear panel of MZK-W04N
to start PBC connection. However, you should also go to the
configuration page of GW-DS300N to click “PBC” to make the
connection.
47
Chapter 3 Advanced Configuration
3
2.Open the utility of GW-DS300N. Click the button of “PBC”
and then GW-DS300N will automatically start to make a connection
with MZK-W04N and use the same wireless settings and encryption
configuration with it. If they successfully make a connection,
GW-DS300N will show a green check before the AP's SSID.
48
GW-DS300N
3
II. Start PIN
1.Open the utility of GW-DS300N and click “WPS Configuration”
tab. Copy the “Pin Code” on the right side of the page.
49
Chapter 3 Advanced Configuration
3
2.And then enter the configuration page of MZK-W04N and click “LAN
ƖWirelessƖWPS”. Enter the Pin Code which you just copied from
GW-DS300N into the blank of “Configure via Client PinCode”.
Also you have to go back to GW-DS300N configuration page to click
“PIN” button on the left side of the page. After that, GW-DS300N will
automatically start to make a connection with MZK-W04N and use
the same wireless settings and encryption configuration with it. If they
successfully make a connection, GW-DS300N will show a green check
before the AP's SSID.
50
GW-DS300N
3
51
Chapter 3 Advanced Configuration
3.4 About
3
Click on the“About”tab on the homepage of the utility, and you can check
all the information about GW-DS300N.
Items
Website Links
Descriptions
Click the button and the web browser will be
opened automatically and connect to PLANEX
Communications Inc. Taiwan website.
RaConfig Version /
Driver Version /
EEPROM Version /
Firmware Version
This section shows the version and released date of
the Utility and Driver. EEPROM (Electrically
Erasable Programmable Read-Only Memory) and
Firmware version are also displayed.
IP Address /
Phy_Address /
Sub Mask /
Default Gateway
This section shows the TCP/IP settings of
GW-DS300N and the MAC/Physical Address.
OK
Click“OK”button and the utility will save the
settings and close the page.
52
GW-DS300N
3
53
Chapter 3 Advanced Configuration
4
Soft AP Mode
GW-DS300N also has Soft AP function. The functions included in AP
mode are Channel, SSID, MAC access control, WEP encryption, and so
on.
4
4.1 How to use AP mode
If you want to use the Soft AP function of GW-DS300N, please follow the
steps below to install the driver and the utility of GW-DS300N.
1.After finishing installation and restart the computer, the task bar on the
desktop will show as follows. Right click the mouse on the PLANEX
icon, and the four options will show: Launch Config Utilities, Use
Zero Configuration as Configuration utility, Switch to AP Mode, and
Exit. Click “Switch to AP Mode”, the utility will switch GW-DS300N
to the AP mode immediately.
55
Chapter 4 Soft AP Mode
4
2.Right click on the AP mode icon, and click “Launch Config Utilities”
to enter the AP mode configuration page. If you want to switch back
to the Station Mode, you may just click “Switch to Station Mode”.
Also you can click “StartƖProgramsƖPlanex WirelessƖPLANEX
Wireless Utility” on the desktop to open the utility.
4.2 ConÀg
After switch GW-DS300N to the AP mode, users can set up the general
settings, encryption, authentication, and so on. If you want to check the
advanced setup and information, please refer to the following chapters.
If you want to configure the general settings, please refer to the following
instructions.
Items
Internet
Connection
Sharing with
SoftAP
Descriptions
Please select the adapter which you’re using now
and then click “Enable ICS”.
SSID
The default AP name (SSID) is “SoftAP-XX” (XX
is the last 2 digits of the adapter’s MAC address).
Or you can choose “Use MAC Address” and the
system will automatically copy the NIC MAC
Address to this column and add two characters,“AP”,
before the MAC address.
56
GW-DS300N
Wireless Mode
S c r o l l d o w n the lis t to c h o o s e t h e w i r e l e s s
m o d e f o r t h e A P. T h e r e a r e f o u r k i n d s
of modes : “802.11 B/G Mixed”, “802.11 B only”,
“802.11 G only” and “802.11 B/G/N mix”. The
system default is “802.11 B/G/N mix”. Please set the
mode according to the real environment.
4
Country Region Code You can change the detected channel if you want.
There are 8 kinds of Country Region Codes to
choose from.
0ĈFCC(Canada) CH1~11
1ĈETSI CH1~13
2ĈSPAIN CH10~11
3ĈFRANCE CH10~13
4ĈMKK CH14~14
5ĈMKKI(TELEC) CH1~14
6ĈISRAEL CH3~9
7ĈISRAEL CH5~13
Wireless Protection 802.11b uses CCK (Complementary Code Keying),
however 802.11g/n uses OFDM (Orthogonal
Frequency Division Multiplexing) and also
compatible with CCK. So, when there are both
802.11b and 802.11g/n stations in the range of an
AP, to avoid collisions of data transmitted between
stations, it is necessary to set B/G Protection.
The settings only take effects when using “802.11
B/G Mixed” and “802.11B/G/N mix”, and the
settings are:
œAuto: STA will dynamically change as AP
announcement.
œOn: Always send frame with protection.
57
Chapter 4 Soft AP Mode
œOff: Always send frame without protection.
4
Beacon(ms)
The time between two beacons. System default is
100 ms.
TX Power
Please manually choose the transmitting power for
GW-DS300N.There are“100%ă75%ă50%ă
25% and Lowest”. The system default is 100%
which means GW-DS300N has the maximum TX
Power on wireless network.
Idle time(60 - 3600)(s Idle Timeout means a period of idle time before
you go offline. Enter a maximum period of time
(seconds) to define the maximum idle time. If the idle
time is above the defined maximum idle
TX Rate
There are several options including Auto/1/2/5.5/11/
6/9/12/18/24/36/48/54Mbps for you to select. When
“Auto”is selected, the device will choose the most
suitable transmission rate automatically. The higher
data rate you designated in the network, the shorter
distance is allowed between the adapter and the AP.
When the wireless mode is“802.11 B only”, the
maximum data rate is 11Mbps (11b) so that there are
only “Auto/1/2/5.5/11Mbps” options you can select.
Channel
Scroll down the list to choose a channel for the AP.
The default setting is channel 1.
Security Setting
Click this button and then to set up the authentication
and security of the AP. The detailed configuration is
shown in the“4.3. Security Setting”.
58
GW-DS300N
Not forwarding
among wireless
clients
If enable this function, though the wireless clients
are connecting to the same AP, still they cannot share
information with each other. The system default is
not forwarding data between stations.
Hide SSID
If the check box of“Hide SSID”is enabled, the AP
will not appear in the list of all the other wireless
adapters. It means only the wireless adapters
which has the same SSID can connect to the AP. In
this way, it can avoid the AP being connected by
unauthorized users. The default setting is disabled.
4
Allow BW40 MHz When using “802.11B/G/N mix” mode, you may
choose this function to allow BW40 MHz capability.
Default
Click this button and the AP will show the default
value of this page. (Without Tx BURST, and Use
Short Slot)
Apply
Click“Apply”to enable the settings you made on
this page.
OK
Click“OK”button and the utility will save the
settings and close the page.
59
Chapter 4 Soft AP Mode
4
60
GW-DS300N
4.3 Security Setting
Click “Security Setting” tab on the “Config” page and you can start
configuring authentication. Please refer to the following instructions.
Items
Descriptions
Authentication
Authentication Type The authentication of GW-DS300N must set the
same as the settings of the destination.
Open – It does not need authentication when
connecting to the AP.
WPA – includes WPA, WPA-PSK, WPA2 and
WPA2-PSK. WPA and WPA2 are for enterprise
which requires a RADIUS Server and Certificate
Server for the authentication. WPA-PSK and WPA2PSK are special modes designed for small office/
home office users who do not have access to the
network authentication servers.
Encryption Type
4
WEPăAESăTKIPăBOTH (AES & TKIP)–
Please refer to“2.4. Authentication and Security”.
WPA-Preshared Key This setting only takes effect under“WPA-PSK”,
“WPA2-PSK”or“WPA-PSK/ WPA2-PSK”mode.
Besides, the key should be at least 8 characters
and 63 characters at maximum. This Passphrase
(also called a shared secret) that must be entered
in both the wireless access point and the WPA
clients (computers). The WPA pre-shared key
should be a random sequence of either keyboard
characters (upper and lowercase letters, numbers, and
punctuation). You have to enter the same Passphrase
or Hexadecimal key into both your access points and
61
Chapter 4 Soft AP Mode
computers but the length requirement is changed.
The more random your WPA pre-shared key, the
safer it is to use.
4
Group Rekey Interval T h i s f u n c t i o n o n l y t a k e s e ff e c t w h e n u s i n g
“WPA-PSK”, “WPA2-PSK”and“WPA-PSK/
WPA2-PSK” authentication. The key set by the user
will be changed according to the interval set by the
user. The system default value is 0.
WEP Key
Key#1~#4
Show Password
62
GW-DS300N
This setting only takes effect after selecting“WEP”
encryption. There are four types of WEP key
settings, please set the key depending on the real
environment. According to the type and length, there
are four WEP Key types:
Hexadecimal – Only“A~F,”“a~f,”and“0~9”are
allowed to be set in a WEP key.
ASCII –Numerical values, characters or signs are
all allowed to be arranged into a WEP key. It is more
recognizable for user.
64-bit – Enter 10-digit Hex values or 5-digit ASCII
values as the encryption keys. For example:“
0123456aef”or“Guest.”
128-bit – Enter 26-digit Hex values or 13-digit
ASCII values as the encryption keys. For example:“
01234567890123456789abcdef”or“administrator.”
If you want to let the system shows the password
you set, you can enable this check box. After that,
the asterisk(*) will be replaced by the showing the
password.
OK
Click this button and the utility will save the settings
and close the page.
Cancel
Click“Cancel”will exit the page and won't save
the settings.
4
63
Chapter 4 Soft AP Mode
4.4 Access Control
4
Click on the“Access Control”tab on the homepage of the AP mode and
you can start to set the MAC address filter function. Please refer to the
instructions below.
Items
Access Policy
Descriptions
Scroll down the list to set if you want to use access
control function. GW-DS300N has three kinds of
access policies:
“Disable”,“Allow All”, and“Reject All”. The default
setting is “Disa ble”.
Disable – Do not use access control function.
Allow All – Only the MAC addresses listed in the
Access List can connect with GW-DS300N.
Reject All – Only the MAC addresses listed in the
Access List can NOT connect with GW-DS300N.
MAC Address
MAC address is a unique identification for hardware
devices on the network. It is a 12-digit hexadecimal
value. Fill in the MAC addresses of wireless adapters
you want to accept or reject to access GW-DS300N
in this table.
Access List
Here displays all the accepted or rejected MAC
addresses.
Delete
Choose a MAC address which you want to delete in
the Access List, and click this button to delete it.
Remove All
Click this button to delete all the MAC addresses in
the Access List.
64
GW-DS300N
Apply
Click“Apply”to enable the settings you made on
this page.
OK
Click this button and the utility will save the settings
and close the page.
4
65
Chapter 4 Soft AP Mode
4.5 MAC Table
4
Click on the“MAC Table”tab on the homepage of the AP mode, the page
will display the clients which are connecting with GW-DS300N. The MAC
Table will show you the MAC address, AID and Power Saving Mode
status..
Items
MAC Address
Descriptions
Here shows the Mac address of stations which are
connecting with GW-DS300N.
AID
The number of AID will increase as the number of
connections increasing. It can be a kind of
identification for the connection.
Power Saving Mode H e r e s h o w s i f t h e s t a t i o n s c o n n e c t i n g w i t h
GW-DS300N are in power saving mode.
OK
66
GW-DS300N
Click this button and the utility will save the settings
and close the page.
4
67
Chapter 4 Soft AP Mode
4.6 Event Log
4
Click on the“Event Log”tab on the homepage of the AP mode, the page
will display the happened events after start up GW-DS300N The Event
Log page will show you the time and the description of every event
happened on Soft AP.
Items
Descriptions
Event Time
Here shows the time when event happened.
(yy/mm/dd-hh:mm:ss)
Message
The utility will depict every event happened on the
Soft AP, including restart AP or station is failed to
link or success to link, and so on.
Clear
Click this button to delete all the previous event logs.
OK
Click this button and the utility will save the settings
and close the page.
68
GW-DS300N
4
69
Chapter 4 Soft AP Mode
4.7 Statistics
Click on the“Statistics”tab on the homepage of the AP mode, the page will
display the transmitted and received results.
4
Items
Descriptions
Transmit Statistics
Frames Transmitted Frames successfully sent.
Successfully
Frames Fail To
Receive ACK
Frames failed to transmit after hitting retry limit.
(ACKnowledge)
After All Retries
RTS Frames
Successfully
Receive CTS
Successfully receive CTS (Clear To Send) after
sending RTS (Request To Send) frame.
RTS Frames Fail
Failed to receive CTS (Request To Send) after
To Receive CTS
sending RTS (Clear To Send).
Frames
Successfully retransmitted frames numbers.
Transmitted
Successfully
After Retry
Receive Statistics
Frames Receive
Successfully
70
GW-DS300N
Frames received successfully.
Frames Receive
With CRC Error
Frames received with CRC error.
Frames Dropped
Due To Out-of-
Frames dropped due to resource problem.
4
Resource
Duplicate Frames
Frames received more than twice.
Received
Buttons
Reset Counters
Click the button to reset counters to zero.
OK
Click“OK”button and the utility will save the
settings and close the page.
71
Chapter 4 Soft AP Mode
4.8 About
Click on the“About”tab on the homepage of the AP mode, and you can
check all the information about GW-DS300N.
4
Items
Website Links
Descriptions
Click the button and the web browser will be
opened automatically and connect to PLANEX
Communications Inc. Taiwan website.
Utility Version /
This section shows the version and released date of
the Utility and Driver. EEPROM (Electrically
Erasable Programmable Read-Only Memory) and
Firmware version are also displayed.
MAC Address
This section shows the TCP/IP settings of
GW-DS300N and the MAC/Physical Address.
OK
Click this button to save the settings and close the
page.
72
GW-DS300N
4
73
Chapter 4 Soft AP Mode