1
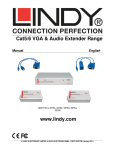
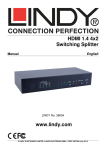
Product Information Reset button USB to 4 Port Serial Converter Installation Guide Benutzerhandbuch English Deutsch USB connection Connection for optional power supply LINDY No. 42858 Serial port connection www.lindy.com st © LINDY ELECTRONICS LIMITED & LINDY-ELEKTRONIK GMBH – 1 EDITION (March 2006) Introduction Installation Thank you for purchasing the LINDY USB to 4 Port Serial Converter. This device provides multiple external RS-232 connections to your PC. It features four standard 9 Way D Male connectors for connecting your serial devices. 1. Ensure the computer has booted up into its OS and then, using the supplied USB Type A to B cable, connect the USB to Serial Converter to an available USB port. The unit’s compact size makes it ideal for use with notebooks or as an alternative to installing an internal serial card in your desktop PC. It supports most standard RS-232 serial devices such as modems, ISDN terminal adaptors, PDAs, barcode readers, label printers, EPOS devices etc. Installation is easy with no changes to IRQ, I/O Address or DMA settings needed. In most instances, when the converter is connected to a PCs USB port or to a self-powered USB, no additional power supply is required. However, if required, an optional 5V DC (+ on centre) USB power supply with mini DC jack may be used to self power the converter. Features USB 1.1 interface, USB 2.0 Full Speed compatible Provides 4 separate RS-232 serial ports (4 x 9 Way D Male) Reset button for device detection Powered from the USB bus Chipset: FTDI Package Contents USB to 4 Port Serial Converter USB Type A to B Cable Driver CD This manual System Requirements PC with available USB port OS: Windows 98SE/ME/2000/XP, Linux* * For a Linux driver, please visit this website: www.ftdichip.com 2. The New Hardware Wizard will appear; Windows will detect and install a Standard USB Hub and begin to install the drivers for the 4 RS-232 Converters, 3. You may use the drivers from the enclosed CD. Select not to use the Windows Update Server online. Insert the CD and click Next to continue. 4. When the dialog box appears, leave the default choice (Search for the best drivers for your device); click Next to continue. Windows should find the appropriate drivers automatically. If not, you may have to select the appropriate directory USB To Serial on the CD. 5. If a Windows Logo test dialog box appears, click Continue installation. 6. When the Ready to Install dialog box appears, click Next. 7. The driver will be installed. A dialog box will appear to confirm the installation has completed; click Finish. 8. Repeat the above procedure for the installation of the other three serial devices. 9. To confirm the devices were correctly installed, select: Control Panel > System > Hardware > Device Manager 10. From the Device Manager list, select: Universal Serial Bus controllers, you will see four entries listed for USB High Speed Serial Converter. Note: If you want to remove a serial device from one of the ports and then connect a different device to that port, just plug in the new device and push the RESET button for the relevant port. The system will detect the new device. Then, simply follow the installation procedure again, as outlined above. Einführung Installation Dieser USB zu 4x RS-232 Konverter stellt ihnen via USB Anschluss Ihres Rechners 4 serielle RS-232 Ports zur Verfügung. Der Anschluss der Seriellen Geräte erfolgt über vier 9polige D-Sub-Steckerbuchsen am Konverter. 1. Schließen Sie den Konverter erst an den Computer an nachdem der Computer komplett hochgefahren ist. Der Konverter ist eine ideale Alternative zur Installation einer internen seriellen Schnittstellenkarte. Die Installation ist einfach und erfordert keine Definition von I/O- oder DMA-Adressen, IRQs etc. und sie macht das Öffnen des Rechners überflüssig. Der Konverter unterstützt die meisten Standard-RS-232-Devices wie PDAs, Modems, ISDN Terminaladapter , Barcodeleser, Serielle Drucker, EPOS Laufwerke etc.. Im Regelfall ist die Stromversorgung des Konverters über den USB Bus ausreichend. Dazu darf der Konverter aber NICHT an einem USB Hub ohne eigenes Netzteil angeschlossen werden. Optional kann an den DCAnschluss des Konverters ein USB-Netzteil 5VDC geregelt, + auf Mittenkontakt mit Mini-Stecker angeschlossen werden. Eigenschaften USB 1.1 Interface, USB 2.0 Full Speed kompatibel Stellt 4 RS-232 Ports zur Verfügung, 4x Sub-D 9 Pol MALE Reset Taste für jeden RS-232 Port Stromversorgung über den USB Bus, keine Netzteil erforderlich Chipset: FTDI Systemanforderungen PC mit USB Ports Betriebssystem: Windows 98SE/ME/2000/XP, Linux* * Linux-Anwender finden jeweils aktuelle Treiber und Informationen auf: www.ftdichip.com Lieferumfang USB - 4 Port RS-232 Seriell Konverter USB Typ A/B Anschlusskabel Treiber-CD Dies Handbuch Certifications CE Statement This device complies with the European Regulations for Electromagnetic Compatibility (EMC) of the European Union and it is equipped with the CE mark. This unit has to be used with high quality shielded connection cables. Only if these high quality shielded cables are used it can be sure that the EMC compatibility is not adversely influenced. FCC Statement Shielded cables must be used with this equipment to maintain compliance with radio frequency energy emission regulations and ensure a suitably high level of immunity to electromagnetic disturbances. FCC Warning This equipment has been tested and found to comply with the limits for a Class B Digital device, pursuant to part 15 of the FCC Rules. These limits are designed to provide reasonable protection against harmful interference in a residential installation. This equipment generates, uses, and can radiate radio frequency energy and, if not installed and used in accordance with the instructions, may cause harmful interference to radio communications. However, there is no guarantee that interference will not occur in a particular installation. If this equipment does cause harmful interference to radio or television reception, which can be determined by turning the equipment off and on, the user is encouraged to try to correct the interference by one or more of the following measures: 2. Der Rechner wird einen Standard USB Hub und das neue Device erkennen, einen Standard USB Hub installieren und den Assistenten für die Installation neuer Hardware starten. 3. Verwenden Sie die Treiber von der beiliegenden CD, Sie benötigen keinen Online-Zugang zum Windows Update Server. Wählen Sie Nein, dismal nicht und klicken Sie auf Weiter. 4. Legen Sie die beiliegende CD ein und klicken Sie auf Weiter. 5. Windows sollte den Treiber für den High Speed Serial Converter selbständig finden. Sollte dies nicht der Fall sein, wählen Sie ggf. das Verzeichnis USB To Serial aus. 6. Da der Treiber nicht Windows-Logo-Test zertifiziert ist klicken Sie in der entsprechenden Checkbox auf Installation fortsetzen. 7. Windows sollte den Treiber korrekt installieren. Klicken Sie abschließend den Button Fertig stellen. 8. Wiederholen Sie die beschriebene Prozedur für alle 4 RS-232 Konverterports. 9. Überprüfen Sie die korrekte Installation gegebenenfalls über den Windows Gerätemanager. Start > Systemsteuerung > System > Hardware > Gerätemanager Dort können Sie gegebenenfalls die Installation der Treiber erneut anstoßen. Unter dem Eintrag USB-Controller finden Sie die 4 Einträge zu USB High Speed Serial Converter HINWEIS: Wenn Sie ein neues serielles Gerät an einen der Ports anschließen drücken Sie einfach nach Anschluss die Taste RESET des jeweiligen Ports. Der Computer wird dann automatisch das neue Gerät erkennen. Folgen Sie dann der Installationsprozedur wie oben beschrieben. WEEE (Waste of Electrical and Electronic Equipment), Recycling of Electronic Products In 2006 the European Union introduced regulations (WEEE) for the collection and recycling of all waste electrical and electronic equipment. It is no longer allowable to simply throw away electrical and electronic equipment. Instead, these products must enter the recycling process. Each individual EU member state has implemented the WEEE regulations into national law in slightly different ways. Please follow your national law when you want to dispose of any electrical or electronic products. More details can be obtained from your national WEEE recycling agency. Germany / Deutschland: Die Europäische Union hat mit der WEEE Direktive umfassende Regelungen für die Verschrottung und das Recycling von Elektro- und Elektronikprodukten geschaffen. Diese wurden von der Bundesregierung im Elektro- und Elektronikgerätegesetz – ElektroG in deutsches Recht umgesetzt. Dieses Gesetz verbietet vom 24.März 2006 an das Entsorgen von entsprechenden, auch alten, Elektro- und Elektronikgeräten über die Hausmülltonne! Diese Geräte müssen den lokalen Sammelsystemen bzw. örtlichen Sammelstellen zugeführt werden! Dort werden sie kostenlos entgegen genommen. Die Kosten für den weiteren Recyclingprozess übernimmt die Gesamtheit der Gerätehersteller. Reorient or relocate the receiving antenna Increase the separation between the equipment and receiver Connect the equipment into an outlet on a circuit different from that to which the receiver is connected Consult the dealer or an experienced technician for help You are cautioned that changes or modifications not expressly approved by the party responsible for compliance could void your authority to operate the equipment. LINDY No. 42858 st 1 Edition March 2006 www.lindy.com