1
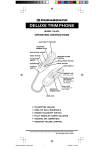
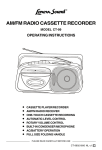
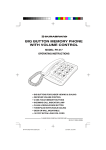
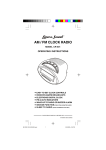
® JUMBO DISPLAY AM / FM CLOCK RADIO MODEL CR-776 OPERATING INSTRUCTIONS EASY TO READ JUMBO CLOCK DISPLAY WAKE UP TO RADIO OR ALARM AM/FM RADIO RECEIVER ELECTRONIC DIGITAL CLOCK PM & AUTO INDICATORS SNOOZE FUNCTION SLEEP TO RADIO BATTERY BACK-UP (FOR EXTRA 9 MINUTES SLEEP) (WITH AUTOMATIC SHUTOFF) (9V BATTERY, NOT INCLUDED) PLEASE READ CAREFULLY BEFORE USE CR-776_031500 NL v.2 E SAFETY INSTRUCTIONS CAUTION RISK OF ELECTRIC SHOCK DO NOT OPEN The lightning flash and arrow head within the triangle is a warning sign alerting you of dangerous voltage inside the product. CAUTION: TO REDUCE THE RISK OF ELECTRIC SHOCK, DO NOT REMOVE COVER (OR BACK). NO USER SERVICEABLE PARTS INSIDE. REFER SERVICING TO QUALIFIED SERVICE PERSONNEL. The exclamation point within the triangle is a warning sign alerting you of important instructions accompanying the product. See bottom of the unit WARNING: TO REDUCE THE RISK OF FIRE OR ELECTRIC SHOCK, DO NOT EXPOSE THIS APPLIANCE TO RAIN OR MOISTURE. THESE IMPORTANT SAFETY INSTRUCTIONS ARE INCLUDED, AS APPLICABLE TO THE APPLIANCE, CONVEYING TO THE USER THE INFORMATION ITEMIZED BELOW: 1. Read Instructions - All the safety and operating instructions should be read before the appliance is operated. 2. Retain Instructions - The safety and operating instructions should be retained for future reference. 3. Heed Warnings - All warnings on the appliance and in the operating instructions should be adhered to. 4. Follow Instructions - All operating and use instructions should be followed. 5. Water and Moisture - The appliance should not be used near water - for example near a bathtub, washbowl, kitchen sink, laundry tub, in a wet basement, or near a swimming pool, and the like. 6. Wall or Ceiling Mounting - The appliance should not be mounted to a wall or ceiling. 7. Ventilation - The appliance should be situated so that its location or position does not interfere with its proper ventilation. For example, the appliance should not be situated on a bed, sofa, rug, or similar surface that may block the ventilation openings; or, placed in a built-in installation, such as a bookcase or cabinet that impede the flow air through the ventilation openings. 8. Heat - The appliance should be situated away from heat sources such as radiators, heat registers, stoves, or other appliances (including amplifiers) that produce heat. 9. Power Sources - The appliance should be connected to a power supply only of the type described in the operating instructions or as marked on the appliance. 10. Grounding or Polarization - Precautions should be taken so that the grounding or polarization means of an appliance is not defeated. 1 CR-776_031500 NL v.2 E SAFETY INSTRUCTIONS 11. Power Cord Protection - Power supply cords should be routed so that they are not likely to be walked on or pinched by items placed upon or against them, paying particular attention to cords at plugs, convenient receptacles, and the point where they exit from the appliance. 12. Cleaning - The appliance should be cleaned only as recommended by the manufacturer. 13. Nonuse periods - The power cord of the appliance should be unplugged from the outlet when left unused for a long period of time. 14. Object and Liquid Entry - Care should be taken so that objects do not fall and liquids are not spilled into the enclosure through openings. 15. Damage Requiring Service - The appliance should be serviced by qualified service personnel when: A. The power supply cord or the plug has been damaged; or B. Objects have fallen, or liquid been spilled into the appliance; or C. The appliance has been exposed to rain; or D. The appliance does not appear to operate normally or exhibits a marked change in performance; or E. The appliance has been dropped, or the enclosure damaged. 16. Servicing - The user should not attempt to service the appliance beyond that described in the operating instructions. All other servicing should be referred to qualified service personnel. 17. Power lines - An outdoor antenna should be located away from power lines. 18. Outdoor Antenna Grounding - If an outside antenna is connected to the receiver, be sure the antenna system is grounded so as to provide some protection against voltage surges and built up static charges. Section 810 of the National Electrical Code, ANSI/NFPA 70 provides information with respect to proper grounding of the mast and supporting structure, grounding of the lead-in wire to an antenna discharge unit, size of grounding conductors, location of antenna-discharge unit, connection to grounding electrodes, and requirements for the grounding electrode. See Figure. EXAMPLE OF ANTENNA GROUNDING AS PER NATIONAL ELECTRICAL CODE ANTENNA LEAD IN WIRE GROUND CLAMP ANTENNA DISCHARGE UNIT (NEC SECTION 810-20) GROUNDING CONDUCTORS (NEC SECTION 810-21) ELECTRIC SERVICE EQUIPMENT GROUND CLAMPS POWER SERVICE GROUNDING ELECTRODE SYSTEM (NEC ART 250, PART H) 2 CR-776_031500 NL v.2 E LOCATION OF CONTROLS FRONT VIEW PM INDICATOR DIAL SCALE CLOCK DISPLAY TUNING CONTROL VOLUME CONTROL AUTO (ALARM) INDICATOR TOP VIEW DIMMER SWITCH FUNCTION SWITCH (ALARM/AUTO/OFF/ON) HOUR SET MINUTE SET SNOOZE BUTTON BUTTON BUTTON TIME SET BUTTON ALARM SET/ OFF BUTTON BAND SWITCH SLEEP BUTTON BACK VIEW BATTERY COMPARTMENT (9V, for back up) FM ANTENNA WIRE 3 AC POWER CORD CR-776_031500 NL v.2 E OPERATING INSTRUCTIONS Powering Up Plug the AC power cord into a 120V, 60Hz electrical outlet. The clock display will light up and flash indicating the power is on. NOTE: This cord is polarized. This means the cord will only fit one way into the socket or wall outlet. If it does not fit, do not force it, just reverse it and try again. BATTERY BACK-UP If the AC cord is disconnected or if there is a short time power failure, this electronic clock and timer are designed to continue operating internally (without showing in the display) if a 9 volt battery (not included) is installed. The radio will work fine without this back up battery. NOTE: You may check the condition of the battery every few months by disconnecting the AC cord and connecting it again 2 or 3 minutes later. The preset times will show. If the time flashes, it indicates the battery is dead or not connected properly. Setting the Clock 1. Press the TIME set button together with the HOUR set button until the display shows the desired hour. 2. Press the TIME set button together with the MINUTE set button until the display shows the desired minutes. NOTE: When the PM indicator is off, the time is AM. Setting the Alarm Time 1. Use the ALARM/OFF button to check the alarm time. 2. Press the ALARM/OFF button together with the HOUR set button until the display shows the desired alarm hour time. 3. Press the ALARM/OFF button together with the MINUTE set button until the display shows the correct alarm minutes. 4. Make sure the PM lamp is off if you want the clock to wake you in the morning. 5. Release the ALARM/OFF button, the clock display will show the normal time of day. NOTE: Again check the PM indicator. If you want the radio to wake you in the morning, the lamp next to PM should be off on alarm time (when pressing ALARM/OFF button). To change PM to AM time, advance time 12 hours. To have clock wake you up, slide the FUNCTION switch to AUTO or ALARM position(s). Playing the Radio 1. Slide the FUNCTION switch to ON position. 2. Slide the BAND switch to either AM or FM. 3. Turn the TUNING control to your desired station. 4. Adjust the VOLUME control to your favorite listening level. 5. Slide the FUNCTION switch to OFF position to shut off the radio. GETTING BETTER RADIO RECEPTION: For best AM reception, rotate the radio a small amount or position it near the window. For best FM reception, unwrap and fully extend the FM antenna wire. WARNING: Do not connect the FM antenna to an outdoor antenna. 4 CR-776_031500 NL v.2 E OPERATING INSTRUCTIONS Waking up to Radio 1. Set the alarm time as previously instructed. 2. Select your desired AM or FM broadcast by following the procedure of Playing the Radio. 3. Make sure the VOLUME control is set loud enough to wake you up. 4. Slide the FUNCTION switch to AUTO position and the AUTO lamp will light up. NOTE: Your set is now ready to turn on automatically at your selected alarm time. 5. When alarm sounds, to get 9 minutes of extra sleep, press the SNOOZE button. 6. To shut off the alarm, press ALARM/OFF button. Wake to Buzzer 1. Set the alarm time as previously instructed. 2. Slide the FUNCTION switch to ALARM position. The AUTO indicator will light. 3. The buzzer alarm is now set to turn on automatically at the selected alarm time. 4. When buzzer sounds, to get 9 minutes of extra sleep, press the SNOOZE button. 5. To shut off the alarm, press ALARM/OFF button. Snooze Control When this set has waken you up and you wish to sleep a few minutes more, simply press the SNOOZE button. The radio or alarm will go off for 9 minutes and then come on again. This is repeated in a row. Alarm Off 1. Press ALARM/OFF button. This will shut the alarm for that day only. Next day the set will wake you again at the same time. 2. Slide the FUNCTION switch to OFF position and the alarm function is off until you re-adjust the FUNCTION switch to AUTO or ALARM. Sleep Control The SLEEP control will allow the radio to play 58 minutes (or 1 hour and 59 minutes) before the radio turns itself off. 1. Press the SLEEP button, the display will show 58 minutes and the radio will start to play. 2. Holding the SLEEP button down, the display will count down. Release the SLEEP button when the display shows your desired amount of time you want the radio to play before shutting itself off. 3. Pressing the SLEEP button, the HOUR set button, and the MINUTE set button all simultaneously down, the required sleep time will be changed to 1 hour and 59 minutes. You may reduce the sleep time by following the above Step 2. 4. To turn the radio off before the playing time has expired, simply press the SNOOZE button. NOTE: The sleep function will not affect the wake-up operation of the clock if the FUNCTION switch is in AUTO or ALARM position. In the morning, the radio or buzzer will wake you up if FUNCTION switch is in the AUTO or ALARM position. 5 CR-776_031500 NL v.2 E TROUBLE SHOOTING (Helpful Hints) SHOULD YOUR SET EXHIBIT A PROBLEM, CHECK THE FOLLOWING BEFORE SEEKING SERVICE. SYMPTOM Alarm does not come on in the morning. FM is distorted and weak. Noise or weak sound on AM broadcasts. CAUSE SOLUTION AM or PM not set correctly. Is alarm time set in AM range (PM Lamp off)? Advance the clock 12 hours. FUNCTION switch is in OFF position. Is the AUTO Lamp off? Set the FUNCTION switch to AUTO or ALARM position. FM antenna wire is not extended. Extend FM antenna wire. Station not tuned in properly. Tune to desired station carefully. Weak broadcast station. Turn to a stronger Station. Signal is blocked. Rotate the set to receive better signal. External interference. Turn the radio for better AM reception or bring set near a window. FUNCTION switch is Slide the FUNCTION switch to ON position. in the OFF position. No sound. The clock is flashing. Clock is dead. VOLUME control set to minimum position. Rotate VOLUME control for desired sound. The clock is not set. Set the clock and alarm time. A power failure has occurred. Reset the clock alarm time and time of the day. The sets AC cord is not connected. Connect sets AC cord and make sure outlet has power. LENOXX reserves the right to make design and specification changes for product improvement. PROTECT YOUR FINE FURNITURE! WE RECOMMEND A CLOTH OR OTHER PROTECTIVE MATERIAL BE PLACED UNDER THE SET WHEN PLACING IT ON SURFACE WITH A NATURAL OR LACQUER FINISH. 6 CR-776_031500 NL v.2 E SPECIFICATIONS Power source: Dimensions: Frequency range: AC 120V, 60Hz, 8W DC 9V battery for backup time memory (optional, alkaline batteries are recommended) 9" (Length) 4 1/4" (High) 2 3/4" (Depth) FM 88 - 108MHz AM 530 - 1700kHz LIMITED WARRANTY We warrant this product to be free from defects in material and workmanship under normal use for a period of 90 days after purchase and we will repair it free of charge or replace it at no charge, should it become defective under this warranty, providing you submit proof of purchase (sales slip) with the set. During the initial 90 day period after original purchase, we will service or exchange, at no charge, the set that is returned to LENOXX ELECTRONICS CORP.(LENOXX will pay the shipping back to you). After the initial 90 day period expires, and for a period of 12 months from original purchase, we will repair the unit covering any part(s) that need to be replaced at no charge, but will charge for the cost of labor, return postage paid by LENOXX. This warranty does not apply to any products which have been subject to misuse, neglect or accident. This warranty does not cover broken headphones or cabinet. UNDER NO CIRCUMSTANCES WILL LENOXX ELECTRONICS CORP. BE LIABLE FOR ANY INCIDENTAL OR CONSEQUENTIAL DAMAGES. Some states do not allow the exclusion or limitation of incidental or consequential damages, so the above limitations or exclusions may not apply to you. This warranty gives you specific legal rights, and you may also have other rights which vary from state to state. The following charges apply to repairs beyond the warranty period: $8.00. Be sure to pack carefully and return postage paid insured together with your money order (personal checks will not be accepted) and sales receipt to : LENOXX ELECTRONICS CORP. 2 GERMAK DRIVE, CARTERET N.J. 07008 For customer service Dial 1-800-315-5885 (MONDAY - THURSDAY 09:00 AM - 5:00 PM, FRIDAY 09:00 AM - 1:00 PM EST) or Visit Our Website: http://www.lenoxx.com © 2000 LENOXX ELECTRONICS CORP. 2 GERMAK DRIVE CARTERET, N.J. 07008 MADE & PRINTED IN CHINA 7 CR-776_031500 NL v.2 E