1
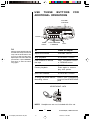
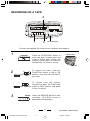
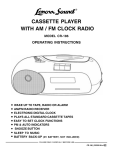
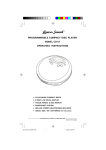
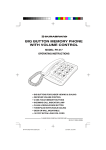
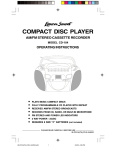
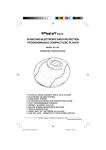
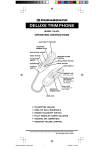
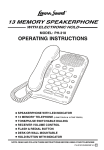
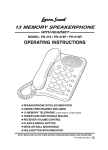
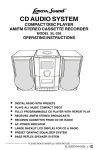
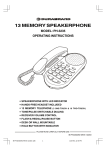
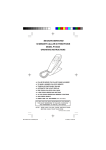
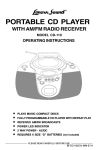
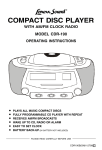
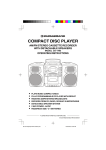
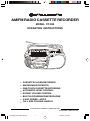
AM/FM RADIO CASSETTE RECORDER MODEL CT-992 OPERATING INSTRUCTIONS CASSETTE PLAYER/RECORDER AM/FM RADIO RECEIVER ONE-TOUCH CASSETTE RECORDING AUTOMATIC LEVEL CONTROL ROTARY VOLUME CONTROL BUILT-IN CONDENSER MICROPHONE 2 WAY POWER - AC/DC FULL SIZE FOLDING HANDLE PLEASE READ CAREFULLY BEFORE USE IB-CT992(NL)-WM-E-031103 CT-992(NL)-WM-E-031103.p65 1 3/12/03, 11:00 AM WARNING TO PREVENT FIRE OR SHOCK HAZARD, DO NOT USE THE PLUG WITH AN EXTENSION CORD, RECEPTACLE OR OTHER OUTLET UNLESS THE BLADES CAN BE FULLY INSERTED TO PREVENT BLADE EXPOSURE. TO PREVENT FIRE OR SHOCK HAZARD, DO NOT EXPOSE THIS APPLIANCE TO RAIN OR MOISTURE. WARNING RISK OF ELECTRIC SHOCK DO NOT OPEN The lightning flash with arrowhead symbol, within an equilateral triangle, is intended to alert the user to the presence of uninsulated dangerous voltage within the products enclosure that may be of sufficient magnitude to constitute a risk of electric shock to persons. WARNING: TO REDUCE THE RISK OF ELECTRIC SHOCK, DO NOT REMOVE COVER (OR BACK). NO USER SERVICEABLE PARTS INSIDE. REFER SERVICING TO QUALIFIED SERVICE PERSONNEL. The exclamation point within an equilateral triangle is intended to alert the user to the presence of important operating and maintenance (servicing) instructions in the literature accompanying the appliance. IMPORTANT SAFETY INSTRUCTIONS 1. 2. 3. 4. 5. 6. 7. Read these instructions. Keep these instructions. Heed all warnings. Follow all instructions. Do not use this apparatus near water. Clean only with dry cloth. Do not block any ventilation openings, install in accordance with the manufacturers instructions. 8. Do not install near any heat sources such as radiators, heat registers, stoves, or other apparatus (including amplifiers) that produce heat. 9. Do not defeat the safety purpose of the polarized or grounding-type plug. A polarized plug has two blades with one wider than the other. A grounding type plug has two blades and a third grounding prong. The wide blade or the third prong are provided for your safety. If the provided plug does not fit into your outlet, consult an electrician for replacement of the obsolete outlet. 10. Protect the power cord from being walked on or pinched particularly at plugs, convenience receptacles, and the point where they exit from the apparatus. 11. Only use attachments/accessories specified by the manufacturer. 12. Unplug this apparatus during lightning storms or when unused for long periods of time. 13. Refer all servicing to qualified service personnel. Servicing is required when the apparatus has been damaged in any way, such as power-supply cord or plug is damaged, liquid has been spilled or objects have fallen into the apparatus, the apparatus has been exposed to rain or moisture, does not operate normally or has been dropped. 14. This appliance shall not be exposed to dripping or splashing water and that no object filled with liquid such as vases shall be placed on the apparatus. 1 CT-992(NL)-WM-E-031103.p65 2 IB-CT992(NL)-WM-E-031103 3/12/03, 11:00 AM ADDITIONAL SAFETY INSTRUCTIONS 1. Power Sources - The appliance should be connected to a power supply only of the type described in the operating instructions or as marked on the appliance. 2. Wall or Ceiling Mounting - The appliance should not be mounted to a wall or ceiling. 3. Object and Liquid Entry - Care should be taken so that objects do not fall and liquids are not spilled into the enclosure through openings. 4. Servicing - The user should not attempt to service the appliance beyond that described in the operating instructions. All other servicing should be referred to qualified service personnel. It is the intent of Lenoxx that this product be used in full compliance with the copyright laws of the United States and that prior permission be obtained from copyright owners whenever recording songs from the RADIO. Do not apply oil or petroleum products or solvents to any part of this set. 2 CT-992(NL)-WM-E-031103.p65 3 IB-CT992(NL)-WM-E-031103 3/12/03, 11:00 AM BATTERY SAFETY INSTRUCTIONS CAUTION: TO REDUCE THE RISK OF FIRE OR PERSONAL INJURY OR DAMAGE TO YOUR SET, READ AND FOLLOW THESE INSTRUCTIONS. 1. Use only the type and size of batteries mentioned in the operating instructions booklet (batteries are not included with this set, please buy the proper batteries). 2. Do not dispose the batteries into a fire. The cells may explode. Check with local codes for possible special disposal instructions. 3. Do not open or mutilate the batteries. Released electrolyte is corrosive and may cause damage to the eyes or skin. It may be toxic if swallowed. 4. Be careful when handling batteries in order not to short the battery with conducting materials such as rings, bracelets and keys. The battery or conductor may over heat and cause burns. 5. Do not attempt to recharge non-rechargeable batteries. The batteries may leak corrosive electrolyte or explode. 6. Do not attempt to rejuvenate the batteries identified for use with this product by heating them. Sudden release of the battery electrolyte may cause burns or irritation to eyes or skin. 7. All batteries should be replaced at the same time. Mixing fresh and discharged batteries could increase internal cell pressure and rupture the batteries. and ) or 8. When inserting batteries into this product, the proper polarity ( direction must be observed. Reverse insertion of some or all of the batteries may result in battery electrolyte leakage or explosion. 9. Remove the batteries from this product if the product will not be used for a long period of time (several months or more) since during the period the batteries could leak, damaging the product. 10. Discard weak or dead batteries as soon as possible since they are more likely to leak in the product. Batteries should be replaced (depending on the product) when the display gets dim or if the Low Battery Indicator shows or if the sound gets distorted. 11. Do not store this product in high temperature areas. Batteries that are stored in a freezer or refrigerator for the purpose of extending shelf life should be protected from condensation during storage and defrosting. Batteries should be stabilized at room temperature prior to use after cold storage. 12. If this product does not operate normally, see TROUBLE SHOOTING in this manual. If you cant resolve the problem, or if the product is damaged, refer to the LENOXX WARRANTY INFORMATION. Opening or removing covers may expose you to dangerous voltages or other risks. Incorrect reassembly can cause electric shock when the appliance is subsequently used. 13. If liquid leaks from the batteries, carefully wipe this liquid. Do not allow it to touch your skin, and discard the leaking batteries. 14. Do not mix batteries (OLD and NEW or CARBON and ALKALINE, etc.). 15. The use of rechargeable batteries is not recommended for this set because their voltage and life is lower than standard batteries. 16. Installation of batteries should be done by an adult only. SAVE THESE INSTRUCTIONS 3 CT-992(NL)-WM-E-031103.p65 4 IB-CT992(NL)-WM-E-031103 3/12/03, 11:00 AM CHOOSING THE POWER SOURCES You can use the AC power or batteries as a power source. Battery compartment To a wall outlet NOTE: BATTERY DOOR One blade of plug & outlet is wider. TIP The plug of the AC power cord is polarized and only fits one way into the wall outlet. If this plug does not match your outlet, do not force it. Reverse it and try again. 1. Connecting the AC Power Cord Open the BATTERY COMPARTMENT DOOR, stretch the AC power cord out, and insert the AC PLUG into the wall outlet. 2. Operate the Set on Batteries Insert 4 size C batteries (not included) into the battery compartment. C C C C NOTE To install the batteries properly into the compartment, first place the AC plug into the slot, then fold the excess cord carefully into the battery compartment. Then install batteries. 4 CT-992(NL)-WM-E-031103.p65 5 IB-CT992(NL)-WM-E-031103 3/12/03, 11:00 AM LISTENING TO THE RADIO 1&4 3 2 Connect the supplied AC power cord or batteries (see page 4). 1 2 RADIO OFF TAPE FM Slide the FUNCTION SWITCH to AM or FM position. AM TUNING Tune into the station you prefer using the TUNING control. Adjust for the clearest sound. 3 Adjust the volume level by rotating the VOLUME control. 4 To turn off the Radio, slide the FUNCTION switch to TAPE (RADIO OFF) position. RADIO OFF TAPE FM AM TIP: To improve broadcast reception, change position of the antenna for FM and rotate the player itself for AM. 5 CT-992(NL)-WM-E-031103.p65 6 IB-CT992(NL)-WM-E-031103 3/12/03, 11:00 AM PLAYING A TAPE 1 3 2 Connect the supplied AC power cord or batteries (see page 4). 1 2 RADIO OFF TAPE STOP/EJECT FM AM Slide the FUNCTION switch to TAPE (RADIO OFF) position. Press the STOP/EJECT button to open the tape compartment and insert a recorded tape. Close the door. E M P TY R EE L FU LL R EE L INSERT TAPE THIS WAY FULL REEL O N RIGHT 3 PLAY Press the PLAY button. The player turns on and starts playing. 6 CT-992(NL)-WM-E-031103.p65 7 IB-CT992(NL)-WM-E-031103 3/12/03, 11:00 AM USE THESE BUTTONS ADDITIONAL OPERATIONS FOR VOLUME CONTROL PAUSE STOP/ EJECT TIP When the tape finishes playing that side of the tape, the set will stop and the PLAY button will pop up. To hear the other side, flip the tape over, then insert and press PLAY, or press REWIND then PLAY to hear the same song again. FAST FORWARD & REWIND PLAY To Press or Adjust Adjust the volume VOLUME control Stop playback STOP/EJECT button Fast forward or rewind the tape FAST FORWARD button or REWIND button Pause playback PAUSE button Press again to resume play after pause. Eject the cassette STOP/EJECT button To enjoy the music without disturbing others Insert your headphone plug into the HEADPHONE jack HEADPHONE JACK L NOTE: Headphones are not included with this set. 7 CT-992(NL)-WM-E-031103.p65 8 IB-CT992(NL)-WM-E-031103 3/12/03, 11:00 AM RECORDING ON A TAPE 2 1 3 MICROPHONE Connect the supplied AC power cord or batteries (see page 4). 1 Press the STOP/EJECT button to open the tape compartment and insert a blank tape. Select the program source (AM, FM or built-in microphone) you want to record. STOP/EJECT 2 RADIO OFF TAPE RADIO OFF TAPE 3 FM FM AM AM RECORD To record from radio, slide the FUNCTION switch to AM or FM position, and tune into the station you want. To record from the built-in microphone, leave the FUNCTION switch at TAPE position, and speak in front of the set. Press the RECORD button to start recording. (The PLAY button is depressed automatically.) 8 CT-992(NL)-WM-E-031103.p65 IN SERT TAPE THIS WAY FULL R EEL O N RIG H T 9 IB-CT992(NL)-WM-E-031103 3/12/03, 11:00 AM USE THESE BUTTONS ADDITIONAL OPERATIONS FOR FUNCTION SWITCH PAUSE TIP Adjusting the VOLUME control will not affect the recording level. For best recording effect, use AC power instead of batteries. To erase a recording, just start a new one, and the old recording is automatically replaced. To Press or Adjust Stop recording STOP/EJECT button Pause recording PAUSE button Press the button again to resume recording. Turn off the power Press the STOP/EJECT button and slide the FUNCTION switch to TAPE (RADIO OFF) position. 9 CT-992(NL)-WM-E-031103.p65 STOP/ EJECT 10 IB-CT992(NL)-WM-E-031103 3/12/03, 11:00 AM PRECAUTIONS Notes on Cassette On Safety Should any solid object or liquid fall into the set, disconnect the power, and have it checked by qualified personnel before operating it any further. California Proposition 65 Warning: This product contains chemicals known to the state of California to cause cancer, and birth defects or other reproductive harm. Wash Hands After Handling. Break off the cassette tab from side A or B to prevent accidental recording. If you want to reuse the tape for recording, cover the broken tab with adhesive tape. Side A On Placement Tab for side B Do Tab for side A not leave the set in a location near heat source, or in a place subject to direct sunlight, excessive dust or mechanical shock. To record on a tape with its tab broken not place the set on an inclined or unstable place. Use of a cassette with more than 90 the back of the cabinet. The ventilation holes must be unobstructed for the set to operate properly and prolong the life of its components. To reduce the chances of tape jamming off, cover the respective tab hole for side A or B with adhesive tape. Do minutes, such as C-120 (120 minutes), is not recommended. The extreme thinness of this tape may damage this set. Do not place anything within 1 inch of or tangling, you should check that there are no loose layers of tape visible through the cassette center window. If any, tighten these loose layers of tape using a pencil before inserting the cassette into the set. If the set is left in a car parked in the sun, be sure to choose a location in the car where the set will not be subjected to the direct rays of the sun. Since a strong magnet is used for the speakers, keep personal credit cards using magnetic coding or springwound watches away from the set to prevent possible damage from the magnet. On Power Sources For battery operation, use 4 size C batteries. We recommend alkaline batteries for longer life. When the batteries are not to be used, remove them to avoid damage that can be caused by battery leakage or corrosion. The nameplate indicating operating voltage, power consumption, etc. is located at the back of the set. 10 CT-992(NL)-WM-E-031103.p65 11 IB-CT992(NL)-WM-E-031103 3/12/03, 11:00 AM MAINTENANCE Cleaning the Tape Heads Wipe the heads, the pinch roller and the capstan with a cleaning swab slightly moistened with cleaning fluid or alcohol after every 10 hours of operation for optimum playback and recording quality. After cleaning, insert a tape when the areas cleaned are completely dry. NOTE: In order to see and clean the head, you may have to press PLAY first. Notes for Storing Cassette Tapes 1. Do not put a tape near a magnetic field, such as a TV, or speaker. Magnetic fields may reduce the tape sensitivity or even erase the recording. 2. Do not store tape for any length of time in a hot, moist or dusty place. Cleaning the Cabinet Clean the cabinet, panel and controls with a soft cloth slightly moistened with a mild detergent solution. Do not use any type of abrasive pad, scouring powder, or solvent, such as alcohol or benzene. 11 CT-992(NL)-WM-E-031103.p65 12 IB-CT992(NL)-WM-E-031103 3/12/03, 11:00 AM TROUBLE SHOOTING Remedy General Problem Connect the AC power cord to a wall outlet securely. Make sure the batteries are inserted The power is not on. correctly and they are fresh. Make sure the FUNCTION switch is in the correct position. Adjust the volume. Unplug the headphone when listening There is no sound. Radio through speakers. The sound is weak or poor quality. The RECORD button does not function/The tape does not play. Tape player The tape does completely. not erase Replace all the batteries with fresh ones if they are weak, or bring the set near a window, or rotate the set (for AM) or adjust the FM antenna for best FM reception. Make sure the safety tab on the cassette is in place. Make sure the FUNCTION switch is at TAPE position. Clean the erasing head. Replace all the batteries with fresh ones if they are weak. The tape does not record. The sound is weak / The sound quality is poor. Cassette PLAY button pops up. Tape jamming or tangling. Make sure the tape is inserted properly. Make sure the cassette tab is in place. Clean the heads, pinch roller and capstan. The tape has reached its end. Remove it, flip to the other side, re-insert and press PLAY. Use only better quality tapes. Do not use a cassette with more than 90 minutes. Make sure there are no loose layers of tape visible before inserting the cassette. NOTE: Normal battery life using alkaline batteries is about 8 hours of playing time. PROTECT YOUR FINE FURNITURE! WE RECOMMEND A CLOTH OR OTHER PROTECTIVE MATERIAL BE PLACED UNDER THE SET WHEN PLACING IT ON SURFACE WITH A NATURAL OR LACQUER FINISH. For Customer Service Dial 1-800-315-5885 (MONDAY - THURSDAY 9:00 AM - 5:00 PM, FRIDAY 9:00 AM - 1:00 PM EST) 12 CT-992(NL)-WM-E-031103.p65 13 IB-CT992(NL)-WM-E-031103 3/12/03, 11:00 AM SPECIFICATION General Description Power source: AC 120V, 60Hz 6 Watts DC 6V (4 size C batteries) (we recommend alkaline batteries for longer life) Speakers: 3 DYNAMIC Output power: Dimensions: 600mW Width: 11 3/ 4 Depth: 4 Height: 6 1/ 4 Weight: 3 LBs (without batteries) Tape Recorder Section Tape: Standard normal bias cassette tape Frequency response: 70 Hz - 10 kHz Wow & flutter: 0.35% W.R.M.S. Radio Section Frequency range: FM: 88 - 108 MHz AM: 530 - 1700 kHz LENOXX reserves the right to make design and specification changes for product improvement. LIMITED WARRANTY We warrant this product to be free from defects in material and workmanship under normal use for a period of 90 days after purchase and we will repair it free of charge or replace it at no charge, should it become defective under this warranty, providing you submit proof of purchase (sales slip) with the set. During the initial 90 day period after original purchase, we will service or exchange, at no charge, the set that is returned to LENOXX ELECTRONICS CORP. After the initial 90 days period expires, and for a period of 12 months from original purchase we will repair the unit covering any part(s) that need to be replaced at no charge, but will charge for the cost of labor, return postage paid by Lenoxx. This warranty does not apply to any product which has been subject to misuse, neglect or accident. This warranty does not cover a broken cabinet. UNDER NO CIRCUMSTANCES WILL LENOXX ELECTRONICS CORP. BE LIABLE FOR ANY INCIDENTAL OR CONSEQUENTIAL DAMAGES. Some states do not allow the exclusion or limitation of incidental or consequential damages, so the above limitations or exclusions may not apply to you. This warranty gives you specific legal rights, and you may also have other rights which vary from state to state. The following charges apply to repairs beyond the warranty period: $5.00. Be sure to pack carefully and return postage paid insured together with your money order (personal checks will not be accepted) and sales receipt to: LENOXX ELECTRONICS CORP., 2 GERMAK DRIVE, CARTERET, N.J. 07008 © 2003 LENOXX ELECTRONICS CORP. 2 GERMAK DRIVE CARTERET, N.J. 07008 http://www.lenoxx.com MADE & PRINTED IN CHINA 13 CT-992(NL)-WM-E-031103.p65 14 IB-CT992(NL)-WM-E-031103 3/12/03, 11:00 AM