1
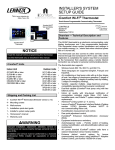
HOMEOWNER’S MANUAL
ComfortSense® 7000 Series
E2009 Lennox Industries Inc.
Dallas, Texas, USA
Model L7742U Touch Screen Programmable Thermostat
CONTROLS
506229−01
05/09
Supersedes 04/09
Litho U.S.A.
Table of Contents
S Tabbed user interface with
touch screen interaction
S Humidification measurement
and control
S Soft blue backlighted screen
with adjustable brightness
S Programmable or
non−programmable options
S Equipment maintenance
reminders
S Automatically changes
between heating cooling
05/09
*2P0509*
ComfortSense® 7000 Series Model L7742U Thermostat . . .
Display Fields & Touch Screen Points . . . . . . . . . . . . . . . . . .
Home ScreenCurrent Conditions & Temperature Settings
Controlling the Heat/Cool Modes of Operation . . . . . . . . . . .
Controlling the Fan Operation . . . . . . . . . . . . . . . . . . . . . . . . .
Controlling the Schedule . . . . . . . . . . . . . . . . . . . . . . . . . . . . .
Schedule ScreenProgramming . . . . . . . . . . . . . . . . . . . . . .
Options screenReminders & User Settings . . . . . . . . . . . .
Humidification . . . . . . . . . . . . . . . . . . . . . . . . . . . . . . . . . . . . . .
Dehumidification . . . . . . . . . . . . . . . . . . . . . . . . . . . . . . . . . . . .
Humiditrol® EDA Accessory . . . . . . . . . . . . . . . . . . . . . . . . . .
Temporary Temperature ChangePause the Schedule . . .
Remote Outdoor Sensor . . . . . . . . . . . . . . . . . . . . . . . . . . . . .
Memory Protection . . . . . . . . . . . . . . . . . . . . . . . . . . . . . . . . . .
506229−01
2
3
4
5
6
6
8
9
12
13
13
14
15
15
*P506229-01*
ComfortSense® 7000 Series Model L7742U Thermostat
The ComfortSense® 7000 Series Model L7742U thermostat is an electronic 7−day, universal, multi−stage, programmable, touch screen thermostat. It also offers enhanced capabilities including humidification /
dehumidification / dewpoint measurement and control, Humiditrol®
EDA (Enhanced Dehumidification Accessory) control, and equipment
maintenance reminders.
S
Large, clear display with soft blue backlight shows the current and
set temperature, day/date/time, indoor relative humidity and outdoor temperature (if optional outdoor sensor is used).
S
Dehumidification measurement and control
S
Humiditrol® EDA capability
S
Dew point adjustment control
S
Menu−driven programming guides user through the scheduling
process showing only necessary information on each screen.
S
Ergonomic design.
S
Smooth Setback Recovery starts system early to achieve setpoint at start of program period.
506229−01 05/09
S
S
Compressor short−cycle protection (5 minutes).
Real−time clock keeps time during power failures and automatically adjusts for daylight savings time and leap year.
S
Maintenance reminders let user know when to service or replace
filters, humidifier pads, ultraviolet lamps, plus two user or installer
defined custom reminders.
S
Program Hold options allow user to override the program schedule as desired by time and date.
S
Select individual days or groups of days to set programming.
S
Programmable fan offers increased performance when combined
with whole home indoor air quality products.
S
Outdoor temperature display (with optional outdoor sensor)
shows current outdoor temperature.
Your installer has set up your thermostat based on the type of heating
and cooling system and accessories that your thermostat connects to.
This booklet details user settings available to you that will give you as
much functionality and control as you want.
Page 2
Touch Screen Display
C SCHED (schedule) − press to change between ON and OFF.
D Displays room temperature.
B
A
E Displays the current operation SET AT point(s). If MODE is set to
AUTO (autochangeover), both HEAT and COOL setpoints are
displayed.
E
F Up/down arrows used for adjusting temperature up or down; if in
AUTO (autochangeover) mode, two sets of up/down arrows appear.
G Information display area, displays different information depending
on the tab selected:
D HOME tab: displays outdoor temperature (if outdoor sensor X2658 is installed), indoor relative humidity (RH),
which mode is calling, hold settings information, service
reminders.
D SCHEDULE tab: displays the event being programmed;
D OPTIONS tab: displays a scrolling list of installer- and
user−adjustable parameters, including filter and service
reminder periods, etc.
F
D
E
C
G
H
I
Figure 1. Touchscreen display
Press the screen anywhere − the first press turns on the backlight.
A Selection Tabs − Press to select: HOME (normal display),
SCHEDULE (for programming), OPTIONS (to set fan operation,
alerts, service reminders, and other user and installer settings).
B MODE − press to cycle through HEAT, COOL, AUTO
(autochangeover), OFF, EM HEAT (emergency heat).
Page 3
H Schedule time adjustment, User/Installer Settings up/down arrows:
D HOME screen: not visible except when executing a HOLD
SETTING)
D SCHEDULE and OPTION screens: used to adjust schedule and option settings.
I Dynamic keys − not visible in HOME screen unless executing a
HOLD SETTING. For SCHEDULE and OPTIONS settings, these
keys appear and change depending on the selection. See the
schedule and options sections for details.
ComfortSenset Model L7742U Touch Screen 7−Day Programmable Thermostat
Home ScreenCurrent Conditions & Temperature Settings
The HOME screen (figure 2) displays indoor temperature and outdoor
temperature if the outdoor sensor is installed. Other system operational
information, such as indoor relative humidity (if turned on in user settings), dehumidifying, cooling or heating, will alternately be displayed in
the information display.
Equipment operation information appears in the boxes along the left
side of the home screen to indicate cooling or heating equipment operation setting, and whether scheduled programming is ON or OFF. From
these boxes, users can change the unit’s mode to HEAT, COOL, AUTO
(autochangeover − default), EM HEAT (emergency heat for heat pump
applications including dual fuel and HP with Electric Heat), or OFF.
COOLING
TUE OCT 23 1:15PM
The user can also decide whether to operate the unit per the programmable schedule, or in a non−programmable mode using the SCHED
box.
INFORMATION
DISPLAY AREA
Figure 2. Home Screen
506229−01 05/09
Page 4
Controlling the Heat/Cool Modes of Operation
On initial power up or after an a power loss over 2
hours, the thermostat powers up at the HOME
screen in the AUTO position. If it powers up after a
power loss of less than 2 hours, it assumes the last
mode set. Pressing MODE repeatedly scrolls
through all the modesAUTO, EM HEAT, COOL,
HEAT, then back to OFF.
HEAT, COOL and OFF modes are as each name implies. AUTO
(autochangeover) allows the thermostat to switch between Heating
and Cooling, whichever mode is dictated by the indoor temperature.
EM HEAT (emergency heat) bypasses the first stage of heating (any
stage[s] of heat pump heating) and goes directly to the heat stage used
for maximum heating to more quickly warm a very cold house.
When the indoor temperature decreases or increases, the HEATING or
COOLING cycle will turn on based on the displayed mode. When the
HVAC system is on, the INFORMATION DISPLAY AREA (shown in figure 3) will display one or several operational messages (listed in the
table below). If the outdoor sensor is connected, and is turned on in both
installer and user settings, outdoor temperature will be included in the
displays. The table below summarizes the information messages.
When the faults, errors, and service information displays appear, dynamic keys will appear under the second line entries, REMIND,
CLEAR, SERVICE, or RESET. Press the box to perform the action.
INFORMATION DISPLAY AREA
Figure 3. Selecting Mode of Operation
Information Display Area table
Faults, Errors, and Service Information
Operating Information
TEMP SENSOR ERROR, MEMORY ERROR
CALL FOR SERVICE
NO OUTDOOR SENSOR
CALL DEALER INFO
Top line: fault/error
Bot. line: action
Top line: fault/error
Bot. line: action
REPLACE: MEDIA FILTER; UV LAMP; HUM PAD; METAL INSERT
REMIND
RESET
ROUTINE SYS CHECK−UP
REMIND
RESET
NO OUTDOOR SENSOR, HUM SENSOR ERROR, HVAC ERROR DETECTED
REMIND
SERVICE
DEALER INFORMATION (Edited to show dealer contact information [2 lines])
Top line: serv. req’d
Bot. line: action
Top line: serv. req’d
Bot. line: action
Top line: fault/error
Bot. line: action
Contact
Installing Dealer
Page 5
SET DATE/TIME
Default DATE/TIME (MON JAN 1 12:00 PM)
HEATING, COOLING, HUMIDIFYING, DEHUMIDIFYING,
SYSTEM OFF, OUTDOOR TEMP xxF, INDOOR RH xx%,
MON SEP 24 3:OO PM
SCHEDULE ON, SCHEDULE OFF, WAIT, FAN ON, FAN CIRC
MON SEP 24 3:OO PM
HOLD SETTING UNTIL
PRESS SCHED TO
MON SEP 24 3:OO PM
RESUME PROGRAM
[First time start up msg]
Top line: operation msgs
Bottom line: date & time
Top line: operation msgs
Bottom line: date & time
[Alternating msgs during
a held schedule]
ComfortSenset Model L7742U Touch Screen 7−Day Programmable Thermostat
Controlling the Fan Operation
Fan Modes
S
If backlight is not on continuous, press the screen
anywhere to turn on the backlight. Press the
OPTIONS tab to access the FAN mode control.
Press FAN button; repeated presses scroll through
all the modes, AUTO, ON, and CIRC (circulate).
AUTOthe fan is following schedule.
S
ONthe fan is NOT following the schedule and runs continuously
until it is changed from the OPTIONS screen.
S
CIRCthe fan is following schedule and cycles during periods of
equipment inactivity. Cycle time is dependent on user settings
FAN CIRCULATE (Page 10).
If FAN mode displays AUTO and ON or CIRC was selected during
scheduling for the current period, the thermostat will indicate the current
fan mode in the information display (FAN ON or FAN CIRC).
In the CIRC mode, the user can cycle the fan for a programmed
percentage of active time per hour, during periods of equipment
inactivity (i.e., heating or cooling equipment not running). The fan is ON
for 5 minutes at a time. The user may change the percentage of ON time
that the fan is on (see FAN CIRCULATE [Page 10]):
Fan Program
The user can program the fan to be ON, AUTO, or CIRC during a
program event period. While scheduling the event, if the fan is set to
ON, it will remain on during the entire event. If it is set to CIRC, it will
circulate during equipment inactivity per user programmable cycles
(see FAN CIRCULATE, Page 10). If set to AUTO, the fan will come on
with the equipment to serve the heating/cooling demand and go off
accordingly.
NOTE − When the OPTIONS screen FAN mode is changed to ON or
CIRC, whatever was scheduled is ignored − the fan will either be ON or
it will CIRCULATE per the user−programmed intervals (USER
SETTINGS − FAN CIRCULATE (Page 10). When FAN − AUTO is
selected in the OPTIONS screen, the schedule IS followed.
In the CIRC mode, the user can cycle the fan for a programmed
percentage of active time per hour, during periods of equipment
inactivity (i.e., heating or cooling equipment not running). The fan is ON
for 5 minutes at a time. The user may change the percentage of ON time
that the fan is on (see FAN CIRCULATE [Page 10]):
Controlling the Schedule
506229−01 05/09
If backlight is not on continuous, press the screen
anywhere to turn on the backlight.
If OFF, the system operates as a non−programmable thermostatthe
user must make changes when desired. The autochangeover feature
continues to operate based on the manual user inputs.
From the HOME screen press SCHED; repeated
presses toggle the schedule ON and OFF. If ON, the
system follows the program developed by the user
(Page 7).
The fan mode is displayed on the SCHEDULE screen when programming the thermostat and can be changed only during schedule editing
(after EDIT is pressed). Fan settings in OPTIONS screen will OVERRIDE the scheduled fan operation.
Page 6
Schedule tabProgramming
If backlight is not on continuous, press the screen anywhere to turn on
the backlight. Press the SCHEDULE tab along the top of the screen.
The display changes to programming mode (figure 4) and shows the
current settings.
EVENTS DAILY 2 OR 4The thermostat may be programmed for two
or four (default) events per day. The names for the events are: WAKE,
LEAVE, RETURN, and SLEEP. The selected time for an event to occur
is based on when you want the event to begin. Four events (default) are
common for working households. To change to two events per day, see
page 10. When set for two events per day, the display would appear as:
WAKE (or SLEEP) PERIOD BEGINS".
Programming may be performed in groups of days or individual days,
as follows:
A
B
C
MON TO SUN − allows every day to be set the same.
MON TO FRI (weekday programming) and
SAT TO SUN (weekend programming).
MONDAY through SUNDAY allows individual days of the
week to be programmed separately.
NOTE − After using one of the groups of days described above, the
program allows you to subsequently change individual days to suit your
needs.
To get to the different groupings of days, press EDIT, then press NEXT
repeatedly to scroll to the desired grouping.
Programming Complexity
The programming process for groups of days or individual days is the
same, except in the amount of times required to go through the process.
Full WeekThe least complex program is the full week MON TO
SUN" program, wherein the events for every day of the week are the
same. This requires one time through the event programming process.
WAKE PERIOD BEGINS
5:OOAM
Work WeekNext in complexity to the full week program is the work
week program wherein the events are set for a typical work week (MON
TO FRI) and different events are set for the weekend (SAT TO SUN).
This requires two times through the events.
Day by DayMost complex because this requires going through the
programming process 7 times.
Figure 4. Schedule Screen
Page 7
ComfortSenset Model L7742U Touch Screen 7−Day Programmable Thermostat
Schedule ScreenProgramming
Days & Events Programming process
Action
Display shows...
1
Press SCHEDULE tab
SCHEDULE screen
2
Press EDIT
UP/DOWN arrows on right−hand
side of screen; EDIT changes to
CANCEL
3
Press NEXT to highlight the desired grouping of days
Days change to match selected
group, e.g. MON TUE WED THU FRI
4
Press an event: WAKE (default),
LEAVE, RETURN, & SLEEP to
select for programming
Filled triangle above event
indicates which event is selected
for change
Press UP/DOWN arrows to
select desired temperature
After change is made, SAVE
appears in the bottom right−hand
of the screen
5
6
Press FAN repeatedly to select
desired fan mode
Fan indicator displays selection
(ON, AUTO, or CIRC)
7
Press UP/DOWN arrows to
adjust start time for
selected event
Information area displays start
time
8
Repeat steps 4 − 7 for all remaining events.
1
5
6
WAKE PERIOD BEGINS
5:OOAM
2
Press NEXT for the next group
or the next day
10
Repeat steps 3 through 8 for the remaining days, if necessary.
11
Press SAVE when all events and
days are programmed as desired
506229−01 05/09
3
9
Figure 5. Programming days and events
(If you selected other than MON TUE WED THU FRI SAT SUN), continue;
otherwise, skip to step 11.
9
4
7
Days change to match selected
group, e.g. SAT SUN
The changes are made and the
schedule screen reappears.
Page 8
11
Options ScreenReminders & User Settings
CLEAN button [OPTIONS TAB > [CLEAN] ]
User Settings [OPTIONS TAB > USER SETTINGS > [ENTER] ]
When you select the OPTIONS tab, two buttons appear near the bottom of the screen labeled CLEAN and ENTER. Press the CLEAN button to deactivate the touch" zones for 30 seconds. Clean the screen
with a soft cloth and a mild glass cleaning solution.
The Options screen provides user and installer access to the various
features for setup and access to the reminders.
12 OR 24 HOUR
BACKLIGHT INTENSITY
BACKLIGHT SETTING
COOLING LIMIT
DATE/TIME
DISPLAY INFO
EVENTS DAILY 2 OR 4
Page 9
Page 11
Page 11
Page 11
Page 9
Page 10
Page 10
F/C
Page 9
FAN CIRCULATE
Page 10
HEATING LIMIT
Page 11
HUMIDITROL ADJUST
Page 11
HUMIDITY SETTING Pages 11, 12, 13
SECURITY LOCK
Page 11
VIEW CONTACT INFO
Page 10
Press the OPTIONS tab; use the arrows to select USER SETTINGS.
Press ENTER.
USER SETTINGS
INSTALLER SETTINGS
The following items are available for modifying. Follow the instructions
for each parameter.
REMINDERS
USER SETTINGS
DATE/TIMESet month, day, year, hour, and minute using DATE/
TIME option. Select DATE/TIME; press ENTER. Small, filled up-arrow
indicates selected column; use up/down arrows to adjust; press box
below each small up-arrow to select each column. Adjust; press SAVE.
FEB 11 2OO8 12PM 49
MON DAY YR
HR MIN
Reminders [OPTIONS TAB > REMINDERS > [ENTER] ]
Set timers from 1 to 24 months in either calendar time or system run
time. Reminders appear when it is time to service the following (for
more details on REMINDERS, see Page 15):
REPLACE MEDIA FILTER
DUE FRI JUN 12 O9
REPLACE UV LAMP
DUE FRI SEP 11 O9
ROUTINE SYS CHECK−UP
DUE IN 216O HOURS
PURE AIR MAINTENANCE
DUE FRI SEP 11 O9
REPLACE HUM PAD
DUE FRI JUN 12 O9
(CUSTOM REMINDER 1)
DUE WED OCT 21 09
| |
|
|
|
| SAVE|
F/Cdefault is Fahrenheit; to change to Celsius, scroll to F/C; press
ENTER. Use arrows to change to C; press SAVE.
CANCEL
F OR C
DEFAULT(F)
F
12 OR 24 HOUR clockdefault is 12H; to change, scroll to 12 OR 24
HOUR; press ENTER. Use arrows to change to 24H; press SAVE.
12 OR 24 HOUR
DEFAULT(12HR)
Page 9
12H
ComfortSenset Model L7742U Touch Screen 7−Day Programmable Thermostat
Options tabUser Settings (continued)
EVENTS DAILY 2 OR 4default is 4; to change, scroll to EVENTS
DAILY 2 OR 4; press ENTER. Use arrows to change to 2; press SAVE.
For INDOOR RH, use arrows to select ON or OFF; then press SAVE.
INDOOR RH
DEFAULT(OFF)
EVENTS DAILY 2 OR 4
DEFAULT(4)
2
VIEW CONTACT INFOscroll to VIEW CONTACT INFO from the
user settings menu; press ENTER. Use BACK to return to menu. (To
set this to display on the home screen, see DISPLAY INFO.)
DISPLAY INFOcontrols what is displayed in the field below the temperature and above the time on the HOME screen; it may display OUTDOOR TEMP, INDOOR RH (relative humidity), and CONTACT INFO
or any combination of the three, or none if all three are set to OFF.
Scroll to DISPLAY INFO; press ENTER. Use arrows to select OUTDOOR TEMP. INDOOR RH or CONTACT INFO; press ENTER.
DISPLAY INFO
OUTDOOR TEMP
INDOOR RH
CONTACT INFO
NOTE − When turning ON the OUTDOOR TEMP option OUTDOOR SENSOR REQUIRED" will display if the physical sensor
is not installed.
For OUTDOOR TEMP, select ON or OFF; then press SAVE.
OUTDOOR TEMP
DEFAULT(OFF)
ON
For CONTACT INFO, select ON or OFF; then press SAVE.
CONTACT INFO
DEFAULT(OFF)
ON
FAN CIRCULATEAs an option to running the fan all the time, fan circulate allows the user to decide how much the fan will run during periods of equipment inactivity. The fan ON time is always set to 5 minutes.
This option will cause the fan to come on more or less frequently. The
default is 35%; to change, scroll to FAN CIRCULATE; press ENTER.
Use arrows to change to 15, 25, or 45%; press SAVE.
NOTE − If outdoor sensor is not present and if user tries to select the
options DISPLAY INFO −> OUTDOOR TEMP or HUMIDITROL a message is displayed OUTDOOR SENSOR REQUIRED" instead of scroll
options for these menus. Information about installing the sensor is described on Page 15.
506229−01 05/09
ON
Page 10
FAN CIRCULATE
DEFAULT(35%)
25%
15% (9 minutes fan run time per hour)
25% (15 minutes fan run time per hour)
35% (21 minutes fan run time per hour)
45% (27 minutes fan run time per hour).
Options tabUser Settings (continued)
COOLING LIMITThis limits the temperature at which the thermostat
may be set for cooling (default is 50º); to change to any degree between
45ºF and 90ºF, scroll to COOLING LIMIT; press ENTER. Use arrows to
change to desired temperature; press SAVE.
COOLING LIMIT
DEFAULT(5O °F)
55°F
HEATING LIMITThis limits the temperature at which the thermostat
may be set for heating (default is 85º); to change to any degree between
45ºF and 90ºF, scroll to HEATING LIMIT; press ENTER. Use arrows to
change to desired temperature; press SAVE.
HEATING LIMIT
DEFAULT(85 °F)
80°F
HUMIDITY SETTINGSee separate sections − Humidify (Page 12)
and Dehumidify (Page 13).
HUMIDITROL ADJUSTIf Humiditrol® is enabled in the installer settings, then this adjustment affects overcooling operation. Overcooling
ranges from 2ºF below the cooling setpoint (MIN setting) down to 2ºF
above the heating setpoint (MAX setting). Halfway between the two
settings is the MID setting. The default setting is MAX; to change to MID
or MIN, scroll to HUMIDITROL ADJUST; press ENTER. Use arrows to
scroll to MID or MIN; then press SAVE.
HUMIDITROL ADJUST
DEFAULT (MAX)
BACKLIGHT INTENSITY
DEFAULT(1OO%)
8O%
SECURITY LOCKdefault − no locks at all − this provides two methods
of locking the thermostat:
Answer YES to ALLOW TEMP ADJUSTanyone can make temperature setpoint changes without entering a 3−digit code.
Answer NO to ALLOW TEMP ADJUSTprevents making any
changes at all until the 3−digit code is entered.
Scroll to SECURITY LOCK and press ENTER; ALLOW TEMP ADJUST screen appears; press box below YES or NO.
ALLOW TEMP ADJUST
YES
NO
|
|
The ENTER LOCK CODE screen appears.
O
CANCEL
BACKLIGHT SETTINGdefault is POWER SAVE; scroll to BACKLIGHT SETTING; press ENTER. Use arrows to change to CONTINUOUS; press SAVE.
|
CANCEL
|
MIN
NOTE − Humiditrol® does not function if the outdoor temperature is 95ºF
or greater nor when the indoor temperature is 65ºF or less.
BACKLIGHT SETTING
DEF(SAVE)
POWER SAVE
BACKLIGHT INTENSITYdefault is 100%; scroll to BACKLIGHT INTENSITY; press ENTER. Use arrows to change to 20 to 100% in 20%
increments; press SAVE.
ENTER LOCK CODE
O
O
|
|
|
|
SAVE
To enter the lock code, press box below each small up-arrow to select
each column. Use up/down arrows to enter a number, then press the
box below the next number and repeat to enter a 3-digit lock code; write
down the number for future reference; press SAVE.
NOTE − If the security code is forgotten or misplaced, use the universal
code 864" to unlock.
Page 11
ComfortSenset Model L7742U Touch Screen 7−Day Programmable Thermostat
Humidification
BASIC & PRECISIONif set up by the installer settings for BASIC or
PRECISION, this adjustment controls the relative humidity (RH) between 15 and 45%.
Scroll to HUMIDITY SETTINGS; press ENTER. Press the box below
HUMIDIFY.
HUMIDITY MODE
HUMIDIFY
DEHUMIDIFY
Scroll to HUMIDITY SETTINGS; press ENTER. Press the box below
HUMIDIFY.
HUMIDITY MODE
HUMIDIFY
DEHUMIDIFY
|
|
Use up/down arrows to change the humidity setpoint (between 15 and
45%); press SAVE.
HUM SETPOINT
DEFAULT (45%)
4O%
DEWPOINTif set up by the installer settings for DEWPOINT, this adjustment (only when in heating mode) will change the humidification
setpoint based on the outdoor temperature and a user−defined dew
point adjustment setting. When humidifying, if condensation forms on
the windows, the dewpoint should be adjusted in the range of −15 to
−5%; if the home feels dry, set dewpoint upward in the range of +5 to
+15%.
506229−01 05/09
|
|
Use up/down arrows to change the dewpoint (between +15 and −15%);
press SAVE.
DEW POINT ADJ
DEFAULT (O%)
−5%
NOTE − Dewpoint adj available only when outdoor sensor is attached.
OFFif OFF selected in installer settings for both humidify and dehumidify, this message appears when HUMIDITY SETTING is pressed:
HUMIDITY MODES OFF
If OFF is selected by the installer settings for HUMIDIFY but DEHUMIDIFY is on, the dehumidification menu appears (this setpoint adjust has NO effect on humidification):
Page 12
DEHUM SETPOINT
DEFAULT (5O%)
45%
Dehumidification
If your system is set up to control dehumidification, this adjustment controls the relative humidity (RH) between 45 and 60%. Scroll to HUMIDITY SETTINGS; press ENTER. Press the box below DEHUMIDIFY.
HUMIDITY MODE
HUMIDIFY
DEHUMIDIFY
|
|
Use up/down arrows to change the humidity setpoint (between 45 and
60%); press SAVE.
DEHUM SETPOINT
DEFAULT(5O%)
Humiditrol ® Enhanced Dehumidification
Accessory (EDA)
If your system includes a Humiditrol® Enhanced Dehumidification Accessory, if an outdoor sensor is installed, and if Humiditrol mode is selected in the installer settings, the following setting is available:
Scroll to HUMIDITY SETTINGS in user settings to confirm that you can
control the DEHUMIDIFY setting.
45%
HUMIDITY MODE
HUMIDIFY
DEHUMIDIFY
OFFIf your system is set up for neither humidifying or dehumidifying
the air, this message appears when HUMIDITY SETTING is pressed:
|
HUMIDITY MODES OFF
If your system is set up for humidifying but not dehumidifying, the humidification menu appears when HUMIDITY SETTING is pressed (this
setpoint adjust has NO effect on dehumidification):
HUM SETPOINT
DEFAULT(45%)
|
HUMIDITROL ADJUST is available in the user settings. The default
setting is MAX dehumidification but can be changed to MID or MIN. Use
arrows to scroll to MID or MIN; then press SAVE.
HUMIDITROL ADJUST
DEFAULT (MAX)
45%
Page 13
MIN
ComfortSenset Model L7742U Touch Screen 7−Day Programmable Thermostat
Temporary Temperature ChangePause the Schedule
Two types of temperature changes may be made: temporary (while in
the SCHEDule ON mode) or permanent (while in SCHEDule OFF).
NOTE − If autochangeover is enabled at the time a temperature hold is
invoked, the thermostat MAY CHANGE OVER from heating to cooling
and vice versa, to maintain the temperature hold setpoint. The autochangeover deadband (minimum separation between the heat and
cool set points) is still used to determine whether changeover occurs.
This applies to all of the following hold modes.
Temporary Temperature Changes (schedule ON)
While the system is running with the schedule ON, any change to the
temperature settings may be made for the default time (approximately 3
hours) or for as long or short a time as you wish. Therefore, following the
procedure will set a HOLD on the schedule for a few hours or for up to
45 days. Figure 6 shows a typical screen set in the AUTOchangeover
mode. If the SYSTEM were set in HEAT, COOL, or EM HEAT mode,
only the top set of arrows appear.
5. After the 3 hours expires, the scheduled programming will resume, OR, press SCHED to cancel the hold.
Permanent Temperature Changes (schedule OFF − non−
programmable operation)
To make a change for an undefined time span, the schedule must be
turned OFF. The setpoint is maintained indefinitely.
1. From the home screen, press SCHED to turn the scheduled programming OFF.
2. Press the UP or DOWN arrow to set the temperature to the
desired temperature.
The information display field continues to display the active mode, outdoor temperature, indoor relative humidity. Turning the schedule back
ON (press SCHED box on home screen) will cancel a permanent hold
and return to the event-programmed mode.
1. On the home screen, press the UP or DOWN arrow to adjust to
the desired temperature.
2. A set of arrows appears to the right of the information display; use
these arrows to adjust the hold period for as long as desired, or,
if not changed, this setting will hold for approximately 3 hours.
3. Press SAVE.
4. After saving, ON" next to the SCHED button flashes slowly, and
the information display alternates between the following:
HOLD SETTING UNTIL
10:49AM
OCT 10
HOLD SETTING UNTIL
WKD MMM DD HH:MMMM
and
PRESS SCHED TO
RESUME PROGRAM
506229−01 05/09
Figure 6. Setting a Hold on the Schedule
Page 14
Optional Remote Outdoor Sensor
Service Reminders
The outdoor sensor (X2658) may be required, especially when using
Humiditrol® EDA applications. In addition to measuring and displaying
outdoor temperature, the outdoor sensor provides dew point adjustment and control for all models. If used with this thermostat, the sensor
enables optimal heating equipment operation via programmable balance points. The screen will display NO OUTDOOR SENSOR until the
outdoor sensor is installed, the feature is turned on in the USER SETTINGS, in the DISPLAY INFO option. The outdoor temperature is displayed in the information display (lower center of the screen).
NOTE − For proper operation of Humiditrol® EDA applications, the
outdoor sensor MUST be installed.
In many applications, the ComfortSense® Model L7742U thermostat
displays the temperature sensed by the remote outdoor sensor. With
the heat pump system, the remote outdoor sensor helps determine
when to turn on the second stage of heating for optimal comfort.
When the outdoor sensor is connected, the temperature displays in the
information display area (below the indoor temperature display).
Memory Protection
The user may turn on and turn off the following service reminders (all of
which default to OFF) in either chronological time and/or run time and
may be reset (to default) or delayed (snooze) at any time:
Replace Media Filter
Routine Sys (System) Check−up
Replace Hum (Humidifier) Pad
Replace UV Lamp
PureAirt Maintenance
NOTE − When chronological time is selected, the timer runs based on
the calendar. When time is selected in run time, the timer runs based
on the time the specific output is ON (e.g. Fan output for Media Filter).
When the reminder time (either calendar time or run time) has elapsed,
the system displays a screen from which the user can either RESET or
DELAY the reminder.
The user can reset the timer either before it has expired (i.e. reminder is
set to 6 months and user decides to reset it to 6 months or change it to
different value at the end of 4th month) or when the time has expired and
a reminder message has been displayed.
The thermostat stores all the information concerning its programming
(state, mode, program information, last temperature measured) in a
nonvolatile memory.
When a reminder is turned off, the indicator will not be activated even if
the timer is expired. Note that setting filter reminder to 0 (OFF) will not
reset the timers, but will deactivate the filter indicator.
This function avoids the loss of the state of the thermostat when a power−down occurs. The only thing that might be lost is the clock, however,
a lithium battery will remember clock information for as long as it has
charge (approximately 30 days). When power down occurs (due to a
power outage) the thermostat is able to switch off all relays. The O and
B relay will maintain their last state.
In the case of a power interruption:
S
lithium battery has chargethe total accumulated time is maintained (i.e. the counter does not recycle to zero).
S
lithium battery has NO chargethe due date of reminders is maintained.
Page 15
ComfortSenset Model L7742U Touch Screen 7−Day Programmable Thermostat