1
urg_01103.book Page 1 Tuesday, March 2, 2010 7:04 AM
ENGLISH
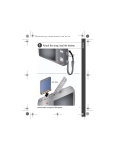
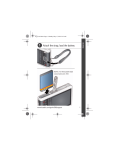
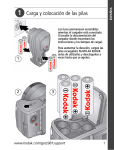
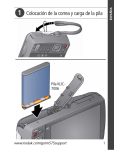
� Attach the strap, load the battery
KLIC-7006
www.kodak.com/go/m550support
1
urg_01103.book Page 2 Tuesday, March 2, 2010 7:04 AM
ENGLISH
� Charge the battery
Charge the battery whenever necessary.
If your package includes an adapter:
1
Turn off the camera.
2
Connect KODAK Camera USB Cable, Micro B / 5-Pin and
charger. (Use only the cable included with this camera!)
Battery Charging light:
• Blinking: charging
• Steady: finished
Your adapter
may differ.
If your package includes a charger:
1
Your plug
may differ.
2
Battery Charging light:
• Orange: charging
• Green: finished
2
www.kodak.com/go/easysharecenter
urg_01103.book Page 3 Tuesday, March 2, 2010 7:04 AM
ENGLISH
� Turn on the camera
Press the Power button.
� Set the language and date/time
Language:
to change
OK
to accept
Date/Time:
At the prompt, press OK.
to change current field
for previous/next field
OK
to accept
See the Extended user guide www.kodak.com/go/m550support
www.kodak.com/go/m550support
3
urg_01103.book Page 4 Tuesday, March 2, 2010 7:04 AM
ENGLISH
� Take a picture
1 The camera turns on in Smart Capture mode.
(If it’s in a different mode, press the Mode button,
until the LCD displays Smart Capture
then
mode. Then press OK.)
2 Compose the picture.
Mode
button
3 Press the Shutter button
halfway to focus and set
exposure.
When the framing marks turn
green, press the Shutter button
completely down.
Framing marks
See other modes
See page 10
See the Extended user guide www.kodak.com/go/m550support
4
www.kodak.com/go/easysharecenter
urg_01103.book Page 5 Tuesday, March 2, 2010 7:04 AM
ENGLISH
� Review pictures/videos
button
Press the Review
to enter/exit Review.
View previous/next
picture/video.
OK
Play a video.
See the Extended user guide www.kodak.com/go/m550support
www.kodak.com/go/m550support
5
urg_01103.book Page 6 Tuesday, March 2, 2010 7:04 AM
ENGLISH
� Download software, transfer pictures
Download KODAK Software—so it’s easy
to transfer and share pictures and videos.
Make sure the computer is connected to the Internet. When
you connect the camera to the computer, the KODAK
Software Downloader automatically runs. Follow the prompts
to download and install KODAK Software.*
1
Turn off the camera.
2
Use the KODAK Camera USB
Cable, Micro B / 5-Pin to
connect camera to
computer. (Use only
the cable included
with this camera!)
3
Turn on the
camera.
After the software
is installed, follow the
prompts to transfer pictures
and videos to your computer.
* If the downloader does not run, find and launch it:
• WINDOWS OS: in My Computer
• MAC OS: on your Desktop
Download KODAK Software
www.kodak.com/go/camerasw
To use this camera on more
than one computer
See the Extended user guide at
www.kodak.com/go/m550support
6
www.kodak.com/go/easysharecenter
urg_01103.book Page 7 Tuesday, March 2, 2010 7:04 AM
ENGLISH
� Get help from your camera
Your camera offers a built-in Help system.
It describes every setting for every menu choice.
1 Press the Menu
button, then highlight a
menu choice.
2 Press the Info
button.
Scroll through a
Help topic.
Keep learning about your camera!
Go to www.kodak.com/go/m550support for:
• the Extended user guide
• interactive troubleshooting and repairs
• interactive tutorials
• and more!
See the Extended user guide www.kodak.com/go/m550support
www.kodak.com/go/m550support
7
urg_01103.book Page 8 Tuesday, March 2, 2010 7:04 AM
ENGLISH
Front View
Microphone
Flash
Self-timer/
Video
Recording
light
Lens
8
Speaker
www.kodak.com/go/easysharecenter
ENGLISH
urg_01103.book Page 9 Tuesday, March 2, 2010 7:04 AM
Back View
Power button
Flash button
Mode button
Shutter button
Wide Angle/
Telephoto
button
USB port
LCD
Delete, Menu, Info,
Review buttons
Strap post
OK,
Share button
Tripod socket
Battery compartment,
SD/SDHC Card slot
www.kodak.com/go/m550support
9
urg_01103.book Page 10 Tuesday, March 2, 2010 7:04 AM
1
Do more with your camera
Press the Mode button, then
until the LCD displays
the mode that best suits your
subjects and surroundings,
then press OK.
Mode button
Use this mode
For
Smart
Capture
General picture taking—excellent image
quality and ease of use.
Program
Advanced picture taking—allows access to
manual settings.
Point-and-shoot simplicity when taking
pictures in practically any situation. (See
page 11.)
Capturing video with sound. (See page 11.)
Scene
Video
Adjust LCD brightness
To adjust the LCD brightness for your environment, see the
Extended user guide (www.kodak.com/go/m550support).
10
www.kodak.com/go/easysharecenter
urg_01103.book Page 11 Tuesday, March 2, 2010 7:04 AM
Do more with your camera
Take a video
1 Press the Mode button, then
until the LCD displays
Video
, then press OK.
2 Press the Shutter button
completely down,
then release it. To stop
recording, press and release
the Shutter button again.
Use Scene (SCN) modes
Choose a Scene mode—for great pictures in any situation.
1 Press the Mode button, then
SCN, then press OK.
2 Press
until the LCD displays
to choose a mode and read its description.
3 Press OK (or let the description turn off) to enter the chosen
Scene mode.
The camera is now in the chosen scene mode. To read a mode
description after it has turned off, press OK.
SCN mode For
Portrait
Full-frame portraits of people.
www.kodak.com/go/m550support
11
urg_01103.book Page 12 Tuesday, March 2, 2010 7:04 AM
Do more with your camera
SCN mode For
Sport
Action pictures.
Blur
Reduction
Reducing blur caused by camera shake or subject
motion.
Panorama
L-R, R-L
“Stitching” 2 or 3 pictures into 1 panoramic scene.
Landscape Distant scenes.
High ISO
People indoors, in low-light scenes.
Close-up
Close range. Use available light instead of flash, if
possible.
Flower
Close-ups of flowers or other small subjects in bright
light.
Sunset
Subjects at dusk.
Backlight
Subjects that are in shadow or “backlit.”
Candle
Light
Subjects illuminated by candle light.
Children
Action pictures of children in bright light.
Manner/
Museum
Quiet occasions. Flash and sound are disabled. For best
results, place the camera on a steady surface or tripod.
Text
Documents. For best results, place the camera on a
steady surface or tripod.
Beach
Bright beach scenes.
12
www.kodak.com/go/easysharecenter
urg_01103.book Page 13 Tuesday, March 2, 2010 7:04 AM
Do more with your camera
SCN mode For
Snow
Bright snow scenes.
Fireworks
Fireworks. For best results, place the camera on a
steady surface or tripod.
SelfPortrait
Close-ups of yourself. Assures proper focus and
minimizes red eye.
Night
Portrait
Reduces red eye of people in night scenes or low-light
conditions.
Night
Distant scenery at night. Flash does not fire.
Landscape
Panning
Shot
Emphasizing horizontal motion, with a sharp subject
and blurred background.
Use the optical zoom
1 Use the LCD to frame your
subject.
2 To zoom in, press Telephoto
(T).
To zoom out, press Wide
Angle (W).
3 Take the picture.
www.kodak.com/go/m550support
13
urg_01103.book Page 14 Tuesday, March 2, 2010 7:04 AM
Do more with your camera
Use the flash
Flash button
Press the Flash button
repeatedly until the LCD
displays the desired flash
mode.
Flash modes
Flash fires
Auto
When the lighting conditions require it.
Fill
(Flash On)
Every time you take a picture, regardless of
the lighting conditions. Use when the
subject is in shadow or is “backlit” (when
the light is behind the subject).
NOTE: (Not available in Smart Capture mode.)
Red-eye
Reduction
Choose a
setting in
the Setup
menu.
Off
14
Preflash
A preflash fires, shrinking the eye pupil,
before the picture is taken.
Digital
A preflash does not fire; the camera
Correction corrects red eye.
NOTE: When using digital correction, image
processing takes longer than when
using preflash.
Never
www.kodak.com/go/easysharecenter
urg_01103.book Page 15 Tuesday, March 2, 2010 7:04 AM
Do more with your camera
Use shortcuts
Your camera has a clean, uncluttered interface. For quick access
to the most popular capture and review functions:
1 Press the Info
button.
The shortcuts appear. To hide the shortcuts again, press
.
2 Press
to access functions like Exposure Compensation,
Self-timer, and Auto focus. (You’ll see different functions in
different modes.)
3 Press
to choose a setting.
Shortcuts
Press
to show/hide
shortcuts.
www.kodak.com/go/m550support
15
urg_01103.book Page 16 Tuesday, March 2, 2010 7:04 AM
Do more with your camera
Delete pictures/videos
1 Press the Review
2 Press
button.
for previous/next picture/video.
3 Press the Delete button.
4 Follow the screen prompts.
Use the menu button to change settings
IMPORTANT: Your camera offers a built-in Help system. To get
the most from your camera, see page 7.
You can change settings to get the best results from your
camera. Some modes offer limited settings.
1 Press the Menu
2 Press
button.
to choose a tab:
■
Capture/Video for the most common picture- and
video-taking settings
■
Setup for other camera settings
3 Press
to choose a setting, then press OK.
4 Choose an option, then press OK.
16
www.kodak.com/go/easysharecenter
urg_01103.book Page 17 Tuesday, March 2, 2010 7:04 AM
Do more with your camera
Understand the picture-taking icons
Focus mode
Self timer
Exposure compensation
Flash mode
Capture mode
Keyword tag
Pictures/time
remaining
Zoom
indicator
Battery level
Understand the review icons
Print/number
of prints
Video duration
Select
picture/video
Add text tag
View
thumbnails
Play video
Upload
Protected
Email
Picture/Video
number
Battery level
Favorite
Text tag
www.kodak.com/go/m550support
17
urg_01103.book Page 18 Tuesday, March 2, 2010 7:04 AM
2
Share pictures/videos
It’s never been easier to share pictures on your favorite social
networking sites.
IMPORTANT: To use the camera’s social networking features, you
need to download KODAK Software. (See page 6.)
1 Press the Review
button, then
to find a picture.
2 Press the Share button.
If it’s your first time, a Help screen appears.
3 Press
to choose a networking site, then press OK.
A check mark appears. Repeat this step to choose more sites.
(You can press OK again to remove a check mark.)
4 Press
to choose Done, then press OK.
The picture is displayed with the Share icon. When you transfer
the picture to your computer, it will be sent to the networking
site(s) that you chose.
Tip: Do you send pictures to the same sites each time?
Find a picture, then press and hold the Share button for about 1
second.
The camera applies the settings that you used previously and adds
the Share icon to the picture.
18
www.kodak.com/go/easysharecenter
urg_01103.book Page 19 Tuesday, March 2, 2010 7:04 AM
Share pictures/videos
Choose which social networking sites to
display on your camera
You can show/hide social networking sites on your camera so
that only your favorite sites appear.
1 In Review, press the Menu
button.
2 Press
to choose the Setup tab, then
Share Button Settings, then press OK.
to choose
3 Press
to choose a social networking site, then press
to choose Show/Hide. Repeat this step until you have
chosen Show/Hide for each social network.
4 When finished, press
to choose Done, then press OK.
To return to picture-taking mode, press the Shutter button
halfway down. When you are in Review and press the Share
button, your chosen sites are shown.
Manage email addresses, KODAK PULSE
Digital Frames
You can add, edit, or delete email addresses and KODAK PULSE
Digital Frames on your camera.
1 In Review, press the Share button. Press
to choose
Manage Email Addresses (or Manage Frames), then press
OK.
www.kodak.com/go/m550support
19
urg_01103.book Page 20 Tuesday, March 2, 2010 7:04 AM
Share pictures/videos
2 To add an email address or frame, press
to choose
New Email or New Frame, then press OK. Use the on-screen
keyboard to make the addition.
(Example: [email protected])
To edit an email address or frame, press
to choose
the address’s nickname (“Dad” or “Mary”) or the frame,
then press OK. Use the on-screen keyboard to make edits.
To delete an email address or frame, choose Delete Email or
Delete Frame, then press OK. Press
to choose the
address or frames, then press OK so that a check mark
appears. Press
to choose Delete, then press OK.
3 When finished, press
to choose Done, then press OK.
To return to picture-taking mode, press the Shutter button
halfway down.
Tag pictures
Tag pictures to make them easy to find, later. You can tag
pictures in 2 ways:
■
People, and then find all pictures of “Mary.”
■
Keywords, and then find all pictures from “Dad’s 60th
Birthday.”
20
www.kodak.com/go/easysharecenter
urg_01103.book Page 21 Tuesday, March 2, 2010 7:04 AM
Share pictures/videos
Tag people
When you tag faces, you’re helping your camera to recognize
people by name. Then it matches names and faces in pictures
you’ve taken—and those you take in the future!
1 Press the Review
that contains faces.
button, then
2 Press the Menu
button. Press
People, then press OK.
3 Press
to find a picture
to choose Tag
to choose Apply Tags, then press OK.
4 Press
to choose an existing name, or New Name to
add a new one (see page 23), then press OK.
If more than one face is detected, a name or question mark is
assigned to each detected face. To resolve an incorrect name or
a question mark, press
to select a face, then press OK.
5 When prompted to Update People Tags, press
to
choose Yes, then press OK.
Other pictures are scanned and updated with the name(s) you
applied here. Press
to add names to other pictures. When
finished, press
to choose Done, then press OK. To return
to picture-taking mode, press the Shutter button halfway down.
www.kodak.com/go/m550support
21
urg_01103.book Page 22 Tuesday, March 2, 2010 7:04 AM
Share pictures/videos
Tip: Are faces not always detected?
If a face is turned sideways, is too distant, or if the contrast
between face and background is insufficient, then the camera
might not detect the face.
Need to update a name?
If you meet a new friend—James—but you already have
pictures tagged with an old friend, James, you can:
■
Tag the new James with “James Smith” and/or
■
Update the old James to “James Monroe”
1 Press the Review
button.
2 Press the Menu
button. Press
People, then press OK.
to choose Tag
3 Press
to choose Modify Names List, then press OK.
4 Press
press OK.
to choose the name you want to modify, then
5 Edit the name, press
to choose OK, then press OK.
To return to picture-taking mode, press the Shutter button
halfway down.
Tip: You can have up to 20 active names.
22
www.kodak.com/go/easysharecenter
urg_01103.book Page 23 Tuesday, March 2, 2010 7:04 AM
Share pictures/videos
Tag with keywords
1 Press the Review
button, then
2 Press the Menu
button. Press
Tag, then press OK.
to find a picture.
to choose Keyword
3 Press
to choose an existing keyword or New Keyword
(see Use the keyboard) to add a new one, then press OK.
4 Press
to add keywords to other pictures. When finished,
press
to choose Done, then press OK.
To return to picture-taking mode, press the Shutter button
halfway down.
Tip: You can pre-choose a tag so that new pictures are
assigned that tag (example: My Italy Trip). See the Extended
user guide at www.kodak.com/go/m550support.
Use the keyboard
The keyboard appears when you need to add names or
keywords.
1 Press
to highlight a letter, then press OK.
2 When finished, press
to choose OK, then press OK.
3 If you’ve added a new name, the camera prompts you to
update all faces to match assigned names. Choose Yes, then
press OK.
The name is assigned to all faces that match this one.
www.kodak.com/go/m550support
23
urg_01103.book Page 24 Tuesday, March 2, 2010 7:04 AM
Share pictures/videos
A smarter way to find your pictures
Once you have tagged pictures—by people or keywords—you
can easily find them, later. For example, the camera can find all
pictures that contain “Mary” or “Dad’s 60th Birthday.” (See
Tag people, page 21 or Tag with keywords, page 23.)
1 Press the Review
button.
2 Press the Wide Angle (W) button to view pictures by
thumbnail (or choose View Thumbnails shortcut).
3 Press
to choose a tab and sort pictures by All,
Date, People, Favorite, or Keyword.
4 Press
to choose a picture or picture stack.
Press Telephoto (T) to see pictures in a stack or to see an
individual picture. Press Wide Angle (W) to see thumbnails or
picture stacks. To return to picture-taking mode, press the
Shutter button halfway down.
All
People
Date
Favorites
Keywords
For best results, make sure the
camera’s date/time is current.
24
www.kodak.com/go/easysharecenter
urg_01103.book Page 25 Tuesday, March 2, 2010 7:04 AM
3
Solve camera problems
Camera problems
Status
Solution
Camera does not
turn on or off
■ Make sure the battery is charged and
installed correctly (see page 1).
Camera buttons and
controls do not function
Flash does not fire
■ Check the flash setting, and change as
needed (see page 14).
NOTE: The flash does not fire in all modes.
In Review, a blue or
black screen is
displayed instead of
a picture
■ Transfer all pictures to the computer (see
You cannot take a
picture
■ Turn the camera off, then on again.
page 6).
■ Take another picture.
■ Press the Shutter button all the way (see
page 4).
■ Insert a new or charged battery (see
page 1).
■ Memory is full. Transfer pictures to the
computer (see page 6), delete pictures
(see page 16), or insert another card.
www.kodak.com/go/m550support
25
urg_01103.book Page 26 Tuesday, March 2, 2010 7:04 AM
4
Appendix
CAUTION:
Do not disassemble this product; there are no user-serviceable parts inside. Refer servicing to
qualified service personnel. KODAK AC Adapters and Battery Chargers are intended for
indoor use only. The use of controls, adjustments, or procedures other than those specified
herein may result in exposure to shock and/or electrical or mechanical hazards. If the LCD
breaks, do not touch the glass or liquid. Contact Kodak customer support.
■ The use of an accessory that is not recommended by Kodak may cause fire, electric
shock, or injury. For approved accessories, go to www.kodak.com/go/accessories.
■ Use only a USB-certified computer equipped with a current-limiting motherboard.
Contact your computer manufacturer if you have questions.
■ If using this product in an airplane, observe all instructions of the airline.
■ When removing the battery, allow it to cool; it may be hot.
■ Follow all warnings and instructions supplied by the battery manufacturer.
■ Use only batteries approved for this product to avoid risk of explosion.
■ Keep batteries out of the reach of children.
■ Do not allow batteries to touch metal objects, including coins. Otherwise, a battery may
short circuit, discharge energy, become hot, or leak.
■ Do not disassemble, install backward, or expose batteries to liquid, moisture, fire, or
extreme temperature.
■ Remove the battery when the product is stored for an extended period of time. In the
unlikely event that battery fluid leaks inside the product, contact Kodak customer
support.
■ In the unlikely event that battery fluid leaks onto your skin, wash immediately with
water and contact your local health provider. For additional health-related information,
contact your local Kodak customer support.
■ See www.kodak.com/go/reach for information about the presence of substances
included on the candidate list according to article 59(1) of Regulation (EC) No.
1907/2006 (REACH).
■ Dispose of batteries according to local and national regulations. Go to
www.kodak.com/go/kes.
■ Do not charge non-rechargeable batteries.
For more information on batteries, see www.kodak.com/go/batterytypes.
Limited Warranty
Kodak warrants its digital cameras and accessories (excluding batteries) to be free from
malfunctions and defects in both materials and workmanship for the warranty period
26
www.kodak.com/go/easysharecenter
urg_01103.book Page 27 Tuesday, March 2, 2010 7:04 AM
Appendix
specified on your KODAK Product packaging. Retain the original dated sales receipt. Proof of
purchase date is required with any request for warranty repair.
Limited warranty coverage
Warranty service is only available from within the country where the products were originally
purchased. You may be required to ship products, at your expense, to the authorized service
facility for the country where the products were purchased. Kodak will repair or replace
products if they fail to function properly during the warranty period, subject to any conditions
and/or limitations stated herein. Warranty service will include all labor as well as any
necessary adjustments and/or replacement parts. If Kodak is unable to repair or replace a
product, Kodak will, at its option, refund the purchase price paid for the product provided
the product has been returned to Kodak along with proof of the purchase price paid. Repair,
replacement, or refund of the purchase price are the sole remedies under the warranty. If
replacement parts are used in making repairs, those parts may be remanufactured, or may
contain remanufactured materials. If it is necessary to replace the entire product, it may be
replaced with a remanufactured product. Remanufactured products, parts and materials are
warranted for the remaining warranty term of the original product, or 90 days after the date
of repair or replacement, whichever is longer.
Limitations
This warranty does not cover circumstances beyond Kodak’s control. This warranty does not
apply when failure is due to shipping damage, accident, alteration, modification,
unauthorized service, misuse, abuse, use with incompatible accessories or attachments (such
as third party ink or ink tanks), failure to follow Kodak’s operation, maintenance or repacking
instructions, failure to use items supplied by Kodak (such as adapters and cables), or claims
made after the duration of this warranty. Kodak makes no other express or implied
warranty for this product, and disclaims the implied warranties of
merchantability and fitness for a particular purpose. In the event that the exclusion
of any implied warranty is ineffective under the law, the duration of the implied warranty will
be one year from the purchase date or such longer period as required by law. The option of
repair, replacement, or refund is Kodak’s only obligation. Kodak will not be responsible for
any special, consequential or incidental damages resulting from the sale, purchase, or use of
this product regardless of the cause. Liability for any special, consequential or incidental
damages (including but not limited to loss of revenue or profit, downtime costs, loss of the
use of the equipment, cost of substitute equipment, facilities or services, or claims of your
customers for such damages resulting from the purchase, use, or failure of the product),
regardless of cause or for breach of any written or implied warranty is expressly disclaimed.
The limitations and exclusions of liability set forth herein apply to both Kodak and its
suppliers.
Your rights
Some states or jurisdictions do not allow exclusion or limitation of incidental or
consequential damages, so the above limitation or exclusion may not apply to you. Some
states or jurisdictions do not allow limitations on how long an implied warranty lasts, so the
above limitation may not apply to you. This warranty gives you specific rights, and you may
have other rights which vary from state to state or by jurisdiction.
www.kodak.com/go/m550support
27
urg_01103.book Page 28 Tuesday, March 2, 2010 7:04 AM
Appendix
Outside the United States and Canada
In countries other than the United States and Canada, the terms and conditions of this
warranty may be different. Unless a specific Kodak warranty is communicated to the
purchaser in writing by a Kodak company, no warranty or liability exists beyond any
minimum requirements imposed by law, even though defect, damage, or loss may be by
negligence or other act.
FCC compliance and advisory
This equipment has been tested and found to comply with the limits for a Class B digital
device, pursuant to Part 15 of the FCC Rules. These limits are designed to provide reasonable
protection against harmful interference in a residential installation. The KODAK High
Performance USB AC Adapter K20-AM complies with part 15 of the FCC Rules. Operation is
subject to the following two conditions: (1) This device may not cause harmful interference,
and (2) this device must accept any interference received, including interference that may
cause undesired operation.
Canadian DOC statement
DOC Class B Compliance—This Class B digital apparatus complies with Canadian
ICES-003.
Observation des normes-Classe B—Cet appareil numérique de la classe B est conforme
à la norme NMB-003 du Canada.
China RoHS
VCCI Class B ITE
Australian C-Tick
N137
28
www.kodak.com/go/easysharecenter
urg_01103.book Page 29 Tuesday, March 2, 2010 7:04 AM
Appendix
Korean Class B ITE
Korean Li-Ion Regulatory
Eastman Kodak Company
Rochester, New York 14650
© Kodak, 2009
Kodak and Pulse and EasyShare are trademarks of Eastman Kodak Company.
4H6808_en
www.kodak.com/go/m550support
29