1
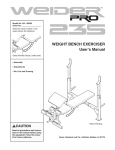
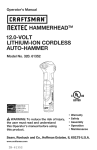
Installation
®
Compact Refrigerator
Model: 62912
Remove all packing material and tape from the unit. Inspect
the unit thoroughly, notify Sears immediately
if the unit has
any damaged or missing parts.
Install the unit on a strong level floor or counter.
direct sunlight, heat source or moisture.
Avoid any
Let air circulate freely around the refrigerator.
Keep the back
of the unit at least 4 inches away from the wall. Provide at
least 1 inch of space between the top of the unit and any
surface above it.
9.5 cu. ft. Capacity
Read This Manual!
It will tell you how to operate and care for your refrigerator.
It also offers tips on how to get the best and lowest cost
performance.
If you prefer installing your own parts, use the parts list to
find the part number. Do not use the illustration number.
In the space below record the model and serial number of
your refrigerator.
Each is printed on the model number
plate located in the upper corner of the refrigerator
back.
Use these numbers when calling for service.
Model No.
Serial
Full One Year Warranty
No.
on Refrigerator
For one year from the date of purchase, when this refrigerator is operated and maintained
in accordance with the
provided owner's manual. Sears will repair it, free of
charge, if found defective in material or workmanship.
at least three minutes before restarting to avoid
blowing
CAUTION:fuses
If you
or tripping
turn off your
the cold
circuitcontrol,
breaker.
allow
Electrical
Requirements
120 Volts, 60 Hz (60 cycles AC),
Electrical
15 amps.
Grounding
Your refrigerator comes with a three-prong plug and must be
inserted into a three-prong,
grounded wall outlet. Do not use
an extension cord.
WARNING:
Unless the above grounding
methods are followed, you are not protected
against severe or lethal shock in the event of a
short circuit in refrigerator wiring or electrical
components.
Things to Remember
Full Five Year Warranty on
Sealed Refrigeration
System
For five years from the date of purchase, when this refrigerator is operated and maintained in accordance
with the
owner's manual that come with it, Sears will repair the
sealed system (consisting of refrigerant, connecting tubing
and compressor motor), free of charge, if found defective in
matedal or workmanship.
1. When resetting your refrigerator to a new temperature,
allow 24 hours for it to reach the new setting.
2. The motor will start and stop often. It must do so in order
to maintain the temperature
you select.
3. Keep your refrigerator
level.
4. Unplug the refrigerator
before doing anything with the
electrical system.
The above warranty coverage applies only to a refrigerator
which is used for the storage of food for private household
purposes.
Warranty
Service is available
by contacting
Sears Service Center in the United States.
the nearest
This warranty applies only while this product is in use in the
United States. This warranty gives you specific rights and
you may also have other rights which vary from state to
state.
Sears, Roebuck and Co., Dept. 817WA,
Hoffman Estates, IL 60179
Sears, Roebuck and Co., Hoffman Estates, IL 60179
Printed in Mexico
Sears, Roebuck and Co., U.S.A.
Part No. 303067
Use and Care Information
Tips on everyday
care and use
1. To control the temperature:
First, set the Cold Control on "3". Wait 24 hours
for the entire cabinet to cool. Then adjust the
control if necessary. Setting the Cold Control to
MIN, is the warmest setting; MAX is the coldest.
The MAX setting mayreduce the temperature
to below freezing, but it will not cool the
refrigerator faster.
The fresh food section should be as cold as
possible without freezing vegetables or milk.
Adjust as necessary.
2. Defrost:
DefrOst when !/4 inch frost forms. Set the
temperature control dial to OFF for defrosting.
Remove food. Do not touch freezing plate with
bare hands. Do not use electric defrost devices
6. Reduce the number and length of time you
open the door. Your cooling system will not
have to run as often.
7. Keep your refrigerator
level, so that the door
seals tightly. When the door is closed, the door
gaskets should touch the refrigerator all the
way around. If net, make your refrigerator level
by use of the adjustable leg located under the
unit.
8. Keep your refrigerator
away from stoves or
other heat sources. A cool and dry place allows
your refrigerator to operate more efficiently.
Before
Calling
for Service
or hair dryers to melt frost. They may damage
plastic parts.
When defrosting is completed, wipe the
freezing plate dry and reset the control dial.
Return food to the refrigerator.
3. For all cleaning:
Mix 2 tablespoons baking soda with 1 quart
warm water or use a mild soap. Do not use
strong cleaners, scouring powder or pads. For
persistent odors, contact Sears Service Center
for odor removal products. Do not put the drip
tray in the dishwasher. Vacuum the condenser
tubing on the back of the refrigerator when
dusty.
• Check the plug and fuse.
• Test the outlet with a lamp.
• Be sure the control is not set to OFF.
Energy
• Product name.
• Model number.
Saving
tips
1. Close the door as soon as you can after
opening it to remove food. Make sure the door
is fully shut after each use so that cold air does
not escape from the refrigerator cavity.
2. Keep the condenser coils clean. The motor
must work harder when the coils are dusty.
Clean the coils at least once every 3 months.
They are located on the back of the unit.
3. Adjust the Cold Control. Try a warmer setting.
Your refrigerator may be colder than necessary.
Use the condition of milk to check refrigerator
temperature. As long as milk keeps without .
spoiling your refrigerator is cold enough.
4. Do Not place hot food in the refrigerator.
5. Do Not allow more than 1/4 inch of frost to build
up in the freezer compartment.
• Read the manual, especially the items under
the Use and Care Information. You may find the
answer to your questions.
• If you do not find the answer to your questions
in this manual, find the unit model number (on
the upper back of the refrigerator) and contact
your Sears Service Center.
When requesting service or ordering parts, always
provide the following information:
_
• Part Name
• Part Number
Disconnect
power beforeSHOCK
servicing.
ANGER: ELECTRICAL
HAZARD
HOW TO TRANSFER THE DOOR HINGE LOCATION
OF A REVERSIBLE DOOR
Refer to the disassembly diagram and change the door hinges in the following procedure.
1. Remove the hinge cap by twisting it off.
2. Use a pad or blanket to protect the floor and to avoid scratching the painted finish.
3. Remove the upper hexagonal head screws. The refrigerator door can now be removed.
4. Tilt the refrigerator back or lay it on its back for steps. Remove the lower hexagonal head screws and
the leg.
5. Remove the left side leg, attach them to the other side hole which was positioned symmetrically.
6. Attach the bottom hinge symmetrically to the other side of the cabinet.
7. Remove the upper hinge plastic pins and insert them in the holes that the screws were removed in
Procedure 2.
8. Take off the hinge grommet using a screwdriver and insert it on the opposite side.
9. Remove the door hinge stopper and install it in the other side of the door.
10. Attach the door to the lower hinge.
11. Attach the upper hinge to the door and use the screws to attach the upper hinge. (Do not tighten the
screws completely.)
12. The direction in which the door opens has now been changed: however, the following points should be
checked.
(A) Make sure the door is on straight.
(B) Make sure that there is no space between the door gasket and the refrigerator unit itself when the
door is closed.
(C) Make sure that the gasket on the hinged side is not caught between the door and the unit when the
door is opened or closed. (If the door is forced closed when the gasket is caught, the gasket may
be damaged.)
When checking the above points, if it is installed correctly, tighten all the screws holding the hinges. If
they are not tightened, the door may slip out of position or there may be an opening between the door
and the unit.
13. Allow the unit to stand upright for three (3) hours before connecting it to a power supply.
Upper hexagonal head s_ow
Hinge cap
/_lj
Hinge gromm_
i.
Sf_ope_ goorhlnge
Leg spacer.-----.-.._......_..,,
Leg _
_
,/
hinge
.L!
Lowerhexagonal head screw
Parts List
Sears model: 564.62912100
Use Sears part number on all orders, not the illustration number.
(Please refer to the illustration on next page.)
Illus. No.
Part No.
Description
1
2
3
4
5
6
7
8
9
10
11
12
13
14
15
16
17
18
19
20
21
22
23
24
25
26
27
301811
303061
302388
302340
303014
300864
300307
300255
303016
300308
301847
301846
302486
303068
302966
302970
302670
302671
303065
302309
302965
302199
301021
302685
301581
302192
302175
Door Liner w/light
Gasket, White
Grommet Cap
Mascot, Kenmore
Foamed Door
Stopper, Door
#10015 Machine Screw
Thermo Bulb Clamp
Panel Guard, Door
Screw #023
Door Shelf Bushing Right
Door Shelf Bushing Left
Ice Cube Tray
Shelf
Drip Tray
Trim Shelf
Glass Shelf
Trim for glass shelf
Crisper
Evaporator Door grommet
Evaporator Door
Socket for lamp
Lamp
Panel Thermo
Thermostat
Switch
Thermo Knob
Parts Not Illustrated
Part No.
Description
303067
303050
303048
302969
Owner's Manual/Parts list
Technical sheet
Wiring Diagram
FTC Label
* Part subject to change without notice.
Illus. No.
Part No.
Description
28
29
30
31
32
33
34
35
36
37
38
39
40
41
42
43
44
45
46
47
48
49
50
51
52
53
54
55
56
300033
302009
301718
302372
301730
301991
301817
301744
300885
302426
302317
302780
302646
302659
303066
303093
305209
302987
302626
302759
300413
303060
303059
300070
300546
303064
302732
302779
302731
57
302824
58
302814
Hinge Cover
#119 Bolts
Hinge Top
Plug Buttons
Case Wire Splicer
#026 Machine Screw
Cord Clamp
Power Cord
Leg
Bottom Hinge
Screw 10159
Condenser Bracket
Condenser
Evaporator
Drier
Compressor
Steel Washer
Relay Cover
PTC Thermistor
Running Capacitor
Compressor Mtg. Bolt
Compressor Mtg. Grommet
Compressor Base Plate
Insulation Aux. Door
10019 Tapping Screw
Green Wire W/Eyelet
Overload Relay
Support, Tube Condenser
Nylon-Plstc. Cable Tie
Spacer-Shim, Bottom Hinge
Nylon Clamp
SR9513SW
07 Jan 18
MODEL:
564.62912100
1
20
\
\
\
\
34
!6
3g
52
33
Your Home
For repair-in your home-of all major brand appliances,
lawn and garden equipment, or heating and cooling system,
no matter who made it, no matter who sold it!
For the replacement parts, accessories and
owner's manuals that you need to do-it-yourself.
For Sears professional installation of home appliances
and items like garage door openers and water heaters.
1-800-4-MY-HOME
®
(1-800-469-4663)
Call anytime, day or night (U.S.A. and Canada)
www.sears.com
www.sears.ca
Our Home
For repair of carry-in items like vacuums, lawn equipment,
and electronics, call or go on-line for the location of your nearest
Sears Parts & Repair Center.
1-800-488-1222
Call anytime, day or night (U.S.A. only)
www,sears.com
To purchase a protection
agreement
on a product serviced
by Sears:
1 800 827 6655 (u s:A )
1 800 361 6665 (Canada)
Pard pedir servicio de reparaciSn
a domicilio, y pard ordenar piezas:
Au Canada pour service en fran£ais:
i
i
i
1-888-SU-HOGAR
+:+>:+_.
•
•
I
i
i
1-888-LE-FOYER
,_,_,_,_
;'i;_!:_';
I
........
:<<.:<<,>:,
_c
sM
(1-888-784-6427)
® Registered Trademark/TM Trademark/"_ Service Mark of Sears; Roebuck and Co.
® Marca Registrada! TM Marca de F&brica/_ Marca de Servicio de Sears, Roebuck and Co.
_c Marque commerce/_ Marque deposed de Sears, Roebuck and Co.
(SR9513SW)
Part No. 8336460157020